2015 MITSUBISHI L200 ignition
[x] Cancel search: ignitionPage 4 of 418

Instruments and Controls (Driver’s area)E00100108331
1LHD23456789101112131415161. Combination headlamps and dipper switch p. 5-32Turn-signals lever p. 5-36
Front fog lamp switch* p. 5-37
Rear fog lamp switch p. 5-38
Headlamp washer switch* p. 5-42
2. Instruments p. 5-02
3. Audio remote control switches* p. 7-44, 7-63
4. Wiper and washer switch p. 5-38
5. Cruise control switches* p. 6-51
6. Supplemental restraint system (SRS) - airbag (for driver’s seat)* p. 4-28
Horn switch p. 5-44
7. Ignition switch p. 6-12
8. Hands-free & voice recognition switches* p. 7-84
9. Steering wheel height adjustment p. 6-09
10. Fuel tank filler door release lever* p. 2-02
11. Bonnet release lever p. 10-03
12. Fuses p. 10-20
13. Active stability control (ASC) OFF switch Type 2* p. 6-49
14. Headlamp levelling switch* p. 5-35
15. Active stability control (ASC) OFF switch Type 1* p. 6-49 Rear differential lock switch* p. 6-34
16. Electric remote-controlled outside rear-view mirror switch* p. 6-10
Instruments and Controls (Driver’s area)
1-02OKTE15E3Overview1
Page 5 of 418

1. Supplemental restraint system (SRS) - airbag (for driver’s seat)*p. 4-28
Horn switch p. 5-44
2. Audio remote control switches* p. 7-44, 7-63
3. Combination headlamps and dipper switch p. 5-32 Turn-signals lever p. 5-36
Front fog lamp switch* p. 5-37
Rear fog lamp switch p. 5-38
Headlamp washer switch* p. 5-42
4. Cruise control switches* p. 6-51
5. Instruments p. 5-02
6. Wiper and washer switch p. 5-38
7. Ignition switch p. 6-12
8. Electric remote-controlled outside rear-view mirror switch* p. 6-10
9. Active stability control (ASC) OFF switch Type 1* p. 6-49 Rear differential lock switch* p. 6-34
10. Headlamp levelling switch* p. 5-35
11. Active stability control (ASC) OFF switch Type 2* p. 6-49
12. Fuses p. 10-20
13. Bonnet release lever p. 10-03
14. Fuel tank filler door release lever* p. 2-02
15. Steering wheel height adjustment p. 6-09
16. Hands-free & voice recognition switches* p. 7-84
Instruments and Controls (Driver’s area)
1-03OKTE15E3Overview1RHD
Page 38 of 418

Unlocking doors using selectorlever (vehicle with keyless en- try system)
It is possible to unlock all of the doors using the selector lever by placing in the “P” posi- tion while the ignition switch is in the “ON”
position.
NOTEl The vehicle is shipped from the factory with
a setting established such that the doors arenot unlocked when the selector lever isplaced in the in the “P” position with the ig-
nition switch in the “ON” position. If you wish to change the setting such that thedoors are unlocked, contact your
MITSUBISHI MOTORS Authorized Serv-
ice Point.“Child-protection” rear
doors (Double cab) E00300900742
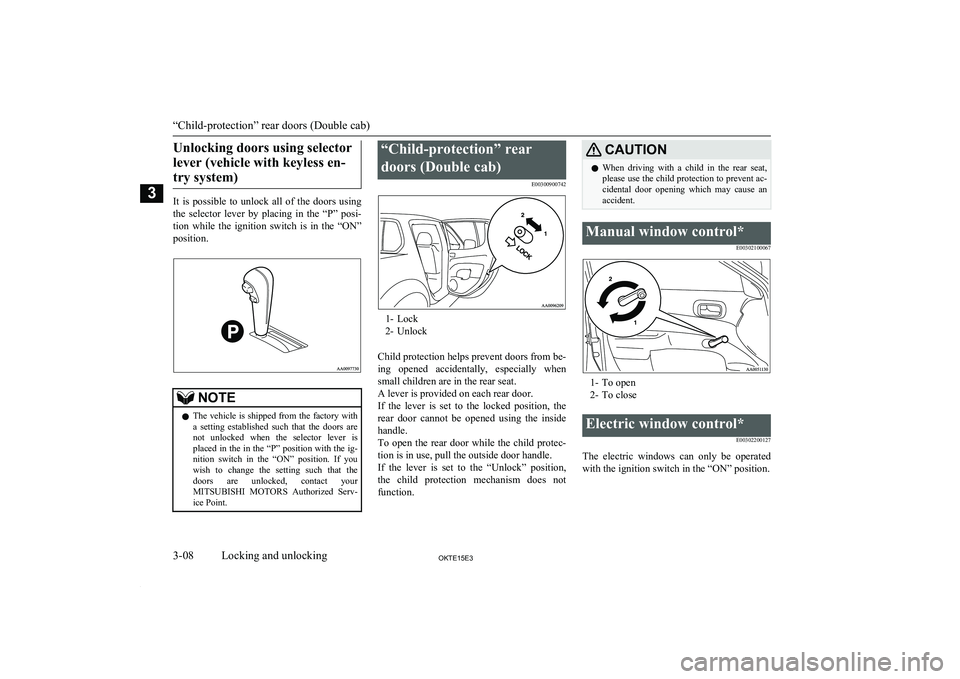
1- Lock
2- Unlock
Child protection helps prevent doors from be-
ing opened accidentally, especially when small children are in the rear seat.
A lever is provided on each rear door.
If the lever is set to the locked position, the rear door cannot be opened using the inside
handle.
To open the rear door while the child protec- tion is in use, pull the outside door handle.
If the lever is set to the “Unlock” position,
the child protection mechanism does not function.
CAUTIONl When driving with a child in the rear seat,
please use the child protection to prevent ac-
cidental door opening which may cause an accident.Manual window control*
E00302100067
1- To open2- To close
Electric window control*
E00302200127
The electric windows can only be operatedwith the ignition switch in the “ON” position.
“Child-protection” rear doors (Double cab)
3-08OKTE15E3Locking and unlocking3
Page 41 of 418

In this position, the rear retractable pow-er window is fully open.
To place the rear retractable power win-
dow in the fully open position, firmly
press the rear retractable power window switch (2).WARNINGl If the rear retractable power window
switch (1) is lightly pressed while the rear
retractable power window is moving from the fully closed position towards the fullyopen position, the rear retractable power
window will come up to the ventilation position. To avoid the risk of accidentally
trapping a hand or your head, do not op-
erate the switch while the rear retractable power window is moving.NOTEl The rear retractable power window only
opens halfway.Lock switch
E00303100396
When this switch is operated, the passenger’s
switches and the rear retractable power win-
dow switch cannot be used to open or close
the windows.
To unlock, press it once again.
1- Lock
2- Unlock
NOTEl The driver’s switch can open or close any
door windows.WARNINGl A child may tamper with the switch at the
risk of its hands or head being trapped in
the window. When driving with a child in the vehicle, please press the window lockswitch to disable the passenger’s switches
and rear retractable power window switch.Timer function
E00302400709
Door’s window
The door windows can be opened or closed
for 30 seconds after the ignition switch is turned from the “ON” position to the “ACC” or “LOCK” position. If the driver’s door is
opened during this period, the door window
can be opened or closed for another 30 sec- onds.
However, once the driver’s door is closed,
the windows cannot be operated.
Rear retractable power window
The rear retractable power window can be
opened or closed for 30 seconds after the ig-
nition switch is turned from the “ON” posi-tion to the “ACC” or “LOCK” position.If the driver’s door is opened during this peri- od, the rear retractable power window can be
opened or closed for another 30 seconds.
However, once the driver’s door is closed,
the rear retractable power window cannot be
operated.Safety mechanism
E00302501912
Door’s window
If a hand or head is trapped in the closing power window, it will lower automatically.
Nonetheless, make sure that nobody puts
their head or hand out of the power window
when closing a power window.
The lowered window will become operation-
al after a few seconds.
Electric window control*
3-11OKTE15E3Locking and unlocking3
Page 46 of 418

WARNINGlDo not put head, hands or anything else
out of the sunroof opening while driving
the vehicle.
l Never leave a child (or other person who
might not be capable of safe operation of
the sunroof switch) in the vehicle alone.
l Before operating the sunroof, make sure
that nothing is capable of being trapped
(head, hand, finger, etc.).NOTEl The sunroof stops just before reaching the
fully open position.
If the vehicle is driven with the sunroof in
this position, wind throb is lower than with the sunroof fully open.
l When leaving the vehicle unattended, make
sure you close the sunroof and remove the ignition key.
l Do not try to operate the sunroof if it is fro-
zen closed (after snow fall or during extreme cold).
l Do not sit or place heavy luggage on the
sunroof or roof opening edge.
l Release the switch as soon as the sunroof
reaches the fully open or fully closed posi-
tion.NOTEl If the sunroof does not operate when the
sunroof switch is operated, release the switch and check whether something is trap-
ped by the sunroof. If nothing is trapped, we recommend you to have the sunroof
checked.
l Depending on the model of ski carriers or
roof carriers, the sunroof may make contactwith the carrier when the sunroof is tilted up.Be careful when tilting up the sunroof if
such a ski carrier or a roof carrier is instal-
led.
l Be sure to close the sunroof completely
when washing the vehicle or when leaving
the vehicle.
l Be careful, not to put any wax on the weath-
erstrip (black rubber) around the sunroof opening. If stained with wax, the weather-
strip cannot maintain a weatherproof seal with the sunroof.
l After washing the vehicle or after it has
rained, wipe off any water that is on the sun-
roof before operating it.
l Operating the sunroof repeatedly with the
engine stationary will run down the battery. Operate the sunroof while the engine is run-
ning.
Sunroof*
3-16OKTE15E3Locking and unlocking3
Page 57 of 418

WARNINGlNever wear the lap portion of the belt
across your abdomen. During accidents it
can press sharply against the abdomen and increase the risk of injury.
l The seat belts must not be twisted when
worn.
3. Pull the belt slightly to adjust slackness
as desired.
To unfasten
Hold the latch plate and push the button on
the buckle.
NOTEl As the belt retracts automatically, keep hold-
ing the latch plate while retracting so that the
belt stows slowly. Failure to do this could damage the vehicle.Seat belt reminder/warning
lamp
E00409802026
A tone and warning lamp are used to remind the driver and front passenger (if so equip-ped) to fasten the seat belt.
NOTEl For the front passenger seat, the warning
function works only while a person is sitting on the seat.
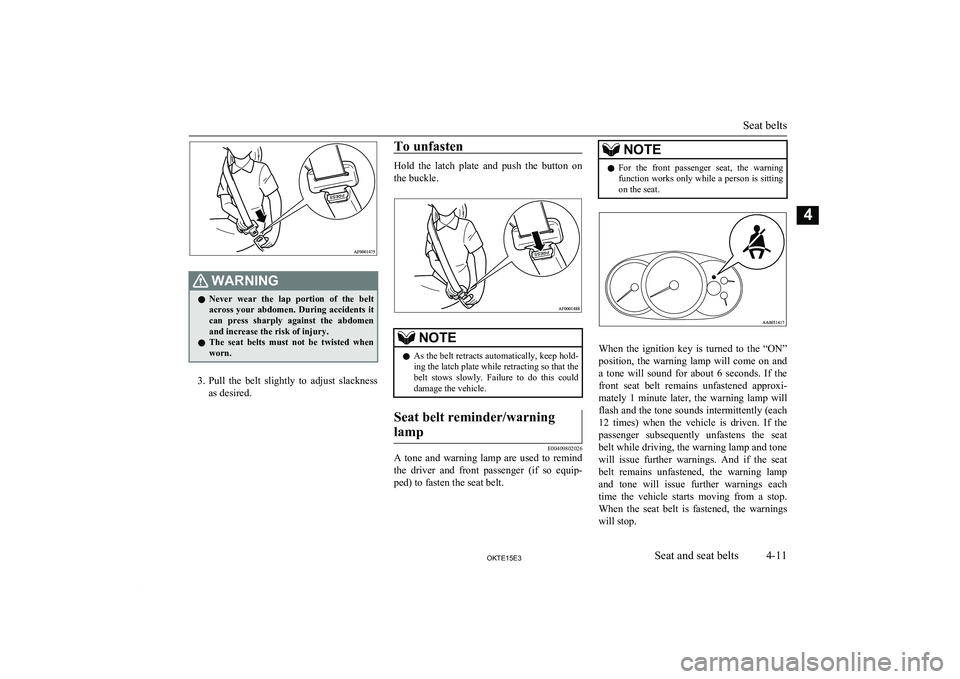
When the ignition key is turned to the “ON”
position, the warning lamp will come on and
a tone will sound for about 6 seconds. If the
front seat belt remains unfastened approxi-
mately 1 minute later, the warning lamp will flash and the tone sounds intermittently (each 12 times) when the vehicle is driven. If the
passenger subsequently unfastens the seat
belt while driving, the warning lamp and tone will issue further warnings. And if the seat
belt remains unfastened, the warning lamp and tone will issue further warnings each
time the vehicle starts moving from a stop. When the seat belt is fastened, the warnings
will stop.
Seat belts
4-11OKTE15E3Seat and seat belts4
Page 59 of 418

Pregnant women restraintE00405600064WARNINGlSeat belts work for everyone, including
pregnant women. Pregnant women should
use the available seat belts. This will re- duce the likelihood of injury to both thewoman and the unborn child. The lap belt
should be worn across the thighs and as snug against the hips as possible, but not
across the waist. Consult your doctor if you have any additional questions or con-
cerns.Seat belt pretensioner
system and force limiter
system* E00405700283
The driver’s and front passenger’s seat equip-ped with an airbag has a pretensioner seat belt.
Pretensioner system
E00405801089
The pretensioner system will retract their re-
spective seat belts instantaneously, thus max-imizing the seat belt’s effectiveness, if there
is a frontal impact severe enough to injure the
driver and/or front passenger and the ignition
switch is in the “ON” or “START” position.
The seat belt pretensioner includes the fol-
lowing components:
1- Front impact sensors
2- Seat belt pretensioners
3- Airbag control unit
WARNINGl To obtain the best results from your pre-
tensioner seat belt, make sure you have
adjusted your seat correctly and wear your seat belt properly.CAUTIONl Installation of audio equipment or repairs in
the vicinity of the pretensioner seat belts or
floor console must be performed in line with MITSUBISHI MOTORS guidelines. It is
important to do so because the work could affect the pretensioner systems.CAUTIONl If you need to scrap the vehicle, please con-
sult a MITSUBISHI MOTORS Authorized
Service Point. It is important to do so be- cause unexpected activation of the preten-
sioner seat belts could cause injuries.NOTEl The pretensioner seat belts will be activated
if the vehicle suffers a severe frontal impact, even if the seat belts are not worn.
l The pretensioner seat belts are designed to
work only once. After the pretensioner seat
belts have been activated, we recommend you have them replaced by a MITSUBISHI
MOTORS Authorized Service Point.SRS warning lamp
E00405900126
This warning lamp is shared by the SRS air-
bags and the pretensioner seat belts.
Refer to “SRS warning lamp” on page 4-40.
Force limiter system
E00406000078
In the event of a collision, each force limiter system will effectively absorb the load ap- plied to the seat belt so as to minimize the
impact to the passenger.
Pregnant women restraint
4-13OKTE15E3Seat and seat belts4
Page 76 of 418

WARNINGlOlder children should be seated, properly
wearing the seat belt, with an appropriatebooster seat if needed.Caution for installing the child
restraint on vehicles with a front passenger airbag
E00408800588
The label shown here is attached on vehicles with a front passenger airbag.
WARNINGl Extreme Hazard!
Do not use a rearward facing child re- straint on a seat protected by an airbag in
front of it!How the Supplemental Re-
straint System works
E00407301352
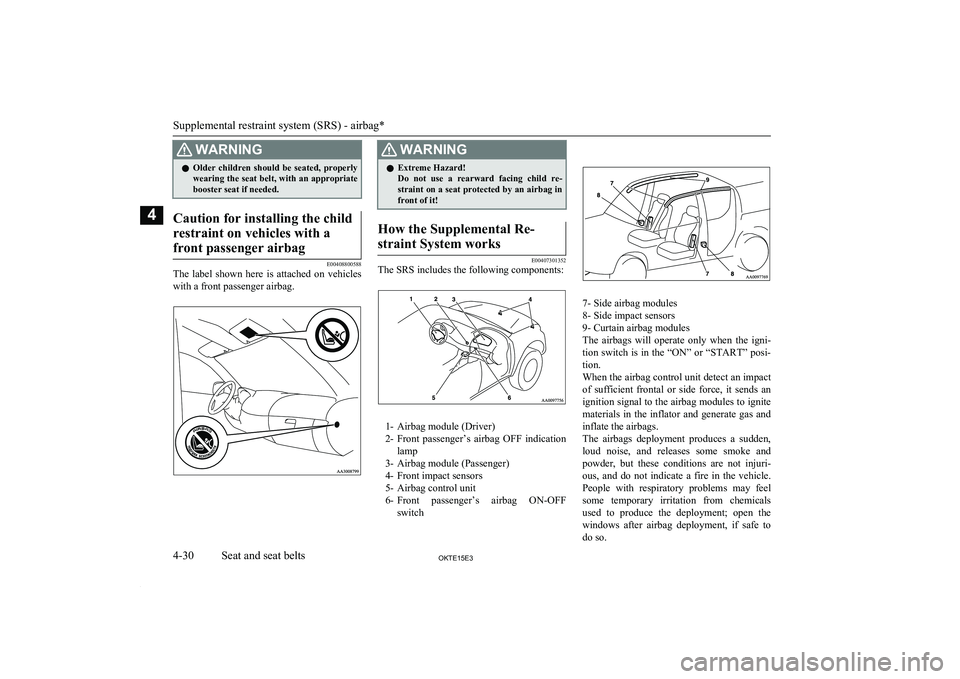
The SRS includes the following components:
1- Airbag module (Driver)
2- Front passenger’s airbag OFF indication
lamp
3- Airbag module (Passenger)
4- Front impact sensors
5- Airbag control unit
6- Front passenger’s airbag ON-OFF
switch
7- Side airbag modules
8- Side impact sensors
9- Curtain airbag modules
The airbags will operate only when the igni- tion switch is in the “ON” or “START” posi-
tion.
When the airbag control unit detect an impact of sufficient frontal or side force, it sends an
ignition signal to the airbag modules to ignite
materials in the inflator and generate gas and
inflate the airbags.
The airbags deployment produces a sudden, loud noise, and releases some smoke andpowder, but these conditions are not injuri-
ous, and do not indicate a fire in the vehicle. People with respiratory problems may feel
some temporary irritation from chemicals
used to produce the deployment; open the
windows after airbag deployment, if safe to do so.
Supplemental restraint system (SRS) - airbag*
4-30OKTE15E3Seat and seat belts4