2015 MINI COUPE ROADSTER CONVERTIBLE clock
[x] Cancel search: clockPage 176 of 231
CoolantVehicle equipment
This chapter describes all series equipment as
well as country-specific and special equipment
offered for this model series. Therefore, it also
describes equipment that may not be found in
your vehicle, for instance due to the selected
special equipment or the country version. This
also applies to safety-related functions and sys‐
tems.
When using the features and systems described
here, adhere to local regulations.
General information Danger of burns from hot engine
Do not open the cooling system while the
engine is hot; otherwise, escaping coolant may
cause burns. ◀
Suitable additives
Only use suitable additives; otherwise,
engine damage may occur. The additives are
harmful to your health. ◀
Coolant consists of water and additives.
Not all commercially available additives are
suitable for your MINI vehicle. Ask your service
center for suitable additives.
Coolant temperature
If the coolant and therefore the engine over‐
heat, a warning lamp lights up, refer to
page 199.Coolant level
Checking1.Do not open the hood until the engine has
cooled down.2.Turn the expansion tank cap counterclock‐
wise slightly to allow any accumulated
pressure to escape; then continue turning
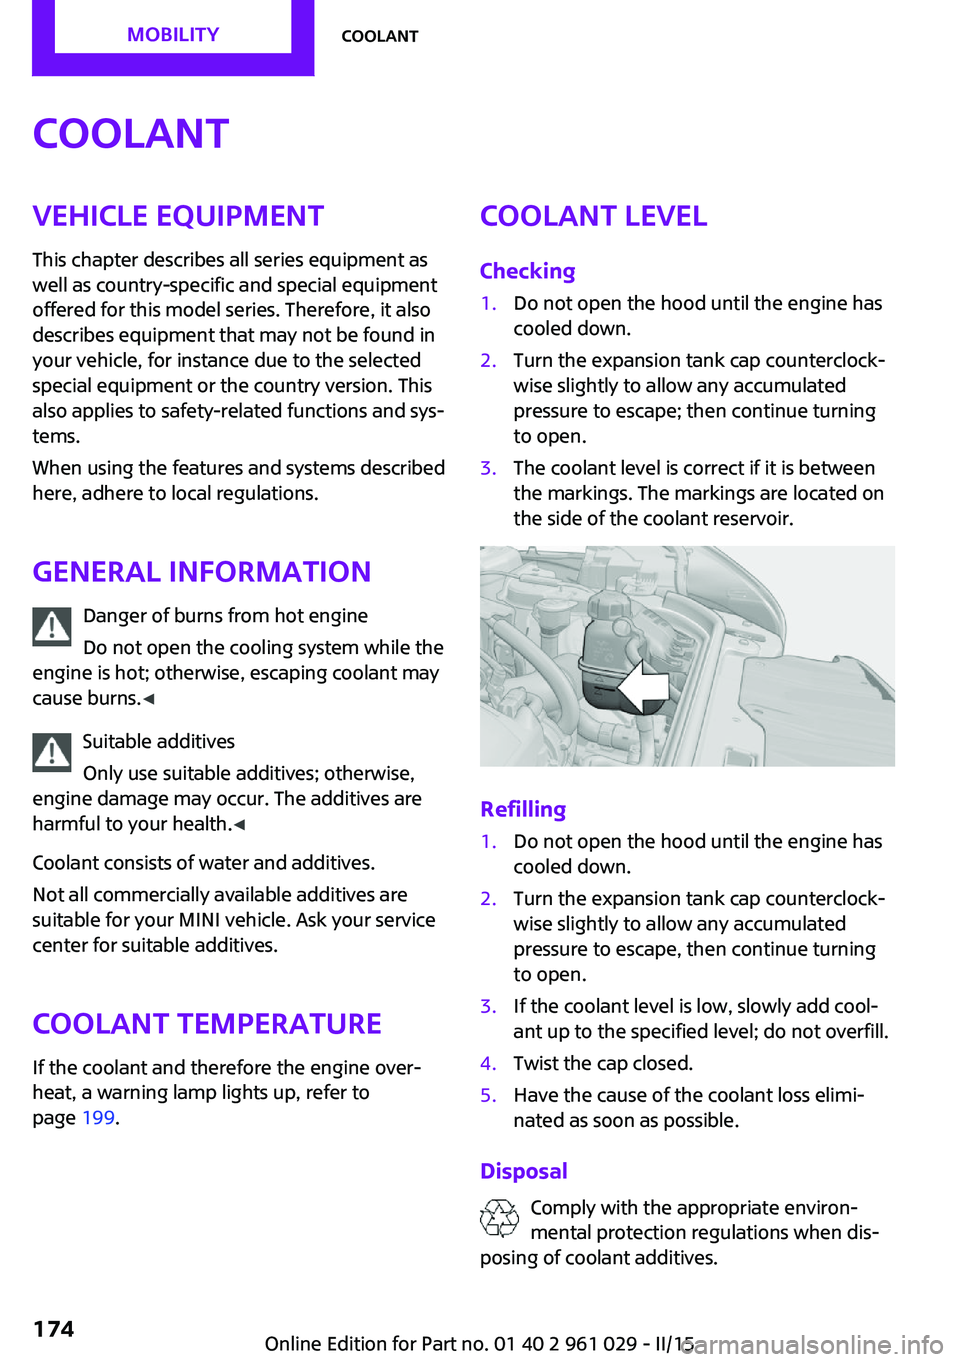
to open.3.The coolant level is correct if it is between
the markings. The markings are located on
the side of the coolant reservoir.
Refilling
1.Do not open the hood until the engine has
cooled down.2.Turn the expansion tank cap counterclock‐
wise slightly to allow any accumulated
pressure to escape, then continue turning
to open.3.If the coolant level is low, slowly add cool‐
ant up to the specified level; do not overfill.4.Twist the cap closed.5.Have the cause of the coolant loss elimi‐
nated as soon as possible.
Disposal
Comply with the appropriate environ‐mental protection regulations when dis‐
posing of coolant additives.
Seite 174MOBILITYCoolant174
Online Edition for Part no. 01 40 2 961 029 - II/15
Page 182 of 231

Lower LED front lights1Parking lights / daytime running lights2Fog lights
Halogen low beams and high-beams
H13 bulb, 60/55 watt
Wear protective goggles and glovesHalogen bulbs are pressurized. Therefore,
wear protective goggles and gloves. Otherwise,
there is a danger of injuries if the bulb is acci‐
dentally damaged during replacement. ◀
Attach the cover carefully
When attaching the cover, proceed care‐
fully; otherwise, leaks may occur, causing dam‐
age to the headlamp system. ◀
Access to the bulbs through the engine
compartment
Follow the general instructions on lamps and
bulbs, refer to page 178.
Low beam/high-beam bulbs can be changed
from the engine compartment.
To remove the cover:
1.Press the tab.2.Fold away the cover and take it out of the
holder.
Proceed in reverse order to attach the cover.
Attach the cover carefully
When attaching the cover, proceed care‐
fully; otherwise, leaks may occur, causing dam‐
age to the headlamp system. ◀
Replacing the bulb
1.Turn the bulb counterclockwise, arrow 1,
and remove it, arrow 2.2.Press the release, arrow 1, and pull off the
connector, arrow 2.Seite 180MOBILITYReplacing components180
Online Edition for Part no. 01 40 2 961 029 - II/15
Page 183 of 231
3.Insert the new bulb and attach the cover in
reverse order.
LED parking lights/LED fog lights/LED
daytime running lights
Follow the general instructions on lamps and
bulbs, refer to page 178.
Lights are implemented using LED technology.
Contact your service center in the event of a
malfunction.
Turn signals/parking lights/roadside
parking lights/fog lights/and daytime
running lights
Access to the bulbs via the wheel housing
Follow the general instructions on lamps and
bulbs, refer to page 178.
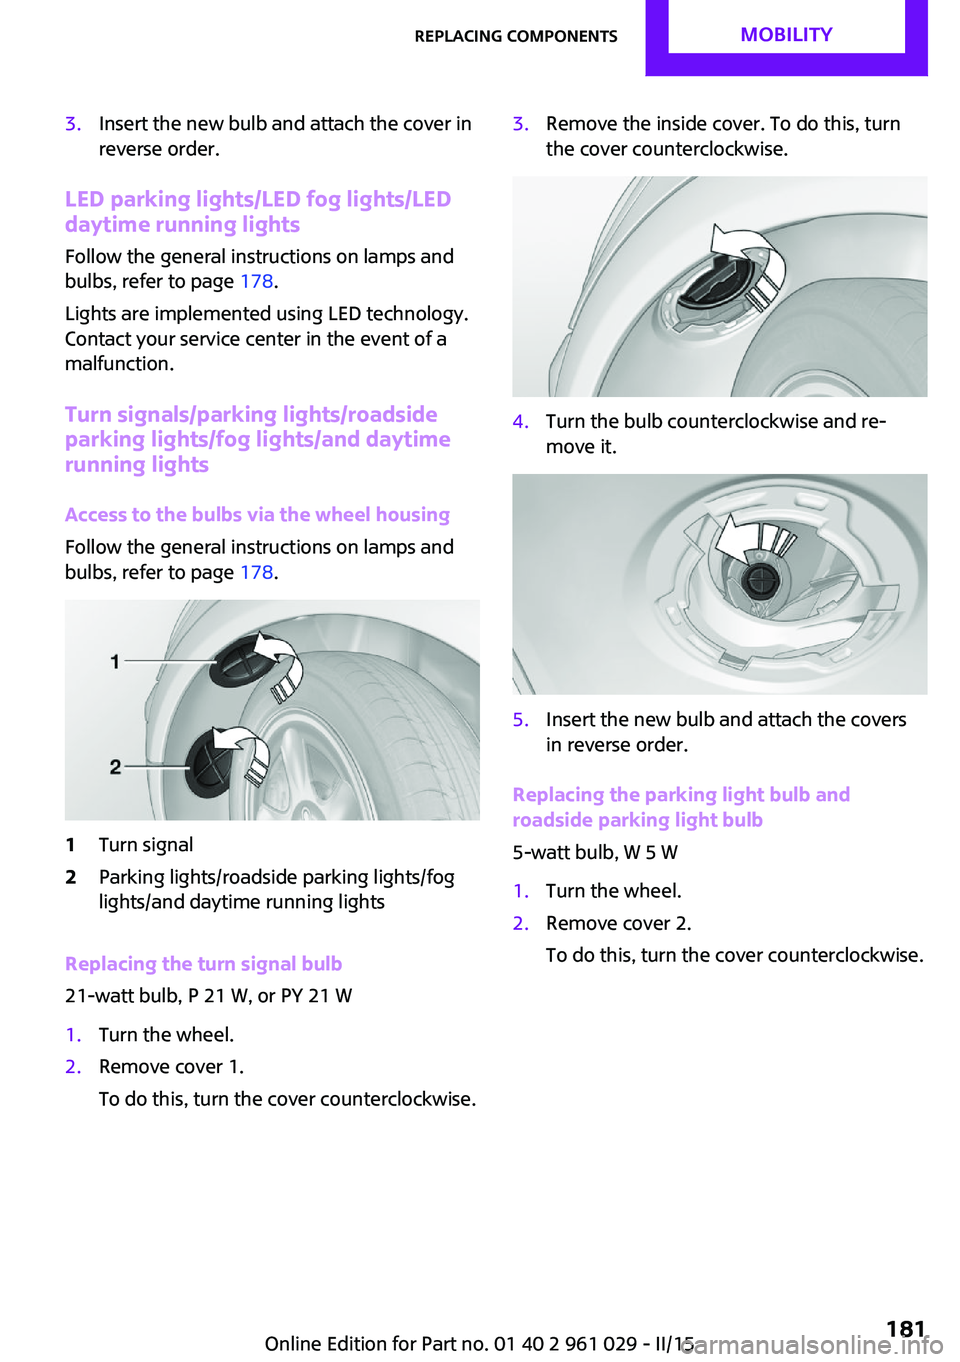
1Turn signal2Parking lights/roadside parking lights/fog
lights/and daytime running lights
Replacing the turn signal bulb
21-watt bulb, P 21 W, or PY 21 W
1.Turn the wheel.2.Remove cover 1.
To do this, turn the cover counterclockwise.3.Remove the inside cover. To do this, turn
the cover counterclockwise.4.Turn the bulb counterclockwise and re‐
move it.5.Insert the new bulb and attach the covers
in reverse order.
Replacing the parking light bulb and
roadside parking light bulb
5-watt bulb, W 5 W
1.Turn the wheel.2.Remove cover 2.
To do this, turn the cover counterclockwise.Seite 181Replacing componentsMOBILITY181
Online Edition for Part no. 01 40 2 961 029 - II/15
Page 184 of 231
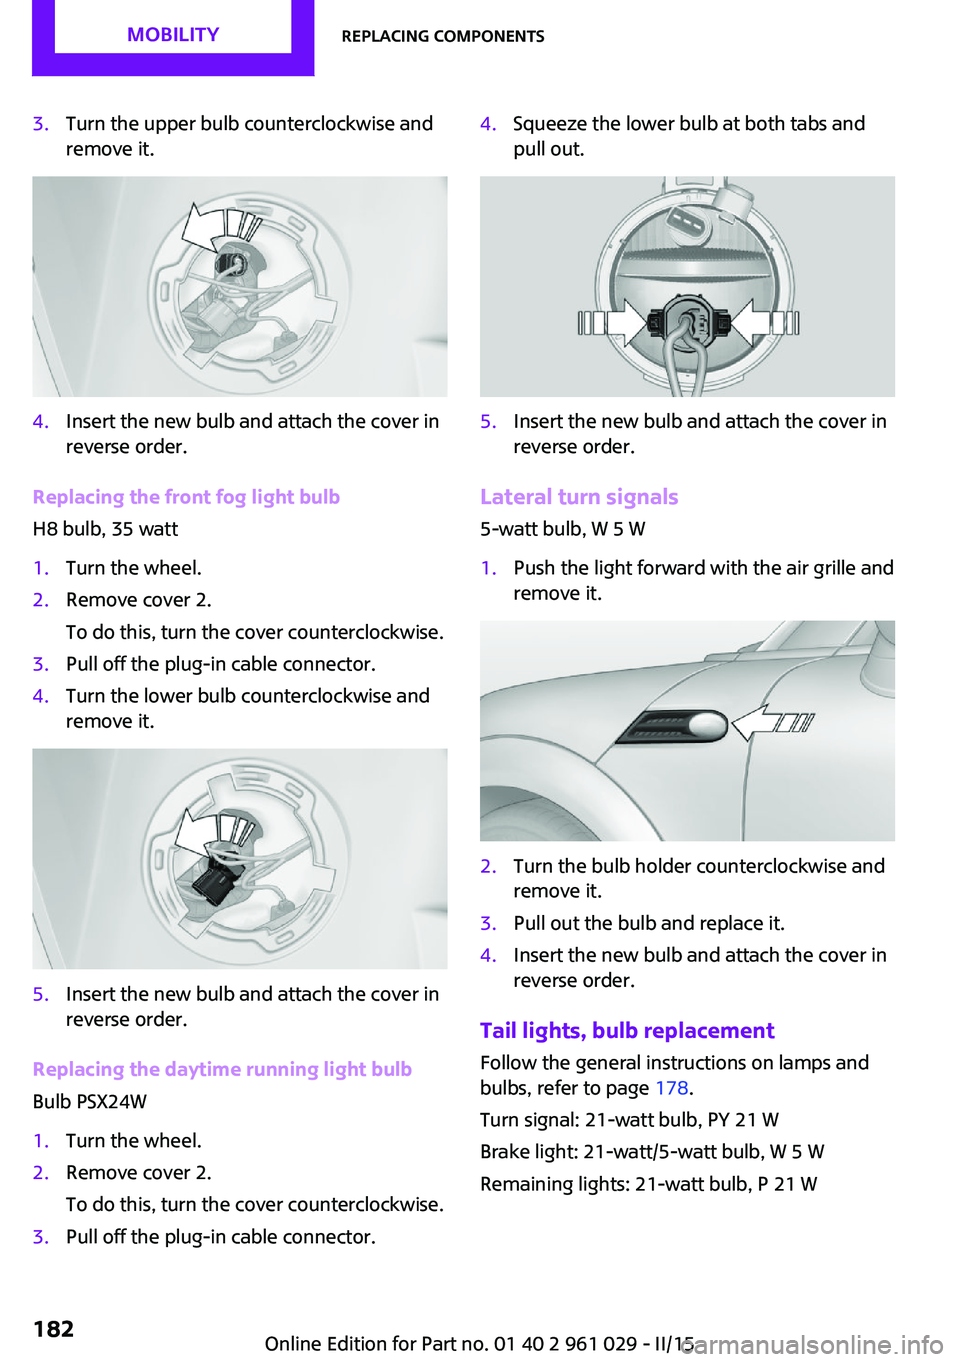
3.Turn the upper bulb counterclockwise and
remove it.4.Insert the new bulb and attach the cover in
reverse order.
Replacing the front fog light bulb
H8 bulb, 35 watt
1.Turn the wheel.2.Remove cover 2.
To do this, turn the cover counterclockwise.3.Pull off the plug-in cable connector.4.Turn the lower bulb counterclockwise and
remove it.5.Insert the new bulb and attach the cover in
reverse order.
Replacing the daytime running light bulb
Bulb PSX24W
1.Turn the wheel.2.Remove cover 2.
To do this, turn the cover counterclockwise.3.Pull off the plug-in cable connector.4.Squeeze the lower bulb at both tabs and
pull out.5.Insert the new bulb and attach the cover in
reverse order.
Lateral turn signals
5-watt bulb, W 5 W
1.Push the light forward with the air grille and
remove it.2.Turn the bulb holder counterclockwise and
remove it.3.Pull out the bulb and replace it.4.Insert the new bulb and attach the cover in
reverse order.
Tail lights, bulb replacement
Follow the general instructions on lamps and
bulbs, refer to page 178.
Turn signal: 21-watt bulb, PY 21 W
Brake light: 21-watt/5-watt bulb, W 5 W
Remaining lights: 21-watt bulb, P 21 W
Seite 182MOBILITYReplacing components182
Online Edition for Part no. 01 40 2 961 029 - II/15
Page 185 of 231
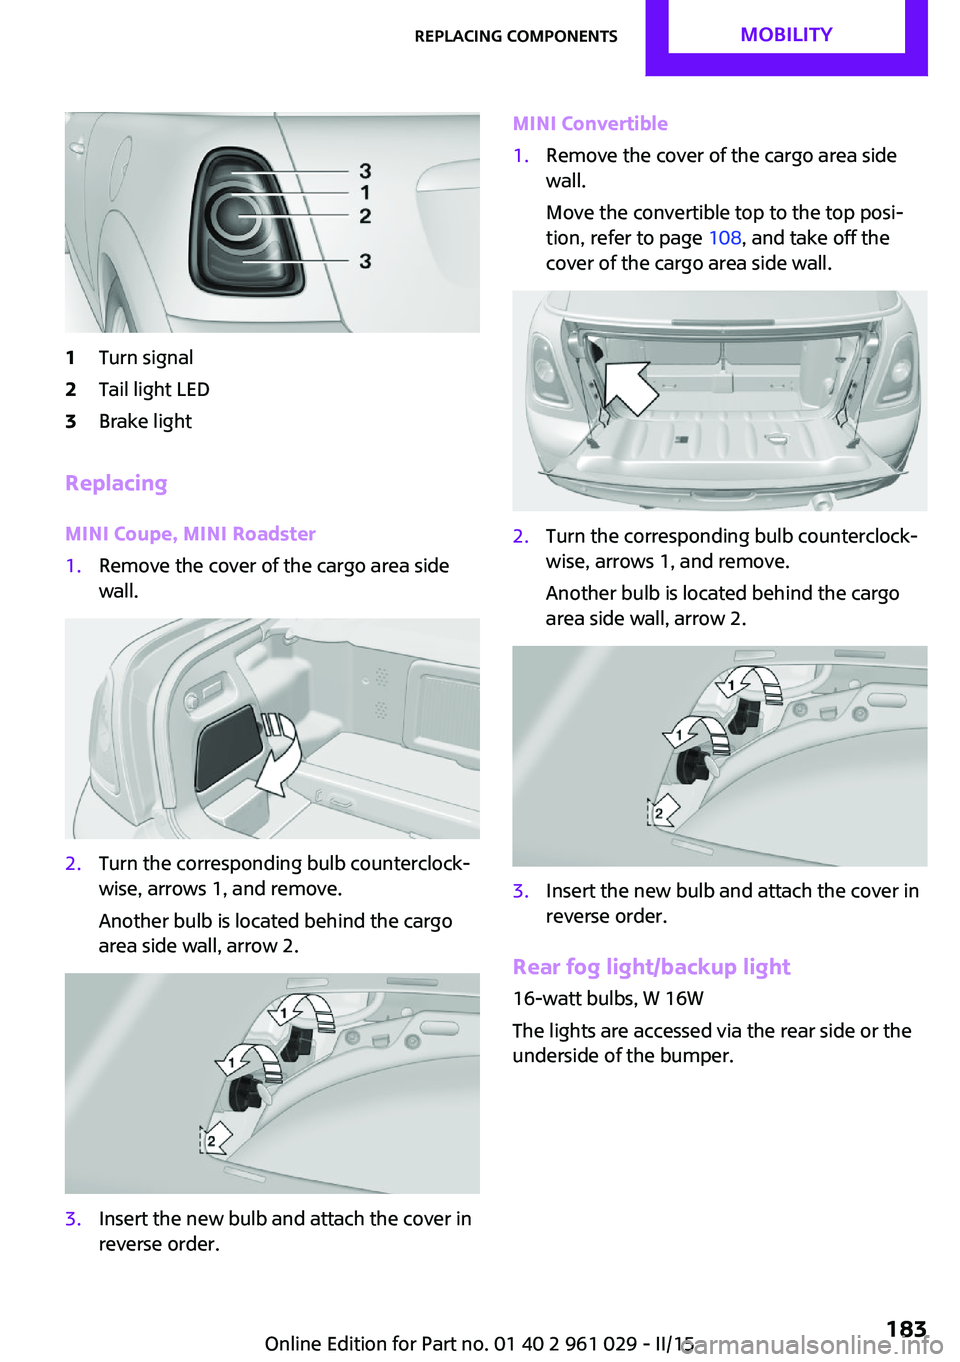
1Turn signal2Tail light LED3Brake light
Replacing
MINI Coupe, MINI Roadster
1.Remove the cover of the cargo area side
wall.2.Turn the corresponding bulb counterclock‐
wise, arrows 1, and remove.
Another bulb is located behind the cargo
area side wall, arrow 2.3.Insert the new bulb and attach the cover in
reverse order.MINI Convertible1.Remove the cover of the cargo area side
wall.
Move the convertible top to the top posi‐
tion, refer to page 108, and take off the
cover of the cargo area side wall.2.Turn the corresponding bulb counterclock‐
wise, arrows 1, and remove.
Another bulb is located behind the cargo
area side wall, arrow 2.3.Insert the new bulb and attach the cover in
reverse order.
Rear fog light/backup light
16-watt bulbs, W 16W
The lights are accessed via the rear side or the
underside of the bumper.
Seite 183Replacing componentsMOBILITY183
Online Edition for Part no. 01 40 2 961 029 - II/15
Page 186 of 231
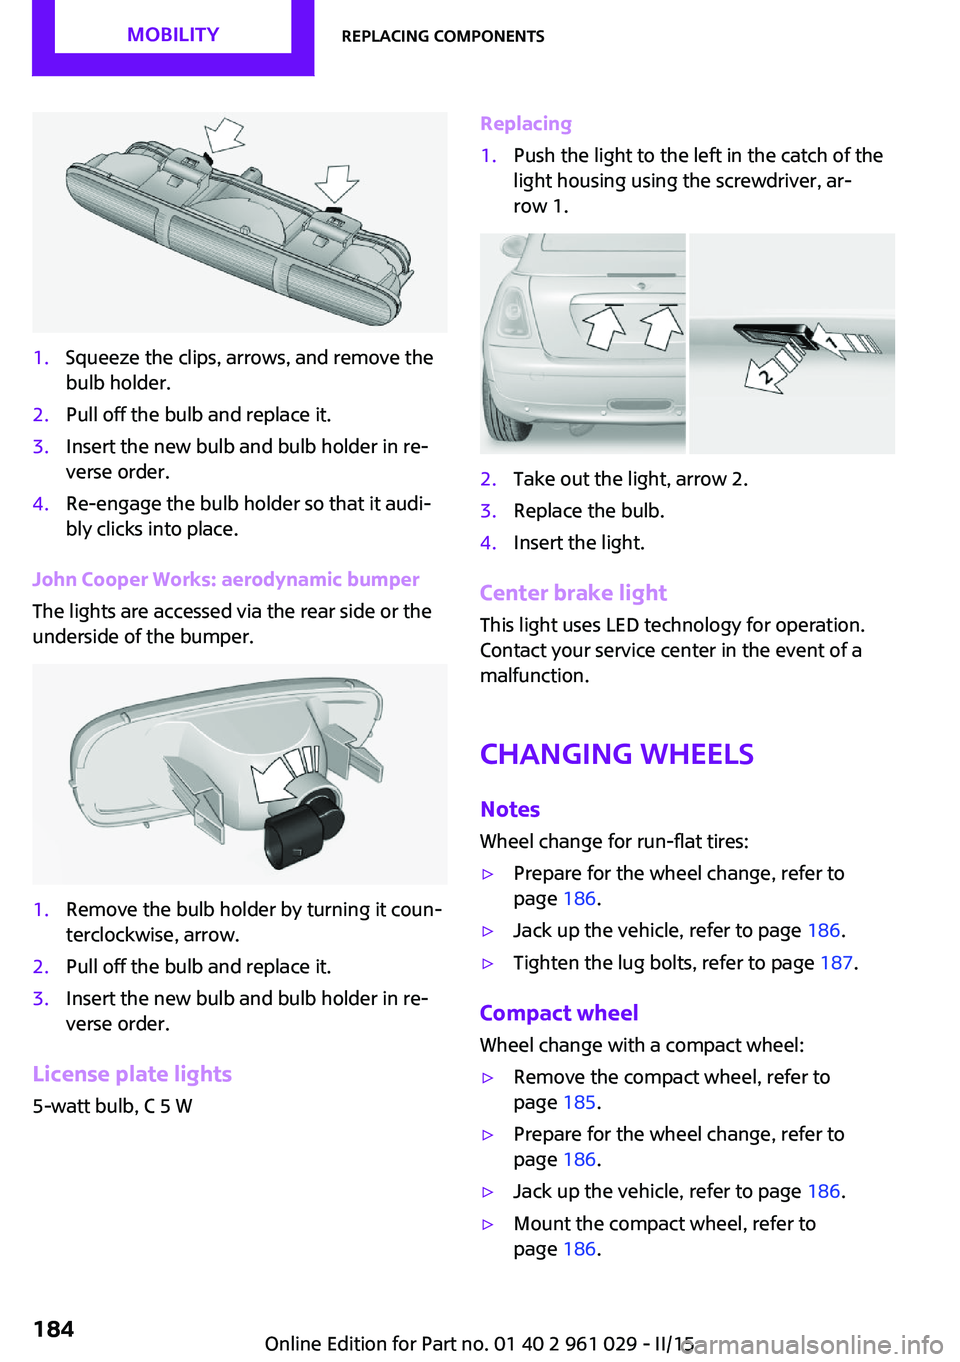
1.Squeeze the clips, arrows, and remove the
bulb holder.2.Pull off the bulb and replace it.3.Insert the new bulb and bulb holder in re‐
verse order.4.Re-engage the bulb holder so that it audi‐
bly clicks into place.
John Cooper Works: aerodynamic bumper
The lights are accessed via the rear side or the
underside of the bumper.
1.Remove the bulb holder by turning it coun‐
terclockwise, arrow.2.Pull off the bulb and replace it.3.Insert the new bulb and bulb holder in re‐
verse order.
License plate lights
5-watt bulb, C 5 W
Replacing1.Push the light to the left in the catch of the
light housing using the screwdriver, ar‐
row 1.2.Take out the light, arrow 2.3.Replace the bulb.4.Insert the light.
Center brake light
This light uses LED technology for operation.
Contact your service center in the event of a
malfunction.
Changing wheels NotesWheel change for run-flat tires:
▷Prepare for the wheel change, refer to
page 186.▷Jack up the vehicle, refer to page 186.▷Tighten the lug bolts, refer to page 187.
Compact wheel
Wheel change with a compact wheel:
▷Remove the compact wheel, refer to
page 185.▷Prepare for the wheel change, refer to
page 186.▷Jack up the vehicle, refer to page 186.▷Mount the compact wheel, refer to
page 186.Seite 184MOBILITYReplacing components184
Online Edition for Part no. 01 40 2 961 029 - II/15
Page 191 of 231

Breakdown assistanceVehicle equipment
This chapter describes all series equipment as
well as country-specific and special equipment
offered for this model series. Therefore, it also
describes equipment that may not be found in
your vehicle, for instance due to the selected
special equipment or the country version. This
also applies to safety-related functions and sys‐
tems.
When using the features and systems described
here, adhere to local regulations.
Hazard warning flash‐
ers
The button is located on the speedometer.
Warning triangle The warning triangle is located in the front on
the trunk floor.
First aid kit Some of the articles contained in the first aid kit
have a limited service life. Therefore, check the
use-by dates of the contents regularly and re‐
place the items before they expire.
The first aid kit is located in the left side trim on
the cargo area floor.
Roadside Assistance
Service availability Roadside Assistance can be reached around the
clock in many countries. You can obtain assis‐
tance there in the event of a vehicle break‐
down.
Roadside Assistance A phone number for Roadside Assistance can
be displayed, refer to page 146, via the radio.
Jump-starting Notes
If the battery is discharged, the engine can be
started using the battery of another vehicle and
two jumper cables. In the same way, you can
help jump-start another vehicle. Only use
jumper cables with fully insulated clamp han‐
dles.
To prevent personal injury or damage to both
vehicles, adhere strictly to the following proce‐
dure.
Seite 189Breakdown assistanceMOBILITY189
Online Edition for Part no. 01 40 2 961 029 - II/15
Page 221 of 231
Brakes, service require‐ments 71
Brake system, MINI mainte‐ nance system 175
Braking, notes 116
Braking, parking brake 58
Breakdown assistance, Road‐ side Assistance 189
Breaking in 114
Button for starting the engine, refer to Start/Stop button 56
C
California Proposition 65 Warning 7
Car battery, refer to Vehicle battery 187
Car care products 195
Care, displays 198
Care, vehicle 195
Cargo area, Comfort Ac‐ cess 30
Cargo area door, refer to Tail‐ gate 27
Cargo area, emergency opera‐ tion, refer to Unlocking man‐
ually 27
Cargo area, emergency un‐ locking 28
Cargo area light, refer to Inte‐ rior lights 79
Cargo area, opening from the outside 27
Car horn, refer to Horn 12
Carpet, care 198
Car phone, refer to Tele‐ phone 140
Car wash 194
CBC, Cornering Brake Con‐ trol 91
CBS Condition Based Serv‐ ice 175
CD/DVD drives, care 198 Center console, refer to
Around the center con‐
sole 15
Central locking, Comfort Ac‐ cess 29
Central locking from the in‐ side 26
Central locking system, con‐ cept 21
Central locking system, from the outside 21
Changes, technical, refer to Safety 6
Changing wheels/tires 165
Check Control 73
Children, transporting 51
Child restraint fixing system LATCH 53
Child restraint fixing sys‐ tems 51
Child restraint fixing systems, mounting 51
Child seat, mounting 51
Child seats, refer to Transport‐ ing children safely 51
Chrome parts, care 197
Circulation of air, refer to Re‐ circulated air mode, air con‐
ditioner 100
Circulation of air, refer to Re‐ circulated air mode, auto‐
matic climate control 102
Cleaning, displays 198
Cleaning, refer to Care 194
Climate 99
Climate mode, ventila‐ tion 104
Clock 66
Clock, 12h/24h mode 70
Closing from the inside 26
Closing, from the outside 22
Clutch, breaking in 114
Cockpit 12
Cold start, refer to Starting the engine 57 Combination instrument, refer
to Displays 14
Combination switch, refer to Turn signal/high-beams/
headlight flasher 59
Combination switch, refer to Washer/wiper system 60
Comfort Access 29
Comfort Access, in the car wash 30
Comfort Access, replacing the battery 31
Comfort area, refer to Around the center console 15
Compact wheel, inflation pres‐ sure 161
Compartment for remote con‐ trol, refer to Ignition lock 56
Computer 67
Computer, displaying informa‐ tion 67
Condition Based Service CBS 175
Confirmation signals for vehi‐ cle locking/unlocking 24
Consumption, refer to Aver‐ age fuel consumption 68
Control Display, care 198
Controls and displays 12
Control systems, driving stabil‐ ity 91
Convenient operation, win‐ dow 23
Convertible top 34
Convertible top, manual 39
Convertible top, mechani‐ cal 39
Coolant temperature 67
Cooling function, switching on and off 103
Cooling, maximum 103
Cornering Brake Control, CBC 91
Corrosion on brake discs 116 Seite 219Everything from A to ZREFERENCE219
Online Edition for Part no. 01 40 2 961 029 - II/15