2015 MERCEDES-BENZ SLS AMG GT ROADSTER check engine light
[x] Cancel search: check engine lightPage 65 of 290
G
WARNING
When leaving the vehicle, alwaysr emove the
SmartKey from the ignitio nlock. Always take
the SmartKey with you and lock the vehicle.
Do not leave children unsupervised in the
vehicle, even if they are secure dinachild
restraint system, and do not give them access to an unlocked vehicle. Achild's unsupervised
access to avehicl ecouldr esult in an accident
and/or serious personal injury .They could:
R injure themselves on vehicl eparts
R be seriouslyorf atally injured by extreme
heatorc old
R injure themselves or have an accident with
vehicl eequipment that may still be in oper-
ation even after the SmartKey has been
removed from the ignition, such as the seat
adjustment, steering whee ladjustment or
memory function.
If children open adoor, they coul dcause
severe or even fatal injury to other persons; if they get out of the vehicle, they coul dinjure
themselves when doing so or be seriouslyor
even fatally injured by any passing traffic.
Do not expose the child restraint system to
direct sunlight. The child restraint system's
metal parts, for example, coul dbecome very
hot, and achild coul dbeburned on these
parts. G
WARNING
If you attach heavy or larg eobjects to the
SmartKey ,the SmartKey coul dbeuninten-
tionally turned in the ignitio nlock. This could
caus ethe engine to be switched off. There is a
risk of an accident.
Do not attach any heavy or larg eobjects to the
SmartKey .Remove any bulky key rings before
inserting the SmartKey into the ignitio nlock.
! Keep the SmartKey away from strong
magnetic fields. Otherwise, the remote
control function coul dbeaffected.
Strong magnetic fields can occur in the
vicinity of powerful electrical installations. 0043
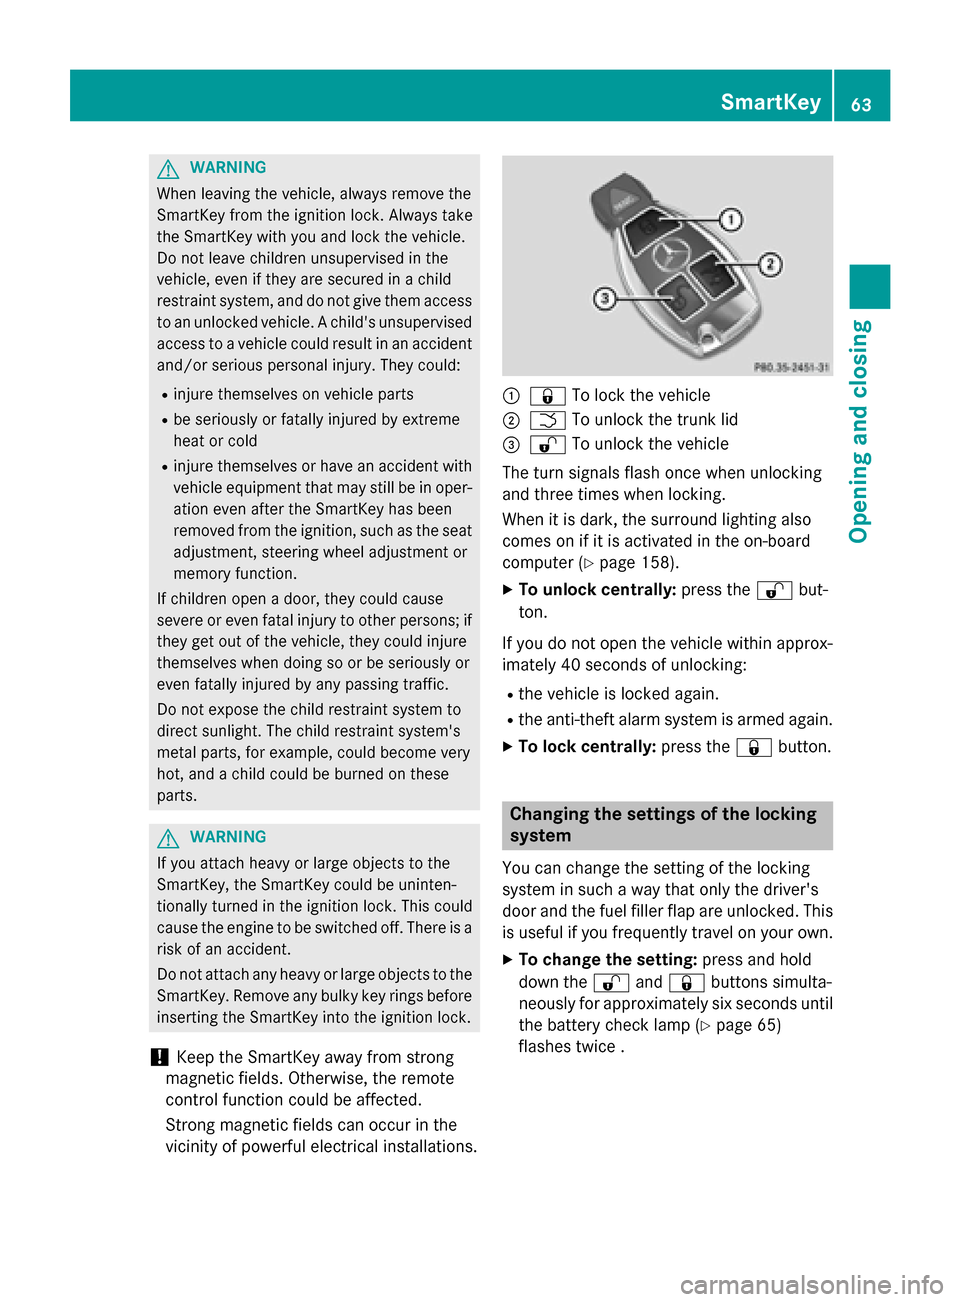
0037 To lock the vehicle
0044 0054 To unlock the trunk lid
0087 0036 To unlock the vehicle
The turn signals flas honce when unlocking
and three times when locking.
When it is dark, the surround lighting also
comes on if it is activated in the on-board
computer (Y page158).
X To unlock centrally: press the0036but-
ton.
If you do not open the vehicl ewithinapprox-
imatel y40seconds of unlocking:
R the vehicl eislocked again.
R the anti-theft alarm system is armed again.
X To lockc entrally: press the 0037button. Changing the setting
softhe locking
system
You can change the setting of the locking
system in such awaythat only the driver's
door and the fuel filler flap are unlocked .This
is useful if you frequently travel on youro wn.
X To chang ethe setting: press and hold
downt he0036 and0037 buttons simulta-
neously for approximatel ysix seconds until
the battery check lamp (Y page65)
flashes twice . SmartKey
63Opening and closing Z
Page 69 of 290
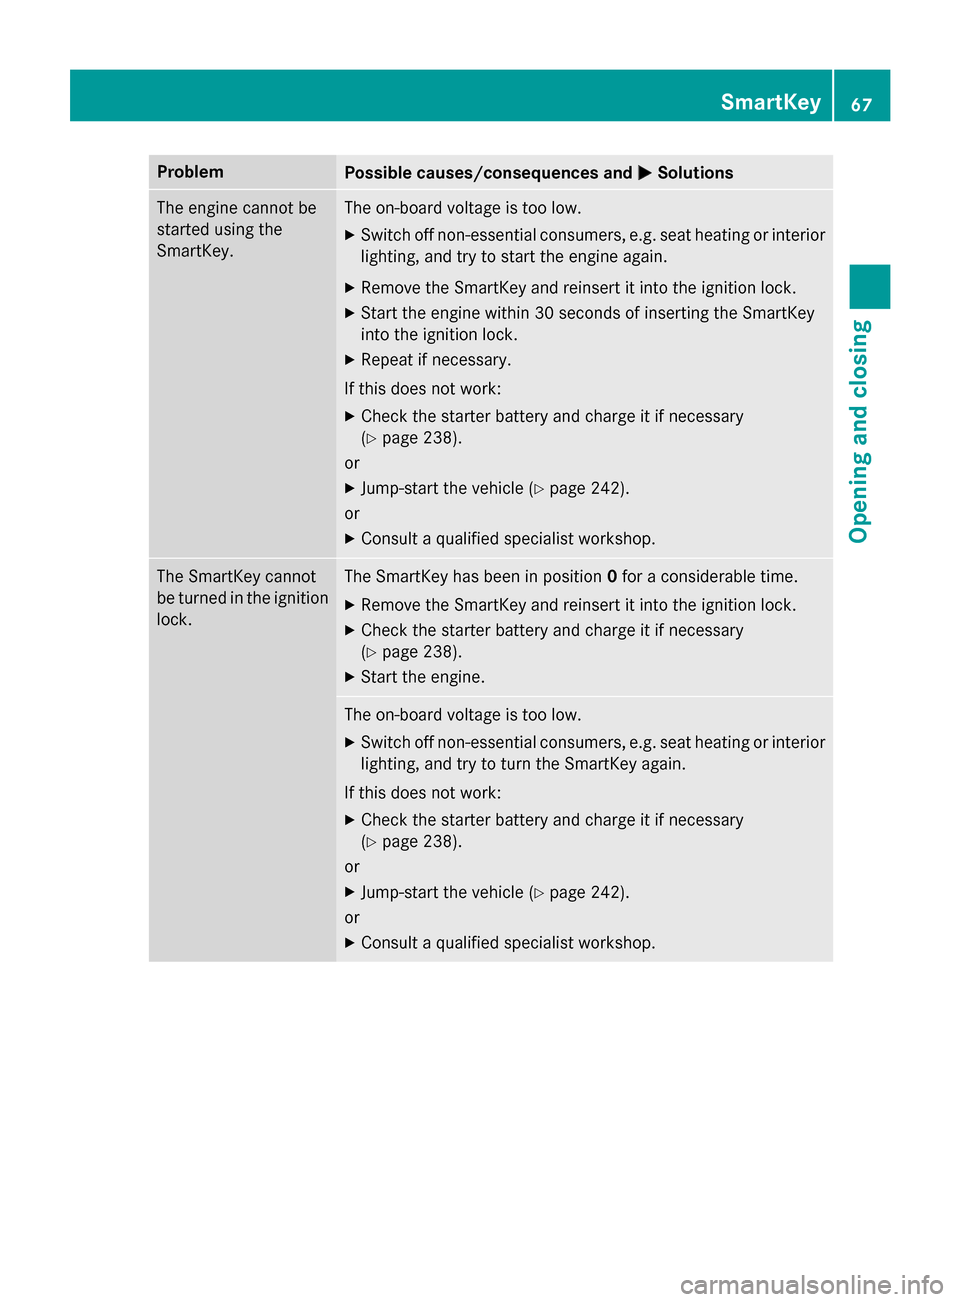
Problem
Possible causes/consequences and
0050
0050Solutions The engine cannot be
started using the
SmartKey. The on-board voltage is too low.
X Switch off non-essential consumers, e.g. seat heating or interior
lighting, and try to start the engine again.
X Remove the SmartKey and reinsert it into the ignition lock.
X Start the engine within 30 seconds of insertingt he SmartKey
into the ignition lock.
X Repeatifn ecessary.
If this does not work: X Check the starter battery and charge it if necessary
(Y page 238).
or
X Jump-start the vehicle (Y page 242).
or
X Consult aqualified specialist workshop. The SmartKey cannot
be turned in the ignition
lock. The SmartKey has been in position
0for aconsiderable time.
X Remove the SmartKey and reinsert it into the ignition lock.
X Check the starter battery and charge it if necessary
(Y page 238).
X Start the engine. The on-board voltage is too low.
X Switch off non-essential consumers, e.g. seat heating or interior
lighting, and try to turn the SmartKey again.
If this does not work:
X Check the starter battery and charge it if necessary
(Y page 238).
or
X Jump-start the vehicle (Y page 242).
or
X Consult aqualified specialist workshop. SmartKey
67Opening and closing Z
Page 74 of 290
X
Turn the mechanical key counter-clockwise
to position 0049.
The door is locked.
X Turn the mechanical key back and remove
it.
X Check that both doors are locked.
i If you lock the vehicle as described above,
the fuel filler flap is not locked. The anti-
theft alarm system is not armed.
Roadster X
Open the driver's door.
X Close the front-passenger door and the
trunk lid.
X Press the lockin gbutton (Y page 70).
X Check that the lockin gknobisint he lower
position on the front-passenger door. Press the lockin gknobd own by hand, if neces-
sary.
X Close the driver's door.
X Take the mechanical key out of the Smart-
Key (Y page 64).
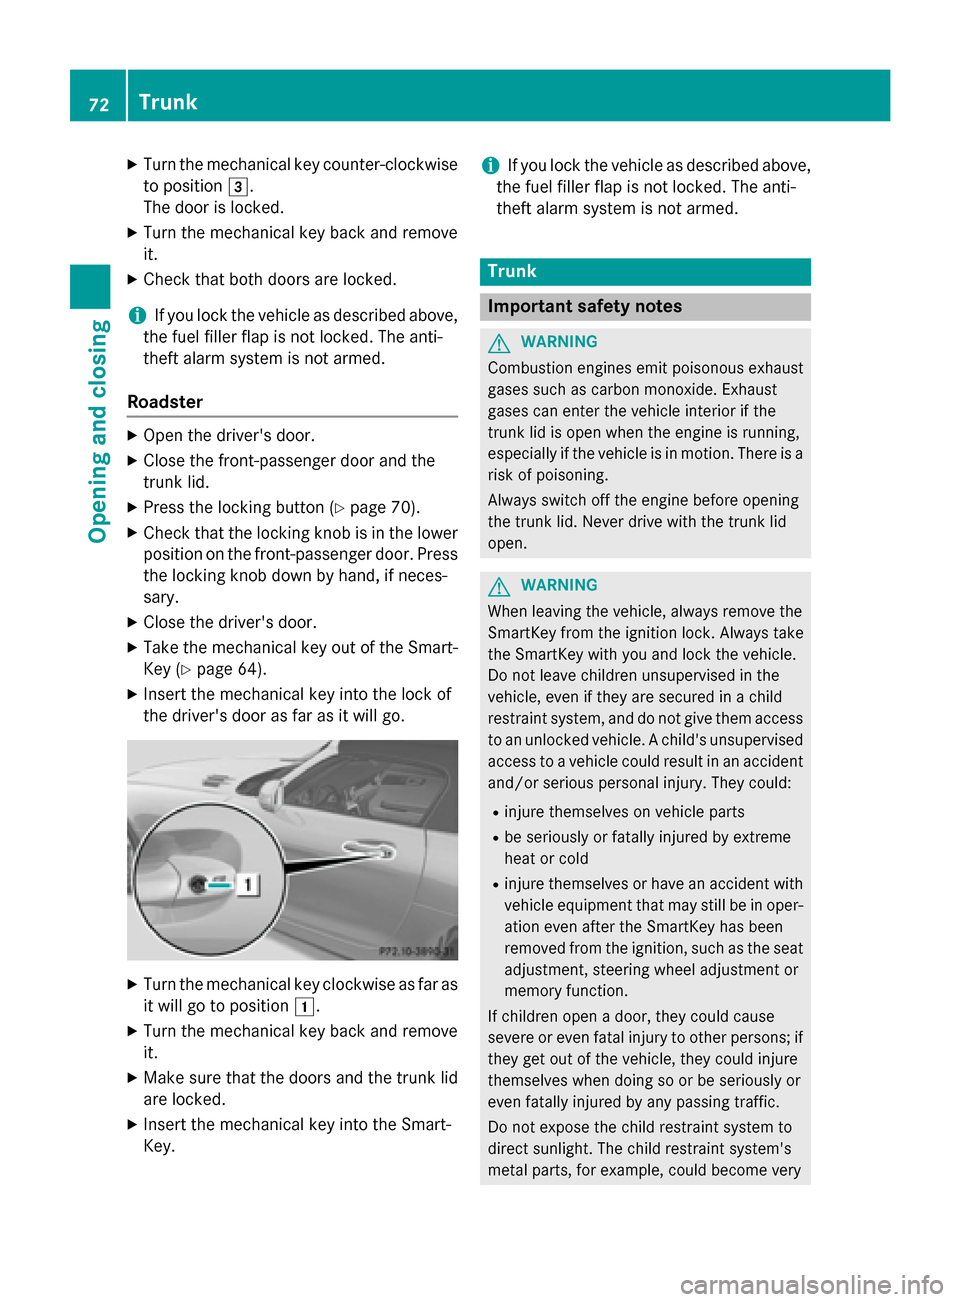
X Insert the mechanical key into the lock of
the driver's door as far as it will go. X
Turn the mechanical key clockwise as far as
it will go to position 0047.
X Turn the mechanical key back and remove
it.
X Make sure that the doors and the trunk lid
are locked.
X Insert the mechanical key into the Smart-
Key. i
If you lock the vehicle as described above,
the fuel filler flap is not locked. The anti-
theft alarm system is not armed. Trunk
Important safety notes
G
WARNING
Combustion engines emit poisonous exhaust
gases such as carbon monoxide. Exhaust
gases can enter the vehicle interior if the
trunk lid is open when the engine is running,
especially if the vehicle is in motion .There is a
risk of poisoning.
Always switch off the engine before opening
the trunk lid. Never drive with the trunk lid
open. G
WARNING
When leaving the vehicle, alway sremove the
SmartKey from the ignition lock. Always take
the SmartKey with you and lock the vehicle.
Do not leave children unsupervised in the
vehicle, even if they are secured in achild
restraint system, and do not give them access to an unlocked vehicle. Achild's unsupervised
access to avehicle could result in an accident
and/or serious personal injury. They could:
R injure themselves on vehicle parts
R be seriously or fatally injured by extreme
heat or cold
R injure themselves or have an accident with
vehicle equipment that may still be in oper-
ation even after the SmartKey has been
removed from the ignition ,such as the seat
adjustment, steerin gwheel adjustmen tor
memory function.
If children open adoor, they could cause
severe or even fatal injury to other persons; if they get out of the vehicle, they could injure
themselves when doing so or be seriously or
even fatally injured by any passing traffic.
Do not expose the child restraint system to
direct sunlight. The child restraint system's
metal parts, for example, could become very 72
TrunkOpening and closing
Page 101 of 290
The hazard warning lamps switch off auto-
matically if the vehicle exceeds aspeed of
6m ph(10 km/h) again after afull brake appli-
cation.
i The hazard warning lamps still operate if
the ignition is switched off. Headlam
pcleaning system
The headlamps are cleaned automatically if
the "Wipe with washer fluid" function is oper-
ated five times (Y page 101) while the lights
are on and the engine is running. When you
switch off the ignition ,the automatic head-
lamp cleaning system is reset and counting is
resumed from 0. Headlamps fogged up on the inside
The headlamps may fog up on the inside if
there is high atmospheric humidity.
X Drive with the headlamps switched on.
The level of moisture diminishes, depend-
ing on the length of the journey and the
weather conditions (humidity and temper-
ature).
If the level of moisture does not diminish:
X Have the headlamps checked at aqualified
specialist workshop. Interior lighting
Overview of interior lighting
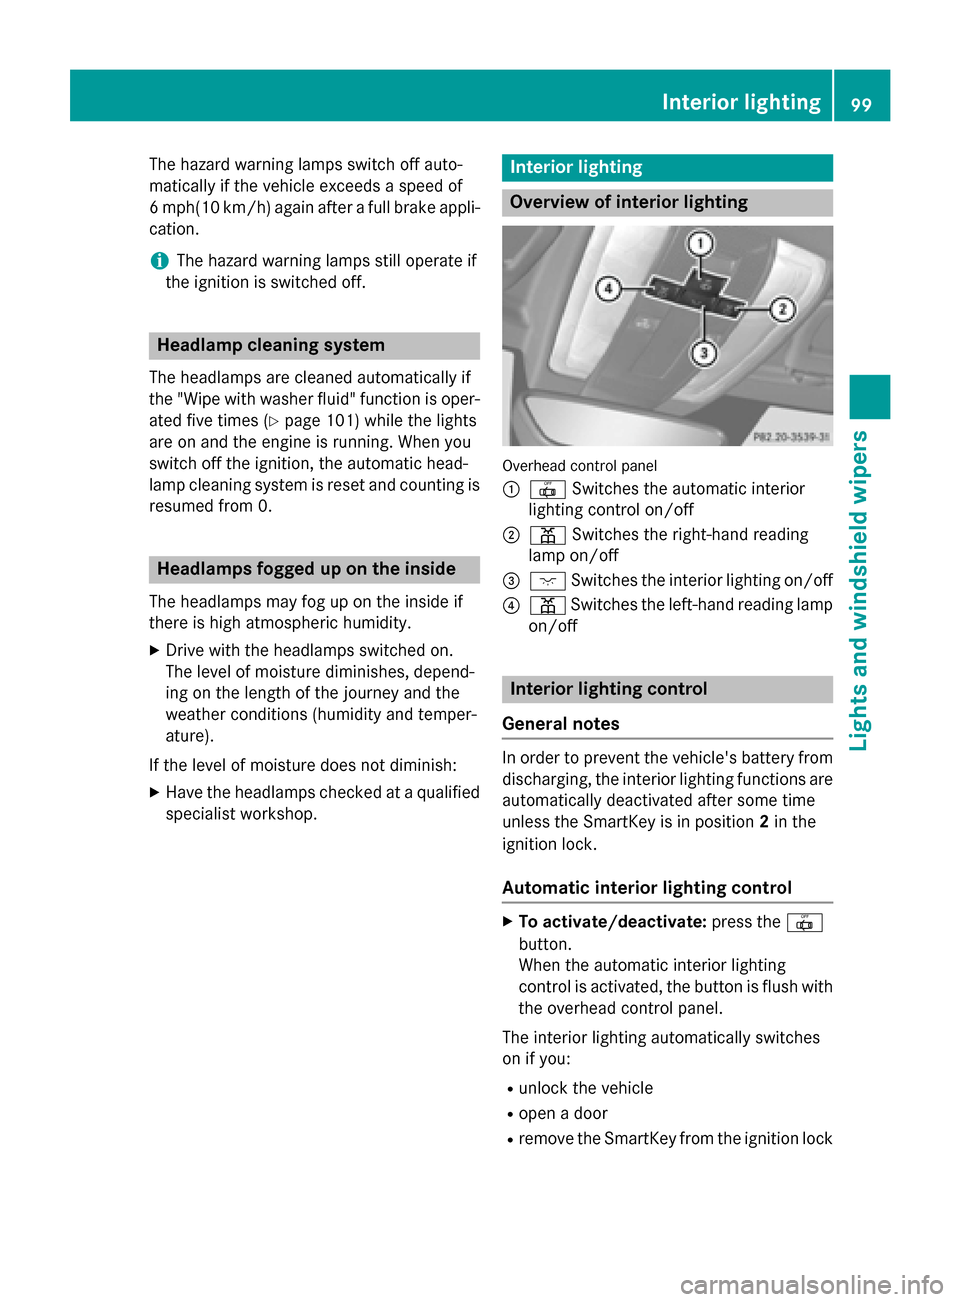
Overhead control panel
0043
0033 Switches the automatic interior
lighting control on/off
0044 003D Switches the right-hand reading
lamp on/off
0087 004A Switches the interior lighting on/off
0085 003D Switches the left-hand reading lamp
on/off Interior lighting control
General notes In order to prevent the vehicle's battery from
discharging, the interior lighting functions are
automatically deactivated after some time
unless the SmartKey is in position 2in the
ignition lock.
Automatic interior lighting control X
To activate/deactivate: press the0033
button.
When the automatic interior lighting
control is activated, the button is flush with
the overhead control panel.
The interior lighting automatically switches
on if you:
R unlock the vehicle
R open adoor
R remove the SmartKey from the ignition lock Interior lighting
99Lights and windshield wipers Z
Page 102 of 290
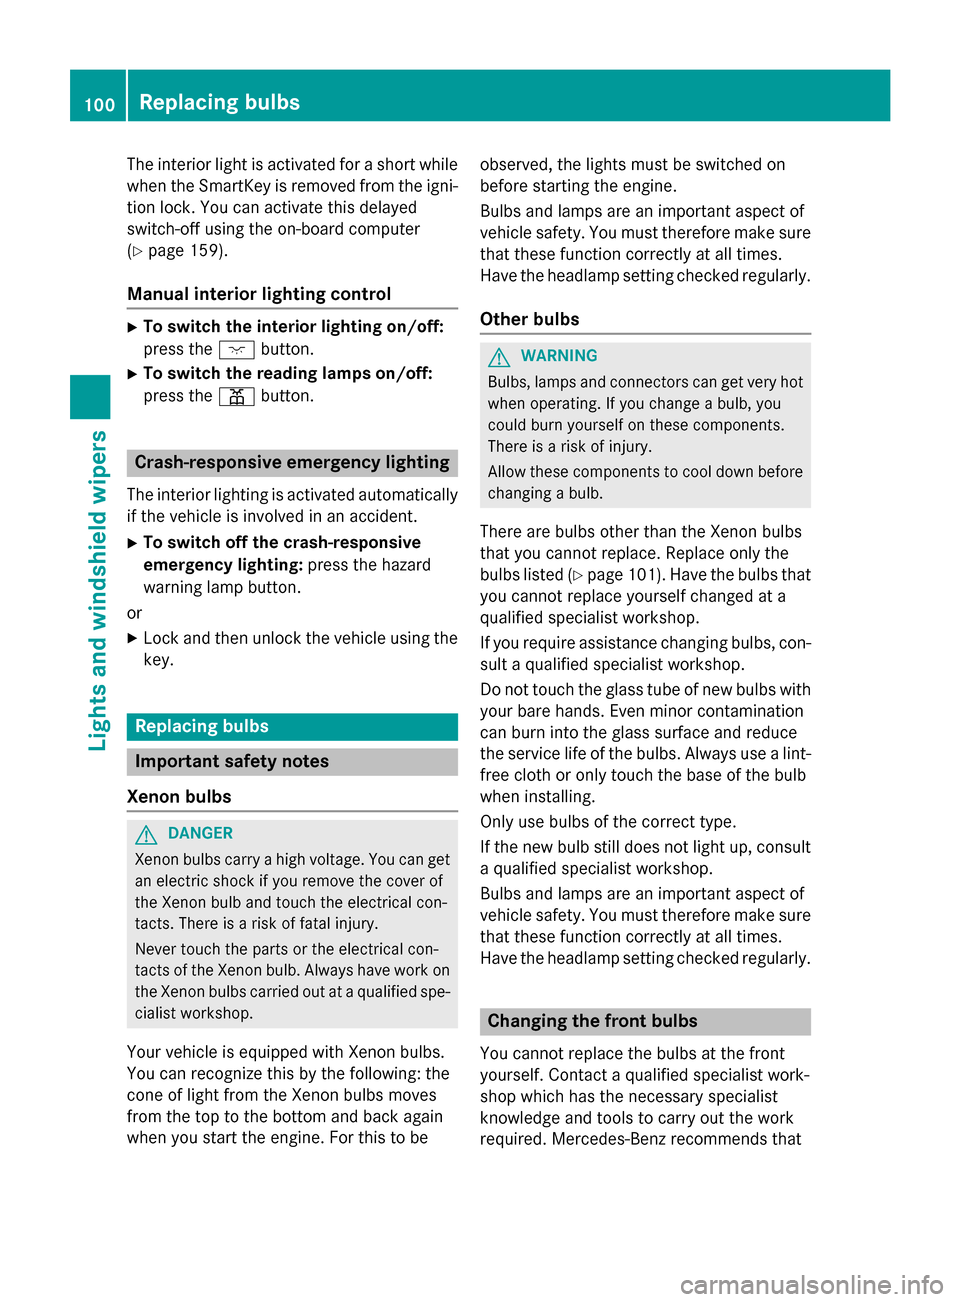
The interior light is activated for
ashort while
when the SmartKey is removed from the igni-
tion lock. You can activat ethis delayed
switch-off using the on-board computer
(Y page 159).
Manua linterior lighting control X
To switch the interior lighting on/off:
press the 004Abutton.
X To switch the reading lampso n/off:
press the 003Dbutton. Crash-responsive emergency lighting
The interior lighting is activated automatically
if the vehicle is involved in an accident.
X To switch off the crash-responsive
emergency lighting: press the hazard
warning lamp button.
or X Lock and then unlock the vehicle using the
key. Replacing bulbs
Important safety notes
Xenon bulbs G
DANGER
Xenon bulbs carry ahigh voltage. You can get
an electric shock if you remove the cover of
the Xenon bulb and touch the electrical con-
tacts. There is arisk of fatal injury.
Never touch the parts or the electrical con-
tactsoft he Xenon bulb. Always have work on
the Xenon bulbs carried out at aqualified spe-
cialist workshop.
Your vehicle is equipped with Xenon bulbs.
You can recognize this by the following: the
cone of light from the Xenon bulbs moves
from the top to the bottom and back again
when you start the engine. For this to be observed, the lights must be switched on
before starting the engine.
Bulbs and lamps are an importan
taspect of
vehicle safety. You must therefore make sure that these function correctly at all times.
Have the headlamp setting checked regularly.
Other bulbs G
WARNING
Bulbs, lamps and connector scan get very hot
when operating. If you change abulb, you
could burn yourself on these components.
There is arisk of injury.
Allow these components to cool down before changin gabulb.
There are bulbs other than the Xenon bulbs
that you cannot replace. Replace only the
bulbs listed (Y page 101). Have the bulbs that
you cannot replace yourself changed at a
qualified specialist workshop.
If you require assistance changin gbulbs, con-
sult aqualified specialist workshop.
Do not touch the glass tube of new bulbs with
your bare hands. Even minor contamination
can burn into the glass surface and reduce
the service life of the bulbs. Always use alint-
free cloth or only touch the base of the bulb
when installing.
Only use bulbs of the correc ttype.
If the new bulb still does not light up, consult
aq ualified specialist workshop.
Bulbs and lamps are an importan taspect of
vehicle safety. You must therefore make sure that these function correctly at all times.
Have the headlamp setting checked regularly. Changing the front bulbs
You cannot replace the bulbs at the front
yourself. Contact aqualified specialist work-
shop which has the necessary specialist
knowledge and tools to carry out the work
required. Mercedes-Benz recommends that 100
Replacing bulbsLights and windshield wipers
Page 105 of 290
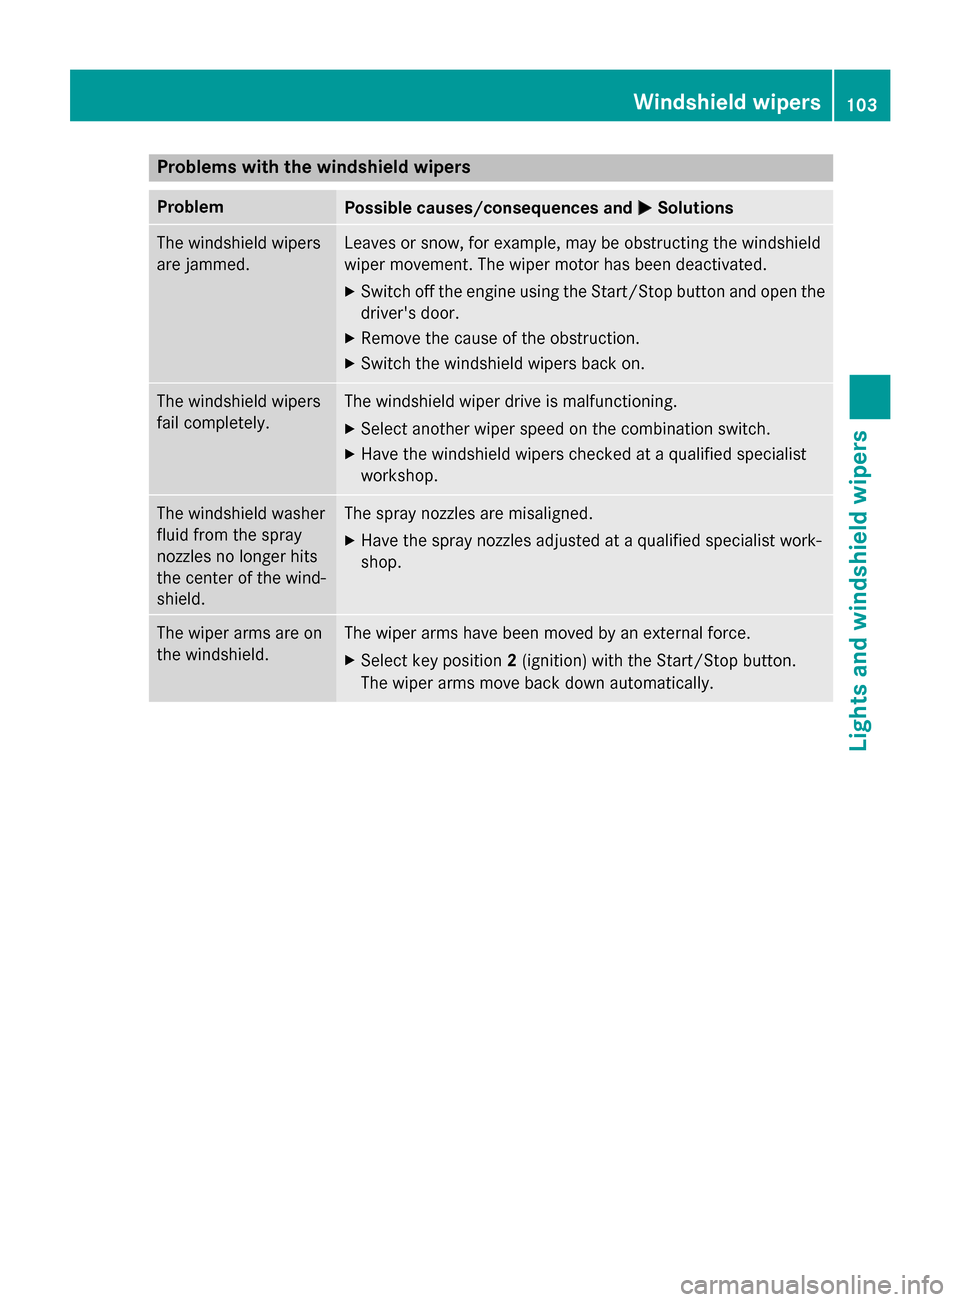
Problems with the windshield wipers
Problem
Possible causes/consequences and
0050
0050Solutions The windshield wipers
are jammed. Leaves or snow, for example, may be obstructing the windshield
wiper movement.T
he wiper motor has been deactivated.
X Switch off the engine using the Start/Stop button and open the
driver's door.
X Remove the cause of the obstruction.
X Switch the windshield wipers back on. The windshield wipers
fail completely. The windshield wiper drive is malfunctioning.
X Select another wiper speed on the combination switch.
X Have the windshield wipers checked at aqualified specialist
workshop. The windshield washer
fluid from the spray
nozzles no longer hits
the center of the wind-
shield. The spray nozzles are misaligned.
X Have the spray nozzles adjusted at aqualified specialist work-
shop. The wiper arms are on
the windshield. The wiper arms have been moved by an external force.
X Select key position 2(ignition) with the Start/Stop button.
The wiper arms move back down automatically. Windshield wipers
103Lights and windshieldw ipers Z
Page 138 of 290
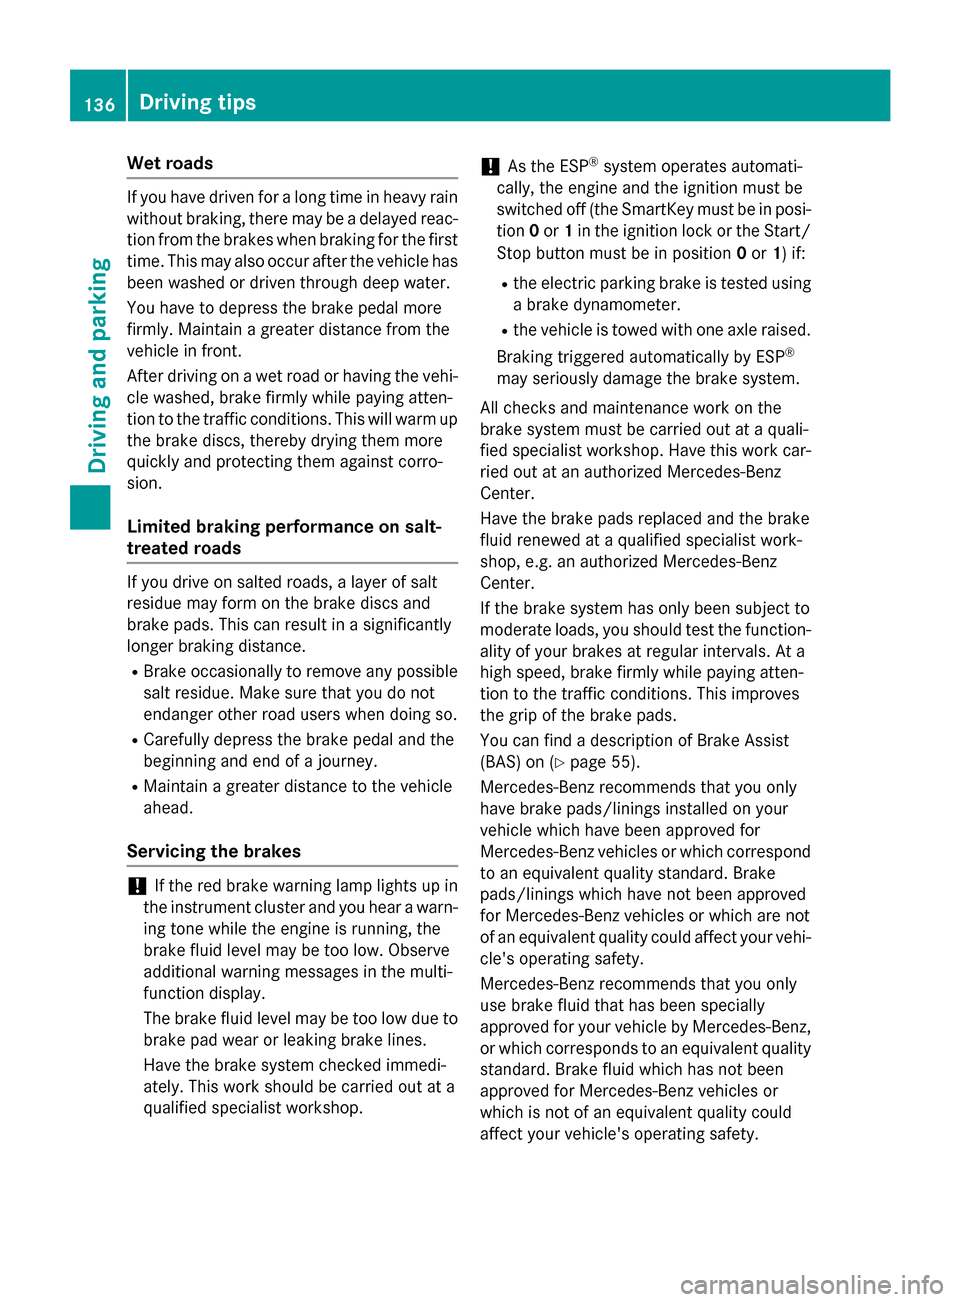
Wet roads
If you have drive
nfor along time in heavy rain
without braking, there may be adelayed reac-
tion from the brakes whe nbraking for the first
time. This may also occur after the vehicl ehas
been washed or drive nthroug hdeep water.
You have to depress the brake pedal more
firmly .Maintain agreater distance from the
vehicl einfront.
After driving on awet road or having the vehi-
cle washed ,brake firmly while paying atten-
tion to the traffic conditions. This wil lwarmup
the brake discs, thereby drying them more
quickly and protecting them against corro-
sion.
Limited braking performance on salt-
treated roads If you drive on salted roads,
alayer of salt
residue may form on the brake discs and
brake pads. This can result in asignificantly
longe rbraking distance.
R Brake occasionally to remove any possible
sal tresidue. Make sure that you do not
endange rother road users whe ndoing so.
R Carefully depress the brake pedal and the
beginning and end of ajourney.
R Maintain agreater distance to the vehicle
ahead.
Servicing the brakes !
If the red brake warning lamp lights up in
the instrument cluster and you hea rawarn-
ing tone while the engine is running, the
brake fluid leve lmay be too low .Observe
additiona lwarning messages in the multi-
function display.
The brake fluid leve lmay be too low due to
brake pad wea rorleaking brake lines.
Have the brake syste mchecked immedi-
ately. This work should be carrie dout at a
qualified specialist workshop. !
As the ESP ®
syste moperates automati-
cally, the engine and the ignition must be
switched off (the SmartKey must be in posi-
tion 0or 1in the ignition lock or the Start/
Stop button must be in position 0or 1)i f:
R the electric parking brake is tested using
ab rake dynamometer.
R the vehicl eistowed with one axle raised.
Braking triggered automatically by ESP ®
may seriousl ydamage the brake system.
All checks and maintenance work on the
brake syste mmust be carrie dout at aquali-
fied specialist workshop. Have this work car- ried out at an authorized Mercedes-Benz
Center.
Have the brake pad sreplaced and the brake
fluid renewe dataqualified specialist work-
shop, e.g. an authorized Mercedes-Benz
Center.
If the brake syste mhas only been subject to
moderate loads, you should test the function- ality of you rbrakes at regulari ntervals. At a
high speed, brake firmly while paying atten-
tion to the traffic conditions. This improves
the grip of the brake pads.
You can find adescription of Brake Assist
(BAS) on (Y page55).
Mercedes-Benz recommends that you only
have brake pads/linings installed on your
vehicl ewhich have been approved for
Mercedes-Benz vehicles or which correspond to an equivalent quality standard. Brake
pads/linings which have not been approved
for Mercedes-Benz vehicles or which are not
of an equivalent quality coul daffect you rvehi-
cle's operating safety.
Mercedes-Benz recommends that you only
use brake fluid that has been specially
approved for you rvehicl ebyM ercedes-Benz,
or which corresponds to an equivalent quality standard. Brake fluid which has not been
approved for Mercedes-Benz vehicles or
which is not of an equivalent quality could
affect you rvehicle's operating safety. 136
Driving tipsDriving and parking
Page 197 of 290
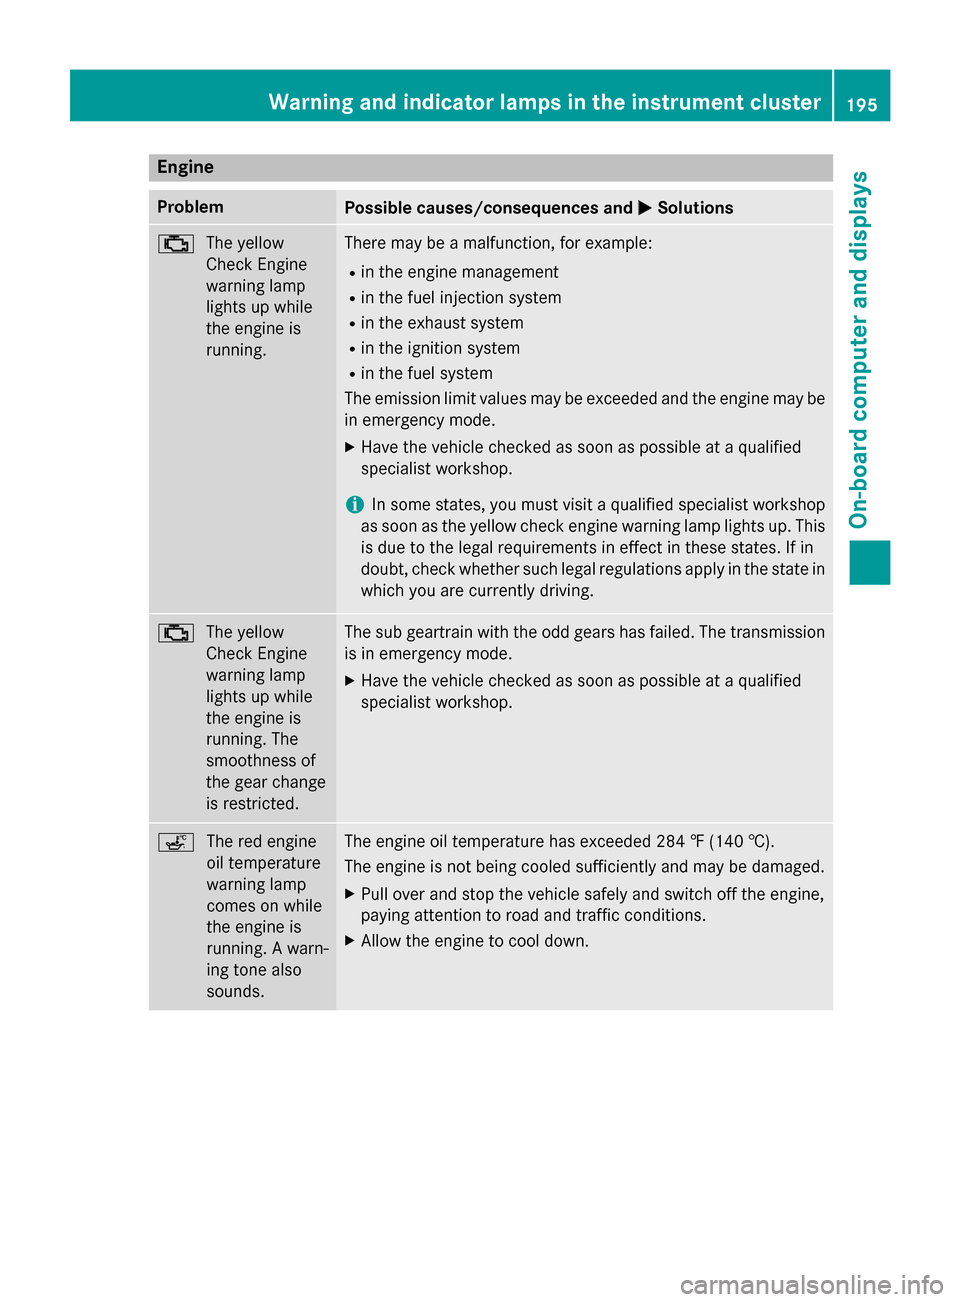
Engine
Problem
Possible causes/consequences and
0050
0050Solutions 00B9
The yellow
CheckEngine
warning lamp
light supw hile
th ee ngineis
running. Ther
emay be amalfunction, for example:
R in th eenginem anagement
R in th efuel injection system
R in th eexhaust system
R in th eignition system
R in th efuel system
The emission limit values may be exceeded and th eenginem ay be
in emergency mode.
X Hav ethe vehicle checked as soon as possible at aqualified
specialist workshop.
i In som
estates, you must visi taqualifie dspecialist workshop
as soon as th eyellow check engin ewarning lamp light sup. This
is due to th elegal requirements in effect in these states. If in
doubt ,che ck whether suc hlegal regulations apply in th estate in
whic hyou are currently driving. 00B9
The yellow
CheckEngine
warning lamp
light supw hile
th ee ngineis
running. The
smoothness of
th eg ear change
is restricted. The sub geartrain with th
eodd gear shas failed .The transmission
is in emergency mode.
X Hav ethe vehicle checked as soon as possible at aqualified
specialist workshop. 00E4
The red engine
oil temperature
warning lamp
comes on while
thee ngineis
running. Awarn-
ing tone also
sounds. The engin
eoil temperatur ehas exceeded 28 4‡(140† ).
The engin eisnotbein gcooled sufficiently and may be damaged.
X Pull ove rand stop th evehicle safely and switch off th eengine,
paying attentio ntoroad and traffic conditions.
X Allo wthe engin etoc ooldown. Warning and indicator lamps in th
einstrumen tcluster
195On-boar dcomputer and displays Z