2015 MERCEDES-BENZ SLS AMG GT COUPE trunk
[x] Cancel search: trunkPage 247 of 290
!
Tow-starting the vehicle is not permitted.
The transmission may otherwise be dam-
aged.
If the vehicle can no longer be driven because of an accident or breakdown, you have the
following options:
R transportingt he vehicle
As arule, you should have the vehicle trans-
ported.
R towing the vehicle with the rear axle raised
Only tow the vehicle with the rear axle
raised in exceptional cases.
R towing the vehicle with atow rope or tow
bar
Only tow the vehicle in exceptional cases.
The engine must be running if you tow the
vehicle with atow rope or tow bar. Observe
the following notes.
Also observe the following notes:
R If the engine does not start, try jump-start-
ing it (Y page 242). Tow-starting the vehicle
is not permitted.
R If it is not possibletoj ump-start the vehicle,
have it transported to the nearest qualified specialist workshop, e.g. an authorized
Mercedes-Benz Center.
R If the vehicle has transmission damage,
have it transported to aqualified specialist
workshop. Observe the displaym essages
in the instrument cluster. Installing/removing the towing eye
Installingt he towing eye X
Take the towing eye and the wheel wrench 4
out of the wheel-change tool kit
(Y page 234).
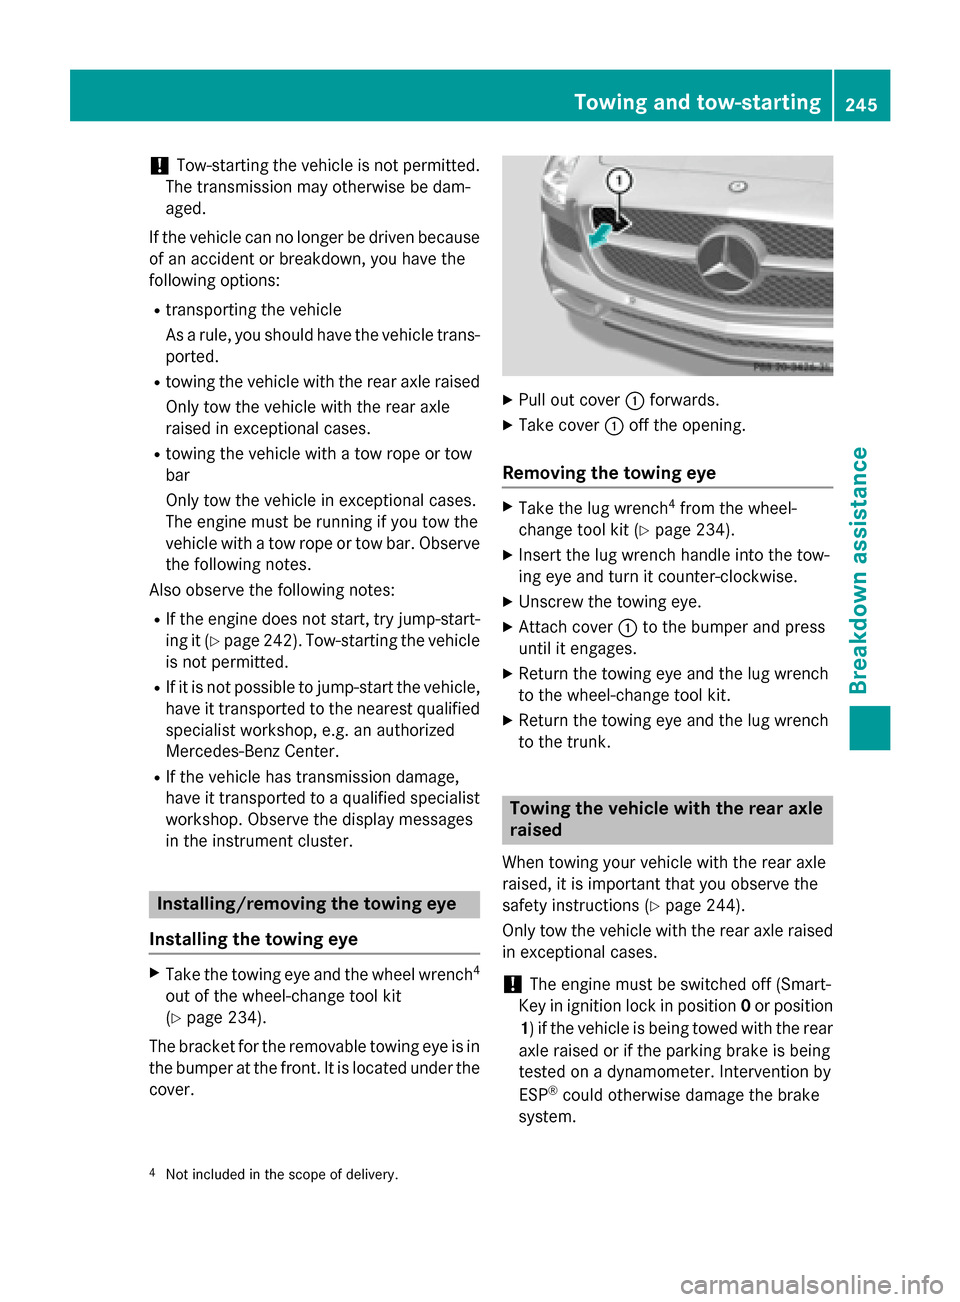
The bracket for the removable towing eye is in
the bumper at the front.Itisl ocated under the
cover. X
Pull out cover 0043forwards.
X Take cover 0043off the opening.
Removing the towing eye X
Take the lug wrench 4
from the wheel-
change tool kit (Y page 234).
X Insert the lug wrench handle into the tow-
ing eye and turn it counter-clockwise.
X Unscrew the towing eye.
X Attach cover 0043to the bumper and press
until it engages.
X Return the towing eye and the lug wrench
to the wheel-change tool kit.
X Return the towing eye and the lug wrench
to the trunk. Towing the vehiclew
ith the rear axle
raised
When towing your vehicle with the rear axle
raised, it is important that you observe the
safety instructions (Y page 244).
Only tow the vehicle with the rear axle raised in exceptional cases.
! The engine must be switched off (Smart-
Key in ignition lock in position 0or position
1)ift he vehicle is being towed with the rear
axle raised or if the parking brake is being
tested on adynamometer. Intervention by
ESP ®
could otherwise damage the brake
system.
4 Not included in the scope of delivery. Towing and tow-starting
245Breakdown assistance Z
Page 249 of 290
the color and value. Th
efuser ating sarelisted
in the fuse allocation chart.
If an ewly inserte dfusea lsob lows ,havet he
cause traced and rectifie dataqualified spe-
cialist workshop ,e.g.ana uthorized
Mercedes-Benz Center. Before changin
gafuse
X Park the vehicl eand appl ythe electric park-
ing brake.
X Switch off al lelectrica lconsumers.
X Remov ethe SmartKe yfromt he ignition
lock.
Th ef uses arel oc ate dinv arious fuse boxes:
R fuse bo xinthe footwell on the front-
passenge rside
R fuse bo xinthe rear
Th e" Rela yand fuse information sheet" is
locate dwitht he wheel-chang etoolki tinthe
trunk. Fuse bo
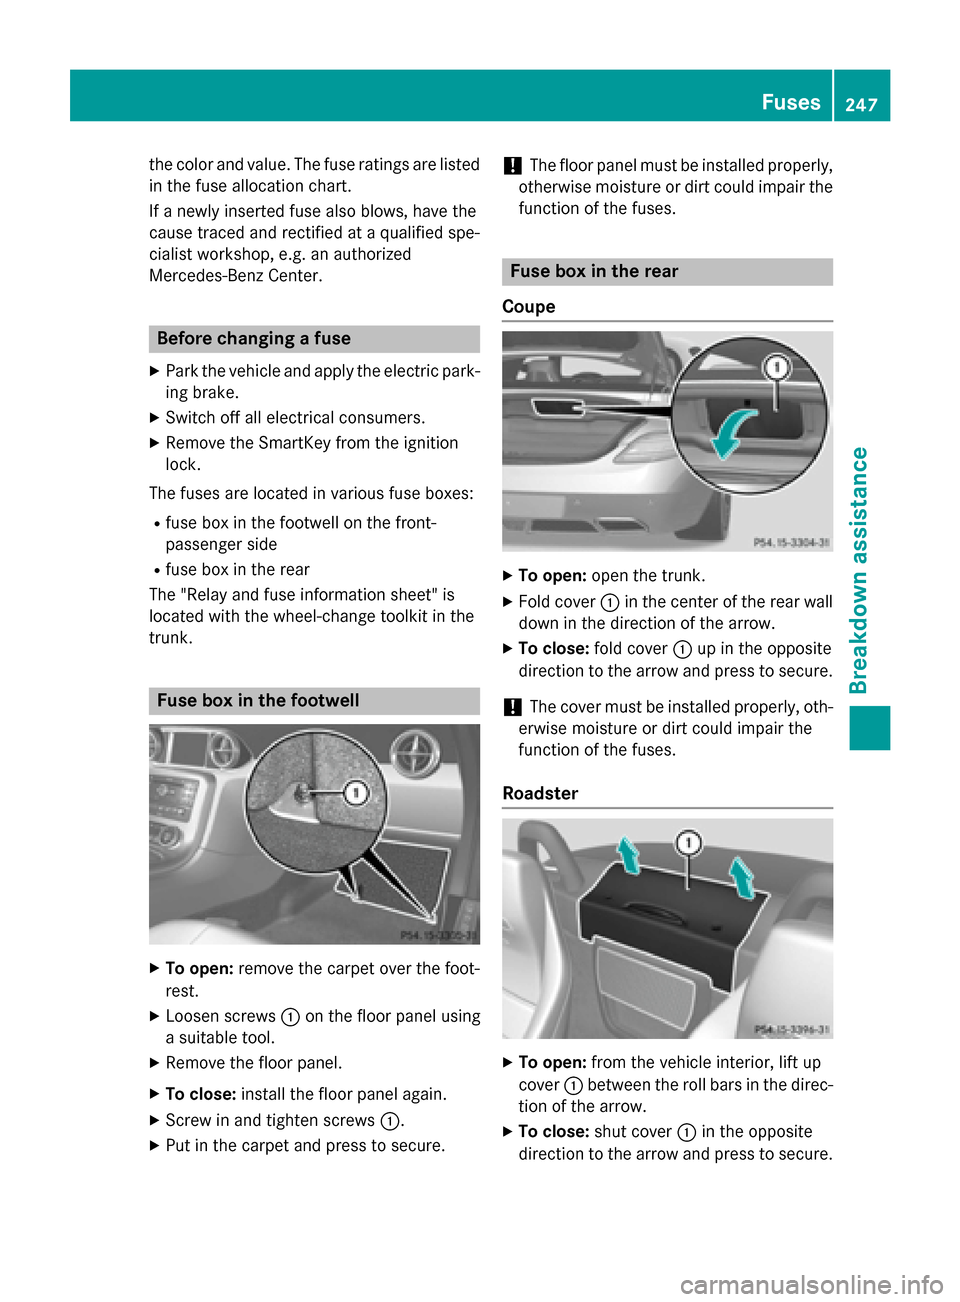
xinthe footwell X
To open: remove the carpe toverthe foot-
rest.
X Loose nscrews 0043on the floo rpanel using
as uitabl etool.
X Remov ethe floo rpanel.
X To close: installthe floo rpanel again.
X Scre wina nd tighte nscrews 0043.
X Pu tint he carpe tand press to secure. !
Th
efloor panel must be installe dproperly,
otherwis emoisture or dirt could impair the
functio nofthe fuses. Fuse bo
xinthe rear
Coupe X
To open: open the trunk.
X Fol dcover 0043in the cente rofthe rea rwall
down in the directio nofthe arrow.
X To close: foldc over 0043up in the opposite
directio ntothe arrow and press to secure.
! Th
ec ove rmustbei nstalle dproperly, oth-
erwis emoisture or dirt could impair the
functio nofthe fuses.
Roadster X
To open: fromt he vehicl einterior, lift up
cover 0043between the rol lbarsint he direc-
tio noft he arrow.
X To close: shutcover 0043in the opposite
directio ntothe arrow and press to secure. Fuses
247Breakdow nassistance Z
Page 273 of 290
of hydroplaning. You will only gain these ben-
efits if the correc tdirection of rotation is
maintained.
An arrow on the sidewal lofthe tire indicates
its correc tdirection of rotation. Storing wheels
Storew heels that are not being used in acool,
dry and preferably dark place. Protec tthe
tires from oil, grease, gasoline and diesel. Cleaning the wheels
G
WARNING
The water jet from acircular jet nozzle (dirt
blasters) can cause invisible exterior damage to the tires or chassis components. Compo-
nentsd amaged in this way may fail unexpect-
edly. There is arisk of an accident.
Do not use power washers with circular jet
nozzles to clean the vehicle. Have damaged
tires or chassis components replaced imme-
diately. Mounting
awheel
Preparing the vehicle X
Stop the vehicle on solid, non-slippery and
level ground.
X Apply the electric parking brake manually.
X Bring the front wheels into the straight-
ahead position.
X Shift the transmission to position P.
X Switch off the engine.
X Open the driver's door.
The on-board electronics now have status
0.T his is the same as the SmartKey having
been removed.
X Remove Start/Stop button from ignition
lock (Y page 119). X
Take the following object sfrom the left-
hand stowage compartment and the left-
hand stowage space in the trunk:
R lug wrench
R folding wheel chock
R jack
R alignment bolt
X Secure the vehicle to prevent it from rolling
away.
Securing the vehicle to prevent it from
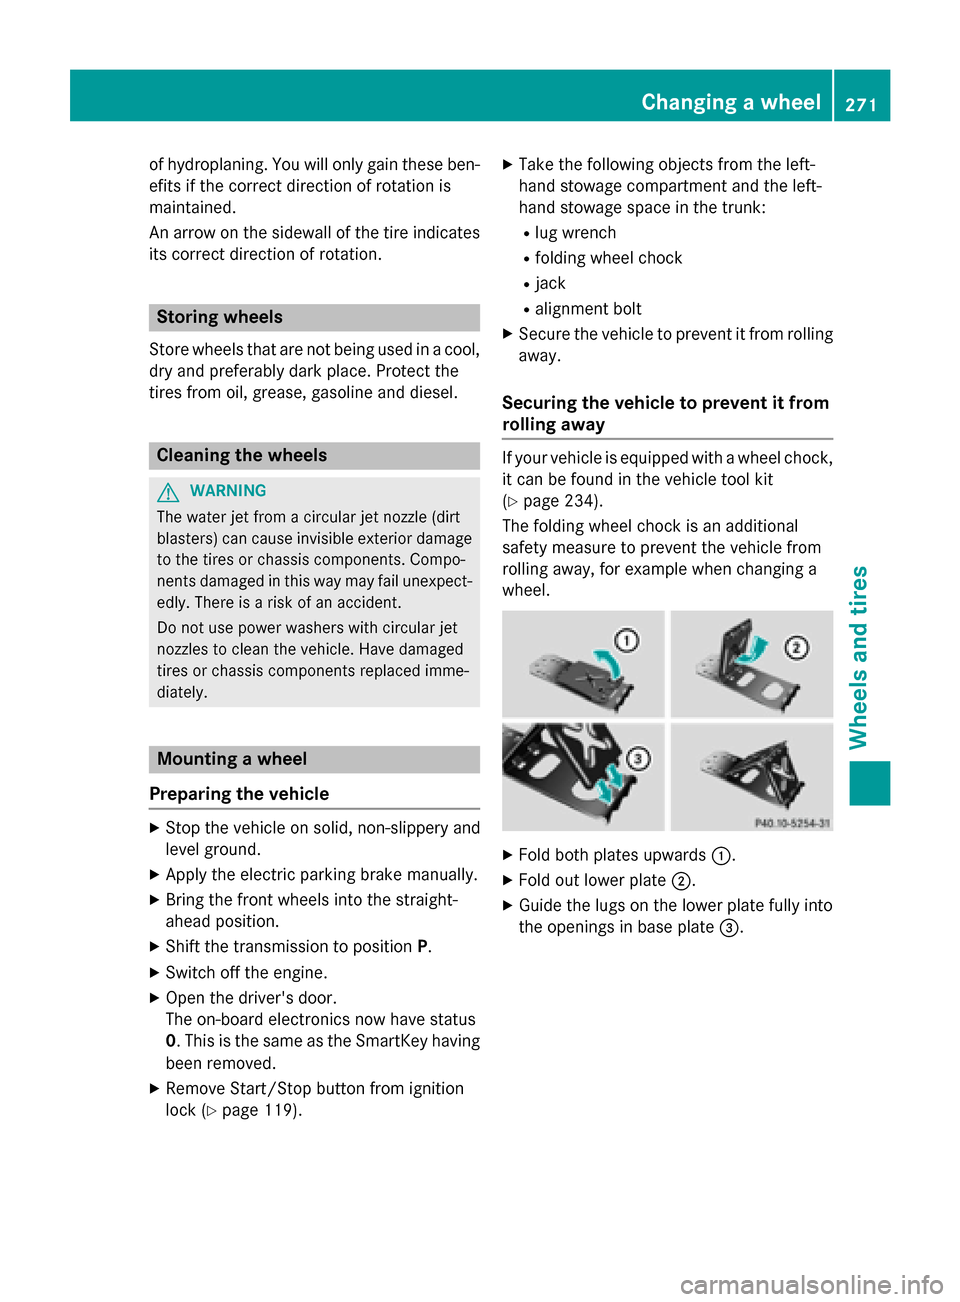
rolling away If your vehicle is equipped with
awheel chock,
it can be found in the vehicle tool kit
(Y page 234).
The folding wheel chock is an additional
safety measure to prevent the vehicle from
rolling away,f or example when changing a
wheel. X
Fold both plates upwards 0043.
X Fold out lower plate 0044.
X Guide the lugs on the lower plate fully into
the openings in base plate 0087. Changing
awheel
271Wheels and tires Z
Page 274 of 290
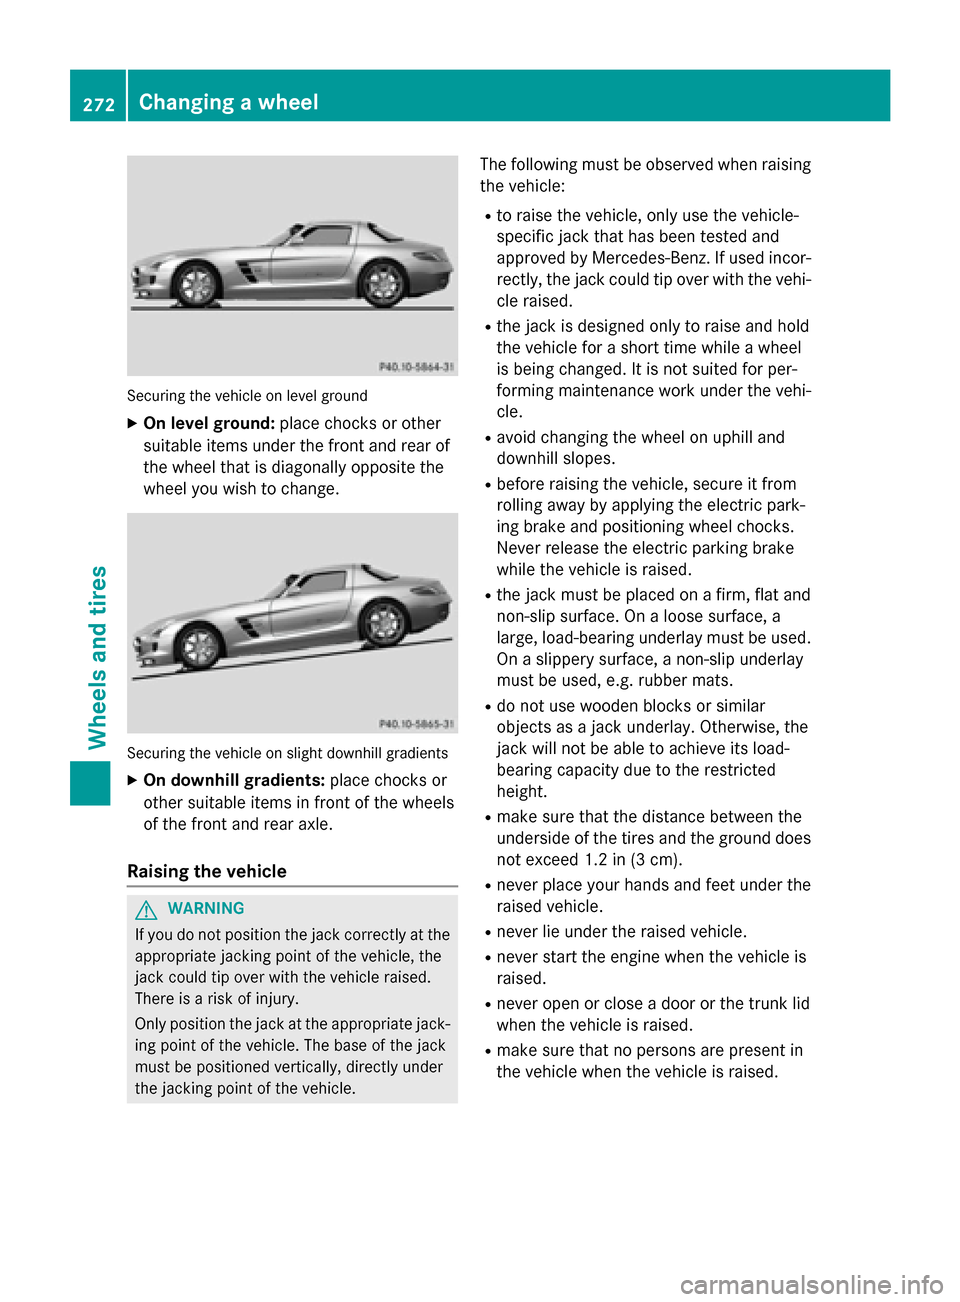
Securing the vehicle on level ground
X On level ground: place chocks or other
suitabl eitem sunder the front and rea rof
the wheel that is diagonall yopposite the
wheel yo uwishtoc hange. Securing the vehicle on slight downhil
lgradients
X On downhill gradients: place chocks or
othe rsuitabl eitem sinf ront of the wheels
of the front and rea raxle.
Raisin gthe vehicle G
WARNING
If yo udon ot position the jack correctly at the
appropriate jacking point of the vehicle ,the
jack could tip ove rwitht he vehicle raised.
There is ariskofi njury.
Only position the jack at the appropriate jack-
ing point of the vehicle .The base of the jack
mus tbep ositioned vertically ,directl yunder
the jacking point of the vehicle. The following mus
tbeo bserve dwhenr aising
the vehicle:
R to raise the vehicle ,only us ethe vehicle-
specifi cjack that ha sbeent ested and
approved by Mercedes-Benz. If used incor-
rectly, the jack could tip ove rwitht he vehi-
cle raised.
R the jack is designe donly to raise and hold
the vehicle for ashort time whil eawheel
is being changed .Itisnot suited for per-
forming maintenance work under the vehi-
cle.
R avoid changing the wheel on uphil land
downhil lslopes.
R before raising the vehicle ,secure it from
rolling away by applying the electri cpark-
ing brake and positioning wheel chocks.
Neve rrelease the electri cparking brake
whil ethe vehicle is raised.
R the jack mus tbep lace donaf irm,flata nd
non-slip surface. On aloose surface, a
large ,load-bearing underlay mus tbeu sed.
On aslippery surface, anon-slip underlay
mus tbeu sed, e.g. rubber mats.
R do not us ewoodenb locks or similar
objects as ajack underlay .Otherwise, the
jack will not be able to achieve its load-
bearing capacity du etothe restricted
height.
R make sure that the distance between the
underside of the tire sand the ground does
not excee d1.2 in (3 cm).
R never place your hands and fee tunder the
raised vehicle.
R never li eunder the raised vehicle.
R never star tthe engine when the vehicle is
raised.
R never ope norclosead oorort he trunk lid
when the vehicle is raised.
R make sure that no persons are present in
the vehicle when the vehicle is raised. 272
Changing
awheelWheels and tires
Page 277 of 290
X
Tighten the wheel bolts until they are fin-
ger-tight.
X Unscrew the alignment bolt.
X Tighten the last wheel bolt until it is finger-
tight.
Lowering the vehicle G
WARNING
The wheels could work loose if the wheel nuts and bolts are not tightened to the specified
tightening torque. There is arisk of accident.
Have the tightening torque immediately
checked at aqualified specialist workshop
after awheel is changed.
X Turn the crank of the jack counter-clock-
wise until the vehicle is once again standing
firmly on the ground.
X Place the jack to one side. X
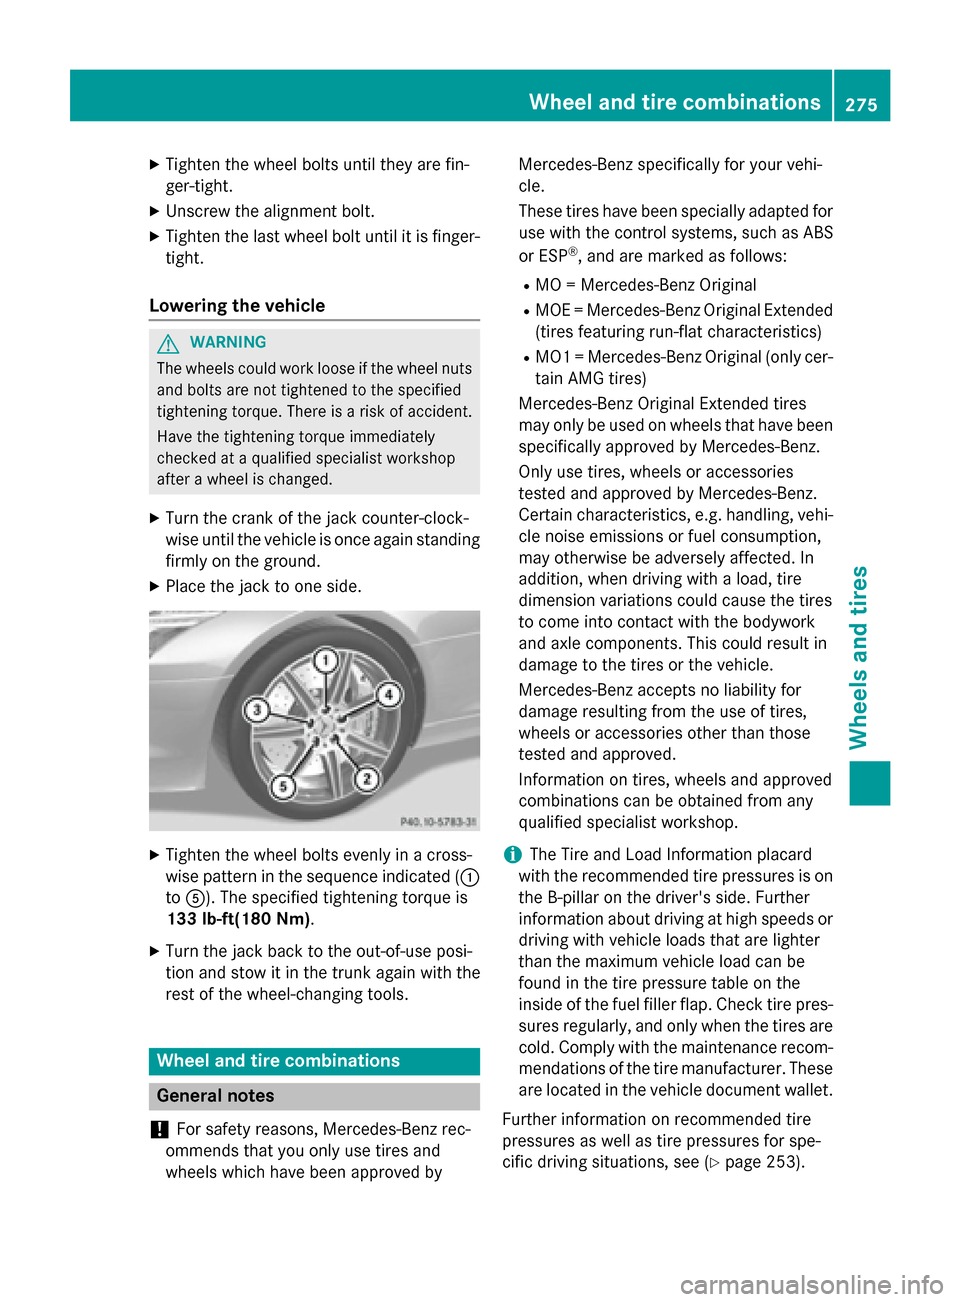
Tighten the wheel bolts evenly in across-
wise pattern in the sequence indicated ( 0043
to 0083). The specified tightening torque is
133 lb-ft(180 Nm).
X Turn the jack back to the out-of-use posi-
tion and stow it in the trunk again with the
rest of the wheel-changin gtools. Wheel and tire combinations
General notes
! For safety reasons, Mercedes-Benz rec-
ommends that you only use tires and
wheels which have been approved by Mercedes-Benz specifically for your vehi-
cle.
These tires have been specially adapted for
use with the control systems, such as ABS
or ESP ®
,a nd are marked as follows:
R MO =Mercedes-Benz Original
R MOE =Mercedes-Benz Original Extended
(tires featuring run-flat characteristics)
R MO1 =Mercedes-Benz Original (only cer-
tain AMG tires)
Mercedes-Benz Original Extended tires
may only be used on wheels that have been
specifically approved by Mercedes-Benz.
Only use tires, wheels or accessories
tested and approved by Mercedes-Benz.
Certain characteristics, e.g. handling, vehi-
cle noise emissions or fuel consumption,
may otherwise be adversely affected. In
addition, when driving with aload, tire
dimension variations could cause the tires
to come into contact with the bodywork
and axle components. This could result in
damage to the tires or the vehicle.
Mercedes-Benz accepts no liability for
damage resulting from the use of tires,
wheels or accessories other than those
tested and approved.
Information on tires, wheels and approved
combinations can be obtained from any
qualified specialist workshop.
i The Tire and Load Information placard
with the recommended tire pressures is on the B-pillar on the driver's side. Further
information about driving at high speeds or driving with vehicle loads that are lighter
than the maximum vehicle load can be
found in the tire pressure table on the
inside of the fuel filler flap. Check tire pres- sures regularly, and only when the tires arecold. Comply with the maintenance recom-
mendation softhe tire manufacturer. These
are located in the vehicle document wallet.
Further information on recommended tire
pressures as well as tire pressures for spe-
cific driving situations, see (Y page 253). Wheel and tirec
ombinations
275Wheels and tires Z
Page 289 of 290
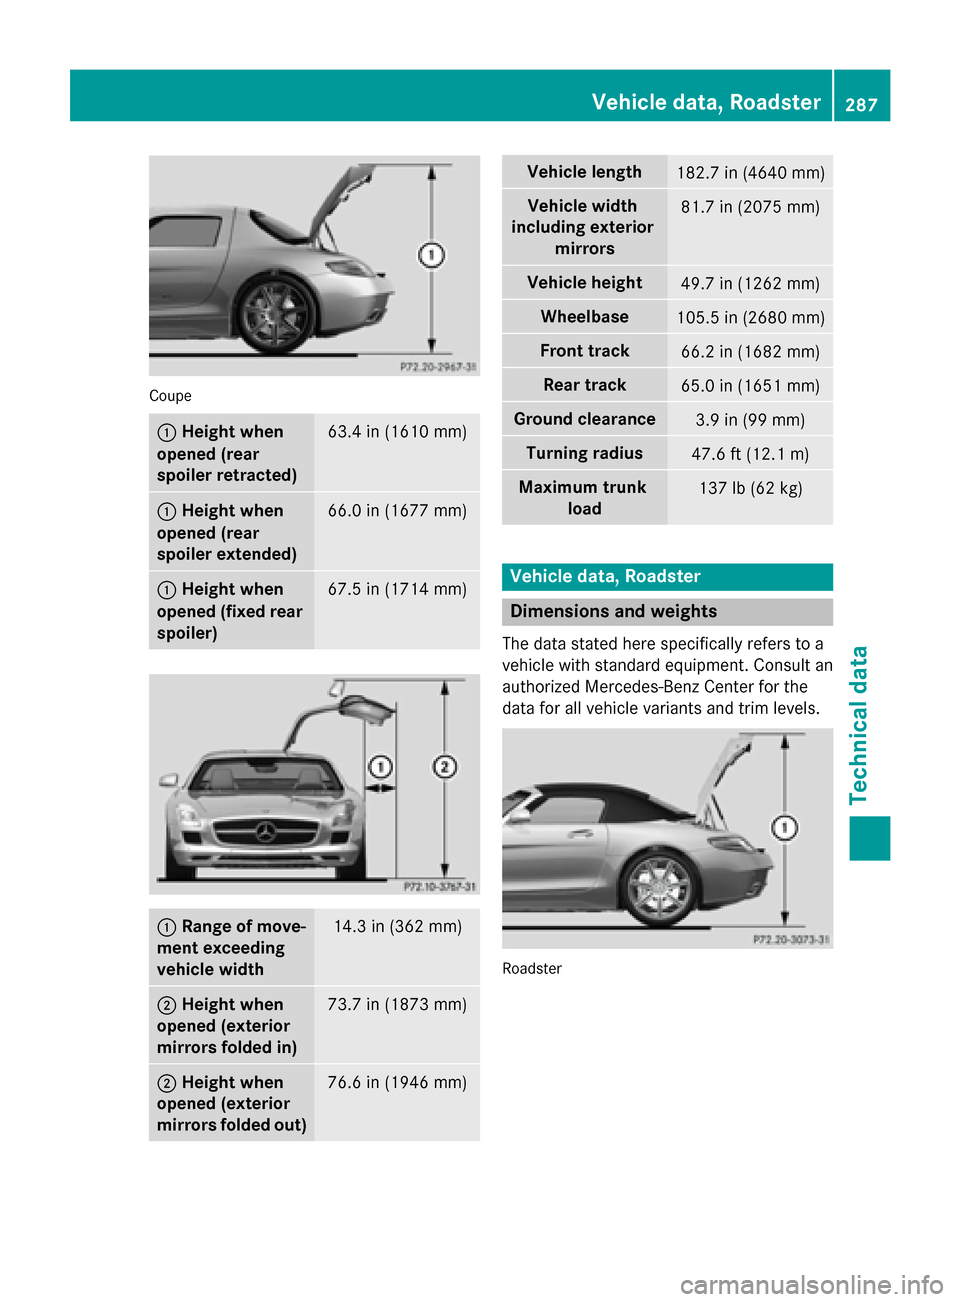
Coupe
0043
Heigh twhen
opene d(rear
spoiler retracted) 63.4 in (1610 mm)
0043
Height when
opene d(rear
spoiler extended) 66.0 in (1677 mm)
0043
Height when
opene d(fixed rear
spoiler) 67.5 in (1714 mm)
0043
Range of move-
ment exceeding
vehicle width 14.3 in (362 mm)
0044
Height when
opene d(exterior
mirrors folde din) 73.7 in (1873 mm)
0044
Height when
opene d(exterior
mirrors folde dout) 76.6 in (1946 mm) Vehicle length
182.7 in (4640 mm)
Vehicle width
including exterior mirrors 81.7 in (2075 mm)
Vehicle height
49.7 in (1262 mm)
Wheelbase
105.5 in (2680 mm)
Front track
66.2 in (1682 mm)
Rear track
65.0 in (1651 mm)
Ground clearance
3.9 in (99 mm)
Turning radius
47.6 ft (12.1 m)
Maximum trunk
load 137 lb (62 kg)
Vehicle data, Roadster
Dimensions and weights
The data stated here specificallyr efers to a
vehicl ewith standard equipment. Consult an
authorized Mercedes-Benz Center for the
data for all vehicl evariants and trim levels. Roadster Vehicle data, Roadster
287Technical data Z
Page 290 of 290
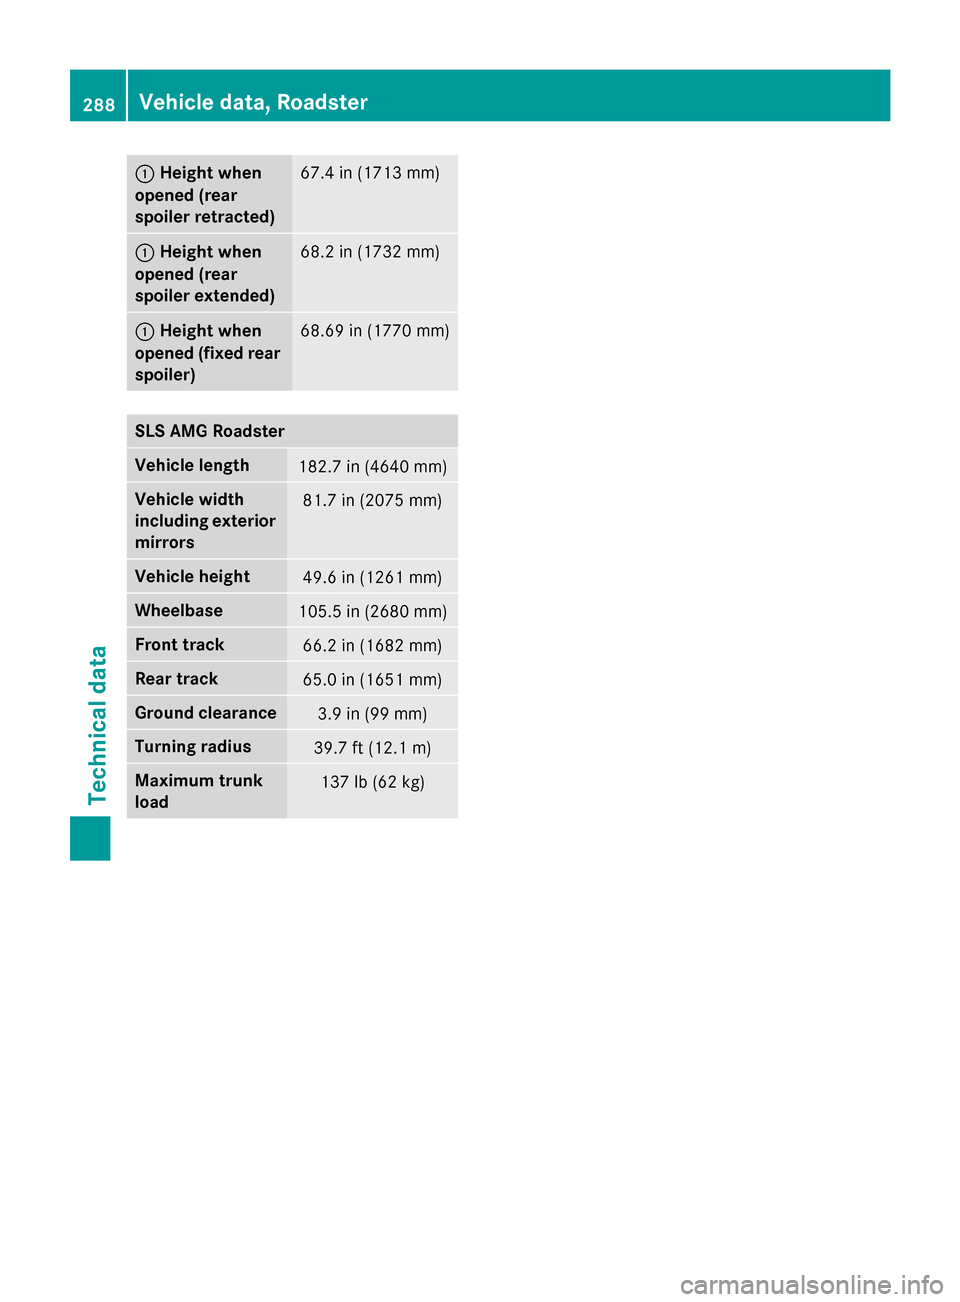
0043
Height when
opened (rear
spoiler retracted) 67.4 in (1713 mm)
0043
Height when
opened (rear
spoiler extended) 68.2 in (1732 mm)
0043
Height when
opened (fixed rear spoiler) 68.69 in (1770 mm)
SLS AMG Roadster
Vehicle length
182.7 in (4640 mm)
Vehicle width
including exterior mirrors 81.7 in (2075 mm)
Vehicle height
49.6 in (1261 mm)
Wheelbase
105.5 in (2680 mm)
Fron
ttrack 66.2 in (1682 mm)
Rear track
65.0 in (1651 mm)
Ground clearance
3.9 in (99 mm)
Turning radius
39.7 ft (12.1 m)
Maximum trunk
load
137 lb (62 kg)288
Vehicle data, RoadsterTechnical data