2015 MERCEDES-BENZ SLS AMG GT COUPE trunk
[x] Cancel search: trunkPage 202 of 290
Useful information
i This Operator's Manual describes all
models and all standard and optional equip- ment of your vehicle available at the time of
publication of the Operator's Manual.
Country-specific differences are possible.
Please not ethat your vehicle may not be
equipped with all feature sdescribed. This
also applies to safety-related system sand
functions.
i Please read the information on qualified
specialist workshops (Y page 23).Stowage areas
Stowage space
Important safet ynotes G
WARNING
If you do not correctly stor eobjects in the
vehicle interior, they can slip or be flung
around, thus strikin gvehicle occupants.
There is arisk of injury, especially when brak-
ing or abruptly changing directions.
R Always stor eobjects so that they cannot be
flung around in thes eorinsimilar situa-
tions.
R Always make sure that objects do not pro-
trude from stowage compartments, parcel
net sors towage nets.
R Close lockable stowage compartments
while driving.
R Stow and secure objects that are heavy,
hard, pointy, sharp-edged, fragile or too
large in the trunk. Glove box X
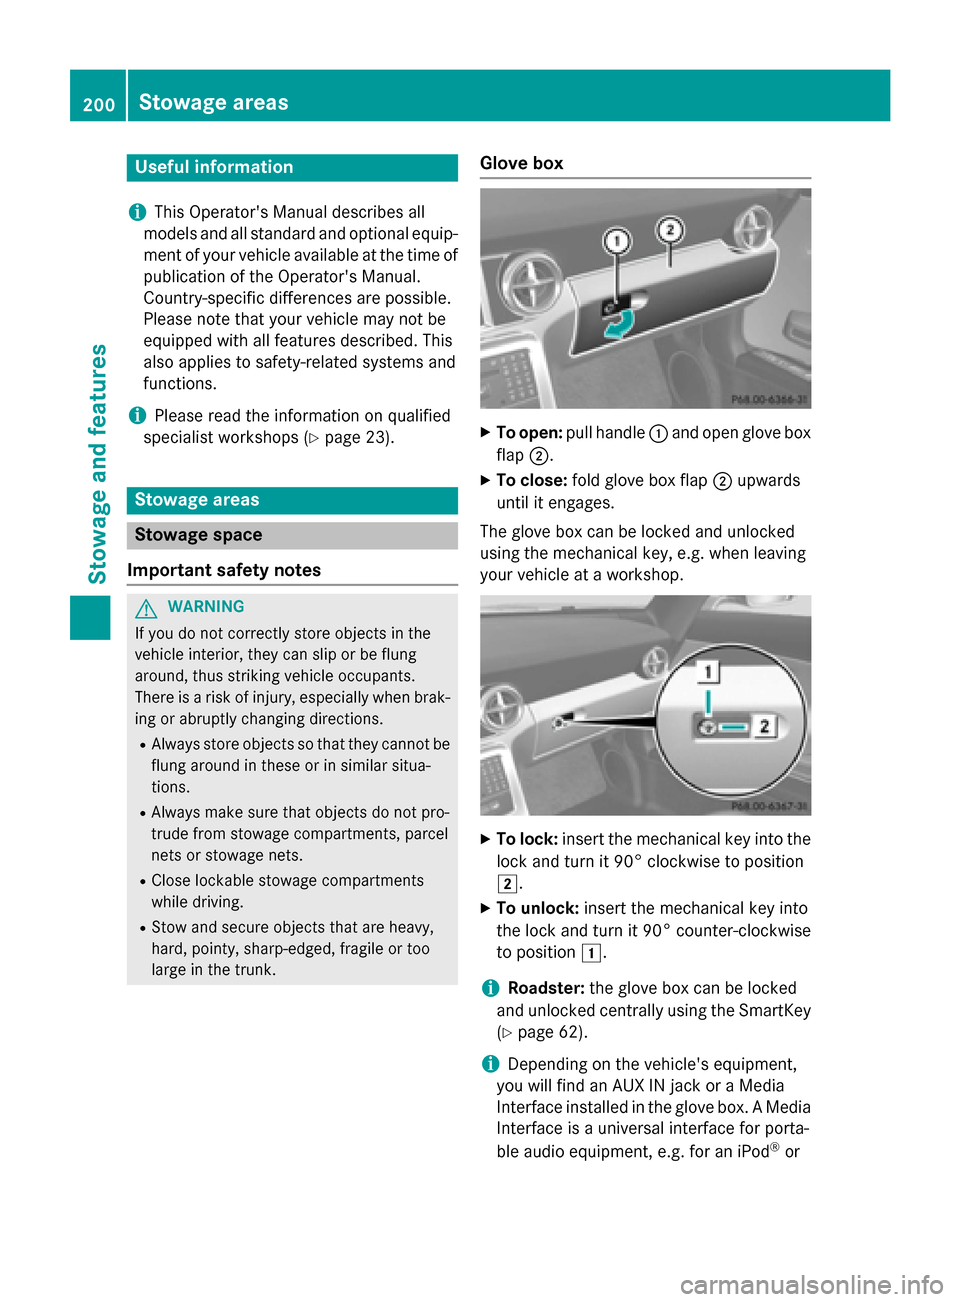
To open: pull handle 0043and open glove box
flap 0044.
X To close: fold glove box flap 0044upwards
until it engages.
The glove box can be locked and unlocked
using the mechanical key, e.g. when leaving
your vehicle at aworkshop. X
To lock: insertthe mechanical key int othe
lock and turn it 90° clockwise to position
0048.
X To unlock: insertthe mechanical key into
the lock and turn it 90° counter-clockwise
to position 0047.
i Roadster:
the glove box can be locked
and unlocked centrally using the SmartKey (Y page 62).
i Depending on the vehicle'
sequipment,
you will find an AUX IN jack or aMedia
Interfac einstalled in the glove box. AMedia
Interfac eisauniversal interfac efor porta-
ble audio equipment ,e.g. for an iPod ®
or 200
Stowage areasStowage and features
Page 203 of 290
USB device (see the separate COMAND
operating instructions).
i There is
a12Vpower socket located in
the glove box.
Stowage compartment in the center
console X
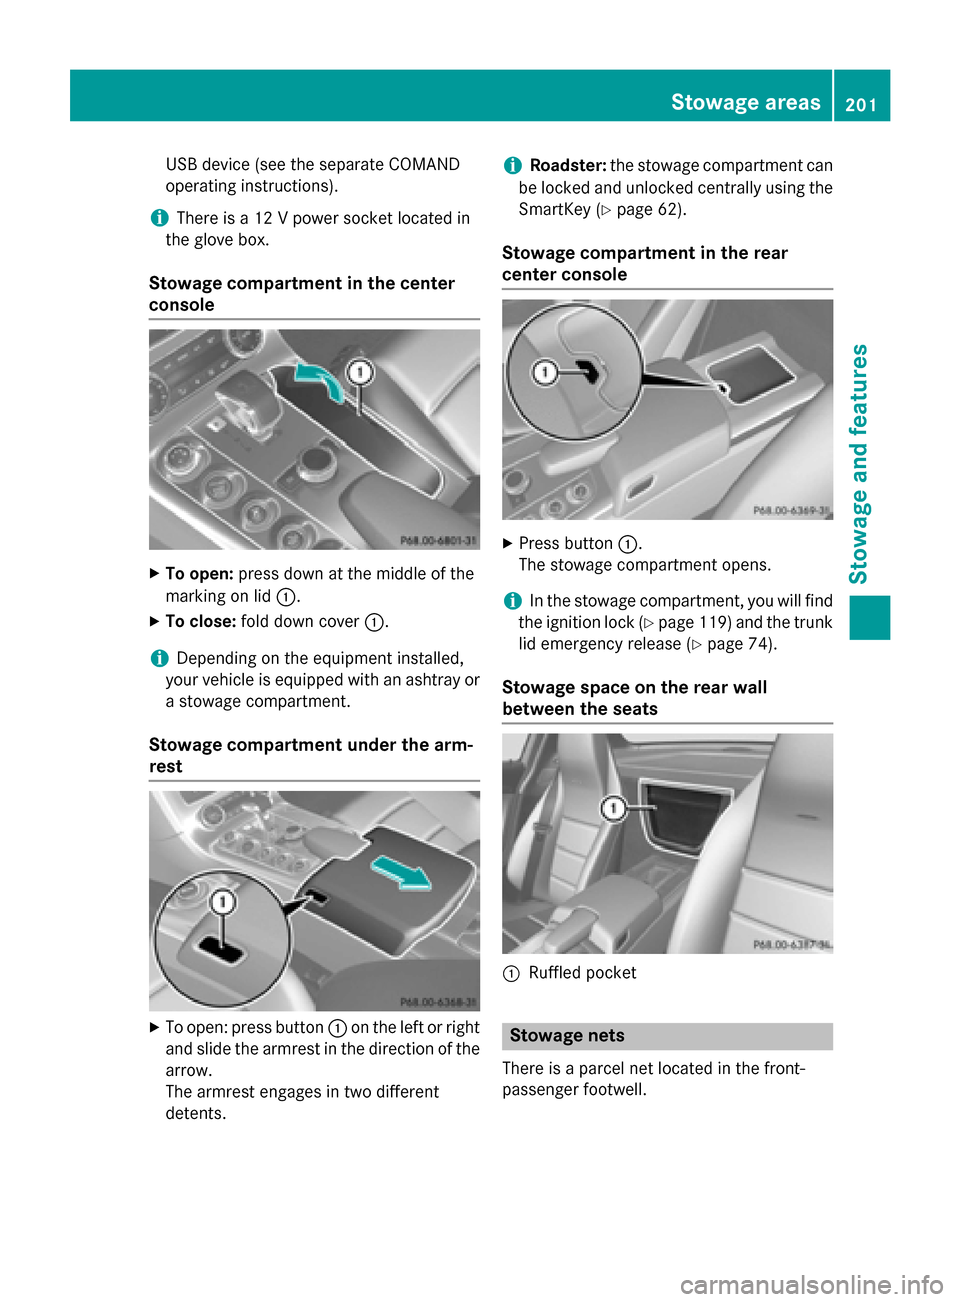
To open: press down at the middle of the
marking on lid 0043.
X To close: fold down cover 0043.
i Depending on the equipment installed,
your vehicle is equipped with an ashtray or as towage compartment.
Stowage compartment under the arm-
rest X
To open: press button 0043on the left or right
and slide the armrest in the direction of the arrow.
The armrest engages in two different
detents. i
Roadster:
the stowage compartment can
be locked and unlocked centrally using the
SmartKey (Y page 62).
Stowage compartment in the rear
center console X
Press button 0043.
The stowage compartment opens.
i In the stowage compartment,y
ou will find
the ignition lock (Y page 119) and the trunk
lid emergency release (Y page 74).
Stowage space on the rear wall
betweent he seats 0043
Ruffled pocket Stowage nets
There is aparcel net located in the front-
passenger footwell. Stowage areas
201Stowage and features Z
Page 212 of 290
Extendable rea
rspoiler
The rear spoiler improve sthe handlin gofthe
vehicle .Itadapt sthe vehicle's aerodynamics
to th eoperatin gconditions, dependen tonthe
spee doft hevehicle. Example
:Coupe
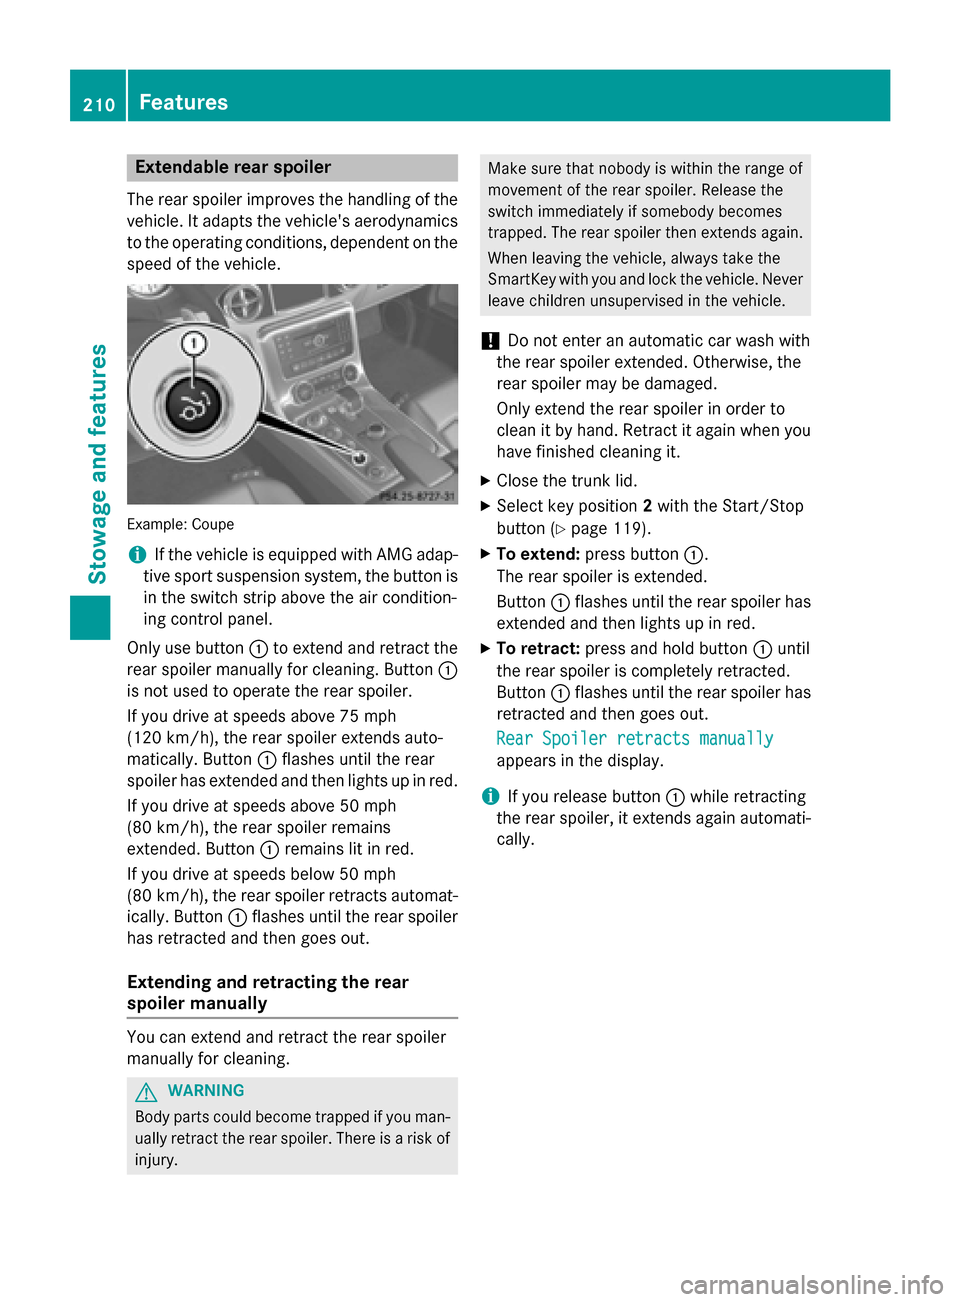
i If th
evehicle is equippe dwith AM Gadap-
tiv es por tsuspension system, th ebutton is
in th eswitch strip above th eair condition-
ing control panel.
Only use button 0043to exten dand retrac tthe
rear spoiler manually for cleaning. Button 0043
is no tused to operate th erear spoiler.
If you driv eatspeeds above 75 mph
(12 0km/ h),t he rear spoiler extends auto-
matically. Button 0043flashes until the rear
spoiler has extended and then lights up in red.
If you drive at speeds above 50 mph
(8 0k m/ h),t he rear spoiler remains
extended. Button 0043remain slit in red.
If you drive at speeds below 50 mph
(8 0k m/ h),t he rear spoiler retract sautomat-
ically. Button 0043flashes until the rear spoiler
has retracted and then goes out.
Extending and retracting ther ear
spoiler manually You can extend and retract the rear spoiler
manually for cleaning. G
WARNING
Body parts could becom etrappe difyou man-
ually retract the rear spoiler. There is arisk of
injury. Make sure that nobody is within the range of
movement of the rear spoiler. Release the
switc himmediately if somebod ybecomes
trapped. The rear spoiler then extends again.
When leaving the vehicle, always tak ethe
SmartKe ywith you and lock the vehicle. Never
leave children unsupervised in the vehicle.
! Do not enter an automatic car wash with
the rear spoiler extended. Otherwise, the
rear spoiler may be damaged.
Only extend the rear spoiler in order to
clean it by hand. Retrac titagain when you
have finished cleanin git.
X Close the trunk lid.
X Selec tkey position 2with the Start/Stop
button (Y page 119).
X To extend: press button 0043.
The rear spoiler is extended.
Button 0043flashes until the rear spoiler has
extended and then lights up in red.
X To retract: press and hold button 0043until
the rear spoiler is completely retracted.
Button 0043flashes until the rear spoiler has
retracted and then goes out.
Rear Spoiler retracts manually Rear Spoiler retracts manually
appears in the display.
i If you release button
0043while retracting
the rear spoiler, it extends again automati-
cally. 210
FeaturesStowage and features
Page 213 of 290
Problems with the rear spoiler
Problem
Possible causes/consequences and
0050
0050Solutions The rear spoiler stops
before reaching the
end position when
retracting manually. You have opened the trunk lid while manually retracting the rear
spoiler.
X Close the trunk lid.
The rear spoiler extends or, if you press and hold button 0043,
continues retracting. The rear spoiler stops
before reaching the
end position when
retracting/extending
manually. You have switched off the ignition.
X Switch the ignition back on.
X Press button to extend/retract the rear spoiler.
The rear spoiler extends/retracts. The rear spoiler cannot
be retracted again after
manually extending it. You have opened the trunk lid while manually extending the rear
spoiler.
X Close the trunk lid. The rear spoiler does
not extendorr
etract
automatically. The rear spoiler's movement is blocked, e.g. by an object jammed
between the body and the rear spoiler.
X Remove the object. Garage door opener
Important safety notes G
WARNING
When you operate or program the garage door with the integrated garage door opener, per-
sons in the range of movement of the garage
door can become trapped or struck by the
garage door. There is arisk of injury.
When using the integrated garage door
opener, always make sure that nobody is
within the range of movement of the garage
door. G
WARNING
Combustion engines emit poisonous exhaust
gases such as carbon monoxide. Inhaling
these exhaust gases leads to poisoning. There is ar isk of fatal injury. Therefore never leave
the engine running in enclosed spaces with-
out sufficient ventilation. The HomeLink
®
garage door opener inte-
grated in the rear-view mirror allowsy ou to
operate up to three different door and gate
systems.
Use the integrated garage door opener only
on garage doors that:
R have safety stop and reverse features and
R meet current U.S. federal safety standards
When programing agarage door opener, park
the vehicle outside the garage.
i Certain garage door drives are incompat-
ible with the integrated garage door
opener. If you have difficulty programing
the integrated garage door opener, contact
an authorized Mercedes-Benz Center.
Alternatively, you can call the following
telephone assistance services:
R USA: Mercedes-Benz Customer Assis-
tanceC enter at 1-800-FOR-MERCedes
R Canada: Customer Service at
1-800-387-0100 Features
211Stowage and features Z
Page 216 of 290
also read th
eoperatin ginstruction sfor the
garag edoor system.
X Select ke yposition 2wit hthe Start/Stop
button.
X Press button 0044,0087or0085 whic hyou have
programed to operate th egarag edoor.
Garage door system wit hafixed code: indi-
cator lamp 0043light supg reen.
Garage door system wit harolling code:
indicator lamp 0043flashes green.
i The transmitte
rwill transmit asignal as
lon gast hebutto nisp ressed. The trans-
mission is halted after amaximum of ten
seconds and indicator lamp 0043light sup
yellow. Press button 0044,0087or0085 again if
necessary.
Clearing th ememory X
Select ke yposition 2wit hthe Start/Stop
button.
X Press buttons 0044and 0085.
The indicator lamp light supyellow.
X Press and hold buttons 0044and 0085until the
indicator lamp turns green.
i Mak
esure that you clear th ememory of
th ei ntegrate dgarag edoor opener before
sellin gthe vehicle. Charg
emaintenance socket
The battery may drain if th evehicle is left sta-
tionar yfor lon gperiods. In this case,
Mercedes-Ben zrecommends attaching the
trickle charge rtothecharge maintenance
socket.
The charge maintenance socke tisdesigned
solely for connecting atrickle charger. A
trickle charge rcan be obtaine dfroman
authorized Mercedes-Ben zCenter, for exam-
ple. X
Switch th eignition off.
X Open th etrunk lid.
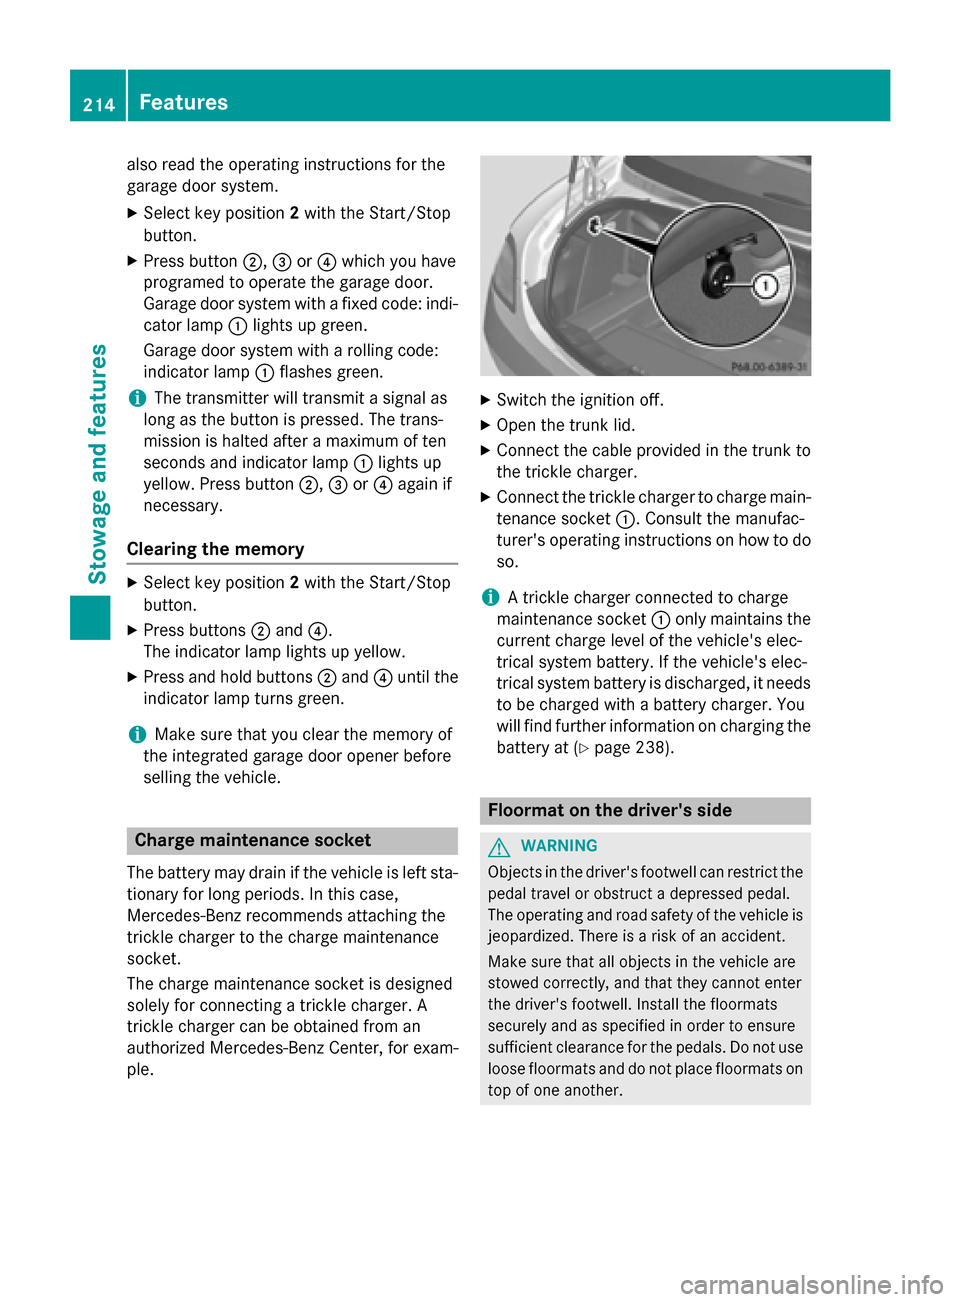
X Connect th ecabl ep rovide dinthetrunk to
th et rickle charger.
X Connect th etrickle charge rtocharge main-
tenance socket 0043.Consult th emanufac-
turer' soperatin ginstruction sonhow to do
so.
i At
rickle charge rconnected to charge
maintenance socket 0043only maintain sthe
curren tcharge leve lofthevehicle's elec-
trical system battery. If th evehicle's elec-
trical system battery is discharged, it needs
to be charge dwithab attery charger. You
will fin dfurther informatio nonchargin gthe
battery at (Y page 238). Floorma
tonthedriver's side G
WARNING
Object sinthedriver' sfootwell can restrict the
pedal travel or obstruc tadepressed pedal.
The operatin gand road safety of th evehicle is
jeopardized. Ther eisariskofana ccident.
Mak esure that all object sinthevehicle are
stowed correctly, and that they canno tenter
th ed river' sfootwell. Install th efloormats
securely and as specifie dinorder to ensure
sufficient clearance for th epedals .Don otuse
loos efloormats and do no tplac efloormats on
to pofo neanother. 214
FeaturesStowage and features
Page 236 of 290
Useful information
i This Operator's Manual describes all
models and all standard and optional equip- ment of your vehicle available at the time of
publication of the Operator's Manual.
Country-specific differences are possible.
Please not ethat your vehicle may not be
equipped with all feature sdescribed. This
also applies to safety-related system sand
functions.
i Please read the information on qualified
specialist workshops (Y page 23).Wher
ewillIfind...? First-aid kit
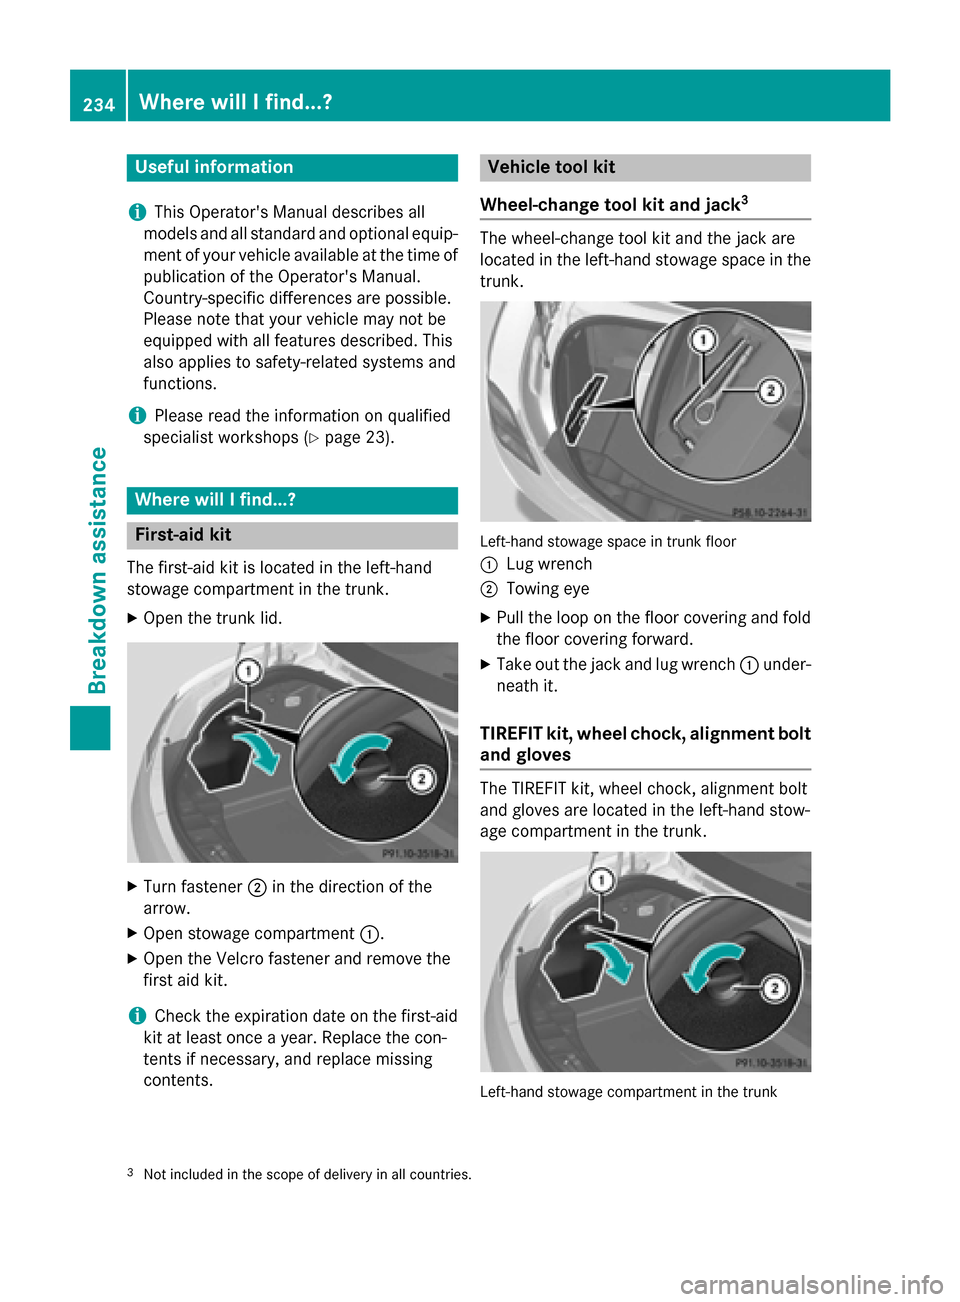
The first-aid kit is locate dinthe left-hand
stowage compartment in the trunk.
X Open the trun klid. X
Turn fastener 0044in the direction of the
arrow.
X Open stowage compartment 0043.
X Open the Velcr ofastener and remov ethe
first aid kit.
i Check the expiration date on the first-aid
kit at least onc eayear. Replace the con-
tents if necessary, and replace missing
contents. Vehicle tool kit
Wheel-change tool kit and jack 3 The wheel-change tool kit and the jack are
locate
dinthe left-hand stowage space in the
trunk. Left-han
dstowage space in trun kfloor
0043 Lug wrench
0044 Towing eye
X Pull the loop on the floor covering and fold
the floor covering forward.
X Take out the jack and lug wrench 0043under-
neat hit.
TIREFIT kit, wheel chock, alignment bolt
and gloves The TIREFIT kit
,wheel chock, alignmen tbolt
and gloves are locate dinthe left-hand stow-
age compartment in the trunk. Left-han
dstowage compartmen tinthe trunk
3 Not included in the scope of delivery in all countries. 234
Wher
ewillIfind...?Breakdown assistance
Page 237 of 290
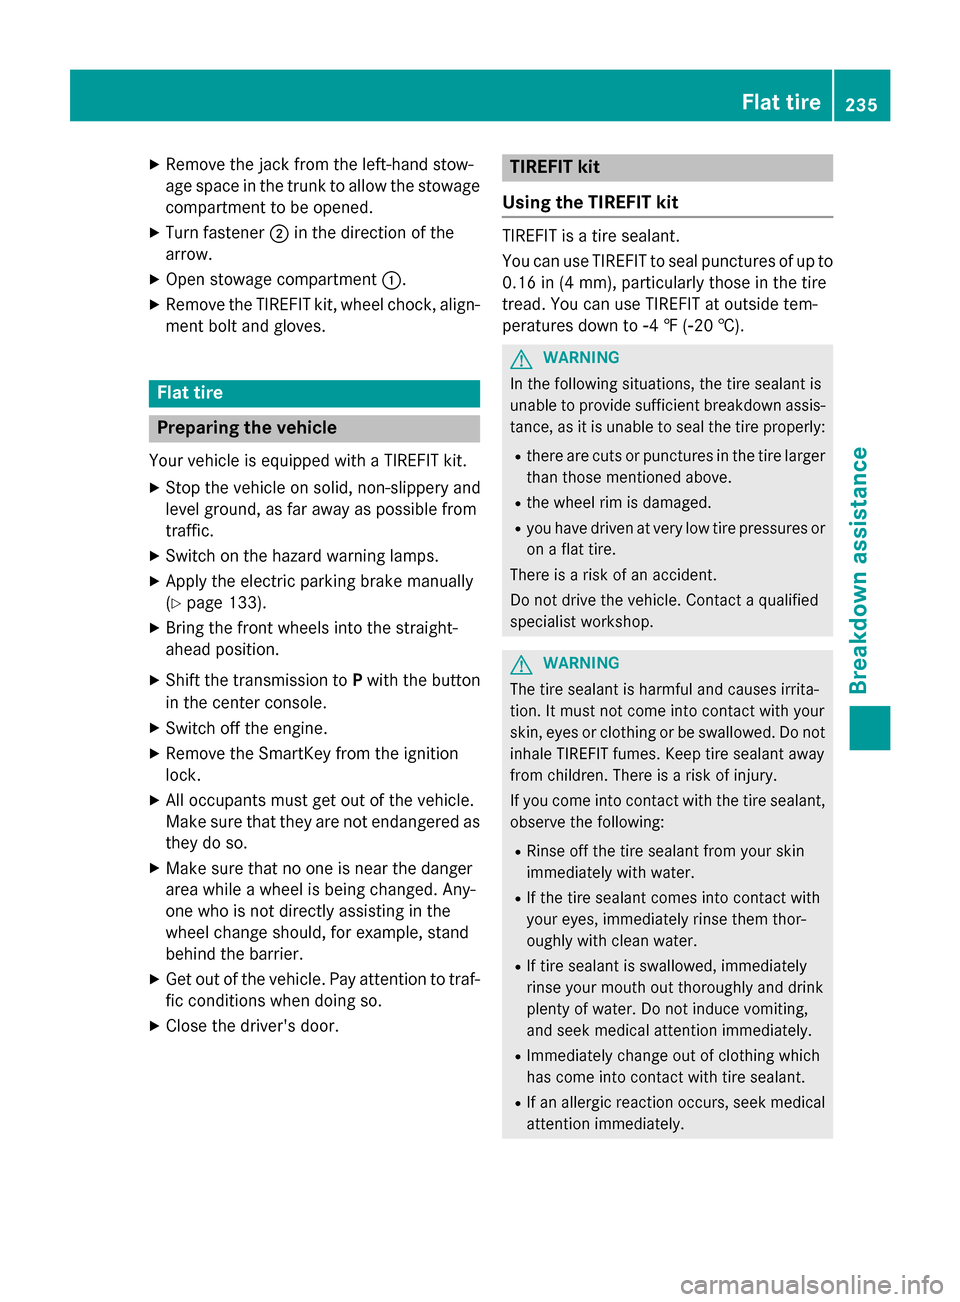
X
Remove th ejackf romt heleft-han dstow-
age spac einthetrunk to allow th estowage
compartmen ttobeopened.
X Turn fastener 0044in th edirection of the
arrow.
X Ope nstowage compartment 0043.
X Remove th eTIREFI Tkit,w hee lchock ,align-
men tbolt and gloves. Flat tire
Preparing th
evehicle
Your vehicl eisequipped wit haTIREFI Tkit.
X Stop th evehicl eons olid, non-slipper yand
level ground ,asfar away as possibl efrom
traffic.
X Switc hont hehazard warnin glamps.
X Apply th eelectric parkin gbrak em anually
(Y page 133).
X Brin gthe fron twheels into th estraight-
ahead position.
X Shift th etransmission to Pwit hthe button
in th ecenter console.
X Switc hoff th eengine.
X Remove th eSmartKey from th eignition
lock.
X Allo ccupant smustg et out of th evehicle.
Mak esuret hatthe ya re no tend angered as
they do so.
X Mak esuret hatnoo neis near th edanger
area while awhee lisb eingchanged. Any-
on ew ho is no tdirectl yassistin ginthe
whee lcha ng es hould, for example, stand
behind th ebarrier.
X Get out of th evehicle. Pay attention to traf-
fic condition swhen doin gso.
X Clos ethe driver's door. TIREFIT kit
Usin gthe TIREFIT kit TIREFI
Tisat ires ealant.
You can use TIREFI Ttoseal punctures of up to
0.16 in (4 mm), particularly those in th etire
tread. You can use TIREFI Tatoutside tem-
peratures down to 00F84‡(00F820 †). G
WARNING
In th efollowin gsituations, th etires ealant is
unable to provid esufficien tbreakdown assis-
tance ,asitisu nable to seal th etirep roperly:
R there are cut sorpunctures in th etirel arger
than those mentioned above.
R thew hee lrim is damaged.
R you hav edriven at ver ylow tire pressures or
on aflat tire.
There is ariskofana ccident.
Do no tdrive th evehicle. Contac taqualified
specialist workshop. G
WARNING
The tire sealant is harmful and causes irrita-
tion .Itm ustn otcome into contact wit hyour
skin ,eyes or clothin gorbeswallowed .Donot
inhale TIREFI Tfumes. Kee ptires ealant away
from children .There is ariskofi njury.
If you come into contact wit hthe tire sealant,
observ ethe following:
R Rinse off th etires ealant from your skin
immediately wit hwater.
R If th etires ealant comes into contact with
your eyes ,immediately rinse them thor-
oughly wit hclean water.
R If tire sealant is swallowed ,immediately
rinse your mout hout thoroughl yand drink
plenty of water. Do no tind ucev omiting,
and see kmedica lattention immediately.
R Immediately chang eout of clothin gwhich
has come into contact wit htires ealant.
R If an allergic reaction occurs, see kmedical
attention immediately. Flat ti
re
235Breakdo wn assis tance Z
Page 238 of 290
X
Do not remove any foreign objects which
have penetrated the tire, e.g .screws or
nails.
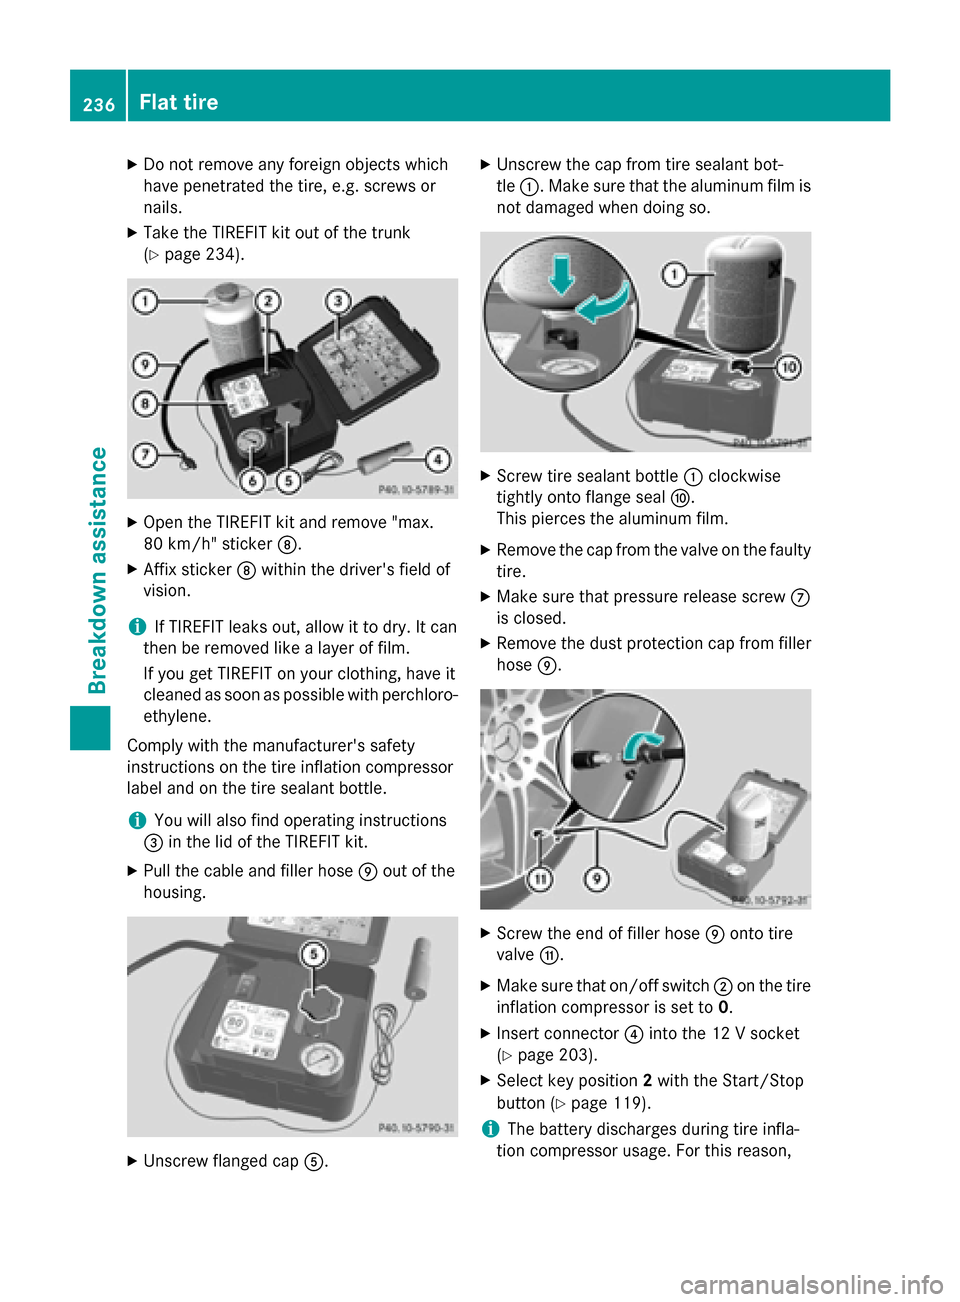
X Take the TIREFIT kit ou tofthe trunk
(Y page 234). X
Open the TIREFIT kit and remove "max.
80 km/h" sticker 006C.
X Affi xsticker 006Cwithi nthe driver's field of
vision.
i If TIREFIT leaks out, allo
wittodry.Itc an
the nberemove dlikeal ayer of film.
If yo ugetTIREFIT on your clothing, have it
cleane dassoona spossibl ewithp erchloro-
ethylene.
Compl ywitht he manufacturer's safety
instructions on the tir einflatio ncompressor
labe land on the tir esealan tbottle.
i Yo
uw illa lsof indo perating instructions
0087 in the li dofthe TIREFIT kit.
X Pull the cable and fille rhose 006Doutoft he
housing. X
Unscrew flange dcap 0083. X
Unscrew the cap fro mtires ealan tbot-
tle 0043.M akes uret hatthe aluminu mfilmis
not damage dwhend oing so. X
Scre wtires ealan tbottle 0043 clockwise
tightl yonto flange seal 006E.
This pierces the aluminu mfilm.
X Remov ethe cap fro mthe valv eonthe faulty
tire.
X Make sure tha tpressure release screw 006B
is closed.
X Remov ethe dust protection cap fro mfiller
hose 006D. X
Scre wthe end of fille rhose 006Donto tire
valve 006F.
X Make sure tha ton/off switch 0044on the tire
inflatio ncompressor is se tto0.
X Insert connector 0085into the 12 Vsocket
(Y page 203).
X Select key position 2with the Start/Stop
button (Y page 119).
i Th
eb attery discharge sdurin gtirei nfla-
tio nc ompressor usage. For thi sreason, 236
Flat tireBreakdow
nassistance