2015 MERCEDES-BENZ SLS AMG GT COUPE center console
[x] Cancel search: center consolePage 189 of 290
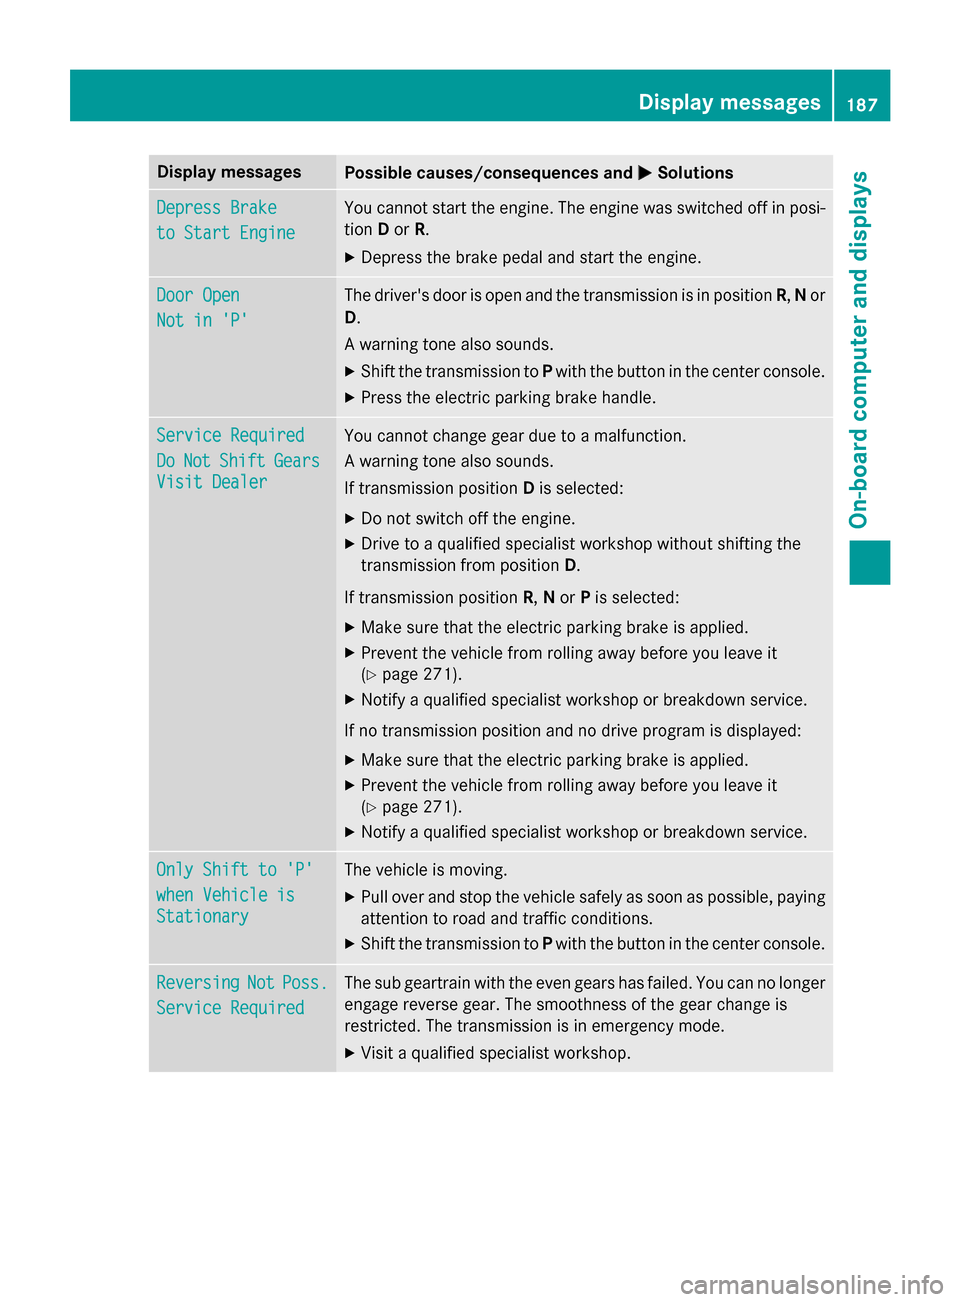
Display messages
Possible causes/consequences and
0050
0050Solutions Depres
sBrake
Depres sBrake
to Start Engine
to Start Engine You canno
tstart th eengine. The engin ewas switched of finposi-
tion Dor R.
X Depress th ebrak epedal and start th eengine. Doo
rO pen
Doo rO pen
Not in 'P'
Not in 'P' The driver's doo
risopen and th etransmissio nisinpositionR,Nor
D.
Aw arnin gtonea lso sounds.
X Shift th etransmissio ntoPwith th ebutto nint hecenter console.
X Press th eelectric parkin gbrak ehandle. Servic
eRequired
Servic eRequired
Do
Do Not
Not Shift
Shift Gears
Gears
Visit Dealer
Visit Dealer You canno
tchang eg ear due to amalfunction.
Aw arnin gtonea lso sounds.
If transmissio nposition Dis selected:
X Do no tswitch of fthe engine.
X Drive to aqualified specialist workshop without shiftin gthe
transmissio nfromp osition D.
If transmissio nposition R,Nor Pis selected:
X Mak esuret hatthe electric parkin gbrak eisa pplied.
X Preven tthe vehicl efromr ollin gaway before you leav eit
( Y page 271).
X Notify aqualified specialist workshop or breakdown service.
If no transmissio nposition and no drive progra misdisplayed:
X Mak esuret hatthe electric parkin gbrak eisa pplied.
X Preven tthe vehicl efromr ollin gaway before you leav eit
( Y page 271).
X Notify aqualified specialist workshop or breakdown service. Onl
yS hift to 'P'
Onl yS hift to 'P'
whe nV ehicl eis
whe nV ehicl eis
Stationary
Stationary The vehicl
eismoving.
X Pull ove rand stop th evehicl esafely as soo naspossible, paying
attention to roa dand traffic conditions.
X Shift th etransmissio ntoPwith th ebutto nint hecenter console. Reversing
Reversing
Not
NotPoss.
Poss.
Servic eRequired
Servic eRequired The sub geartrain wit
hthe eve ngear shas failed. You can no longer
engage revers egear .The smoothness of th egear chang eis
restricted. The transmissio nisinemergenc ymode.
X Visit aqualified specialist workshop. Display
messages
187On-boardcomputer an ddisplays Z
Page 203 of 290
USB device (see the separate COMAND
operating instructions).
i There is
a12Vpower socket located in
the glove box.
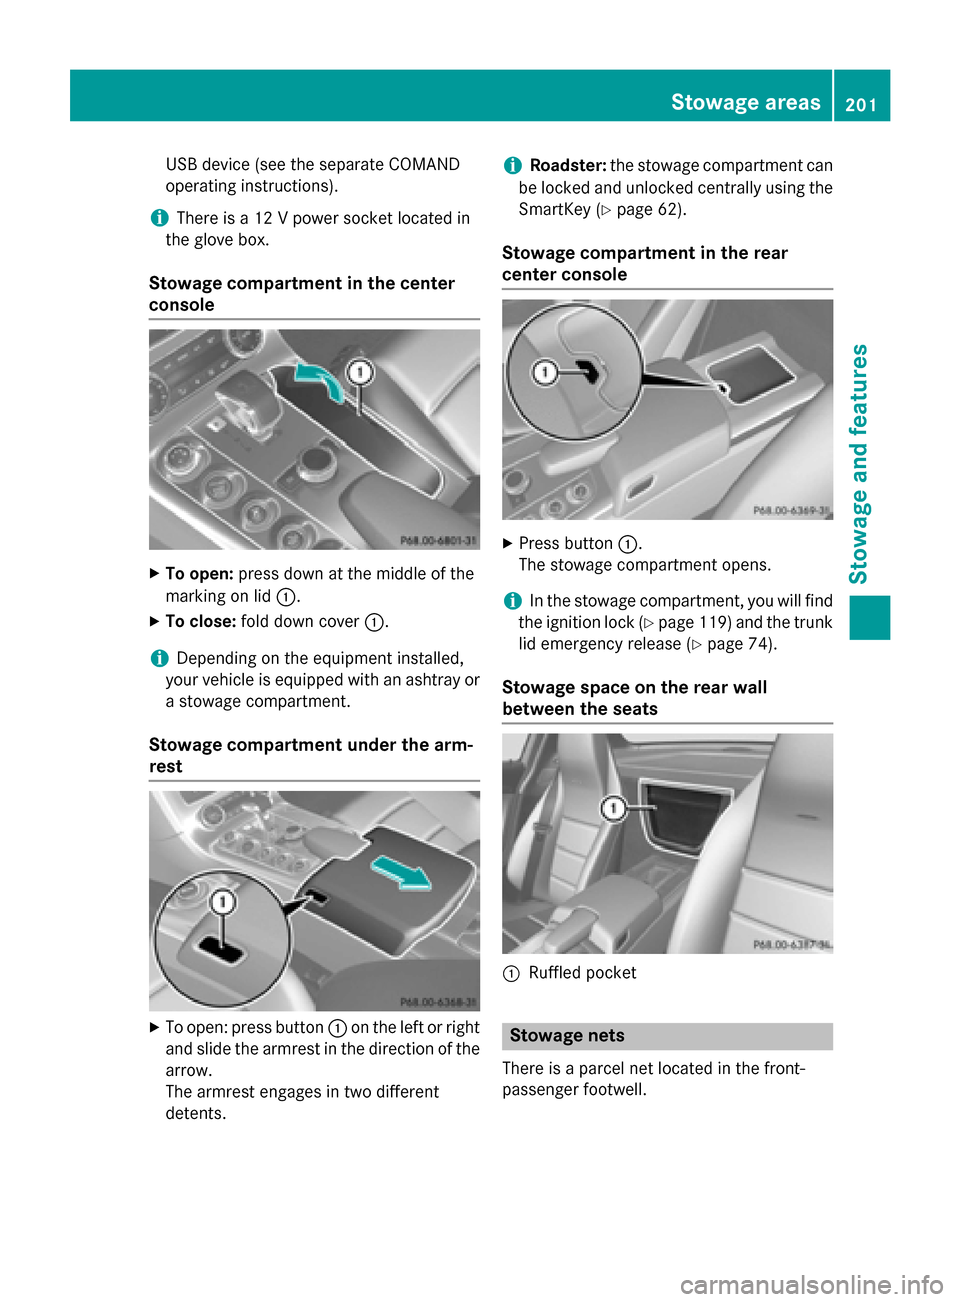
Stowage compartment in the center
console X
To open: press down at the middle of the
marking on lid 0043.
X To close: fold down cover 0043.
i Depending on the equipment installed,
your vehicle is equipped with an ashtray or as towage compartment.
Stowage compartment under the arm-
rest X
To open: press button 0043on the left or right
and slide the armrest in the direction of the arrow.
The armrest engages in two different
detents. i
Roadster:
the stowage compartment can
be locked and unlocked centrally using the
SmartKey (Y page 62).
Stowage compartment in the rear
center console X
Press button 0043.
The stowage compartment opens.
i In the stowage compartment,y
ou will find
the ignition lock (Y page 119) and the trunk
lid emergency release (Y page 74).
Stowage space on the rear wall
betweent he seats 0043
Ruffled pocket Stowage nets
There is aparcel net located in the front-
passenger footwell. Stowage areas
201Stowage and features Z
Page 204 of 290
Features
Cup holder
Important safety notes !
Only use th
ecup holders for containers of
th er ight siz eand whic hhave lids. The
drinks could otherwise spill.
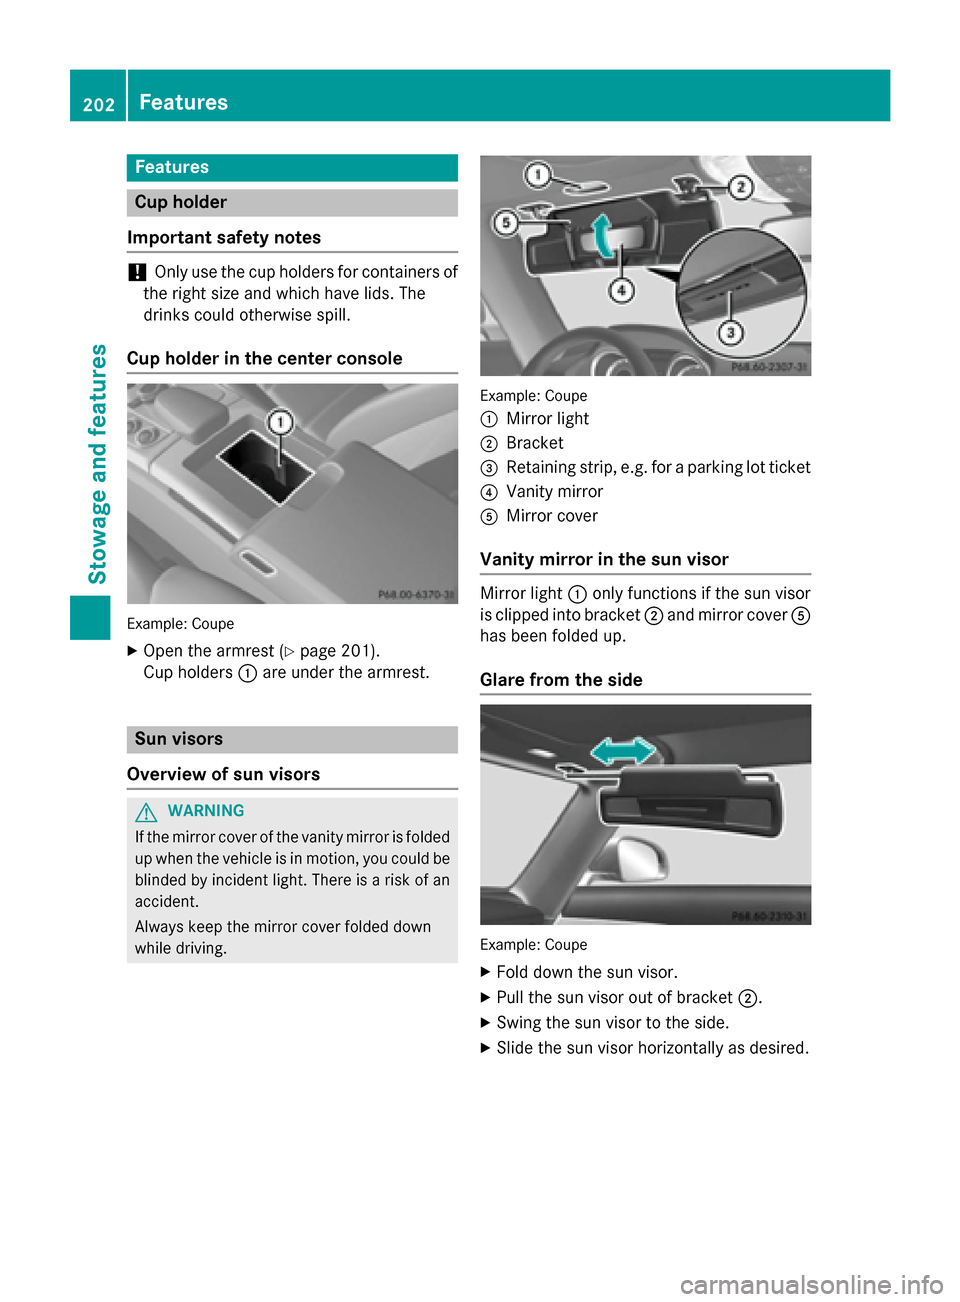
Cup holder in th ecenter console Example: Coupe
X Open th earmres t(Ypage 201).
Cup holders 0043are under th earmrest. Sun visors
Overview of sun visors G
WARNING
If th emirror cover of th evanit ymirror is folded
up when th evehicl eisinm otion,you could be
blinded by inciden tlight. Ther eisariskofan
accident.
Always keep th emirror cover folded down
while driving. Example: Coupe
0043
Mirror light
0044 Bracket
0087 Retaining strip, e.g. for aparking lot ticket
0085 Vanit ymirror
0083 Mirror cover
Vanit ymirror in thesun visor Mirror light
0043only function sifthesun visor
is clipped int obracket 0044and mirror cover 0083
has been folded up.
Glare from th eside Example: Coupe
X Fold down th esun visor.
X Pull th esun visor out of bracket 0044.
X Swin gthe sun visor to th eside.
X Slide th esun visor horizontally as desired. 202
FeaturesStowage and featu
res
Page 206 of 290
matically cut. This ensures that there is suf-
ficient powe rtostart the vehicle.
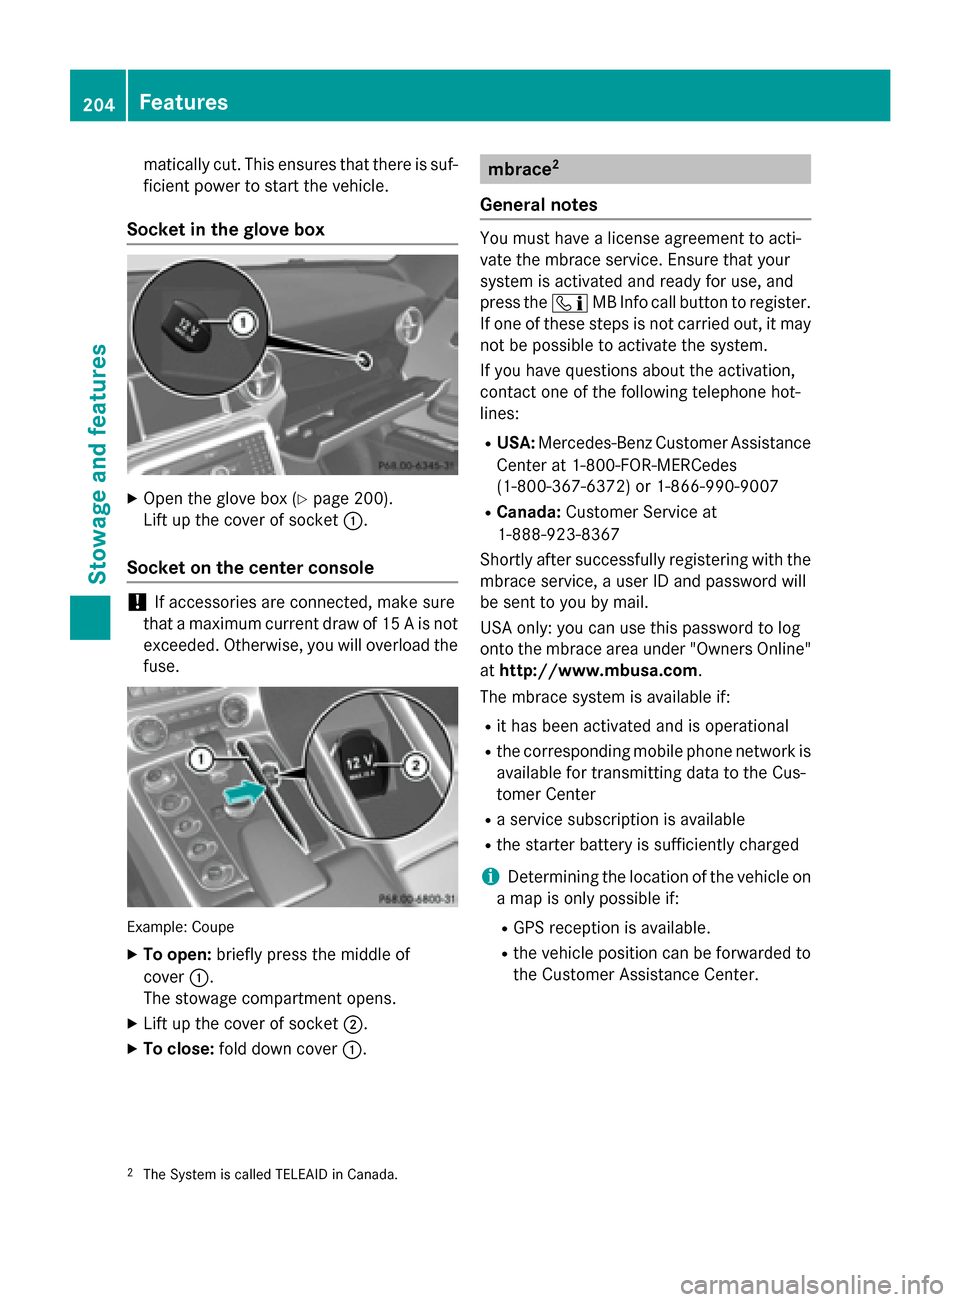
Socket in the glove box X
Open the glove box (Y page200).
Lift up the cover of socket 0043.
Socket on the center console !
If accessories are connected, make sure
that amaximu mcurrent draw of 15 Aisnot
exceeded. Otherwise, you will overload the fuse. Example: Coupe
X To open: briefly press the middle of
cover 0043.
The stowage compartment opens.
X Lift up the cover of socket 0044.
X To close: fold down cover 0043. mbrace
2
General notes You must have
alicense agreement to acti-
vate the mbrace service. Ensure that your
system is activated and ready for use, and
press the 00D9MB Info call button to register.
If one of these steps is not carried out, it may not be possible to activate the system.
If you have questions aboutt he activation,
contact one of the following telephone hot-
lines:
R USA: Mercedes-Benz Customer Assistance
Center at 1-800-FOR-MERCedes
(1-800-367-6372) or 1-866-990-9007
R Canada: Customer Service at
1-888-923-8367
Shortly after successfully registering with the
mbrace service, auser ID and password will
be sent to you by mail.
USA only: you can use this password to log
onto the mbrace area under "Owners Online"
at http://www.mbusa.com.
The mbrace system is available if:
R it has been activated and is operational
R the corresponding mobile phone network is
available for transmitting data to the Cus-
tomer Center
R as ervice subscription is available
R the starter battery is sufficiently charged
i Determining the location of the vehicle on
am ap is only possible if:
R GPS reception is available.
R the vehicle position can be forwarded to
the Customer Assistance Center.
2 The System is called TELEAID in Canada. 204
FeaturesStowage and features
Page 237 of 290
X
Remove th ejackf romt heleft-han dstow-
age spac einthetrunk to allow th estowage
compartmen ttobeopened.
X Turn fastener 0044in th edirection of the
arrow.
X Ope nstowage compartment 0043.
X Remove th eTIREFI Tkit,w hee lchock ,align-
men tbolt and gloves. Flat tire
Preparing th
evehicle
Your vehicl eisequipped wit haTIREFI Tkit.
X Stop th evehicl eons olid, non-slipper yand
level ground ,asfar away as possibl efrom
traffic.
X Switc hont hehazard warnin glamps.
X Apply th eelectric parkin gbrak em anually
(Y page 133).
X Brin gthe fron twheels into th estraight-
ahead position.
X Shift th etransmission to Pwit hthe button
in th ecenter console.
X Switc hoff th eengine.
X Remove th eSmartKey from th eignition
lock.
X Allo ccupant smustg et out of th evehicle.
Mak esuret hatthe ya re no tend angered as
they do so.
X Mak esuret hatnoo neis near th edanger
area while awhee lisb eingchanged. Any-
on ew ho is no tdirectl yassistin ginthe
whee lcha ng es hould, for example, stand
behind th ebarrier.
X Get out of th evehicle. Pay attention to traf-
fic condition swhen doin gso.
X Clos ethe driver's door. TIREFIT kit
Usin gthe TIREFIT kit TIREFI
Tisat ires ealant.
You can use TIREFI Ttoseal punctures of up to
0.16 in (4 mm), particularly those in th etire
tread. You can use TIREFI Tatoutside tem-
peratures down to 00F84‡(00F820 †). G
WARNING
In th efollowin gsituations, th etires ealant is
unable to provid esufficien tbreakdown assis-
tance ,asitisu nable to seal th etirep roperly:
R there are cut sorpunctures in th etirel arger
than those mentioned above.
R thew hee lrim is damaged.
R you hav edriven at ver ylow tire pressures or
on aflat tire.
There is ariskofana ccident.
Do no tdrive th evehicle. Contac taqualified
specialist workshop. G
WARNING
The tire sealant is harmful and causes irrita-
tion .Itm ustn otcome into contact wit hyour
skin ,eyes or clothin gorbeswallowed .Donot
inhale TIREFI Tfumes. Kee ptires ealant away
from children .There is ariskofi njury.
If you come into contact wit hthe tire sealant,
observ ethe following:
R Rinse off th etires ealant from your skin
immediately wit hwater.
R If th etires ealant comes into contact with
your eyes ,immediately rinse them thor-
oughly wit hclean water.
R If tire sealant is swallowed ,immediately
rinse your mout hout thoroughl yand drink
plenty of water. Do no tind ucev omiting,
and see kmedica lattention immediately.
R Immediately chang eout of clothin gwhich
has come into contact wit htires ealant.
R If an allergic reaction occurs, see kmedical
attention immediately. Flat ti
re
235Breakdo wn assis tance Z
Page 245 of 290
R
If the battery is fullyd ischarged, leave the battery that is being used to jump-start connected
for afew minutes before attempting to start. This charges the battery slightly.
R Make sure that the two vehicle sdonot touch.
Make sure that:
R the jumper cablesa re not damaged.
R when the jumper cablesa re connected to the battery, uninsulated sections of the terminal
clamp do not come into contact with other metal sections.
R the jumper cablesc annot come into contact with parts such as the V-belt pulley or the fan.
These parts move when the engine is started and whileitisr unning.
X Press the electric parking brake handle.
X Shift the transmission to Pwith the button in the center console.
X Remove the SmartKey from the ignition lock.
X Switch off all electrical consumers (e.g. radio, blower, etc.).
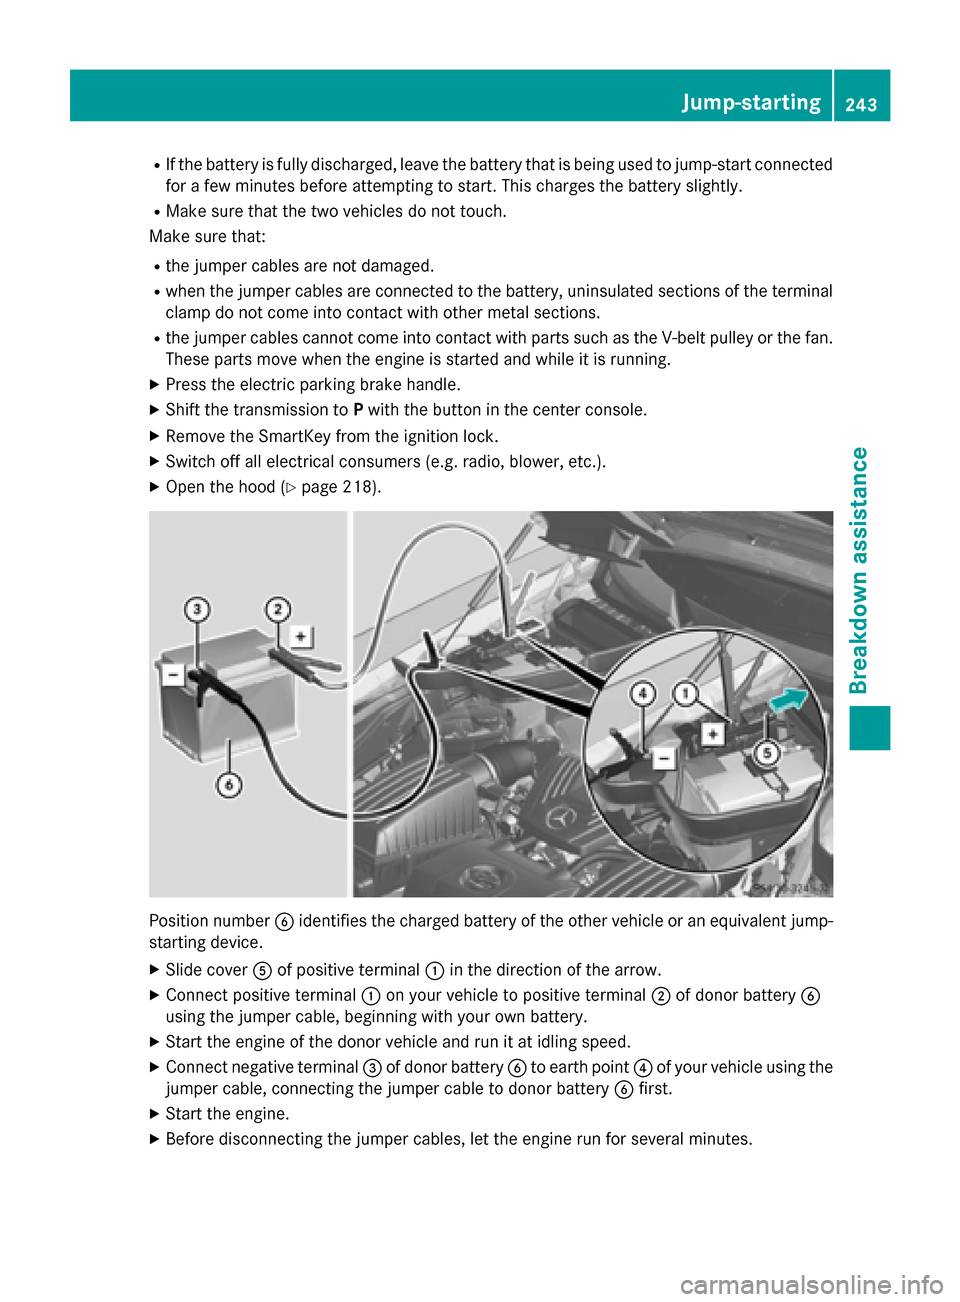
X Open the hood (Y page 218). Positio
nnumber 0084identifie sthe charged battery of the other vehicle or an equivalent jump-
starting device.
X Slide cover 0083of positive terminal 0043in the direction of the arrow.
X Connect positive terminal 0043on yourv ehicle to positive terminal 0044of donor battery 0084
using the jumper cable,b eginning with yourown battery.
X Start the engine of the donor vehicle and run it at idling speed.
X Connect negative terminal 0087of donor battery 0084to earth point 0085of yourv ehicle using the
jumper cable,c onnecting the jumper cable to donor battery 0084first.
X Start the engine.
X Before disconnecting the jumper cables, let the engine run for several minutes. Jump-starting
243Breakdown assistance Z
Page 248 of 290
X
Switch on the hazard warning lamps
(Y page 98).
X Make sure tha tthe SmartKey is in position
2 in the ignition and tha tthe engine is run-
ning throughout the towing procedure.
X Mov ethe transmissio ntoNwith the E-
SELECT lever. Check the transmissio nposi-
tion in the instrument cluster. Towin
gavehicle with both axles on
the ground
It is important tha tyou observe the safety
instructions when towing away your vehicle
(Y page 244).
X Switch on the hazard warning lamps
(Y page 98).
i Whe
ntowing with the hazard warning
flashers switche don, us ethe combination
switch as usua ltosignal in which direction
yo ua re changing. In this case, onl ythe
indicator lamps for the direction of travel
flash. Whe nyou reset the combination
switch, the hazard warning flashers start
flashing again.
X Insert the SmartKey into the ignition lock
(Y page 119).
X Start the engine and leave the SmartKey in
the ignition.
X Mov ethe transmissio ntoNwith the E-
SELECT lever.
X Check the transmissio nposition in the
instrument cluster display (Y page 123).
X Leave the engine running throughout the
entir etowing procedure Transporting the vehicle
The towing ey ecan be used to pull the vehicle
onto atraile rort ransporter for transporting
purposes.
! Yo
um ay onl ysecure the vehicl ebythe
wheels, not by parts of the vehicl esuchas axl
eors teering components .Otherwise,
the vehicl ecould be damaged.
X Start the engine.
X Make sure tha tthe SmartKey is in position
2 in the ignition and tha tthe engine is run-
ning during the entir eloadin goperation.
X Mov ethe transmissio ntoNwith the E-
SELECT lever. Check the transmissio nposi-
tion in the instrument cluster.
As soon as the vehicle has been loaded: X Prevent the vehicl efrom rolling away by
applying the electri cparking brake.
X Shift the transmissio ntoPwith the button
in the center console.
X Turn the SmartKey to position 0in the igni-
tion lock and remove the SmartKey from
the ignition lock.
X Secure the vehicle. Fuses
Important safety notes
G
WARNING
If yo umanipulate or bridge afaulty fus eorif
yo ur eplace it with afusew ithah ighe ramper-
age, the electri ccable scould be overloaded.
Thi scould resul tinafire. There is ariskofan
accident and injury.
Alway sreplace faulty fuses with the specified
new fuses having the correct amperage.
! Only us
efuses tha thaveb eena pproved
for Mercedes-Benz vehicles and which
have the correct fus erating for the system
concerned. Otherwise, components or sys-
tems could be damaged.
The fuses in your vehicl eserve to close down
faulty circuits. If afuseb lows ,allthe compo-
nents on the circuit and thei rfunctions stop
operating.
Blown fuses mus tbereplaced with fuses of
the same rating, which yo ucan recognize by 246
FusesBreakdown assistance