2015 MERCEDES-BENZ SLK-CLASS ROADSTER ECU
[x] Cancel search: ECUPage 59 of 358
Important safety notes
!Make sure that there are no objects in the
footwell or behind the seats. There is a dan- ger that the seats and/or objects could be
damaged when PRE-SAFE ®
is activated.
Although your vehicle is equipped with PRE-
SAFE ®
, the possibility of injury in the event of
an accident cannot be ruled out. Always
adapt your driving style to suit the prevailing
road and weather conditions and maintain a
safe distance from the vehicle in front. Drive
carefully.
Function
PRE-SAFE ®
intervenes:
R in emergency braking situations, e.g. when
BAS is activated
R in critical driving situations, e.g. when phys-
ical limits are exceeded and the vehicle
understeers or oversteers severely
R on vehicles with the Driving Assistance
package: if BAS PLUS intervenes power-
fully or the radar sensor system detects an
imminent danger of collision in certain sit-
uations
PRE-SAFE ®
takes the following measures
depending on the hazardous situation detec-
ted:
R the seat belts are pre-tensioned.
R if the vehicle skids, the side windows are
closed so that only a small gap remains.
R vehicles with the memory function: the
front-passenger seat is adjusted if it is in an
unfavorable position.
If the hazardous situation passes without
resulting in an accident, PRE-SAFE ®
slackens
the belt pre-tensioning. All settings made by
PRE-SAFE ®
can then be reversed.
If the seat belt pre-tensioning is not reduced: X Move the seat backrest or seat back
slightly when the vehicle is stationary.
The seat belt pre-tensioning is reduced and
the locking mechanism is released. The seat-belt adjustment is an integral part of
the PRE-SAFE ®
convenience function. Infor-
mation about the convenience function can
be found under "Belt adjustment"( Y page 45).
Automatic measures after an acci-
dent
Immediately after an accident, the following
measures are implemented, depending on
the type and severity of the impact:
R the hazard warning lamps are activated
R the emergency lighting is activated
R the vehicle doors are unlocked
R the front side windows are lowered
R vehicles with a memory function: the elec-
trically adjustable steering wheel is raised
R the engine is switched off and the fuel sup-
ply is cut off
R vehicles with mbrace: automatic emer-
gency call
Children in the vehicle
Important safety notes
If a child younger than 12 years and under 5 ft
(1.50 m) in height is traveling in the vehicle:
R always secure the child in a child restraint
system suitable for Mercedes-Benz vehi-
cles. The child restraint system must be
appropriate to the age, weight and size of
the child
R be sure to observe the instructions and
safety notes in this section in addition to
the child restraint system manufacturer's
installation instructions
R be sure to observe the instructions and
safety notes on the "Occupant classifica-
tion system (OCS)" ( Ypage 49)
Children in the vehicle57
Safety
Z
Page 60 of 358
GWARNING
If you leave children unsupervised in the vehi-cle, they could set it in motion by, for example:
R release the parking brake.
R shift the automatic transmission out of park
position Por shift manual transmission into
neutral.
R start the engine.
In addition, they may operate vehicle equip-
ment and become trapped. There is a risk of
an accident and injury.
When leaving the vehicle, always take the
SmartKey with you and lock the vehicle. Never
leave children unsupervised in the vehicle.
GWARNING
If persons, particularly children are subjected to prolonged exposure to extreme heat or
cold, there is a risk of injury, possibly even
fatal. Never leave children unattended in the
vehicle.
GWARNING
If the child restraint system is subjected to
direct sunlight, parts may get very hot. Chil-
dren may burn themselves on these parts,
particularly on the metal parts of the child
restraint system. There is a risk of injury.
If you leave the vehicle, taking the child with
you, always ensure that the child restraint
system is not exposed to direct sunlight. Pro-tect it with a blanket, for example. If the child
restraint system has been exposed to direct
sunlight, let it cool down before securing the
child in it. Never leave children unattended inthe vehicle.
Always ensure that all vehicle occupants have
their seat belts fastened correctly and are sit- ting properly. Particular attention must be
paid to children.
Observe the safety notes on the seat belt ( Y page 42) and the information on the cor-
rect use of the seat belt ( Ypage 43). A booster seat may be necessary to achieve
proper seat belt positioning for children over
41 lbs (18 kg) until they reach a height where
a three-point seat belt fits properly without abooster seat.
Special seat belt retractor
GWARNING
If the seat belt is released while driving, the
child restraint system will no longer be
secured properly. The special seat belt retrac- tor is disabled and the inertia real draws in a
portion of the seat belt. The seat belt cannot
be immediately refastened. There is an
increased risk of injury, possibly even fatal.
Stop the vehicle immediately, paying atten-
tion to road and traffic conditions. Reactivate
the special seat belt retractor and secure the
child restraint system properly.
The seat belt on the front-passenger side is
equipped with a special seat belt retractor.
When activated, the special seat belt retrac-
tor ensures that the seat belt cannot slacken once the child seat is secured.
Installing a child restraint system:
X Make sure you observe the child restraint
system manufacturer's installation instruc-
tions.
X Pull the seat belt smoothly out of the belt
loop.
X Engage seat belt tongue in belt buckle.
Activating the special seat belt retractor: X Pull the seat belt out fully and let the inertia
reel retract it again.
While the seat belt is retracting, you should
hear a ratcheting sound. The special seat
belt retractor is enabled.
X Push the child restraint system down so
that the seat belt is tight and does not
loosen.
58Children in the vehicle
Safety
Page 61 of 358
Removing a child restraint system/deactivat-
ing the special seat belt retractor:
X Make sure you observe the child restraint
system manufacturer's installation instruc-
tions.
X Press the belt buckle release button, hold
the belt tongue and guide it back towards
the belt loop.
The special seat belt retractor is deactiva-
ted.
Child restraint system
The use of seat belts and child restraint sys-
tems is required by law in:
R all 50 states
R the U.S. territories
R the District of Columbia
R all Canadian provinces
You can obtain further information about the correct child restraint system from any
authorized Mercedes-Benz Center.
GWARNING
If the child restraint system is installed incor- rectly on a suitable seat, it cannot protect as
intended. The child cannot then be restrained in the event of an accident, heavy braking or
sudden changes of direction. There is an
increased risk of injury, possibly even fatal.
Make sure that you observe the child restraint
system manufacturer's installation instruc-
tions and the notes on use. Please ensure,
that the base of the child restraint system is
always resting completely on the seat cush-
ion. Never place objects, e.g. cushions, under or behind the child restraint system. Only use
child restraint systems with the original cover
designed for them. Only replace damaged
covers with genuine covers.
GWARNING
If the child restraint system is installed incor- rectly or is not secured, it can come loose in
the event of an accident, heavy braking or a
sudden change in direction. The child
restraint system could be thrown about, strik- ing vehicle occupants. There is an increased
risk of injury, possibly even fatal.
Always install child restraint systems prop-
erly, even if they are not being used. Make
sure that you observe the child restraint sys-
tem manufacturer's installation instructions.
Further information on stowing objects, lug-
gage and loads securely can be found under
“Stowing options/stowage compartments”( Y page 258).
GWARNING
Child restraint systems or their securing sys-
tems which have been damaged or subjected
to a load in an accident can no longer protect
as intended. The child cannot then be
restrained in the event of an accident, heavy
braking or sudden changes of direction. There is an increased risk of injury, possibly even
fatal.
Replace child restraint systems which have
been damaged or subjected to a load in an
accident as soon as possible. Have the secur-
ing systems on the child restraint system
checked at a qualified specialist workshop,
before you install a child restraint system
again.
The securing system of child restraint sys-
tems is the seat belt system.
iIf a child is carried on the front-passenger
seat, be sure to observe the information on
the "Occupant Classification System
(OCS)" ( Ypage 49). There you will also find
information on deactivating the front-
passenger front air bag.
All child restraint systems must meet the fol- lowing standards:
R U.S. Federal Motor Vehicle Safety Stand-
ards 213 and 225
R Canadian Motor Vehicle Safety Standards
213 and 210.2
Child ren in the vehi cle59
Safety
Z
Page 62 of 358
Confirmation that the child restraint system
corresponds to the standards can be found
on an instruction label on the child restraint
system. This confirmation can also be found
in the installation instructions that are inclu-
ded with the child restraint system.
Observe the warning labels in the vehicle inte-
rior and on the child restraint system.
Child restraint system on the front-
passenger seat
General notes
If you secure a child in a child restraint system on the front-passenger seat, be sure to
observe the instructions and safety notes on
the "Occupant Classification System (OCS)"( Y page 49).
You can thus avoid the risks that could arise
as a result of:
R an incorrectly categorized person in the
front-passenger seat
R the unintentional deactivation of the front-
passenger front air bag
R the unsuitable positioning of the child
restraint system, e.g. too close to the dash-
board
Rearward-facing child restraint system
If it is absolutely necessary to install a rear-
ward-facing child restraint system on the
front-passenger seat, always make sure that
the front-passenger front air bag is deactiva-
ted. Only if the PASSENGER AIR BAG OFF
indicator lamp is permanently lit ( Ypage 41)
is the front-passenger front air bag deactiva-
ted.
Always observe the child restraint system
manufacturer's installation and operating
instructions.
Forward-facing child restraint system
If you secure a child in a forward-facing child
restraint system on the front-passenger seat,
always move the front-passenger seat as far
back as possible. The entire base of the child
restraint system must always rest on the seat cushion of the front-passenger seat. The
backrest of the child restraint system must lie as flat as possible against the backrest of the
front-passenger seat. The child restraint sys-
tem must not touch the roof or be subjected
to a load by the head restraint. Adjust the
angle of the seat backrest and the head
restraint position accordingly. Always make
sure that the shoulder belt strap is correctly
routed from the front-passenger seat belt
loop to the shoulder belt guide on the child
restraint system. The shoulder belt strap
must be routed forwards and downwards
from the front-passenger seat belt loop.
Always observe the child restraint system
manufacturer's installation and operating
instructions.
Pets in the vehicle
GWARNING
If you leave animals unattended or unsecured in the vehicle, they could press buttons or
switches, for example.
As a result, they could: R activate vehicle equipment and become
trapped, for example
R activate or deactivate systems, thereby
endangering other road users
Unsecured animals could also be flung around
the vehicle in the event of an accident or sud- den steering or braking, thereby injuring vehi-
cle occupants. There is a risk of an accident
and injury.
Never leave animals unattended in the vehi-
cle. Always secure animals properly during
the journey, e.g. use a suitable animal trans-
port box.
60Pets in the vehicle
Safety
Page 82 of 358
You could therefore lock yourself out if:
R the vehicle is being pushed.
R the vehicle is being towed.
R the vehicle is on a roller dynamometer.
You can also switch the automatic locking
function on and off using the on-board com-
puter ( Ypage 206).
Unlocking the driver's door (mechan-
ical key)
If the vehicle can no longer be unlocked with
the SmartKey, use the mechanical key.
If you use the mechanical key to unlock and
open the driver's door, the anti-theft alarm
system will be triggered ( Ypage 69).
X Take the mechanical key out of the Smart-
Key ( Ypage 74).
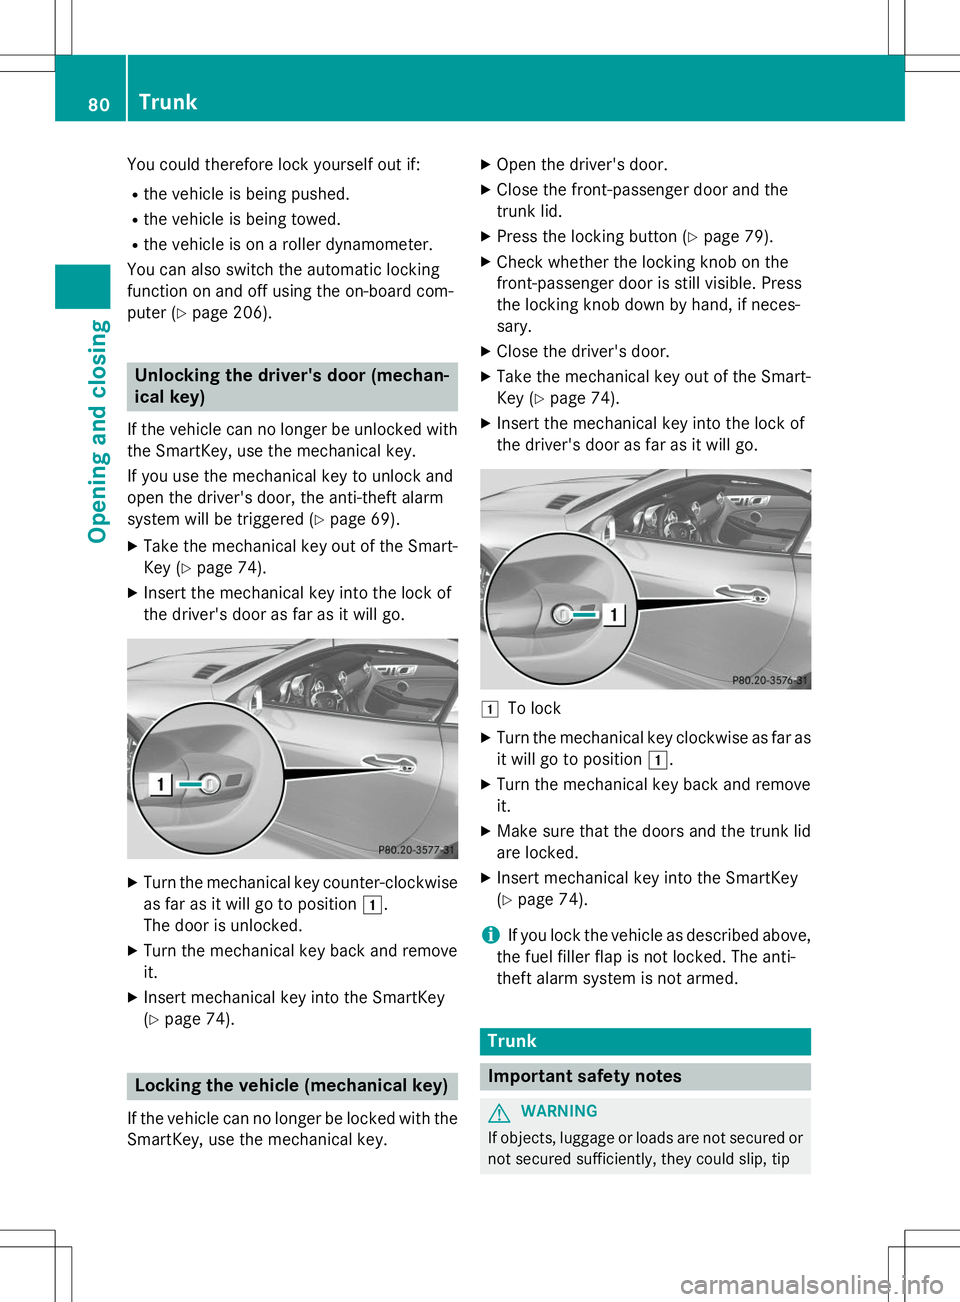
X Insert the mechanical key into the lock of
the driver's door as far as it will go.
XTurn the mechanical key counter-clockwise
as far as it will go to position 1.
The door is unlocked.
X Turn the mechanical key back and remove it.
X Insert mechanical key into the SmartKey(Y page 74).
Locking the vehicle (mechanical key)
If the vehicle can no longer be locked with the
SmartKey, use the mechanical key. X
Open the driver's door.
X Close the front-passenger door and the
trunk lid.
X Press the locking button ( Ypage 79).
X Check whether the locking knob on the
front-passenger door is still visible. Press
the locking knob down by hand, if neces-sary.
X Close the driver's door.
X Take the mechanical key out of the Smart-
Key ( Ypage 74).
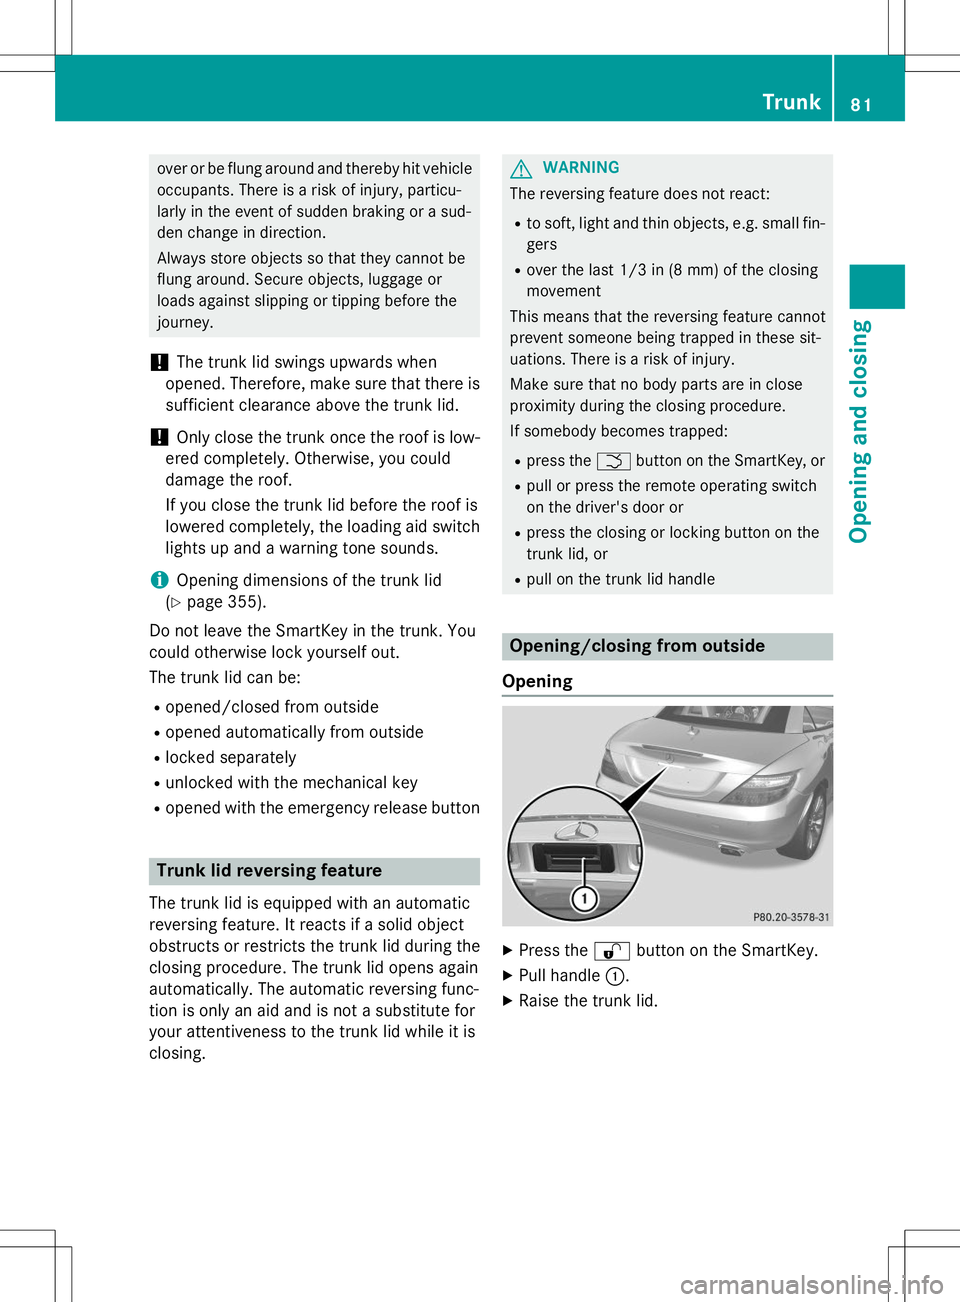
X Insert the mechanical key into the lock of
the driver's door as far as it will go.
1To lock
X Turn the mechanical key clockwise as far as
it will go to position 1.
X Turn the mechanical key back and remove it.
X Make sure that the doors and the trunk lid
are locked.
X Insert mechanical key into the SmartKey(Y page 74).
iIf you lock the vehicle as described above,
the fuel filler flap is not locked. The anti-
theft alarm system is not armed.
Trunk
Important safety notes
GWARNING
If objects, luggage or loads are not secured or not secured sufficiently, they could slip, tip
80Trunk
Opening and closing
Page 83 of 358
over or be flung around and thereby hit vehicleoccupants. There is a risk of injury, particu-
larly in the event of sudden braking or a sud-
den change in direction.
Always store objects so that they cannot be
flung around. Secure objects, luggage or
loads against slipping or tipping before thejourney.
!The trunk lid swings upwards when
opened. Therefore, make sure that there is sufficient clearance above the trunk lid.
!Only close the trunk once the roof is low-
ered completely. Otherwise, you could
damage the roof.
If you close the trunk lid before the roof is
lowered completely, the loading aid switch lights up and a warning tone sounds.
iOpening dimensions of the trunk lid
( Y page 355).
Do not leave the SmartKey in the trunk. You
could otherwise lock yourself out.
The trunk lid can be:
R opened/closed from outside
R opened automatically from outside
R locked separately
R unlocked with the mechanical key
R opened with the emergency release button
Trunk lid reversing feature
The trunk lid is equipped with an automatic
reversing feature. It reacts if a solid object
obstructs or restricts the trunk lid during the
closing procedure. The trunk lid opens again
automatically. The automatic reversing func-
tion is only an aid and is not a substitute for
your attentiveness to the trunk lid while it isclosing.
GWARNING
The reversing feature does not react:
R to soft, light and thin objects, e.g. small fin-
gers
R over the last 1/3 in (8 mm) of the closing movement
This means that the reversing feature cannot
prevent someone being trapped in these sit-
uations. There is a risk of injury.
Make sure that no body parts are in close
proximity during the closing procedure.
If somebody becomes trapped:
R press the Fbutton on the SmartKey, or
R pull or press the remote operating switch
on the driver's door or
R press the closing or locking button on the
trunk lid, or
R pull on the trunk lid handle
Opening/closing from outside
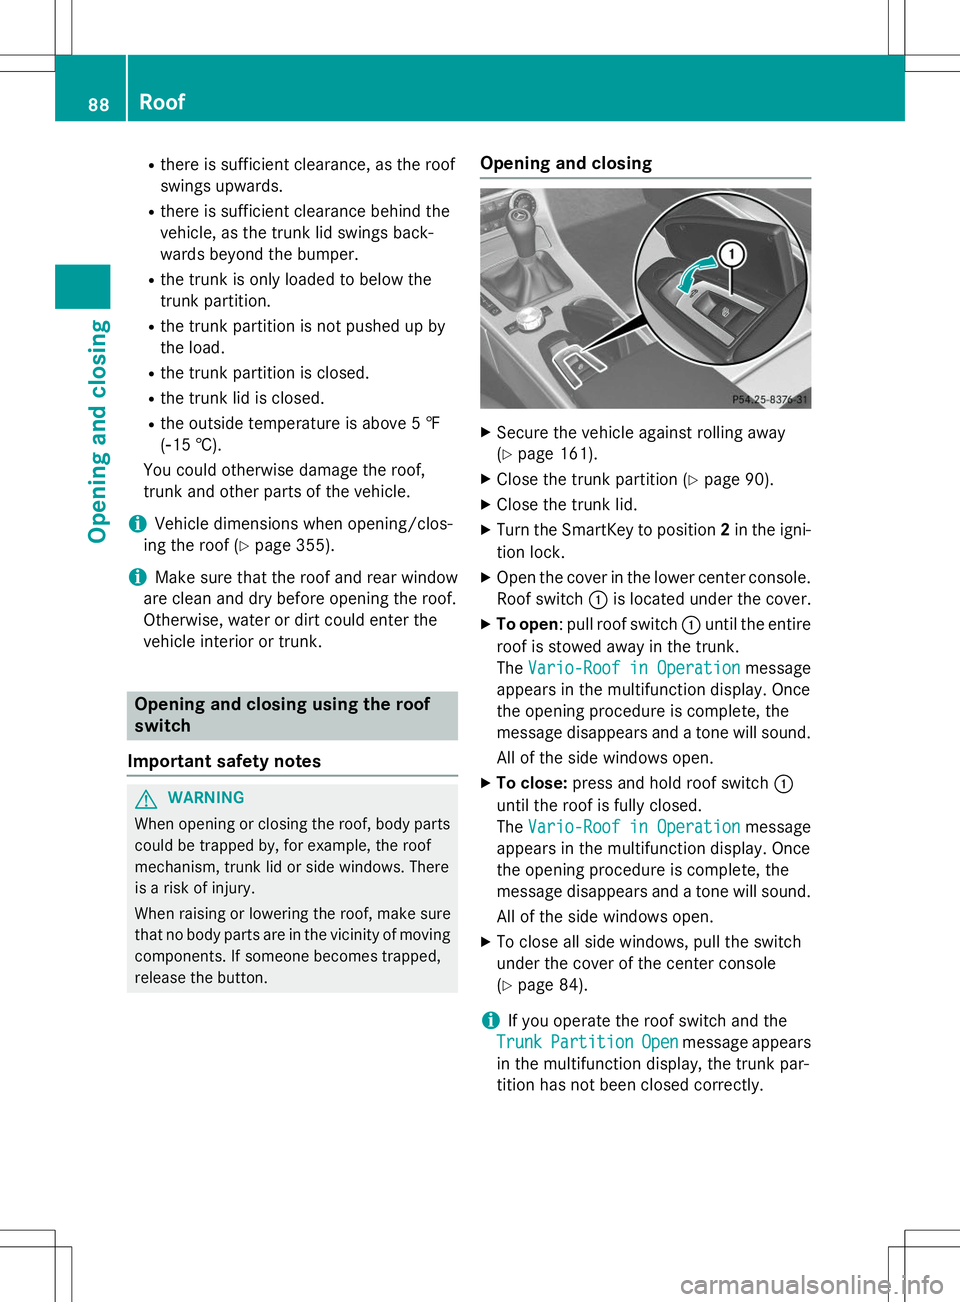
Opening
X Press the %button on the SmartKey.
X Pull handle :.
X Raise the trunk lid.
Trunk81
Opening and closing
Z
Page 90 of 358
Rthere is sufficient clearance, as the roof
swings upwards.
R there is sufficient clearance behind the
vehicle, as the trunk lid swings back-
wards beyond the bumper.
R the trunk is only loaded to below the
trunk partition.
R the trunk partition is not pushed up by
the load.
R the trunk partition is closed.
R the trunk lid is closed.
R the outside temperature is above 5 ‡(Ò 15 †).
You could otherwise damage the roof,
trunk and other parts of the vehicle.
iVehicle dimensions when opening/clos-
ing the roof ( Ypage 355).
iMake sure that the roof and rear window
are clean and dry before opening the roof.
Otherwise, water or dirt could enter the
vehicle interior or trunk.
Opening and closing using the roof
switch
Important safety notes
GWARNING
When opening or closing the roof, body parts could be trapped by, for example, the roof
mechanism, trunk lid or side windows. There
is a risk of injury.
When raising or lowering the roof, make sure
that no body parts are in the vicinity of moving
components. If someone becomes trapped,
release the button.
Opening and closing
X Secure the vehicle against rolling away (Y page 161).
X Close the trunk partition ( Ypage 90).
X Close the trunk lid.
X Turn the SmartKey to position 2in the igni-
tion lock.
X Open the cover in the lower center console.
Roof switch :is located under the cover.
X To open : pull roof switch :until the entire
roof is stowed away in the trunk.
The
Vario-Roof in Operationmessage
appears in the multifunction display. Once
the opening procedure is complete, the
message disappears and a tone will sound.
All of the side windows open.
X To close: press and hold roof switch :
until the roof is fully closed.
The
Vario-Roof in Operationmessage
appears in the multifunction display. Once
the opening procedure is complete, the
message disappears and a tone will sound.
All of the side windows open.
X To close all side windows, pull the switch
under the cover of the center console(Y page 84).
iIf you operate the roof switch and the
TrunkPartitionOpenmessage appears
in the multifunction display, the trunk par-
tition has not been closed correctly.
88Roof
Opening and closing
Page 93 of 358
Runlocking buttons Rand Lpoint in the
direction of travel.
R latch =facing you is unlocked.
R latch ;facing away from you is locked.
X To unlock the latch: press unlocking but-
ton Ror Lon the locked latch.
X To lock the latch: push the unlocked latch
upwards by hand until it engages.
Installing
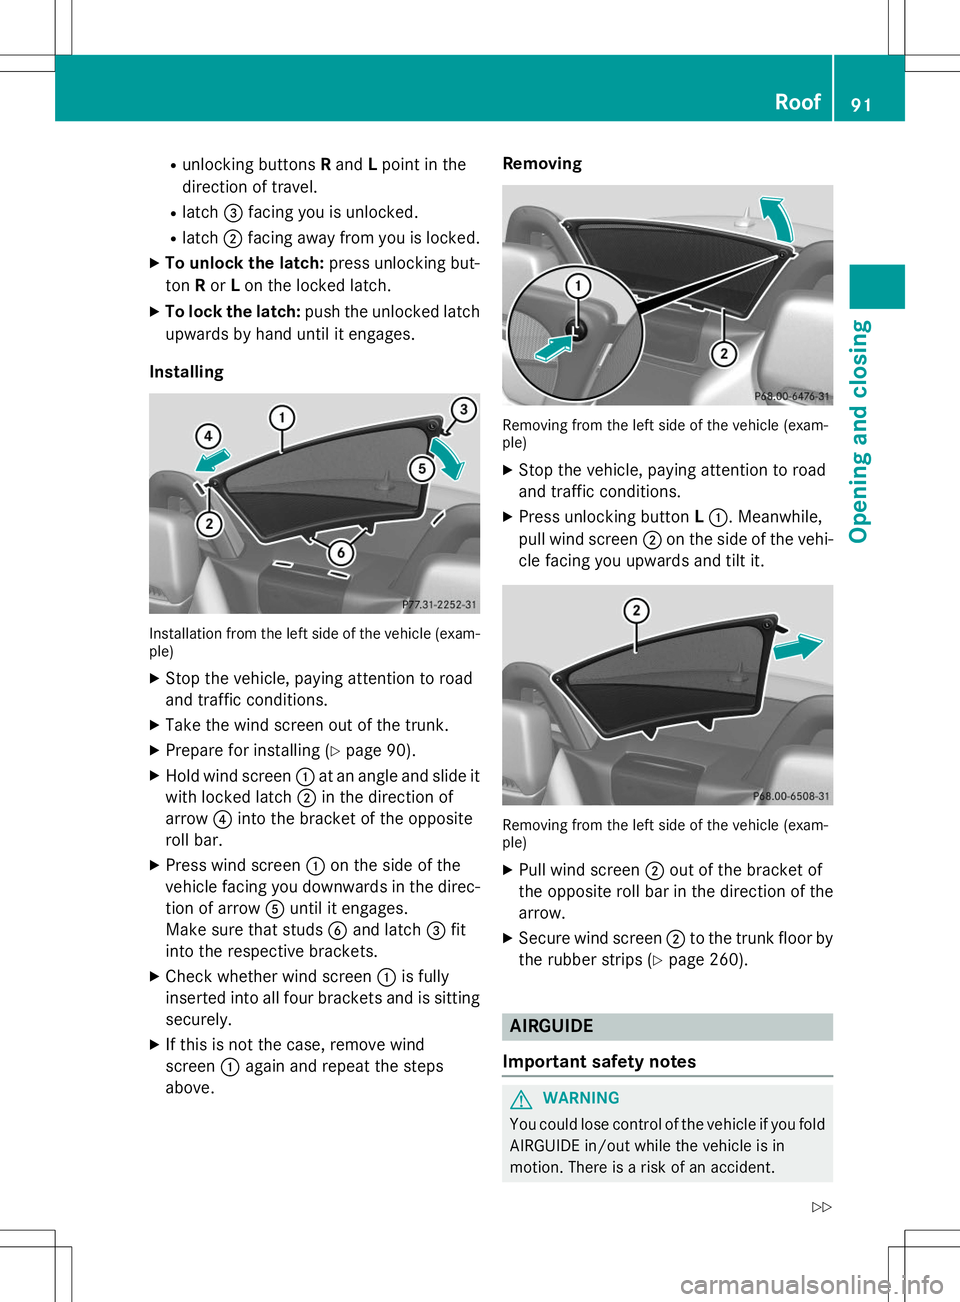
Installation from the left side of the vehicle (exam- ple)
X Stop the vehicle, paying attention to road
and traffic conditions.
X Take the wind screen out of the trunk.
X Prepare for installing ( Ypage 90).
X Hold wind screen :at an angle and slide it
with locked latch ;in the direction of
arrow ?into the bracket of the opposite
roll bar.
X Press wind screen :on the side of the
vehicle facing you downwards in the direc-
tion of arrow Auntil it engages.
Make sure that studs Band latch =fit
into the respective brackets.
X Check whether wind screen :is fully
inserted into all four brackets and is sitting
securely.
X If this is not the case, remove wind
screen :again and repeat the steps
above. Removing
Removing from the left side of the vehicle (exam- ple)
X
Stop the vehicle, paying attention to road
and traffic conditions.
X Press unlocking button L: . Meanwhile,
pull wind screen ;on the side of the vehi-
cle facing you upwards and tilt it.
Removing from the left side of the vehicle (exam- ple)
X Pull wind screen ;out of the bracket of
the opposite roll bar in the direction of the
arrow.
X Secure wind screen ;to the trunk floor by
the rubber strips ( Ypage 260).
AIRGUIDE
Important safety notes
GWARNING
You could lose control of the vehicle if you fold AIRGUIDE in/out while the vehicle is in
motion. There is a risk of an accident.
Roof91
Opening and closing
Z