2015 MERCEDES-BENZ SLK-Class trunk
[x] Cancel search: trunkPage 90 of 358
R
there is sufficient clearance, as the roof
swings upwards.
R there is sufficient clearance behind the
vehicle, as the trunk lid swings back-
wards beyond the bumper.
R the trunk is only loaded to below the
trunk partition.
R the trunk partition is not pushed up by
the load.
R the trunk partition is closed.
R the trunk lid is closed.
R the outside temperature is above 5 ‡
(00F815 †).
You could otherwise damage the roof,
trunk and other parts of the vehicle.
i Vehicle dimensions when opening/clos-
ing the roof (Y page 353).
i Make sure that the roof and rear window
are clean and dry before opening the roof.
Otherwise, water or dirt could enter the
vehicle interior or trunk. Opening and closing using the roof
switch
Important safety notes G
WARNING
When opening or closing the roof, body parts could be trapped by, for example, the roof
mechanism, trunk lid or side windows. There
is a risk of injury.
When raising or lowering the roof, make sure
that no body parts are in the vicinity of moving
components. If someone becomes trapped,
release the button. Opening and closing X
Secure the vehicle against rolling away
(Y page 161).
X Close the trunk partition (Y page 90).
X Close the trunk lid.
X Turn the SmartKey to position 2in the igni-
tion lock.
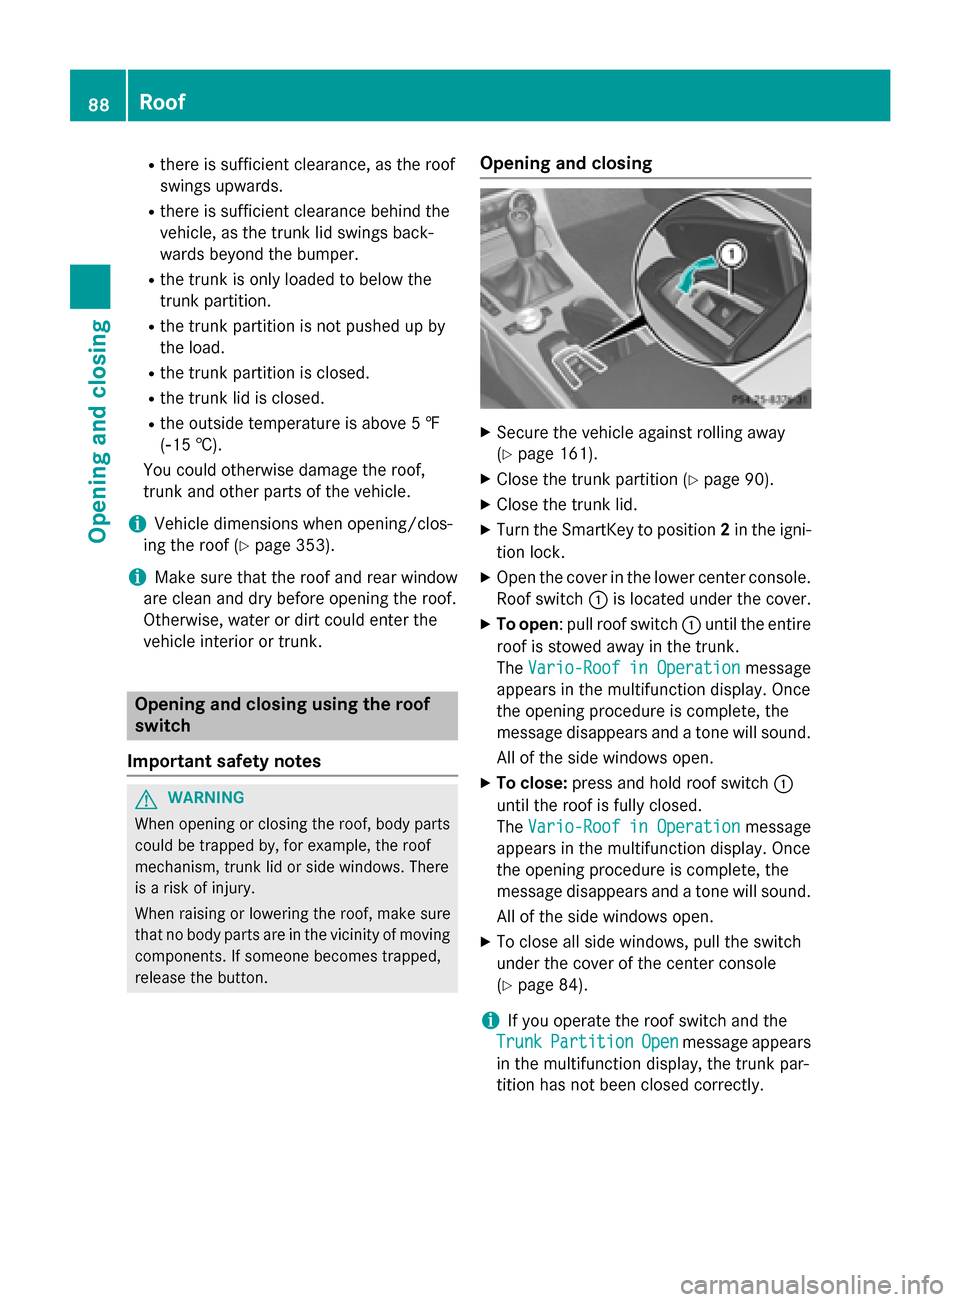
X Open the cover in the lower center console.
Roof switch 0043is located under the cover.
X To open: pull roof switch 0043until the entire
roof is stowed away in the trunk.
The Vario-Roof in Operation
Vario-Roof in Operation message
appears in the multifunction display. Once
the opening procedure is complete, the
message disappears and a tone will sound.
All of the side windows open.
X To close: press and hold roof switch 0043
until the roof is fully closed.
The Vario-Roof in Operation Vario-Roof in Operation message
appears in the multifunction display. Once
the opening procedure is complete, the
message disappears and a tone will sound.
All of the side windows open.
X To close all side windows, pull the switch
under the cover of the center console
(Y page 84).
i If you operate the roof switch and the
Trunk
Trunk Partition Partition Open
Openmessage appears
in the multifunction display, the trunk par-
tition has not been closed correctly. 88
RoofOpening and closing
Page 91 of 358
Opening and closing using the Smart-
Key
Important safety notes G
WARNING
When opening or closing the roof, body parts could be trapped by, for example, the roof
mechanism, trunk lid or side windows. There
is a risk of injury.
When raising or lowering the roof, make sure
that no body parts are in the vicinity of moving
components. If someone becomes trapped,
release the button.
Opening and closing X
Close the trunk partition (Y page 89).
X Close the trunk lid (Y page 80).
X Point the tip of the SmartKey at the driver's
door handle.
X To open: press and hold the 0036button
on the SmartKey until the roof is fully
opened.
The roof and the rear side windows open.
The front side windows close.
X To interrupt the opening procedure:
release the 0036button.
X To open the front side windows: press
and hold the 0036button on the SmartKey
again.
X To close: press and hold the 0037button
on the SmartKey until the roof is fully
closed.
The roof and the side windows close.
X To interrupt the closing procedure:
release the 0037button.
i When the roof is closed and the trunk par-
tition is open, the roof cannot be opened
using the SmartKey functions. Instead, all
of the side windows open or close simulta-
neously (Y page 84). Additionally, the
Trunk
Trunk Partition Partition Open
Openmessage appears
in the multifunction display. Locking the roof again
Important safety notes G
WARNING
If you do not fully open/close the soft top, the soft-top hydraulics depressurize after a short
time. This causes the soft top to lower unex-
pectedly and may cause you or others to be
trapped. There is a risk of injury.
Always open or close the soft top completely.
The roof is not locked if:
R the 0059 symbol and the Vario-Roof
Vario-Roof in in
Operation
Operation message appear in the multi-
function display.
R the 0059 symbol and the Open/Close
Open/Close
Vario-Roof Completely
Vario-Roof Completely message
appear and you hear a warning tone.
R you hear a warning tone for up to 10 sec-
onds when pulling away or while driving.
Locking You can lock the roof again if it is not locked
fully.
X Pull over and stop the vehicle safely as soon
as possible, paying attention to road and
traffic conditions.
X Make sure that the SmartKey is in position
2 in the ignition lock.
X Press the roof switch (Y page 88). Trunk partition
General notes !
To avoid damaging the roof or luggage
when folding back the roof, you should:
R only load the trunk to below the trunk
partition
R not place any objects on or in front of the
trunk partition Roof
89Opening and closing Z
Page 92 of 358
R
not place any objects on the cover
behind the roll bars
R not allow the cargo to push the trunk
partition upwards
The trunk partition can be used to cover lug-
gage and loads in the trunk.
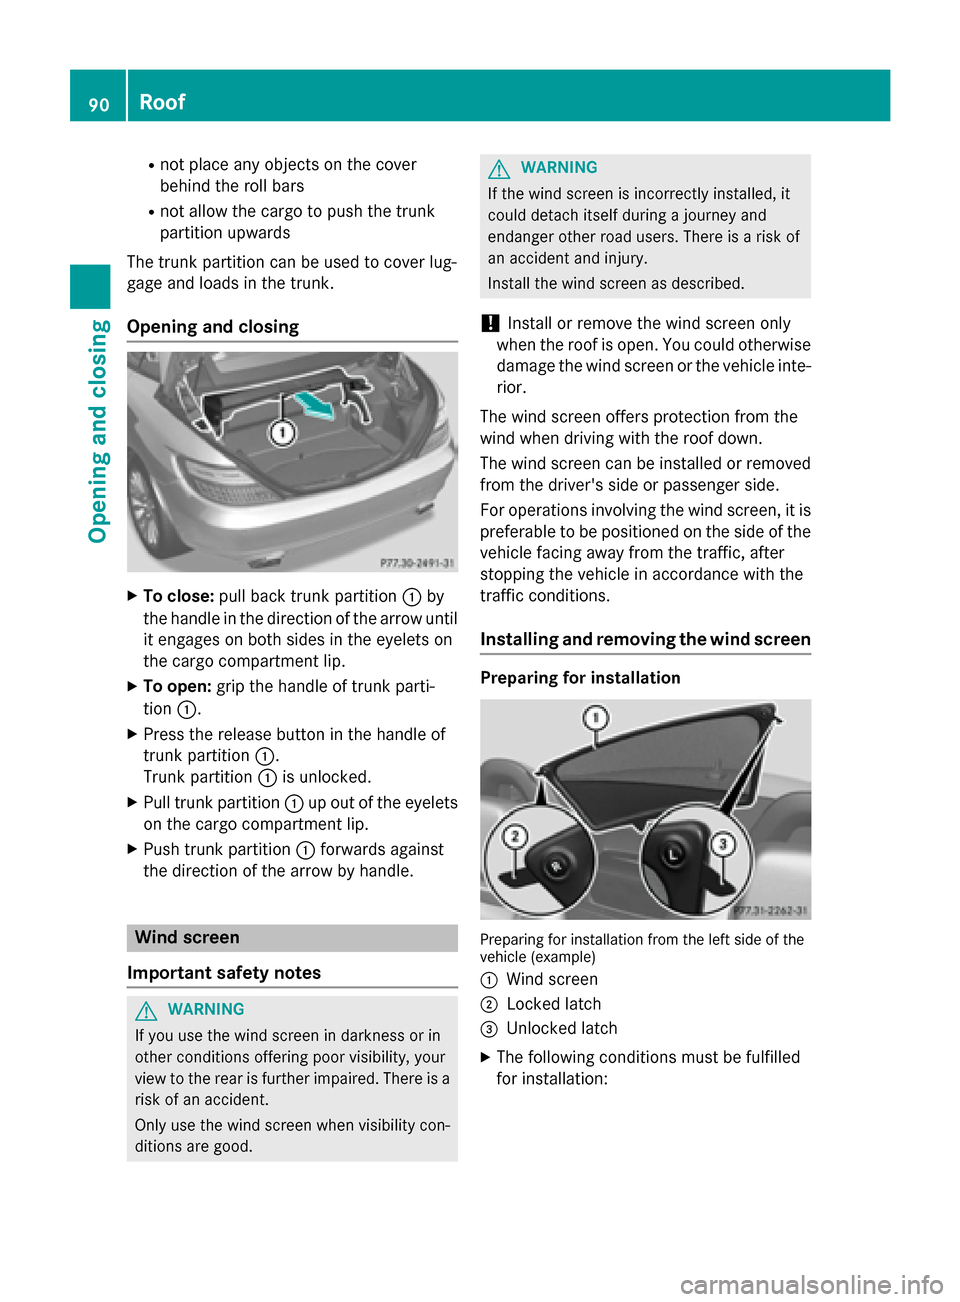
Opening and closing X
To close: pull back trunk partition 0043by
the handle in the direction of the arrow until
it engages on both sides in the eyelets on
the cargo compartment lip.
X To open: grip the handle of trunk parti-
tion 0043.
X Press the release button in the handle of
trunk partition 0043.
Trunk partition 0043is unlocked.
X Pull trunk partition 0043up out of the eyelets
on the cargo compartment lip.
X Push trunk partition 0043forwards against
the direction of the arrow by handle. Wind screen
Important safety notes G
WARNING
If you use the wind screen in darkness or in
other conditions offering poor visibility, your
view to the rear is further impaired. There is a
risk of an accident.
Only use the wind screen when visibility con-
ditions are good. G
WARNING
If the wind screen is incorrectly installed, it
could detach itself during a journey and
endanger other road users. There is a risk of
an accident and injury.
Install the wind screen as described.
! Install or remove the wind screen only
when the roof is open. You could otherwise
damage the wind screen or the vehicle inte-
rior.
The wind screen offers protection from the
wind when driving with the roof down.
The wind screen can be installed or removed from the driver's side or passenger side.
For operations involving the wind screen, it is
preferable to be positioned on the side of the vehicle facing away from the traffic, after
stopping the vehicle in accordance with the
traffic conditions.
Installing and removing the wind screen Preparing for installation
Preparing for installation from the left side of the
vehicle (example)
0043 Wind screen
0044 Locked latch
0087 Unlocked latch
X The following conditions must be fulfilled
for installation: 90
RoofOpening and closing
Page 93 of 358
R
unlocking buttons Rand Lpoint in the
direction of travel.
R latch 0087facing you is unlocked.
R latch 0044facing away from you is locked.
X To unlock the latch: press unlocking but-
ton Ror Lon the locked latch.
X To lock the latch: push the unlocked latch
upwards by hand until it engages.
Installing Installation from the left side of the vehicle (exam-
ple)
X Stop the vehicle, paying attention to road
and traffic conditions.
X Take the wind screen out of the trunk.
X Prepare for installing (Y page 90).
X Hold wind screen 0043at an angle and slide it
with locked latch 0044in the direction of
arrow 0085into the bracket of the opposite
roll bar.
X Press wind screen 0043on the side of the
vehicle facing you downwards in the direc-
tion of arrow 0083until it engages.
Make sure that studs 0084and latch 0087fit
into the respective brackets.
X Check whether wind screen 0043is fully
inserted into all four brackets and is sitting
securely.
X If this is not the case, remove wind
screen 0043again and repeat the steps
above. Removing
Removing from the left side of the vehicle (exam-
ple)
X Stop the vehicle, paying attention to road
and traffic conditions.
X Press unlocking button L0043. Meanwhile,
pull wind screen 0044on the side of the vehi-
cle facing you upwards and tilt it. Removing from the left side of the vehicle (exam-
ple)
X Pull wind screen 0044out of the bracket of
the opposite roll bar in the direction of the
arrow.
X Secure wind screen 0044to the trunk floor by
the rubber strips (Y page 258). AIRGUIDE
Important safety notes G
WARNING
You could lose control of the vehicle if you fold AIRGUIDE in/out while the vehicle is in
motion. There is a risk of an accident. Roof
91Opening and closing
Z
Page 96 of 358
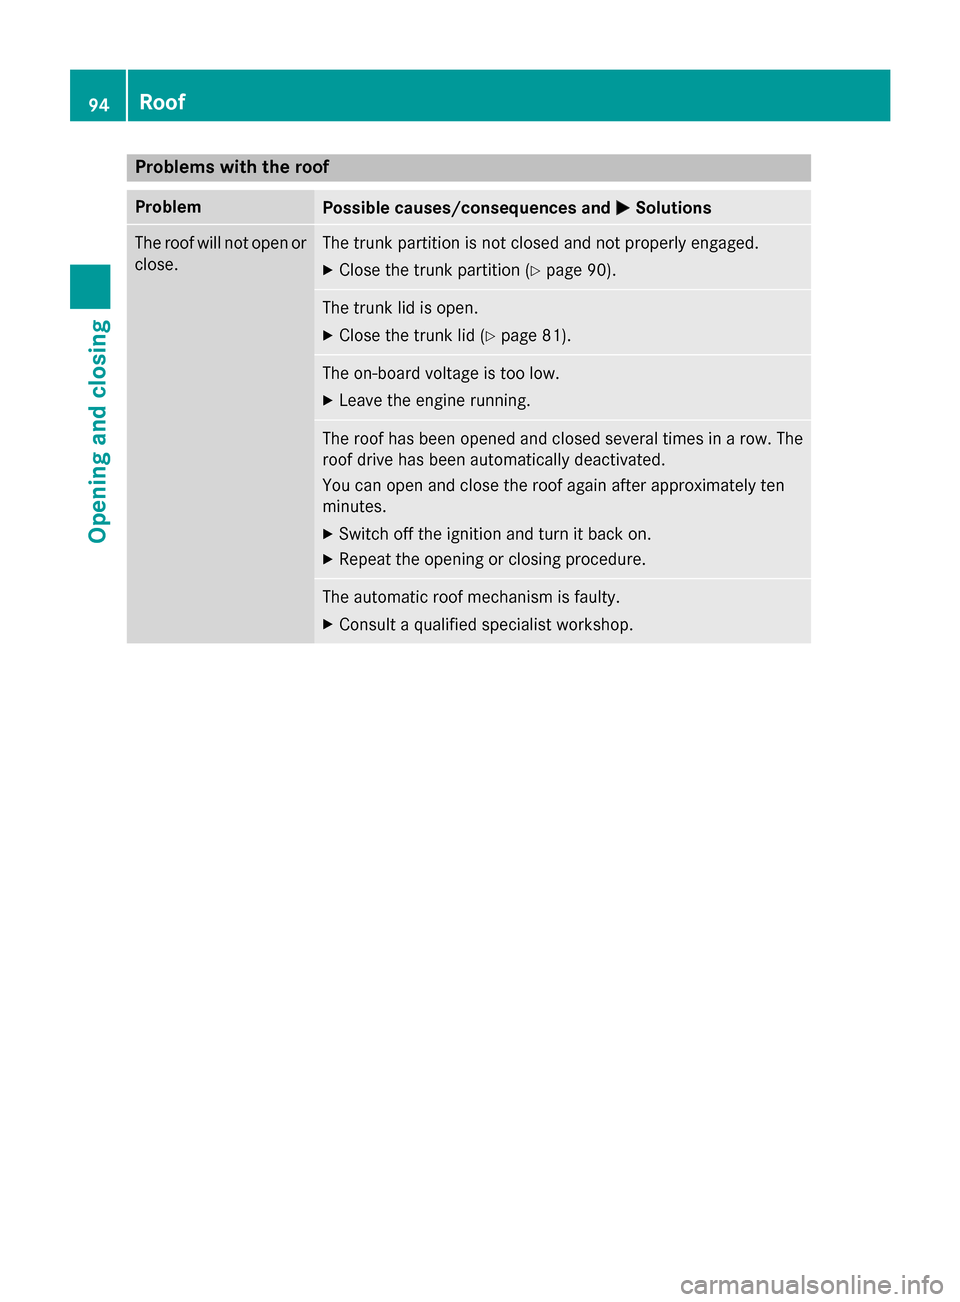
Problems with the roof
Problem
Possible causes/consequences and
0050
0050Solutions The roof will not open or
close. The trunk partition is not closed and not properly engaged.
X Close the trunk partition (Y page 90). The trunk lid is open.
X Close the trunk lid (Y page 81). The on-board voltage is too low.
X Leave the engine running. The roof has been opened and closed several times in a row. The
roof drive has been automatically deactivated.
You can open and close the roof again after approximately ten
minutes.
X Switch off the ignition and turn it back on.
X Repeat the opening or closing procedure. The automatic roof mechanism is faulty.
X Consult a qualified specialist workshop. 94
RoofOpening and closing
Page 119 of 358
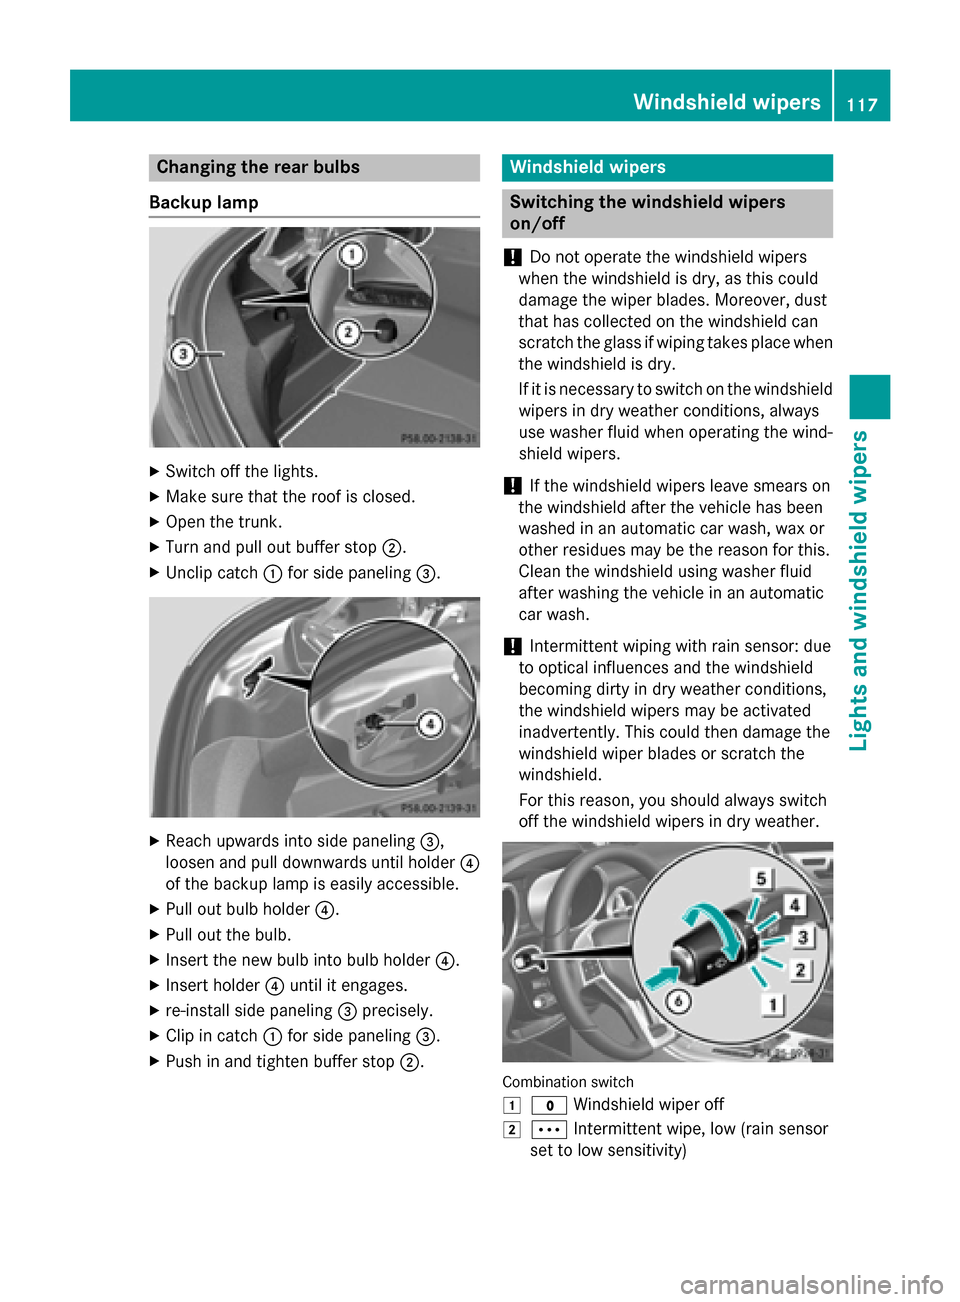
Changing the rear bulbs
Backup lamp X
Switch off the lights.
X Make sure that the roof is closed.
X Open the trunk.
X Turn and pull out buffer stop 0044.
X Unclip catch 0043for side paneling 0087. X
Reach upwards into side paneling 0087,
loosen and pull downwards until holder 0085
of the backup lamp is easily accessible.
X Pull out bulb holder 0085.
X Pull out the bulb.
X Insert the new bulb into bulb holder 0085.
X Insert holder 0085until it engages.
X re-install side paneling 0087precisely.
X Clip in catch 0043for side paneling 0087.
X Push in and tighten buffer stop 0044. Windshield wipers
Switching the windshield wipers
on/off
! Do not operate the windshield wipers
when the windshield is dry, as this could
damage the wiper blades. Moreover, dust
that has collected on the windshield can
scratch the glass if wiping takes place when the windshield is dry.
If it is necessary to switch on the windshield wipers in dry weather conditions, always
use washer fluid when operating the wind-
shield wipers.
! If the windshield wipers leave smears on
the windshield after the vehicle has been
washed in an automatic car wash, wax or
other residues may be the reason for this.
Clean the windshield using washer fluid
after washing the vehicle in an automatic
car wash.
! Intermittent wiping with rain sensor: due
to optical influences and the windshield
becoming dirty in dry weather conditions,
the windshield wipers may be activated
inadvertently. This could then damage the
windshield wiper blades or scratch the
windshield.
For this reason, you should always switch
off the windshield wipers in dry weather. Combination switch
0047
003F Windshield wiper off
0048 0062 Intermittent wipe, low (rain sensor
set to low sensitivity) Windshield wipers
117Lights and windshield wipers Z
Page 165 of 358
The function of the electric parking brake is
dependent on the on-board voltage. If the on-
board voltage is low or there is a malfunction in the system, it may not be possible to apply
the released parking brake.
X If this is the case, only park the vehicle on
level ground and secure it to prevent it roll-
ing away.
X Vehicles with automatic transmission:
shift the automatic transmission to posi-
tion P.
X Vehicles with manual transmission:
engage first gear.
It may not be possible to release an applied
parking brake if the on-board voltage is low or
there is a malfunction in the system. Contact a qualified specialist workshop.
i The electric parking brake performs a
function test at regular intervals while the
engine is switched off. The sounds that can
be heard while this is occurring are normal.
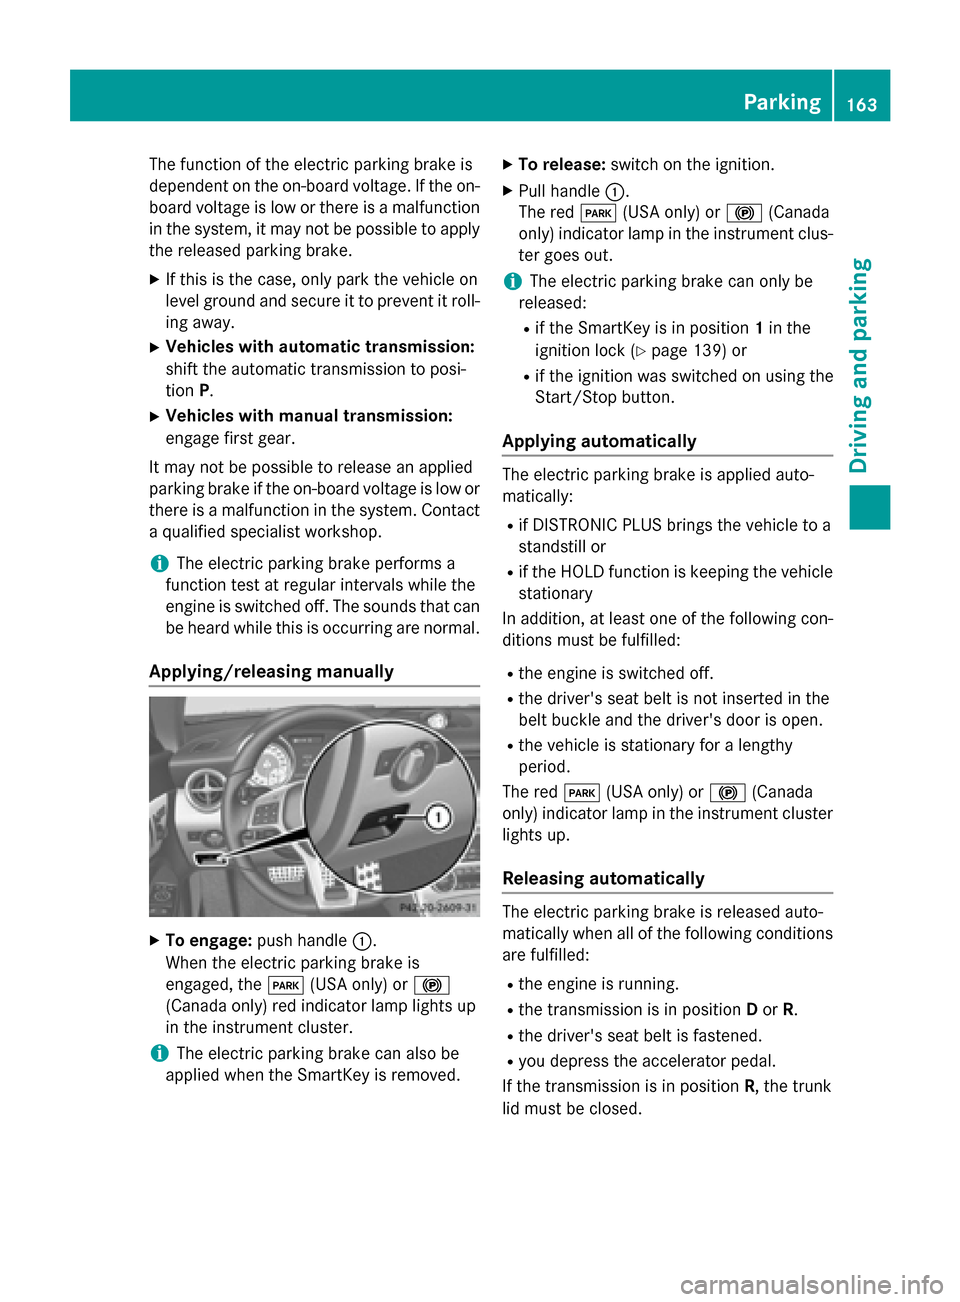
Applying/releasing manually X
To engage: push handle 0043.
When the electric parking brake is
engaged, the 0049(USA only) or 0024
(Canada only) red indicator lamp lights up
in the instrument cluster.
i The electric parking brake can also be
applied when the SmartKey is removed. X
To release: switch on the ignition.
X Pull handle 0043.
The red 0049(USA only) or 0024(Canada
only) indicator lamp in the instrument clus-
ter goes out.
i The electric parking brake can only be
released:
R if the SmartKey is in position 1in the
ignition lock (Y page 139) or
R if the ignition was switched on using the
Start/Stop button.
Applying automatically The electric parking brake is applied auto-
matically:
R if DISTRONIC PLUS brings the vehicle to a
standstill or
R if the HOLD function is keeping the vehicle
stationary
In addition, at least one of the following con-
ditions must be fulfilled:
R the engine is switched off.
R the driver's seat belt is not inserted in the
belt buckle and the driver's door is open.
R the vehicle is stationary for a lengthy
period.
The red 0049(USA only) or 0024(Canada
only) indicator lamp in the instrument cluster
lights up.
Releasing automatically The electric parking brake is released auto-
matically when all of the following conditions
are fulfilled:
R the engine is running.
R the transmission is in position Dor R.
R the driver's seat belt is fastened.
R you depress the accelerator pedal.
If the transmission is in position R, the trunk
lid must be closed. Parking
163Driving and parking Z
Page 208 of 358
X
Press 0076to confirm.
X Press the 0064or0063 button to select the
Amb. Light +/-
Amb. Light +/- function.
You will see the selected setting.
X Press 0076to confirm.
X Press the 0064or0063 button to adjust the
brightness to a level from Off
OfftoLevel 5
Level 5
(bright).
X Press the 0076or0038 button to save the
setting.
Activating/deactivating surround light-
ing and exterior lighting delayed switch-
off
X Press the 0059or0065 button on the steer-
ing wheel to select the Sett
Sett menu.
X Press the 0064or0063 button to select the
Light
Light submenu.
X Press 0076to confirm.
X Press the 0064or0063 button to select the
Surround Lighting Surround Lighting function.
When the Surround Lighting
Surround Lighting function is
activated, the light cone and the area
around the vehicle are displayed in orange
in the multifunction display.
X Press the 0076button to save the setting.
Deactivating delayed switch-off of the exte-
rior lighting temporarily:
X Before leaving the vehicle, turn the Smart-
Key to position 0in the ignition lock.
X Turn the SmartKey to position 2in the igni-
tion lock.
The exterior lighting delayed switch-off is
deactivated.
Delayed switch-off of the exterior lighting is
reactivated the next time you start the
engine.
If you have activated the Surround Light‐
Surround Light‐
ing ing function and the light switch is set to
0058, the following functions are activated
when it is dark:
R surround lighting: the exterior lighting
remains lit for 40 seconds after unlocking
with the SmartKey. If you start the engine, the surround lighting is switched off and
automatic headlamp mode is activated
(Y
page 109).
R exterior lighting delayed switch-off: the
exterior lighting remains lit for 60 seconds
after the engine is switched off. If you close all the doors and the trunk lid, the exterior
lighting goes off after 15 seconds.
i Depending on your vehicle's equipment,
when the surround lighting and delayed
switch-off exterior lighting are on, the fol-
lowing light up:
R Parking lamps
R Front fog lamps
R Low-beam headlamps
R Daytime running lamps
R Side marker lamps
R Surround lighting in the exterior mirrors
Activating/deactivating the interior light-
ing delayed switch-off
If you activate the Interior Lighting
Interior Lighting
Delay Delay function, the interior lighting remains
on for 20 seconds after you remove the
SmartKey from the ignition lock.
X Press the 0059or0065 button on the steer-
ing wheel to select the Sett Settmenu.
X Press the 0064or0063 button to select the
Lights
Lights submenu.
X Press 0076to confirm.
X Press the 0064or0063 button to select the
Interior Lighting Delay
Interior Lighting Delay function.
If the Interior
Interior Lighting
Lighting Delay
Delayfunction
has been switched on, the vehicle interior is displayed in orange in the multifunction
display.
X Press the 0076button to save the setting. 206
Menus and submenusOn-board computer and displays