2015 MERCEDES-BENZ SLK-Class battery
[x] Cancel search: batteryPage 79 of 358
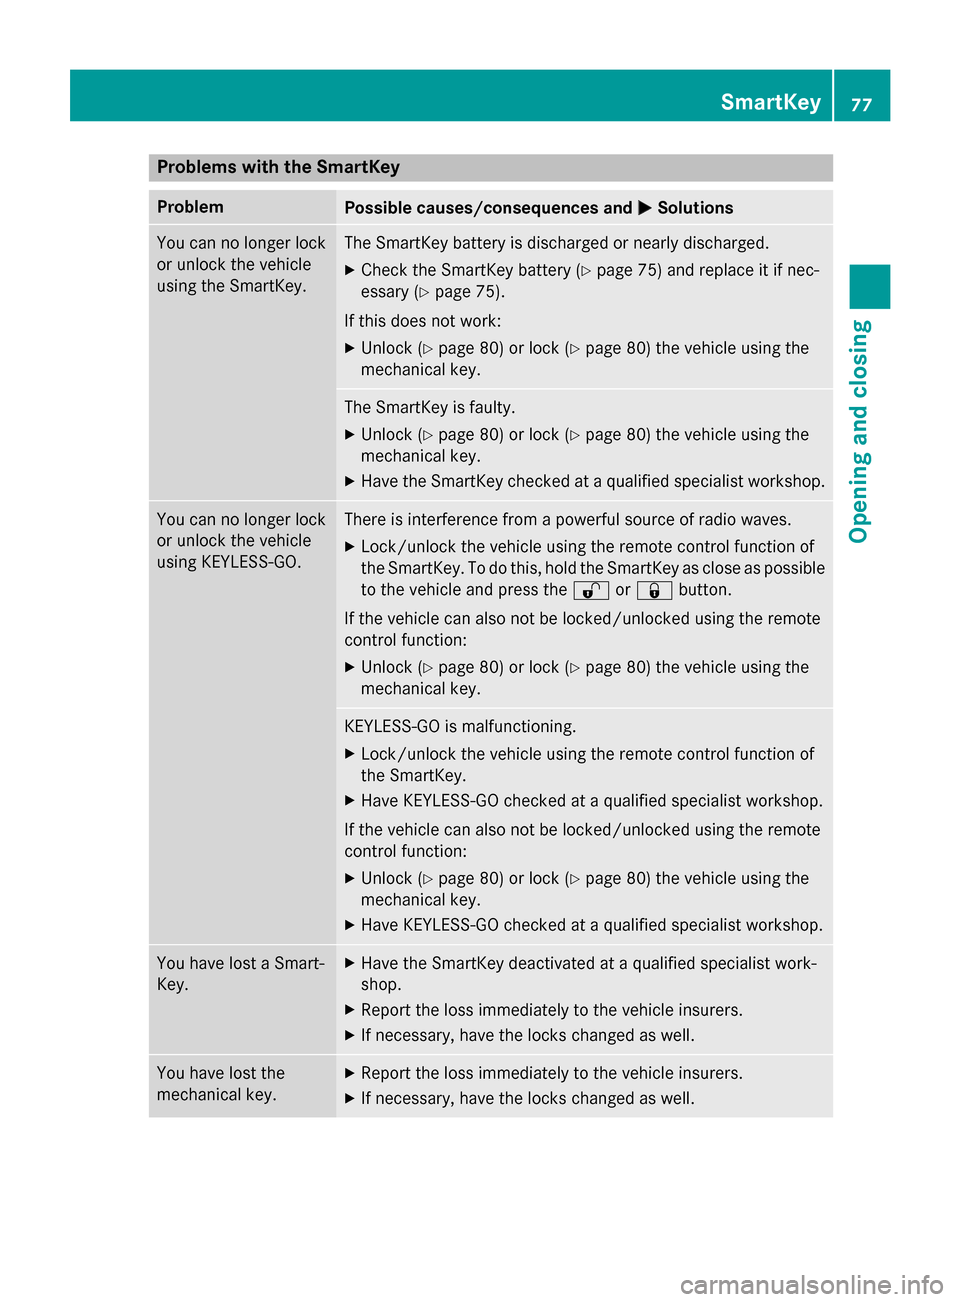
Problems with the SmartKey
Problem
Possible causes/consequences and
0050
0050Solutions You can no longer lock
or unlock the vehicle
using the SmartKey. The SmartKey battery is discharged or nearly discharged.
X Check the SmartKey battery (Y page 75) and replace it if nec-
essary (Y page 75).
If this does not work:
X Unlock (Y page 80) or lock (Y page 80) the vehicle using the
mechanical key. The SmartKey is faulty.
X Unlock (Y page 80) or lock (Y page 80) the vehicle using the
mechanical key.
X Have the SmartKey checked at a qualified specialist workshop. You can no longer lock
or unlock the vehicle
using KEYLESS-GO. There is interference from a powerful source of radio waves.
X Lock/unlock the vehicle using the remote control function of
the SmartKey. To do this, hold the SmartKey as close as possible
to the vehicle and press the 0036or0037 button.
If the vehicle can also not be locked/unlocked using the remote
control function:
X Unlock (Y page 80) or lock (Y page 80) the vehicle using the
mechanical key. KEYLESS-GO is malfunctioning.
X Lock/unlock the vehicle using the remote control function of
the SmartKey.
X Have KEYLESS-GO checked at a qualified specialist workshop.
If the vehicle can also not be locked/unlocked using the remote
control function:
X Unlock (Y page 80) or lock (Y page 80) the vehicle using the
mechanical key.
X Have KEYLESS-GO checked at a qualified specialist workshop. You have lost a Smart-
Key. X
Have the SmartKey deactivated at a qualified specialist work-
shop.
X Report the loss immediately to the vehicle insurers.
X If necessary, have the locks changed as well. You have lost the
mechanical key. X
Report the loss immediately to the vehicle insurers.
X If necessary, have the locks changed as well. SmartKey
77Opening and closing Z
Page 80 of 358
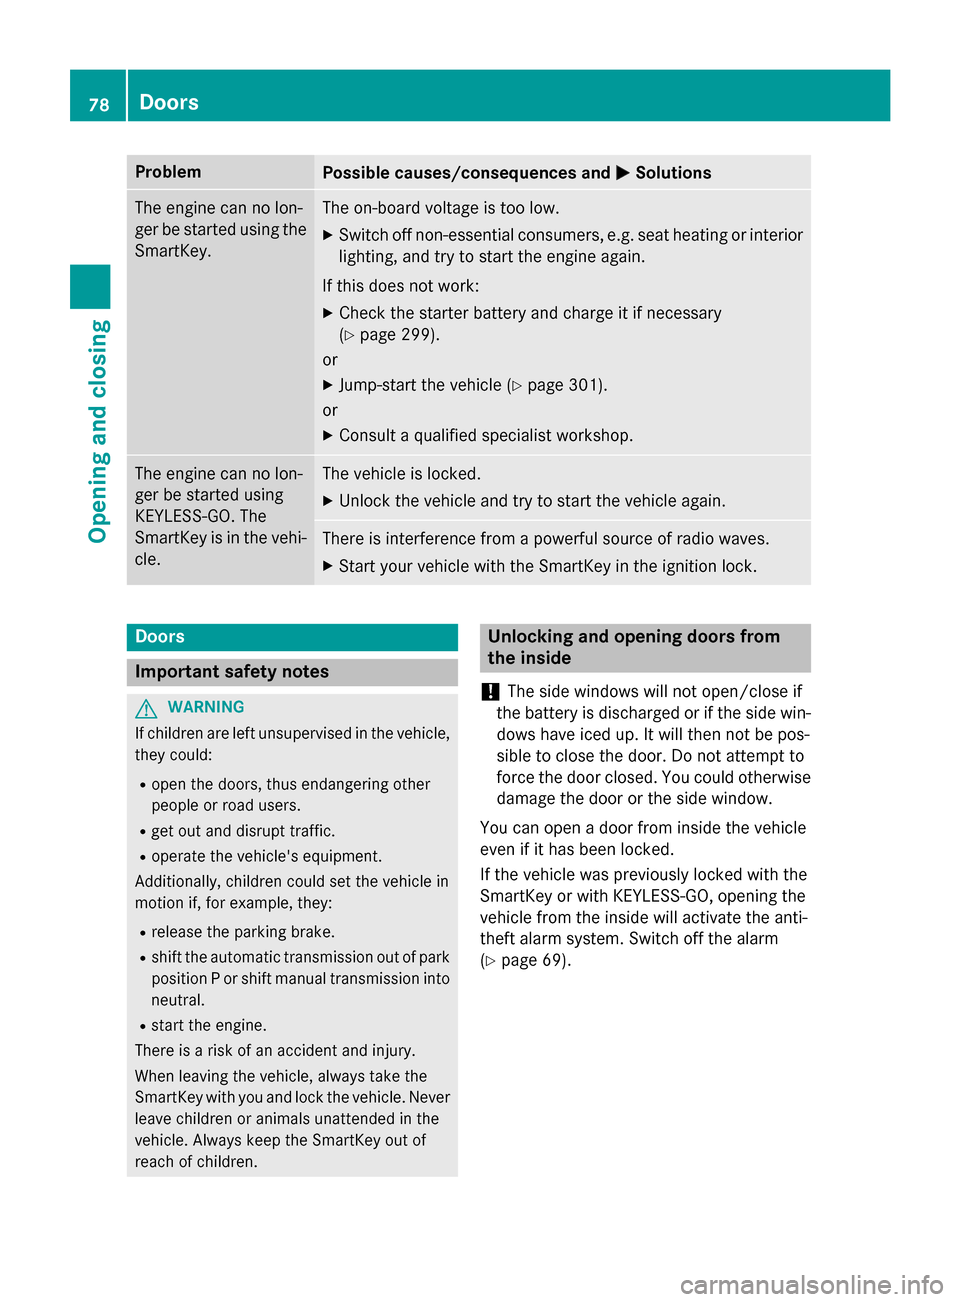
Problem
Possible causes/consequences and
0050
0050Solutions The engine can no lon-
ger be started using the SmartKey. The on-board voltage is too low.
X Switch off non-essential consumers, e.g. seat heating or interior
lighting, and try to start the engine again.
If this does not work:
X Check the starter battery and charge it if necessary
(Y page 299).
or
X Jump-start the vehicle (Y page 301).
or
X Consult a qualified specialist workshop. The engine can no lon-
ger be started using
KEYLESS-GO. The
SmartKey is in the vehi-
cle. The vehicle is locked.
X Unlock the vehicle and try to start the vehicle again. There is interference from a powerful source of radio waves.
X Start your vehicle with the SmartKey in the ignition lock. Doors
Important safety notes
G
WARNING
If children are left unsupervised in the vehicle, they could:
R open the doors, thus endangering other
people or road users.
R get out and disrupt traffic.
R operate the vehicle's equipment.
Additionally, children could set the vehicle in
motion if, for example, they:
R release the parking brake.
R shift the automatic transmission out of park
position P or shift manual transmission into
neutral.
R start the engine.
There is a risk of an accident and injury.
When leaving the vehicle, always take the
SmartKey with you and lock the vehicle. Never leave children or animals unattended in the
vehicle. Always keep the SmartKey out of
reach of children. Unlocking and opening doors from
the inside
! The side windows will not open/close if
the battery is discharged or if the side win- dows have iced up. It will then not be pos-
sible to close the door. Do not attempt to
force the door closed. You could otherwise
damage the door or the side window.
You can open a door from inside the vehicle
even if it has been locked.
If the vehicle was previously locked with the
SmartKey or with KEYLESS-GO, opening the
vehicle from the inside will activate the anti-
theft alarm system. Switch off the alarm
(Y page 69). 78
DoorsOpening and closing
Page 85 of 358

0047
Basic position
0048 To unlock
X Turn the mechanical key counter-clockwise
as far as it will go from position 0047to posi-
tion 0048.
X Pull the trunk lid handle.
The trunk is unlocked.
X Turn the mechanical key back to position
0047 and remove it.
X Insert mechanical key into the SmartKey
(Y page 74).
i When you lock the vehicle (Y
page 80),
the trunk is also locked. Trunk emergency release
You can unlock the trunk lid from the inside
with the emergency release button. X
Press emergency release button 0043briefly.
The trunk lid unlocks and opens.
The trunk lid can be unlocked with the trunk
lid emergency release when the vehicle is
stationary or while driving. The trunk lid emergency release does not
unlock the trunk lid if the battery is discon-
nected or discharged.
Trunk lid emergency release light:
R emergency release button 0043flashes for
30 minutes after the trunk lid is opened
R emergency release button 0043flashes for
60 minutes after the trunk lid is closed Side windows
Important safety notes
G
WARNING
While opening the side windows, body parts
could become trapped between the side win- dow and the door frame as the side window
moves. There is a risk of injury.
Make sure that nobody touches the side win-
dow during the opening procedure. If some-
body becomes trapped, release the switch or pull the switch to close the side window again. G
WARNING
While closing the side windows, body parts in the closing area could become trapped. There is a risk of injury.
When closing make sure that no parts of the
body are in the closing area. If somebody
becomes trapped, release the switch or press
the switch to open the side window again. G
WARNING
If children operate the side windows they
could become trapped, particularly if they are left unsupervised. There is a risk of injury.
When leaving the vehicle, always take the
SmartKey with you and lock the vehicle. Never
leave children unsupervised in the vehicle. Side window reversing feature
The front side windows are equipped with an automatic reversing feature. If a solid object
blocks or restricts one of the front side win- Side windows
83Opening and closing Z
Page 101 of 358
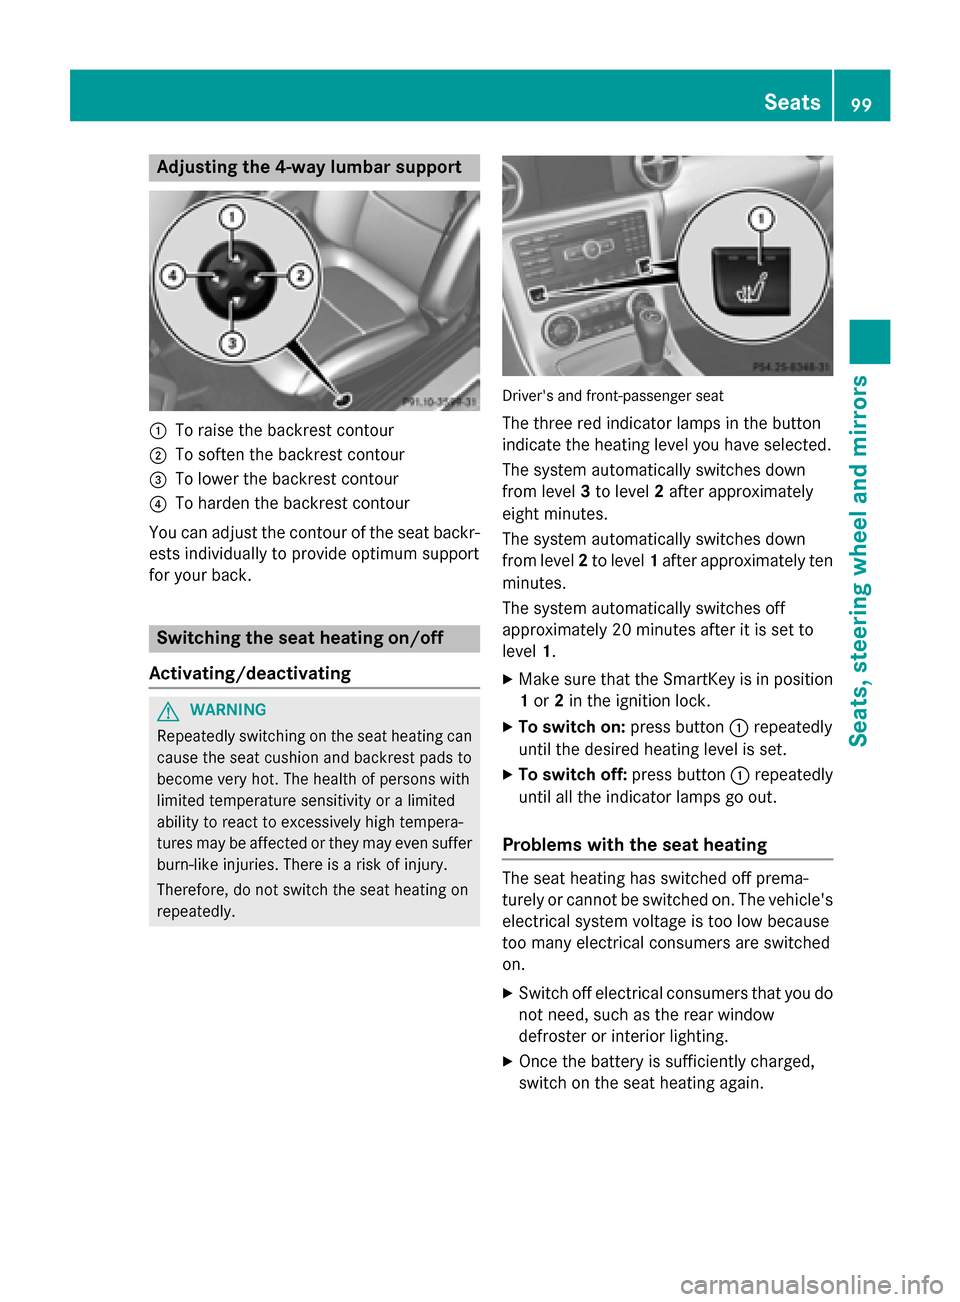
Adjusting the 4-way lumbar support
0043
To raise the backrest contour
0044 To soften the backrest contour
0087 To lower the backrest contour
0085 To harden the backrest contour
You can adjust the contour of the seat backr-
ests individually to provide optimum support
for your back. Switching the seat heating on/off
Activating/deactivating G
WARNING
Repeatedly switching on the seat heating can
cause the seat cushion and backrest pads to
become very hot. The health of persons with
limited temperature sensitivity or a limited
ability to react to excessively high tempera-
tures may be affected or they may even suffer burn-like injuries. There is a risk of injury.
Therefore, do not switch the seat heating on
repeatedly. Driver's and front-passenger seat
The three red indicator lamps in the button
indicate the heating level you have selected.
The system automatically switches down
from level 3to level 2after approximately
eight minutes.
The system automatically switches down
from level 2to level 1after approximately ten
minutes.
The system automatically switches off
approximately 20 minutes after it is set to
level 1.
X Make sure that the SmartKey is in position
1 or 2in the ignition lock.
X To switch on: press button0043repeatedly
until the desired heating level is set.
X To switch off: press button0043repeatedly
until all the indicator lamps go out.
Problems with the seat heating The seat heating has switched off prema-
turely or cannot be switched on. The vehicle's
electrical system voltage is too low because
too many electrical consumers are switched
on.
X Switch off electrical consumers that you do
not need, such as the rear window
defroster or interior lighting.
X Once the battery is sufficiently charged,
switch on the seat heating again. Seats
99Seats, steering wheel and mirrors Z
Page 102 of 358
AIRSCARF
Activating/deactivating G
WARNING
When AIRSCARF is switched on, very hot air
can flow from the vents in the head restraints. This could result in burns in the immediate
vicinity of the air vents. There is a risk of injury.
Reduce the heater output before it becomes
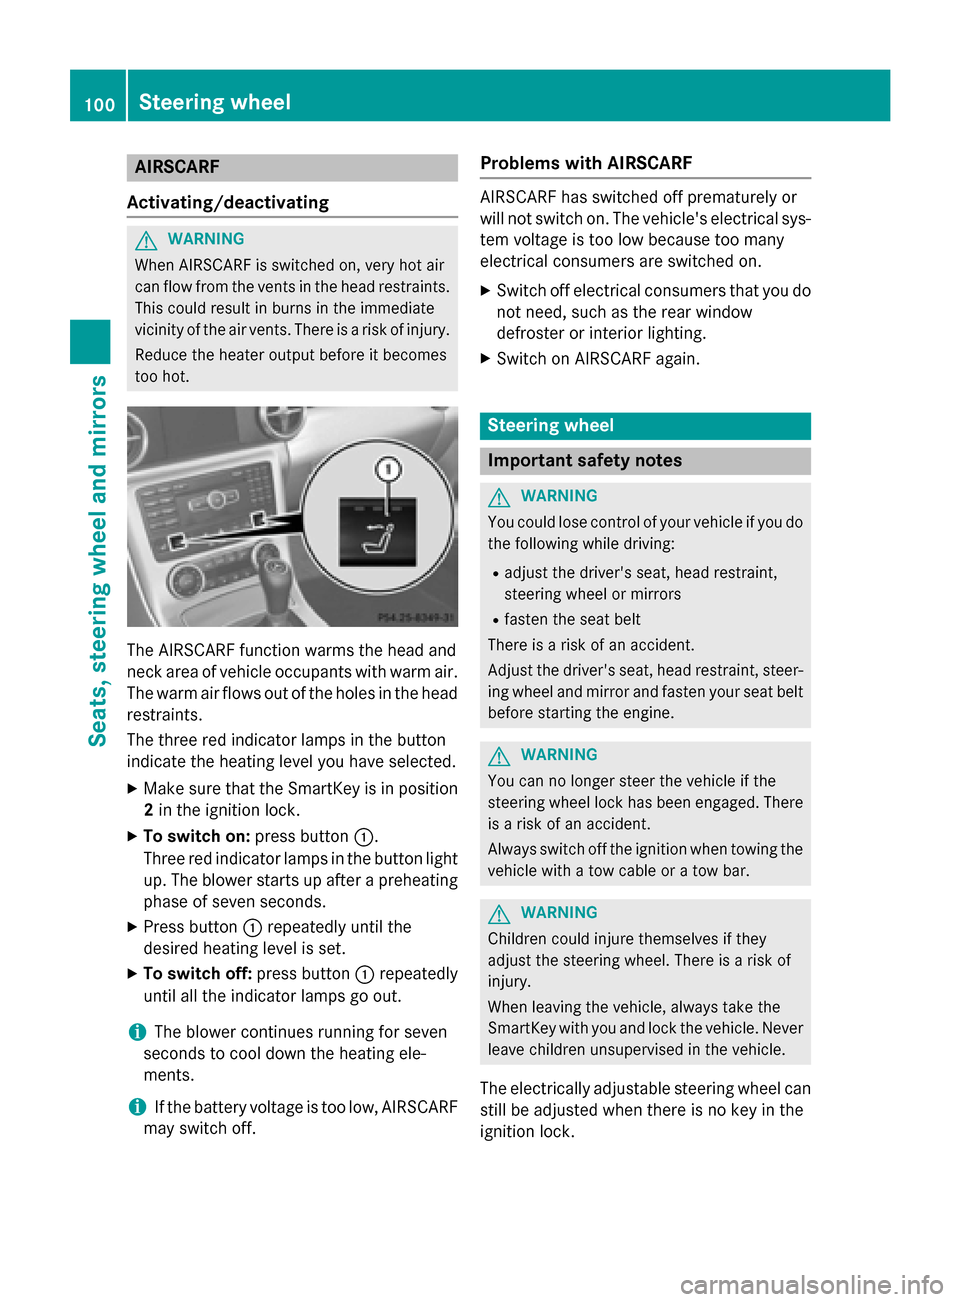
too hot. The AIRSCARF function warms the head and
neck area of vehicle occupants with warm air.
The warm air flows out of the holes in the head restraints.
The three red indicator lamps in the button
indicate the heating level you have selected.
X Make sure that the SmartKey is in position
2 in the ignition lock.
X To switch on: press button0043.
Three red indicator lamps in the button light
up. The blower starts up after a preheating phase of seven seconds.
X Press button 0043repeatedly until the
desired heating level is set.
X To switch off: press button0043repeatedly
until all the indicator lamps go out.
i The blower continues running for seven
seconds to cool down the heating ele-
ments.
i If the battery voltage is too low, AIRSCARF
may switch off. Problems with AIRSCARF AIRSCARF has switched off prematurely or
will not switch on. The vehicle's electrical sys-
tem voltage is too low because too many
electrical consumers are switched on.
X Switch off electrical consumers that you do
not need, such as the rear window
defroster or interior lighting.
X Switch on AIRSCARF again. Steering wheel
Important safety notes
G
WARNING
You could lose control of your vehicle if you do the following while driving:
R adjust the driver's seat, head restraint,
steering wheel or mirrors
R fasten the seat belt
There is a risk of an accident.
Adjust the driver's seat, head restraint, steer-
ing wheel and mirror and fasten your seat belt before starting the engine. G
WARNING
You can no longer steer the vehicle if the
steering wheel lock has been engaged. There is a risk of an accident.
Always switch off the ignition when towing the
vehicle with a tow cable or a tow bar. G
WARNING
Children could injure themselves if they
adjust the steering wheel. There is a risk of
injury.
When leaving the vehicle, always take the
SmartKey with you and lock the vehicle. Never leave children unsupervised in the vehicle.
The electrically adjustable steering wheel can
still be adjusted when there is no key in the
ignition lock. 100
Steering wheelSeats
, steering wheel and mirrors
Page 112 of 358
with the parking lamps and low-beam head-
lamps.
X To switch on the front fog lamps: turn
the SmartKey in the ignition lock to position 2 or start the engine.
X Turn the light switch to 0058or0058.
X Press the 005Abutton.
The green 005Aindicator lamp in the instru-
ment cluster lights up.
X To switch off the front fog lamps: press
the 005A button.
The green 005Aindicator lamp in the instru-
ment cluster goes out.
Only vehicles with front fog lamps have the
fog lamps function.
Rear fog lamp
The rear fog lamp improves visibility of your
vehicle for the traffic behind in the event of
thick fog. Please take note of the country-
specific regulations for the use of rear fog
lamps.
X To switch on the rear fog lamps: turn the
SmartKey in the ignition lock to position 2
or start the engine.
X Turn the light switch to 0058or0058.
X Press the 005Ebutton.
The yellow 005Eindicator lamp in the
instrument cluster lights up.
X To switch off the rear fog lamp: press the
005E button.
The yellow 005Eindicator lamp in the
instrument cluster goes out.
Parking lamps ! If the battery has been excessively dis-
charged, the parking lamps or standing
lamps are automatically switched off to
enable the next engine start. Always park
your vehicle safely and sufficiently lit
according to legal standards. Avoid the
continuous use of the 0060parking lamps
for several hours. If possible, switch on the
0064 right or the 0063left standing lamp. X
To switch on: turn the light switch to 0060.
The green 0060indicator lamp in the instru-
ment cluster lights up.
Standing lamps
Switching on the standing lamps ensures the
corresponding side of the vehicle is illumina-
ted.
X To switch on the standing lamps: the
SmartKey is not in the ignition lock or it is in position 0.
X Turn the light switch to 0063(left-hand side
of the vehicle) or 0064(right-hand side of
the vehicle). Combination switch
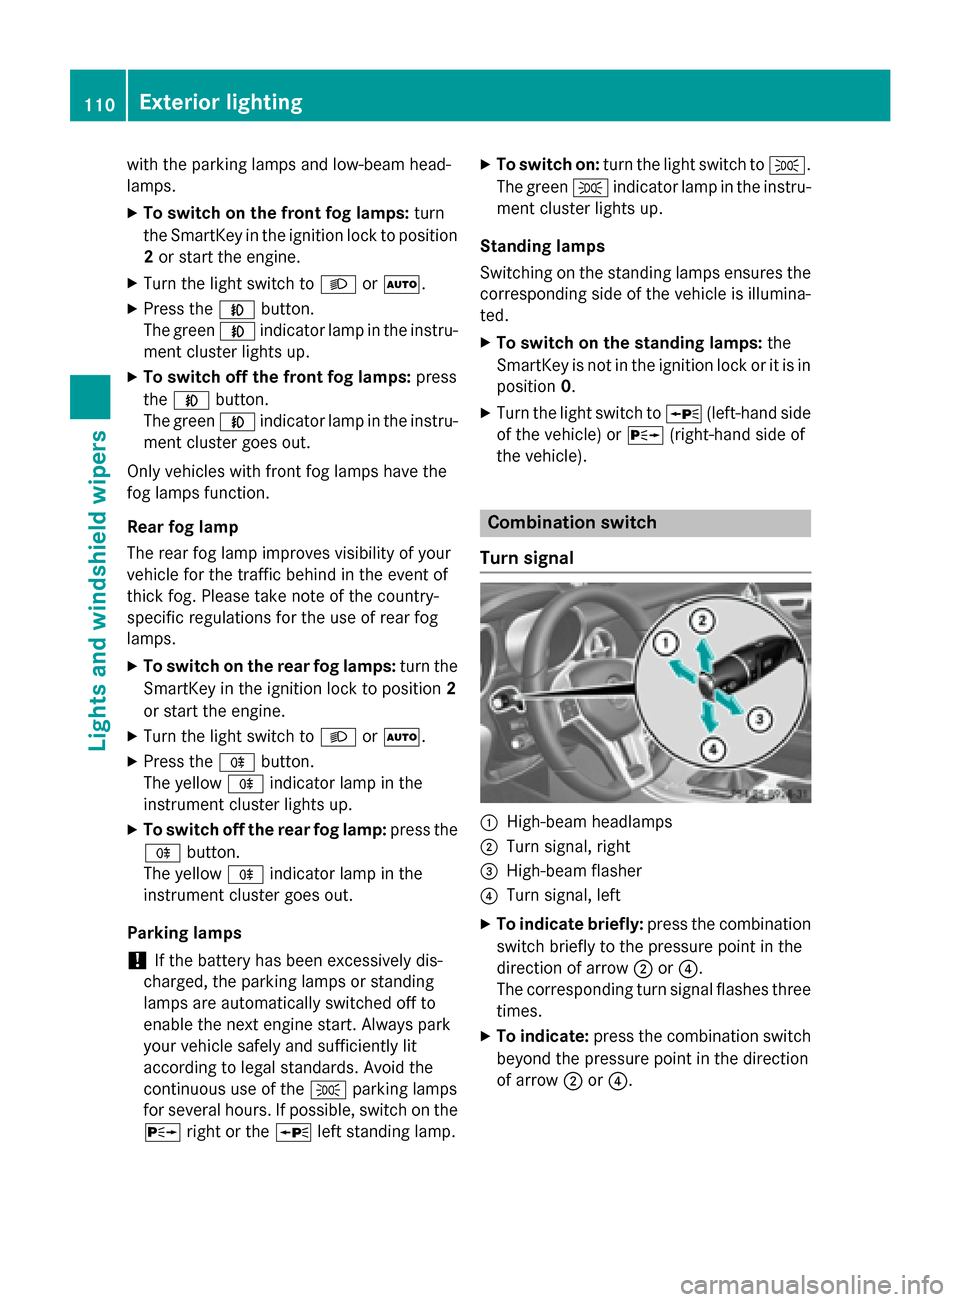
Turn signal 0043
High-beam headlamps
0044 Turn signal, right
0087 High-beam flasher
0085 Turn signal, left
X To indicate briefly: press the combination
switch briefly to the pressure point in the
direction of arrow 0044or0085.
The corresponding turn signal flashes three
times.
X To indicate: press the combination switch
beyond the pressure point in the direction
of arrow 0044or0085. 110
Exterior lightingLights and windshield wipers
Page 115 of 358
Switching Adaptive Highbeam Assist
on/off X
To switch on: turn the light switch to 0058.
X Press the combination switch beyond the
pressure point in the direction of arrow 0043.
The 00CE indicator lamp in the multifunc-
tion display lights up when it is dark and the light sensor activates the low-beam head-
lamps.
If you are driving at speeds above approx-
imately 16 mph (25 km/h):
The headlamp range is set automatically
depending on the distance between the
vehicle and other road users.
If you are driving at speeds above approx-
imately 19 mph (30 km/h) and no other
road users have been detected:
The high-beam headlamps are switched on
automatically. The 0057indicator lamp in
the instrument cluster also lights up.
If you are driving at speeds below approx-
imately 16 mph (25 km/h) or other road
users have been detected or the roads are adequately lit:
The high-beam headlamps are switched off
automatically. The 0057indicator lamp in
the instrument cluster goes out. The 00CE
indicator lamp in the multifunction display
remains lit.
X To switch off: move the combination
switch back to its normal position or move
the light switch to another position.
The 00CE indicator lamp in the multifunc-
tion display goes out. Headlamps fogged up on the inside
Certain climatic and physical conditions may
cause moisture to form in the headlamp. This moisture does not affect the functionality of
the headlamp. Interior lighting
Overview of interior lighting
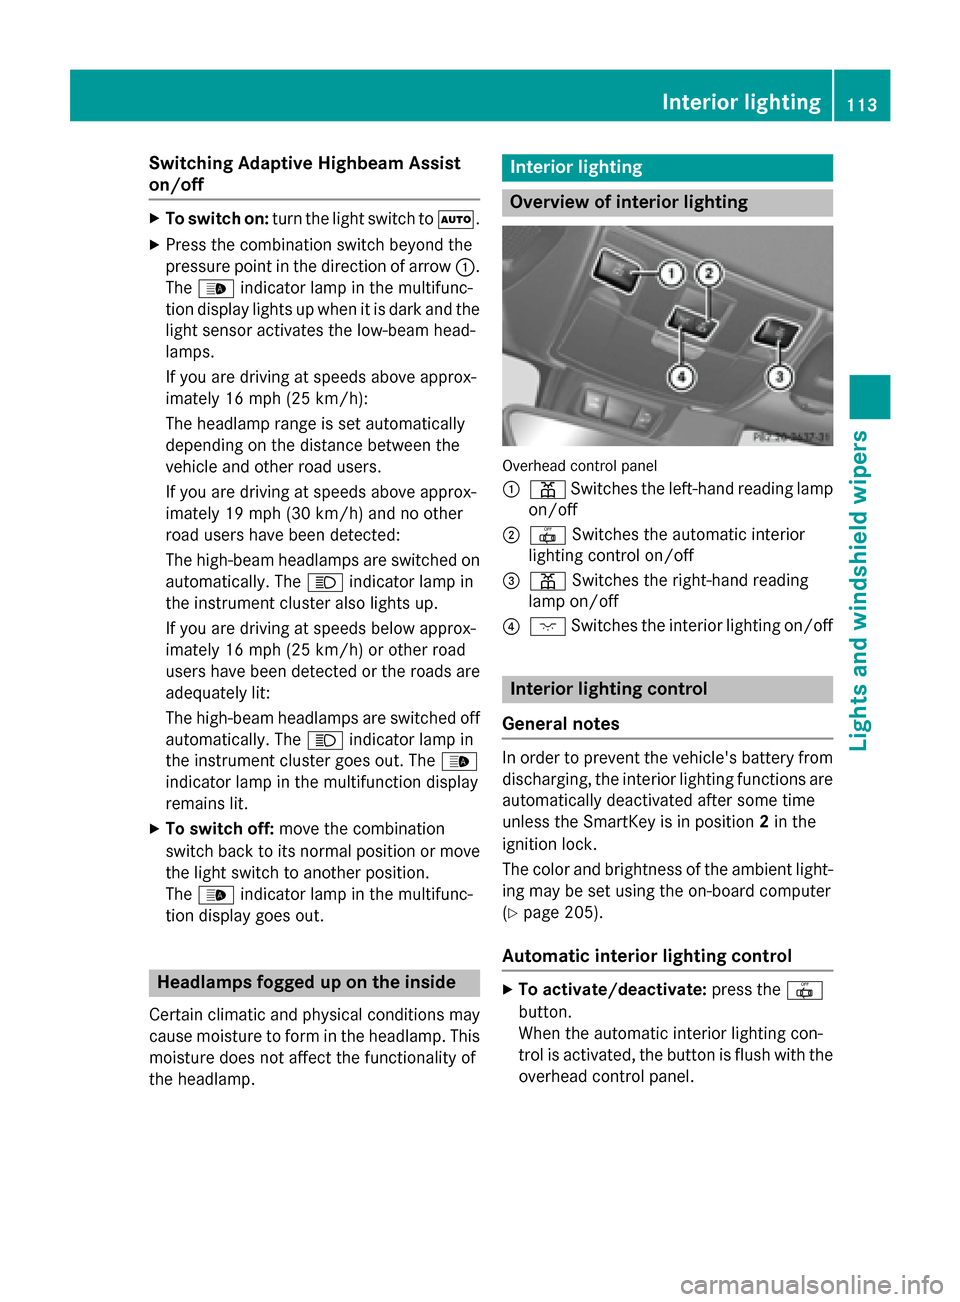
Overhead control panel
0043
003D Switches the left-hand reading lamp
on/off
0044 0033 Switches the automatic interior
lighting control on/off
0087 003D Switches the right-hand reading
lamp on/off
0085 004A Switches the interior lighting on/off Interior lighting control
General notes In order to prevent the vehicle's battery from
discharging, the interior lighting functions are
automatically deactivated after some time
unless the SmartKey is in position 2in the
ignition lock.
The color and brightness of the ambient light-
ing may be set using the on-board computer
(Y page 205).
Automatic interior lighting control X
To activate/deactivate: press the0033
button.
When the automatic interior lighting con-
trol is activated, the button is flush with the overhead control panel. Interior lighting
113Lights and windshield wipers Z
Page 134 of 358
Rear window defroster
General notes The rear window defroster has a high current
draw. You should therefore switch it off as
soon as the rear window is clear. Otherwise,
the rear window defroster switches off auto-
matically after several minutes.
If the battery voltage is too low, the rear win-
dow defroster may switch off.
Activating/deactivating X
Turn the SmartKey to position 2in the igni-
tion lock (Y page 139).
X Press the 006Cbutton.
The indicator lamp in the 006Cbutton lights
up or goes out. 132
Operating the climate control systemsClimate control