2015 MERCEDES-BENZ SLK-Class oil level
[x] Cancel search: oil levelPage 11 of 358

ECO start/stop function
Automatic engine start .................. 146
Automatic engine switch-off .......... 144
Deactivating/activating ................ .147
General information ....................... 144
Important safety notes .................. 143
Introduction ................................... 143
Electronic Stability Program
see ESP ®
(Electronic Stability Program)
Emergency
Automatic measures after an acci-
dent ................................................. 57
Emergency release
Driver's door ................................... .80
Trunk ............................................... 83
Vehicle ............................................. 80
Emergency spare wheel
General notes ................................ 341
Important safety notes .................. 341
Removing ....................................... 341
Stowing .......................................... 342
Technical data ...............................3 44
Emergency Tensioning Devices
Activation ......................................... 54
Emissions control
Service and warranty information .... 22
Engine
Check Engine warning lamp ........... 251
Display message ............................ 228
ECO start/stop function ................ 143
Engine number ............................... 347
Irregular running ............................ 149
Jump-starting ................................. 301
Starting problems .......................... 149
Starting the engine with the
SmartKey ....................................... 142
Starting with KEYLESS-GO ............. 142
Switching off .................................. 162
Tow-starting (vehicle) ..................... 306
Engine electronics
Problem (malfunction) ................... 149
Engine oil
Adding .......................................... .280
Additives ........................................ 350
Checking the oil level ..................... 279
Checking the oil level using the
dipstick .......................................... 279 Display message ............................ 230
Filling capacity ............................... 350
Notes about oil grades ................... 349
Notes on oil level/consumption .... 279
Temperature (on-board com-
puter) ............................................. 208
Viscosity ........................................ 350
ESP ®
(Electronic Stability Pro-
gram) AMG menu (on-board computer) ... 209
Characteristics ................................. 64
Deactivating/activating (AMG
vehicles) .......................................... 65
Deactivating/activating (notes;
except AMG vehicles) ..................... .64
Display message ............................ 213
ETS .................................................. 63
Function/note s................................ 63
General notes .................................. 63
Important safety information ........... 64
Warning lamp ................................. 247
ETS (Electronic Traction System) ....... 63
Exhaust check ................................... 165
Exhaust pipe (cleaning instruc-
tions) .................................................. 287
Exterior lighting Setting options .............................. 108
see Lights
Exterior mirrors
Adjusting ....................................... 103
Dipping (automatic) ....................... 104
Folding in/out (automatically )....... 104
Folding in/out (electrically) ........... 104
Folding in when locking (on-board
computer) ...................................... 208
Out of position (troubleshooting) ... 104
Storing settings (memory func-
tion) ............................................... 106
Storing the parking position .......... 105
Eyeglasses compartment ................. 257 F
Filler cap see Fuel filler flap
Filling capacities (Technical data) ... 347
Flat tire MOExtended tire s.......................... 293 Index
9
Page 160 of 358
Problems with the transmission
Problem
Possible causes/consequences and
0050
0050Solutions The transmission has
problems shifting gear. The transmission is losing oil.
X Have the transmission checked at a qualified specialist work-
shop immediately. The acceleration ability
is deteriorating.
The transmission no
longer changes gear. The transmission is in emergency mode.
It is only possible to shift into
secondgear and reverse gear.
X Stop the vehicle.
X Shift the transmission to position P.
X Switch off the engine.
X Wait at least ten seconds before restarting the engine.
X Shift the transmission to position Dor R.
If D is selected, the transmission shifts into secondgear; ifRis
selected, the transmission shifts into reverse gear.
X Have the transmission checked at a qualified specialist work-
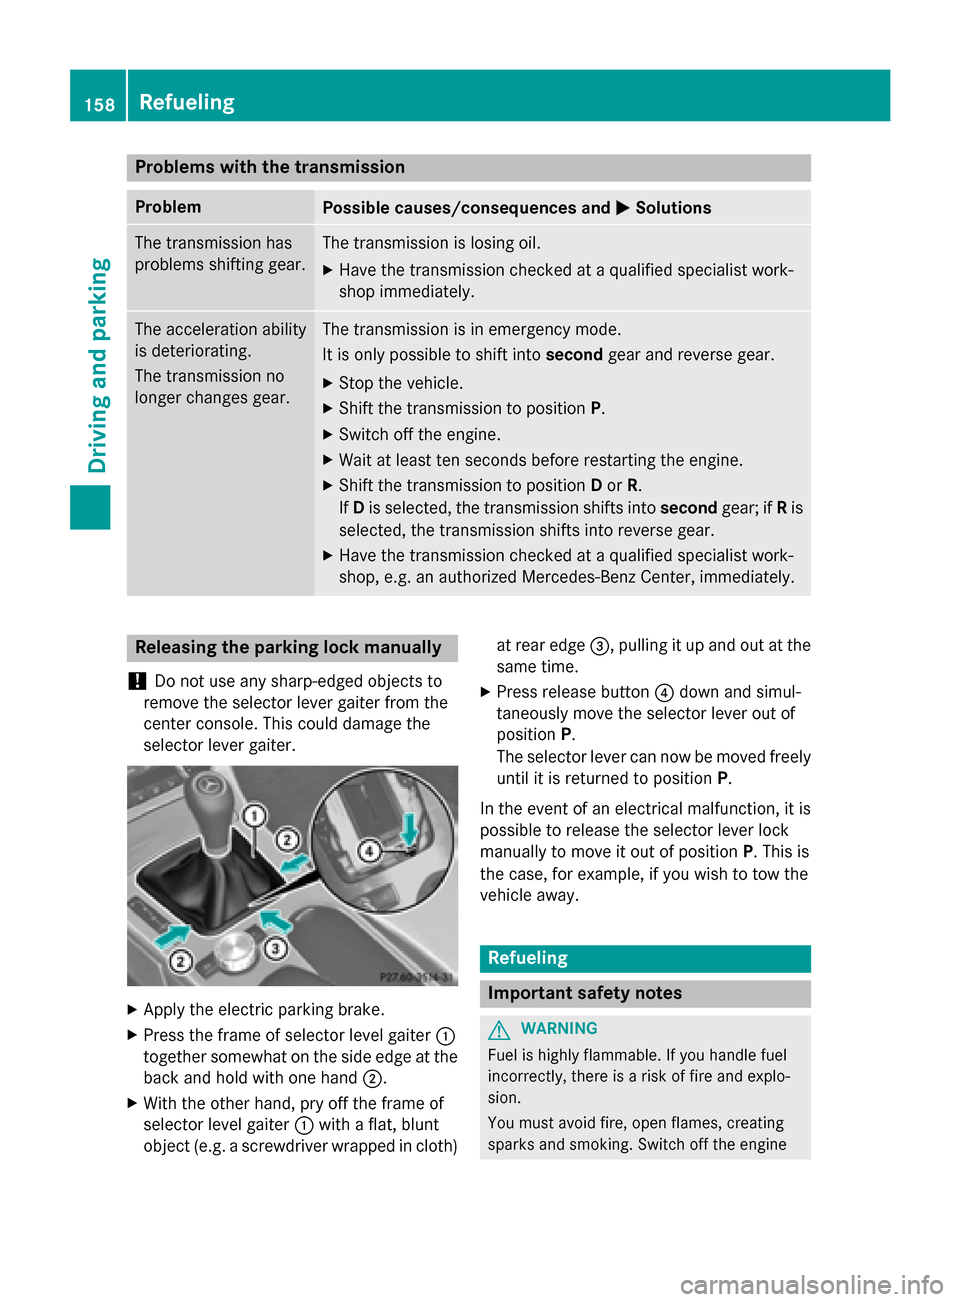
shop, e.g. an authorized Mercedes-Benz Center, immediately. Releasing the parking lock manually
! Do not use any sharp-edged objects to
remove the selector lever gaiter from the
center console. This could damage the
selector lever gaiter. X
Apply the electric parking brake.
X Press the frame of selector level gaiter 0043
together somewhat on the side edge at the back and hold with one hand 0044.
X With the other hand, pry off the frame of
selector level gaiter 0043with a flat, blunt
object (e.g. a screwdriver wrapped in cloth) at rear edge
0087, pulling it up and out at the
same time.
X Press release button 0085down and simul-
taneously move the selector lever out of
position P.
The selector lever can now be moved freely
until it is returned to position P.
In the event of an electrical malfunction, it is
possible to release the selector lever lock
manually to move it out of position P. This is
the case, for example, if you wish to tow the
vehicle away. Refueling
Important safety notes
G
WARNING
Fuel is highly flammable. If you handle fuel
incorrectly, there is a risk of fire and explo-
sion.
You must avoid fire, open flames, creating
sparks and smoking. Switch off the engine 158
RefuelingDriving and parking
Page 232 of 358
Display messages
Possible causes/consequences and
0050
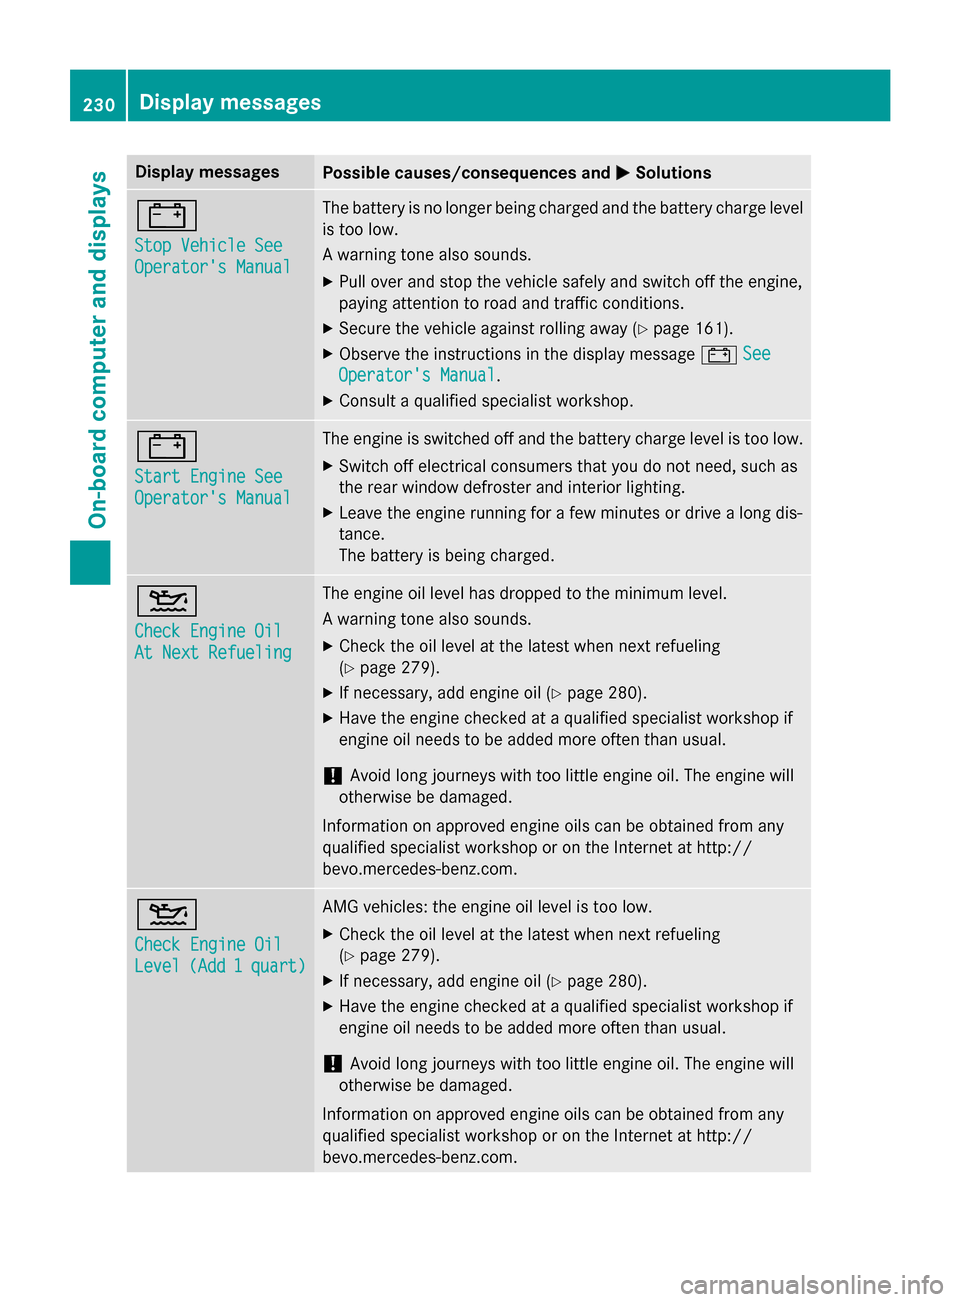
0050Solutions 003D
Stop Vehicle See Stop Vehicle See
Operator's Manual Operator's Manual The battery is no longer being charged and the battery charge level
is too low.
A warning tone also sounds.
X Pull over and stop the vehicle safely and switch off the engine,
paying attention to road and traffic conditions.
X Secure the vehicle against rolling away (Y page 161).
X Observe the instructions in the display message 003DSee See
Operator's Manual
Operator's Manual .
X Consult a qualified specialist workshop. 003D
Start Engine See Start Engine See
Operator's Manual Operator's Manual The engine is switched off and the battery charge level is too low.
X Switch off electrical consumers that you do not need, such as
the rear window defroster and interior lighting.
X Leave the engine running for a few minutes or drive a long dis-
tance.
The battery is being charged. 00B2
Check Engine Oil Check Engine Oil
At Next Refueling At Next Refueling The engine oil level has dropped to the minimum level.
A warning tone also sounds.
X Check the oil level at the latest when next refueling
(Y page 279).
X If necessary, add engine oil (Y page 280).
X Have the engine checked at a qualified specialist workshop if
engine oil needs to be added more often than usual.
! Avoid long journeys with too little engine oil. The engine will
otherwise be damaged.
Information on approved engine oils can be obtained from any
qualified specialist workshop or on the Internet at http://
bevo.mercedes-benz.co m.00B2
Check Engine Oil Check Engine Oil
Level Level
(Add
(Add1
1quart)
quart) AMG vehicles: the engine oil level is too low.
X Check the oil level at the latest when next refueling
(Y page 279).
X If necessary, add engine oil (Y page 280).
X Have the engine checked at a qualified specialist workshop if
engine oil needs to be added more often than usual.
! Avoid long journeys with too little engine oil. The engine will
otherwise be damaged.
Information on approved engine oils can be obtained from any
qualified specialist workshop or on the Internet at http://
bevo.mercedes-benz.com. 230
Display messagesOn-board computer and displays
Page 271 of 358

X
Press OK
OKto confirm the message.
The voice connection with the Customer
Assistance center is terminated.
You will see the Vehicle Diagnosis: Vehicle Diagnosis:
Transferring data...
Transferring data... message.
The vehicle data is sent to the Customer
Assistance center.
Depending on what the customer service rep-
resentative agreed with you, the voice con-
nection is re-established after the transfer is
complete. If necessary, you will be contacted at a later time by another means, e.g. by e-
mail or phone.
Further functions of the vehicle remote mal-
function diagnosis include, for example:
R transfer of service data to the Customer
Assistance center. If a service is overdue,
the COMAND display shows a message
about various special offers at your work-
shop.
R monthly status information e-mail on oil
level, air pressure, maintenance, brakes,
etc. If applicable, you will receive informa-
tion on special offers in the e-mail.
USA only: this information can also be
called up under "Owners Online" at http://
www.mbusa.com.
Information on the data stored in the vehicle
(Y page 27).
Information on Roadside Assistance
(Y page 23).
Downloading routes Downloading routes allows you to transfer
and save predefined routes in the navigation
system. To do this, an SD memory card must
be inserted into the COMAND system. If no
SD memory card is inserted, you must insert
the card into the card slot on the COMAND
system before saving.
A route can be prepared and sent either by a
customer service representative or via the
mbrace portal on the Internet.
Each route can include up to 20 way points.
Once a route has been received by the navi- gation system, you will see the
name> has
hasbeen
been saved
saved to
tomemory
memory card.
card.
Do
Do you
you want
want to
tostart
start route
routeguidance?
guidance?
message in the COMAND display. The route is
saved to the SD memory card.
X To start route guidance: selectYes
Yes.
An overview of the route is shown in the
display.
i If you select
No No, the saved route can be
called up later via the navigation menu.
X Select Start
Start.
Route guidance is started.
i Downloaded and saved data can be called
up again in COMAND.
You can find further information in the sep-
arate COMAND Operating Instructions.
Speed alert You can define the upper speed limit, which
must not be exceeded by the vehicle.
If this selected speed is exceeded by the vehi-
cle, a message will be sent to the Customer
Assistance Center. The Customer Assistance Center then forwards this information to you.
You can select the way in which you receive
this information beforehand. Possible options
include text message, e-mail or an automated call.
The data you receive contains the following
information:
R the location where the speed limit was
exceeded
R the time at which the speed limit was
exceeded
R the selected speed limit which was excee-
ded
Geo fencing Geo fencing allows you to select areas which
the vehicle should not enter or leave. You will
be informed if the vehicle crosses the boun-
daries of the selected areas. You can select
the way in which you receive this information Features
269Stowage and features Z
Page 281 of 358
X
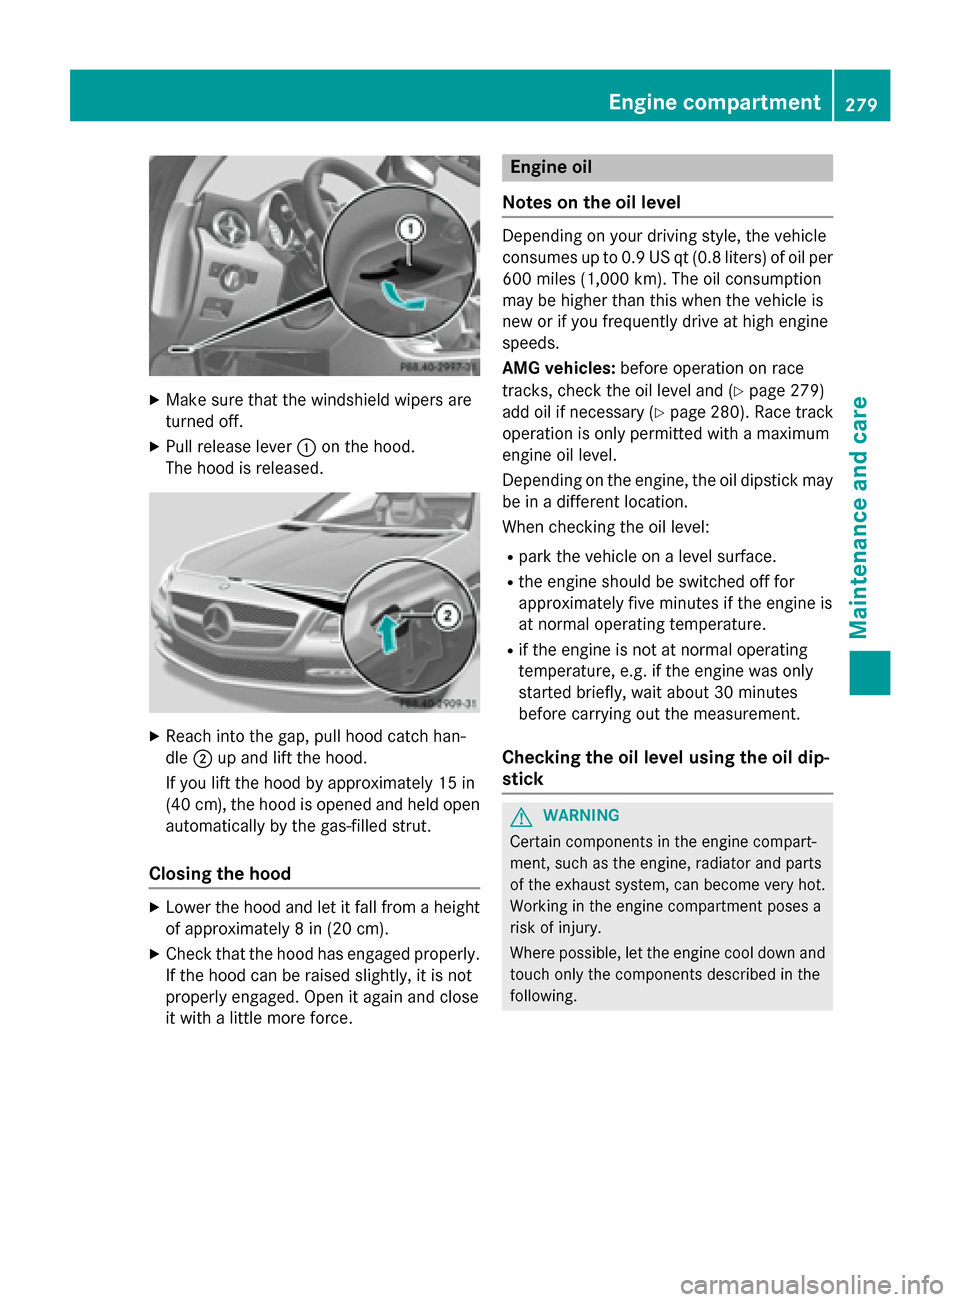
Make sure that the windshield wipers are
turned off.
X Pull release lever 0043on the hood.
The hood is released. X
Reach into the gap, pull hood catch han-
dle 0044up and lift the hood.
If you lift the hood by approximately 15 in
(40 cm), the hood is opened and held open automatically by the gas-filled strut.
Closing the hood X
Lower the hood and let it fall from a height
of approximately 8 in (20 cm).
X Check that the hood has engaged properly.
If the hood can be raised slightly, it is not
properly engaged. Open it again and close
it with a little more force. Engine oil
Notes on the oil level Depending on your driving style, the vehicle
consumes up to 0.9 US qt (0.8 liters) of oil per
600 miles (1,000 km). The oil consumption
may be higher than this when the vehicle is
new or if you frequently drive at high engine
speeds.
AMG vehicles: before operation on race
tracks, check the oil level and (Y page 279)
add oil if necessary (Y page 280). Race track
operation is only permitted with a maximum
engine oil level.
Depending on the engine, the oil dipstick may be in a different location.
When checking the oil level:
R park the vehicle on a level surface.
R the engine should be switched off for
approximately five minutes if the engine is
at normal operating temperature.
R if the engine is not at normal operating
temperature, e.g. if the engine was only
started briefly, wait about 30 minutes
before carrying out the measurement.
Checking the oil level using the oil dip-
stick G
WARNING
Certain components in the engine compart-
ment, such as the engine, radiator and parts
of the exhaust system, can become very hot.
Working in the engine compartment poses a
risk of injury.
Where possible, let the engine cool down and touch only the components described in the
following. Engine compartment
279Maintenance and care Z
Page 282 of 358
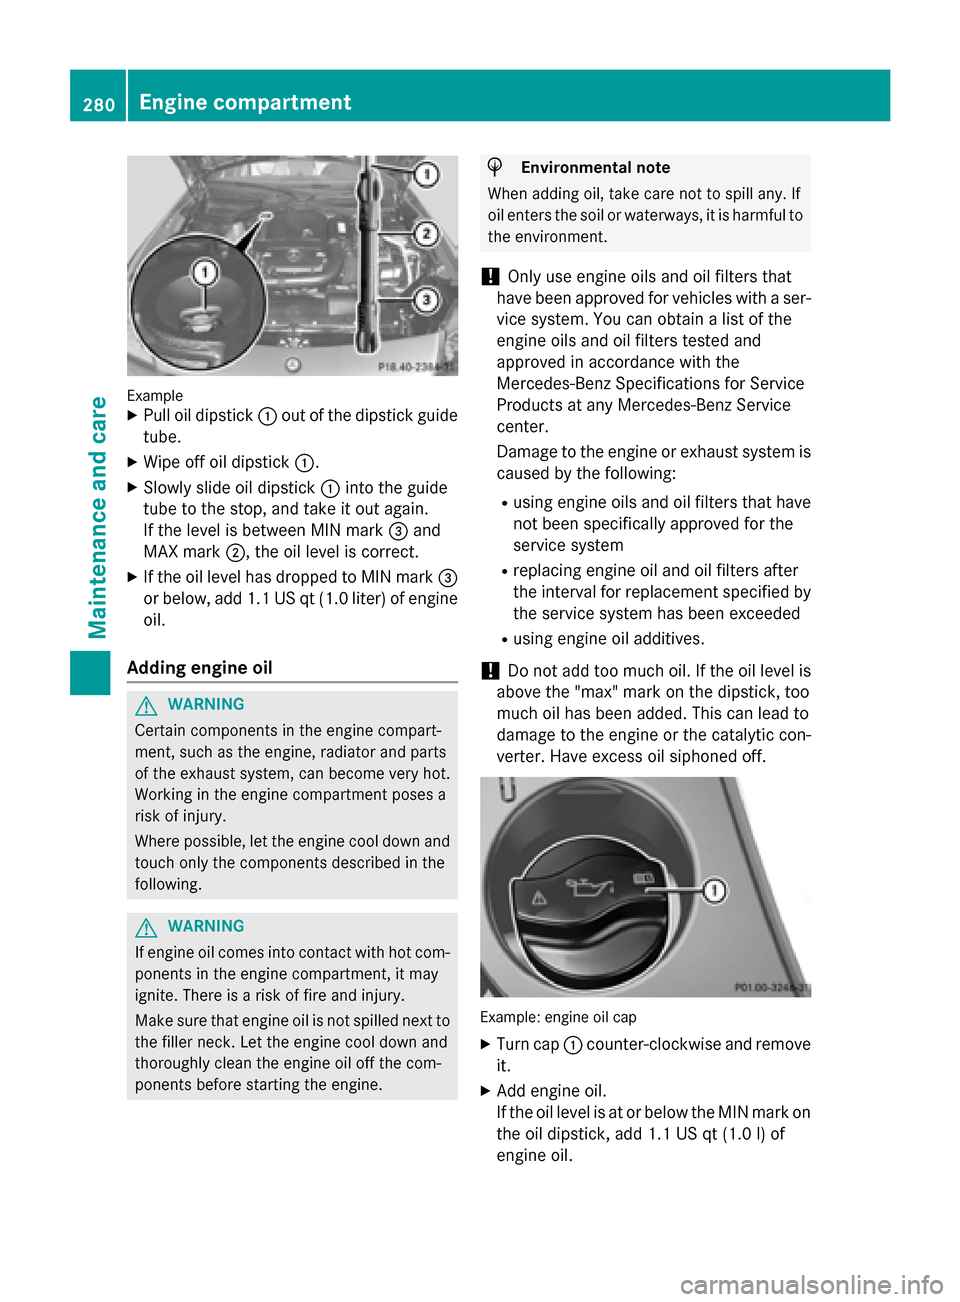
Example
X Pull oil dipstick 0043out of the dipstick guide
tube.
X Wipe off oil dipstick 0043.
X Slowly slide oil dipstick 0043into the guide
tube to the stop, and take it out again.
If the level is between MIN mark 0087and
MAX mark 0044, the oil level is correct.
X If the oil level has dropped to MIN mark 0087
or below, add 1.1 US qt (1.0 liter) of engine oil.
Adding engine oil G
WARNING
Certain components in the engine compart-
ment, such as the engine, radiator and parts
of the exhaust system, can become very hot.
Working in the engine compartment poses a
risk of injury.
Where possible, let the engine cool down and touch only the components described in the
following. G
WARNING
If engine oil comes into contact with hot com- ponents in the engine compartment, it may
ignite. There is a risk of fire and injury.
Make sure that engine oil is not spilled next to
the filler neck. Let the engine cool down and
thoroughly clean the engine oil off the com-
ponents before starting the engine. H
Environmental note
When adding oil, take care not to spill any. If
oil enters the soil or waterways, it is harmful to the environment.
! Only use engine oils and oil filters that
have been approved for vehicles with a ser-
vice system. You can obtain a list of the
engine oils and oil filters tested and
approved in accordance with the
Mercedes-Benz Specifications for Service
Products at any Mercedes-Benz Service
center.
Damage to the engine or exhaust system is caused by the following:
R using engine oils and oil filters that have
not been specifically approved for the
service system
R replacing engine oil and oil filters after
the interval for replacement specified by
the service system has been exceeded
R using engine oil additives.
! Do not add too much oil. If the oil level is
above the "max" mark on the dipstick, too
much oil has been added. This can lead to
damage to the engine or the catalytic con-
verter. Have excess oil siphoned off. Example: engine oil cap
X Turn cap 0043counter-clockwise and remove
it.
X Add engine oil.
If the oil level is at or below the MIN mark on
the oil dipstick, add 1.1 US qt (1.0 l)of
engine oil. 280
Engine compartmentMaintenance and care
Page 283 of 358
X
Replace cap 0043on the filler neck and turn
clockwise.
Ensure that the cap locks into place
securely.
X Check the oil level again with the oil dip-
stick (Y page 279).
Further information on engine oil
(Y page 349). Checking and adding other service
products
Checking coolant level G
WARNING
Certain components in the engine compart-
ment, such as the engine, radiator and parts
of the exhaust system, can become very hot.
Working in the engine compartment poses a
risk of injury.
Where possible, let the engine cool down and touch only the components described in the
following. G
WARNING
The engine cooling system is pressurized, par- ticularly when the engine is warm. When
opening the cap, you could be scalded by hotcoolant spraying out. There is a risk of injury.
Let the engine cool down before opening the
cap. Wear eye and hand protection when
opening the cap. Open the cap slowly half a
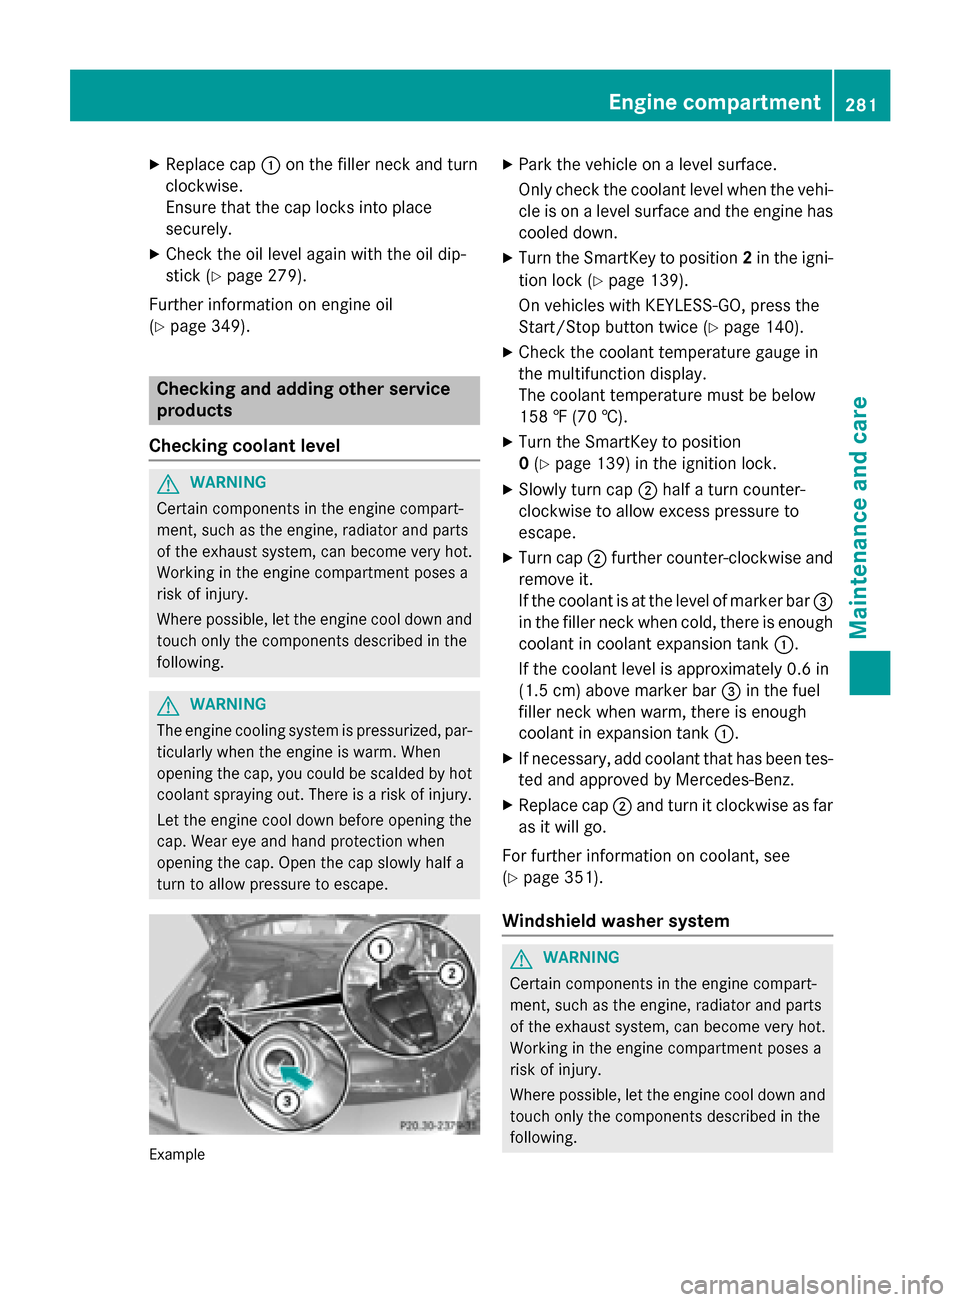
turn to allow pressure to escape. Example X
Park the vehicle on a level surface.
Only check the coolant level when the vehi- cle is on a level surface and the engine has
cooled down.
X Turn the SmartKey to position 2in the igni-
tion lock (Y page 139).
On vehicles with KEYLESS-GO, press the
Start/Stop button twice (Y page 140).
X Check the coolant temperature gauge in
the multifunction display.
The coolant temperature must be below
158 ‡ (70 †).
X Turn the SmartKey to position
0(Y page 139) in the ignition lock.
X Slowly turn cap 0044half a turn counter-
clockwise to allow excess pressure to
escape.
X Turn cap 0044further counter-clockwise and
remove it.
If the coolant is at the level of marker bar 0087
in the filler neck when cold, there is enough coolant in coolant expansion tank 0043.
If the coolant level is approximately 0.6 in
(1.5 cm) above marker bar 0087in the fuel
filler neck when warm, there is enough
coolant in expansion tank 0043.
X If necessary, add coolant that has been tes-
ted and approved by Mercedes-Benz.
X Replace cap 0044and turn it clockwise as far
as it will go.
For further information on coolant, see
(Y page 351).
Windshield washer system G
WARNING
Certain components in the engine compart-
ment, such as the engine, radiator and parts
of the exhaust system, can become very hot.
Working in the engine compartment poses a
risk of injury.
Where possible, let the engine cool down and touch only the components described in the
following. Engine compartment
281Maintenance and care Z
Page 284 of 358

G
WARNING
Windshield washer concentrate could ignite if it comes into contact with hot engine compo-
nents or the exhaust system. There is a risk of
fire and injury.
Make sure that no windshield washer con-
centrate is spilled next to the filler neck. Example
X To open: pull cap0043upwards by the tab.
X Add the premixed washer fluid.
X To close: press cap 0043onto the filler neck
until it engages.
If the washer fluid level drops below the rec-
ommended minimum of 1 liter, a message
appears in the multifunction display prompt-
ing you to add washer fluid (Y page 242).
Further information on windshield washer
fluid/antifreeze (Y page 352).ASSYST PLUS
Service messages
The ASSYST PLUS service interval display
informs you of the next service due date.
Information on the type of service and service
intervals (see the separate Maintenance
Booklet).
You can obtain further information from an
authorized Mercedes-Benz Center or at
http://www.mbusa.com (USA only).
i The ASSYST PLUS service interval display
does not show any information on the engine oil level. Observe the notes on the
engine oil level (Y
page 279).
The multifunction display shows a service
message for several seconds, e.g.:
R Service A in .. Days Service A in .. Days
R Service A Due
Service A Due
R Service A Exceeded by .. Days
Service A Exceeded by .. Days
Depending on the operating conditions of the vehicle, the remaining time or distance until
the next service due date is displayed.
The letter A Aor B
B, possibly in connection with a
number or another letter, shows the type of
service. A Astands for a minor service and B
Bfor
a major service.
You can obtain further information from an
authorized Mercedes-Benz Center.
The ASSYST PLUS service interval display
does not take into account any periods of
time during which the battery is disconnec-
ted.
Maintaining the time-dependent service
schedule:
X Note down the service due date displayed
in the multifunction display before discon-
necting the battery.
or
X After reconnecting the battery, subtract
the battery disconnection periods from the
service date shown on the display. Hiding a service message
X Press the 0076or0038 button on the steer-
ing wheel. 282
ASSYST PLUSMaintenance and care