2015 MERCEDES-BENZ SLK-Class ECO mode
[x] Cancel search: ECO modePage 126 of 358
0087
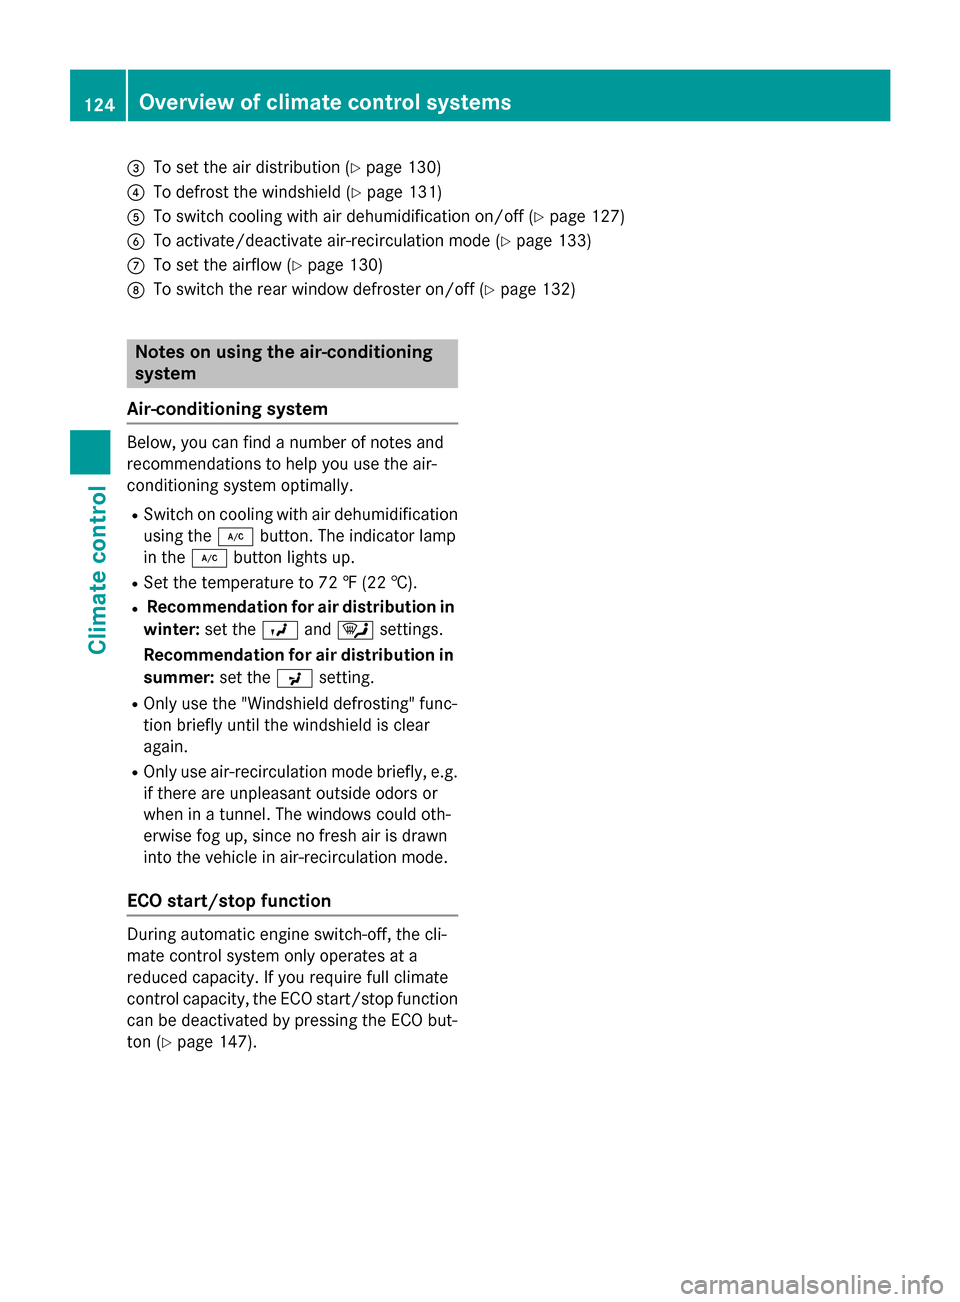
To set the air distribution (Y page 130)
0085 To defrost the windshield (Y page 131)
0083 To switch cooling with air dehumidification on/off (Y page 127)
0084 To activate/deactivate air-recirculation mode (Y page 133)
006B To set the airflow (Y page 130)
006C To switch the rear window defroster on/off (Y page 132)Notes on using the air-conditioning
system
Air-conditioning system Below, you can find a number of notes and
recommendations to help you use the air-
conditioning system optimally.
R Switch on cooling with air dehumidification
using the 005Abutton. The indicator lamp
in the 005Abutton lights up.
R Set the temperature to 72 ‡ (22 †).
R Recommendation for air distribution in
winter: set the009Band0061 settings.
Recommendation for air distribution in
summer: set the009Csetting.
R Only use the "Windshield defrosting" func-
tion briefly until the windshield is clear
again.
R Only use air-recirculation mode briefly, e.g.
if there are unpleasant outside odors or
when in a tunnel. The windows could oth-
erwise fog up, since no fresh air is drawn
into the vehicle in air-recirculation mode.
ECO start/stop function During automatic engine switch-off, the cli-
mate control system only operates at a
reduced capacity. If you require full climate
control capacity, the ECO start/stop function can be deactivated by pressing the ECO but-
ton (Y page 147). 124
Overview of climate control systemsClimate control
Page 129 of 358

heat function can only be activated or deac-
tivated with the ignition switched off.
ECO start/stop function During automatic engine switch-off, the cli-
mate control only operates at a reduced capa- city. If you require full climate control capa-
city, the ECO start/stop function can be
deactivated by pressing the ECO button
(Y page 147). Operating the climate control sys-
tems
Switching climate control on/off
General notes When the climate control is switched off, the
air supply and air circulation are also
switched off. The windows could fog up.
Therefore, switch off climate control only
briefly
i Activate climate control primarily using
the 0058 button (Y page 129).
Air-conditioning system X
Turn the SmartKey to position 2in the igni-
tion lock (Y page 139).
X To activate: turn airflow control 006Bclock-
wise to the desired position (except posi-
tion 0) (Y page 123).
X To deactivate: turn airflow control 006B
counter-clockwise to position
0(Y page 123). Dual-zone automatic climate control X
Turn the SmartKey to position 2in the igni-
tion lock (Y page 139).
X To switch on: press the0058button.
The indicator lamp in the 0058button lights
up. Airflow and air distribution are set to
automatic mode.
or
X Press the 0078button.
The indicator lamp in the 0078button goes
out. The previously selected settings are
restored.
X To switch off: press the0078button.
The indicator lamp in the 0078button lights
up. Activating/deactivating cooling with
air dehumidification
General notes If you deactivate the "Cooling with air-dehu-
midification" function, the air inside the vehi-
cle will not be cooled. The air inside the vehi-
cle will also not be dehumidified. The win-
dows can fog up more quickly. Therefore,
deactivate the cooling with air-dehumidifica-
tion function only briefly.
The "Cooling with air dehumidification" func-
tion is only available when the engine is run-
ning. The air inside the vehicle is cooled and
dehumidified according to the temperature
selected.
Condensation may drip from the underside of the vehicle when it is in cooling mode. This isnormal and not a sign that there is a malfunc-
tion. Operating the climate control systems
127Climate control
Page 140 of 358

Useful information
i This Operator's manual describes all
models and all standard and optional equip- ment of your vehicle available at the time of
publication of the Operator's manual.
Country-specific differences are possible.
Please note that your vehicle may not be
equipped with all features described. This
also applies to safety-related systems and
functions.
i Read the information on qualified special-
ist workshops (Y page 26). Notes on breaking-in a new vehicle
Important safety notes
The sensor system of some driving and driv-
ing safety systems adjusts automatically
while a certain distance is being driven after
the vehicle has been delivered or after
repairs. Full system effectiveness is not
reached until the end of this teach-in proce-
dure.
New and replaced brake pads and discs only
reach their optimum braking effect after sev-
eral hundred kilometers of driving. Compen-
sate for this by applying greater force to the
brake pedal. The first 1000 miles (1500 km)
The more you look after the engine when it is
new, the more satisfied you will be with its
performance in the future.
R You should therefore drive at varying vehi-
cle and engine speeds for the first
1,000 miles (1,500 km).
R Avoid heavy loads, e.g. driving at full throt-
tle, during this period. R
Change gear in good time, before the tach-
ometer needle is 00C3of the way to the red
area of the tachometer.
R Do not manually shift to a lower gear to
brake the vehicle.
Vehicles with automatic transmission:
R Try to avoid depressing the accelerator
pedal beyond the point of resistance (kick-
down).
R Ideally, for the first 1,000 miles (1,500 km),
drive in program C.
After 1,000 miles (1,500 km), you can
increase the engine speed gradually and bring the vehicle to full speed.
Additional breaking-in notes for AMG vehi-
cles:
R Do not drive faster than 85 mph
(140 km/h) for the first 1,000 miles
(1,500 km).
R Only allow the engine to reach a maximum
engine speed of 4,500 rpm briefly.
R Change gear in good time.
i You should also observe these notes on
breaking in if the engine or parts of the drive train on your vehicle have been replaced.
i Always observe the respective speed lim-
its. AMG vehicles with self-locking rear
axle differential
Your vehicle is equipped with a self-locking
differential on the rear axle. To protect the
differential on the rear axle, carry out an oil
change after a breaking-in phase of
2,000 miles (3,000 km). This oil change pro-
longs the service life of the differential. Have the oil change carried out at a qualified spe-
cialist workshop. Mercedes-Benz recom-
mends that you use an authorized Mercedes-
Benz Center for this purpose. 138
Notes on breaking-in a new vehicleDriving and parking
Page 144 of 358
i
AMG vehicles:
the exhaust flap of the
exhaust system will be checked after every cold start. A resulting noise can be heard
during this process.
i During a cold start, the engine runs at
higher speeds to enable the catalytic con-
verter to reach its operating temperature.
The sound of the engine may change during this time.
Manual transmission X
Depress the brake pedal and keep it
depressed.
X Fully depress the clutch pedal.
X Shift to neutral N.
i You can only start the engine when the
clutch pedal is fully depressed.
Automatic transmission X
Shift the transmission to position P.
The transmission position display in the
multifunction display shows P.
i You can also start the engine when the
transmission is in position N.
Starting procedure with the SmartKey X
Turn the SmartKey to position 3in the igni-
tion lock (Y page 139) and release it as
soon as the engine is running.
i To start the engine using the SmartKey
instead of KEYLESS-GO, pull the Start/
Stop button out of the ignition lock.
Using KEYLESS-GO to start the engine i
The Start/Stop button can be used to
start the vehicle manually without inserting
the SmartKey into the ignition lock. The
Start/Stop button must be inserted in the
ignition lock and the SmartKey must be in
the vehicle. This mode for starting the
engine operates independently of the ECO
start/stop automatic engine start function. X
Depress the brake pedal and keep it
depressed.
X Press the Start/Stop button (Y page 140)
once.
The engine starts. Pulling away
Manual transmission !
Change gear in good time and avoid spin-
ning the wheels. You could otherwise dam-
age the vehicle.
X Depress the brake pedal and keep it
depressed.
X Depress the clutch pedal fully.
X Shift to either first gear or reverse gear R.
X Release the electric parking brake
(Y page 162).
X Release the brake pedal.
X Slowly release the clutch pedal and gently
depress the accelerator pedal.
i Follow the shift recommendations in the
multifunction display for an economical
driving style (Y page 151).
i The vehicle locks centrally once you have
pulled away. The locking knobs in the doors
drop down.
You can open the doors from the inside at
any time.
You can also deactivate the automatic lock- ing feature (Y page 207).
Automatic transmission G
WARNING
If the engine speed is above the idling speed
and you engage transmission position Dor R,
the vehicle could pull away suddenly. There is a risk of an accident.
When engaging transmission position Dor R,
always firmly depress the brake pedal and do not simultaneously accelerate. 142
DrivingDriving and pa
rking
Page 160 of 358
Problems with the transmission
Problem
Possible causes/consequences and
0050
0050Solutions The transmission has
problems shifting gear. The transmission is losing oil.
X Have the transmission checked at a qualified specialist work-
shop immediately. The acceleration ability
is deteriorating.
The transmission no
longer changes gear. The transmission is in emergency mode.
It is only possible to shift into
secondgear and reverse gear.
X Stop the vehicle.
X Shift the transmission to position P.
X Switch off the engine.
X Wait at least ten seconds before restarting the engine.
X Shift the transmission to position Dor R.
If D is selected, the transmission shifts into secondgear; ifRis
selected, the transmission shifts into reverse gear.
X Have the transmission checked at a qualified specialist work-
shop, e.g. an authorized Mercedes-Benz Center, immediately. Releasing the parking lock manually
! Do not use any sharp-edged objects to
remove the selector lever gaiter from the
center console. This could damage the
selector lever gaiter. X
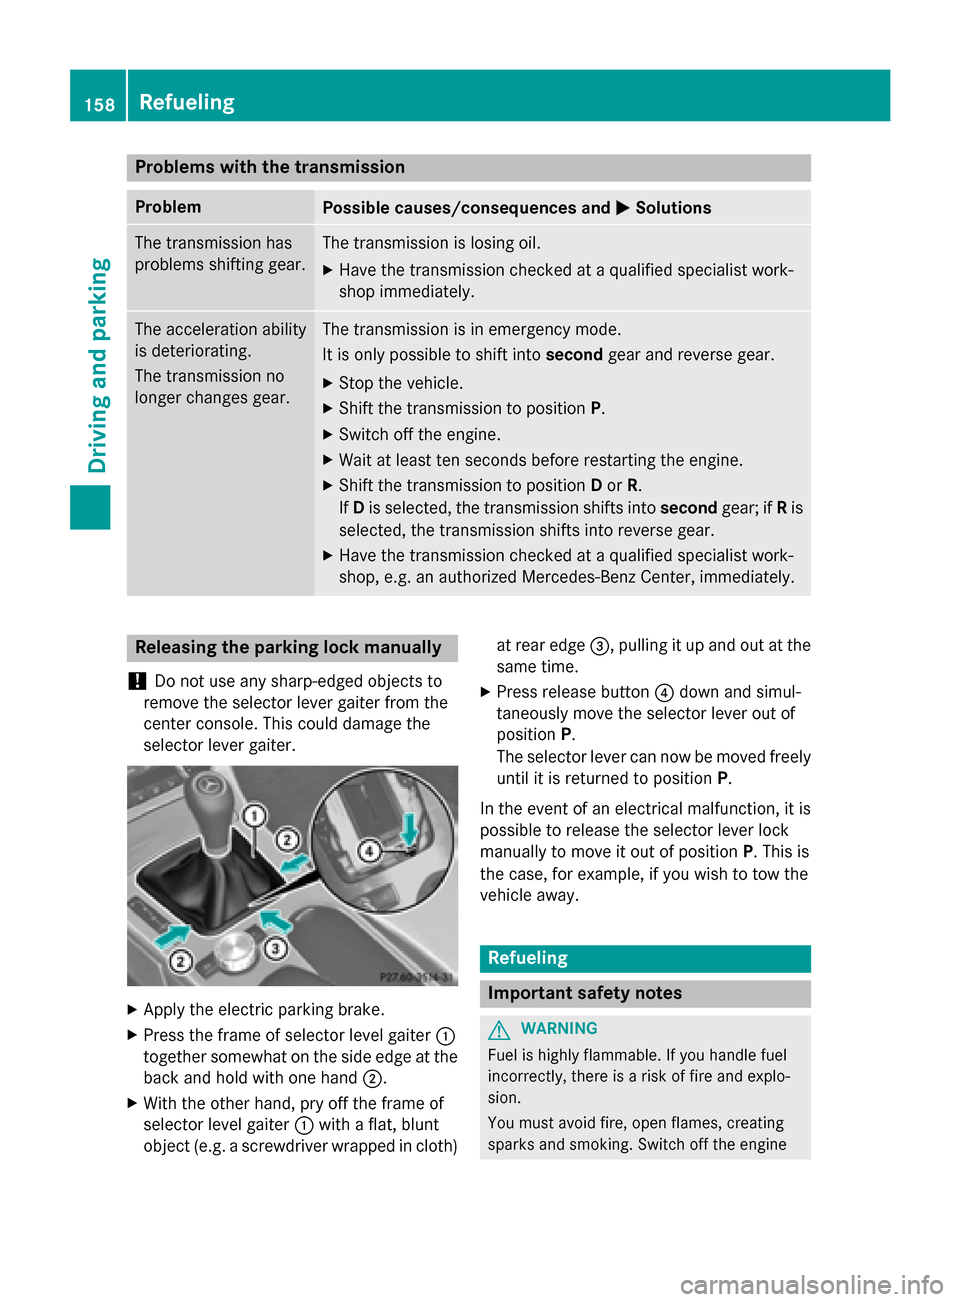
Apply the electric parking brake.
X Press the frame of selector level gaiter 0043
together somewhat on the side edge at the back and hold with one hand 0044.
X With the other hand, pry off the frame of
selector level gaiter 0043with a flat, blunt
object (e.g. a screwdriver wrapped in cloth) at rear edge
0087, pulling it up and out at the
same time.
X Press release button 0085down and simul-
taneously move the selector lever out of
position P.
The selector lever can now be moved freely
until it is returned to position P.
In the event of an electrical malfunction, it is
possible to release the selector lever lock
manually to move it out of position P. This is
the case, for example, if you wish to tow the
vehicle away. Refueling
Important safety notes
G
WARNING
Fuel is highly flammable. If you handle fuel
incorrectly, there is a risk of fire and explo-
sion.
You must avoid fire, open flames, creating
sparks and smoking. Switch off the engine 158
RefuelingDriving and parking
Page 168 of 358
in the ECO display does not indicate a fixed
consumption.
Apart from driving style, consumption is
dependent on many factors such as, e.g.:
R load
R tire pressure
R cold start
R choice of route
R electrical consumers switched on
These factors are not included in the ECO dis-
play.
The evaluation of your driving style is carried
out using the following three categories:
R Acceleration
Acceleration (evaluation of all accelera-
tion processes):
- The bar fills up: moderate acceleration,
especially at higher speeds
- The bar empties: sporty acceleration
R Constant
Constant (assessment of driving behavior
at all times):
- The bar fills up: constant speed and
avoidance of unnecessary acceleration
and deceleration
- The bar empties: fluctuations in speed
R Coasting Coasting (assessment of all deceleration
processes):
- The bar fills up: anticipatory driving,
keeping your distance and early release
of the accelerator. The vehicle can coast
without use of the brakes.
- The bar empties: frequent braking
i An economical driving style specially
requires driving at moderate engine
speeds.
To achieve a higher value in the categories
Acceleration
Acceleration andConstant Constant :
R observe the gearshift recommendations.
R drive in drive program E(vehicles with an
automatic transmission).
i On long journeys at a constant speed, e.g.
on the highway, only the bar for Constant
Constant
will change. i
The ECO display summarizes the driving
characteristics from the start of the journey
to its completion. For this reason, the bars change dynamically at the beginning of the
journey. On longer journeys, there are
fewer changes. For more dynamic changes, carry out a manual reset.
For further information on the ECO display,
see (Y page 198). Brakes
Important safety notes G
WARNING
If you shift down on a slippery road surface in an attempt to increase the engine's braking
effect, the drive wheels could lose their grip.
There is an increased danger of skidding and
accidents.
Do not shift down for additional engine brak-
ing on a slippery road surface.
Downhill gradients !
On long, steep gradients, you must
reduce the load on the brakes. To use
engine braking, shift to a lower gear in good time. This helps you to avoid overheating
the brakes and wearing them out exces-
sively.
When making use of the engine braking
effect, it is possible that a drive wheel may
not turn for some time, e.g. in the case of
suddenly changing or slippery road surface conditions. This could cause damage to the
drive train. This type of damage is not cov- ered by the Mercedes-Benz warranty.
Change into a lower gear in good time on long
and steep downhill gradients. This is espe-
cially important if the vehicle is laden. 166
Driving tipsDriving and parking
Page 169 of 358
Heavy and light loads
G
WARNING
If you rest your foot on the brake pedal while
driving, the braking system can overheat. This increases the stopping distance and can even
cause the braking system to fail. There is a
risk of an accident.
Never use the brake pedal as a footrest. Never
depress the brake pedal and the accelerator
pedal at the same time.
! Depressing the brake pedal constantly
results in excessive and premature wear to
the brake pads.
If the brakes have been subjected to a heavy load, do not stop the vehicle immediately, but
drive on for a short while. This allows the air- flow to cool the brakes more quickly.
Wet roads If you have driven for a long time in heavy rain
without braking, there may be a delayed reac- tion from the brakes when braking for the first
time. This may also occur after the vehicle has been washed or driven through deep water.
You then have to depress the brake pedal
more firmly. Maintain a greater distance from
the vehicle in front.
After driving on a wet road or having the vehi- cle washed, brake firmly while paying atten-
tion to the traffic conditions. This will warm upthe brake discs, thereby drying them more
quickly and protecting them against corro-
sion.
Limited braking performance on salt-
treated roads If you drive on salted roads, a layer of salt
residue may form on the brake discs and
brake pads. This can result in a significantly
longer braking distance. R
Brake occasionally to remove any possible
salt residue. Make sure that you do not
endanger other road users when doing so.
R Carefully depress the brake pedal and the
beginning and end of a journey.
R Maintain a greater distance to the vehicle
ahead.
Servicing the brakes !
If the red brake warning lamp lights up in
the instrument cluster and you hear a warn-
ing tone while the engine is running, the
brake fluid level may be too low. Observe
additional warning messages in the multi-
function display.
The brake fluid level may be too low due to brake pad wear or leaking brake lines.
Have the brake system checked immedi-
ately. This work should be carried out at a
qualified specialist workshop.
! As the ESP ®
system operates automati-
cally, the engine and the ignition must be
switched off (SmartKey in position 0or 1in
the ignition lock) if the electric parking
brake is being tested on a brake dynamom-
eter (maximum 10 seconds).
Braking triggered automatically by ESP ®
may seriously damage the brake system.
All checks and maintenance work on the
brake system must be carried out at a quali-
fied specialist workshop. Have this work car-
ried out at an authorized Mercedes-Benz Cen-
ter.
Have the brake pads replaced and the brake
fluid renewed at a qualified specialist work-
shop, e.g. an authorized Mercedes-Benz Cen- ter.
If the brake system has only been subject to
moderate loads, you should test the function- ality of your brakes at regular intervals. To doso, depress the brake pedal firmly when driv-
ing at a high speed. This improves the grip of
the brake pads.
A description of Brake Assist (BAS):
(Y page 62) Driving tips
167Driving and parking Z
Page 196 of 358
Useful information
i This Operator's manual describes all
models and all standard and optional equip- ment of your vehicle available at the time of
publication of the Operator's manual.
Country-specific differences are possible.
Please note that your vehicle may not be
equipped with all features described. This
also applies to safety-related systems and
functions.
i Read the information on qualified special-
ist workshops (Y page 26). Important safety notes
G
WARNING
If you operate information systems and com-
munication equipment integrated in the vehi- cle while driving, you will be distracted from
traffic conditions. You could also lose control of the vehicle. There is a risk of an accident.
Only operate the equipment when the traffic
situation permits. If you are not sure that this
is possible, park the vehicle paying attention
to traffic conditions and operate the equip-
ment when the vehicle is stationary.
You must observe the legal requirements for
the country in which you are currently driving when operating the on-board computer. G
WARNING
If the instrument cluster has failed or mal-
functioned, you may not recognize function
restrictions in systems relevant to safety. The operating safety of your vehicle may be
impaired. There is a risk of an accident.
Drive on carefully. Have the vehicle checked
at a qualified specialist workshop immedi-
ately.
The on-board computer only shows messages
or warnings from certain systems in the mul- tifunction display. You should therefore make
sure your vehicle is operating safely at all times. Otherwise, a vehicle that is not oper-
ating safely may cause an accident.
If the operating safety of your vehicle is
impaired, pull over as soon as it is safe to do
so. Contact a qualified specialist workshop.
For an overview, see the instrument panel
illustration (Y
page 31). Displays and operation
Instrument cluster lighting
The lighting in the instrument cluster, in the
displays and the controls in the vehicle inte-
rior can be adjusted using the brightness con-
trol knob.
The brightness control knob is on the bottom left of the instrument cluster (Y page 31).
X Turn the brightness control knob counter-
clockwise or clockwise.
If the light switch is set to 0058,0060or
0058, the brightness is dependent upon
the brightness of the ambient light.
i The light sensor in the instrument cluster
automatically controls the brightness of
the multifunction display.
In daylight, the displays in the instrument
cluster are not lit. Coolant temperature display
G
WARNING
Opening the hood when the engine is over-
heated or when there is a fire in the engine
compartment could expose you to hot gases
or other service products. There is a risk of
injury.
Let an overheated engine cool down before
opening the hood. If there is a fire in the
engine compartment, keep the hood closed
and contact the fire department.
! A display message is shown if the coolant
temperature is too high. 194
Displays and operationOn-board computer and displays