2015 MERCEDES-BENZ S-COUPE ignition
[x] Cancel search: ignitionPage 13 of 286
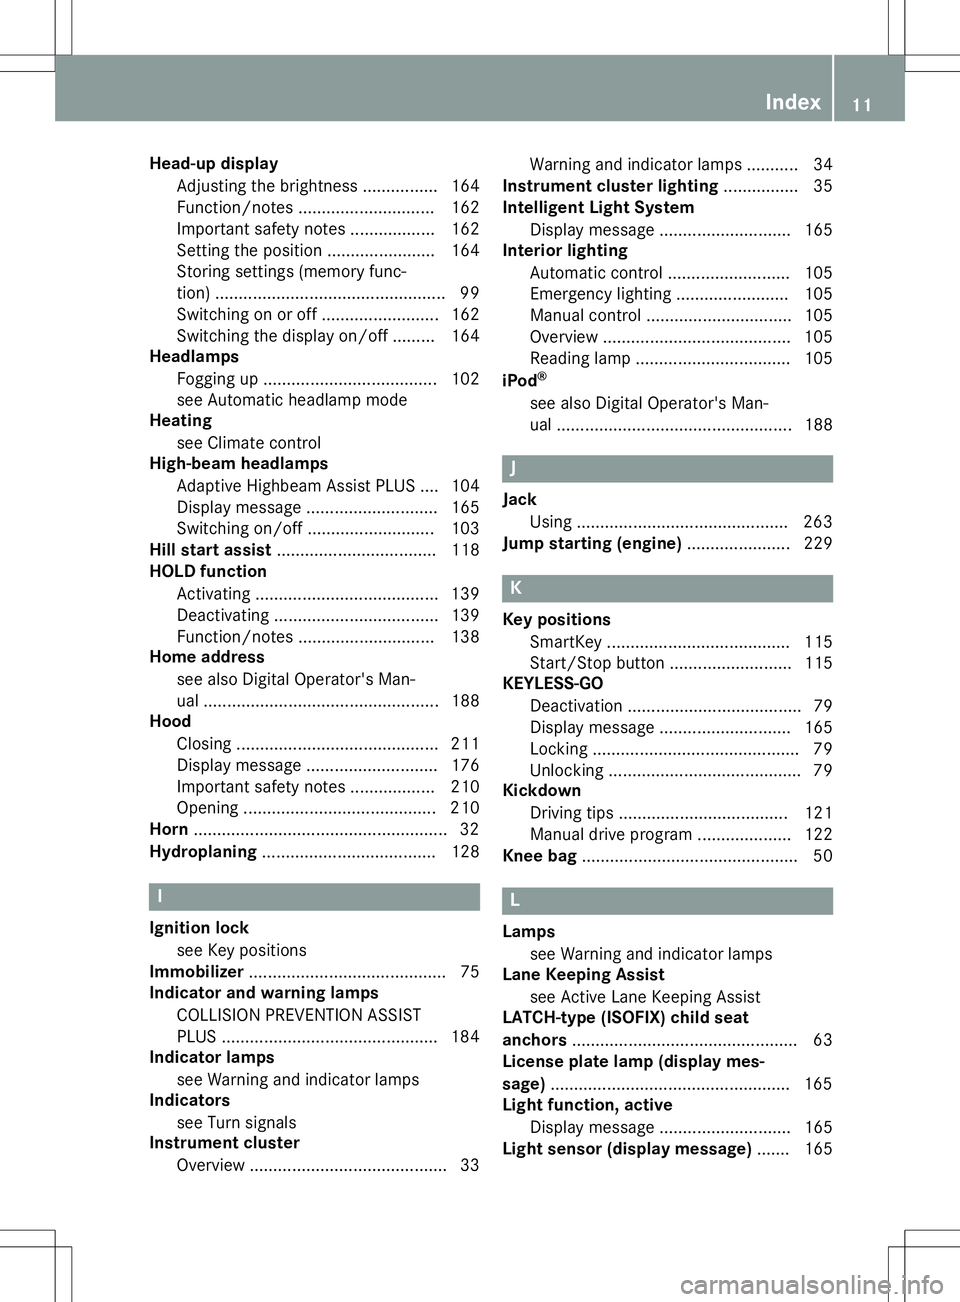
Head-up displayAdjusting the brightness ............... .164
Function/notes ............................ .162
Important safety notes .................. 162
Setting the position ....................... 164
Storing settings (memory func-
tion) ................................................. 99
Switching on or off ......................... 162
Switching the display on/off ......... 164
Headlamps
Fogging up ..................................... 102
see Automatic headlamp mode
Heating
see Climate control
High-beam headlamps
Adaptive Highbeam Assist PLUS .... 104
Display message ............................ 165
Switching on/off ........................... 103
Hill start assist .................................. 118
HOLD function
Activating ....................................... 139
Deactivating ................................... 139
Function/notes ............................ .138
Home address
see also Digital Operator's Man-
ual ................................................. .188
Hood
Closing .......................................... .211
Display message ............................ 176
Important safety notes .................. 210
Opening ......................................... 210
Horn ...................................................... 32
Hydroplaning ..................................... 128
I
Ignition lock
see Key positions
Immobilizer .......................................... 75
Indicator and warning lamps
COLLISION PREVENTION ASSIST
PLUS .............................................. 184
Indicator lamps
see Warning and indicator lamps
Indicators
see Turn signals
Instrument cluster
Overview .......................................... 33 Warning and indicator lamps ........... 34
Instrument cluster lighting ................ 35
Intelligent Light System
Display message ............................ 165
Interior lighting
Automatic control .......................... 105
Emergency lighting ........................ 105
Manual control ............................... 105
Overview ........................................ 105
Reading lamp ................................. 105
iPod ®
see also Digital Operator's Man-
ual ................................................. .188
J
Jack
Using ............................................. 263
Jump starting (engine) ......................229
K
Key positions
SmartKey ....................................... 115
Start/Stop button .......................... 115
KEYLESS-GO
Deactivation ..................................... 79
Display message ............................ 165
Locking ............................................ 79
Unlocking ......................................... 79
Kickdown
Driving tips ................................... .121
Manual drive program .................... 122
Knee bag .............................................. 50
L
Lamps
see Warning and indicator lamps
Lane Keeping Assist
see Active Lane Keeping Assist
LATCH-type (ISOFIX) child seat
anchors ................................................ 63
License plate lamp (display mes-
sage) ................................................... 165
Light function, active
Display message ............................ 165
Light sensor (display message) ....... 165
Index11
Page 19 of 286
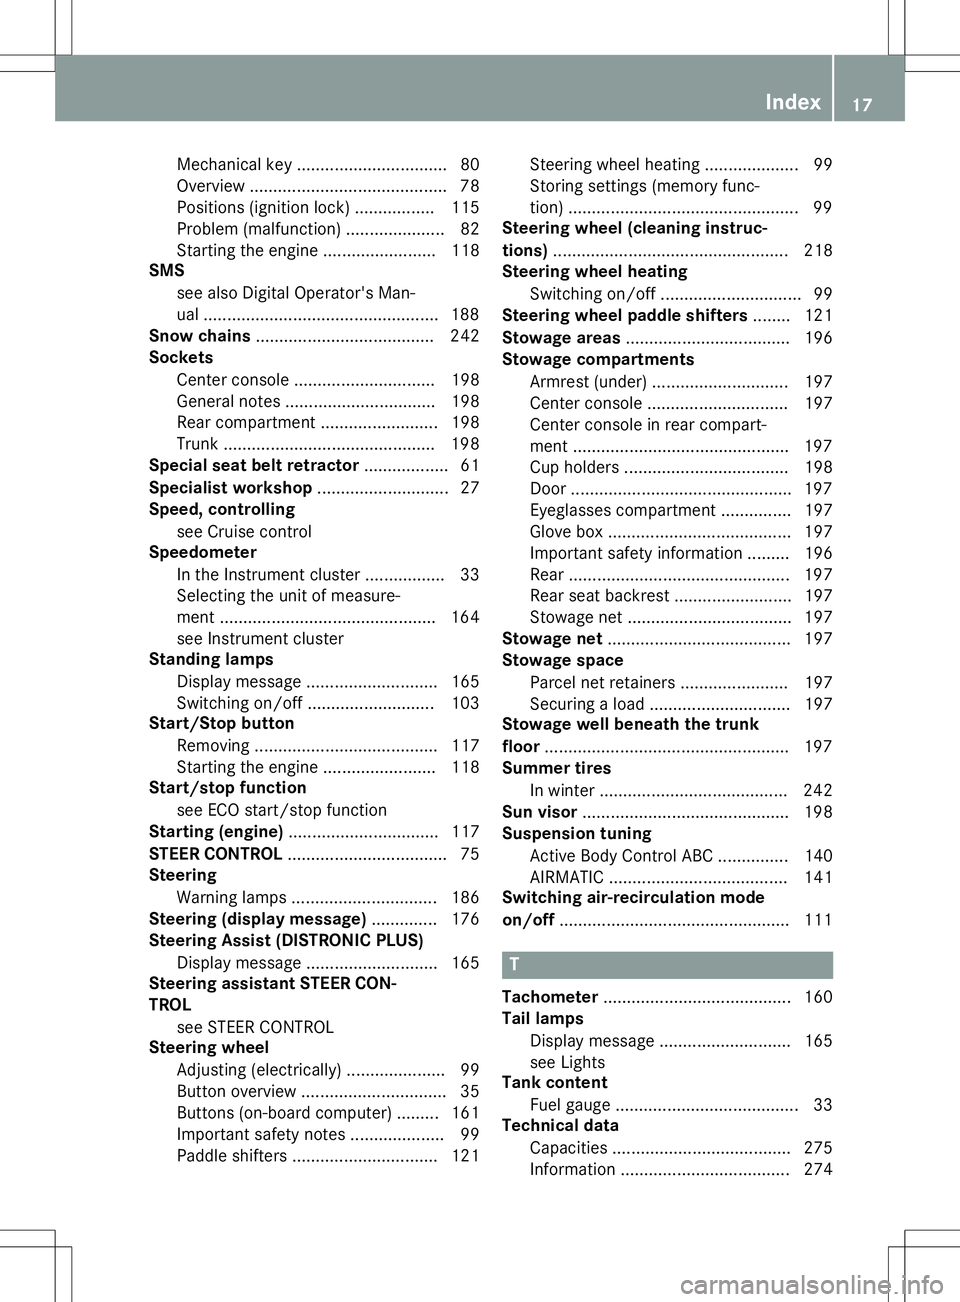
Mechanical key ................................ 80
Overview .......................................... 78
Positions (ignition lock) ................. 115
Problem (malfunction) ..................... 82
Starting the engine ........................ 118
SMS
see also Digital Operator's Man-
ual .................................................. 188
Snow chains ...................................... 242
Sockets
Center console .............................. 198
General notes ................................ 198
Rear compartment ........................ .198
Trunk ............................................. 198
Special seat belt retractor .................. 61
Specialist workshop ............................ 27
Speed, controlling
see Cruise control
Speedometer
In the Instrument cluster ................. 33
Selecting the unit of measure-
ment .............................................. 164
see Instrument cluster
Standing lamps
Display message ............................ 165
Switching on/off ........................... 103
Start/Stop button
Removing ....................................... 117
Starting the engine ........................ 118
Start/stop function
see ECO start/stop function
Starting (engine) ................................ 117
STEER CONTROL .................................. 75
Steering
Warning lamps ............................... 186
Steering (display message) .............. 176
Steering Assist (DISTRONIC PLUS)
Display message ............................ 165
Steering assistant STEER CON-TROL
see STEER CONTROL
Steering wheel
Adjusting (electrically) ..................... 99
Button overview ............................... 35
Buttons (on-board computer) ......... 161
Important safety notes .................... 99
Paddle shifters ............................... 121 Steering wheel heating .................... 99
Storing settings (memory func-
tion) ................................................. 99
Steering wheel (cleaning instruc-
tions) ................................................. .218
Steering wheel heating
Switching on/off .............................. 99
Steering wheel paddle shifters ........121
Stowage areas ................................... 196
Stowage compartments
Armrest (under) ............................ .197
Center console .............................. 197
Center console in rear compart-
ment .............................................. 197
Cup holders ................................... 198
Door ............................................... 197
Eyeglasses compartment .............. .197
Glove box ....................................... 197
Important safety information ......... 196
Rear ............................................... 197
Rear seat backrest ......................... 197
Stowage net ................................... 197
Stowage net ....................................... 197
Stowage space
Parcel net retainers ....................... 197
Securing a load .............................. 197
Stowage well beneath the trunk
floor .................................................... 197
Summer tires
In winter ........................................ 242
Sun visor ............................................ 198
Suspension tuning
Active Body Control ABC .............. .140
AIRMATIC ...................................... 141
Switching air-recirculation mode
on/off ................................................. 111
T
Tachometer ........................................ 160
Tail lamps
Display message ............................ 165
see Lights
Tank content
Fuel gauge ....................................... 33
Technical data
Capacities ...................................... 275
Information ................................... .274
Index17
Page 34 of 286
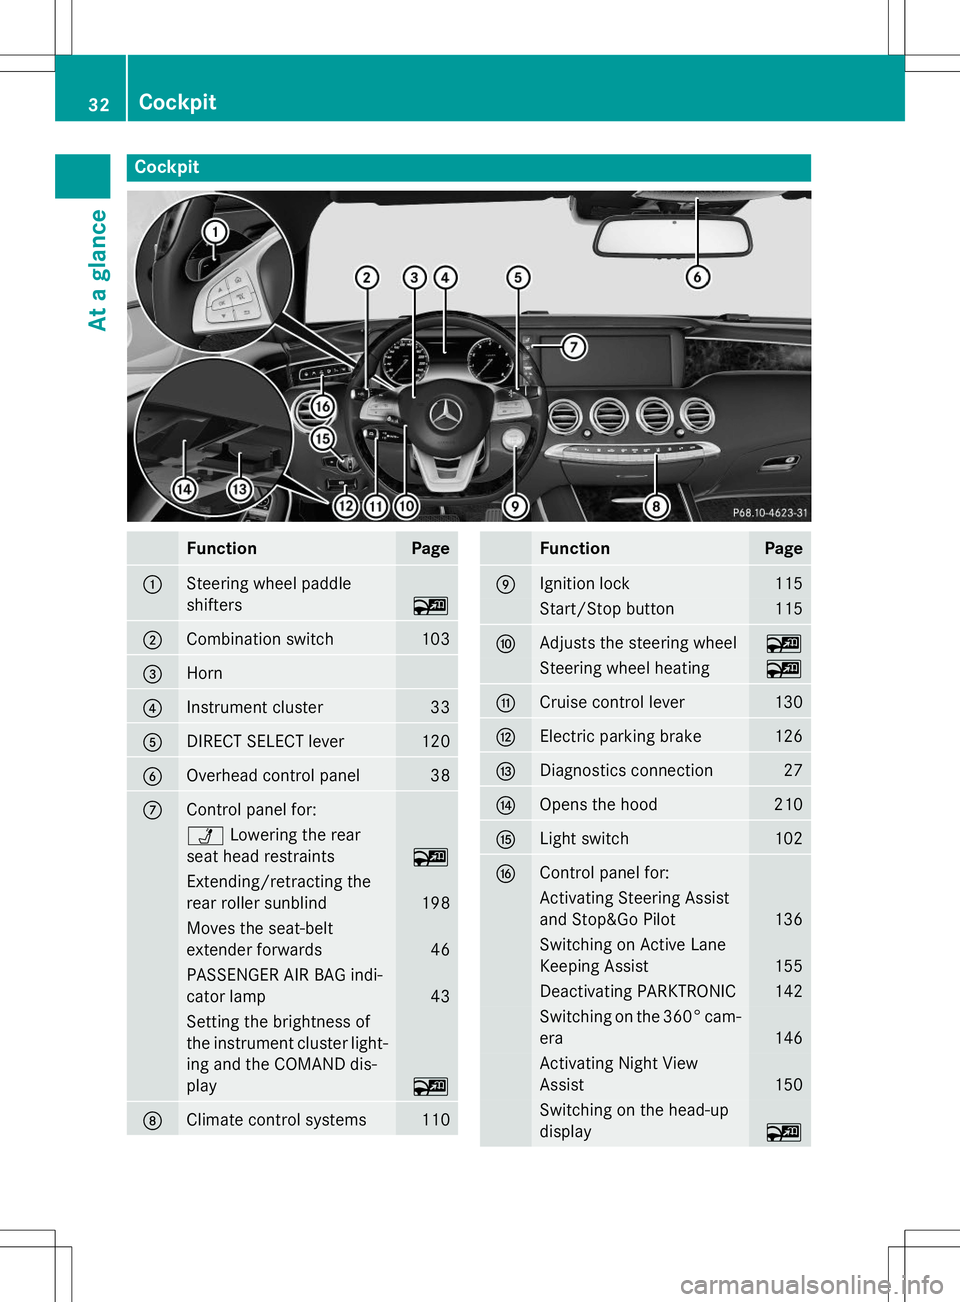
Cockpit
FunctionPage
:Steering wheel paddle
shifters
~
;Combination switch103
=Horn
?Instrument cluster33
ADIRECT SELECT lever120
BOverhead control panel38
CControl panel for:
ÜLowering the rear
seat head restraints
~
Extending/retracting the
rear roller sunblind
198
Moves the seat-belt
extender forwards
46
PASSENGER AIR BAG indi-
cator lamp
43
Setting the brightness of
the instrument cluster light- ing and the COMAND dis-play
~
DClimate control systems110
FunctionPage
EIgnition lock115
Start/Stop button115
FAdjusts the steering wheel~
Steering wheel heating~
GCruise control lever130
HElectric parking brake126
IDiagnostics connection27
JOpens the hood210
KLight switch102
LControl panel for:
Activating Steering Assist
and Stop&Go Pilot
136
Switching on Active Lane
Keeping Assist
155
Deactivating PARKTRONIC142
Switching on the 360° cam-
era
146
Activating Night View
Assist
150
Switching on the head-up
display
~
32Cockpit
At a glance
Page 48 of 286
Rthe seat belt is not twisted.
Only then can the forces which occur be
distributed over the area of the belt.
R the shoulder section of the belt is always
routed across the center of your shoulder.
The shoulder section of the belt must not
come into contact with your neck or be
routed under your arm.
R the lap belt passes tightly and as low down
as possible across your lap.
The lap belt must always be routed across
your hip joints and not across your abdo-
men. This applies particularly to pregnant
women. If necessary, push the lap belt
down to your hip joint and pull it tight usingthe shoulder section of the belt.
R the seat belt is not routed across sharp,
pointed or fragile objects.
If you have such items located on or in your
clothing, e.g. pens, keys or eyeglasses,
store these in a suitable place.
R only one person is using a seat belt at a
time.
Infants and children must never travel sit-
ting on the lap of a vehicle occupant. In the
event of an accident, they could be crushed
between the vehicle occupant and seat
belt.
R objects are never secured with a seat belt if
the seat belt is also being used by one of the
vehicle's occupants.
Seat belts are only intended to secure and
restrain vehicle occupants. Always observe
the "Loading guidelines" for securing objects,
luggage or loads ( Ypage 196).
Fastening seat belts
Observe the safety notes on the seat belt (Y page 44) and the notes on correct use of
seat belts ( Ypage 45).
GWARNING
If the seat-belt extender is extended during
the journey, the seat belt is not fitted properly
on the body. The seat belt can then no longer
perform its intended protective function. This
poses an increased risk of injury or even fatal
injury.
Always make sure that the seat-belt extender is retracted during a journey.
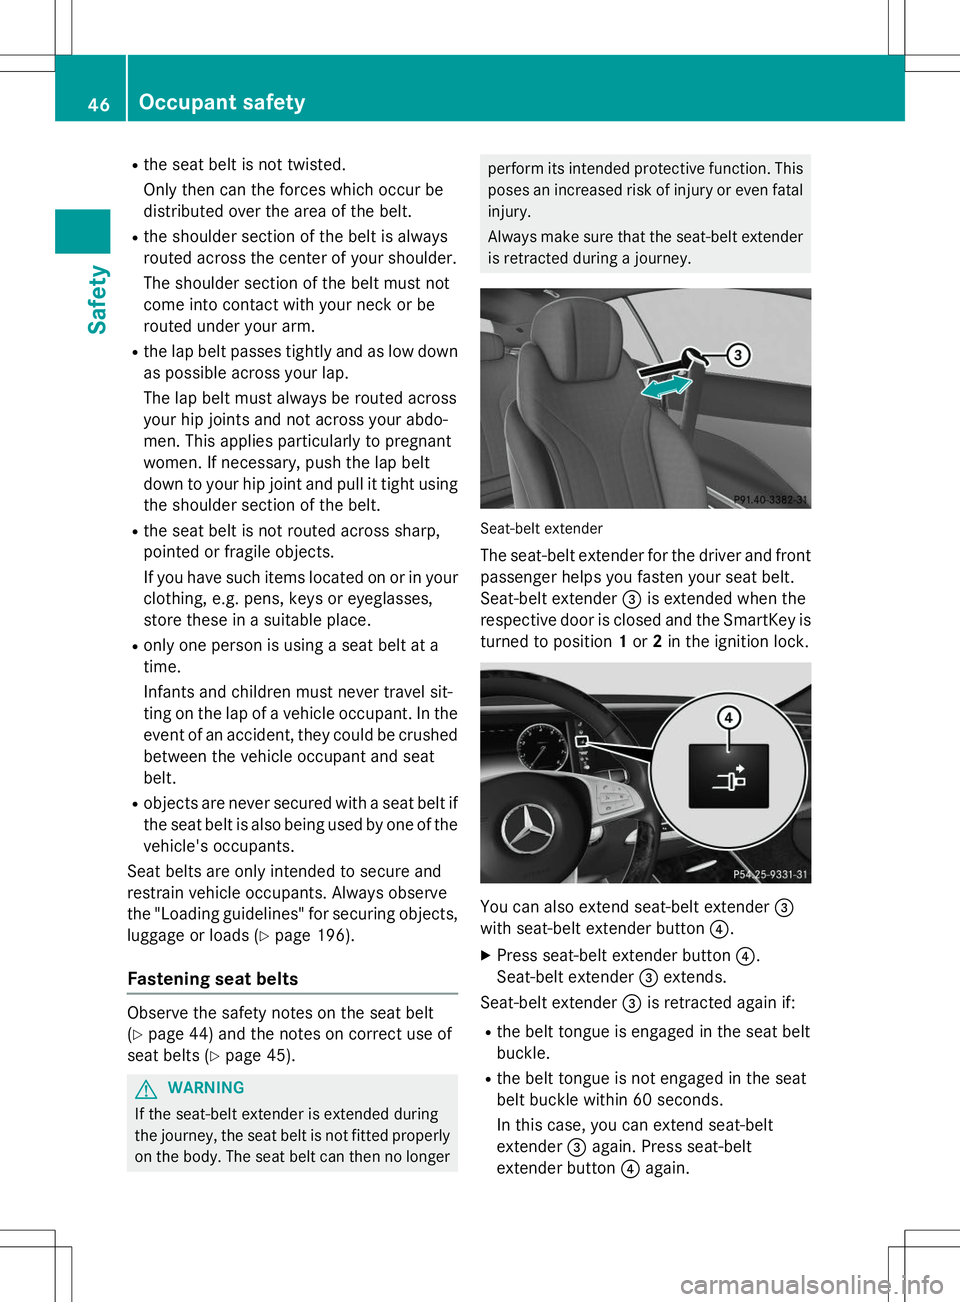
Seat-belt extender
The seat-belt extender for the driver and frontpassenger helps you fasten your seat belt.
Seat-belt extender =is extended when the
respective door is closed and the SmartKey is
turned to position 1or 2in the ignition lock.
You can also extend seat-belt extender =
with seat-belt extender button ?.
X Press seat-belt extender button ?.
Seat-belt extender =extends.
Seat-belt extender =is retracted again if:
R the belt tongue is engaged in the seat belt
buckle.
R the belt tongue is not engaged in the seat
belt buckle within 60 seconds.
In this case, you can extend seat-belt
extender =again. Press seat-belt
extender button ?again.
46Occupant safety
Safety
Page 49 of 286
Rthe respective door is opened.
R the SmartKey is turned to position 0in the
ignition lock.
R you release the seat backrest and fold it
forwards.
R the front-passenger seat is unoccupied
after approximately five seconds.
If you press seat-belt extender button ?
after this, seat-belt extender =will not
extend.
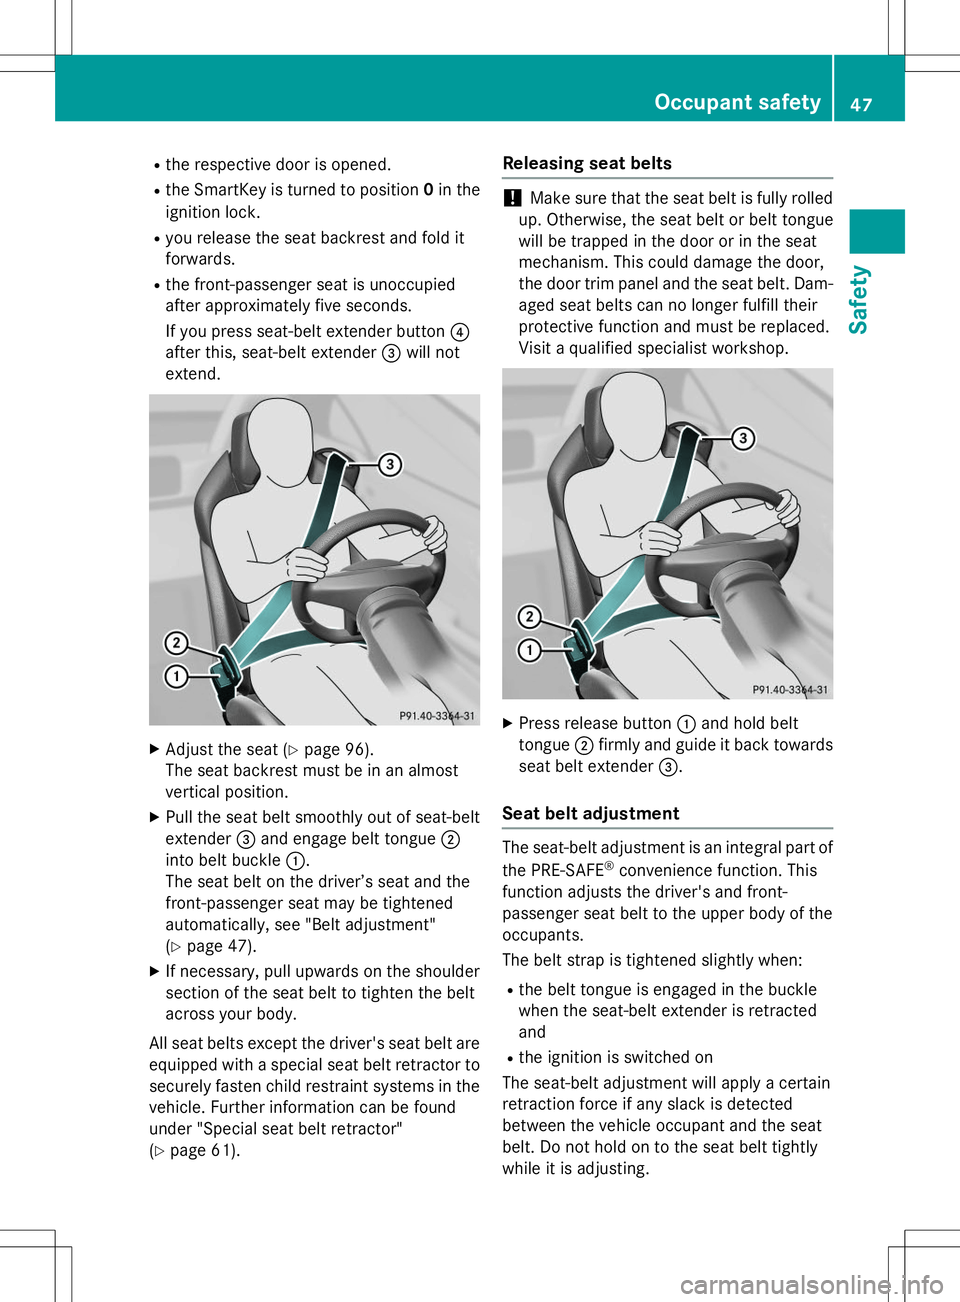
X Adjust the seat ( Ypage 96).
The seat backrest must be in an almost
vertical position.
X Pull the seat belt smoothly out of seat-belt
extender =and engage belt tongue ;
into belt buckle :.
The seat belt on the driver’s seat and the
front-passenger seat may be tightened
automatically, see "Belt adjustment"( Y page 47).
X If necessary, pull upwards on the shoulder
section of the seat belt to tighten the belt
across your body.
All seat belts except the driver's seat belt are
equipped with a special seat belt retractor to securely fasten child restraint systems in the
vehicle. Further information can be found
under "Special seat belt retractor"( Y page 61).
Releasing seat belts
!Make sure that the seat belt is fully rolled
up. Otherwise, the seat belt or belt tongue
will be trapped in the door or in the seat
mechanism. This could damage the door,
the door trim panel and the seat belt. Dam- aged seat belts can no longer fulfill their
protective function and must be replaced.
Visit a qualified specialist workshop.
X Press release button :and hold belt
tongue ;firmly and guide it back towards
seat belt extender =.
Seat belt adjustment
The seat-belt adjustment is an integral part of
the PRE-SAFE ®
convenience function. This
function adjusts the driver's and front-
passenger seat belt to the upper body of the
occupants.
The belt strap is tightened slightly when:
R the belt tongue is engaged in the buckle
when the seat-belt extender is retractedand
R the ignition is switched on
The seat-belt adjustment will apply a certain
retraction force if any slack is detected
between the vehicle occupant and the seat
belt. Do not hold on to the seat belt tightly
while it is adjusting.
Occupant safety47
Safety
Z
Page 54 of 286
rest and the head restraint position accord-
ingly.
Only then can OCS be guaranteed to functioncorrectly. Always observe the child restraint
system manufacturer's installation instruc-tions.
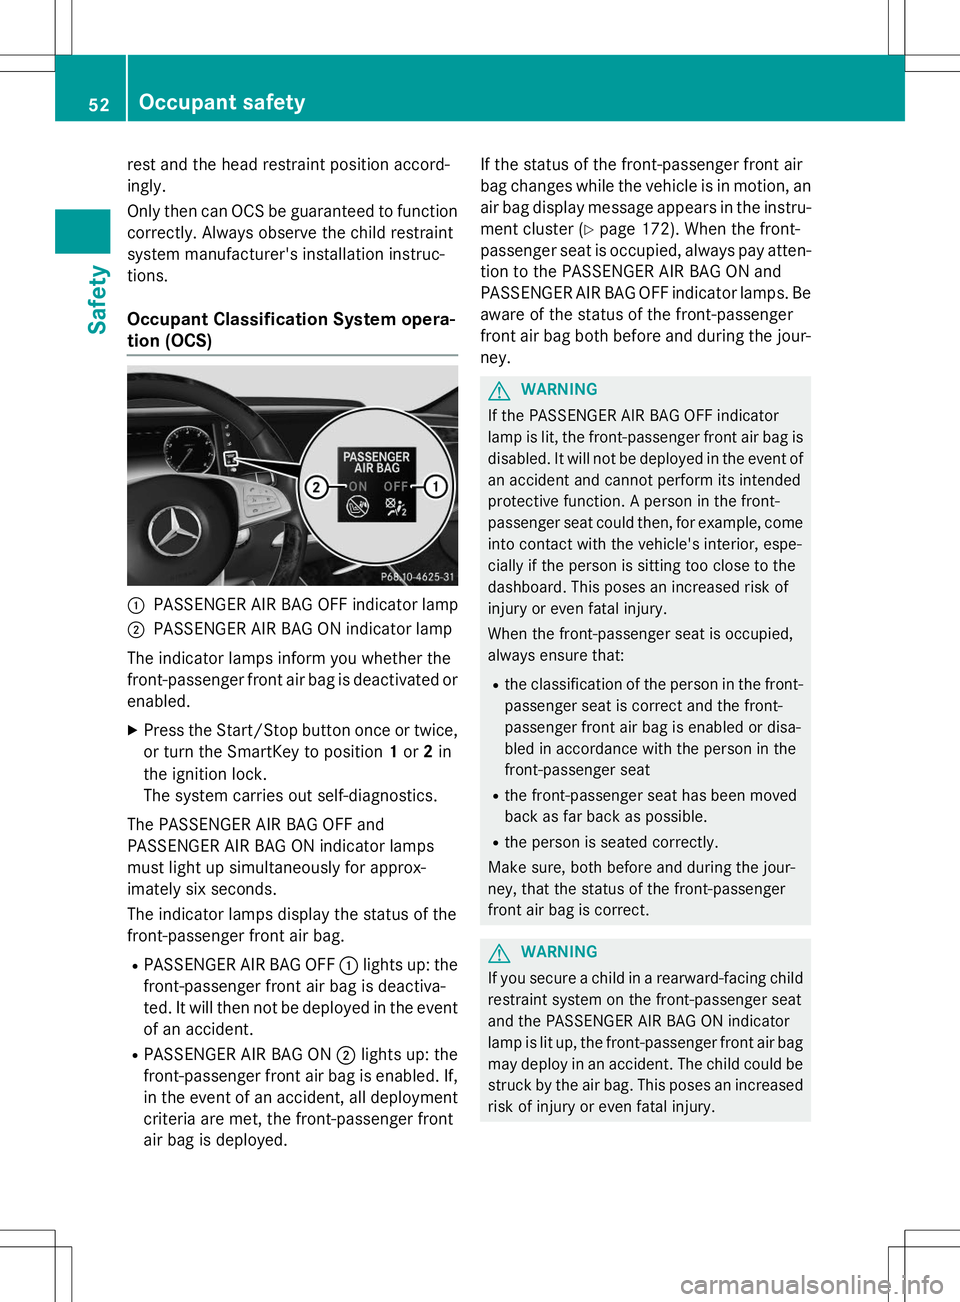
Occupant Classification System opera-
tion (OCS)
:PASSENGER AIR BAG OFF indicator lamp
;PASSENGER AIR BAG ON indicator lamp
The indicator lamps inform you whether the
front-passenger front air bag is deactivated or
enabled.
X Press the Start/Stop button once or twice,
or turn the SmartKey to position 1or 2in
the ignition lock.
The system carries out self-diagnostics.
The PASSENGER AIR BAG OFF and
PASSENGER AIR BAG ON indicator lamps
must light up simultaneously for approx-
imately six seconds.
The indicator lamps display the status of the
front-passenger front air bag. R PASSENGER AIR BAG OFF :lights up: the
front-passenger front air bag is deactiva-
ted. It will then not be deployed in the event
of an accident.
R PASSENGER AIR BAG ON ;lights up: the
front-passenger front air bag is enabled. If,
in the event of an accident, all deployment criteria are met, the front-passenger front
air bag is deployed. If the status of the front-passenger front air
bag changes while the vehicle is in motion, an
air bag display message appears in the instru-
ment cluster ( Ypage 172). When the front-
passenger seat is occupied, always pay atten-
tion to the PASSENGER AIR BAG ON and
PASSENGER AIR BAG OFF indicator lamps. Be aware of the status of the front-passenger
front air bag both before and during the jour- ney.
GWARNING
If the PASSENGER AIR BAG OFF indicator
lamp is lit, the front-passenger front air bag is disabled. It will not be deployed in the event of
an accident and cannot perform its intended
protective function. A person in the front-
passenger seat could then, for example, come
into contact with the vehicle's interior, espe-
cially if the person is sitting too close to the
dashboard. This poses an increased risk of
injury or even fatal injury.
When the front-passenger seat is occupied,
always ensure that:
R the classification of the person in the front-
passenger seat is correct and the front-
passenger front air bag is enabled or disa-
bled in accordance with the person in the
front-passenger seat
R the front-passenger seat has been moved
back as far back as possible.
R the person is seated correctly.
Make sure, both before and during the jour-
ney, that the status of the front-passenger
front air bag is correct.
GWARNING
If you secure a child in a rearward-facing child
restraint system on the front-passenger seat
and the PASSENGER AIR BAG ON indicator
lamp is lit up, the front-passenger front air bag may deploy in an accident. The child could be
struck by the air bag. This poses an increased risk of injury or even fatal injury.
52Occupant safety
Safety
Page 59 of 286
Deployment of Emergency TensioningDevices and air bags
Important safety notes
GWARNING
The air bag parts are hot after an air bag has
been deployed. There is a risk of injury.
Do not touch the air bag parts. Have a
deployed air bag replaced at a qualified spe-
cialist workshop as soon as possible.
GWARNING
A deployed air bag no longer offers any pro-
tection and cannot provide the intended pro-
tection in an accident. There is an increased
risk of injury.
Have the vehicle towed to a qualified special- ist workshop in order to have a deployed air
bag replaced.
It is important for your safety and that of your
passenger to have deployed air bags replaced and to have any malfunctioning air bags
repaired. This will help to make sure the air
bags continue to perform their protective
function for the vehicle occupants in the
event of a crash.
GWARNING
Pyrotechnic Emergency Tensioning Devices
that have been deployed are no longer opera-
tional and are unable to perform their inten-
ded protective function. This poses an
increased risk of injury or even fatal injury.
Therefore, have pyrotechnic Emergency Ten-
sioning Devices which have been triggered
immediately replaced at a qualified specialistworkshop.
An electric motor is used by PRE-SAFE ®
to
trigger the tightening of the seat belt in haz-
ardous situations. This procedure is reversi-ble.
If Emergency Tensioning Devices are trig-
gered or air bags are deployed, you will hear a bang, and a small amount of powder may also be released. The
6restraint system warn-
ing lamp lights up.
Only in rare cases will the bang affect your
hearing. The powder that is released gener-
ally does not constitute a health hazard, but it may cause short-term breathing difficulties in
people with asthma or other respiratory prob-
lems. To avoid this, you may wish to get out of
the vehicle or open the windows as soon as it is safe to do so.
Air bags and pyrotechnic Emergency Tension-
ing Devices (ETDs) contain perchlorate mate-
rial, which may require special handling and
regard for the environment. National guide-
lines must be observed during disposal. In
California, see www.dtsc.ca.gov/
HazardousWaste/Perchlorate/
index.cfm .
Method of operation
During the first stage of a collision, the
restraint system control unit evaluates impor-
tant physical data relating to vehicle deceler-
ation or acceleration, such as:
R duration
R direction
R intensity
Based on the evaluation of this data, the
restraint system control unit triggers the
Emergency Tensioning Devices during a fron-
tal or rear collision.
An Emergency Tensioning Device can only be triggered, if: R the ignition is switched on
R the components of the restraint system are
operational; see "Restraint system warning lamp" ( Ypage 43)
R the belt tongue is engaged in the buckle on
the respective front-passenger seat
The Emergency Tensioning Devices in the
rear compartment are triggered independ-
ently of the lock status of the seat belts.
Occupant safety57
Safety
Z
Page 68 of 286
The driving safety systems described only
work as effectively as possible when there is
adequate contact between the tires and the
road surface. Pay particular attention to the
information regarding tires, recommended
minimum tire tread depths etc. in the "Wheelsand tires" section ( Ypage 240).
In wintry driving conditions, always use winter tires (M+S tires) and if necessary, snow
chains. Only in this way will the driving safety
systems described in this section work as
effectively as possible.
ABS (Anti-lock Braking System)
General information
ABS regulates brake pressure in such a way
that the wheels do not lock when you brake.
This allows you to continue steering the vehi-
cle when braking. The ! ABS warning lamp in the instrument
cluster lights up when the ignition is switched on. It goes out when the engine is running.
Important safety notes
iObserve the "Important safety notes" sec-
tion ( Ypage 65).
GWARNING
If ABS is faulty, the wheels could lock when
braking. The steerability and braking charac-
teristics may be severely impaired. Addition-
ally, further driving safety systems are deac-
tivated. There is an increased danger of skid-
ding and accidents.
Drive on carefully. Have ABS checked imme-
diately at a qualified specialist workshop.
When ABS is malfunctioning, other systems,
including driving safety systems, will also
become inoperative. Observe the information on the ABS warning lamp ( Ypage 179) and
display messages which may be shown in the
instrument cluster ( Ypage 166).
ABS works from a speed of about 5 mph
(8 km/ h), regardless of road-surface condi- tions. ABS works on slippery surfaces, even
when you only brake gently.
Braking
X
If ABS intervenes: continue to depress the
brake pedal vigorously until the braking sit- uation is over.
X To make a full brake application:
depress the brake pedal with full force.
If ABS intervenes when braking, you will feel a pulsing in the brake pedal.
The pulsating brake pedal can be an indica-
tion of hazardous road conditions, and func-
tions as a reminder to take extra care while
driving.
BAS (Brake Assist System)
General information
BAS operates in emergency braking situa-
tions. If you depress the brake pedal quickly,
BAS automatically boosts the braking force,
thus shortening the stopping distance.
Important safety notes
iObserve the "Important safety notes" sec-
tion ( Ypage 65).
GWARNING
If BAS is malfunctioning, the braking distance
in an emergency braking situation is
increased. There is a risk of an accident.
In an emergency braking situation, depress
the brake pedal with full force. ABS prevents
the wheels from locking.
Braking
X
Keep the brake pedal firmly depressed until
the emergency braking situation is over.
ABS prevents the wheels from locking.
The brakes will function as usual once you
release the brake pedal. BAS is deactivated.
66Driving safety systems
Safety