2015 MERCEDES-BENZ S-COUPE light
[x] Cancel search: lightPage 94 of 286
opens again a little. The automatic reversing
feature is only an aid and is not a substitute
for your attention when closing the roller sun-blind.
GWARNING
The reversing feature especially does not
react to soft, light and thin objects such as
small fingers. This means that the reversing
feature cannot prevent someone being trap-
ped in these situations. There is a risk ofinjury.
When closing make sure that no parts of the
body are in the sweep of the roller sunblind.
If somebody becomes trapped:
R release the switch immediately, or
R during automatic operation, push the
switch briefly in any direction
The closing process is stopped.
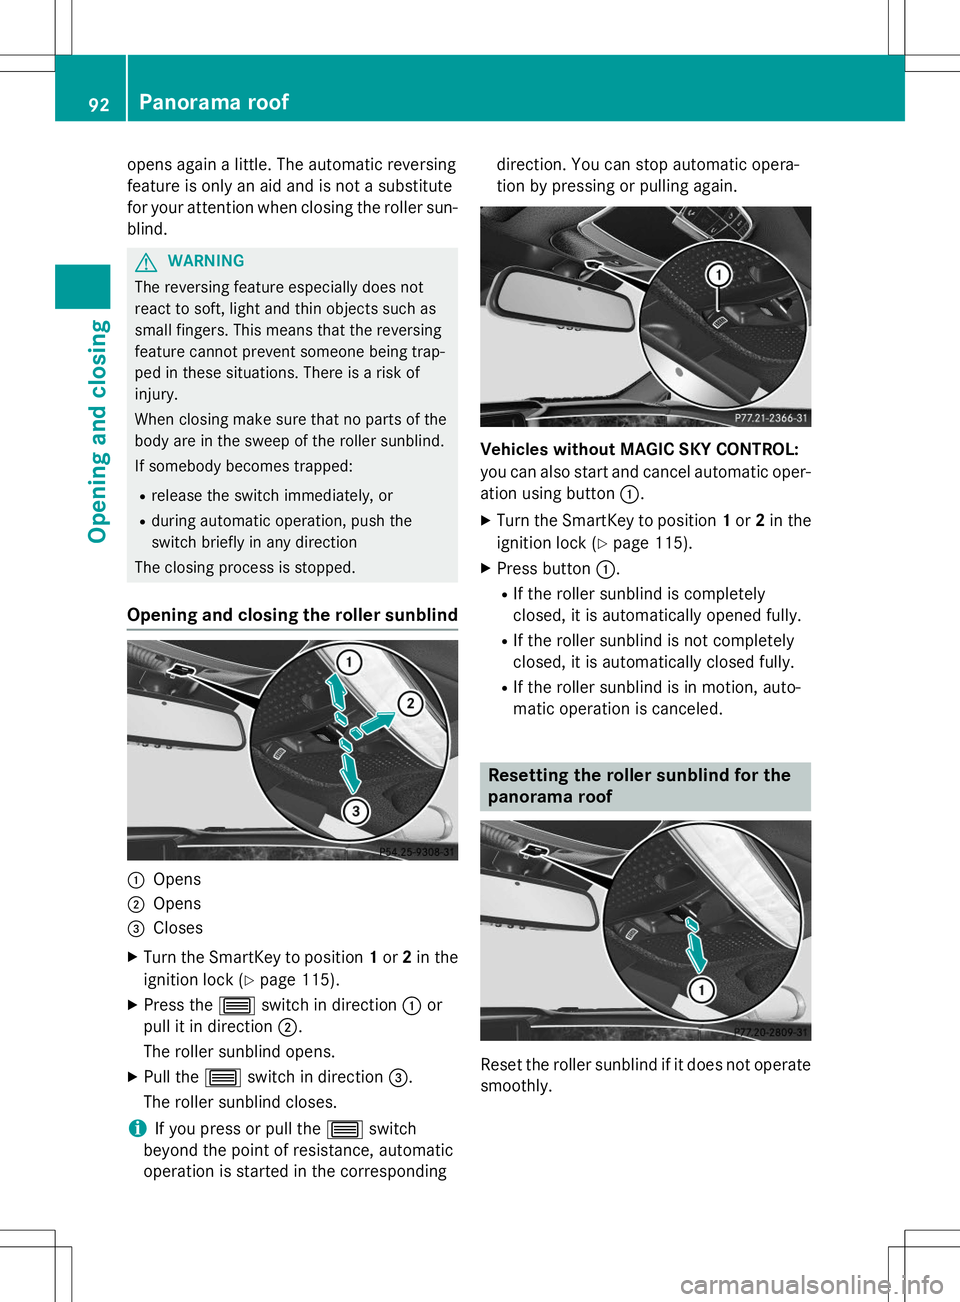
Opening and closing the roller sunblind
:Opens
;Opens
=Closes
X Turn the SmartKey to position 1or 2in the
ignition lock ( Ypage 115).
X Press the 3switch in direction :or
pull it in direction ;.
The roller sunblind opens.
X Pull the 3switch in direction =.
The roller sunblind closes.
iIf you press or pull the 3switch
beyond the point of resistance, automatic
operation is started in the corresponding direction. You can stop automatic opera-
tion by pressing or pulling again.
Vehicles without MAGIC SKY CONTROL:
you can also start and cancel automatic oper-
ation using button
:.
X Turn the SmartKey to position 1or 2in the
ignition lock ( Ypage 115).
X Press button :.
R If the roller sunblind is completely
closed, it is automatically opened fully.
R If the roller sunblind is not completely
closed, it is automatically closed fully.
R If the roller sunblind is in motion, auto-
matic operation is canceled.
Resetting the roller sunblind for the
panorama roof
Reset the roller sunblind if it does not operate
smoothly.
92Panorama roof
Opening and closing
Page 98 of 286
Useful information
iThis Operator's Manual describes all
models and all standard and optional equip- ment of your vehicle available at the time of
publication of the Operator's Manual.
Country-specific differences are possible.
Please note that your vehicle may not be
equipped with all features described. This
also applies to safety-related systems and
functions.
iRead the information on qualified special-
ist workshops ( Ypage 27).
Correct driver's seat position
GWARNING
You could lose control of your vehicle if you do
the following while driving:
R adjust the driver's seat, head restraint,
steering wheel or mirrors
R fasten the seat belt
There is a risk of an accident.
Adjust the driver's seat, head restraint, steer-
ing wheel and mirror and fasten your seat belt before starting the engine.
X Observe the safety guidelines on seat
adjustment ( Ypage 97).
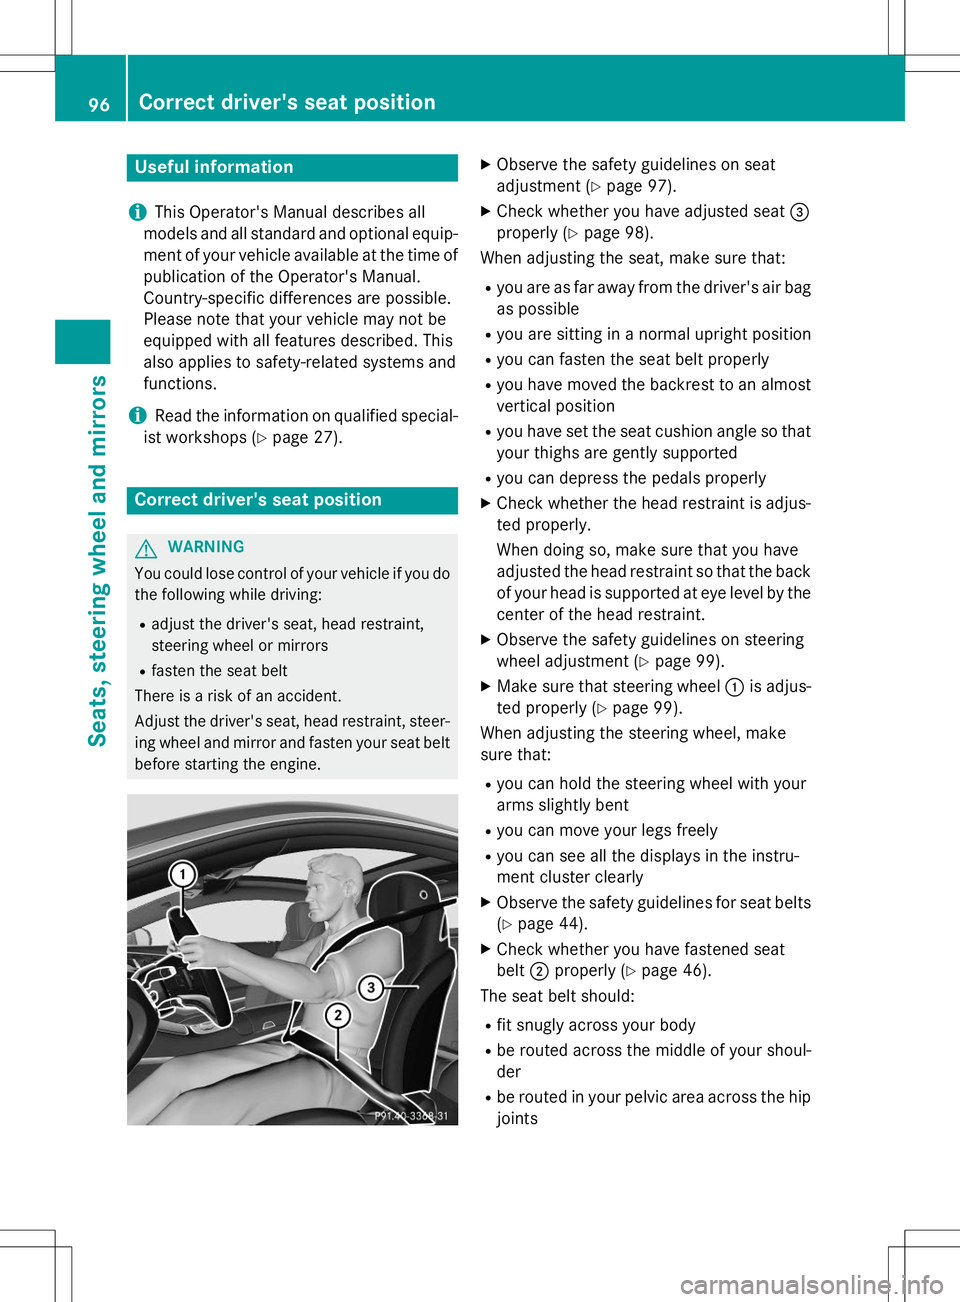
X Check whether you have adjusted seat =
properly ( Ypage 98).
When adjusting the seat, make sure that:
R you are as far away from the driver's air bag
as possible
R you are sitting in a normal upright position
R you can fasten the seat belt properly
R you have moved the backrest to an almost
vertical position
R you have set the seat cushion angle so that
your thighs are gently supported
R you can depress the pedals properly
X Check whether the head restraint is adjus-
ted properly.
When doing so, make sure that you have
adjusted the head restraint so that the back of your head is supported at eye level by the center of the head restraint.
X Observe the safety guidelines on steering
wheel adjustment ( Ypage 99).
X Make sure that steering wheel :is adjus-
ted properly ( Ypage 99).
When adjusting the steering wheel, make
sure that:
R you can hold the steering wheel with your
arms slightly bent
R you can move your legs freely
R you can see all the displays in the instru-
ment cluster clearly
X Observe the safety guidelines for seat belts
( Y page 44).
X Check whether you have fastened seatbelt ;properly ( Ypage 46).
The seat belt should:
R fit snugly across your body
R be routed across the middle of your shoul-der
R be routed in your pelvic area across the hip
joints
96Correct driver's seat position
Seats, steering wheel and mirrors
Page 103 of 286

Useful information............................102
Exterior lighting ................................ 102
Interior lighting ................................. 105
Replacing bulbs ................................. 105
Windshield wipers ............................106
101
Lights and windshield wipers
Page 104 of 286
Useful information
iThis Operator's Manual describes all
models and all standard and optional equip- ment of your vehicle available at the time of
publication of the Operator's Manual.
Country-specific differences are possible.
Please note that your vehicle may not be
equipped with all features described. This
also applies to safety-related systems and
functions.
iRead the information on qualified special-
ist workshops ( Ypage 27).
Exterior lighting
General notes
For reasons of safety, Mercedes-Benz recom-
mends that you drive with the lights switchedon even during the daytime. In some coun-
tries, operation of the headlamps varies due
to legal requirements and self-imposed obli-
gations.
Driving abroad
Symmetrical low-beam headlamps
Switch the headlamps to symmetrical low
beam in countries in which traffic drives on
the opposite side of the road from the country where the vehicle is registered. This prevents
glare to oncoming traffic. When using sym-
metrical lights, the edge of the road is not lit
as widely and as far ahead as normal.
Have the headlamps converted at a qualified
specialist workshop as close to the border as
possible before driving in these countries.
Asymmetrical low beam
Have the headlamps converted back to asym- metrical low-beam headlamps at a qualified
specialist workshop as soon as possible after
crossing the border again.
Information in the Digital Operator's
Manual
In the Digital Operator's Manual you will find
information on the following topics: R Hazard warning lamps
R Headlamps fogged up on the inside
Setting the exterior lighting
Setting options
Exterior lighting can be set using:
R the light switch
R the combination switch ( Ypage 103)
Light switch
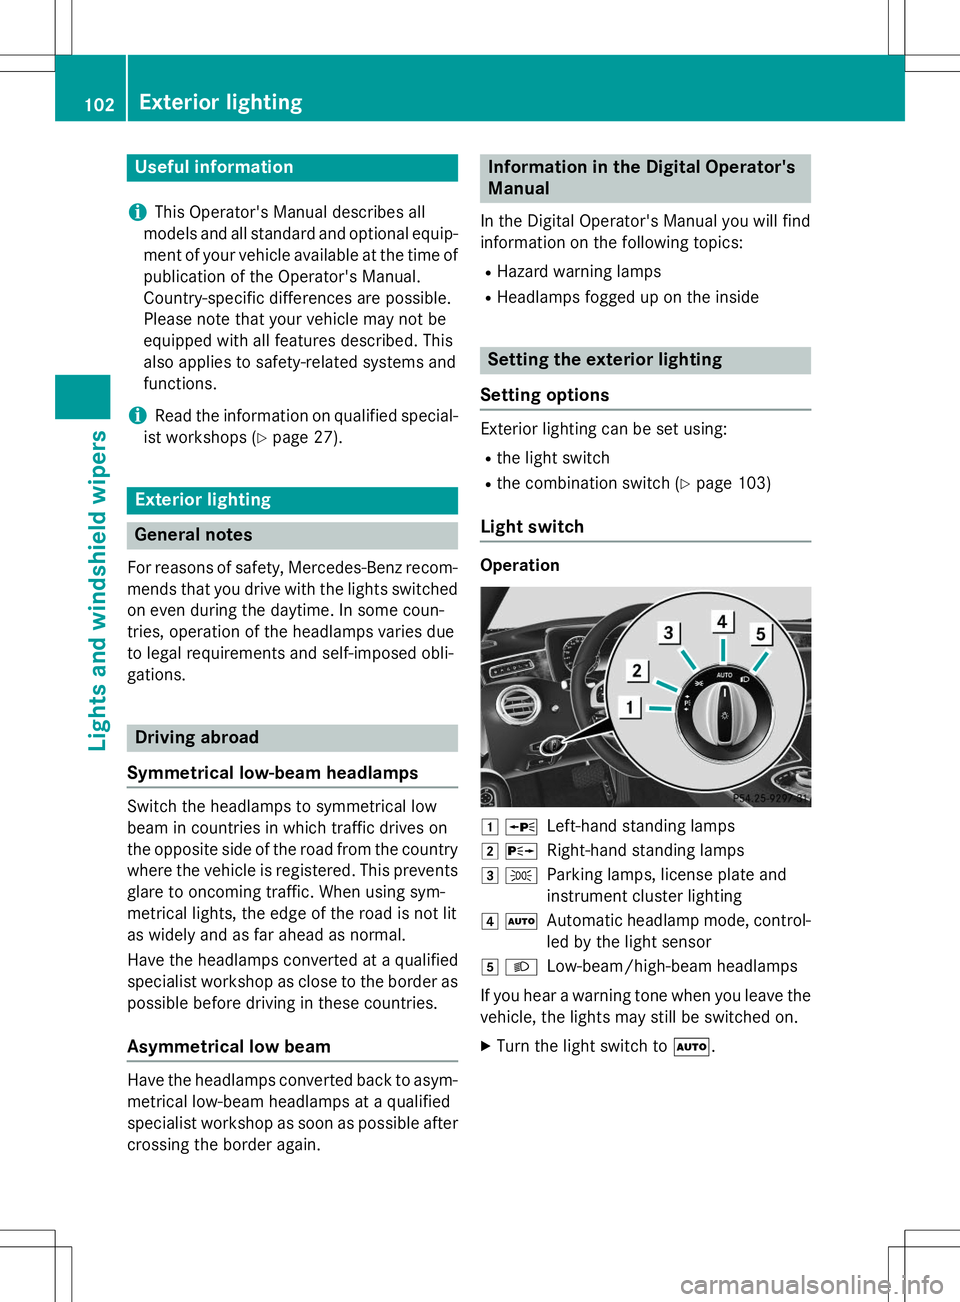
Operation
1 WLeft-hand standing lamps
2XRight-hand standing lamps
3 TParking lamps, license plate and
instrument cluster lighting
4ÃAutomatic headlamp mode, control-
led by the light sensor
5 LLow-beam/high-beam headlamps
If you hear a warning tone when you leave the
vehicle, the lights may still be switched on. X Turn the light switch to Ã.
102Exterior lighting
Lights and windshield wipers
Page 105 of 286
The exterior lighting (except the parking/
standing lamps) switches off automatically ifyou:R remove the SmartKey from the ignition lock
R open the driver's door with the SmartKey in
position 0
Information in the Digital Operator's Man-
ual
In the Digital Operator's Manual you will find
information on the following topics: R Automatic headlamp mode
R Low-beam headlamps
R Parking lamps
R Standing lamps
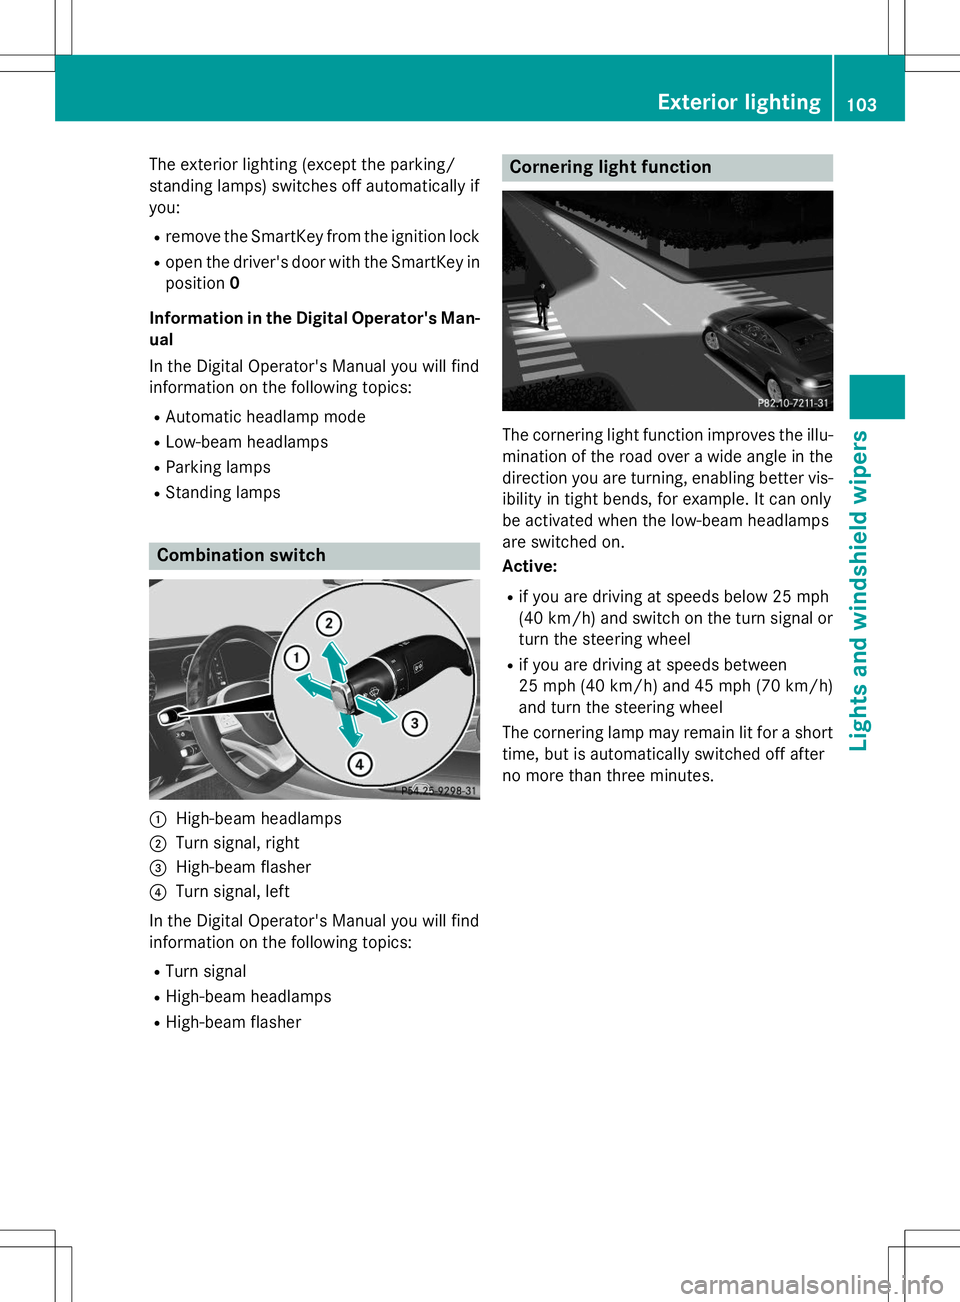
Combination switch
:High-beam headlamps
;Turn signal, right
=High-beam flasher
?Turn signal, left
In the Digital Operator's Manual you will find
information on the following topics: R Turn signal
R High-beam headlamps
R High-beam flasher
Cornering light function
The cornering light function improves the illu-
mination of the road over a wide angle in the direction you are turning, enabling better vis-
ibility in tight bends, for example. It can only
be activated when the low-beam headlamps
are switched on. Active:
R if you are driving at speeds below 25 mph
(40 km/ h)and switch on the turn signal or
turn the steering wheel
R if you are driving at speeds between
25 mph (40 km/ h)and 45 mph (70 km/h)
and turn the steering wheel
The cornering lamp may remain lit for a short
time, but is automatically switched off after
no more than three minutes.
Exterior lighting103
Lights and windshield wipers
Page 106 of 286
Adaptive Highbeam Assist Plus
General notes
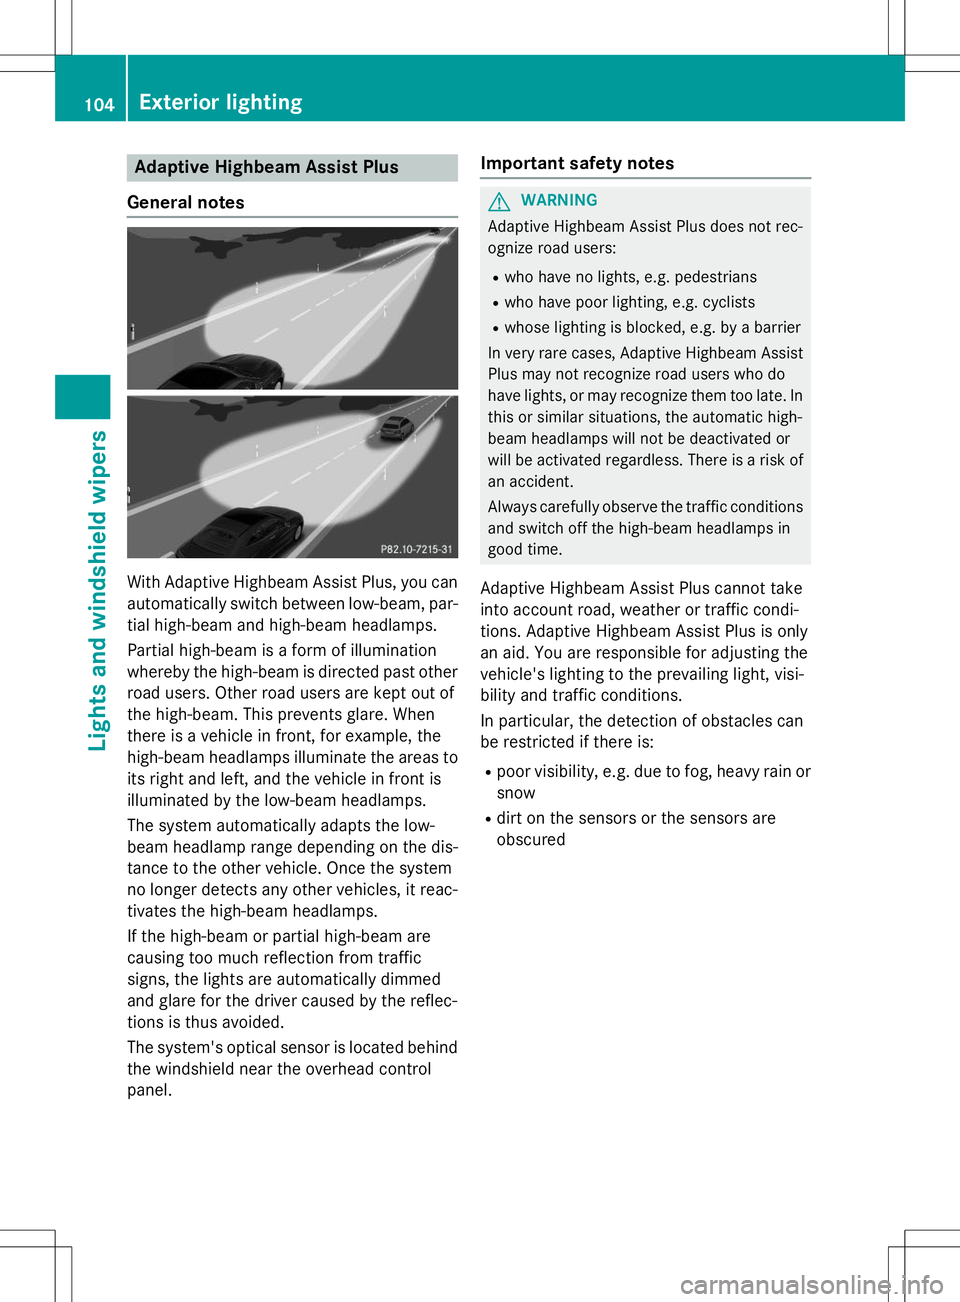
With Adaptive Highbeam Assist Plus, you can automatically switch between low-beam, par-
tial high-beam and high-beam headlamps.
Partial high-beam is a form of illumination
whereby the high-beam is directed past other
road users. Other road users are kept out of
the high-beam. This prevents glare. When
there is a vehicle in front, for example, the
high-beam headlamps illuminate the areas to
its right and left, and the vehicle in front is
illuminated by the low-beam headlamps.
The system automatically adapts the low-
beam headlamp range depending on the dis-
tance to the other vehicle. Once the system
no longer detects any other vehicles, it reac-
tivates the high-beam headlamps.
If the high-beam or partial high-beam are
causing too much reflection from traffic
signs, the lights are automatically dimmed
and glare for the driver caused by the reflec-
tions is thus avoided.
The system's optical sensor is located behind the windshield near the overhead control
panel.
Important safety notes
GWARNING
Adaptive Highbeam Assist Plus does not rec-
ognize road users:
R who have no lights, e.g. pedestrians
R who have poor lighting, e.g. cyclists
R whose lighting is blocked, e.g. by a barrier
In very rare cases, Adaptive Highbeam Assist
Plus may not recognize road users who do
have lights, or may recognize them too late. In
this or similar situations, the automatic high-
beam headlamps will not be deactivated or
will be activated regardless. There is a risk of
an accident.
Always carefully observe the traffic conditions and switch off the high-beam headlamps in
good time.
Adaptive Highbeam Assist Plus cannot take
into account road, weather or traffic condi-
tions. Adaptive Highbeam Assist Plus is only
an aid. You are responsible for adjusting the
vehicle's lighting to the prevailing light, visi-
bility and traffic conditions.
In particular, the detection of obstacles can
be restricted if there is: R poor visibility, e.g. due to fog, heavy rain or
snow
R dirt on the sensors or the sensors are
obscured
104Exterior lighting
Lights and windshield wipers
Page 107 of 286
Switching Adaptive Highbeam Assist
PLUS on/off
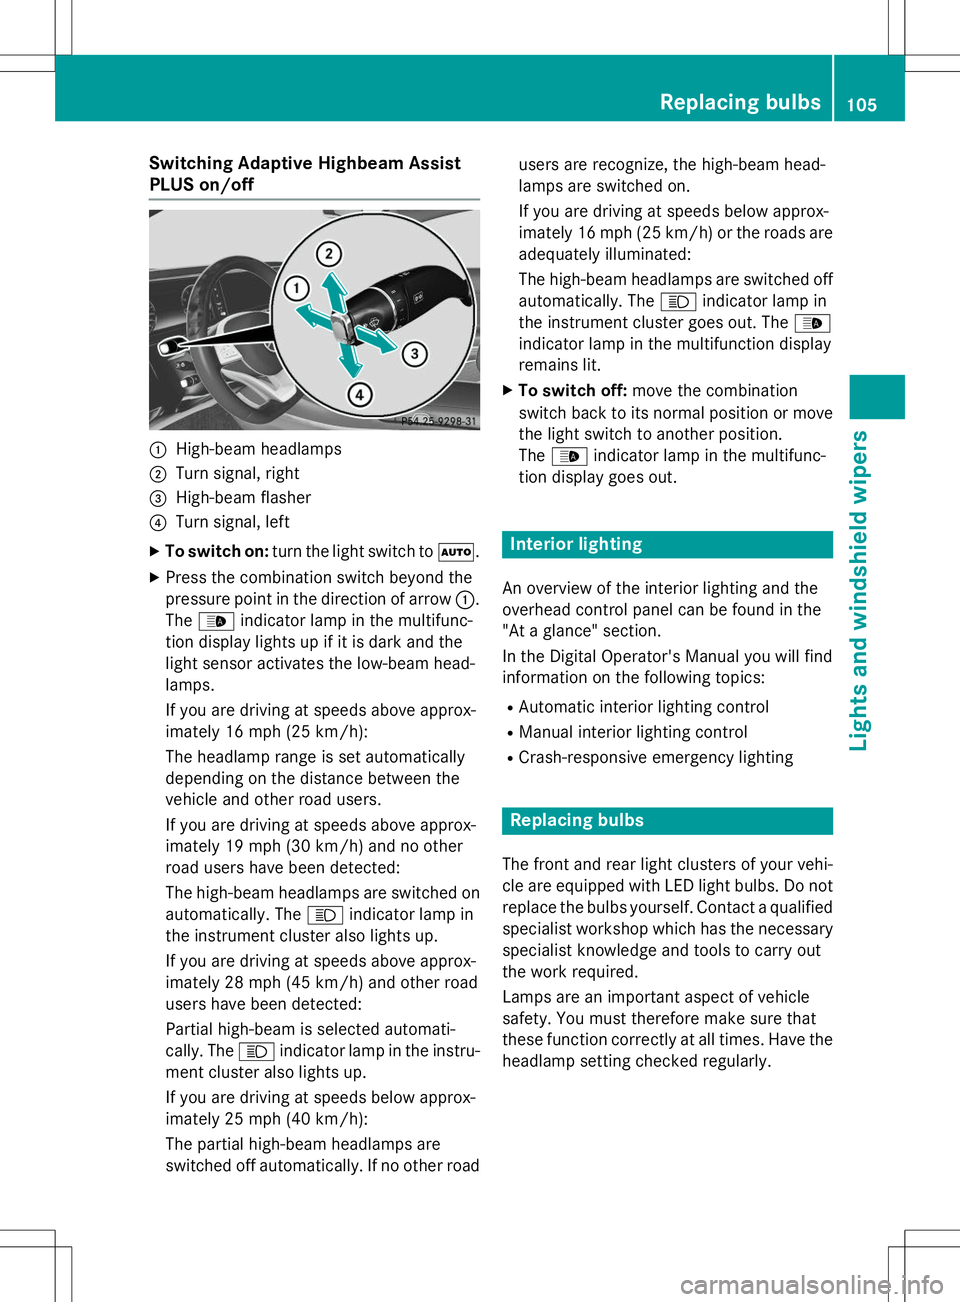
:High-beam headlamps
;Turn signal, right
=High-beam flasher
?Turn signal, left
X To switch on: turn the light switch to Ã.
X Press the combination switch beyond the
pressure point in the direction of arrow :.
The _ indicator lamp in the multifunc-
tion display lights up if it is dark and the
light sensor activates the low-beam head-lamps.
If you are driving at speeds above approx-
imately 16 mph (25 km/h):
The headlamp range is set automatically
depending on the distance between the
vehicle and other road users.
If you are driving at speeds above approx-
imately 19 mph (30 km/h) and no other
road users have been detected:
The high-beam headlamps are switched on
automatically. The Kindicator lamp in
the instrument cluster also lights up.
If you are driving at speeds above approx-
imately 28 mph (45 km/h) and other road
users have been detected:
Partial high-beam is selected automati-
cally. The Kindicator lamp in the instru-
ment cluster also lights up.
If you are driving at speeds below approx-
imately 25 mph (40 km/h):
The partial high-beam headlamps are
switched off automatically. If no other road users are recognize, the high-beam head-
lamps are switched on.
If you are driving at speeds below approx-
imately 16 mph (25 km/h) or the roads are
adequately illuminated:
The high-beam headlamps are switched off
automatically. The Kindicator lamp in
the instrument cluster goes out. The _
indicator lamp in the multifunction display
remains lit.
X To switch off: move the combination
switch back to its normal position or move the light switch to another position.The _ indicator lamp in the multifunc-
tion display goes out.
Interior lighting
An overview of the interior lighting and the
overhead control panel can be found in the
"At a glance" section.
In the Digital Operator's Manual you will find
information on the following topics:
R Automatic interior lighting control
R Manual interior lighting control
R Crash-responsive emergency lighting
Replacing bulbs
The front and rear light clusters of your vehi-
cle are equipped with LED light bulbs. Do not
replace the bulbs yourself. Contact a qualifiedspecialist workshop which has the necessary
specialist knowledge and tools to carry out
the work required.
Lamps are an important aspect of vehicle
safety. You must therefore make sure that
these function correctly at all times. Have the
headlamp setting checked regularly.
Replacing bulbs105
Lights and windshield wipers
Z
Page 108 of 286
Windshield wipers
Switching the windshield wipers
on/off
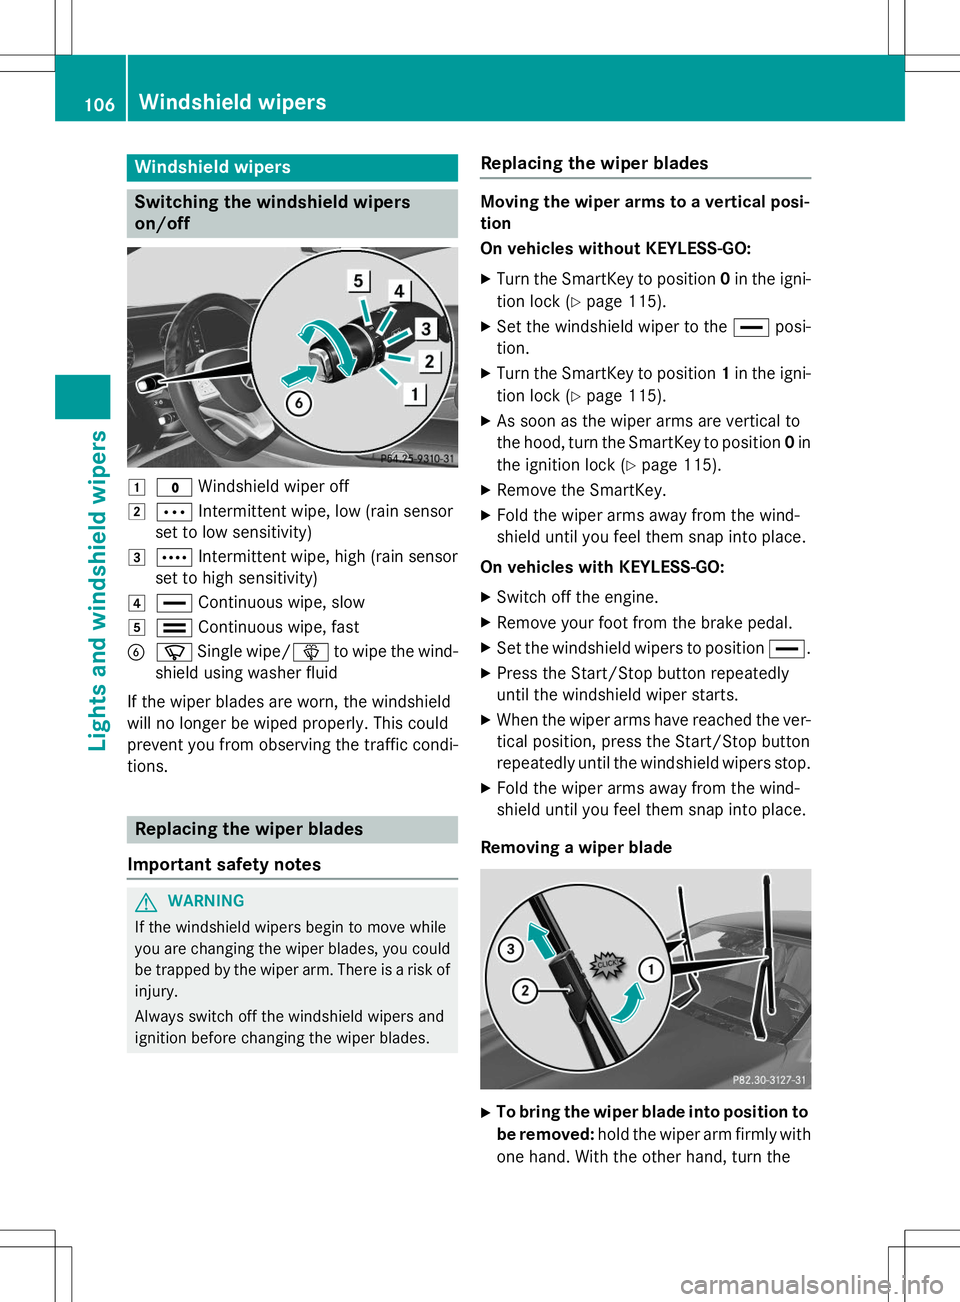
1$Windshield wiper off
2ÄIntermittent wipe, low (rain sensor
set to low sensitivity)
3Å Intermittent wipe, high (rain sensor
set to high sensitivity)
4° Continuous wipe, slow
5¯Continuous wipe, fast
BíSingle wipe/ îto wipe the wind-
shield using washer fluid
If the wiper blades are worn, the windshield
will no longer be wiped properly. This could
prevent you from observing the traffic condi-tions.
Replacing the wiper blades
Important safety notes
GWARNING
If the windshield wipers begin to move while
you are changing the wiper blades, you could be trapped by the wiper arm. There is a risk of
injury.
Always switch off the windshield wipers and
ignition before changing the wiper blades.
Replacing the wiper blades
Moving the wiper arms to a vertical posi- tion
On vehicles without KEYLESS-GO:
X Turn the SmartKey to position 0in the igni-
tion lock ( Ypage 115).
X Set the windshield wiper to the °posi-
tion.
X Turn the SmartKey to position 1in the igni-
tion lock ( Ypage 115).
X As soon as the wiper arms are vertical to
the hood, turn the SmartKey to position 0in
the ignition lock ( Ypage 115).
X Remove the SmartKey.
X Fold the wiper arms away from the wind-
shield until you feel them snap into place.
On vehicles with KEYLESS-GO: X Switch off the engine.
X Remove your foot from the brake pedal.
X Set the windshield wipers to position °.
X Press the Start/Stop button repeatedly
until the windshield wiper starts.
X When the wiper arms have reached the ver-
tical position, press the Start/Stop button
repeatedly until the windshield wipers stop.
X Fold the wiper arms away from the wind-
shield until you feel them snap into place.
Removing a wiper blade
X To bring the wiper blade into position to
be removed: hold the wiper arm firmly with
one hand. With the other hand, turn the
106Windshield wipers
Lights and windshield wipers