2015 MERCEDES-BENZ S-COUPE ECU
[x] Cancel search: ECUPage 179 of 286
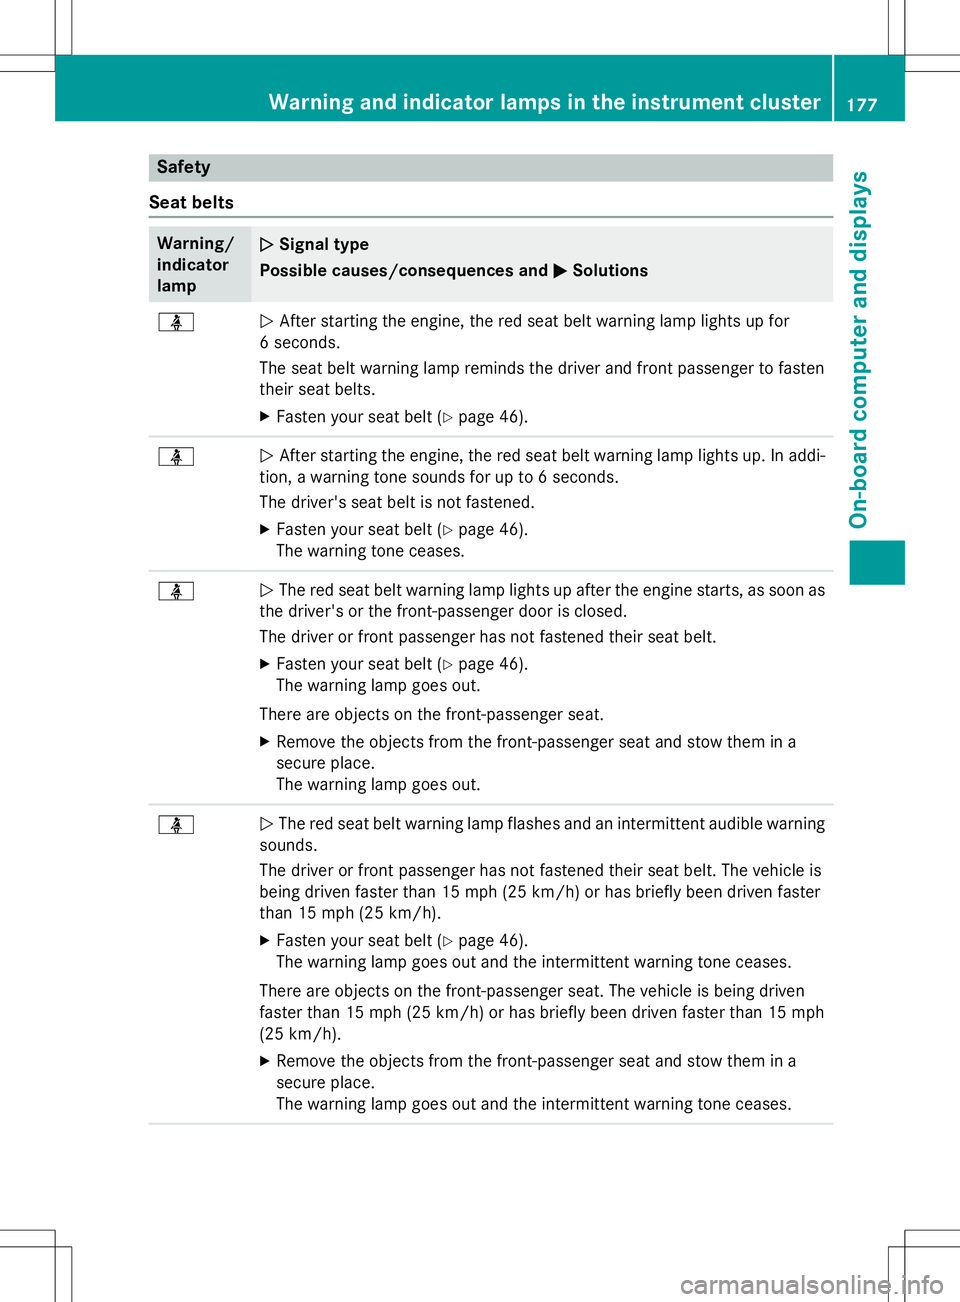
Safety
Seat belts
Warning/ indicatorlampNSignal type
Possible causes/consequences and M
Solutions
üNAfter starting the engine, the red seat belt warning lamp lights up for
6 seconds.
The seat belt warning lamp reminds the driver and front passenger to fasten
their seat belts. X Fasten your seat belt ( Ypage 46).
üN After starting the engine, the red seat belt warning lamp lights up. In addi-
tion, a warning tone sounds for up to 6 seconds.
The driver's seat belt is not fastened.
X Fasten your seat belt ( Ypage 46).
The warning tone ceases.
üN The red seat belt warning lamp lights up after the engine starts, as soon as
the driver's or the front-passenger door is closed.
The driver or front passenger has not fastened their seat belt.
X Fasten your seat belt ( Ypage 46).
The warning lamp goes out.
There are objects on the front-passenger seat. X Remove the objects from the front-passenger seat and stow them in a
secure place.
The warning lamp goes out.
üN The red seat belt warning lamp flashes and an intermittent audible warning
sounds.
The driver or front passenger has not fastened their seat belt. The vehicle is
being driven faster than 15 mph (25 km/h) or has briefly been driven faster
than 15 mph (25 km/ h).
X Fasten your seat belt ( Ypage 46).
The warning lamp goes out and the intermittent warning tone ceases.
There are objects on the front-passenger seat. The vehicle is being driven
faster than 15 mph (25 km/h) or has briefly been driven faster than 15 mph
(25 km/h). X Remove the objects from the front-passenger seat and stow them in a
secure place.
The warning lamp goes out and the intermittent warning tone ceases.
Warning and indicator lamps in the instrument cluster177
On-board computer and displays
Z
Page 180 of 286
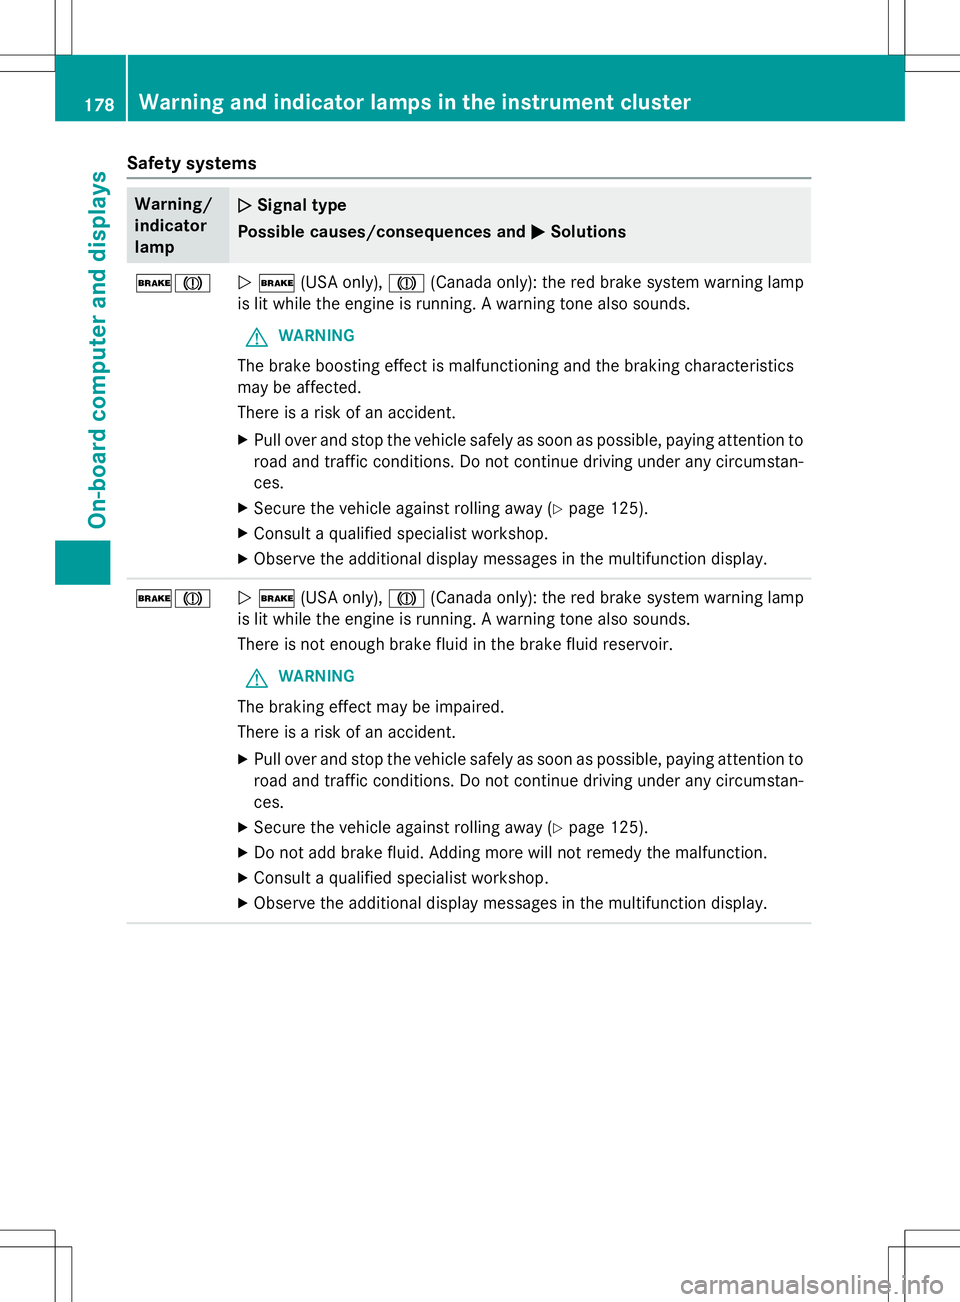
Safety systems
Warning/ indicatorlampNSignal type
Possible causes/consequences and M
Solutions
$JN$ (USA only), J(Canada only): the red brake system warning lamp
is lit while the engine is running. A warning tone also sounds.
GWARNING
The brake boosting effect is malfunctioning and the braking characteristics
may be affected.
There is a risk of an accident.
X Pull over and stop the vehicle safely as soon as possible, paying attention to
road and traffic conditions. Do not continue driving under any circumstan- ces.
X Secure the vehicle against rolling away ( Ypage 125).
X Consult a qualified specialist workshop.
X Observe the additional display messages in the multifunction display.
$JN $ (USA only), J(Canada only): the red brake system warning lamp
is lit while the engine is running. A warning tone also sounds.
There is not enough brake fluid in the brake fluid reservoir.
GWARNING
The braking effect may be impaired.
There is a risk of an accident.
X Pull over and stop the vehicle safely as soon as possible, paying attention to
road and traffic conditions. Do not continue driving under any circumstan- ces.
X Secure the vehicle against rolling away ( Ypage 125).
X Do not add brake fluid. Adding more will not remedy the malfunction.
X Consult a qualified specialist workshop.
X Observe the additional display messages in the multifunction display.
178Warning and indicator lamps in the instrument cluster
On-board computer and displays
Page 185 of 286
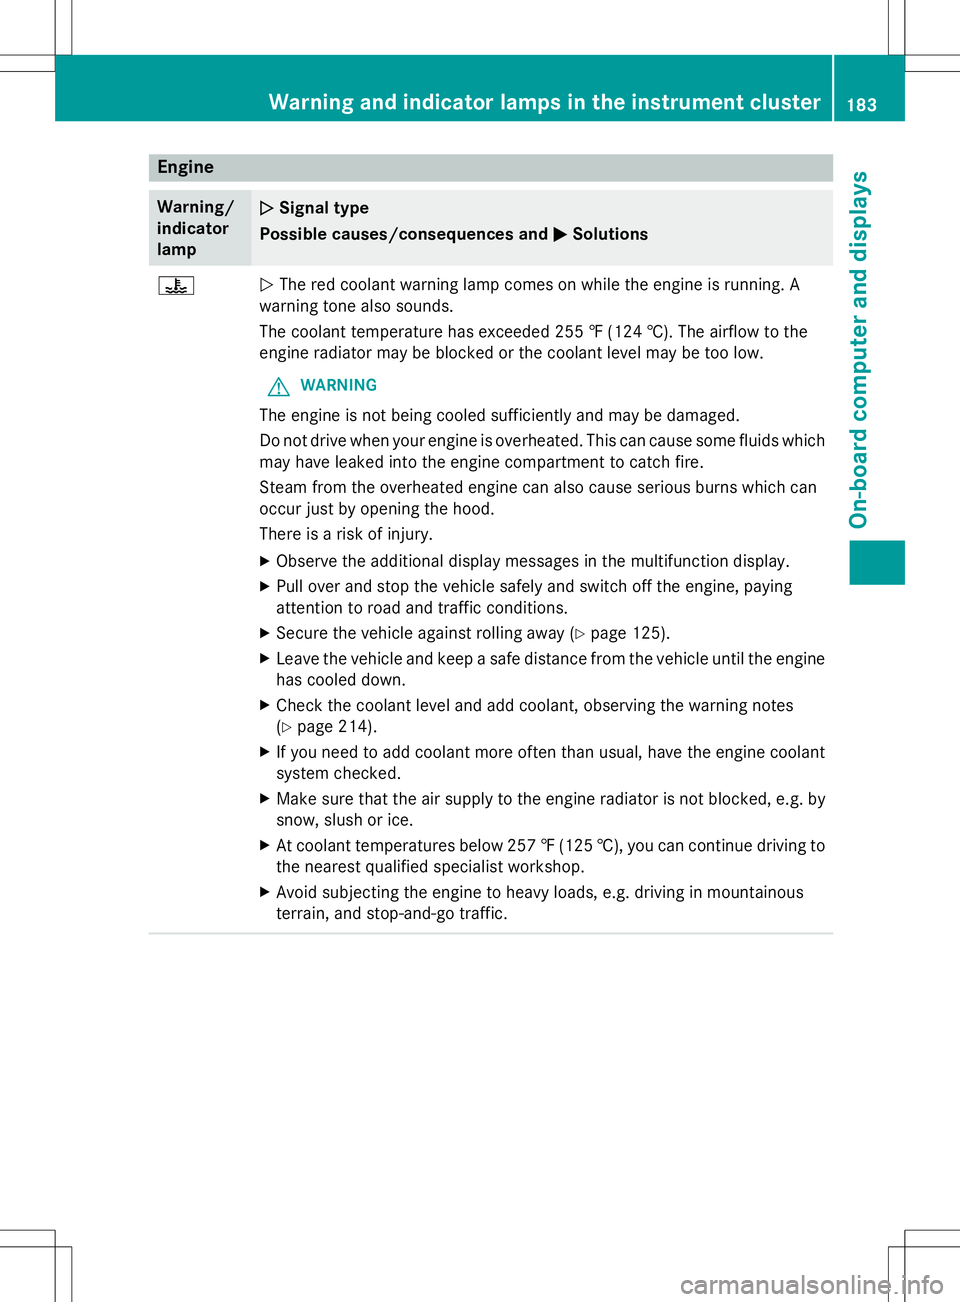
Engine
Warning/
indicator
lampNSignal type
Possible causes/consequences and M
Solutions
?NThe red coolant warning lamp comes on while the engine is running. A
warning tone also sounds.
The coolant temperature has exceeded 255 ‡ (124 †). The airflow to the
engine radiator may be blocked or the coolant level may be too low.
GWARNING
The engine is not being cooled sufficiently and may be damaged.
Do not drive when your engine is overheated. This can cause some fluids which may have leaked into the engine compartment to catch fire.
Steam from the overheated engine can also cause serious burns which can
occur just by opening the hood.
There is a risk of injury.
X Observe the additional display messages in the multifunction display.
X Pull over and stop the vehicle safely and switch off the engine, paying
attention to road and traffic conditions.
X Secure the vehicle against rolling away ( Ypage 125).
X Leave the vehicle and keep a safe distance from the vehicle until the engine
has cooled down.
X Check the coolant level and add coolant, observing the warning notes(Y page 214).
X If you need to add coolant more often than usual, have the engine coolant
system checked.
X Make sure that the air supply to the engine radiator is not blocked, e.g. by
snow, slush or ice.
X At coolant temperatures below 257 ‡(125 †), you can continue driving to
the nearest qualified specialist workshop.
X Avoid subjecting the engine to heavy loads, e.g. driving in mountainous
terrain, and stop-and-go traffic.
Warning and indicator lamps in the instrument cluster183
On-board computer and displays
Z
Page 187 of 286
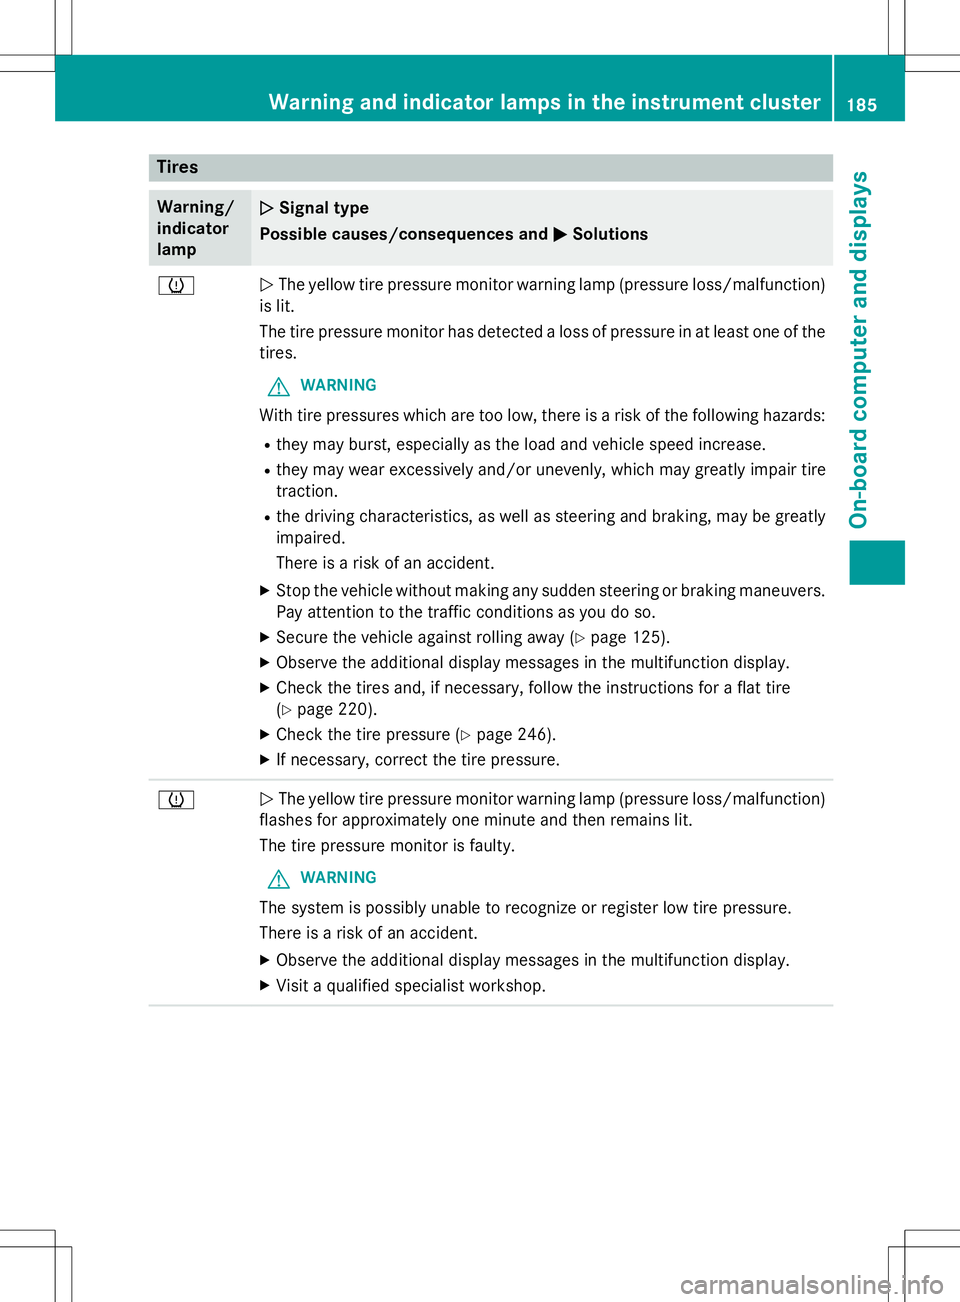
Tires
Warning/
indicatorlampNSignal type
Possible causes/consequences and M
Solutions
hNThe yellow tire pressure monitor warning lamp (pressure loss/malfunction)
is lit.
The tire pressure monitor has detected a loss of pressure in at least one of the
tires.
GWARNING
With tire pressures which are too low, there is a risk of the following hazards:
R they may burst, especially as the load and vehicle speed increase.
R they may wear excessively and/or unevenly, which may greatly impair tire
traction.
R the driving characteristics, as well as steering and braking, may be greatly
impaired.
There is a risk of an accident.
X Stop the vehicle without making any sudden steering or braking maneuvers.
Pay attention to the traffic conditions as you do so.
X Secure the vehicle against rolling away ( Ypage 125).
X Observe the additional display messages in the multifunction display.
X Check the tires and, if necessary, follow the instructions for a flat tire (Y page 220).
X Check the tire pressure ( Ypage 246).
X If necessary, correct the tire pressure.
hN The yellow tire pressure monitor warning lamp (pressure loss/malfunction)
flashes for approximately one minute and then remains lit.
The tire pressure monitor is faulty.
GWARNING
The system is possibly unable to recognize or register low tire pressure.
There is a risk of an accident.
X Observe the additional display messages in the multifunction display.
X Visit a qualified specialist workshop.
Warning and indicator lamps in the instrument cluster185
On-board computer and displays
Z
Page 198 of 286
Useful information
iThis Operator's Manual describes all
models and all standard and optional equip- ment of your vehicle available at the time of
publication of the Operator's Manual.
Country-specific differences are possible.
Please note that your vehicle may not be
equipped with all features described. This
also applies to safety-related systems and
functions.
iRead the information on qualified special-
ist workshops ( Ypage 27).
Stowage areas
Loading guidelines
GWARNING
Combustion engines emit poisonous exhaust
gases such as carbon monoxide. Exhaust
gases can enter the vehicle interior if the
trunk lid is open when the engine is running,
especially if the vehicle is in motion. There is a
risk of poisoning.
Always switch off the engine before opening
the trunk lid. Never drive with the trunk lidopen.
GWARNING
If objects, luggage or loads are not secured or not secured sufficiently, they could slip, tip
over or be flung around and thereby hit vehicle
occupants. There is a risk of injury, particu-
larly in the event of sudden braking or a sud-
den change in direction.
Always store objects so that they cannot be
flung around. Secure objects, luggage or
loads against slipping or tipping before the
journey.
GWARNING
The exhaust tail pipe and tail pipe trim can
become very hot. If you come into contact
with these parts of the vehicle, you could burn
yourself. There is a risk of injury.
Always be particularly careful around the
exhaust tail pipe and the tail pipe trim. Allow
these components to cool down before touch-
ing them.
The handling characteristics of a laden vehi-
cle are dependent on the distribution of the
load within the vehicle. For this reason, you
should observe the following notes when
transporting a load: R Never exceed the maximum permissible
gross vehicle weight or the gross axle
weight rating of the vehicle (including occu-
pants). The values are specified on the vehi-
cle identification plate on the B-pillar of the
driver's door.
R The trunk is the preferred place to carry
objects.
R Position heavy loads as far forwards as pos-
sible and as low down in the trunk as pos-sible.
R The load must not protrude above the
upper edge of the seat backrests.
R Always place the load behind unoccupied
seats if possible.
R Secure the load with sufficiently strong and
wear-resistant tie-downs. Pad sharp edges
for protection.
Stowage spaces
Important safety notes
GWARNING
If you do not correctly store objects in the
vehicle interior, they can slip or be flung
around, thus striking vehicle occupants.
There is a risk of injury, especially when brak- ing or abruptly changing directions.
R Always store objects so that they cannot be
flung around in these or in similar situa-
tions.
R Always make sure that objects do not pro-
trude from stowage compartments, parcel
nets or stowage nets.
196Stowage areas
Stowage and features
Page 199 of 286
RClose lockable stowage compartments
while driving.
R Stow and secure objects that are heavy,
hard, pointy, sharp-edged, fragile or too
large in the trunk.
Observe the loading guidelines ( Ypage 196).
Information in the Digital Operator's
Manual
In the Digital Operator's Manual you will find
information on the following topics:
R Glove box
R Eyeglasses compartment
R Stowage compartments in the center con-sole
R Stowage compartment under the armrest
R Stowage compartment under the front
seats
R Stowage compartments in the doors
R Stowage compartment in the rear-com-
partment center console
R Stowage box in the rear seat backrest
Stowage nets
Stowage nets are located:
R in the front-passenger footwell
R on the back of the driver's and the front-
passenger seat
R on the left and right-hand side in the trunk
Observe the loading guidelines ( Ypage 196)
and the safety notes regarding stowage
spaces ( Ypage 196).
Securing loads using parcel net hooks
General notes
Observe the following notes on securing
loads:
R Secure the load using the parcel net hooks.
R Do not use elastic straps or nets to secure
a load, as these are only intended as an
anti-slip protection for light loads.
R Do not route tie-downs across sharp edges
or corners.
R Pad sharp edges for protection.
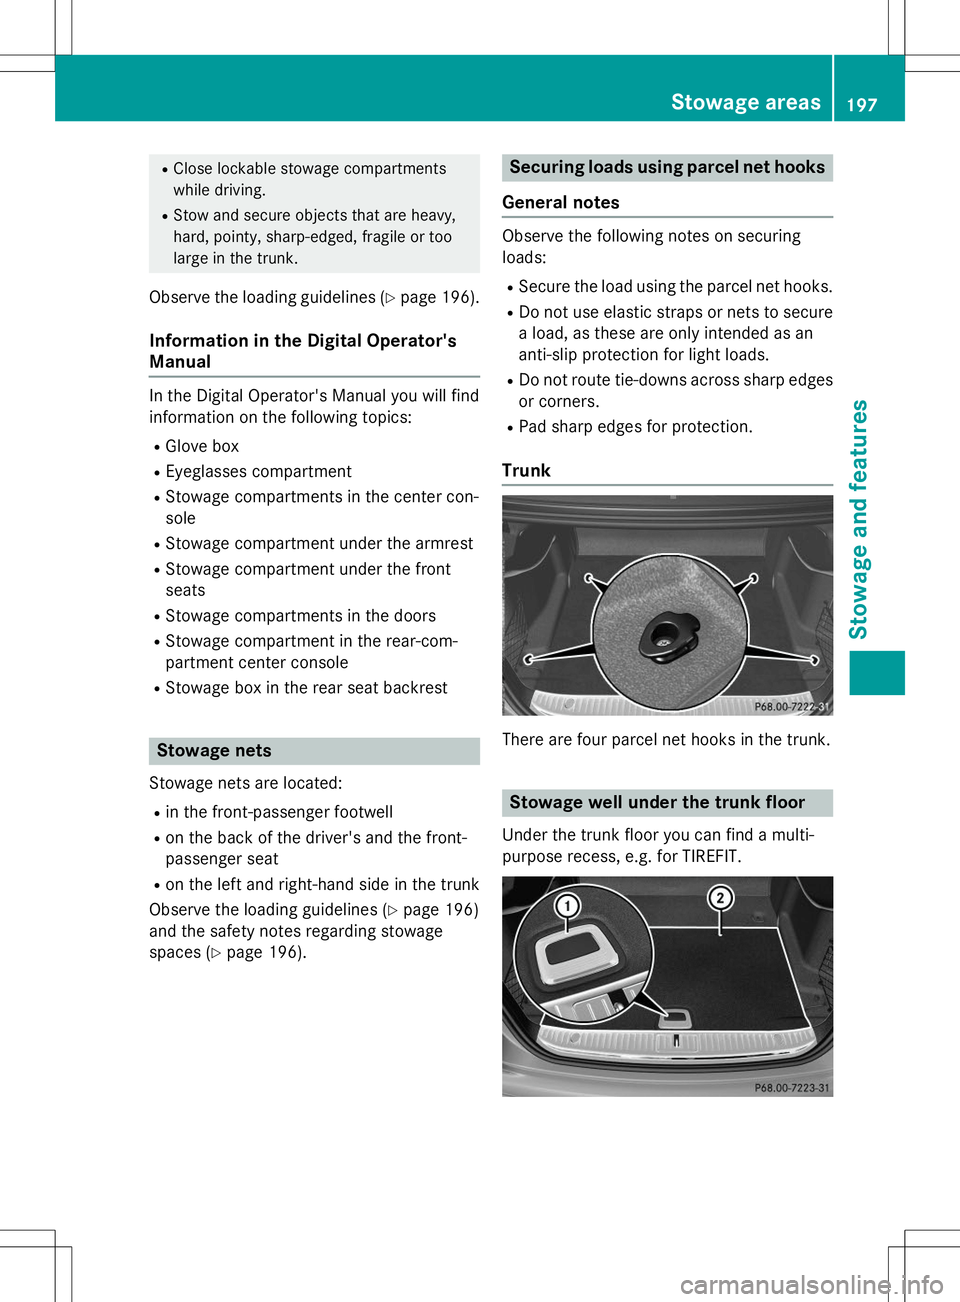
Trunk
There are four parcel net hooks in the trunk.
Stowage well under the trunk floor
Under the trunk floor you can find a multi-
purpose recess, e.g. for TIREFIT.
Stowage areas197
Stowage and features
Z
Page 202 of 286
A malfunction in the system has been detec-
ted if one of the following occurs:
R The indicator lamp in the SOS button does
not come on during the system self-test.
R The indicator lamp in the FRoadside
Assistance button does not light up during
self-diagnosis of the system.
R The indicator lamp in the ïMB Info call
button does not light up during self-diag-
nosis of the system.
R The indicator lamp in one or more of the
following buttons continues to light up red
after the system self-diagnosis:
- SOS button
- F Roadside Assistance call button
- ï MB Info call button
R The
Inoperativeor theService Not
Activatedmessage appears in the multi-
function display after the system self-diag-
nosis.
If a malfunction is indicated as outlined
above, the system may not operate as expec-
ted. In the event of an emergency, help will
have to be summoned by other means.
Have the system checked at the nearest
authorized Mercedes-Benz Center or contact the following service hotlines:
Mercedes-Benz Customer Assistance Center
at 1-800-FOR-MERCede s (1-800-367-6372)
or 1-866-990-9007
Emergency call
Important safety notes
GWARNING
It can be dangerous to remain in the vehicle,
even if you have pressed the SOS button in an emergency if:
R you see smoke inside or outside of the vehi-
cle, e.g. if there is a fire after an accident
R the vehicle is on a dangerous section of
road
R the vehicle is not visible or cannot easily be
seen by other road users, particularly whendark or in poor visibility conditions
There is a risk of an accident and injury.
Leave the vehicle immediately in this or simi-
lar situations as soon as it is safe to do so.
Move to a safe location along with other vehi-
cle occupants. In such situations, secure the
vehicle in accordance with national regula-
tions, e. g. with a warning triangle.
General notes
Observe the notes on system activation ( Y page 199).
An emergency call is dialed automatically if an
air bag or Emergency Tensioning Device is
triggered. You cannot end an automatically
triggered emergency call yourself.
An emergency call can also be initiated man- ually.
As soon as the emergency call has been ini-
tiated, the indicator lamp in the SOS button
flashes. The
Connecting Callmessage
appears in the multifunction display.
The audio output is muted.
Once the connection has been made, the
Call Connectedmessage appears in the
multifunction display.
200Features
Sto wage an d features
Page 208 of 286
Problems when programming
If you are experiencing problems programing
the integrated garage door opener on the
rear-view mirror, take note of the following
instructions:
R Check the transmitter frequency used by
garage door drive remote control Aand
whether it is supported. The transmitter
frequency can usually be found on the back
of the garage door drive remote control.
The integrated garage door opener is com-
patible with devices that have units which
operate in the frequency range of 280 to
433 MHz.
R Replace the batteries in garage door
remote control A. This increases the like-
lihood that garage door remote control A
will transmit a strong and precise signal to
the integrated garage door opener.
R When programming, hold remote controlA at varying distances and angles from the
button which you are programming. Try var- ious angles at a distance between 2and
12 inches (5to 30 cm) or at the same angle
but at varying distances.
R If another remote control is available for the
same garage door drive, repeat the same
programming steps with this remote con-
trol. Before performing these steps, make
sure that new batteries have been installed
in garage door drive remote control A.
R Note that some remote controls only trans-
mit for a limited amount of time (the indi-
cator lamp on the remote control goes out).
Press button Bon remote control Aagain
before transmission ends.
R Align the antenna cable of the garage door
opener unit. This can improve signal recep-tion/transmission.
Opening/closing the garage door
After it has been programmed, the integrated
garage door opener performs the function of
the garage door system remote control. Please also read the operating instructions
for the garage door system.
X Turn the SmartKey to position 2in the igni-
tion lock ( Ypage 115).
X Press button ;,= or? which you have
programmed to operate the garage door.
Garage door system with a fixed code: indi-
cator lamp :lights up green.
Garage door system with a rolling code:
indicator lamp :flashes green.
The transmitter will transmit a signal as
long as the button is pressed. The trans-
mission is halted after a maximum of ten
seconds and indicator lamp :lights up
yellow.
X Press button ;,= or? again if neces-
sary.
Clearing the memory
Make sure that you clear the memory of the
integrated garage door opener before selling
the vehicle.
X Turn the SmartKey to position 2in the igni-
tion lock ( Ypage 115).
X Press and hold buttons ;and ?.
The indicator lamp initially lights up yellow
and then green.
X Release buttons ;and ?.
The memory of the integrated garage door
opener in the rear-view mirror is cleared.
Floormats
GWARNING
Objects in the driver's footwell can restrict the pedal travel or obstruct a depressed pedal.
The operating and road safety of the vehicle is
jeopardized. There is a risk of an accident.
Make sure that all objects in the vehicle are
stowed correctly, and that they cannot enter
the driver's footwell. Install the floormats
securely and as specified in order to ensure
sufficient clearance for the pedals. Do not use
206Features
Stowage and features