2015 MERCEDES-BENZ S-COUPE key
[x] Cancel search: keyPage 21 of 286
Tire tread ....................................... 241
Tire tread (definition) ..................... 261
Total load limit (definition)............. 261
Traction ......................................... 254
Traction (definition) ....................... 261
Tread wear ..................................... 254
Uniform Tire Quality Grading
Standards ...................................... 254
Uniform Tire Quality Grading
Standards (definition) .................... 259
Wear indicator (definition) ............. 261
Wheel and tire combination ........... 268
Wheel rim (definition) .................... 259
see Flat tire
Top Tether ............................................ 63
Tow-starting
Emergency engine starting ............ 234
Important safety notes .................. 232
Towing away
Important safety guidelines ........... 232
Installing the towing eye ................ 233
Notes for 4MATIC vehicles ............ 234
Removing the towing eye ............... 233
With both axles on the ground ....... 233
With the rear axle raised ................ 234
Towing eye ......................................... 220
Traffic reports
see also Digital Operator's Man-
ual .................................................. 188
Traffic Sign Assist
Activating/deactivating the warn-ing function .................................... 164
Display message ............................ 165
Transfer case ..................................... 122
Transmission
see Automatic transmission
Transporting the vehicle .................. 234
Trim pieces (cleaning instruc-
tions) .................................................. 218
Trip computer (on-board com-puter) .................................................. 164
Trip odometer
Calling up ....................................... 164
Trunk
Emergency release .......................... 88
Important safety notes .................... 84
Locking separately ........................... 88 Opening/closing (automatically
from inside) ...................................... 87
Opening/closing (automatically
from outside) ................................... 85
Opening/closing (from outside,
HANDS-FREE ACCESS) .................... 86
Power closing .................................. 82
Trunk lid
Display message ............................ 165
Obstacle recognition ........................ 84
Opening dimensions ...................... 281
Opening/closing .............................. 84
Trunk load (maximum) ...................... 281
Turn signals
Display message ............................ 165
Switching on/of f........................... 103
TV
see Separate operating instructions
Two-way radio
Windshield (infrared reflective) ...... 198
Type identification plate
see Vehicle identification plate
U
Unlocking Emergency unlocking ....................... 83
From inside the vehicle (central
unlocking button) ............................. 82
V
Vanity mirror (in the sun visor) ........ 199
Vehicle
Correct use ...................................... 28
Data acquisition ............................... 29
Display message ............................ 176
Equipment ....................................... 24
Limited Warranty ............................. 28
Loading .......................................... 249
Locking (in an emergency) ............... 83
Locking (SmartKey) .......................... 79
Lowering ........................................ 266
Maintenance .................................... 25
Operating safety .............................. 26
Parking for a long period ................ 126
Pulling away ................................... 118
Raising ........................................... 263
Reporting problems ......................... 28
Index19
Page 22 of 286
Securing from rolling away ............ 262
Towing away .................................. 232
Transporting .................................. 234
Unlocking (in an emergency) ........... 83
Unlocking (SmartKey) ...................... 79
Vehicle data ................................... 281
Vehicle dimensions ........................... 281
Vehicle emergency locking ................ 83
Vehicle identification number
see VIN
Vehicle identification plate .............. 274
Vehicle level
Active Body Control ABC ............... 140
Vehicle maintenance
see ASSYST PLUS
Vehicle tool kit .................................. 220
Video
see also Digital Operator's Man-
ual .................................................. 188
Video (DVD) ........................................ 164
VIN ...................................................... 274
Voice Control System
see Separate operating instructions
W
Warning and indicator lampsABS ................................................ 179
Brakes ........................................... 178
Check Engine ................................. 176
Coolant .......................................... 183
Distance warning ........................... 184 ESP ®
.............................................. 181
ESP ®
OFF ....................................... 182
General notes ................................ 176
Overview .......................................... 34
PASSENGER AIR BAG ...................... 43
Reserve fue l................................... 176
Restraint system ............................ 182
Seat belt ........................................ 177
Steering ......................................... 186
Tire pressure monitor .................... 185
Warranty .............................................. 24
Washer fluid
Display message ............................ 165
Wheel and tire combination
see Tires
Wheel bolt tightening torque ........... 266Wheel chock
...................................... 262
Wheels
Changing a whee l.......................... 261
Checking ........................................ 241
Cleaning ......................................... 217
Important safety notes .................. 240
Interchanging/changing ................ 261
Mounting a new whee l................... 265
Mounting a whee l.......................... 262
Removing a whee l.......................... 265
Storing ........................................... 262
Tightening torque ........................... 266
Wheel size/tire size ....................... 266
Window curtain air bag
Operation ......................................... 51
Windows
see Side windows
Windshield
Defrosting ...................................... 111
Infrared reflective .......................... 198
Windshield washer fluid
see Windshield washer system
Windshield washer system
Adding washer fluid ....................... 215
Notes ............................................. 280
Windshield wipers
Problem (malfunction) ................... 107
Replacing the wiper blades ............ 106
Switching on/of f........................... 106
Winter driving
Important safety notes .................. 242
Slippery road surfaces ................... 128
Snow chains .................................. 242
Winter operation
Summer tires ................................. 242
Winter tires
M+S tires ....................................... 242
Wiper blades
Cleaning ......................................... 217
Important safety notes .................. 106
Replacing ....................................... 106
Wooden trim (cleaning instruc-
tions) .................................................. 218
Workshop
see Qualified specialist workshop
20Index
Page 23 of 286
Introduction
The printed Operator's Manual provides infor-mation about the safe operation of your vehi-
cle. The Digital Operator's Manual addition-
ally describes further functions and equip-
ment installed in your vehicle. The vehicle
functions and functions of COMAND are
described in the Digital Operator's Manual.
You can call up the Digital Operator's Manual via COMAND.
iYou will not incur any costs when calling
up the Digital Operator's Manual. The Dig-
ital Operator's Manual works without con-
necting to the Internet.
There are three ways to access the topics of
the Digital Operator's Manual:
R Visual search
The visual search allows you to explore your
vehicle "virtually". Starting from either the
vehicle exterior view or interior view, you
can access many of the different topics
covered by the Digital Operator's Manual.
To access the vehicle interior section,
select the "Vehicle interior" view.
R Keyword Search
The keyword search allows you to search
for a keyword by entering characters. Fur-
ther information can be found in the Digital
Operator's Manual in the "COMAND" sec-
tion under the "Character entry (teleph-
ony)" keyword.
R Contents
You can select individual sections in the
contents.
iThe Digital Operator's Manual is deacti-
vated for safety reasons while driving.
Operation
Calling up the Digital Operator's Man-
ual
X Press the Øbutton in the center con-
sole.
The overview relating to the vehicle opens.
X Select the "Operator's Manual" menu item
by turning 3or sliding 1the con-
troller.
X Confirm 7the message about the warning
and safety notes.
The basic menu for the Digital Operator's
Manual opens.
Operating the Digital Operator's Man-
ual
General notes
Please observe the information about the
operation of the controller ( Ypage 192).
Content pages
The content pages can be accessed by means
of a visual search, a keyword search or using
the contents.
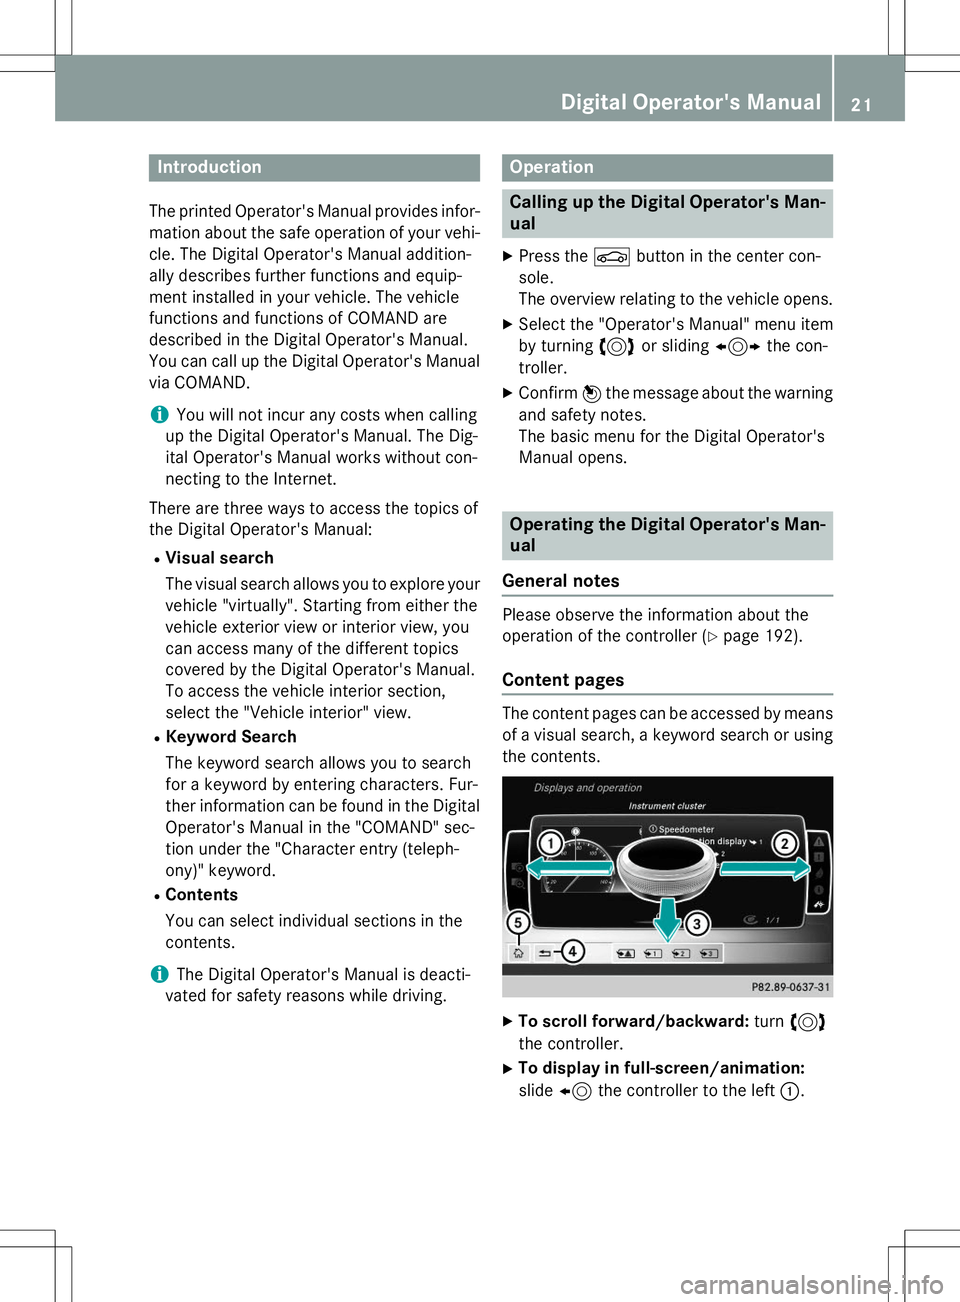
X To scroll forward/backward: turn3
the controller.
X To display in full-screen/animation: slide 8 the controller to the left :.
Digital Operator's Manual21
Page 39 of 286
Center console
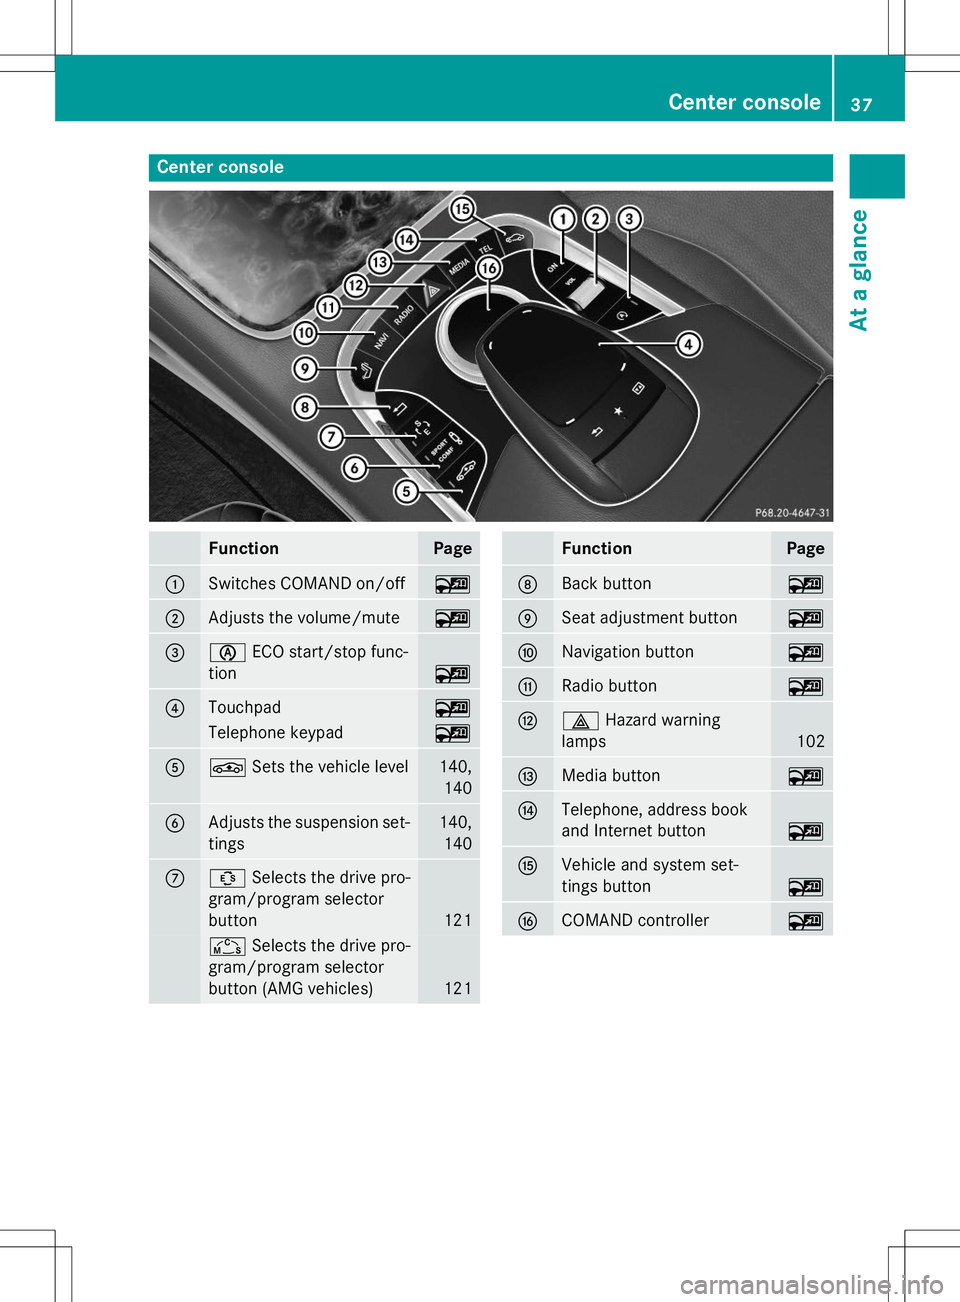
FunctionPage
:Switches COMAND on/off~
;Adjusts the volume/mute~
=èECO start/stop func-
tion
~
?Touchpad~
Telephone keypad~
AÉ Sets the vehicle level140,
140
BAdjusts the suspension set-tings140, 140
CÛ Selects the drive pro-
gram/program selector
button
121
Ñ Selects the drive pro-
gram/program selector
button (AMG vehicles)
121
FunctionPage
DBack button~
ESeat adjustment button~
FNavigation button~
GRadio button~
H£ Hazard warning
lamps
102
IMedia button~
JTelephone, address book
and Internet button
~
KVehicle and system set-
tings button
~
LCOMAND controller~
Center console37
At a glance
Page 44 of 286
Useful information
iThis Operator's Manual describes all
models and all standard and optional equip- ment of your vehicle available at the time of
publication of the Operator's Manual.
Country-specific differences are possible.
Please note that your vehicle may not be
equipped with all features described. This
also applies to safety-related systems and
functions.
iRead the information on qualified special-
ist workshops ( Ypage 27).
Panic alarm
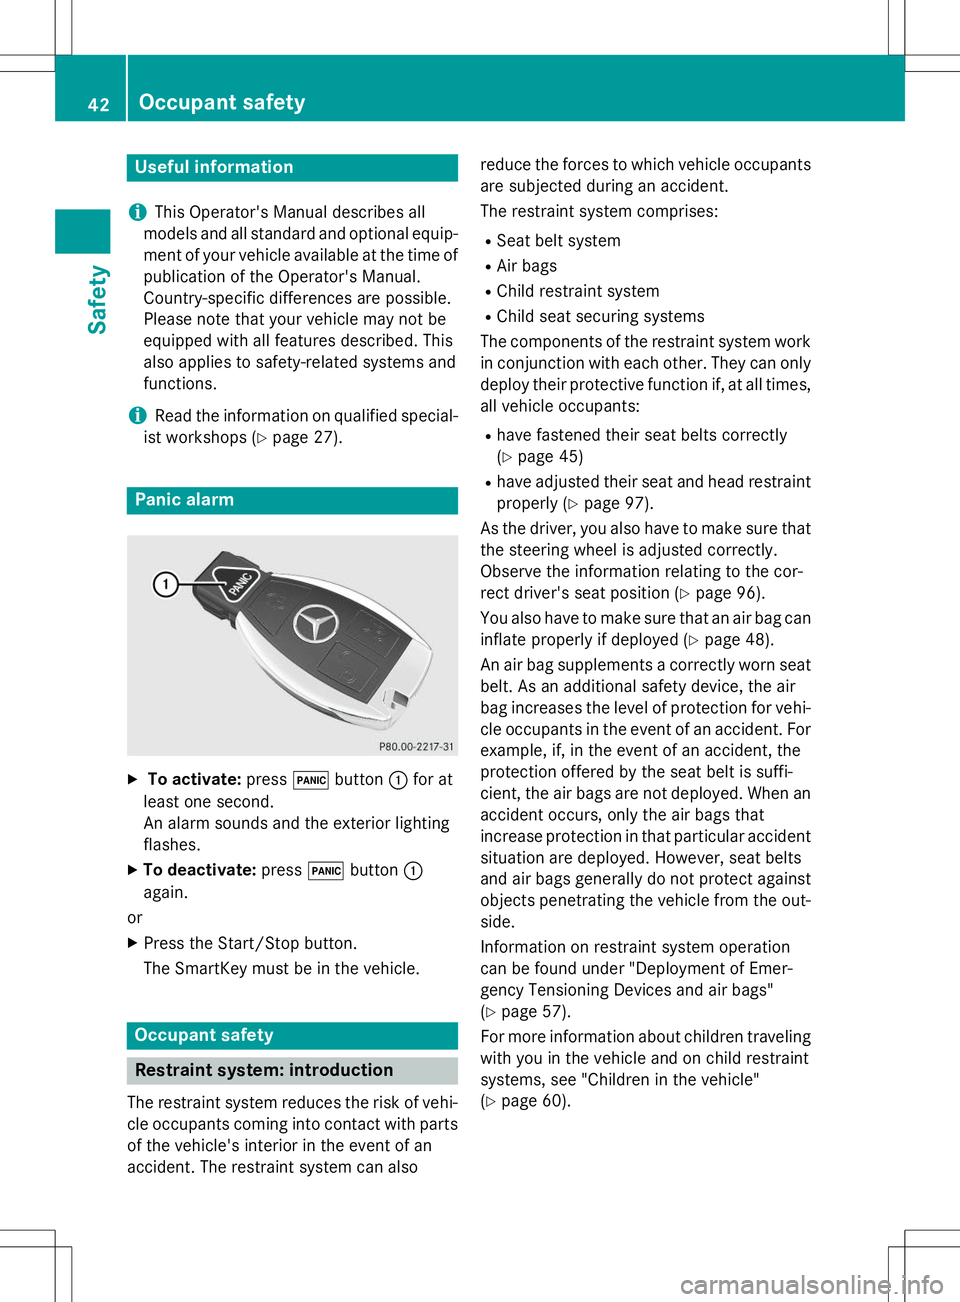
X
To activate: press!button :for at
least one second.
An alarm sounds and the exterior lightingflashes.
X To deactivate: press!button :
again.
or
X Press the Start/Stop button.
The SmartKey must be in the vehicle.
Occupant safety
Restraint system: introduction
The restraint system reduces the risk of vehi-
cle occupants coming into contact with parts of the vehicle's interior in the event of an
accident. The restraint system can also reduce the forces to which vehicle occupants
are subjected during an accident.
The restraint system comprises:
R Seat belt system
R Air bags
R Child restraint system
R Child seat securing systems
The components of the restraint system work
in conjunction with each other. They can only deploy their protective function if, at all times,
all vehicle occupants:
R have fastened their seat belts correctly(Y page 45)
R have adjusted their seat and head restraint
properly ( Ypage 97).
As the driver, you also have to make sure that
the steering wheel is adjusted correctly.
Observe the information relating to the cor-
rect driver's seat position ( Ypage 96).
You also have to make sure that an air bag can inflate properly if deployed ( Ypage 48).
An air bag supplements a correctly worn seat
belt. As an additional safety device, the air
bag increases the level of protection for vehi-
cle occupants in the event of an accident. For example, if, in the event of an accident, the
protection offered by the seat belt is suffi-
cient, the air bags are not deployed. When an
accident occurs, only the air bags that
increase protection in that particular accident
situation are deployed. However, seat belts
and air bags generally do not protect against objects penetrating the vehicle from the out-
side.
Information on restraint system operation
can be found under "Deployment of Emer-
gency Tensioning Devices and air bags"( Y page 57).
For more information about children traveling
with you in the vehicle and on child restraint
systems, see "Children in the vehicle"( Y page 60).
42Occupant safety
Safety
Page 48 of 286
Rthe seat belt is not twisted.
Only then can the forces which occur be
distributed over the area of the belt.
R the shoulder section of the belt is always
routed across the center of your shoulder.
The shoulder section of the belt must not
come into contact with your neck or be
routed under your arm.
R the lap belt passes tightly and as low down
as possible across your lap.
The lap belt must always be routed across
your hip joints and not across your abdo-
men. This applies particularly to pregnant
women. If necessary, push the lap belt
down to your hip joint and pull it tight usingthe shoulder section of the belt.
R the seat belt is not routed across sharp,
pointed or fragile objects.
If you have such items located on or in your
clothing, e.g. pens, keys or eyeglasses,
store these in a suitable place.
R only one person is using a seat belt at a
time.
Infants and children must never travel sit-
ting on the lap of a vehicle occupant. In the
event of an accident, they could be crushed
between the vehicle occupant and seat
belt.
R objects are never secured with a seat belt if
the seat belt is also being used by one of the
vehicle's occupants.
Seat belts are only intended to secure and
restrain vehicle occupants. Always observe
the "Loading guidelines" for securing objects,
luggage or loads ( Ypage 196).
Fastening seat belts
Observe the safety notes on the seat belt (Y page 44) and the notes on correct use of
seat belts ( Ypage 45).
GWARNING
If the seat-belt extender is extended during
the journey, the seat belt is not fitted properly
on the body. The seat belt can then no longer
perform its intended protective function. This
poses an increased risk of injury or even fatal
injury.
Always make sure that the seat-belt extender is retracted during a journey.
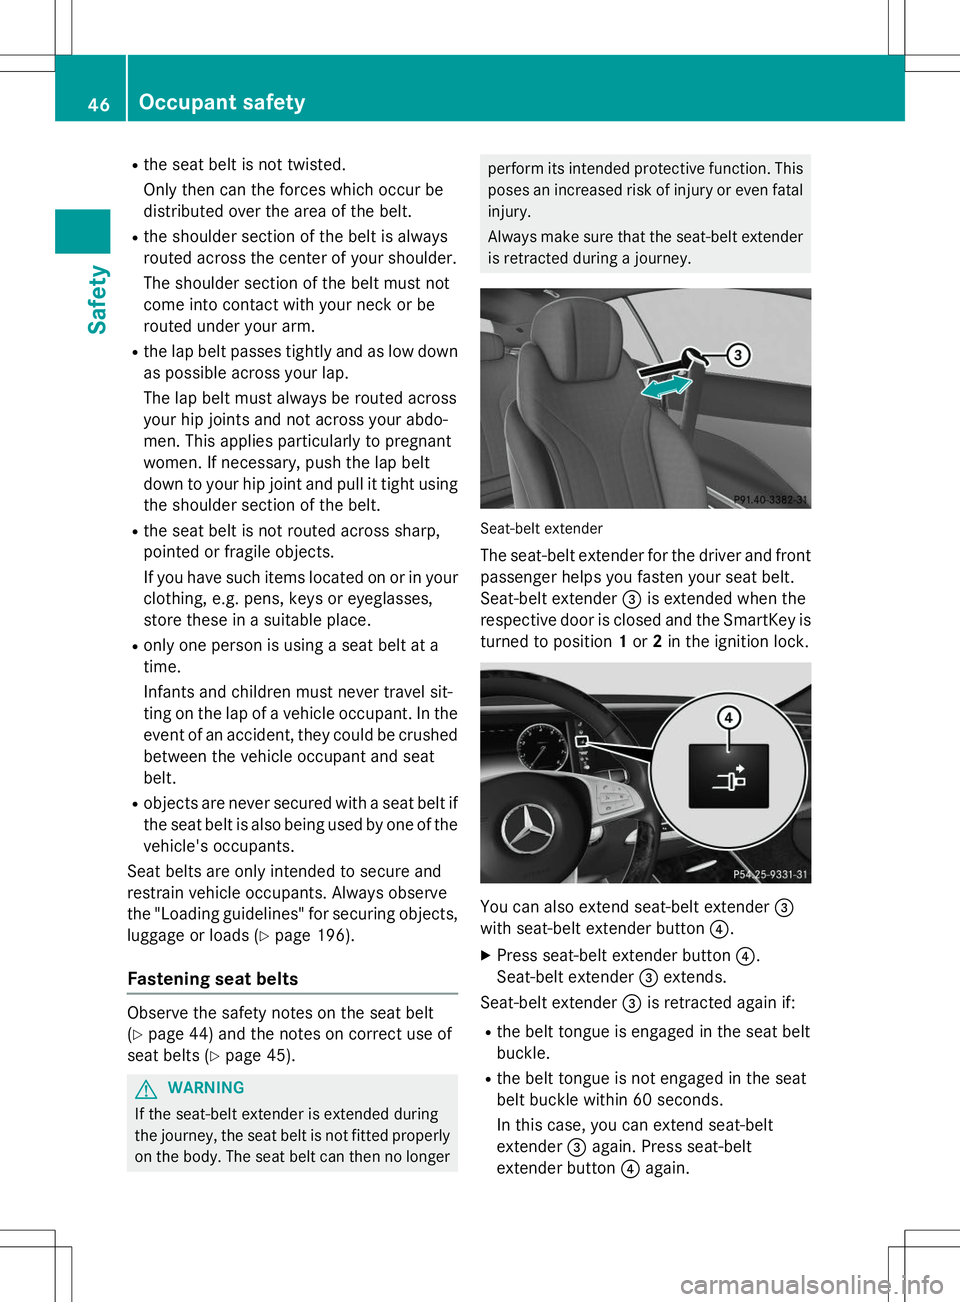
Seat-belt extender
The seat-belt extender for the driver and frontpassenger helps you fasten your seat belt.
Seat-belt extender =is extended when the
respective door is closed and the SmartKey is
turned to position 1or 2in the ignition lock.
You can also extend seat-belt extender =
with seat-belt extender button ?.
X Press seat-belt extender button ?.
Seat-belt extender =extends.
Seat-belt extender =is retracted again if:
R the belt tongue is engaged in the seat belt
buckle.
R the belt tongue is not engaged in the seat
belt buckle within 60 seconds.
In this case, you can extend seat-belt
extender =again. Press seat-belt
extender button ?again.
46Occupant safety
Safety
Page 49 of 286
Rthe respective door is opened.
R the SmartKey is turned to position 0in the
ignition lock.
R you release the seat backrest and fold it
forwards.
R the front-passenger seat is unoccupied
after approximately five seconds.
If you press seat-belt extender button ?
after this, seat-belt extender =will not
extend.
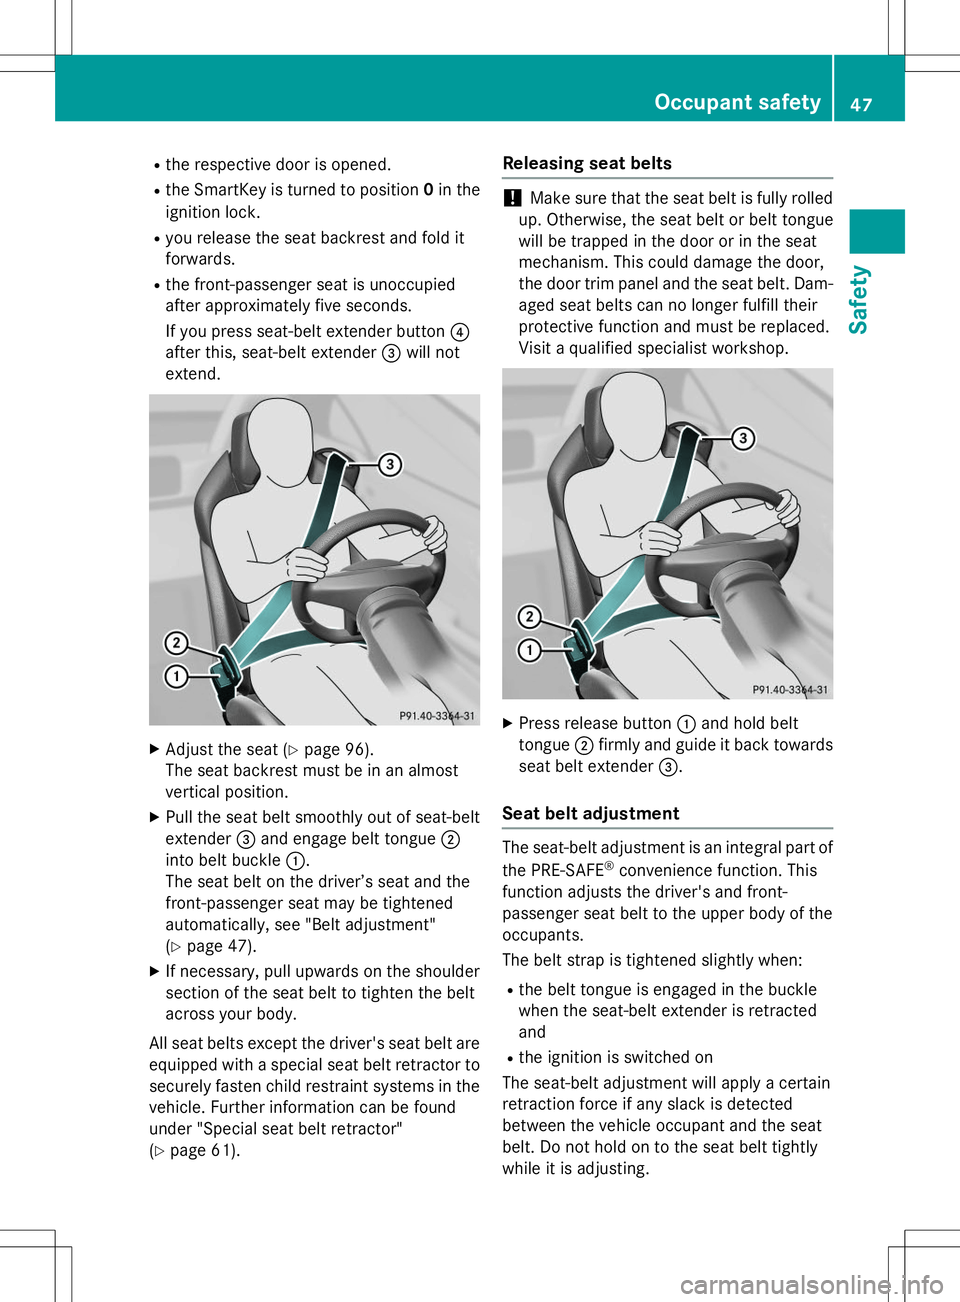
X Adjust the seat ( Ypage 96).
The seat backrest must be in an almost
vertical position.
X Pull the seat belt smoothly out of seat-belt
extender =and engage belt tongue ;
into belt buckle :.
The seat belt on the driver’s seat and the
front-passenger seat may be tightened
automatically, see "Belt adjustment"( Y page 47).
X If necessary, pull upwards on the shoulder
section of the seat belt to tighten the belt
across your body.
All seat belts except the driver's seat belt are
equipped with a special seat belt retractor to securely fasten child restraint systems in the
vehicle. Further information can be found
under "Special seat belt retractor"( Y page 61).
Releasing seat belts
!Make sure that the seat belt is fully rolled
up. Otherwise, the seat belt or belt tongue
will be trapped in the door or in the seat
mechanism. This could damage the door,
the door trim panel and the seat belt. Dam- aged seat belts can no longer fulfill their
protective function and must be replaced.
Visit a qualified specialist workshop.
X Press release button :and hold belt
tongue ;firmly and guide it back towards
seat belt extender =.
Seat belt adjustment
The seat-belt adjustment is an integral part of
the PRE-SAFE ®
convenience function. This
function adjusts the driver's and front-
passenger seat belt to the upper body of the
occupants.
The belt strap is tightened slightly when:
R the belt tongue is engaged in the buckle
when the seat-belt extender is retractedand
R the ignition is switched on
The seat-belt adjustment will apply a certain
retraction force if any slack is detected
between the vehicle occupant and the seat
belt. Do not hold on to the seat belt tightly
while it is adjusting.
Occupant safety47
Safety
Z
Page 54 of 286
rest and the head restraint position accord-
ingly.
Only then can OCS be guaranteed to functioncorrectly. Always observe the child restraint
system manufacturer's installation instruc-tions.
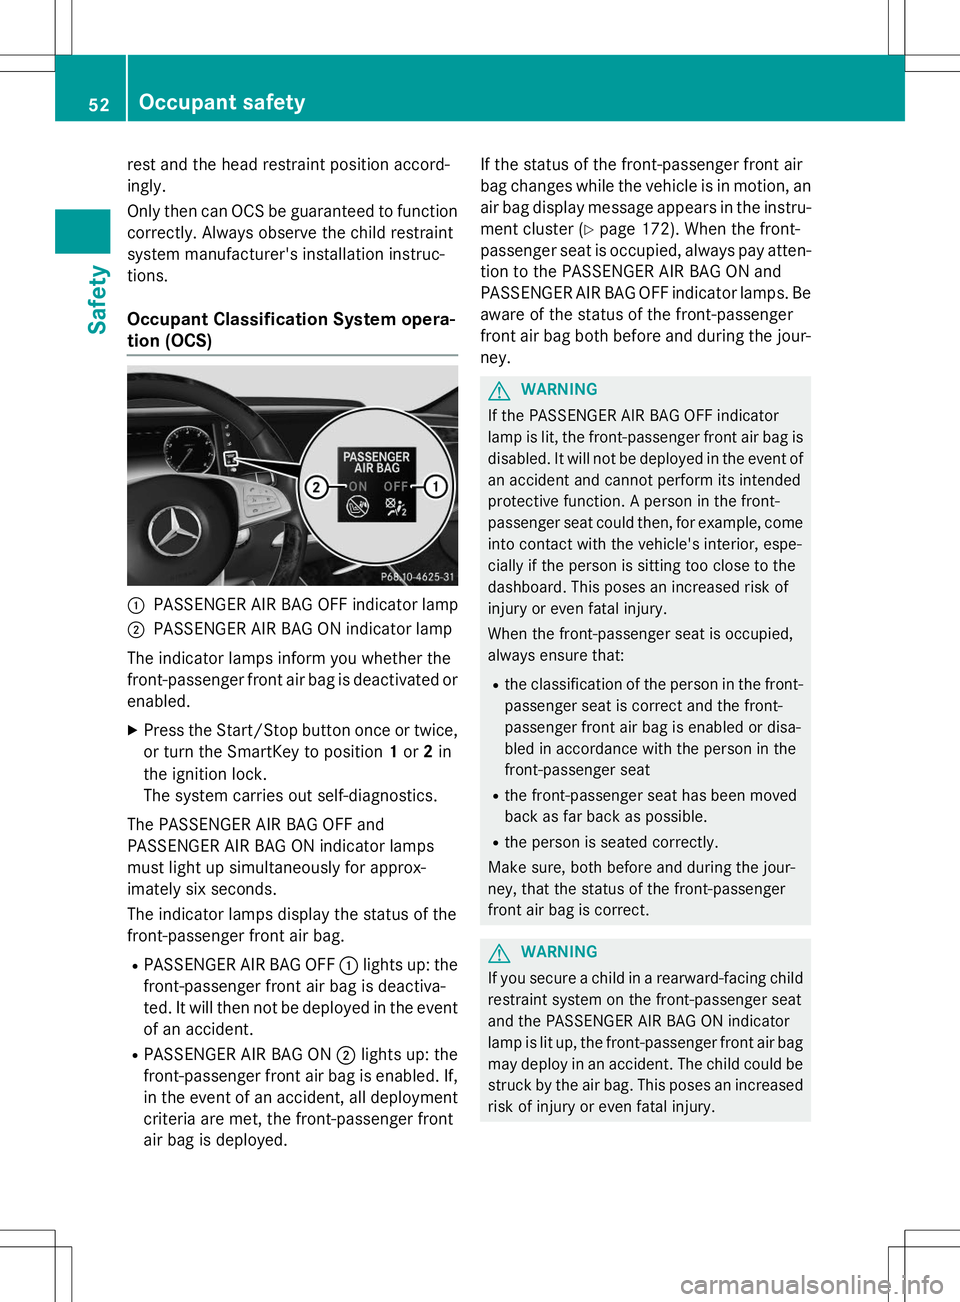
Occupant Classification System opera-
tion (OCS)
:PASSENGER AIR BAG OFF indicator lamp
;PASSENGER AIR BAG ON indicator lamp
The indicator lamps inform you whether the
front-passenger front air bag is deactivated or
enabled.
X Press the Start/Stop button once or twice,
or turn the SmartKey to position 1or 2in
the ignition lock.
The system carries out self-diagnostics.
The PASSENGER AIR BAG OFF and
PASSENGER AIR BAG ON indicator lamps
must light up simultaneously for approx-
imately six seconds.
The indicator lamps display the status of the
front-passenger front air bag. R PASSENGER AIR BAG OFF :lights up: the
front-passenger front air bag is deactiva-
ted. It will then not be deployed in the event
of an accident.
R PASSENGER AIR BAG ON ;lights up: the
front-passenger front air bag is enabled. If,
in the event of an accident, all deployment criteria are met, the front-passenger front
air bag is deployed. If the status of the front-passenger front air
bag changes while the vehicle is in motion, an
air bag display message appears in the instru-
ment cluster ( Ypage 172). When the front-
passenger seat is occupied, always pay atten-
tion to the PASSENGER AIR BAG ON and
PASSENGER AIR BAG OFF indicator lamps. Be aware of the status of the front-passenger
front air bag both before and during the jour- ney.
GWARNING
If the PASSENGER AIR BAG OFF indicator
lamp is lit, the front-passenger front air bag is disabled. It will not be deployed in the event of
an accident and cannot perform its intended
protective function. A person in the front-
passenger seat could then, for example, come
into contact with the vehicle's interior, espe-
cially if the person is sitting too close to the
dashboard. This poses an increased risk of
injury or even fatal injury.
When the front-passenger seat is occupied,
always ensure that:
R the classification of the person in the front-
passenger seat is correct and the front-
passenger front air bag is enabled or disa-
bled in accordance with the person in the
front-passenger seat
R the front-passenger seat has been moved
back as far back as possible.
R the person is seated correctly.
Make sure, both before and during the jour-
ney, that the status of the front-passenger
front air bag is correct.
GWARNING
If you secure a child in a rearward-facing child
restraint system on the front-passenger seat
and the PASSENGER AIR BAG ON indicator
lamp is lit up, the front-passenger front air bag may deploy in an accident. The child could be
struck by the air bag. This poses an increased risk of injury or even fatal injury.
52Occupant safety
Safety