2015 MERCEDES-BENZ S-Class charging
[x] Cancel search: chargingPage 214 of 502

The charging cable and connector will only
heat up within the permissible limiting values,
provided that:
R the power supply and the charging cable
are not damaged
R the instructions for handling the charging
cable and controls on the charging cable
are observed
If the charging cable or plug get too hot, have the mains power supply checked.
Protection device against overvoltage !
Overvoltage in the mains supply may
damage the vehicle. For this reason, the
vehicle is equipped with a protection device
against overvoltage in the mains supply.
This device may be triggered during severe thunderstorms, for example, and may lead
to the building's fuse being tripped and an
interruption in the power supply. These
functions protect the vehicle. After the
building fuse is switched on again, the
charging process resumes automatically.
Following an interruption in the power sup-
ply or tripping of the building's fuse, it may take up to 10 minutes for charging to
resume automatically.
Switch on the building's fuse again after it has
been triggered. Otherwise, the charging proc-
ess cannot be continued.
General information about the charging
procedure Pay attention to the important safety notes
(Y
page 209).
If you unlock/lock the vehicle from the out-
side, the charge socket flap also unlocks/
locks.
The charge socket flap is behind the bumper
on the right-hand side below the rear lamp
cluster. Charging the high-voltage battery via
the electrical outlet
Charging cable for mains sockets Important safety notes
! Only use the charging cable to charge the
high-voltage battery. Do not use the charg-
ing cable for other purposes. It may other-
wise be damaged.
A charging cable for connection to the mains
socket is included with the vehicle. Only use
the charging cable included with the vehicle
or charging cables that have been approved
for the vehicle.
i If you use the supplied 12 A charging
cable to charge a high-voltage battery:
R the charge time increases considerably
R electrical consumption increases consid-
erably
Where possible, charge the high-voltage
battery at a charging station (Y page 216).
Only then can certified electrical energy
consumption levels be reached.
i The charging process can vary depending
on the power supply. Therefore, always
observe the local information.
i For short charge times (charging with
16A), connect the fast-charging cable to
the wallbox/charging station. You can also
use the optionally available charging cable
with the CE plug.
Information about charging from a wallbox
can be found at (Y page 215).
Information about charging at a charging sta-
tion can be found at (Y page 216).
Stowing the charging cable
The charging cable can be stowed in the bag
supplied in the trunk of the vehicle and held in place with the Velcro fastener. 212
Charging the high-voltage battery (plug-in hybrid vehicles)Driving and parking
Page 215 of 502

Controls on the charging cable
:
Alternating current status indicator
; Control/protection system indicator
= Charge current indicator
? Charge current setting button
When displays :and ;on the charging
cable light up, this means the following: Display
:
: Lights up
green The external power supply
connection is working prop-
erly. The high-voltage bat-
tery can be charged. Flashes red A malfunction has been
detected in the external
power supply. The high-volt-
age battery is recharged as
soon as the electricity signal
registers normal values. Lights up red There is a malfunction. The
charging cable must be
removed from the electrical
outlet and then re-inserted.
Display
; ; Lights up
green There are no malfunctions.
The high-voltage battery
can be charged.
Lights up red An impermissible current is
being supplied to the con-
trol unit. The high-voltage
battery cannot be charged. i
For information on problems relating to
the charging process, see (Y page 218).
Setting the maximum charge current G
WARNING
If the charge current draw via a mains socket is too high during the charging process, the
external electrical system may overheat.
There is a risk of fire.
Before beginning the charging process, checkthe maximum permissible charge current
locally. Consult a qualified expert to do so
where necessary.
If necessary, adjust your vehicle's settings.
! An excessive charge current can blow a
fuse or lead to overheating of the external
power supply. Check whether the external
power supply is compatible with the set
charge current. If necessary, lower the set
charge current or use another power
socket.
You can set a limit for the values of the charge current used in charging the high-voltage bat-
tery. This acts as a means of preventing the
power supply from overloading. You can set
this limit by using the controls on the charging
cable or in the on-board computer's menu.
Only set the maximum charge current in the
on-board computer menu if there are no
charge current settings on the charging
cable.
The default standard value in the vehicle cor- responds to the maximum charge current
value.
The default standard value on the charging
cable is the minimum charge current setting.This corresponds to the minimum available
charge current from the power supply. The
value on the charging cable can be increased
and is described in the following section.
i The value of the maximum setting and the
adjustment values may vary depending on
the country. Charging the high-voltage battery (plug-in hybrid vehicles)
213Driving and parking Z
Page 216 of 502

Before charging the high-voltage battery,
check the maximum permissible charge cur-
rent for the relevant power socket.
X To adjust the setting: press button?
repeatedly until the desired setting is selec-
ted in display =.
R Two LEDs are flashing: minimum setting
R All LEDs are flashing: maximum setting
If, after the charging process, the charging
cable is:
R left connected to the power socket, the
currently selected values will be used for
the next charging process.
R removed from the power socket, the values
will be reset to the minimum setting for the next charging process. You may then need
to reset the values of the maximum charge current.
i If the vehicle requires more time than
usual when charging, check the maximum
charge current settings using the controls
on the charging cable or in the on-board
computer's menu.
Indicator lamp on the vehicle socket
When the indicator lamp on the vehicle
socket lights up, this means the following: Indicator
lamp
Ý Ý Flashes
slowly in
orange The connection between
the vehicle and the current
source is being established
before charging begins.
Flashes
slowly in
green The high-voltage battery is
being charged.
Flashes rap-
idly in red A malfunction has occurred
while charging. Indicator
lamp
Ý Ý Lights up
orange A charging break for the
high-voltage battery is tak-
ing place.
Lights up
green The high-voltage battery is
fully charged.
i
If the indicator lamp is off, lock or unlock
the vehicle with the SmartKey. The indica-
tor lamp will then display the current status
of the charging process.
i You can view the condition of charge of
the high-voltage battery in the multifunc-
tion display (see "Charging the high-voltage battery when stationary" in the "Energy
flow display" section (Y page 281)).
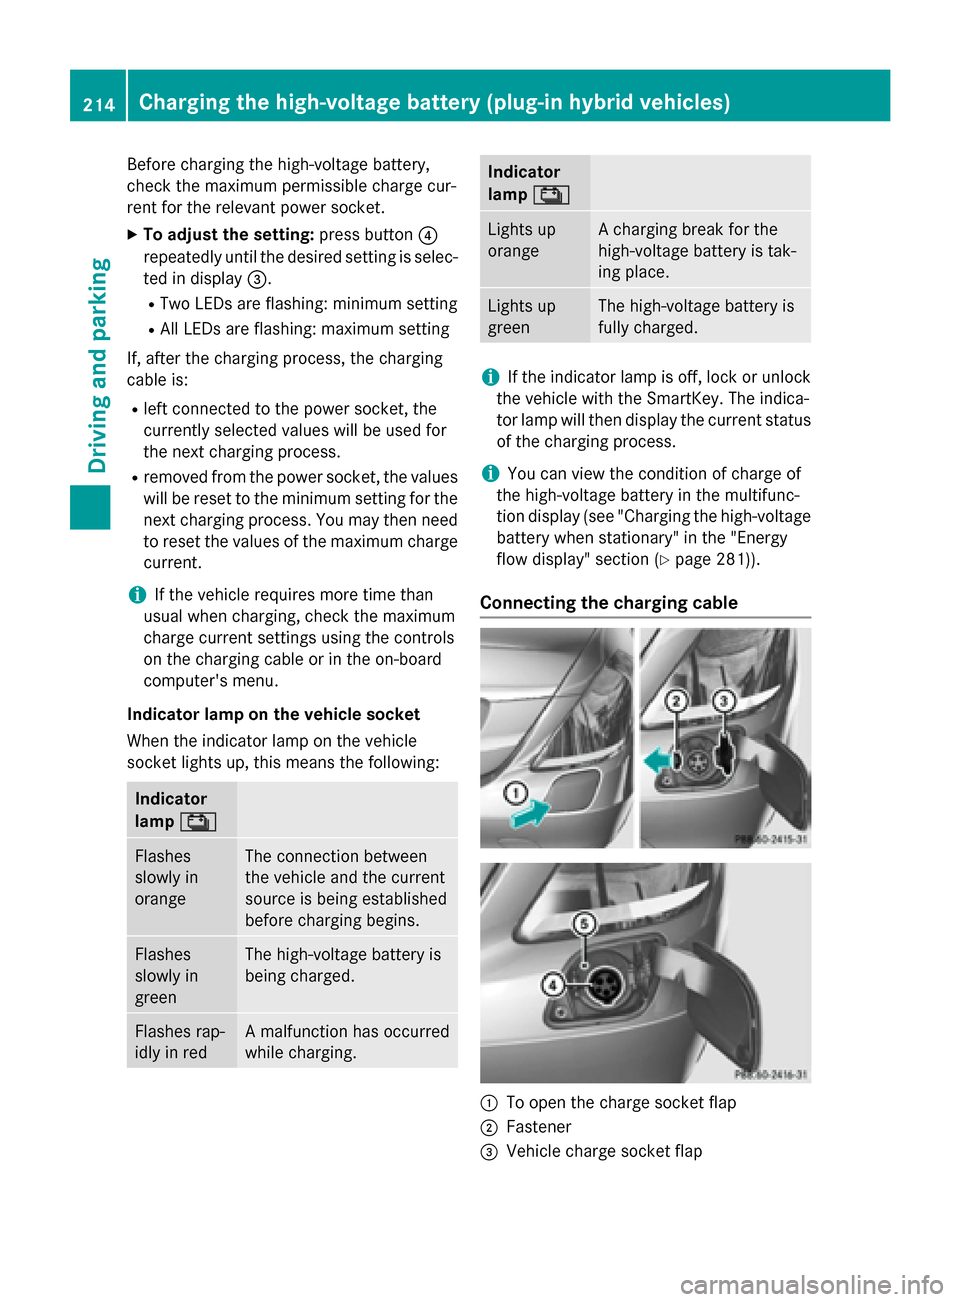
Connecting the charging cable :
To open the charge socket flap
; Fastener
= Vehicle charge socket flap 214
Charging the high-voltage battery (plug-in hybrid vehicles)Driving and parking
Page 217 of 502

?
Vehicle socket
A Indicator lamp Ý
X Use the DIRECT SELECT lever to shift the
automatic transmission to P.
X Switch the ignition off.
X Press the charge socket flap in the direc-
tion of arrow :.
The charge socket flap swings up.
X Slide fastener ;to the right.
Vehicle socket flap =is open.
X Insert the power supply plug into the elec-
trical outlet to the stop.
X Insert the charging cable connector into
vehicle socket ?to the stop.
The high-voltage battery is being charged.
Ý indicator lamp Aon vehicle
socket ?flashes slowly green.
i The vehicle must not be moved during
charging or when the charging cable is con- nected.
i Depending on the temperature, the fan
and battery cooling system may audibly
switch on during the charging process.
Removing the charging cable When the charge level display reaches 100%
in the multifunction display, the battery is
fully charged (Y page 281).
i After the charging cable has been discon-
nected, the indicator lamp in the vehicle
socket remains lit for some time before
switching off. When the battery is fully charged:
X Unlock the vehicle.
Ý indicator lamp Aon vehicle
socket ?lights up green.
X Press and hold button Bon the charging
cable connector and remove the charging
cable from the vehicle socket.
X Close vehicle socket flap =.
X Close charge socket flap :.
X Remove the charging cable from the elec-
trical outlet.
X Stow the charging cable safely in the vehi-
cle (Y page 212). Charging the high-voltage battery
from the wallbox
General notes It is recommended that you charge your vehi-
cle using a wallbox or at a charging station.
Use the optional quick charging cable when
charging at a wallbox. The charging cable is
stored in a bag in the trunk.
Only use charging cables that have been tes- ted and approved by the manufacturer for
charging the high-voltage battery in an elec-
tric vehicle.
Pay attention to the "Important safety notes"
(Y page 209). Charging the high-voltage battery (plug-in hybrid vehicles)
215Driving and parking Z
Page 218 of 502

Connecting the charging cable
:
To open the charge socket flap
; Fastener
= Vehicle charge socket flap
? Vehicle socket
A Indicator lamp Ý
X Use the DIRECT SELECT lever to shift the
automatic transmission to P.
X Switch the ignition off.
X Press the charge socket flap in the direc-
tion of arrow :.
The charge socket flap swings up.
X Slide fastener ;to the right.
Vehicle socket flap =is open.
X Insert the charging cable connector into
vehicle socket ?to the stop.
The high-voltage battery is being charged.
Ý indicator lamp Aon vehicle
socket ?flashes slowly green.
i The vehicle must not be moved during
charging or when the charging cable is con- nected. i
Depending on the temperature, the fan
and battery cooling system may audibly
switch on during the charging process.
Removing the charging cable When the charge level display reaches 100%
in the multifunction display, the battery is
fully charged (Y page 281).
i After the charging cable has been discon-
nected, the indicator lamp in the vehicle
socket remains lit for some time before
switching off. When the battery is fully charged:
X Unlock the vehicle.
Ý indicator lamp Aon vehicle
socket ?lights up green.
X Press and hold button Bon the charging
cable connector and remove the charging
cable from the vehicle socket.
X Close vehicle socket flap =.
X Close charge socket flap :. Charging the high-voltage battery at
the charging station
The connection for the vehicle at a charging
station is identical to the connection on a
wallbox. Read the "Charging a high-voltage
battery at a wallbox" section (Y page 215).
Before beginning the charging process at a
charging station without communication
capabilities, you must first activate the sta-
tion. You can do this by using an RFID card or 216
Charging the high-voltage battery (plug-in hybrid vehicles)Driving and parking
Page 219 of 502

via telephone activation. Observe the on-site
operator instructions for the charging station. Charging the high-voltage battery (plug-in hybrid vehicles)
217Driving and parking Z
Page 220 of 502

Problems with the charging process
Problem
Possible causes/consequences and
M
MSolutions The charge socket flap
cannot be opened. The charge socket flap is not unlocked.
X Unlock the vehicle (Y page 91). The SmartKey batteries are discharged.
X Unlock the vehicle manually using the SmartKey (Y page 93).The charge socket flap is unlocked, but the opening mechanism is
jammed.
X Lock and unlock the vehicle.
If, after that, the opening mechanism is still jammed:
X Consult a qualified specialist workshop. The high-voltage bat-
tery is not being
charged. A malfunction has occurred during the initialization of the charging
process.
X Ensure that the charging cable is connected to the electrical
outlet.
X Disconnect the charging cable connector from the vehicle
socket and plug it back into the vehicle socket.
X If the problem persists, consult a qualified specialist workshop. The high-voltage bat-
tery is not charged dur-
ing the charging proc-
ess when connected to
a power socket. The electrical outlet is faulty.
X Have the electrical outlet checked to test if it is functioning
properly.
or
X Use a different electrical outlet. The charging cable con-
nector cannot be
removed from the vehi- cle socket. The snap fastener on the charging cable connector is locked.
X Press and hold the button on the charging cable connector. The
snap fastener on the vehicle socket is unlocked.
X Remove the charging cable connector from the vehicle socket. The snap fastener on the charging cable connector is blocked.
X Press and hold the button on the charging cable connector.
X Try to remove the blockage. 218
Charging the high-voltage battery (plug-in hybrid vehicles)Driving and parking
Page 221 of 502

Online access to the vehicle
General information G
WARNING
If you operate information systems and com-
munication equipment integrated in the vehi- cle while driving, you will be distracted from
traffic conditions. You could also lose control of the vehicle. There is a risk of an accident.
Only operate the equipment when the traffic
situation permits. If you are not sure that this
is possible, park the vehicle paying attention
to traffic conditions and operate the equip-
ment when the vehicle is stationary.
i Operation of integrated information
systems and communications equip-
ment in the vehicle: you must observe the
legal requirements for the country in which
you are currently driving.
From the "My Mercedes Electric - Vehicle
Homepage", you can call up remote query and
remote configuration functions for your vehi-
cle. This is possible from an Internet-enabled computer, as well as many modern smart-
phones.
You can access the "Vehicle Homepage" via
your web browser.
Please call the Mercedes-Benz Customer
Assistance Center (USA) at the hotline num-
ber
1-800-FOR-MERCedes (1-800-367-6372)
to obtain the relevant Internet address.
In order to use the "Vehicle Homepage", you
must agree to the local terms of use.
The contractual periods of mbrace apply to
the "Vehicle Homepage". To use the "Vehicle Homepage", you require an activated access
to the mbrace emergency call system and a
separate activation/registration for the
"Vehicle Homepage".
More information about how to access the
"Vehicle Homepage" and the terms of use are
available from any authorized Mercedes-Benz Center. The "Vehicle Homepage" is available in the
following languages:
R German
R English
R French
R Italian
R Spanish
R Portuguese
R Dutch
R Chinese
Notes on data protection Bear in mind that the "Vehicle Homepage"
offers access to your data.
Therefore, look after the vehicle verification
code (VVC) provided and your user details
carefully.
The vehicle verification code (VVC) is required when you register for the first time on the
"Vehicle Homepage". This code is used to link
the vehicle and the user access on the "Vehi- cle Homepage" and enables correct use. If
you have any questions, please contact the
Mercedes-Benz Customer Assistance Center
(USA) at the hotline number
1-800-FOR-MERCedes (1-800-367-6372) .
i Prevent unauthorized persons from
accessing this data.
Every person who has access to the infor-
mation stated can use the functions on the
"Vehicle Homepage".
i Information when selling a vehicle or
buying a used vehicle:
R If you sell your vehicle, you are obliged to
delete the vehicle from your personal
area on the "Vehicle Homepage". Addi-
tionally, you must destroy documents
containing the vehicle verification code
(VVC).
R If you have bought a used vehicle, it is
possible that the previous owner still has
access to the "Vehicle Homepage". If in
doubt, have a new vehicle verification Charging the high-voltage battery (plug-in hybrid vehicles)
219Driving and parking Z