2015 MERCEDES-BENZ S-Class steering wheel adjustment
[x] Cancel search: steering wheel adjustmentPage 129 of 502
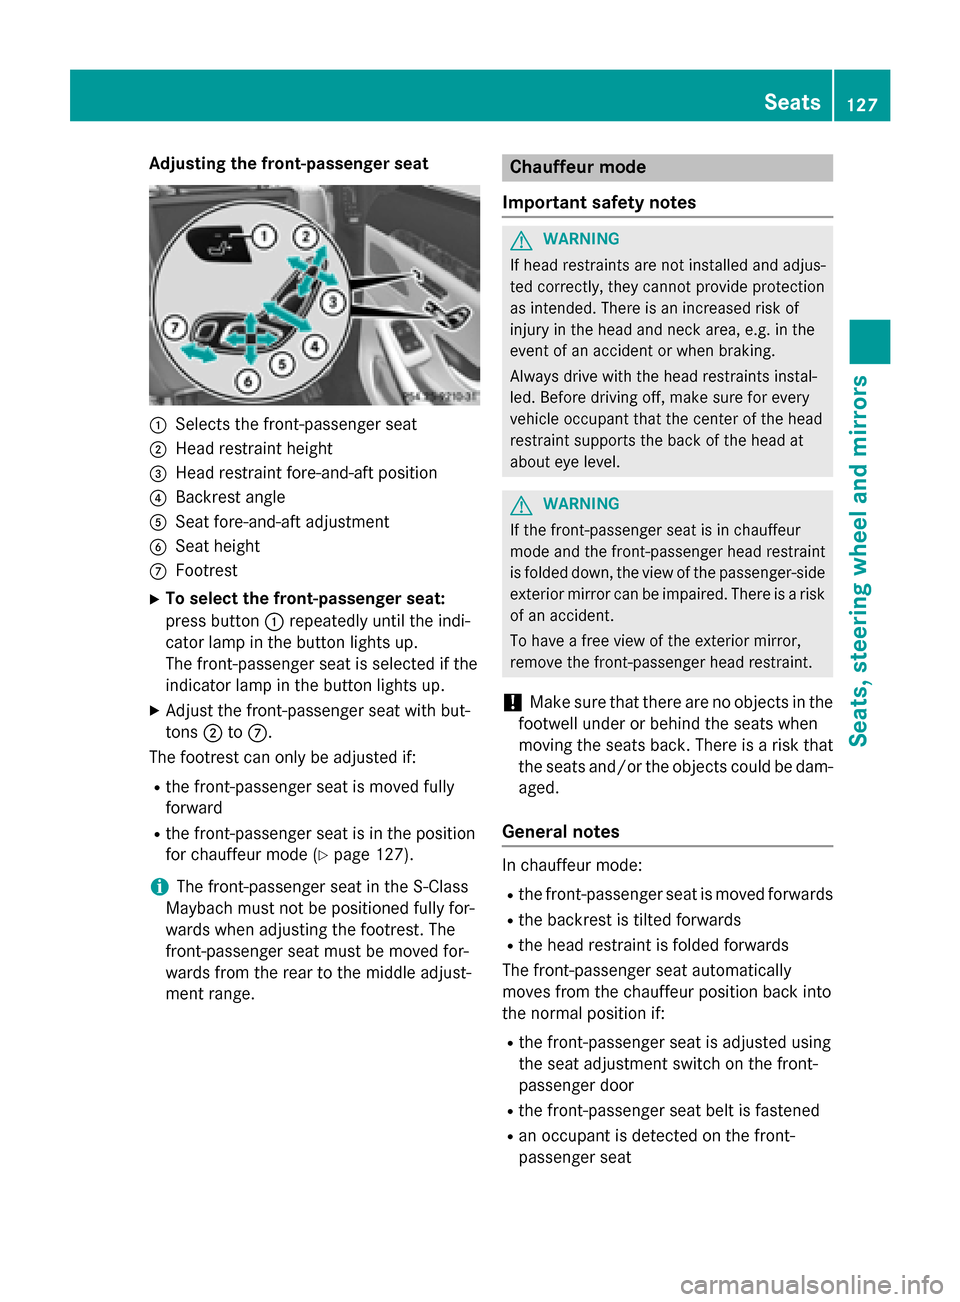
Adjusting the front-passenger seat
:
Selects the front-passenger seat
; Head restraint height
= Head restraint fore-and-aft position
? Backrest angle
A Seat fore-and-aft adjustment
B Seat height
C Footrest
X To select the front-passenger seat:
press button :repeatedly until the indi-
cator lamp in the button lights up.
The front-passenger seat is selected if the
indicator lamp in the button lights up.
X Adjust the front-passenger seat with but-
tons ;toC.
The footrest can only be adjusted if:
R the front-passenger seat is moved fully
forward
R the front-passenger seat is in the position
for chauffeur mode (Y page 127).
i The front-passenger seat in the S-Class
Maybach must not be positioned fully for-
wards when adjusting the footrest. The
front-passenger seat must be moved for-
wards from the rear to the middle adjust-
ment range. Chauffeur mode
Important safety notes G
WARNING
If head restraints are not installed and adjus-
ted correctly, they cannot provide protection
as intended. There is an increased risk of
injury in the head and neck area, e.g. in the
event of an accident or when braking.
Always drive with the head restraints instal-
led. Before driving off, make sure for every
vehicle occupant that the center of the head
restraint supports the back of the head at
about eye level. G
WARNING
If the front-passenger seat is in chauffeur
mode and the front-passenger head restraint
is folded down, the view of the passenger-side
exterior mirror can be impaired. There is a risk of an accident.
To have a free view of the exterior mirror,
remove the front-passenger head restraint.
! Make sure that there are no objects in the
footwell under or behind the seats when
moving the seats back. There is a risk that
the seats and/or the objects could be dam-
aged.
General notes In chauffeur mode:
R the front-passenger seat is moved forwards
R the backrest is tilted forwards
R the head restraint is folded forwards
The front-passenger seat automatically
moves from the chauffeur position back into
the normal position if:
R the front-passenger seat is adjusted using
the seat adjustment switch on the front-
passenger door
R the front-passenger seat belt is fastened
R an occupant is detected on the front-
passenger seat Seats
127Seats, steering wheel and mirrors Z
Page 132 of 502
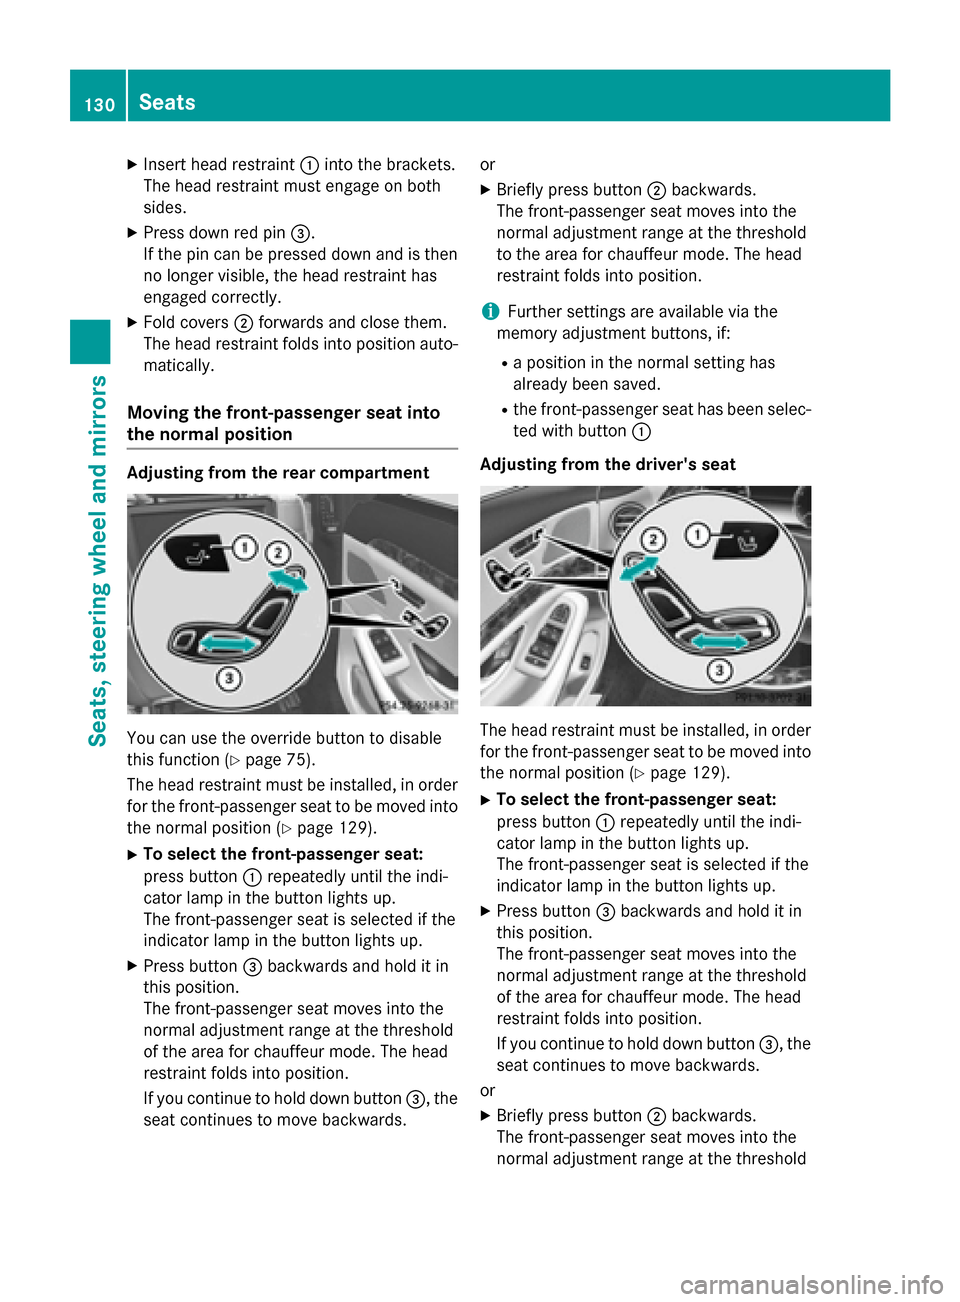
X
Insert head restraint :into the brackets.
The head restraint must engage on both
sides.
X Press down red pin =.
If the pin can be pressed down and is then
no longer visible, the head restraint has
engaged correctly.
X Fold covers ;forwards and close them.
The head restraint folds into position auto- matically.
Moving the front-passenger seat into
the normal position Adjusting from the rear compartment
You can use the override button to disable
this function (Y page 75).
The head restraint must be installed, in order for the front-passenger seat to be moved intothe normal position (Y page 129).
X To select the front-passenger seat:
press button :repeatedly until the indi-
cator lamp in the button lights up.
The front-passenger seat is selected if the
indicator lamp in the button lights up.
X Press button =backwards and hold it in
this position.
The front-passenger seat moves into the
normal adjustment range at the threshold
of the area for chauffeur mode. The head
restraint folds into position.
If you continue to hold down button =, the
seat continues to move backwards. or
X Briefly press button ;backwards.
The front-passenger seat moves into the
normal adjustment range at the threshold
to the area for chauffeur mode. The head
restraint folds into position.
i Further settings are available via the
memory adjustment buttons, if:
R a position in the normal setting has
already been saved.
R the front-passenger seat has been selec-
ted with button :
Adjusting from the driver's seat The head restraint must be installed, in order
for the front-passenger seat to be moved into the normal position (Y page 129).
X To select the front-passenger seat:
press button :repeatedly until the indi-
cator lamp in the button lights up.
The front-passenger seat is selected if the
indicator lamp in the button lights up.
X Press button =backwards and hold it in
this position.
The front-passenger seat moves into the
normal adjustment range at the threshold
of the area for chauffeur mode. The head
restraint folds into position.
If you continue to hold down button =, the
seat continues to move backwards.
or X Briefly press button ;backwards.
The front-passenger seat moves into the
normal adjustment range at the threshold 130
SeatsSeats, steering wheel and mirrors
Page 133 of 502
to the area for chauffeur mode. The head
restraint folds into position.
i Further settings are available via the
memory adjustment buttons if the front-
passenger seat has been selected with but- ton :.
Adjusting from the front-passenger seat X Press any seat adjustment button.
The front-passenger seat moves into the
normal adjustment range at the threshold
of the area for chauffeur mode. The head
restraint folds into position.
Fully reclined position of the front-
passenger seat Adjusting
This function is only available on vehicles with
electrically adjustable rear seats.
You can move the front-passenger seat into a fully reclined position. The rear seat and front-
passenger seat then provide a continuous
surface.
To do so:
R move the seat cushion of the rear seat as
far back as possible in a longitudinal direc-
tion (Y page 123)
R move the front-passenger seat into posi-
tion for chauffeur mode (Y page 128)
R remove the front-passenger seat head
restraint (Y page 129)
R move the front-passenger seat so that the
backrest is in a fully reclined position
(Y page 122)
Exiting
To exit the fully reclined position:
R fold the backrest upright to a suitable posi-
tion
R install the head restraint (Y page 129) Adjusting the head restraints
Adjusting the front head restraints Important safety notes
G
WARNING
You could lose control of your vehicle if you do the following while driving:
R adjust the driver's seat, head restraint,
steering wheel or mirrors
R fasten the seat belt
There is a risk of an accident.
Adjust the driver's seat, head restraint, steer-
ing wheel and mirror and fasten your seat belt before starting the engine. G
WARNING
If head restraints are not installed and adjus-
ted correctly, they cannot provide protection
as intended. There is an increased risk of
injury in the head and neck area, e.g. in the
event of an accident or when braking.
Always drive with the head restraints instal-
led. Before driving off, make sure for every
vehicle occupant that the center of the head
restraint supports the back of the head at
about eye level.
General notes
Pay attention to the important safety notes
(Y page 121).
Do not rotate the head restraints of the front
and rear seats. Otherwise, you cannot adjust
the height and angle of the head restraints to
the correct position. Seats
131Seats, steering wheel and mirrors Z
Page 134 of 502
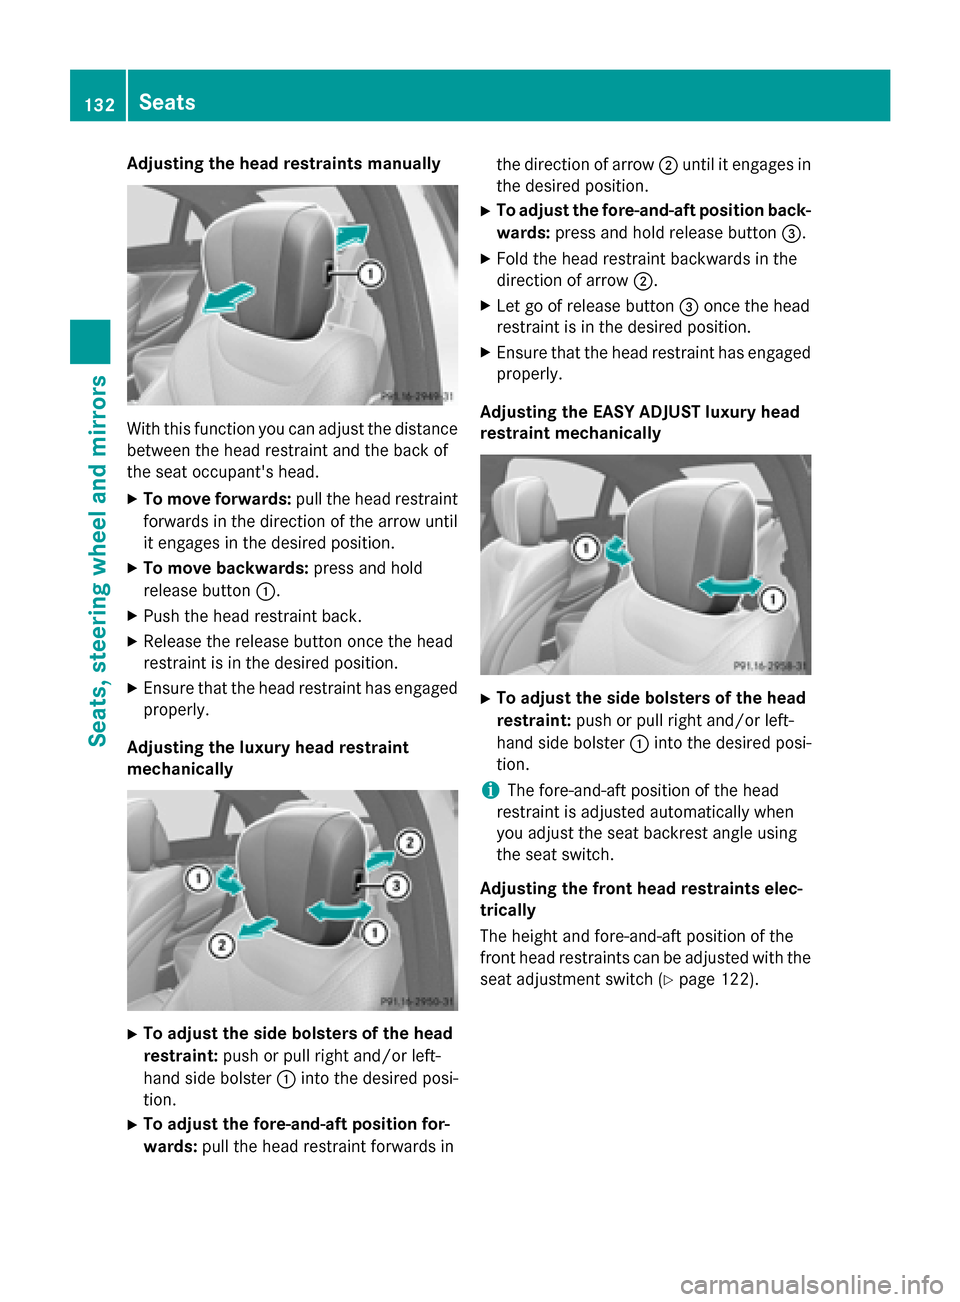
Adjusting the head restraints manually
With this function you can adjust the distance
between the head restraint and the back of
the seat occupant's head.
X To move forwards: pull the head restraint
forwards in the direction of the arrow until
it engages in the desired position.
X To move backwards: press and hold
release button :.
X Push the head restraint back.
X Release the release button once the head
restraint is in the desired position.
X Ensure that the head restraint has engaged
properly.
Adjusting the luxury head restraint
mechanically X
To adjust the side bolsters of the head
restraint: push or pull right and/or left-
hand side bolster :into the desired posi-
tion.
X To adjust the fore-and-aft position for-
wards: pull the head restraint forwards in the direction of arrow
;until it engages in
the desired position.
X To adjust the fore-and-aft position back-
wards: press and hold release button =.
X Fold the head restraint backwards in the
direction of arrow ;.
X Let go of release button =once the head
restraint is in the desired position.
X Ensure that the head restraint has engaged
properly.
Adjusting the EASY ADJUST luxury head
restraint mechanically X
To adjust the side bolsters of the head
restraint: push or pull right and/or left-
hand side bolster :into the desired posi-
tion.
i The fore-and-aft position of the head
restraint is adjusted automatically when
you adjust the seat backrest angle using
the seat switch.
Adjusting the front head restraints elec-
trically
The height and fore-and-aft position of the
front head restraints can be adjusted with the seat adjustment switch (Y page 122).132
SeatsSeats, steering wheel and
mirrors
Page 135 of 502
Adjusting the rear seat head restraints
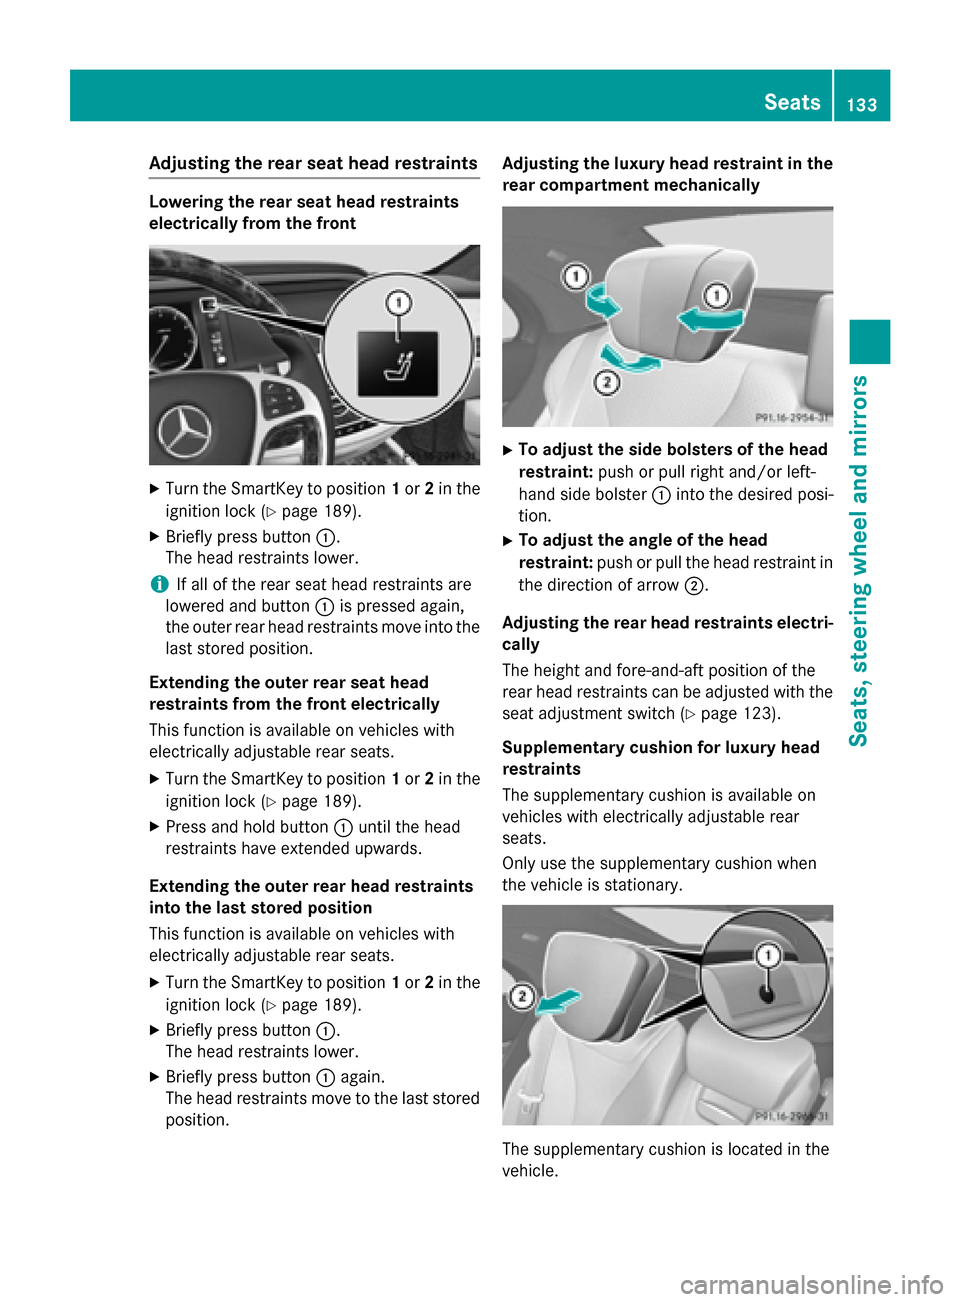
Lowering the rear seat head restraints
electrically from the front X
Turn the SmartKey to position 1or 2in the
ignition lock (Y page 189).
X Briefly press button :.
The head restraints lower.
i If all of the rear seat head restraints are
lowered and button :is pressed again,
the outer rear head restraints move into the last stored position.
Extending the outer rear seat head
restraints from the front electrically
This function is available on vehicles with
electrically adjustable rear seats.
X Turn the SmartKey to position 1or 2in the
ignition lock (Y page 189).
X Press and hold button :until the head
restraints have extended upwards.
Extending the outer rear head restraints
into the last stored position
This function is available on vehicles with
electrically adjustable rear seats.
X Turn the SmartKey to position 1or 2in the
ignition lock (Y page 189).
X Briefly press button :.
The head restraints lower.
X Briefly press button :again.
The head restraints move to the last stored
position. Adjusting the luxury head restraint in the
rear compartment mechanically X
To adjust the side bolsters of the head
restraint: push or pull right and/or left-
hand side bolster :into the desired posi-
tion.
X To adjust the angle of the head
restraint: push or pull the head restraint in
the direction of arrow ;.
Adjusting the rear head restraints electri-
cally
The height and fore-and-aft position of the
rear head restraints can be adjusted with the
seat adjustment switch (Y page 123).
Supplementary cushion for luxury head
restraints
The supplementary cushion is available on
vehicles with electrically adjustable rear
seats.
Only use the supplementary cushion when
the vehicle is stationary. The supplementary cushion is located in the
vehicle. Seats
133Seats, steering wheel and mirrors Z
Page 137 of 502
ability to react to excessively high tempera-
tures may be affected or they may even suffer burn-like injuries. There is a risk of injury.
Therefore, do not switch the seat heating on
repeatedly.
For vehicles equipped with the Warmth Com-
fort package: the armrest in the door and the center console can also be heated when you
switch on the seat heating of one of the front
seats. This can be set with COMAND (see the
separate operating instructions).
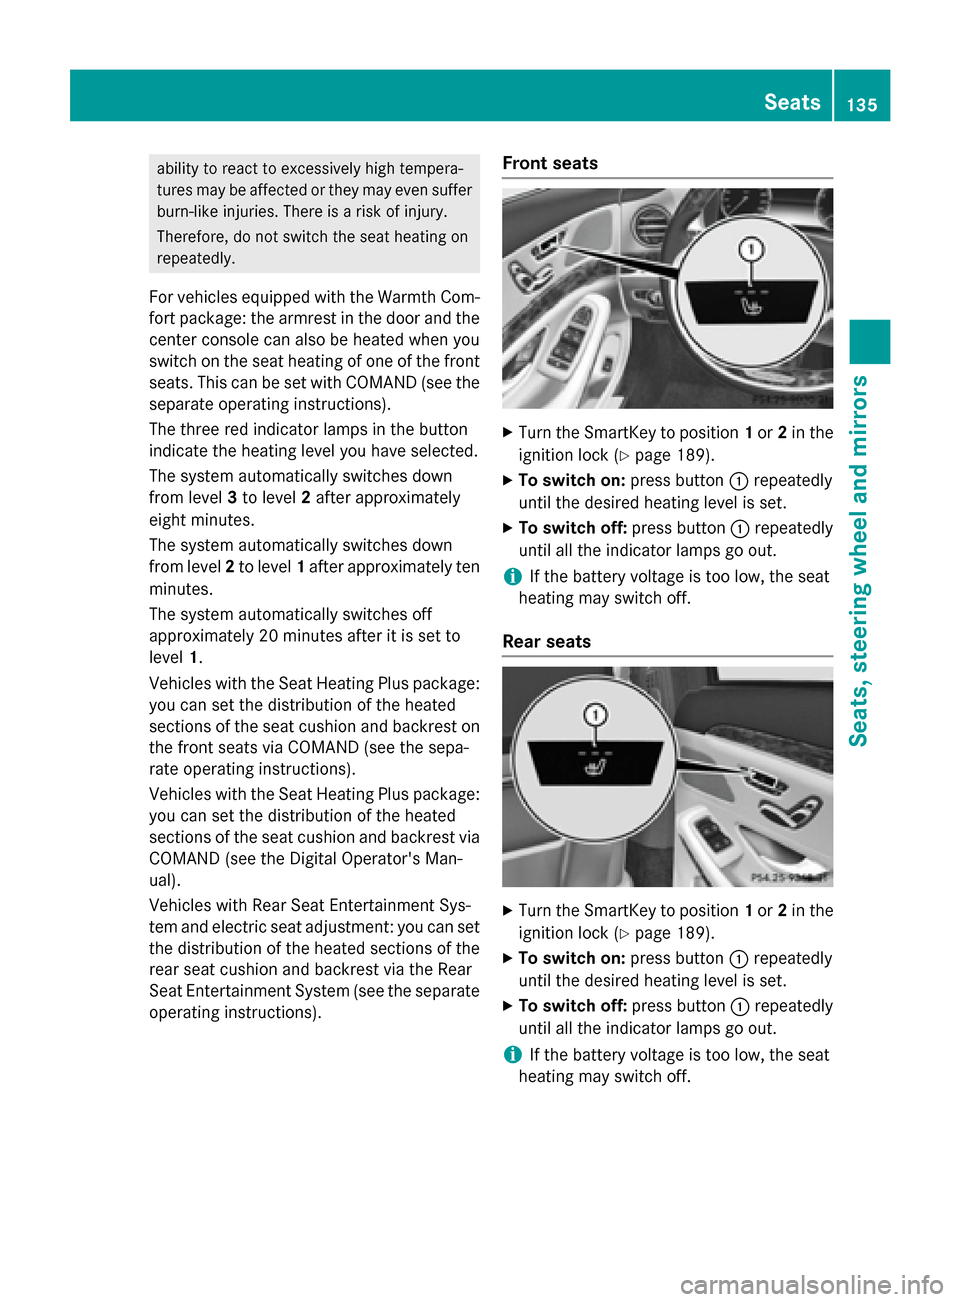
The three red indicator lamps in the button
indicate the heating level you have selected.
The system automatically switches down
from level 3to level 2after approximately
eight minutes.
The system automatically switches down
from level 2to level 1after approximately ten
minutes.
The system automatically switches off
approximately 20 minutes after it is set to
level 1.
Vehicles with the Seat Heating Plus package: you can set the distribution of the heated
sections of the seat cushion and backrest on the front seats via COMAND (see the sepa-
rate operating instructions).
Vehicles with the Seat Heating Plus package: you can set the distribution of the heated
sections of the seat cushion and backrest via
COMAND (see the Digital Operator's Man-
ual).
Vehicles with Rear Seat Entertainment Sys-
tem and electric seat adjustment: you can set
the distribution of the heated sections of the rear seat cushion and backrest via the Rear
Seat Entertainment System (see the separate operating instructions). Front seats X
Turn the SmartKey to position 1or 2in the
ignition lock (Y page 189).
X To switch on: press button:repeatedly
until the desired heating level is set.
X To switch off: press button:repeatedly
until all the indicator lamps go out.
i If the battery voltage is too low, the seat
heating may switch off.
Rear seats X
Turn the SmartKey to position 1or 2in the
ignition lock (Y page 189).
X To switch on: press button:repeatedly
until the desired heating level is set.
X To switch off: press button:repeatedly
until all the indicator lamps go out.
i If the battery voltage is too low, the seat
heating may switch off. Seats
135Seats, steering wheel and mirrors Z
Page 139 of 502
Problems with the seat ventilation
Problem
Possible causes/consequences and
M
MSolutions The seat ventilation has
switched off prema-
turely or cannot be
switched on. The on-board voltage is too low because too many electrical con-
sumers are switched on.
X Switch off electrical consumers that you do not need, such as
the rear window defroster or interior lighting.
Once the battery is sufficiently charged, the seat ventilation can
be switched back on. Steering wheel
Important safety notes
G
WARNING
You could lose control of your vehicle if you do the following while driving:
R adjust the driver's seat, head restraint,
steering wheel or mirrors
R fasten the seat belt
There is a risk of an accident.
Adjust the driver's seat, head restraint, steer-
ing wheel and mirror and fasten your seat belt before starting the engine. G
WARNING
Children could injure themselves if they
adjust the steering wheel. There is a risk of
injury.
When leaving the vehicle, always take the
SmartKey with you and lock the vehicle. Never leave children unsupervised in the vehicle.
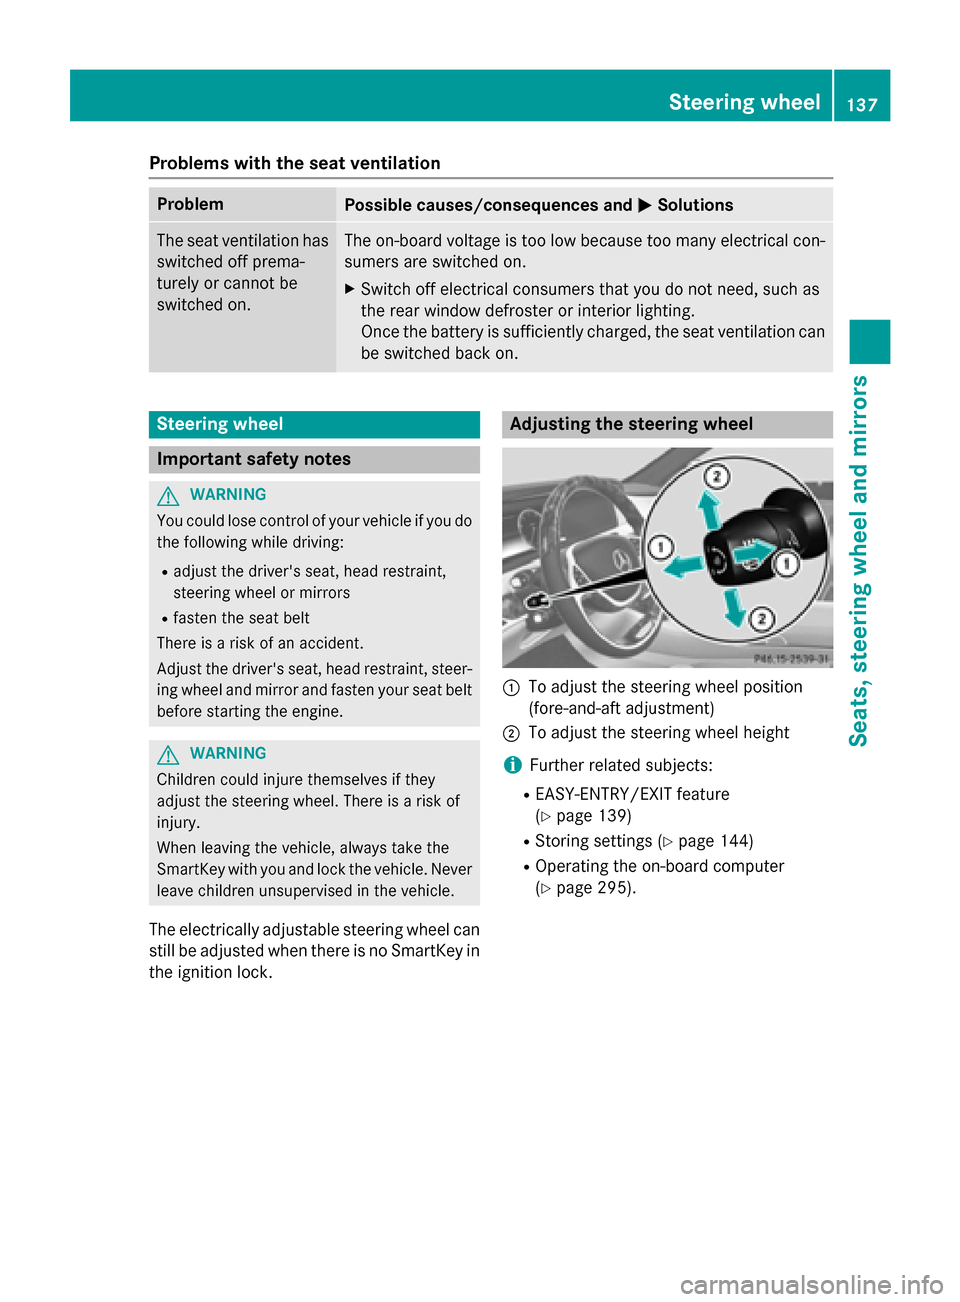
The electrically adjustable steering wheel can
still be adjusted when there is no SmartKey in
the ignition lock. Adjusting the steering wheel
:
To adjust the steering wheel position
(fore-and-aft adjustment)
; To adjust the steering wheel height
i Further related subjects:
R EASY-ENTRY/EXIT feature
(Y page 139)
R Storing settings (Y page 144)
R Operating the on-board computer
(Y page 295). Steering wheel
137Seats, steering wheel and mirrors Z
Page 141 of 502

Problems with the steering wheel heating
Problem
Possible causes/consequences and
M
MSolutions The steering wheel
heating has switched
off prematurely or can-
not be switched on. The on-board voltage is too low because too many electrical con-
sumers are switched on.
X Switch off electrical consumers that you do not need, such as
the rear window defroster or interior lighting. EASY-ENTRY/EXIT feature
Important safety notes G
WARNING
When the EASY-ENTRY/EXIT feature adjusts
the steering wheel and the driver's seat, you
and other vehicle occupants – particularly
children – could become trapped. There is a
risk of injury.
While the EASY-ENTRY/EXIT feature is mak-
ing adjustments, make sure that no one has
any body parts in the sweep of the seat and
the steering wheel.
If there is a risk of becoming trapped by
R the steering wheel: move the steering
wheel adjustment lever.
R the seat: press the switch for seat adjust-
ment.
The adjustment process is stopped.
Press one of the memory function position
switches. The adjustment process is stopped.
This function is only available on vehicles with
memory function. G
WARNING
If children activate the EASY-ENTRY/EXIT fea- ture, they can become trapped, particularly
when unattended. There is a risk of injury.
When leaving the vehicle, always take the
SmartKey with you and lock the vehicle. Never leave children unsupervised in the vehicle. G
WARNING
If you drive off while the EASY-ENTRY/EXIT
feature is making adjustments, you could lose control of the vehicle. There is a risk of an
accident.
Always wait until the adjustment process is
complete before driving off.
The EASY-ENTRY/EXIT feature makes getting in and out of your vehicle easier.
You can activate and deactivate the EASY-
ENTRY/EXIT feature using COMAND (see theseparate operating instructions).
Position of the steering wheel and the
driver's seat when the EASY-ENTRY/
EXIT feature is active The steering wheel tilts upwards and the driv-
er's seat moves backwards if you:
R remove the SmartKey from the ignition lock
R with KEYLESS-GO: open the driver's door;
KEYLESS-GO must be in position 1
R with the SmartKey: open the driver's
door; the SmartKey must be in position 0or
1 in the ignition lock (Y page 189)
R open the driver's door when the ignition is
switched off
i The steering wheel only tilts upwards and
the driver's seat only moves backwards if
the driving position is stored after seat or
steering wheel adjustment (Y page 144).
The last position of the steering wheel or seat is stored if:
R the ignition is switched off
R the setting is stored with the memory func-
tion (Y page 144). Steering wheel
139Seats, steering wheel and mirrors Z