2015 MERCEDES-BENZ S-CLASS COUPE turn signal
[x] Cancel search: turn signalPage 244 of 417
there is sufficient distance to the side for
other traffic or obstacles. If a lane-correcting brake application occurs,
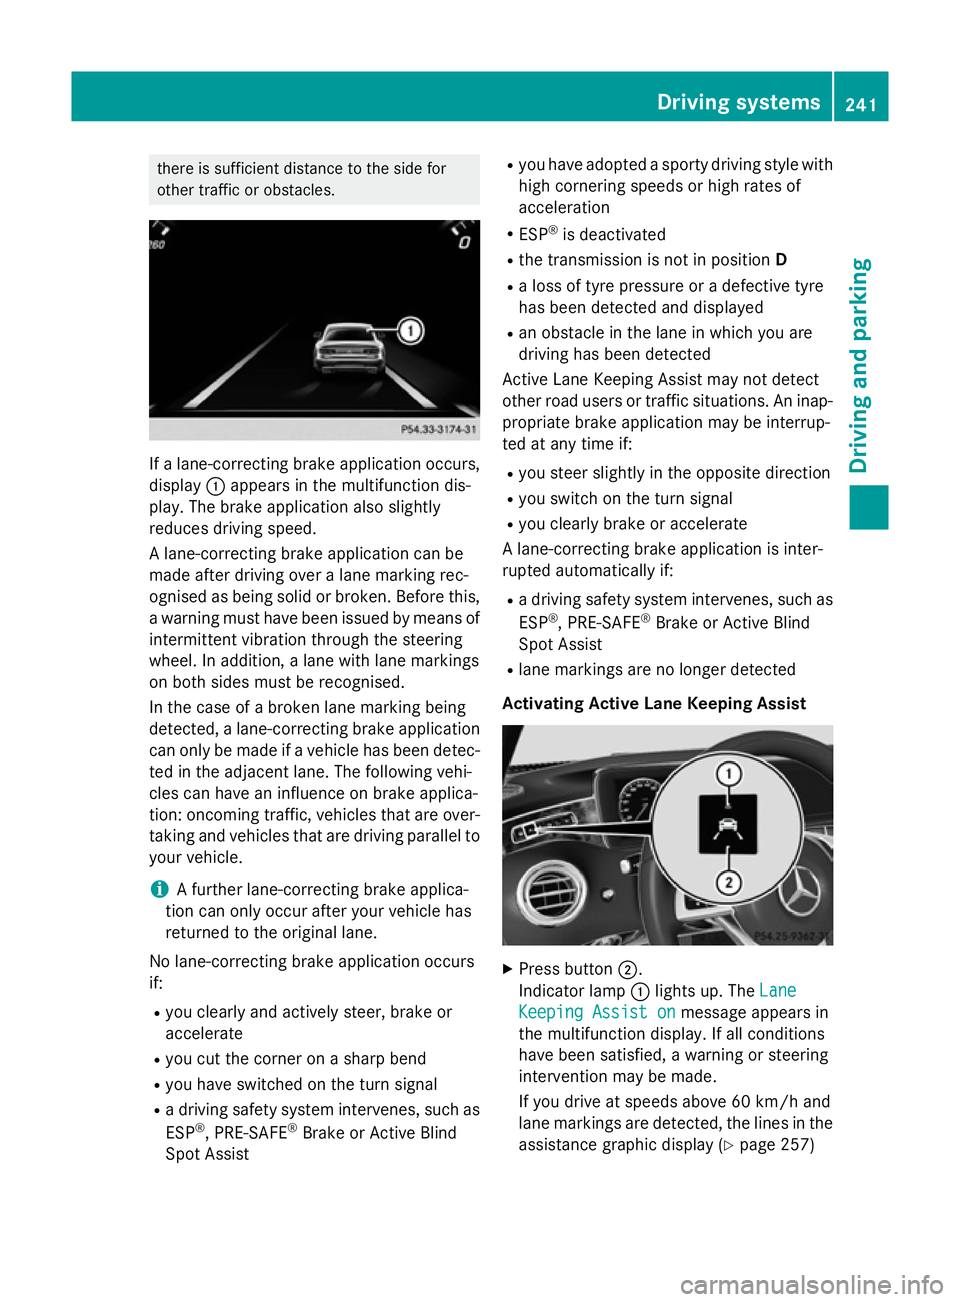
display :appears in the multifunction dis-
play. The brake application also slightly
reduces driving speed.
A lane-correcting brake application can be
made after driving over a lane marking rec-
ognised as being solid or broken. Before this,
a warning must have been issued by means of
intermittent vibration through the steering
wheel. In addition, a lane with lane markings
on both sides must be recognised.
In the case of a broken lane marking being
detected, a lane-correcting brake application can only be made if a vehicle has been detec-
ted in the adjacent lane. The following vehi-
cles can have an influence on brake applica-
tion: oncoming traffic, vehicles that are over-
taking and vehicles that are driving parallel to
your vehicle.
i A further lane-correcting brake applica-
tion can only occur after your vehicle has
returned to the original lane.
No lane-correcting brake application occurs
if:
R you clearly and actively steer, brake or
accelerate
R you cut the corner on a sharp bend
R you have switched on the turn signal
R a driving safety system intervenes, such as
ESP ®
, PRE-SAFE ®
Brake or Active Blind
Spot Assist R
you have adopted a sporty driving style with
high cornering speeds or high rates of
acceleration
R ESP ®
is deactivated
R the transmission is not in position D
R a loss of tyre pressure or a defective tyre
has been detected and displayed
R an obstacle in the lane in which you are
driving has been detected
Active Lane Keeping Assist may not detect
other road users or traffic situations. An inap- propriate brake application may be interrup-
ted at any time if:
R you steer slightly in the opposite direction
R you switch on the turn signal
R you clearly brake or accelerate
A lane-correcting brake application is inter-
rupted automatically if:
R a driving safety system intervenes, such as
ESP ®
, PRE-SAFE ®
Brake or Active Blind
Spot Assist
R lane markings are no longer detected
Activating Active Lane Keeping Assist X
Press button ;.
Indicator lamp :lights up. The Lane Lane
Keeping Assist on
Keeping Assist on message appears in
the multifunction display. If all conditions
have been satisfied, a warning or steering
intervention may be made.
If you drive at speeds above 60 km/h and
lane markings are detected, the lines in the assistance graphic display (Y page 257) Driving systems
241Driving and parking Z
Page 245 of 417
are shown in green. Active Lane Keeping
Assist is ready for use.
X To deactivate: press button;.
Indicator lamp :goes out. Active Lane
Keeping Assist is deactivated. The Lane
Lane
Keeping
Keeping Assist
Assistoff
offmessage appears in
the multifunction display.
Selecting Standard or Adaptive setting
X In the Assistance
Assistance menu on the on-board
computer, select the Active Lane Keep‐
Active Lane Keep‐
ing Assist
ing Assist function (Ypage 261).
X Select Standard
Standard orAdaptive
Adaptive.
When Standard
Standard is selected, no warning
vibration occurs if:
R you have switched on the turn signals. In
this event, the warnings are suppressed
for a certain period of time.
R a driving safety system intervenes, such
as ABS, BAS or ESP ®
.
When Adaptive
Adaptive is selected, no warning
vibration occurs if:
R you have switched on the turn signals. In
this event, the warnings are suppressed
for a certain period of time.
R a driving safety system intervenes, such
as ABS, BAS or ESP ®
.
R you accelerate hard, e.g. kickdown.
R you brake hard.
R you steer actively, e.g. swerve to avoid an
obstacle or change lane quickly.
R you cut the corner on a sharp bend.
In order that you are warned only when nec-
essary and in good time if you cross the lane marking, the system detects certain condi-
tions and warns you accordingly.
The warning vibration occurs earlier if:
R you approach the outer lane marking on a
bend
R the road has very wide lanes, e.g. a motor-
way
R the system detects solid lane markings The warning vibration occurs later if:
R the road has narrow lanes
R you cut the corner on a bend 242
Driving systemsDriving and parking
Page 249 of 417
9
: Press and hold:
R Scrolls rapidly through all lists
R In the Radio
Radio orMedia Media menu:
selects a station, audio track or
video scene using rapid scrolling
R In the Telephone Telephone menu: starts
rapid scrolling if the phone book is open a R
In all menus: confirms the selec-
ted entry in the list
R In the Radio
Radio orMedia
Media menu:
opens the list of available radio
sources or media
R In the Telephone Telephone menu:
switches to the phone book and
starts dialling the selected num-
ber ñ R
Switches off LINGUATRONIC
(see the separate operating
instructions) % Press briefly:
R Back
R In the Radio Radio orMedia
Media menu:
deselects the track or station list or list of available radio sources
or media
R Hides display messages
R Exits the telephone book/redial
memory % Press and hold:
R Calls up the standard display in
the Trip Trip menu Right control panel
~ R
Rejects or ends a call
R Exits the telephone book/redial
memory 6 R
Makes or accepts a call
R Switches to the redial memory W
X R
Adjusts the volume 8 R
Mute ó R
Switches on LINGUATRONIC
(see the separate operating
instructions) Multifunction display
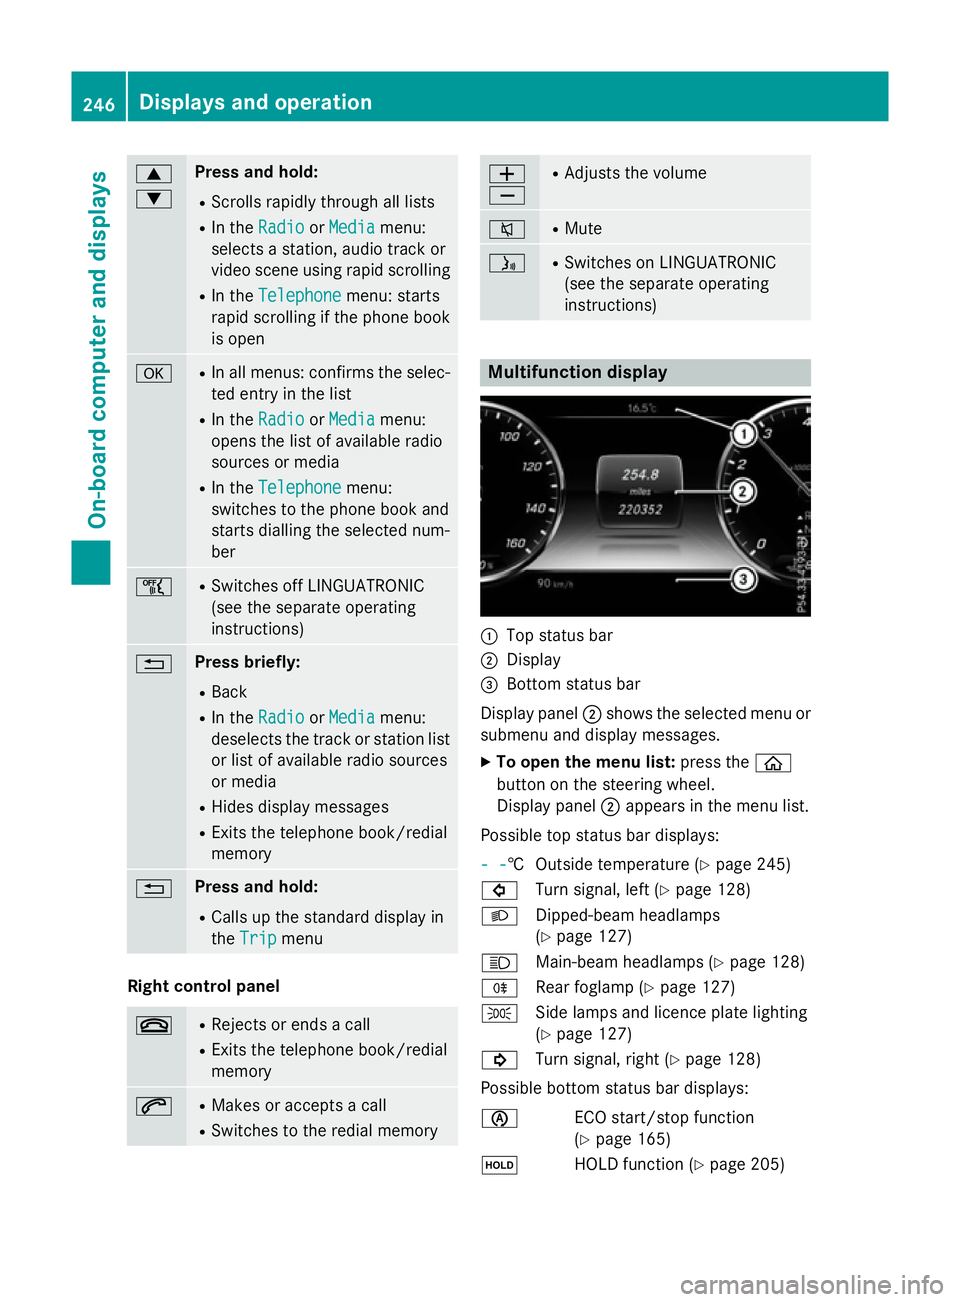
:
Top status bar
; Display
= Bottom status bar
Display panel ;shows the selected menu or
submenu and display messages.
X To open the menu list: press theò
button on the steering wheel.
Display panel ;appears in the menu list.
Possible top status bar displays:
- - - -† Outside temperature (Y
page 245)
# Turn signal, left (Y page 128)
L Dipped-beam headlamps
(Ypage 127)
K Main-beam headlamps (Y page 128)
R Rear foglamp (Y page 127)
T Side lamps and licence plate lighting
(Ypage 127)
! Turn signal, right (Y page 128)
Possible bottom status bar displays:
è ECO start/stop function
(Ypage 165)
ë HOLD function (Y page 205)246
Displays and operationOn-board computer and displays
Page 283 of 417
Display messages
Possible causes/consequences and
M
MSolutions front-passenger front airbag deactivation system has disa-
bled the front-passenger front airbag (Y
page 52)
R the Front-passenger airbag enabled See Owner's Front-passenger airbag enabled See Owner's
Manual
Manual orFront-passenger
Front-passenger airbag
airbagdisabled
disabled See
SeeOwn‐
Own‐
er's Manual
er's Manual display messages must not appear in the mul-
tifunction display
X Wait for a period of at least 60 seconds until the necessary sys-
tem checks have been completed.
X Make sure that the display messages do not appear in the mul-
tifunction display.
If these conditions are met, the front-passenger seat can be occu-
pied again. Whether the PASSENGER AIRBAG OFF or ON indicator
lamp remains lit or goes out depends on how the automatic front-
passenger front airbag deactivation system classifies the occu-
pant.
If the conditions are not met, the system is not operating correctly.
X Consult a qualified specialist workshop immediately.
Further information on the automatic front-passenger front airbag deactivation feature (Y page 51).Lights
i Vehicles with LED light bulbs in the light clusters:
The display message for the corresponding lamp only appears when all of the LEDs in the
lamp have failed. Display messages
Possible causes/consequences and
M MSolutions b
Left cornering Left cornering
light light
orRight cor‐
Right cor‐
nering light
nering light The left or right-hand cornering light is faulty.
X Consult a qualified specialist workshop. b
Left dipped beam Left dipped beam
or
Right dipped Right dipped
beam beam The left or right-hand dipped-beam headlamp is faulty.
X Consult a qualified specialist workshop. b
Rear left indica‐ Rear left indica‐
tor tor
orRear right
Rear right
indicator
indicator The rear left-hand or rear right-hand turn signal is faulty.
X Consult a qualified specialist workshop. 280
Display
messagesOn-board computer and displays
Page 284 of 417
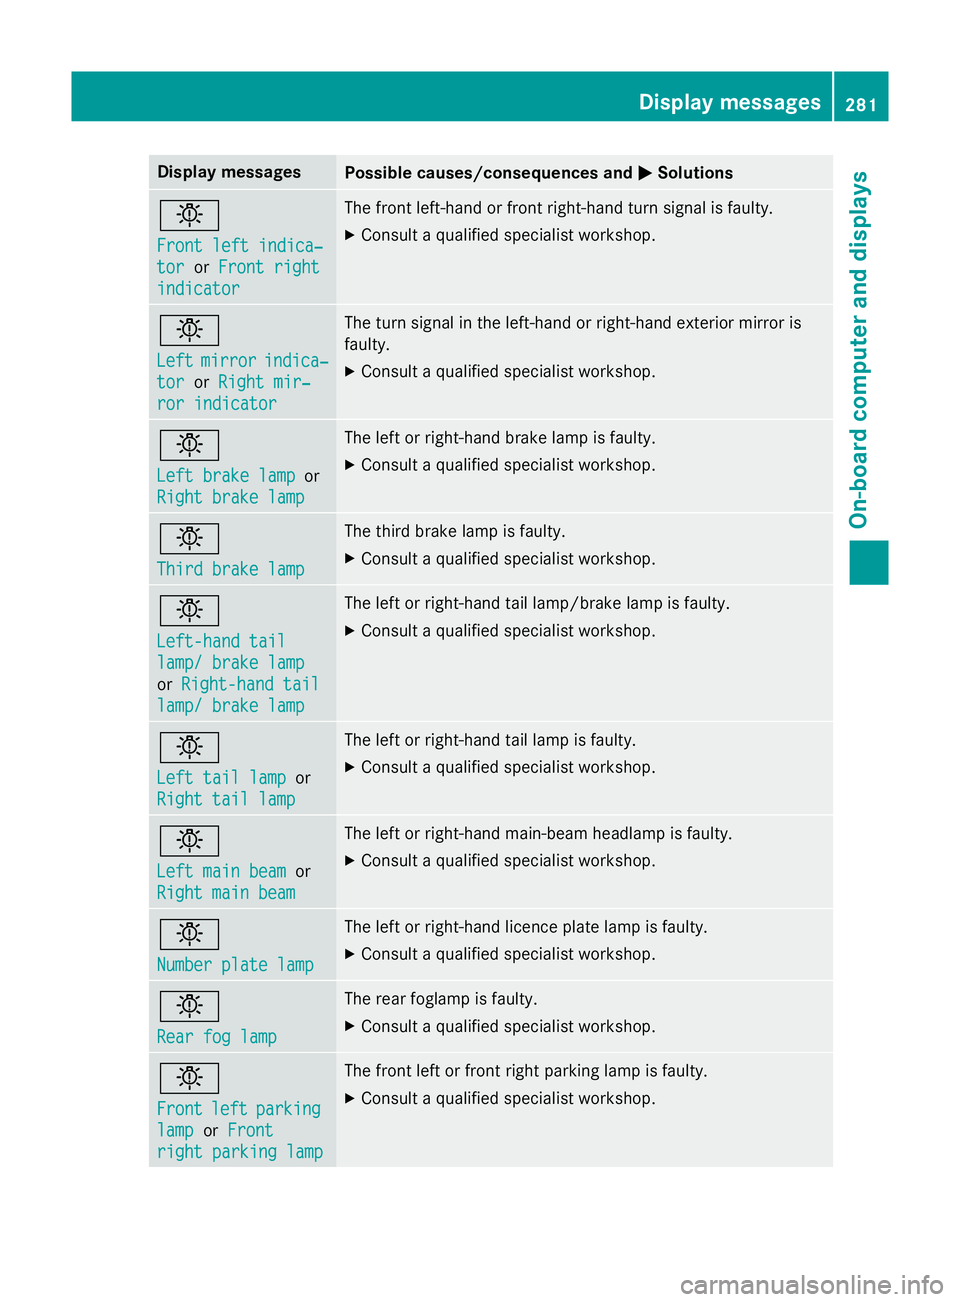
Display messages
Possible causes/consequences and
M
MSolutions b
Front left indica‐ Front left indica‐
tor tor
orFront right
Front right
indicator
indicator The front left-hand or front right-hand turn signal is faulty.
X Consult a qualified specialist workshop. b
Left Left
mirror
mirror indica‐
indica‐
tor
tor orRight mir‐
Right mir‐
ror indicator
ror indicator The turn signal in the left-hand or right-hand exterior mirror is
faulty.
X Consult a qualified specialist workshop. b
Left brake lamp Left brake lamp
or
Right brake lamp
Right brake lamp The left or right-hand brake lamp is faulty.
X Consult a qualified specialist workshop. b
Third brake lamp Third brake lamp The third brake lamp is faulty.
X Consult a qualified specialist workshop. b
Left-hand tail Left-hand tail
lamp/ brake lamp lamp/ brake lamp
or
Right-hand tail Right-hand tail
lamp/ brake lamp
lamp/ brake lamp The left or right-hand tail lamp/brake lamp is faulty.
X Consult a qualified specialist workshop. b
Left tail lamp Left tail lamp
or
Right tail lamp
Right tail lamp The left or right-hand tail lamp is faulty.
X Consult a qualified specialist workshop. b
Left main beam Left main beam
or
Right main beam
Right main beam The left or right-hand main-beam headlamp is faulty.
X Consult a qualified specialist workshop. b
Number plate lamp Number plate lamp The left or right-hand licence plate lamp is faulty.
X Consult a qualified specialist workshop. b
Rear fog lamp Rear fog lamp The rear foglamp is faulty.
X Consult a qualified specialist workshop. b
Front Front
left
leftparking
parking
lamp
lamp orFront
Front
right parking lamp
right parking lamp The front left or front right parking lamp is faulty.
X Consult a qualified specialist workshop. Display
messages
281On-board computer and displays Z
Page 305 of 417
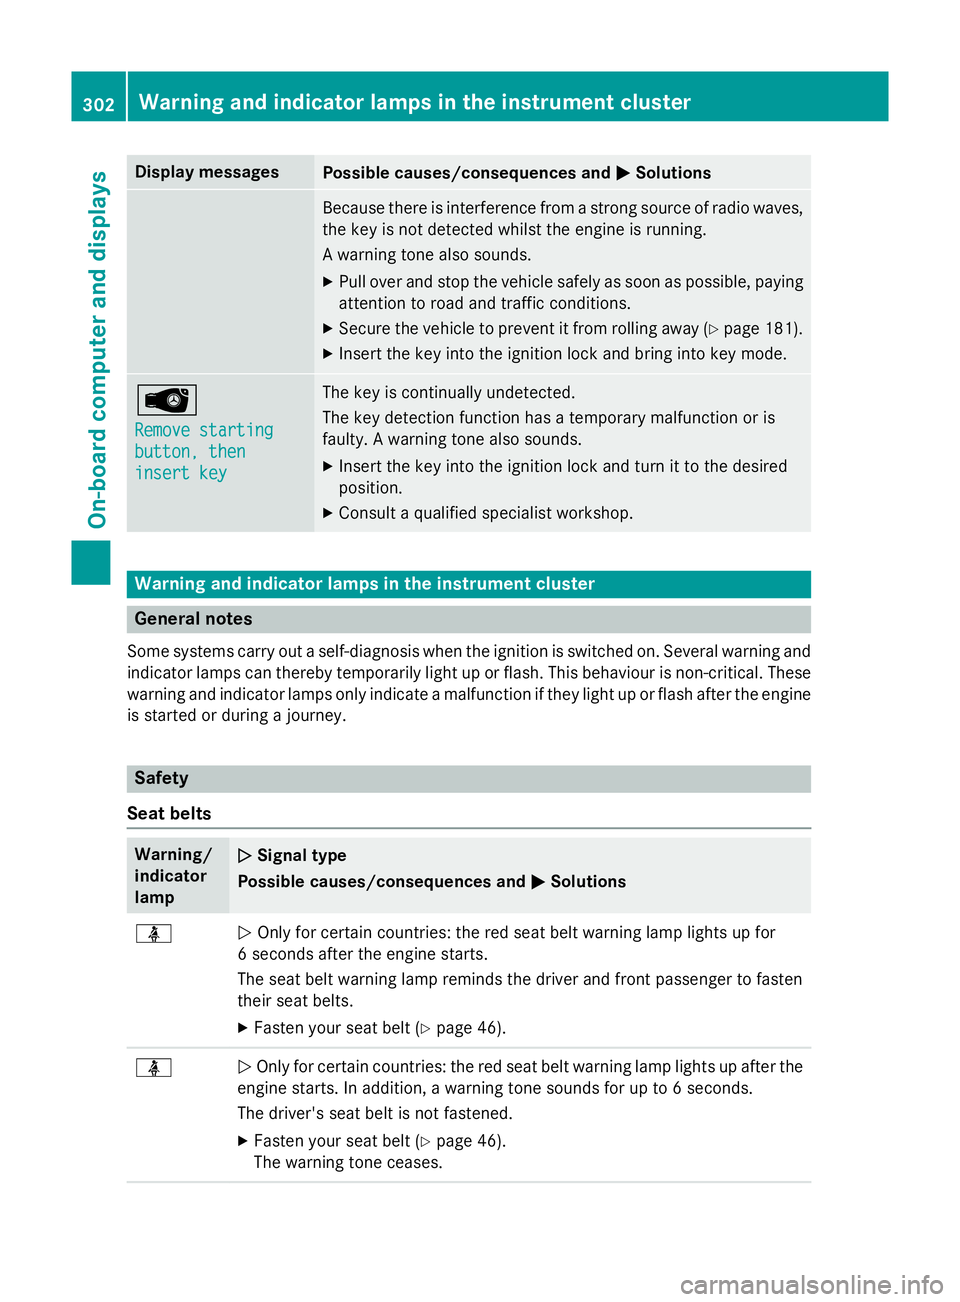
Display messages
Possible causes/consequences and
M
MSolutions Because there is interference from a strong source of radio waves,
the key is not detected whilst the engine is running.
A warning tone also sounds.
X Pull over and stop the vehicle safely as soon as possible, paying
attention to road and traffic conditions.
X Secure the vehicle to prevent it from rolling away (Y page 181).
X Insert the key into the ignition lock and bring into key mode. Â
Remove starting Remove starting
button, then button, then
insert key insert key The key is continually undetected.
The key detection function has a temporary malfunction or is
faulty. A warning tone also sounds.
X Insert the key into the ignition lock and turn it to the desired
position.
X Consult a qualified specialist workshop. Warning and indicator lamps in the instrument cluster
General notes
Some systems carry out a self-diagnosis when the ignition is switched on. Several warning and indicator lamps can thereby temporarily light up or flash. This behaviour is non-critical. These
warning and indicator lamps only indicate a malfunction if they light up or flash after the engine is started or during a journey. Safety
Seat belts Warning/
indicator
lamp
N N
Signal type
Possible causes/consequences and M
MSolutions ü
N
Only for certain countries: the red seat belt warning lamp lights up for
6 seconds after the engine starts.
The seat belt warning lamp reminds the driver and front passenger to fasten
their seat belts.
X Fasten your seat belt (Y page 46).ü
N
Only for certain countries: the red seat belt warning lamp lights up after the
engine starts. In addition, a warning tone sounds for up to 6 seconds.
The driver's seat belt is not fastened.
X Fasten your seat belt (Y page 46).
The warning tone ceases. 302
Wa
rning and indi cator lamps in the instrument clusterOn-board computer and displays
Page 334 of 417
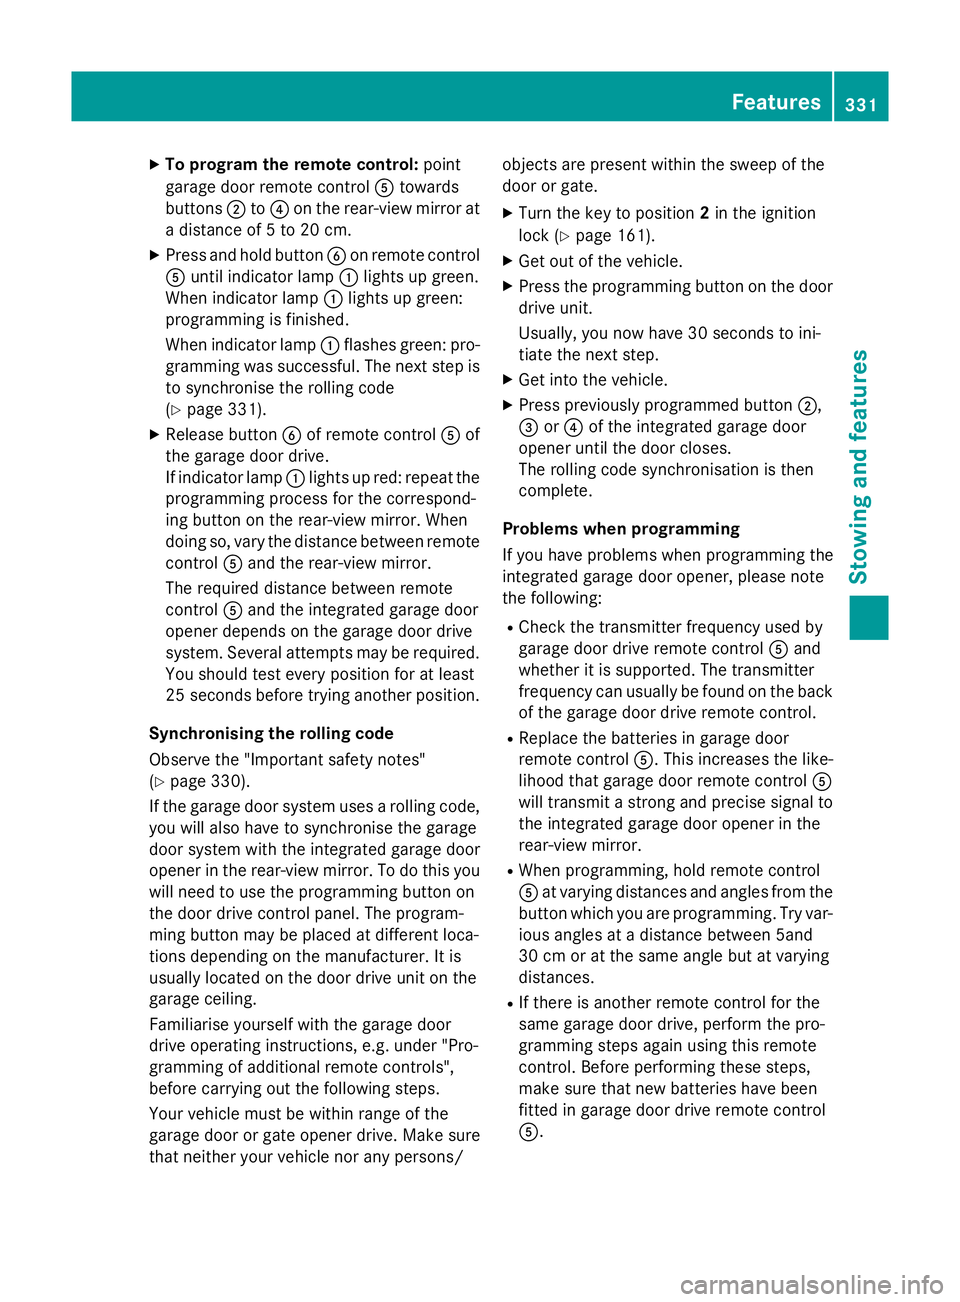
X
To program the remote control: point
garage door remote control Atowards
buttons ;to? on the rear-view mirror at
a distance of 5 to 20 cm.
X Press and hold button Bon remote control
A until indicator lamp :lights up green.
When indicator lamp :lights up green:
programming is finished.
When indicator lamp :flashes green: pro-
gramming was successful. The next step is
to synchronise the rolling code
(Y page 331).
X Release button Bof remote control Aof
the garage door drive.
If indicator lamp :lights up red: repeat the
programming process for the correspond-
ing button on the rear-view mirror. When
doing so, vary the distance between remote control Aand the rear-view mirror.
The required distance between remote
control Aand the integrated garage door
opener depends on the garage door drive
system. Several attempts may be required.
You should test every position for at least
25 second sbefore trying another position.
Synchronising the rolling code
Observe the "Important safety notes"
(Y page 330).
If the garage door system uses a rolling code,
you will also have to synchronise the garage
door system with the integrated garage door
opener in the rear-view mirror. To do this you
will need to use the programming button on
the door drive control panel. The program-
ming button may be placed at different loca-
tions depending on the manufacturer. It is
usually located on the door drive unit on the
garage ceiling.
Familiarise yourself with the garage door
drive operating instructions, e.g. under "Pro-
gramming of additional remote controls",
before carrying out the following steps.
Your vehicle must be within range of the
garage door or gate opener drive. Make sure
that neither your vehicle nor any persons/ objects are present within the sweep of the
door or gate.
X Turn the key to position 2in the ignition
lock (Y page 161).
X Get out of the vehicle.
X Press the programming button on the door
drive unit.
Usually, you now have 30 seconds to ini-
tiate the next step.
X Get into the vehicle.
X Press previously programmed button ;,
= or? of the integrated garage door
opener until the door closes.
The rolling code synchronisation is then
complete.
Problems when programming
If you have problems when programming the
integrated garage door opener, please note
the following: R Check the transmitter frequency used by
garage door drive remote control Aand
whether it is supported. The transmitter
frequency can usually be found on the back
of the garage door drive remote control.
R Replace the batteries in garage door
remote control A. This increases the like-
lihood that garage door remote control A
will transmit a strong and precise signal to
the integrated garage door opener in the
rear-view mirror.
R When programming, hold remote control
A at varying distances and angles from the
button which you are programming. Try var- ious angles at a distance between 5and
30 cm or at the same angle but at varying
distances.
R If there is another remote control for the
same garage door drive, perform the pro-
gramming steps again using this remote
control. Before performing these steps,
make sure that new batteries have been
fitted in garage door drive remote control
A. Features
331Stowing and features Z
Page 335 of 417
R
Note that some remote controls transmit
only for a limited period (the indicator lamp
on the remote control goes out). Press but-ton Bon remote control Aagain before
transmission ends.
R Align the aerial cable of the garage door
opener unit. This can improve signal recep-
tion/transmission.
Opening or closing the garage door Once programmed, the integrated garage
door opener will assume the function of the
garage door system's remote control. Please
also read the operating instructions for the
garage door system.
X Turn the key to position 2in the ignition
lock (Y page 161).
X Press button ;,=or? which you have
programmed to operate the garage door.
Garage door system with a fixed code: indi-
cator lamp :lights up green.
Garage door system with a rolling code:
indicator lamp :flashes green.
The transmitter will transmit a signal for as long as the button is pressed. The trans-
mission is halted after a maximum of ten
seconds and indicator lamp :lights up
yellow.
X Press button ;,=or? again if neces-
sary.
Clearing the memory Make sure that you clear the memory of the
integrated garage door opener before selling
the vehicle.
X Turn the key to position 2in the ignition
lock (Y page 161).
X Press and hold buttons ;and ?.
The indicator lamp initially lights up yellow
and then green.
X Release buttons ;and ?.
The memory of the integrated garage door
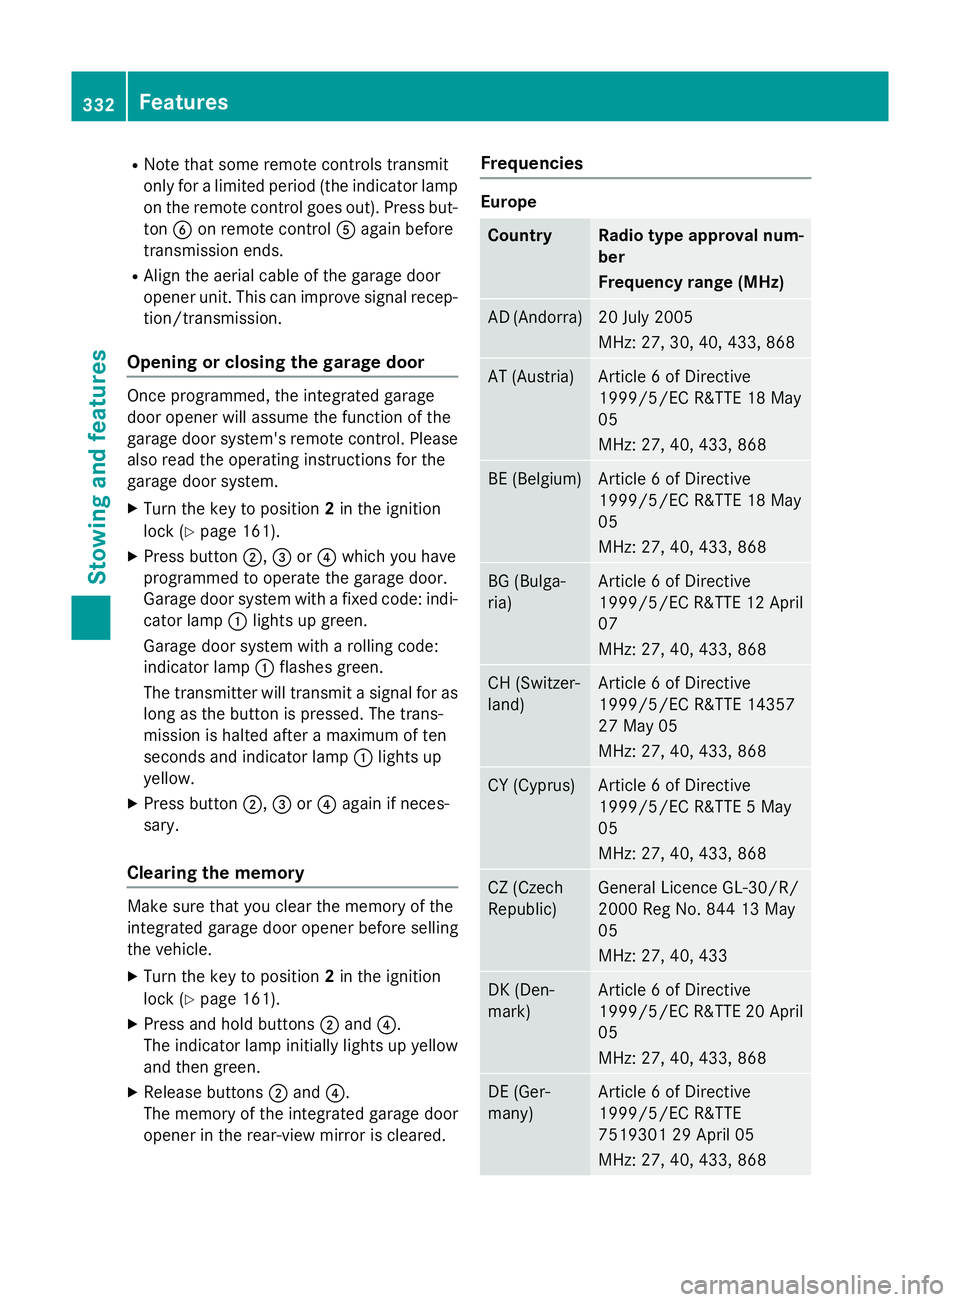
opener in the rear-view mirror is cleared. Frequencies Europe
Country Radio type approval num-
ber
Frequency range (MHz)
AD (Andorra) 20 July 2005
MHz: 27, 30, 40, 433, 868
AT (Austria) Article 6 of Directive
1999/5/EC R&TTE 18 May
05
MHz: 27, 40, 433, 868
BE (Belgium) Article 6 of Directive
1999/5/EC R&TTE 18 May
05
MHz: 27, 40, 433, 868
BG (Bulga-
ria) Article 6 of Directive
1999/5/EC R&TTE 12 April
07
MHz: 27, 40, 433, 868 CH (Switzer-
land) Article 6 of Directive
1999/5/EC R&TTE 14357
27 May 05
MHz: 27, 40, 433, 868
CY (Cyprus) Article 6 of Directive
1999/5/EC R&TTE 5 May
05
MHz: 27, 40, 433, 868
CZ (Czech
Republic) General Licence GL-30/R/
2000 Reg No. 844 13 May
05
MHz: 27, 40, 433
DK (Den-
mark) Article 6 of Directive
1999/5/EC R&TTE 20 April
05
MHz: 27, 40, 433, 868 DE (Ger-
many) Article 6 of Directive
1999/5/EC R&TTE
7519301 29 April 05
MHz: 27, 40, 433, 868332
FeaturesStowing and features