2015 MERCEDES-BENZ S-CLASS COUPE weight
[x] Cancel search: weightPage 70 of 417
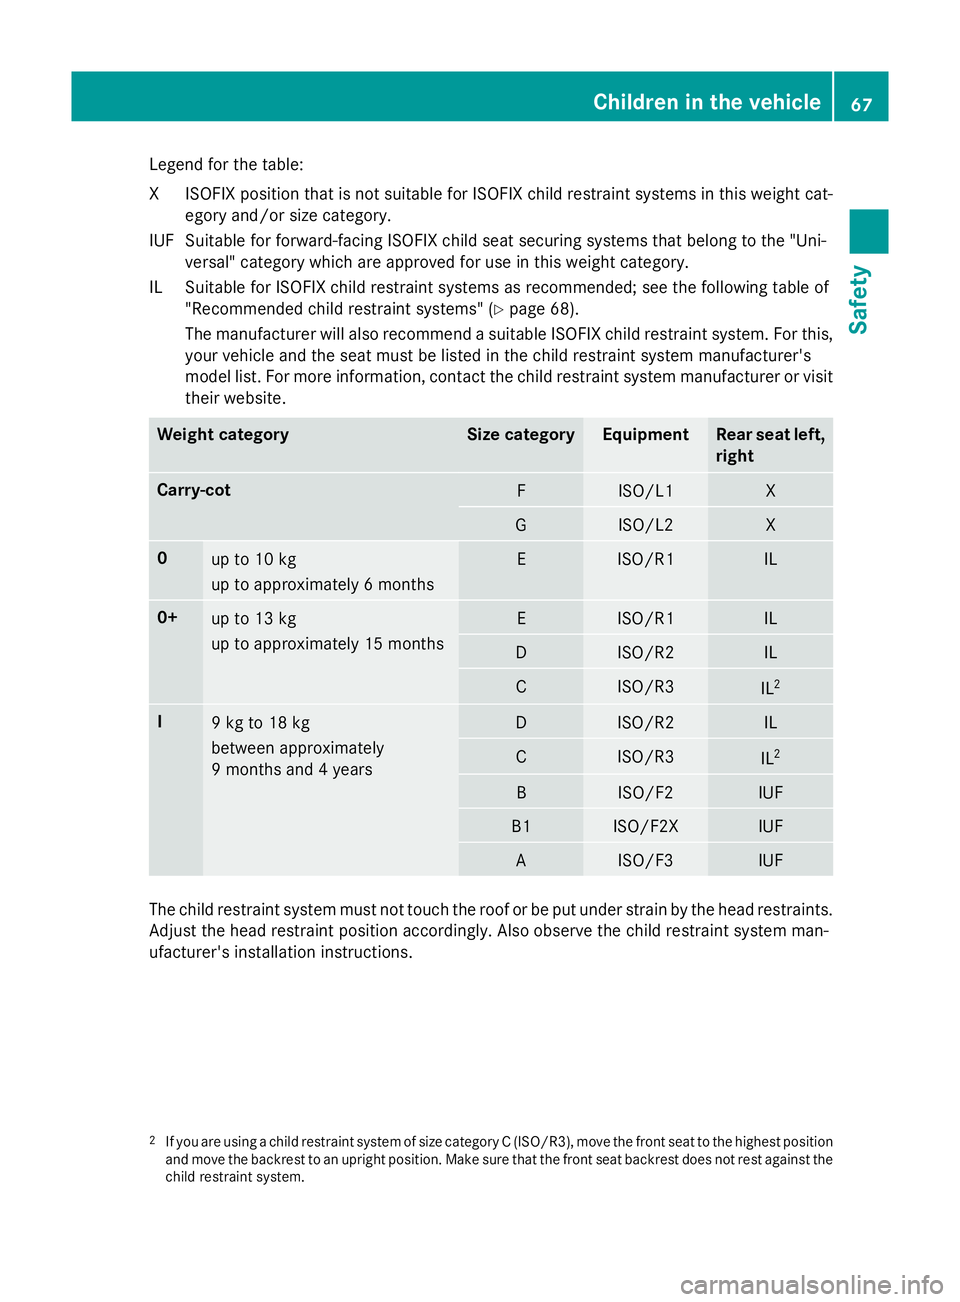
Legend for the table:
XI
SOFIX position that is not suitable for ISOFIX child restraint systems in this weight cat-
egory and/or size category.
IUF Suitable for forward-facing ISOFIX child seat securing systems that belong to the "Uni- versal" category which are approved for use in this weight category.
IL Suitable for ISOFIX child restraint systems as recommended; see the following table of "Recommended child restraint systems" (Y page 68).
The manufacturer will also recommend a suitable ISOFIX child restraint system. For this, your vehicle and the seat must be listed in the child restraint system manufacturer's
model list. For more information, contact the child restraint system manufacturer or visit
their website. Weight category Size category Equipment Rear seat left,
right Carry-cot
F ISO/L1 X
G ISO/L2 X
0
up to 10 kg
up to approximately 6 months E ISO/R1 IL
0+
up to 13 kg
up to approximately 15 months E ISO/R1 IL
D ISO/R2 IL
C ISO/R3
IL
2 I
9 kg to 18 kg
between approximately
9 months and 4 years D ISO/R2 IL
C ISO/R3
IL
2 B ISO/F2 IUF
B1 ISO/F2X IUF
A ISO/F3 IUF
The child restraint system must not touch the roof or be put under strain by the head restraints.
Adjust the head restraint position accordingly. Also observe the child restraint system man-
ufacturer's installation instructions.
2 If you are using a child restraint system of size category C (ISO/R3), move the front seat to the highest position
and move the backrest to an upright position. Make sure that the front seat backrest does not rest against the
child restraint system. Children in the vehicle
67Safety Z
Page 71 of 417
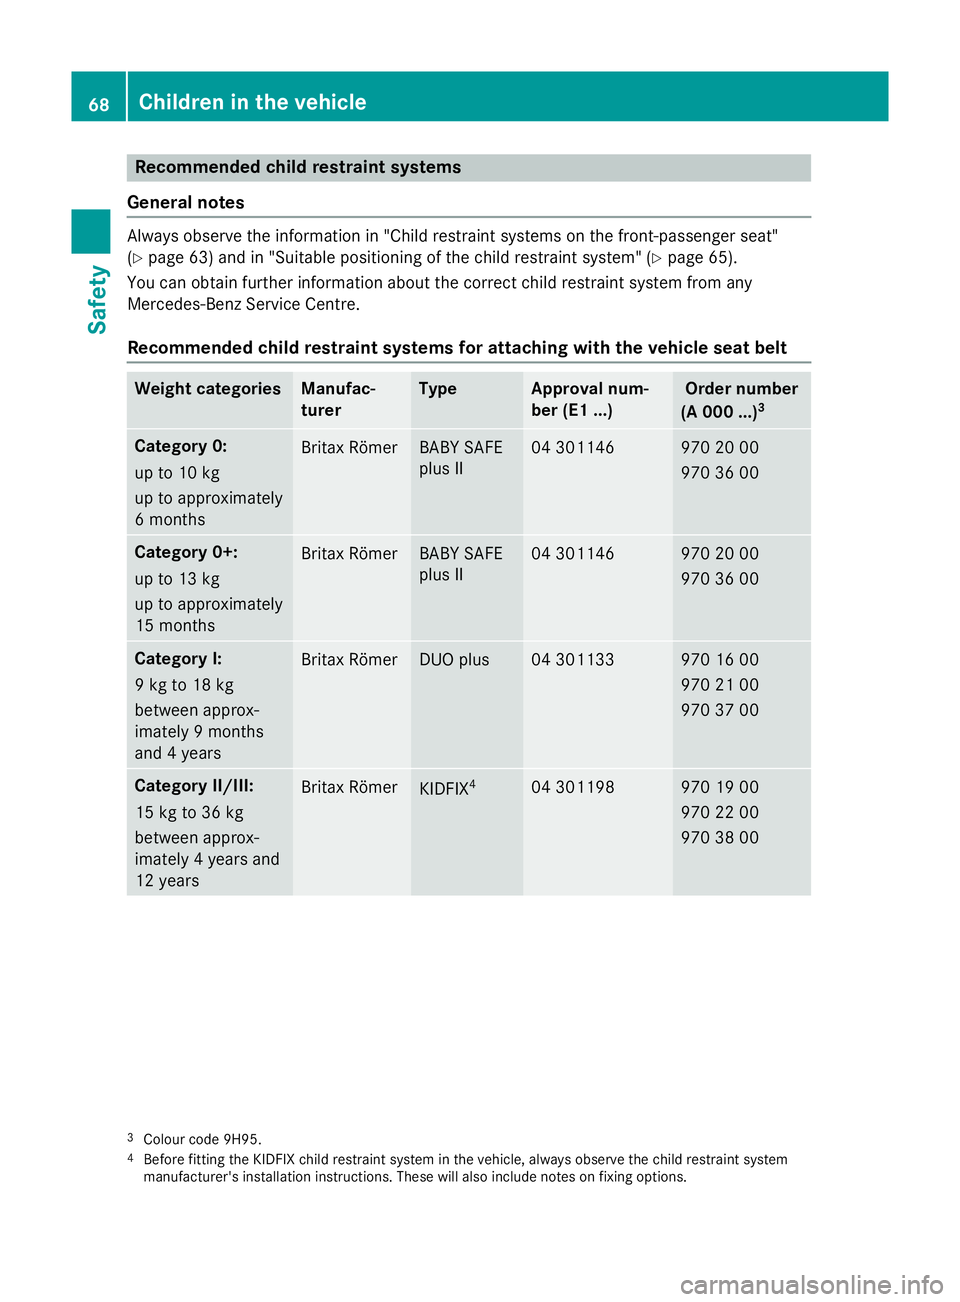
Recommended child restraint systems
General notes Always observe the information in "Child restraint systems on the front-passenger seat"
(Y
page 63) and in "Suitable positioning of the child restraint system" (Y page 65).
You can obtain further information about the correct child restraint system from any
Mercedes-Benz Service Centre.
Recommended child restraint systems for attaching with the vehicle seat belt Weight categories Manufac-
turer Type Approval num-
ber (E1 ...) Order number
(A 000 ...) 3 Category 0:
up to 10 kg
up to approximately
6 months
Britax Römer BABY SAFE
plus II 04 301146 970 20 00
970 36 00
Category 0+:
up to 13 kg
up to approximately
15 months
Britax Römer BABY SAFE
plus II 04 301146 970 20 00
970 36 00
Category I:
9 kg to 18 kg
between approx-
imately 9 months
and 4 years
Britax Römer DUO plus 04 301133 970 16 00
970 21 00
970 37 00
Category II/III:
15 kg to 36 kg
between approx-
imately 4 years and
12 years
Britax Römer
KIDFIX
4 04 301198 970 19 00
970 22 00
970 38 00
3
Colour code 9H95.
4 Before fitting the KIDFIX child restraint system in the vehicle, always observe the child restraint system
manufacturer's installation instructions. These will also include notes on fixing options. 68
Children in the vehicleSafety
Page 72 of 417
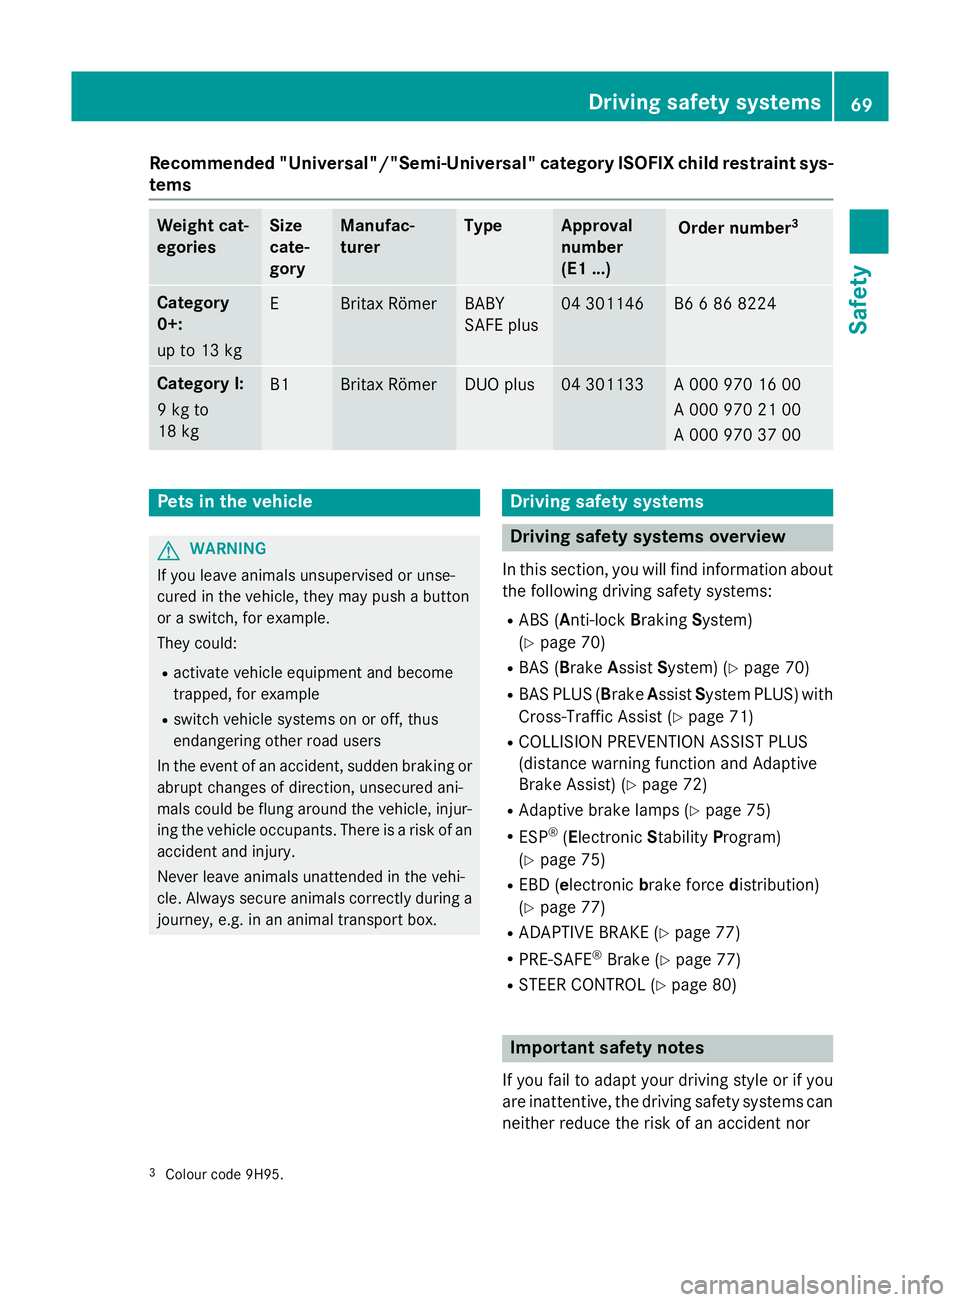
Recommended "Universal"/"Semi-Universal" category ISOFIX child restraint sys-
tems Weight cat-
egories Size
cate-
gory Manufac-
turer Type Approval
number
(E1 ...)
Order number
3 Category
0+:
up to 13 kg
E Britax Römer BABY
SAFE plus 04 301146 B6 6 86 8224
Category I:
9 kg to
18 kg
B1 Britax Römer DUO plus 04 301133 A 000 970 16 00
A 000 970 21 00
A 000 970 37 00
Pets in the vehicle
G
WARNING
If you leave animals unsupervised or unse-
cured in the vehicle, they may push a button
or a switch, for example.
They could:
R activate vehicle equipment and become
trapped, for example
R switch vehicle systems on or off, thus
endangering other road users
In the event of an accident, sudden braking or
abrupt changes of direction, unsecured ani-
mals could be flung around the vehicle, injur-
ing the vehicle occupants. There is a risk of an accident and injury.
Never leave animals unattended in the vehi-
cle. Always secure animals correctly during a
journey, e.g. in an animal transport box. Driving safety systems
Driving safety systems overview
In this section, you will find information about the following driving safety systems:
R ABS ( Anti-lock BrakingSystem)
(Y page 70)
R BAS ( Brake Assist System) (Y page 70)
R BAS PLUS (B rakeAssist System PLUS) with
Cross-Traffic Assist (Y page 71)
R COLLISION PREVENTION ASSIST PLUS
(distance warning function and Adaptive
Brake Assist) (Y page 72)
R Adaptive brake lamps (Y page 75)
R ESP ®
(Electronic StabilityProgram)
(Y page 75)
R EBD ( electronic brake force distribution)
(Y page 77)
R ADAPTIVE BRAKE (Y page 77)
R PRE-SAFE ®
Brake (Y page 77)
R STEER CONTROL (Y page 80) Important safety notes
If you fail to adapt your driving style or if you
are inattentive, the driving safety systems can neither reduce the risk of an accident nor
3 Colour code 9H95. Driving safety systems
69Safety Z
Page 190 of 417
For safety reasons, Mercedes-Benz recom-
mends only fitting the following brake discs
and brake pads/linings:
R brake discs that have been approved by
Mercedes-Benz
R brake pads/linings that have been
approved by Mercedes-Benz or that are of
an equivalent standard of quality
Other brake discs or brake pads/linings can
compromise the safety of your vehicle.
Always replace all brake discs and brake
pads/linings on an axle at the same time.
Always fit new brake pads/linings when
replacing brake discs.
The vehicle is equipped with lightweight
brake discs to which the wheel assembly with
rim and threaded connection is matched.
The use of brake discs other than those
approved by Mercedes-Benz may alter track
width and is subject to approval, if applicable.
Shock-type loads when handling the brake
discs, such as when changing wheels, can
lead to a reduction in comfort when driving
with lightweight brake discs. Avoid shock-
type loads on the lightweight brake discs,
particularly on the brake plate.
AMG high-performance and ceramic
brakes The high-performance brake system is only
available on Mercedes-AMG vehicles.
The AMG brake systems are designed for
heavy loads. This may lead to noise when
braking. This is dependent on:
R speed
R braking force
R environmental conditions, such as temper-
ature and humidity
The wear of individual brake system compo-
nents such as the brake pads/linings or brake discs depends on individual driving style and
operating conditions.
For this reason, it is impossible to state a
mileage (service life) that will be valid under all circumstances. An aggressive driving style
will lead to high wear. You can obtain further information about this from your Mercedes-
Benz Service Centre.
Brake pads/linings and discs that are either
new or have been replaced only achieve opti- mum braking effect after several hundred kil-
ometres of driving. Compensate for the
reduced braking effect by applying greater
force to the brake pedal. Always be aware of
this and adapt your driving and braking
accordingly during the running-in period.
Excessive heavy braking results in corre-
spondingly high brake wear. Observe the
brake wear warning lamp in the instrument
cluster and note any brake status messages
in the multifunction display. If you regularly
drive at high speeds, it is particularly impor-
tant to have the brake system checked and
maintained regularly. Driving on wet roads
Aquaplaning If water has accumulated to a certain depth
on the road surface, there is a danger of aqua-
planing occurring, even if:
R you are driving at low speeds
R the tyres have adequate tread depth
For this reason, drive in the following manner in the event of heavy rain or in conditions in
which aquaplaning can occur:
R lower your speed
R avoid tyre ruts
R avoid sudden steering movements
R brake carefully
Driving on flooded roads !
Bear in mind that vehicles travelling in
front or in the opposite direction create
waves. This may cause the maximum per-
missible water depth to be exceeded.
These notes must be observed under all
circumstances. You could otherwise dam- Driving tips
187Driving and parking Z
Page 281 of 417
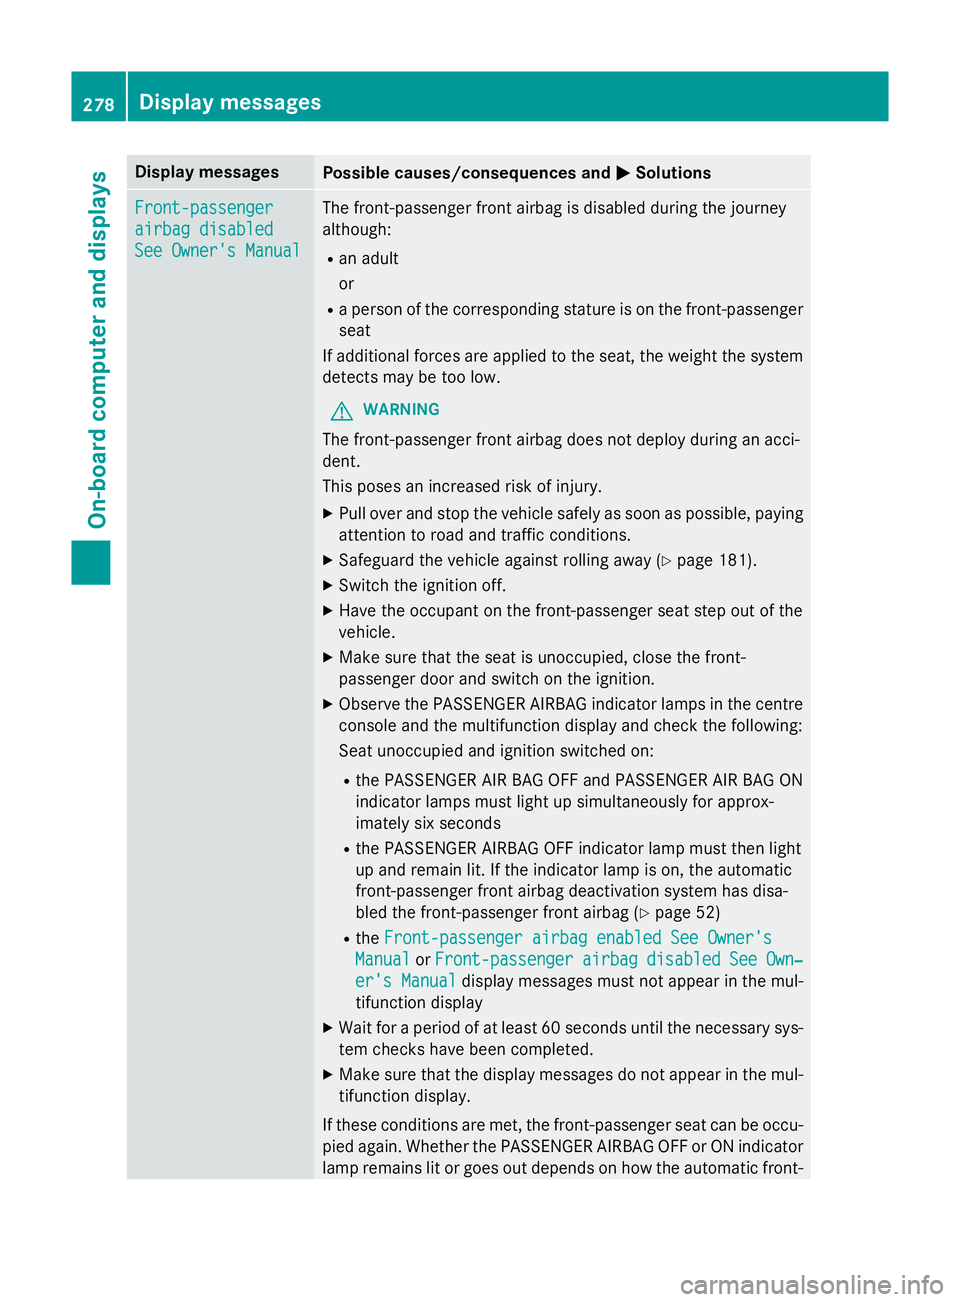
Display messages
Possible causes/consequences and
M
MSolutions Front-passenger
Front-passenger
airbag disabled airbag disabled
See Owner's Manual See Owner's Manual The front-passenger front airbag is disabled during the journey
although:
R an adult
or
R a person of the corresponding stature is on the front-passenger
seat
If additional forces are applied to the seat, the weight the system detects may be too low.
G WARNING
The front-passenger front airbag does not deploy during an acci-
dent.
This poses an increased risk of injury. X Pull over and stop the vehicle safely as soon as possible, paying
attention to road and traffic conditions.
X Safeguard the vehicle against rolling away (Y page 181).
X Switch the ignition off.
X Have the occupant on the front-passenger seat step out of the
vehicle.
X Make sure that the seat is unoccupied, close the front-
passenger door and switch on the ignition.
X Observe the PASSENGER AIRBAG indicator lamps in the centre
console and the multifunction display and check the following:
Seat unoccupied and ignition switched on:
R the PASSENGER AIR BAG OFF and PASSENGER AIR BAG ON
indicator lamps must light up simultaneously for approx-
imately six seconds
R the PASSENGER AIRBAG OFF indicator lamp must then light
up and remain lit. If the indicator lamp is on, the automatic
front-passenger front airbag deactivation system has disa-
bled the front-passenger front airbag (Y page 52)
R the Front-passenger airbag enabled See Owner's
Front-passenger airbag enabled See Owner's
Manual Manual orFront-passenger
Front-passenger airbag
airbagdisabled
disabled See
SeeOwn‐
Own‐
er's Manual
er's Manual display messages must not appear in the mul-
tifunction display
X Wait for a period of at least 60 seconds until the necessary sys-
tem checks have been completed.
X Make sure that the display messages do not appear in the mul-
tifunction display.
If these conditions are met, the front-passenger seat can be occu-
pied again. Whether the PASSENGER AIRBAG OFF or ON indicator
lamp remains lit or goes out depends on how the automatic front- 278
Display
messagesOn-board computer and displays
Page 282 of 417
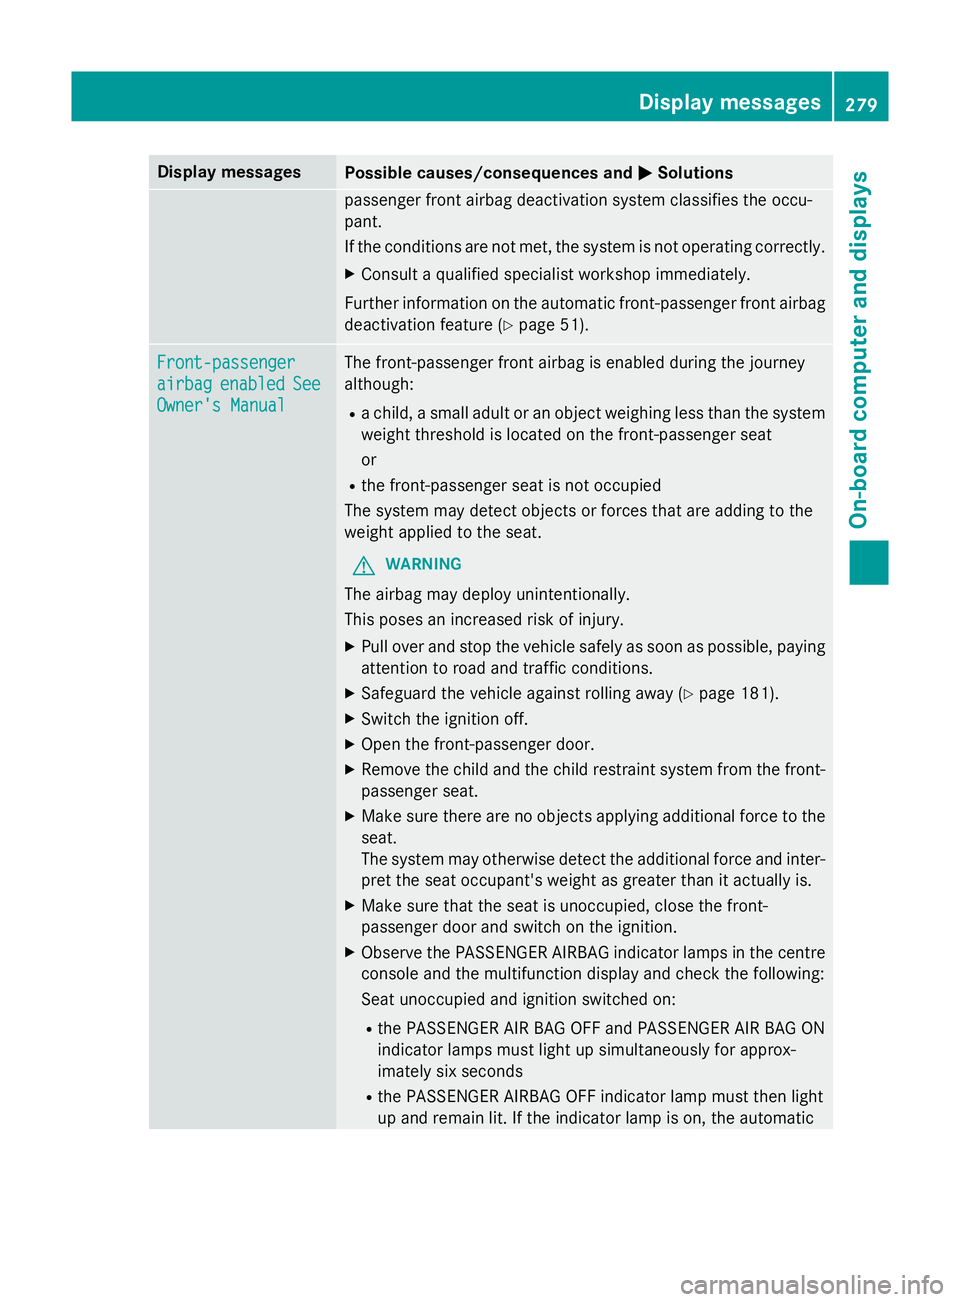
Display messages
Possible causes/consequences and
M
MSolutions passenger front airbag deactivation system classifies the occu-
pant.
If the conditions are not met, the system is not operating correctly.
X Consult a qualified specialist workshop immediately.
Further information on the automatic front-passenger front airbag deactivation feature (Y page 51).Front-passenger Front-passenger
airbag airbag
enabled
enabled See
See
Owner's Manual
Owner's Manual The front-passenger front airbag is enabled during the journey
although:
R a child, a small adult or an object weighing less than the system
weight threshold is located on the front-passenger seat
or
R the front-passenger seat is not occupied
The system may detect objects or forces that are adding to the
weight applied to the seat.
G WARNING
The airbag may deploy unintentionally.
This poses an increased risk of injury.
X Pull over and stop the vehicle safely as soon as possible, paying
attention to road and traffic conditions.
X Safeguard the vehicle against rolling away (Y page 181).
X Switch the ignition off.
X Open the front-passenger door.
X Remove the child and the child restraint system from the front-
passenger seat.
X Make sure there are no objects applying additional force to the
seat.
The system may otherwise detect the additional force and inter-
pret the seat occupant's weight as greater than it actually is.
X Make sure that the seat is unoccupied, close the front-
passenger door and switch on the ignition.
X Observe the PASSENGER AIRBAG indicator lamps in the centre
console and the multifunction display and check the following:
Seat unoccupied and ignition switched on:
R the PASSENGER AIR BAG OFF and PASSENGER AIR BAG ON
indicator lamps must light up simultaneously for approx-
imately six seconds
R the PASSENGER AIRBAG OFF indicator lamp must then light
up and remain lit. If the indicator lamp is on, the automatic Display
messages
279On-board computer and displays Z
Page 319 of 417
Useful information
i This Owner's Manual describes all mod-
els, series and optional equipment for your
vehicle that were available at the time of
going to press. National variations are pos- sible. Note that your vehicle may not be
equipped with all of the functions descri-
bed. This is also the case for systems and
functions relevant to safety.
i Read the information on qualified special-
ist workshops: (Y page 26). Stowage areas
Loading guidelines
G
WARNING
Combustion engines emit poisonous exhaust
gases such as carbon monoxide. Exhaust
gases can enter the vehicle interior if the boot
lid is open when the engine is running, espe-
cially if the vehicle is in motion. There is a risk of poisoning.
Always switch off the engine before opening
the boot lid. Never drive with the boot lid
open. G
WARNING
If objects, luggage or loads are not secured or not secured sufficiently, they could slip, tip
over or be flung around and thereby hit vehicle
occupants. There is a risk of injury, especially when braking or abruptly changing directions.
Always store objects so that they cannot be
flung around. Secure objects, luggage or
loads against slipping or tipping before the
journey. G
WARNING
The exhaust tail pipe and tail pipe trim can
become very hot. If you come into contact
with these parts of the vehicle, you could burn
yourself. There is a risk of injury. Always be particularly careful around the
exhaust tail pipe and the tail pipe trim. Allow
these components to cool down before touch-
ing them.
The handling characteristics of a laden vehi-
cle are dependent on the distribution of the
load within the vehicle. For this reason, you
should observe the following notes when
transporting a load:
R never exceed the maximum permissible
gross vehicle weight or the permissible axle
loads for the vehicle (including occupants).
R the boot is the preferred place to carry
objects.
R position heavy loads as far forwards as pos-
sible and as low down in the boot as pos-
sible.
R the load must not protrude above the upper
edge of the seat backrests.
R always place the load behind unoccupied
seats if possible.
R secure the load with sufficiently strong and
wear-resistant lashing material. Pad sharp
edges for protection.
i Load restraints are available at any quali-
fied specialist workshop, e.g. a Mercedes-
Benz Service Centre. Stowage compartments
Important safety notes G
WARNING
If you do not correctly store objects in the
vehicle interior, they can slip or be flung
around, thus striking vehicle occupants.
There is a risk of injury, especially when brak- ing or abruptly changing directions.
R Always store objects so that they cannot be
flung around in these or in similar situa-
tions.
R Always make sure that objects do not pro-
trude from stowage compartments, lug-
gage nets or stowage nets. 316
Stowage areasStowing and features
Page 326 of 417
You can remove the cup holder and the rub-
ber mat for cleaning. Clean them with clean,
lukewarm water only.
Cup holder in the rear seat armrest !
Do not sit on or support your body weight
on the rear seat armrest when it is folded
down, as you could otherwise damage it.
! Close the cup holder before folding the
rear seat armrest up. Otherwise, the cup
holder could be damaged. X
Fold down the rear seat armrest.
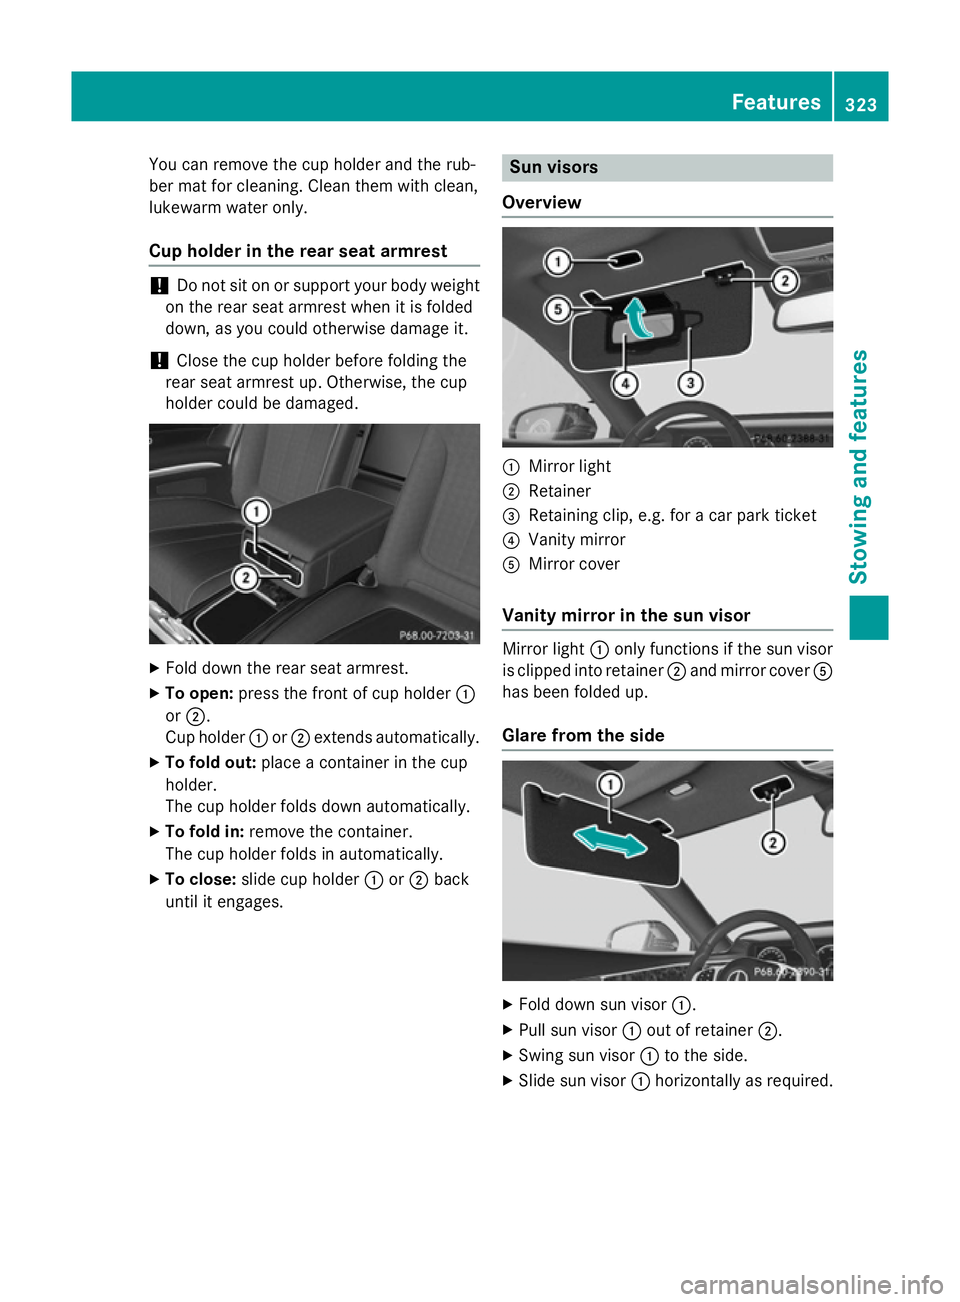
X To open: press the front of cup holder :
or ;.
Cup holder :or; extends automatically.
X To fold out: place a container in the cup
holder.
The cup holder folds down automatically.
X To fold in: remove the container.
The cup holder folds in automatically.
X To close: slide cup holder :or; back
until it engages. Sun visors
Overview :
Mirror light
; Retainer
= Retaining clip, e.g. for a car park ticket
? Vanity mirror
A Mirror cover
Vanity mirror in the sun visor Mirror light
:only functions if the sun visor
is clipped into retainer ;and mirror cover A
has been folded up.
Glare from the side X
Fold down sun visor :.
X Pull sun visor :out of retainer ;.
X Swing sun visor :to the side.
X Slide sun visor :horizontally as required. Features
323Stowing and features Z