2015 MERCEDES-BENZ S-CLASS COUPE ignition
[x] Cancel search: ignitionPage 224 of 417
Activating/deactivating the reversing
camera X
To activate: make sure that the key is in
position 2in the ignition lock.
X Make sure that the Activation by R
Activation by R
gear
gear function is selected in COMAND
Online (see separate operating instruc-
tions).
X Engage reverse gear.
The reversing camera flap opens. The area
behind the vehicle is shown with guide lines in the COMAND display.
The image from the reversing camera is
available throughout the manoeuvring
process.
To deactivate: the reversing camera deacti-
vates if you shift the transmission to Por after
driving forwards a short distance.
Displays in the COMAND display The reversing camera may show a distorted
view of obstacles or show them incorrectly or not at all. Obstacles are not shown by the
reversing camera in the following locations:
R very close to the rear bumper
R under the rear bumper
R in the area immediately above the emblem
in the boot lid.
! Objects not at ground level may appear to
be further away than they actually are, e.g.:
R the bumper of a parked vehicle
R the drawbar of a trailer
R the ball coupling of a trailer tow hitch
R the rear section of an HGV
R a slanted post
Use the guidelines only for orientation.
Approach objects no further than the bot-
tom-most guideline. :
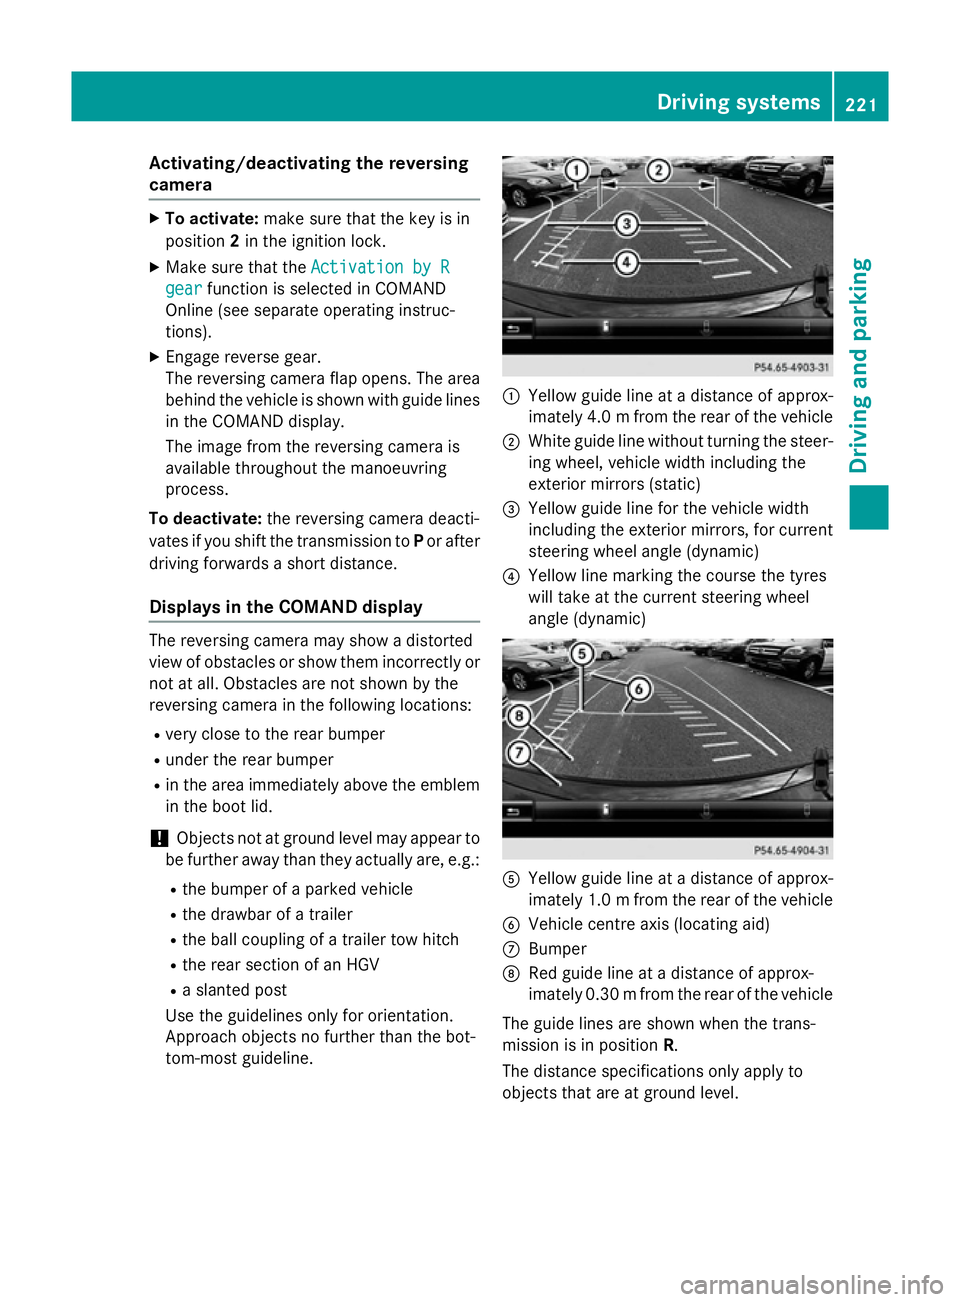
Yellow guide line at a distance of approx-
imately 4.0 mfrom the rear of the vehicle
; White guide line without turning the steer-
ing wheel, vehicle width including the
exterior mirrors (static)
= Yellow guide line for the vehicle width
including the exterior mirrors, for current
steering wheel angle (dynamic)
? Yellow line marking the course the tyres
will take at the current steering wheel
angle (dynamic) A
Yellow guide line at a distance of approx-
imately 1.0 mfrom the rear of the vehicle
B Vehicle centre axis (locating aid)
C Bumper
D Red guide line at a distance of approx-
imately 0.30 mfrom the rear of the vehicle
The guide lines are shown when the trans-
mission is in position R.
The distance specifications only apply to
objects that are at ground level. Driving systems
221Driving and parking Z
Page 229 of 417
R
full-screen view with image from the
front camera
R full-screen view with image from the
reversing camera.
X To switch off: press button:again.
Activating the 360° camera using
COMAND Online X
Press the Øbutton in the centre con-
sole.
The vehicle menu appears.
X To select the 360° camera: turn and press
the controller.
The following appears depending on
whether transmission position Dor Ris
selected:
R a split-screen with top view and the
image from the front camera or
R a split-screen with top view and the
image from the reversing camera.
Further information on the COMAND control-
ler can be found in the separate operating
instructions.
Activating the 360° camera using
reverse gear You can show images from the 360° camera
automatically by engaging reverse gear.
X Make sure that the key is in position 2in the
ignition lock.
X Make sure that the Activation by R Activation by R
gear
gear function is selected in COMAND
Online (see separate operating instruc-
tions).
X To show the 360° camera image: engage
reverse gear.
The area behind the vehicle is shown in the
COMAND display in split-screen mode. You see the top view of the vehicle and the
image from the reversing camera. Selecting the split-screen and full
screen displays Switching between split screen views:
X To switch to the line with the vehicle icons:
slide ZVthe controller.
X To select a vehicle icon: turn the controller.
Switching to full screen mode:
X Select 180° view
180° view by turning and pressing
the controller.
i The 180° option is only available in the
following views:
R Top view with image from the reversing
camera
R Top view with image from the front cam-
era
Displays in the COMAND display Important safety notes
The camera system may show a distorted
view of obstacles or show them incorrectly or
not at all. Obstacles are not shown by the
system in the following locations:
R under the front and rear bumpers
R very close to the front and rear bumpers
R in the area immediately above the handle
on the boot lid
R very close to the exterior mirrors
R in the transitional areas between the vari-
ous cameras in the virtual top view
! Objects not at ground level may appear to
be further away than they actually are, e.g.:
R the bumper of a parked vehicle
R the drawbar of a trailer
R the ball coupling of a trailer tow hitch
R the rear section of an HGV
R a slanted post
Use the guidelines only for orientation.
Approach objects no further than the bot-
tom-most guideline. 226
Driving systemsDriving an
d parking
Page 237 of 417
body contours and posture of a person stand-
ing upright.
Pedestrian recognition is then switched on
automatically if:
R Night View Assist Plus is activated
R you are driving faster than approximately
10 km/h
R it is dark
If pedestrian recognition is active, readiness
symbol ;appears. Persons who are detec-
ted are highlighted by framing =. If the
pedestrian recognition system has brought a
pedestrian to your attention, look through the
windscreen to evaluate the situation. The
actual distance to objects and pedestrians
cannot be gauged accurately by looking at a
screen.
Animal recognition
Animals can be recognised in the following
situations:
R darkness
R outside built-up areas
R below an outside temperature of 32 †
Night View Assist Plus can recognise larger
animals such as deer, cows or horses using
typical characteristics.
The system does not detect:
R smaller animals, e.g. dogs and cats
R animals whose silhouette is not clearly rec-
ognisable
When detected, animals are marked with
small coloured frame corners. In contrast to
pedestrian recognition, there is no separate
readiness symbol in the multifunction dis-
play. Activating/deactivating Night View
Assist Plus Activation conditions
You can only activate Night View Assist if all of
the following conditions have been fulfilled:
R the ignition is switched on (Y page 161) or
the engine has been started.
R the light switch is in the ÃorL posi-
tion.
R reverse gear has not been engaged.
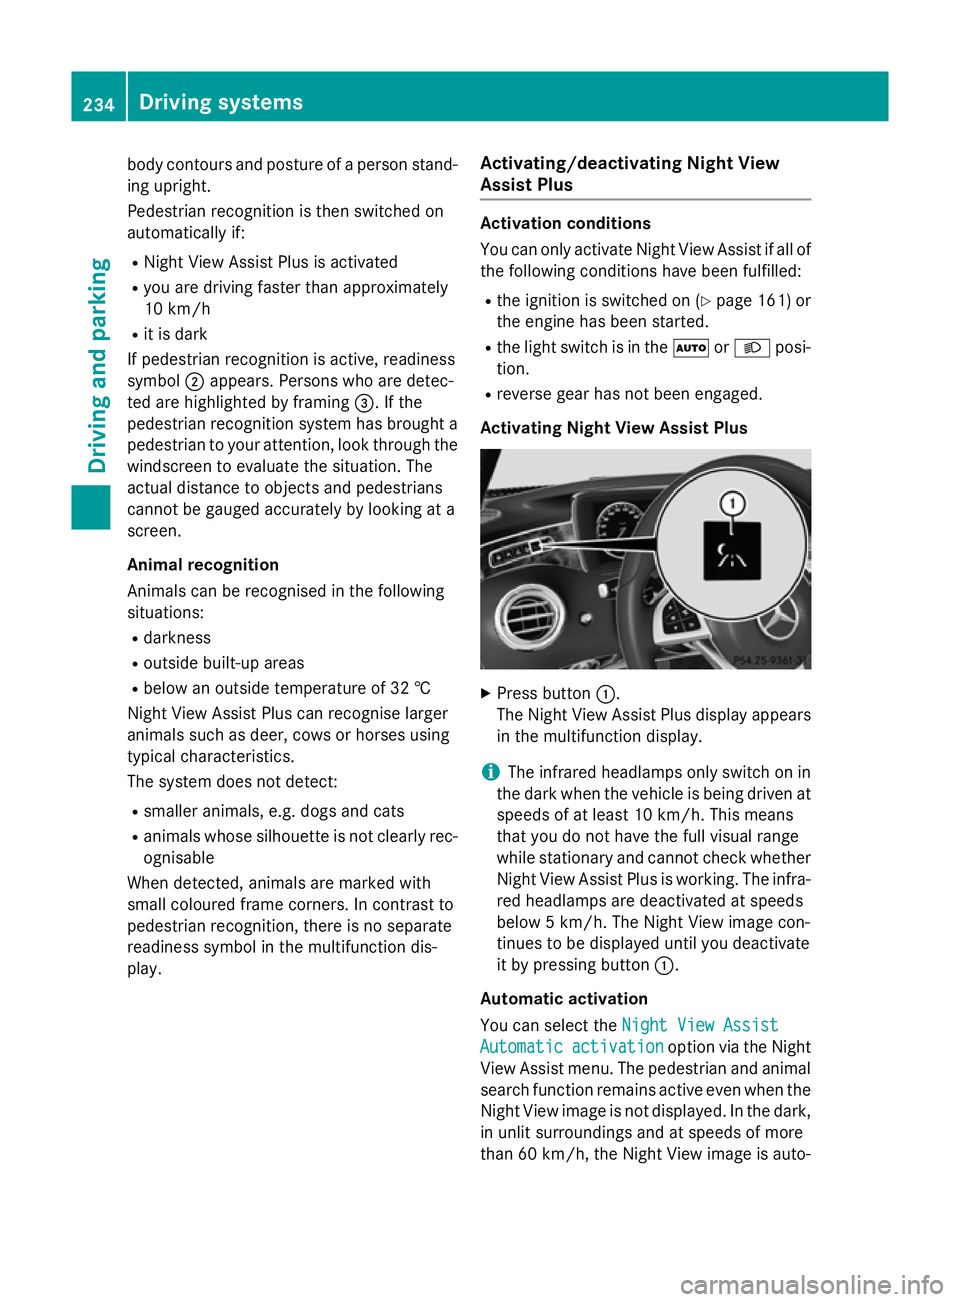
Activating Night View Assist Plus X
Press button :.
The Night View Assist Plus display appears in the multifunction display.
i The infrared headlamps only switch on in
the dark when the vehicle is being driven at speeds of at least 10 km/h. This means
that you do not have the full visual range
while stationary and cannot check whether
Night View Assist Plus is working. The infra- red headlamps are deactivated at speeds
below 5 km/h. The Night View image con-
tinues to be displayed until you deactivate
it by pressing button :.
Automatic activation
You can select the Night View Assist Night View Assist
Automatic Automatic activation
activation option via the Night
View Assist menu. The pedestrian and animal
search function remains active even when the
Night View image is not displayed. In the dark, in unlit surroundings and at speeds of more
than 60 km/ h,the Night View image is auto- 234
Driving systemsDriving an
d parking
Page 242 of 417

ted at any time if you steer slightly in the
opposite direction or accelerate.
The course-correcting brake application is
available in the speed range between
30 km/h and 200 km/h.
Either a course-correcting brake application
appropriate to the driving situation, or none at all, may occur if:
R there are vehicles or obstacles, e.g. crash
barriers, on both sides of your vehicle
R a vehicle approaches too closely on the
side
R you have adopted a sporty driving style with
high cornering speeds
R you clearly brake or accelerate
R a driving safety system intervenes, such as
ESP ®
or PRE-SAFE ®
Brake
R ESP ®
is deactivated
R a loss of tyre pressure or a defective tyre is
detected
Activating Active Blind Spot Assist
X Make sure that Active Blind Spot Assist is
activated in the on-board computer
(Y page 260).
X Turn the key to position 2in the ignition
lock.
Warning lamps :in the exterior mirrors
light up red for approximately 1.5 second s.
Grey radar waves propagating backwards
appear next to the vehicle in the assistance
display in the multifunction display. Active Lane Keeping Assist General notes
Active Lane Keeping Assist monitors the area
in front of your vehicle by means of multi-
function camera :at the top of the wind-
screen. Various different areas to the front,
rear and side of your vehicle are also moni-
tored with the aid of the radar sensor system. Active Lane Keeping Assist detects lane
markings on the road and can warn you
before you leave your lane unintentionally. If
you do not react to the warning, a lane-cor-
recting application of the brakes can bring the
vehicle back into the original lane.
This function is available within a speed range between 60 km/h and 200 km/h.
Important safety notes
If you fail to adapt your driving style, Active
Lane Keeping Assist can neither reduce the
risk of an accident nor override the laws of
physics. Active Lane Keeping Assist cannot
take account of road and weather conditions. It may not detect traffic situations. Active
Lane Keeping Assist is only an aid. You are
responsible for the distance to the vehicle in
front, for vehicle speed, for braking in good
time and for staying in lane.
Active Lane Keeping Assist cannot continu-
ously keep your vehicle in its lane. G
WARNING
Active Lane Keeping Assist cannot always
clearly detect lane markings. Driving systems
239Driving and parking
Z
Page 248 of 417
The red band in the rev counter indicates the
engine's overrevving range.
The fuel supply is interrupted to protect the
engine when the red band is reached. Outside temperature display
You should pay special attention to road con-
ditions when temperatures are around freez-
ing point.
Bear in mind that the outside temperature
display indicates the measured air tempera-
ture and not the road surface temperature.
The outside temperature display is in the mul- tifunction display (Y page 246).
There is a short delay before a change in out- side temperature is shown in the multifunc-
tion display. Coolant temperature gauge
G
WARNING
If you open the bonnet while the engine is
overheating or while there is a fire in the
engine compartment, you could come into
contact with hot gases or other leaking ser-
vice products. There is a danger of injury.
Allow an overheating engine to cool down
before opening the bonnet. If there is a fire in the engine compartment, leave the bonnet
closed and notify the fire brigade.
The multifunction display shows the coolant
temperature gauge in the lower section of the rev counter (Y page 32).
At high outside temperatures and when driv-
ing uphill, the coolant temperature may rise.
Under normal operating conditions and with
the specified coolant level, the coolant tem-
perature may rise to 124 †. Operating the on-board computer
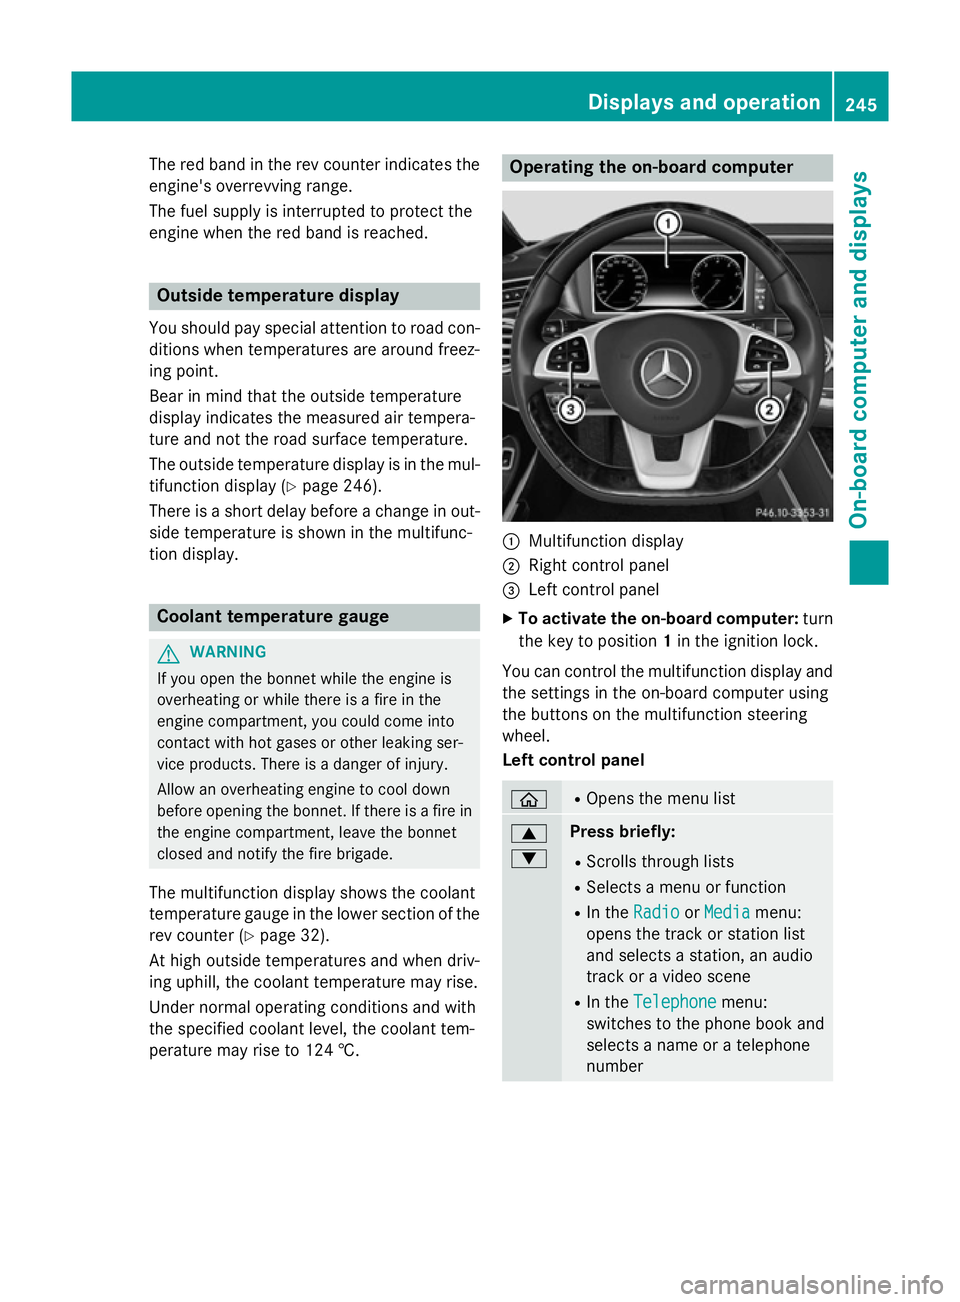
:
Multifunction display
; Right control panel
= Left control panel
X To activate the on-board computer: turn
the key to position 1in the ignition lock.
You can control the multifunction display and
the settings in the on-board computer using
the buttons on the multifunction steering
wheel.
Left control panel ò R
Opens the menu list 9
: Press briefly:
R Scrolls through lists
R Selects a menu or function
R In the Radio Radio orMedia
Media menu:
opens the track or station list
and selects a station, an audio
track or a video scene
R In the Telephone
Telephone menu:
switches to the phone book and
selects a name or a telephone
number Displays and operation
245On-board computer and displays Z
Page 253 of 417
X
Confirm by pressing aon the steering
wheel.
X Press :or9 to select the display
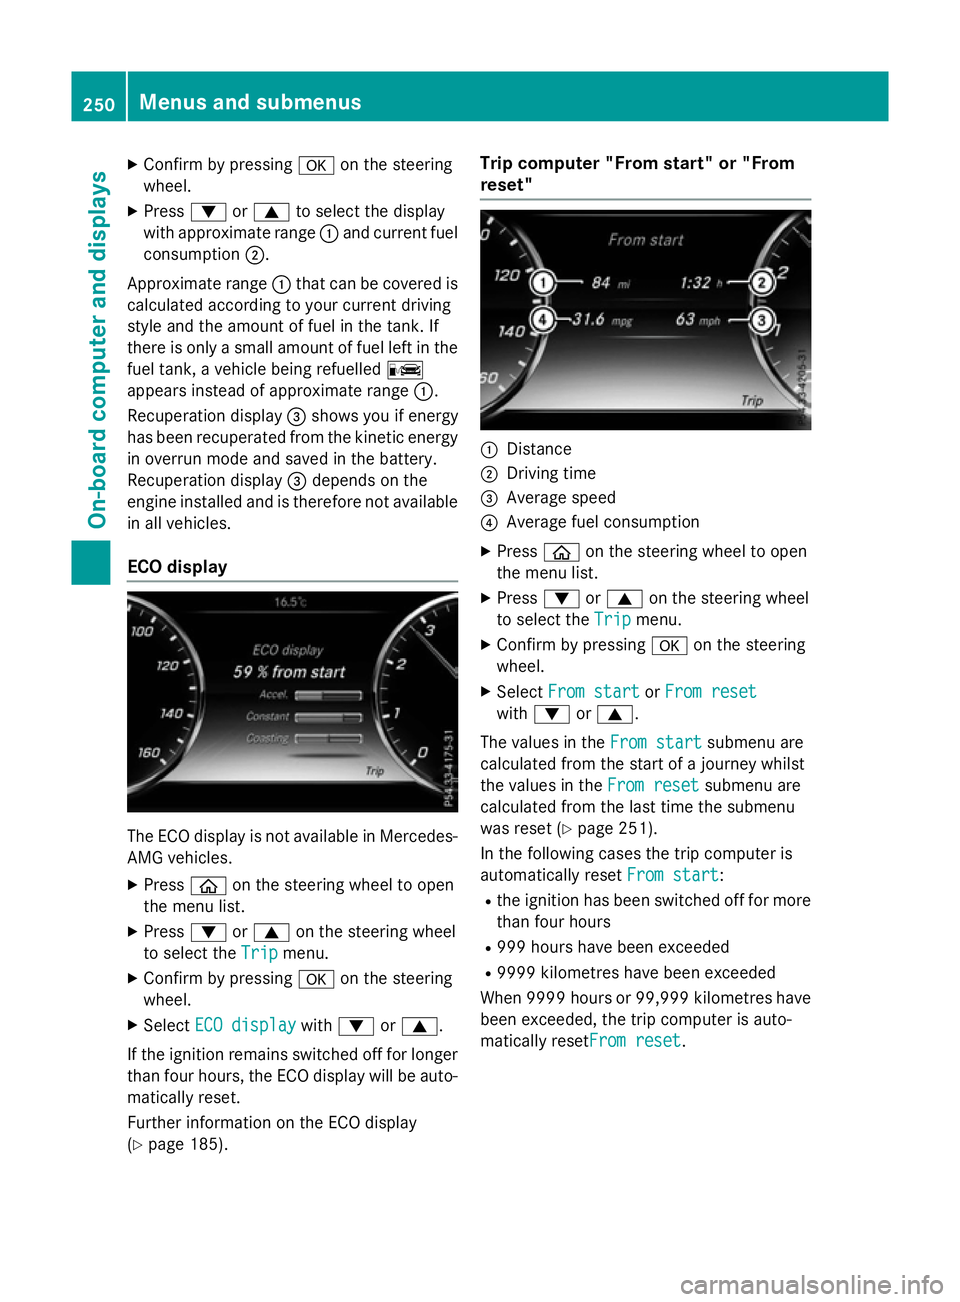
with approximate range :and current fuel
consumption ;.
Approximate range :that can be covered is
calculated according to your current driving
style and the amount of fuel in the tank. If
there is only a small amount of fuel left in the
fuel tank, a vehicle being refuelled C
appears instead of approximate range :.
Recuperation display =shows you if energy
has been recuperated from the kinetic energy
in overrun mode and saved in the battery.
Recuperation display =depends on the
engine installed and is therefore not available in all vehicles.
ECO display The ECO display is not available in Mercedes-
AMG vehicles.
X Press òon the steering wheel to open
the menu list.
X Press :or9 on the steering wheel
to select the Trip Tripmenu.
X Confirm by pressing aon the steering
wheel.
X Select ECO display
ECO display with: or9.
If the ignition remains switched off for longer than four hours, the ECO display will be auto-
matically reset.
Further information on the ECO display
(Y page 185). Trip computer "From start" or "From
reset"
:
Distance
; Driving time
= Average speed
? Average fuel consumption
X Press òon the steering wheel to open
the menu list.
X Press :or9 on the steering wheel
to select the Trip Tripmenu.
X Confirm by pressing aon the steering
wheel.
X Select From start
From start orFrom reset
From reset
with : or9.
The values in the From start
From startsubmenu are
calculated from the start of a journey whilst
the values in the From reset From resetsubmenu are
calculated from the last time the submenu
was reset (Y page 251).
In the following cases the trip computer is
automatically reset From start From start:
R the ignition has been switched off for more
than four hours
R 999 hours have been exceeded
R 9999 kilometres have been exceeded
When 9999 hour sor 99,999 kilometres have
been exceeded, the trip computer is auto-
matically resetFrom reset From reset.250
Menus and submenusOn-board computer and displays
Page 273 of 417
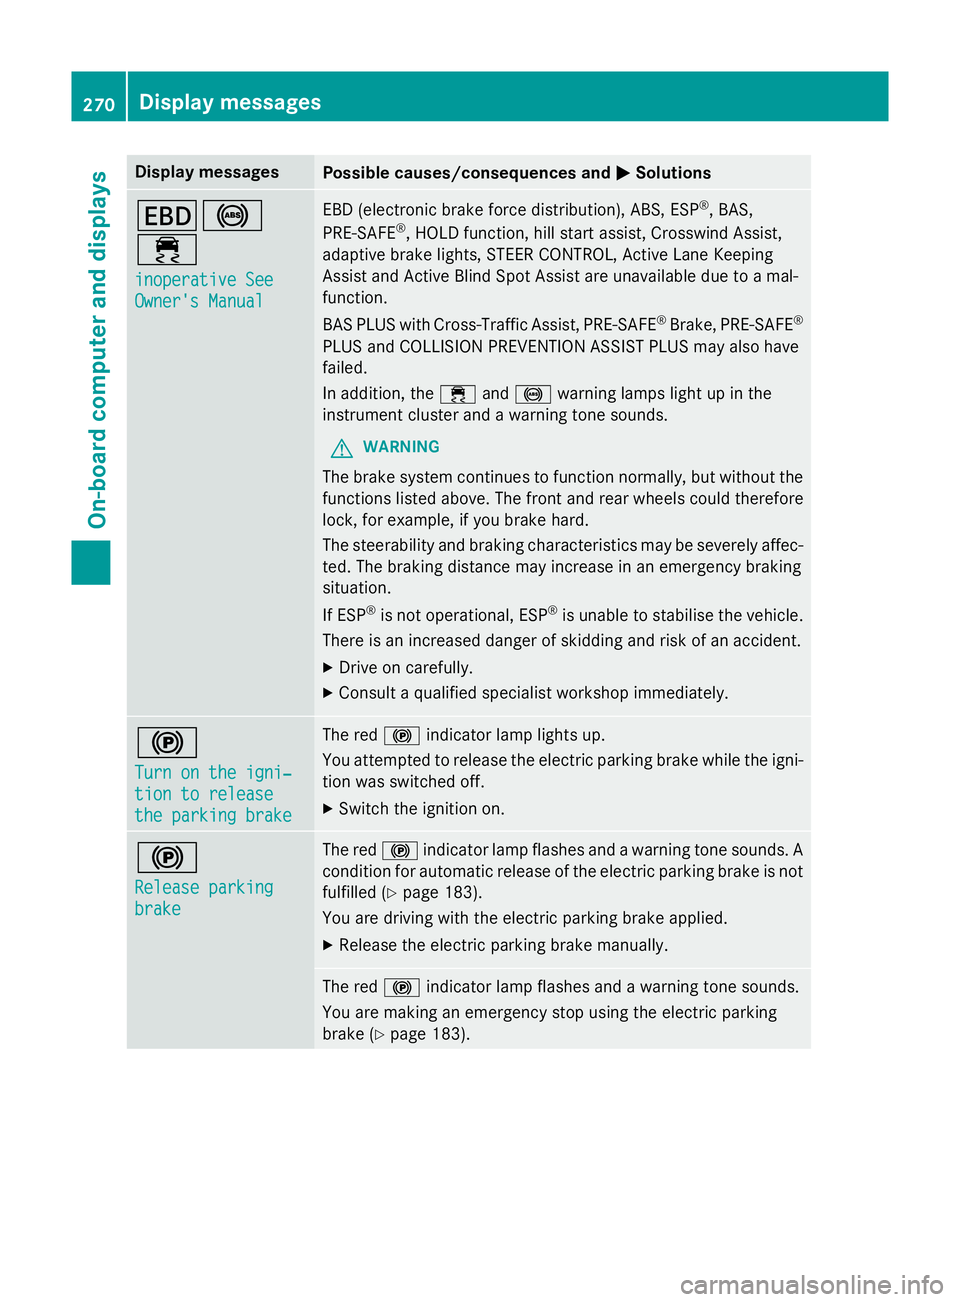
Display messages
Possible causes/consequences and
M
MSolutions T!
÷
inoperative See inoperative See
Owner's Manual Owner's Manual EBD (electronic brake force distribution), ABS, ESP
®
, BAS,
PRE ‑SAFE ®
, HOLD function, hill start assist, Crosswind Assist,
adaptive brake lights, STEER CONTROL, Active Lane Keeping
Assist and Active Blind Spot Assist are unavailable due to a mal-
function.
BAS PLUS with Cross-Traffic Assist, PRE‑ SAFE®
Brake, PRE ‑SAFE®
PLUS and COLLISION PREVENTION ASSIST PLUS may also have
failed.
In addition, the ÷and! warning lamps light up in the
instrument cluster and a warning tone sounds.
G WARNING
The brake system continues to function normally, but without the functions listed above. The front and rear wheels could therefore
lock, for example, if you brake hard.
The steerability and braking characteristics may be severely affec-ted. The braking distance may increase in an emergency braking
situation.
If ESP ®
is not operational, ESP ®
is unable to stabilise the vehicle.
There is an increased danger of skidding and risk of an accident.
X Drive on carefully.
X Consult a qualified specialist workshop immediately. !
Turn on the igni‐ Turn on the igni‐
tion to release tion to release
the parking brake the parking brake The red
!indicator lamp lights up.
You attempted to release the electric parking brake while the igni-
tion was switched off.
X Switch the ignition on. !
Release parking Release parking
brake brake The red
!indicator lamp flashes and a warning tone sounds. A
condition for automatic release of the electric parking brake is not
fulfilled (Y page 183).
You are driving with the electric parking brake applied.
X Release the electric parking brake manually. The red
!indicator lamp flashes and a warning tone sounds.
You are making an emergency stop using the electric parking
brake (Y page 183). 270
Display
messagesOn-board computer and displays
Page 274 of 417
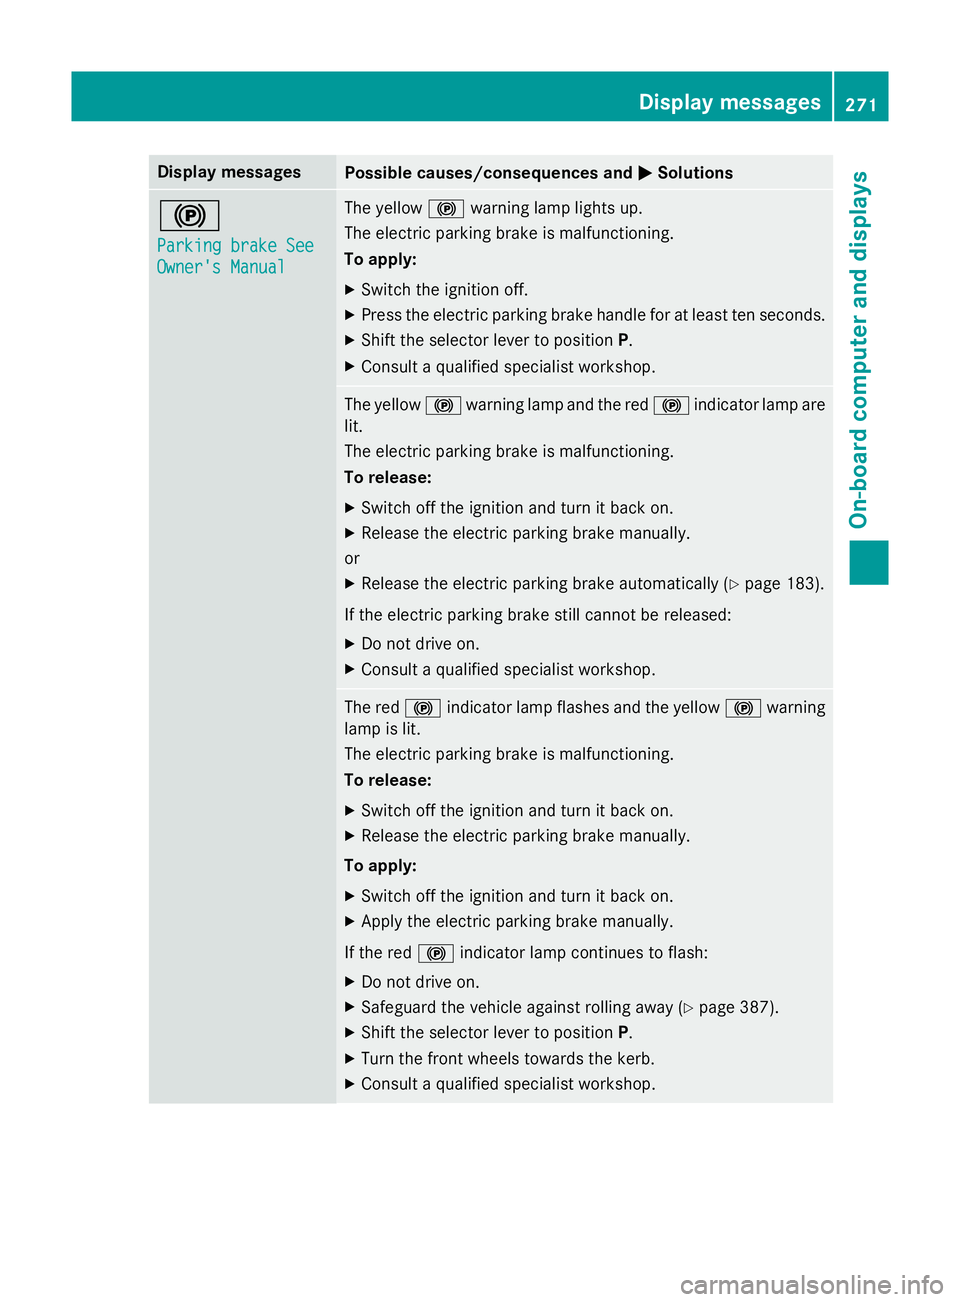
Display messages
Possible causes/consequences and
M
MSolutions !
Parking brake See Parking brake See
Owner's Manual Owner's Manual The yellow
!warning lamp lights up.
The electric parking brake is malfunctioning.
To apply:
X Switch the ignition off.
X Press the electric parking brake handle for at least ten seconds.
X Shift the selector lever to position P.
X Consult a qualified specialist workshop. The yellow
!warning lamp and the red !indicator lamp are
lit.
The electric parking brake is malfunctioning.
To release:
X Switch off the ignition and turn it back on.
X Release the electric parking brake manually.
or X Release the electric parking brake automatically (Y page 183).
If the electric parking brake still cannot be released: X Do not drive on.
X Consult a qualified specialist workshop. The red
!indicator lamp flashes and the yellow !warning
lamp is lit.
The electric parking brake is malfunctioning.
To release:
X Switch off the ignition and turn it back on.
X Release the electric parking brake manually.
To apply:
X Switch off the ignition and turn it back on.
X Apply the electric parking brake manually.
If the red !indicator lamp continues to flash:
X Do not drive on.
X Safeguard the vehicle against rolling away (Y page 387).
X Shift the selector lever to position P.
X Turn the front wheels towards the kerb.
X Consult a qualified specialist workshop. Display
messages
271On-board computer and displays Z