Page 271 of 298

X
Select Language
Language using the00630064 but-
tons and press the 008Bbutton to confirm.
The list of languages appears. A 0036dot
indicates the current setting.
X Select the language using the 00630064
buttons and press the 008Bbutton to confirm.
The system activates the corresponding
language. Switching the display design
X Select Vehicle
Vehicle using the
006300640059 buttons on the
remote control and press the 008Bbutton to
confirm.
X Select System Settings
System Settings using the0064
00590065 buttons on the remote control
and press the 008Bbutton to confirm.
You see the System Settings
System Settings menu on
the selected rear screen.
X Select Display
Display using the 00630064 but-
tons on the remote control and press the
008B button to confirm.
X Select Day Mode
Day Mode, Night Mode
Night Mode orAuto‐
Auto‐
matic
matic using the 00630064 buttons and
press the 008Bbutton to confirm.
The dot indicates the current setting. Design Explanation
Day Mode
Day Mode The display is set per-
manently to day
design.
Night Mode Night Mode The display is set per-
manently to night
design.
Automatic Automatic The display design
changes depending on
the vehicle instrument
cluster illumination.
Setting the brightness
X Select Vehicle Vehicle using the
006300640059 buttons on the remote control and press the
008Bbutton to
confirm.
X Select System Settings
System Settings using the0064
00590065 buttons on the remote control
and press the 008Bbutton to confirm.
You see the System Settings
System Settings menu on
the selected rear screen.
X Select Display
Display using the 00630064 but-
tons on the remote control and press the
008B button to confirm.
X Select Brightness
Brightness using the00630064
buttons and press the 008Bbutton to confirm.
A scale appears.
X Adjust the brightness using the 00630064
buttons and press the 008Bbutton to confirm.
The brightness bar moves up or down. The picture becomes lighter or darker in
accordance with the scale. Showing/hiding the picture
X Select Vehicle Vehicle using the
006300640059 buttons on the
remote control and press the 008Bbutton to
confirm.
X Press button 0064on the remote control.
A menu appears.
X Select Display Off
Display Off using the
006300640059 buttons and press
the 008Bbutton to confirm.
X To display the picture: press the008Bbut-
ton. Adjusting sound settings
You can select the sound settings in the radio, audio CD/audio DVD/MP3, video DVD and
AUX modes.
X Select a medium (e.g. audio CD mode)
(Y page 274).
X To show the menu: press the 0064button
on the remote control. System settings
269Rear Seat Entertainment System Z
Page 279 of 298

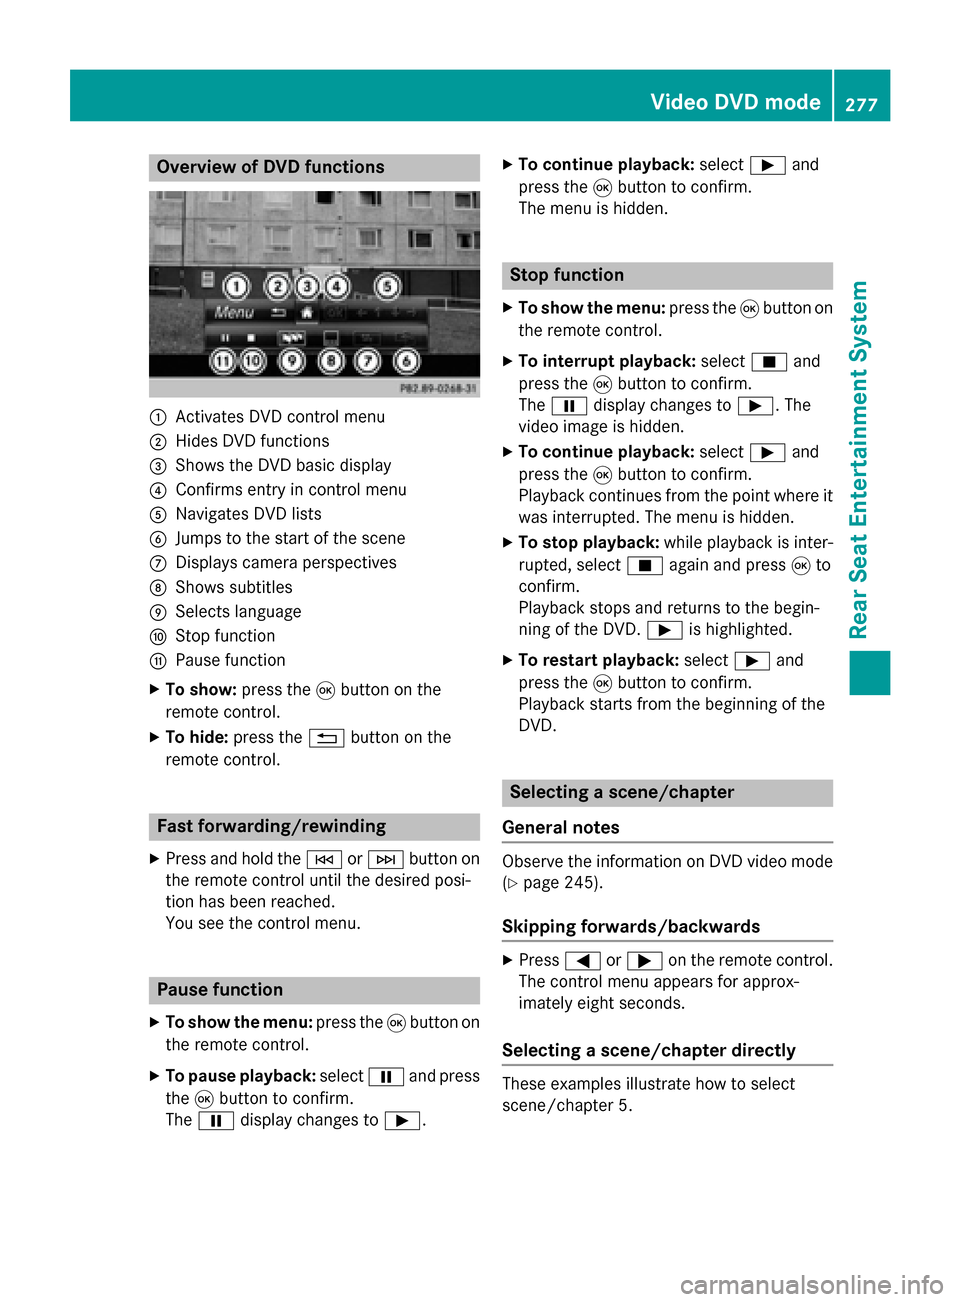
Overview of DVD functions
0043
Activates DVD control menu
0044 Hides DVD functions
0087 Shows the DVD basic display
0085 Confirms entry in control menu
0083 Navigates DVD lists
0084 Jumps to the start of the scene
006B Displays camera perspectives
006C Shows subtitles
006D Selects language
006E Stop function
006F Pause function
X To show: press the008Bbutton on the
remote control.
X To hide: press the 0038button on the
remote control. Fast forwarding/rewinding
X Press and hold the 0048or0049 button on
the remote control until the desired posi-
tion has been reached.
You see the control menu. Pause function
X To show the menu: press the008Bbutton on
the remote control.
X To pause playback: select00CFand press
the 008Bbutton to confirm.
The 00CF display changes to 00D0.X
To continue playback: select00D0and
press the 008Bbutton to confirm.
The menu is hidden. Stop function
X To show the menu: press the008Bbutton on
the remote control.
X To interrupt playback: select00DBand
press the 008Bbutton to confirm.
The 00CF display changes to 00D0. The
video image is hidden.
X To continue playback: select00D0and
press the 008Bbutton to confirm.
Playback continues from the point where it was interrupted. The menu is hidden.
X To stop playback: while playback is inter-
rupted, select 00DBagain and press 008Bto
confirm.
Playback stops and returns to the begin-
ning of the DVD. 00D0is highlighted.
X To restart playback: select00D0and
press the 008Bbutton to confirm.
Playback starts from the beginning of the
DVD. Selecting a scene/chapter
General notes Observe the information on DVD video mode
(Y
page 245).
Skipping forwards/backwards X
Press 0059or0065 on the remote control.
The control menu appears for approx-
imately eight seconds.
Selecting a scene/chapter directly These examples illustrate how to select
scene/chapter 5. Video DVD mode
277Rear Seat Entertainment System Z
Page 282 of 298

X
Select an action using the
006300650064 buttons on the
remote control and press the 008Bbutton to
execute it.
A menu appears and the first entry, Select Select,
is highlighted.
X Press the 008Bbutton. AUX mode
General notes
You can connect an external video source in
the rear compartment.
Depending on the vehicle model and equip-
ment level, the AUX jacks are found:
R in the stowage box between the rear seats
or
R in the rear-compartment armrest
(Y page 264).
Please see the corresponding operating
instructions for information on how to oper-
ate the external video source.
For further details about external video sour- ces, please consult an authorized Mercedes-
Benz Center. Connecting AUX equipment
X Insert the audio plugs for the left and right
signals into the corresponding Land R
jacks.
X Insert the video plug into the Vjack. Activating AUX mode
X Select AUX AUXusing the 006300590065 but-
tons on the remote control and press the
008B button to confirm.
The AUX source is switched on once the
AUX device is active. 280
AUX modeRear Seat Entertainment System
Page 293 of 298

You can also see the time stamp for the weather data on map scales of 50 miles and smaller.
The weather map shows wind directions and wind speeds.
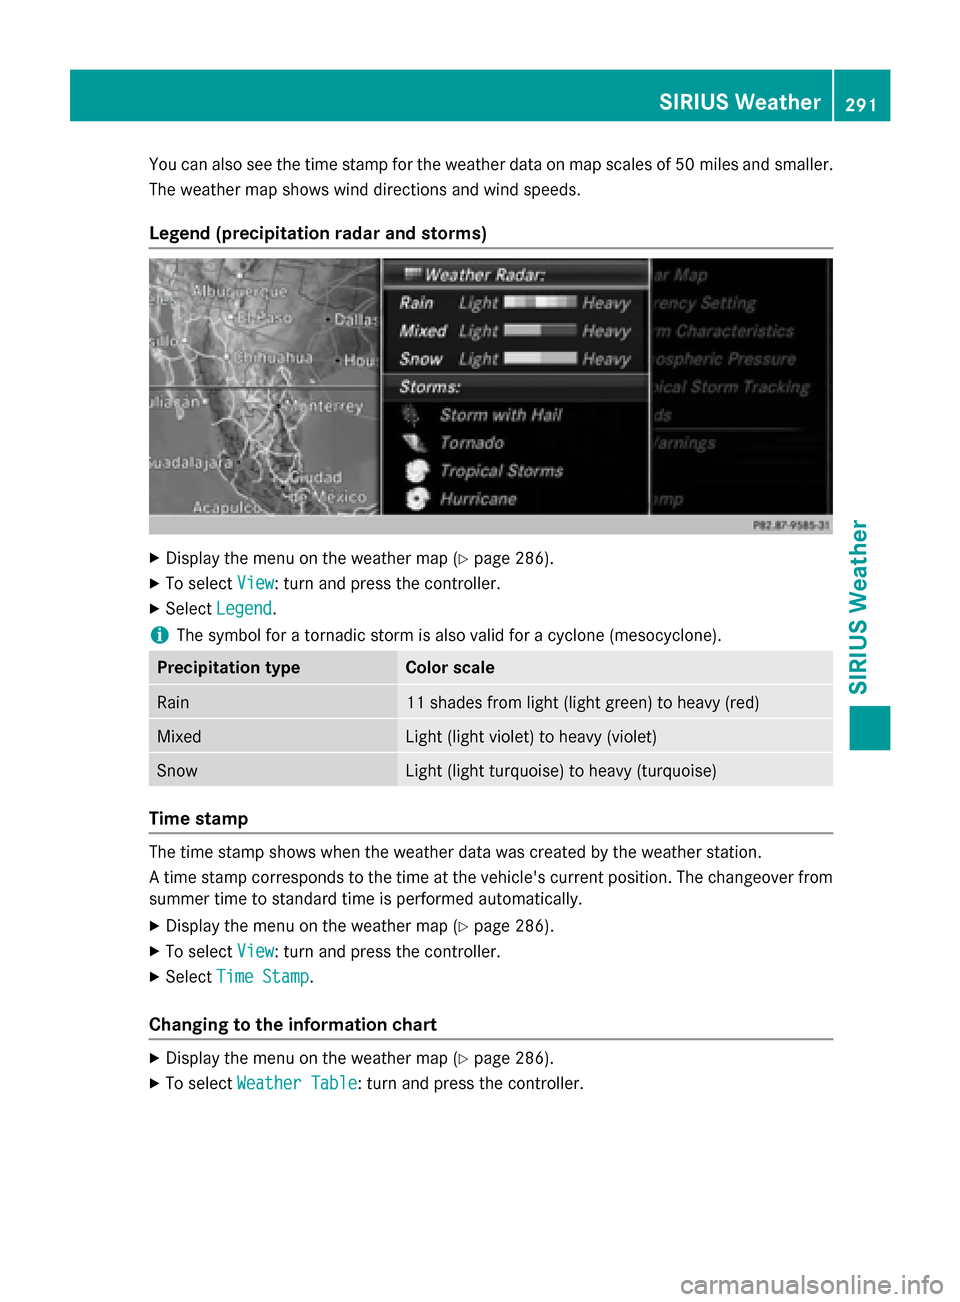
Legend (precipitation radar and storms) X
Display the menu on the weather map (Y page 286).
X To select View
View : turn and press the controller.
X Select Legend
Legend.
i The symbol for a tornadic storm is also valid for a cyclone (mesocyclone). Precipitation type Color scale
Rain 11 shades from light (light green) to heavy (red)
Mixed Light (light violet) to heavy (violet)
Snow Light (light turquoise) to heavy (turquoise)
Time stamp
The time stamp shows when the weather data was created by the weather station.
A time stamp corresponds to the time at the vehicle's current position. The changeover from
summer time to standard time is performed automatically.
X Display the menu on the weather map (Y page 286).
X To select View
View : turn and press the controller.
X Select Time Stamp Time Stamp.
Changing to the information chart X
Display the menu on the weather map (Y page 286).
X To select Weather Table
Weather Table: turn and press the controller. SIRIUS Weather
291SIRIUS Weather
Page 294 of 298

Storm Watch Box
Storm watch areas for which there are storm advisories are displayed as red areas on the
weather map.
To activate/deactivate the display of areas in red:
X To call up the menu from the weather map display: press the controller.
X To select View
View: turn and press the controller.
The list of display levels appears.
X Select Severe Weather Warnings
Severe Weather Warnings.
X Select Show Symbols for Storm Areas On Map Show Symbols for Storm Areas On Map.
Depending on the previous setting, activate 0073or deactivate 0053the display of areas in red.
Activating/deactivating the automatic display of warning popups:
X Select Show Automatic Storm Watch Popups
Show Automatic Storm Watch Popups.
Depending on the previous setting, activate 0073or deactivate 0053the automatic display of
warning popups.
Setting the radius for the popups:
X Select 5 miles
5 miles (5 km5 km), 50 miles
50 miles (50 km50 km) or 200 miles
200 miles (200 km200 km).
Storm Guide Displaying the Storm Guide:
X Display the menu on the weather map
(Y page 286).
X To select Guide
Guide: turn and press the con-
troller.
A menu appears. The current storm is high- lighted. There is information about the
storm in the status bar. 292
SIRIUS WeatherSIRIUS Weather
Page 295 of 298
X
To select Next
Next: turn and press the control-
ler.
The next storm is marked.
X Select Previous
Previous.
The previous storm is highlighted.
Showing storm details:
X Select Details Details.
You see detailed information about the
selected storm. SIRIUS Weather
293SIRIUS Weather