2015 MERCEDES-BENZ M-Class change time
[x] Cancel search: change timePage 384 of 466

Useful information
i This Operator's Manual describes all
models and all standard and optional equip- ment of your vehicle available at the time of
publication of the Operator's Manual.
Country-specific differences are possible.
Please note that your vehicle may not be
equipped with all features described. This
also applies to safety-related systems and
functions.
i Read the information on qualified special-
ist workshops (Y page 29). Where will I find...?
Vehicle tool kit
General notes The vehicle tool kit can be found in the stow-
age well under the cargo compartment floor.
i Apart from certain country-specific varia-
tions, the vehicles are not equipped with a
tire-change tool kit. Some tools for chang-
ing a wheel are specific to the vehicle. For
more information on which tools are
required to perform a wheel change on your vehicle, consult a qualified specialist work-
shop.
Tools required for changing a wheel may
include, for example:
R Jack
R Wheel chock
R Lug wrench
R Ratchet wrench
R Alignment bolt Vehicles with a TIREFIT kit Vehicle tool kit (example)
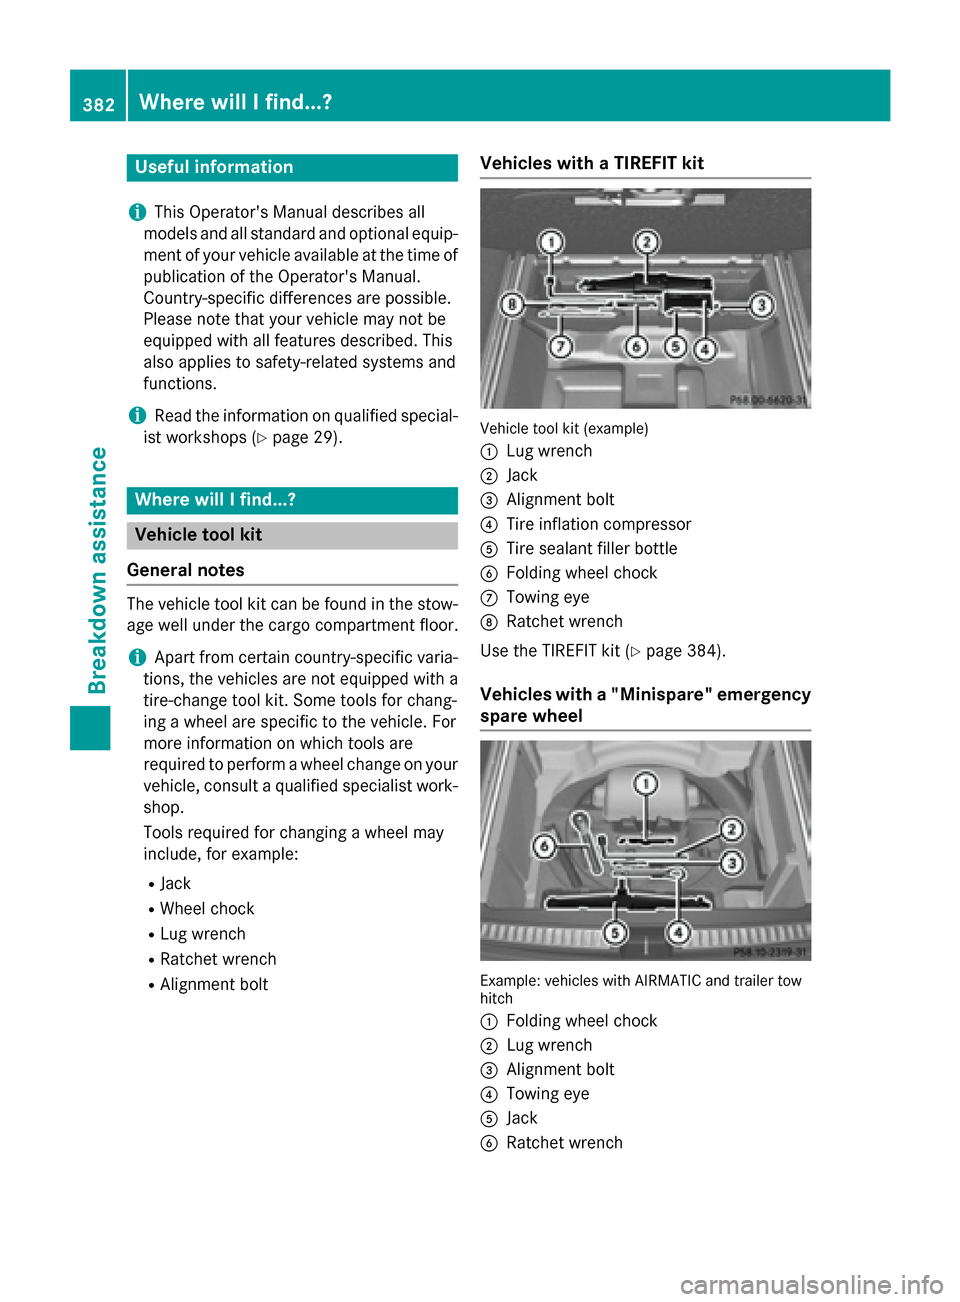
0043
Lug wrench
0044 Jack
0087 Alignment bolt
0085 Tire inflation compressor
0083 Tire sealant filler bottle
0084 Folding wheel chock
006B Towing eye
006C Ratchet wrench
Use the TIREFIT kit (Y page 384).
Vehicles with a "Minispare" emergency
spare wheel Example: vehicles with AIRMATIC and trailer tow
hitch
0043
Folding wheel chock
0044 Lug wrench
0087 Alignment bolt
0085 Towing eye
0083 Jack
0084 Ratchet wrench 382
Where will I find...?Breakdown assistance
Page 387 of 466

inhale TIREFIT fumes. Keep tire sealant away
from children. There is a risk of injury.
If you come into contact with the tire sealant, observe the following:
R Rinse off the tire sealant from your skin
immediately with water.
R If the tire sealant comes into contact with
your eyes, immediately rinse them thor-
oughly with clean water.
R If tire sealant is swallowed, immediately
rinse your mouth out thoroughly and drink
plenty of water. Do not induce vomiting,
and seek medical attention immediately.
R Immediately change out of clothing which
has come into contact with tire sealant.
R If an allergic reaction occurs, seek medical
attention immediately.
! Do not operate the tire inflation compres-
sor for longer than eight minutes at a time
without a break. It may otherwise overheat.
The tire inflation compressor can be oper-
ated again once it has cooled down.
Comply with the manufacturer’s safety
instructions on the sticker on the tire inflation
compressor.
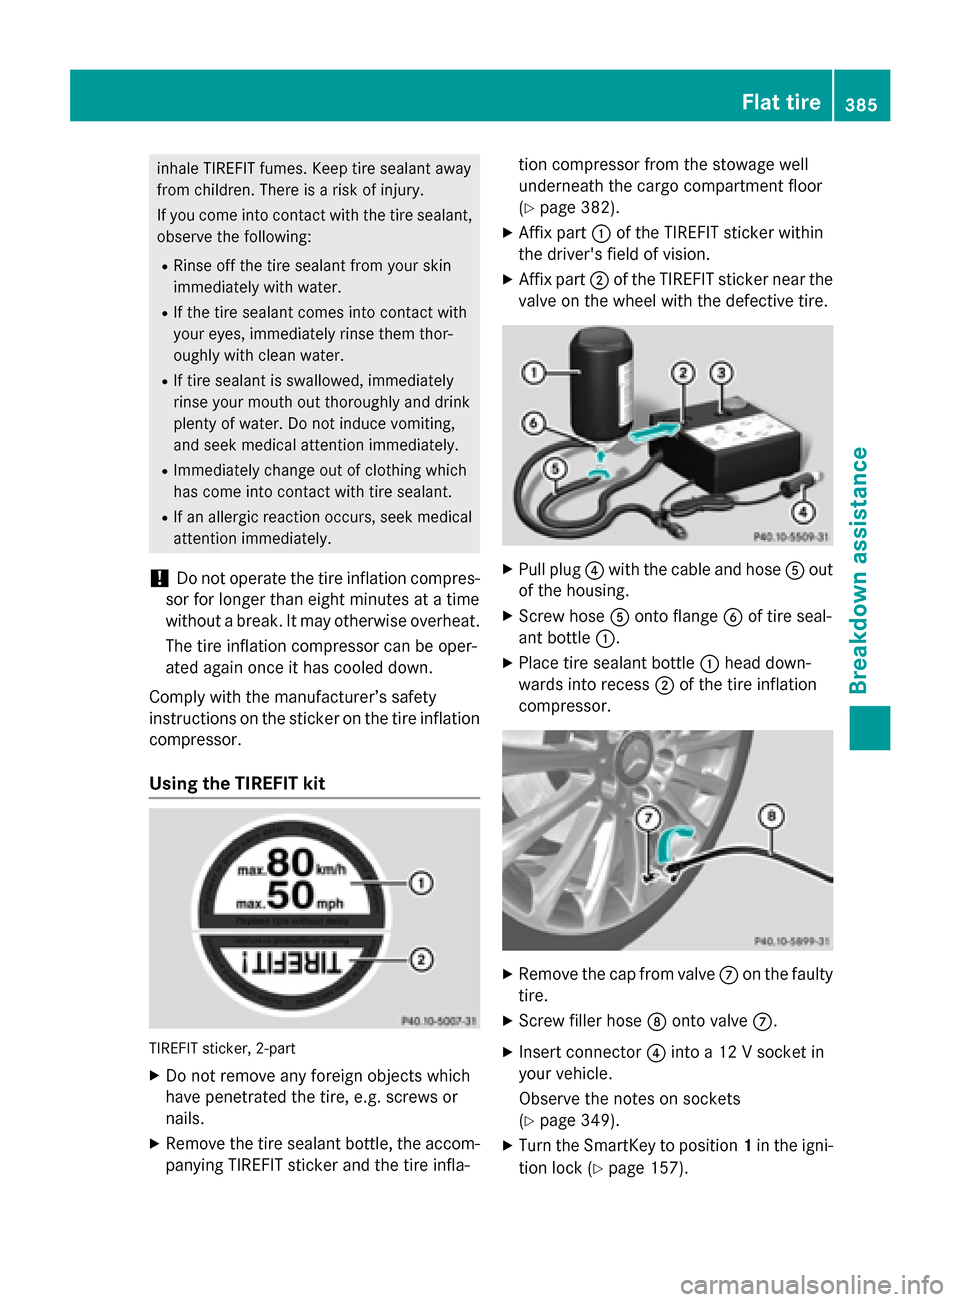
Using the TIREFIT kit TIREFIT sticker, 2-part
X Do not remove any foreign objects which
have penetrated the tire, e.g. screws or
nails.
X Remove the tire sealant bottle, the accom-
panying TIREFIT sticker and the tire infla- tion compressor from the stowage well
underneath the cargo compartment floor
(Y
page 382).
X Affix part 0043of the TIREFIT sticker within
the driver's field of vision.
X Affix part 0044of the TIREFIT sticker near the
valve on the wheel with the defective tire. X
Pull plug 0085with the cable and hose 0083out
of the housing.
X Screw hose 0083onto flange 0084of tire seal-
ant bottle 0043.
X Place tire sealant bottle 0043head down-
wards into recess 0044of the tire inflation
compressor. X
Remove the cap from valve 006Bon the faulty
tire.
X Screw filler hose 006Conto valve 006B.
X Insert connector 0085into a 12 V socket in
your vehicle.
Observe the notes on sockets
(Y page 349).
X Turn the SmartKey to position 1in the igni-
tion lock (Y page 157). Flat tire
385Breakdown assistance Z
Page 409 of 466

when adjusting the tire pressure
(Y
page 404).
i The actual values for tires are vehicle-
specific and may deviate from the values in
the illustration. Checking the tire pressures
Important safety notes Observe the notes on tire pressure
(Y
page 404).
Information on air pressure for the tires on
your vehicle can be found:
R on the vehicle's Tire and Loading Informa-
tion placard on the B-pillar (Y page 412)
R on the tire pressure label on the fuel filler
flap (Y page 179)
R in the "Tire pressure" section
R under "Tire pressure" (Y page 404)
Checking tire pressures manually To determine and set the correct tire pres-
sure, proceed as follows:
X Remove the valve cap of the tire that is to
be checked.
X Press the tire pressure gauge securely onto
the valve.
X Read the tire pressure and compare it with
the recommended value on the Tire and
Loading Information placard (Y page 404).
X If the tire pressure is too low, increase it to
the recommended value.
X If the tire pressure is too high, release air by
pressing down the metal pin in the valve.
Use the tip of a pen, for example. Then,
check the tire pressure again using the tire
pressure gauge.
X Screw the valve cap onto the valve.
X Repeat these steps for the other tires. Tire pressure loss warning system
General notes While the vehicle is in motion, the tire pres-
sure loss warning system monitors the set
tire pressure using the rotational speed of the wheels. This enables the system to detect
significant pressure loss in a tire. If the speed
of rotation of a wheel changes as a result of a loss of pressure, a corresponding warning
message will appear in the multifunction dis- play.
You can recognize the tire pressure loss warn-
ing by the Run Flat Indicator Active Run Flat Indicator Active
Press 'OK' to Restart
Press 'OK' to Restart message which
appears in the Service
Servicemenu of the multi-
function display. Information on the message
display can be found in the "Restarting the tire
pressure loss warning system" section
(Y page 408).
Important safety notes The tire pressure warning system does not
warn you of an incorrectly set tire pressure.
Observe the notes on the recommended tire
pressure (Y page 404).
The tire pressure loss warning does not
replace the need to regularly check the tire
pressure. An even loss of pressure on several tires at the same time cannot be detected by
the tire pressure loss warning system.
The tire pressure monitor is not able to warn
you of a sudden loss of pressure, e.g. if the
tire is penetrated by a foreign object. In the
event of a sudden loss of pressure, bring the
vehicle to a halt by braking carefully. Avoid
abrupt steering maneuvers.
The function of the tire pressure loss warning system is limited or delayed if:
R snow chains are mounted on your vehicle's
tires.
R road conditions are wintry.
R you are driving on sand or gravel. Tire pressure
407Wheels and tires Z
Page 413 of 466

too low and must be corrected at the next
opportunity.
R If the Check
Check Tires
Tiresmessage appears in the
multifunction display, the tire pressure in
one or more tires has dropped significantly
and the tires must be checked.
R If the Warning Tire Malfunction Warning Tire Malfunction
appears in the multifunction display, the
tire pressure in one or more tires has drop- ped suddenly and the tires must be
checked.
i If the wheel positions on the vehicle are
rotated, the tire pressures may be dis-
played for the wrong positions for a short
time. This is rectified after a few minutes of driving, and the tire pressures are displayedfor the correct positions.
Restarting the tire pressure monitor When you restart the tire pressure monitor, all
existing warning messages are deleted and
the warning lamps go out. The monitor uses
the currently set tire pressures as the refer-
ence values for monitoring. In most cases, the
tire pressure monitor will automatically
detect the new reference values after you
have changed the tire pressure. However, you
can also define reference values manually as described here. The tire pressure monitor
then monitors the new tire pressure values.
X Set the tire pressure to the value recom-
mended for the corresponding driving sit-
uation on the Tire and Loading Information
placard on the driver's side
B-pillar (Y page 404).
Additional tire pressure values for different loads can also be found on the tire pressure
table on the inside of the fuel filler flap
(Y page 404).
X Make sure that the tire pressure is correct
on all four wheels.
X Make sure that the SmartKey is in position
2 in the ignition lock.
X Press the 0059or0065 button on the steer-
ing wheel to select the Service
Service menu. X
Press the 0063or0064 button to select
Tire Pressure Tire Pressure.
X Press the 0076button.
The multifunction display shows the cur-
rent tire pressure for the individual tires or
the Tire Tire pressure
pressure will
willbe
bedisplayed
displayed
after driving a few minutes
after driving a few minutes mes-
sage.
X Press the 0064button.
The Use Current Pressures as New
Use Current Pressures as New
Reference Values
Reference Values message appears in
the multifunction display.
If you wish to confirm the restart: X Press the 0076button.
The Tire Press. Monitor Restarted
Tire Press. Monitor Restarted
message appears in the multifunction dis-
play.
After driving for a few minutes, the system
checks whether the current tire pressures
are within the specified range. The new tire
pressures are then accepted as reference
values and monitored.
If you wish to cancel the restart:
X Press the 0038button.
The tire pressure values stored at the last
restart will continue to be monitored.
Radio type approval for the tire pres-
sure monitor Country Radio type approval number
USA FCC ID: MRXMW2433A
FCC ID: MRXGG4
FCC ID: MRXMC34MA4
Canada IC: 2546A-MW2433A
IC: 2546A-GG4
IC: 2546A-MC34MA4 Tire pressure
411Wheels and tires Z
Page 425 of 466

Treadwear indicators
Narrow bars (tread wear bars) that are dis-
tributed over the tire tread. If the tire tread is level with the bars, the wear limit of 00CDin
(1.6 mm) has been reached.
Occupant distribution
The distribution of occupants in a vehicle at
their designated seating positions.
Total load limit
Rated cargo and luggage load plus
68 kilograms (150 lb) multiplied by the num-
ber of seats in the vehicle. Changing a wheel
Flat tire
You can find information on what to do in the
event of a flat tire in the "Breakdown assis-
tance" section (Y page 383). Information on
driving with MOExtended tires in the event of
a flat tire can be found under "MOExtended
tires (tires with run-flat characteristics"
(Y page 383).
The "Breakdown assistance" section
(Y page 383) contains information and notes
on how to deal with a flat tire. Information on
driving with MOExtended tires in the event of
a flat tire can be found under "MOExtended
tires (tires with run-flat characteristics"
(Y page 383).
Vehicles with an emergency spare wheel: in the event of a flat tire, mount the emer-
gency spare wheel according to the descrip-
tion under "Mounting a wheel" (Y page 424).Rotating the wheels
G
WARNING
Interchanging the front and rear wheels may
severely impair the driving characteristics if
the wheels or tires have different dimensions. The wheel brakes or suspension components may also be damaged. There is a risk of acci-
dent.
Rotate front and rear wheels only if the wheels and tires are of the same dimensions.
! On vehicles equipped with a tire pressure
monitor, electronic components are loca-
ted in the wheel.
Tire-mounting tools should not be used
near the valve. This could damage the elec- tronic components.
Only have tires changed at a qualified spe-cialist workshop.
Always observe the instructions and safety
notes in the "Mounting a wheel" section
(Y page 424).
The wear patterns on the front and rear tires
differ, depending on the operating conditions.
Rotate the wheels before a clear wear pattern has formed on the tires. Front tires typically
wear more on the shoulders and the rear tires in the center.
If your vehicle's tire configuration allows, you can rotate the wheels according to the inter-
vals in the tire manufacturer's warranty book
in your vehicle documents. If no warranty
book is available, the tires should be rotated
every 3,000 to 6,000 miles (5,000 to
10,000 km), or earlier if tire wear requires. Do
not change the direction of wheel rotation.
Clean the contact surfaces of the wheel and
the brake disc thoroughly every time a wheel
is rotated. Check the tire pressure and, if nec- essary, restart the tire pressure loss warning
system or the tire pressure monitor. Direction of rotation
Tires with a specified direction of rotation
have additional benefits, e.g. if there is a risk of hydroplaning. You will only gain these ben-
efits if the correct direction of rotation is
observed.
An arrow on the sidewall of the tire indicates
its correct direction of rotation. Changing a wheel
423Wheels and tires Z
Page 427 of 466

X
Fold both plates upwards 0043.
X Fold out lower plate 0044.
X Guide the lugs on the lower plate fully into
the openings in base plate 0087.Securing the vehicle on level ground
X On level ground: place chocks or other
suitable items under the front and rear of
the wheel that is diagonally opposite the
wheel you wish to change. Securing the vehicle on slight downhill gradients
X On light downhill gradients: place
chocks or other suitable items in front of
the wheels of the front and rear axle.
Raising the vehicle G
WARNING
If you do not position the jack correctly at the appropriate jacking point of the vehicle, the
jack could tip over with the vehicle raised.
There is a risk of injury.
Only position the jack at the appropriate jack-
ing point of the vehicle. The base of the jack must be positioned vertically, directly under
the jacking point of the vehicle.
! AMG vehicles with "Minispare" emer-
gency spare wheel: use the "Minispare"
emergency spare wheel only on the rear
axle . If you mount the "Minispare" emer-
gency spare wheel on the front axle, this
could result in damage to the brake system.
If a tire on the front axle is defective, an
intact wheel from the rear axle must first be
replaced with the "Minispare" emergency
spare wheel. The faulty wheel on the front
axle may only then be replaced by the
undamaged wheel from the rear axle.
Make sure to note the placard on the
"Minispare" emergency spare wheel.
! The jack is designed exclusively for jack-
ing up the vehicle at the jacking points.
Otherwise, your vehicle could be damaged.
Observe the following when raising the vehi-
cle:
R To raise the vehicle, only use the vehicle-
specific jack that has been tested and
approved by Mercedes-Benz. If used incor-
rectly, the jack could tip over with the vehi-
cle raised.
R The jack is designed only to raise and hold
the vehicle for a short time while a wheel
is being changed. It is not suited for per-
forming maintenance work under the vehi- cle.
R Avoid changing the wheel on uphill and
downhill slopes.
R Before raising the vehicle, secure it from
rolling away by applying the parking brake
and inserting wheel chocks. Do not disen-
gage the parking brake while the vehicle is
raised.
R The jack must be placed on a firm, flat and
non-slip surface. On a loose surface, a
large, flat, load-bearing underlay must be
used. On a slippery surface, a non-slip
underlay must be used, e.g. rubber mats. Changing a wheel
425Wheels and tires Z
Page 454 of 466

Filling capacities
Model Total capacity
ML 250 BlueTEC
4MATIC
ML 350 Blue-
TEC 4MATIC
7.3 US gal
(27.5 l) Engine oil
General notes !
Never use engine oil or an oil filter of a
specification other than is necessary to ful- fill the prescribed service intervals. Do not
change the engine oil or oil filter in order to
achieve longer replacement intervals than
those prescribed. You could otherwise
cause engine damage or damage to the
exhaust gas aftertreatment.
Follow the instructions in the service inter-
val display regarding the oil change. Other-
wise, you may damage the engine and the
exhaust gas aftertreatment.
When handling engine oil, observe the impor- tant safety notes on service products
(Y page 447).
The engine oils are matched to the perform-
ance of Mercedes-Benz engines and service
intervals. You should therefore only use
engine oils and oil filters that are approved for vehicles with maintenance systems.
For a list of approved engine oils and oil filters, consult an authorized Mercedes-Benz Cen-
ter. Or visit the website
http://bevo.mercedes-benz.co m.
The table shows which engine oils have been
approved for your vehicle. Missing values were not available at time of
going to print. Model Engine
model MB
Approval ML 350
276 229.5
ML 350 4MATIC
276 229.5
ML 400
276 229.5
ML 400 4MATIC
276 229.5
ML 550 4MATIC
278 229.5
ML 250 BlueTEC
4MATIC 651 228.51,
229.31,
229.51,
229.52 ML 350 Blue-
TEC 4MATIC
642 228.51,
229.31,
229.51,
229.52 AMG vehicles
157 229.5
i
MB approval is indicated on the oil con-
tainers.
Filling capacities The following values refer to an oil change
including the oil filter. Model Capacity
ML 350
ML 350 4MATIC
ML 400
ML 400 4MATIC
7.4 US qt (7.0
l) ML 550 4MATIC
9.0 US qt (8.5
l) ML 250 BlueTEC
4MATIC
6.9 US qt (6.5
l)452
Service products and filling capacitiesTechnical data