2015 MERCEDES-BENZ M-Class instrument cluster
[x] Cancel search: instrument clusterPage 159 of 466

G
WARNING
Unsuitable footwear can hinder correct usage of the pedals, e.g.:
R shoes with thick soles
R shoes with high heels
R slippers
There is a risk of an accident.
Wear suitable footwear to ensure correct
usage of the pedals. G
WARNING
If you switch off the ignition while driving,
safety-relevant functions are only available
with limitations, or not at all. This could affect, for example, the power steering and the brake
boosting effect. You will require considerably
more effort to steer and brake. There is a risk of an accident.
Do not switch off the ignition while driving. G
WARNING
If the parking brake has not been fully
released when driving, the parking brake can:
R overheat and cause a fire
R lose its hold function.
There is a risk of fire and an accident. Release
the parking brake fully before driving off.
! Warm up the engine quickly. Do not use
the engine's full performance until it has
reached operating temperature.
Only shift the automatic transmission to
the desired drive position when the vehicle
is stationary.
Where possible, avoid spinning the drive
wheels when pulling away on slippery
roads. You could otherwise damage the
drive train.
! AMG vehicles:
at low engine oil temper-
atures below 68 ‡ (+20 †), the maximum
engine speed is restricted in order to pro-
tect the engine. To protect the engine and
maintain smooth engine operation, avoid driving at full throttle when the engine is
cold. Key positions
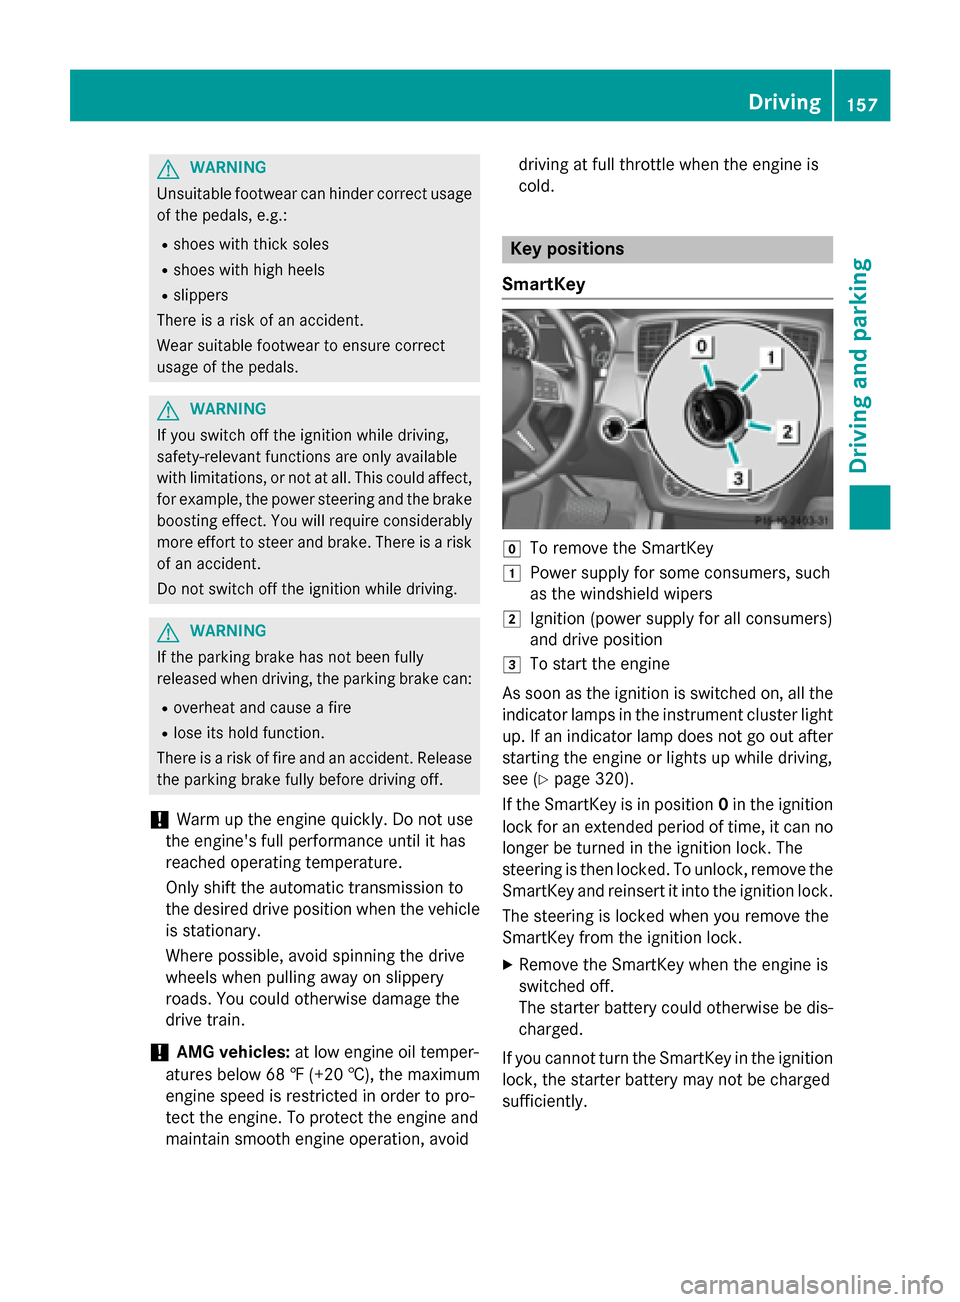
SmartKey 005A
To remove the SmartKey
0047 Power supply for some consumers, such
as the windshield wipers
0048 Ignition (power supply for all consumers)
and drive position
0049 To start the engine
As soon as the ignition is switched on, all the
indicator lamps in the instrument cluster light up. If an indicator lamp does not go out after
starting the engine or lights up while driving,
see (Y page 320).
If the SmartKey is in position 0in the ignition
lock for an extended period of time, it can no
longer be turned in the ignition lock. The
steering is then locked. To unlock, remove the SmartKey and reinsert it into the ignition lock.
The steering is locked when you remove the
SmartKey from the ignition lock.
X Remove the SmartKey when the engine is
switched off.
The starter battery could otherwise be dis-
charged.
If you cannot turn the SmartKey in the ignition
lock, the starter battery may not be charged
sufficiently. Driving
157Driving and parking Z
Page 161 of 466

As soon as the ignition is switched on, all the
indicator lamps in the instrument cluster light up. If an indicator lamp does not go out afterstarting the engine or lights up while driving,
see (Y page 320).
If Start/Stop button 0043has not yet been
pressed, this corresponds to the SmartKey
being removed from the ignition.
X To switch on the power supply: press
Start/Stop button 0043once.
The power supply is switched on. You can
now activate the windshield wipers, for
example.
i The power supply is switched off again if:
R the driver's door is opened and
R you press Start/Stop button 0043twice
when in this position.
X To switch on the ignition: press Start/
Stop button 0043twice.
The ignition is switched on.
i The ignition is switched off when:
R the driver's door is opened and
R you press Start/Stop button 0043once
when in this position. 0087
Start/Stop button USA
0085 Start/Stop button Canada
Removing the Start/Stop button
You can remove the Start/Stop button from
the ignition lock and start the vehicle as nor-
mal using the SmartKey.
It is only possible to switch between KEY-
LESS-GO mode and SmartKey operation
when the transmission is in position P.X
Remove Start/Stop button 0043from ignition
lock 0044.
i You do not have to remove the Start/Stop
button from the ignition lock when you
leave the vehicle. You should, however,
always take the SmartKey with you when
leaving the vehicle. As long as the Smart-
Key is in the vehicle:
R the vehicle can be started using the
Start/Stop button
R electrically powered equipment can be
operated. Starting the engine
Important safety notes G
WARNING
If children are left unsupervised in the vehicle, they could:
R open the doors, thus endangering other
people or road users.
R get out and disrupt traffic.
R operate the vehicle's equipment.
Additionally, children could set the vehicle in
motion if, for example, they:
R release the parking brake.
R shifting the automatic transmission out of
park position P
R Start the engine.
There is a risk of an accident and injury.
When leaving the vehicle, always take the
SmartKey with you and lock the vehicle. Never
leave children or animals unattended in the
vehicle. Always keep the SmartKey out of
reach of children. G
WARNING
Combustion engines emit poisonous exhaust
gases such as carbon monoxide. Inhaling
these exhaust gases leads to poisoning. There is a risk of fatal injury. Therefore never leave
the engine running in enclosed spaces with-
out sufficient ventilation. Driving
159Driving an d parking Z
Page 162 of 466

G
WARNING
Flammable materials introduced through
environmental influence or by animals can
ignite if in contact with the exhaust system or parts of the engine that heat up. There is a risk
of fire.
Carry out regular checks to make sure that
there are no flammable foreign materials in
the engine compartment or in the exhaust
system.
! Do not depress the accelerator when
starting the engine.
General notes i
Vehicles with a gasoline engine:
the
catalytic converter is preheated for up to
30 seconds after a cold start. The sound of the engine may change during this time.
Automatic transmission X
Shift the transmission to position P
(Y page 168).
The transmission position display in the
multifunction display shows
P (Y page 168).
i You can start the engine in transmission
position Pand N.
Starting procedure with the SmartKey X
To start a gasoline engine: turn the
SmartKey to position 3in the ignition lock
(Y page 157) and release it as soon as the
engine is running.
X To start a diesel engine: turn the Smart-
Key to position 2in the ignition lock
(Y page 157).
The 0028 preglow indicator lamp in the
instrument cluster lights up.
X When the 0028preglow indicator lamp
goes out, turn the SmartKey to position 3
(Y page 157) and release it as soon as the
engine is running. i
You can start the engine without preglow
if the engine is warm.
Using KEYLESS-GO to start the engine X
Depress the brake pedal and keep it
depressed.
X To start a gasoline engine: press the
Start/Stop button (Y page 158) once.
The engine starts.
X To start a diesel engine: press the Start/
Stop button once (Y page 158).
Preglow is activated and the engine starts.
i The Start/Stop button can be used to
start the vehicle without inserting the
SmartKey into the ignition lock. The Start/
Stop button must be inserted in the ignition
lock and the SmartKey must be in the vehi-
cle. This mode for starting the engine oper-
ates independently of the ECO start/stop
automatic engine start function. Pulling away
Automatic transmission G
WARNING
If the engine speed is above the idling speed
and you engage transmission position Dor R,
the vehicle could pull away suddenly. There is a risk of an accident.
When engaging transmission position Dor R,
always firmly depress the brake pedal and do not simultaneously accelerate.
X Depress the brake pedal and keep it
depressed.
X Shift the transmission to position Dor R
(Y page 168).
X Release the brake pedal.
X Carefully depress the accelerator pedal.
The electric parking brake (Y page 184) is
automatically released. 160
DrivingDriving and parking
Page 169 of 466

Problems with the engine
Problem
Possible causes/consequences and
0050
0050Solutions The engine does not
start. The starter motor
can be heard. R
There is a malfunction in the engine electronics.
R There is a malfunction in the fuel supply.
X Before attempting to start the engine again, turn the SmartKey
in the ignition back to position 0or press the Start/Stop button
repeatedly until all indicator lamps in the instrument cluster go out.
X Try to start the engine again (Y page 159). Avoid excessively
long and frequent attempts to start the engine as these will drain
the battery.
If the engine does not start after several attempts:
X Consult a qualified specialist workshop. The engine does not
start. You cannot hear
the starter motor. The on-board voltage is too low because the battery is too weak or
discharged.
X Jump-start the vehicle (Y page 391).
If the engine does not start despite attempts to jump-start it:
X Consult a qualified specialist workshop. The starter motor was exposed to a thermal load that was too high.
X Allow the starter motor to cool down for approximately two
minutes.
X Try to start the engine again.
If the engine still does not start:
X Consult a qualified specialist workshop. Vehicles with a gaso-
line engine:
The engine is not run-
ning smoothly and is
misfiring. There is a malfunction in the engine electronics or in a mechanical
component of the engine management system.
X Only depress the accelerator pedal slightly.
Otherwise, non-combusted fuel may get into the catalytic con-
verter and damage it.
X Have the cause rectified immediately at a qualified specialist
workshop. The coolant tempera-
ture gauge shows a
value above 248 ‡
(120 †). The coolant level is too low. The coolant is too hot and the engine
is no longer being cooled sufficiently.
X Stop as soon as possible and allow the engine and the coolant to
cool down.
X Check the coolant level (Y page 369). Observe the warning
notes as you do so and add coolant if necessary. Driving
167Driving and parking Z
Page 176 of 466

transmission automatically shifts up in
order to prevent engine damage.
X To shift down: pull on the left-hand steer-
ing wheel paddle shifter (Y page 172).
The automatic transmission shifts down to the next gear.
i If the engine exceeds the maximum
engine speed when shifting down, the auto- matic transmission protects against engine
damage by not shifting down.
i Automatic down shifting occurs when
coasting.
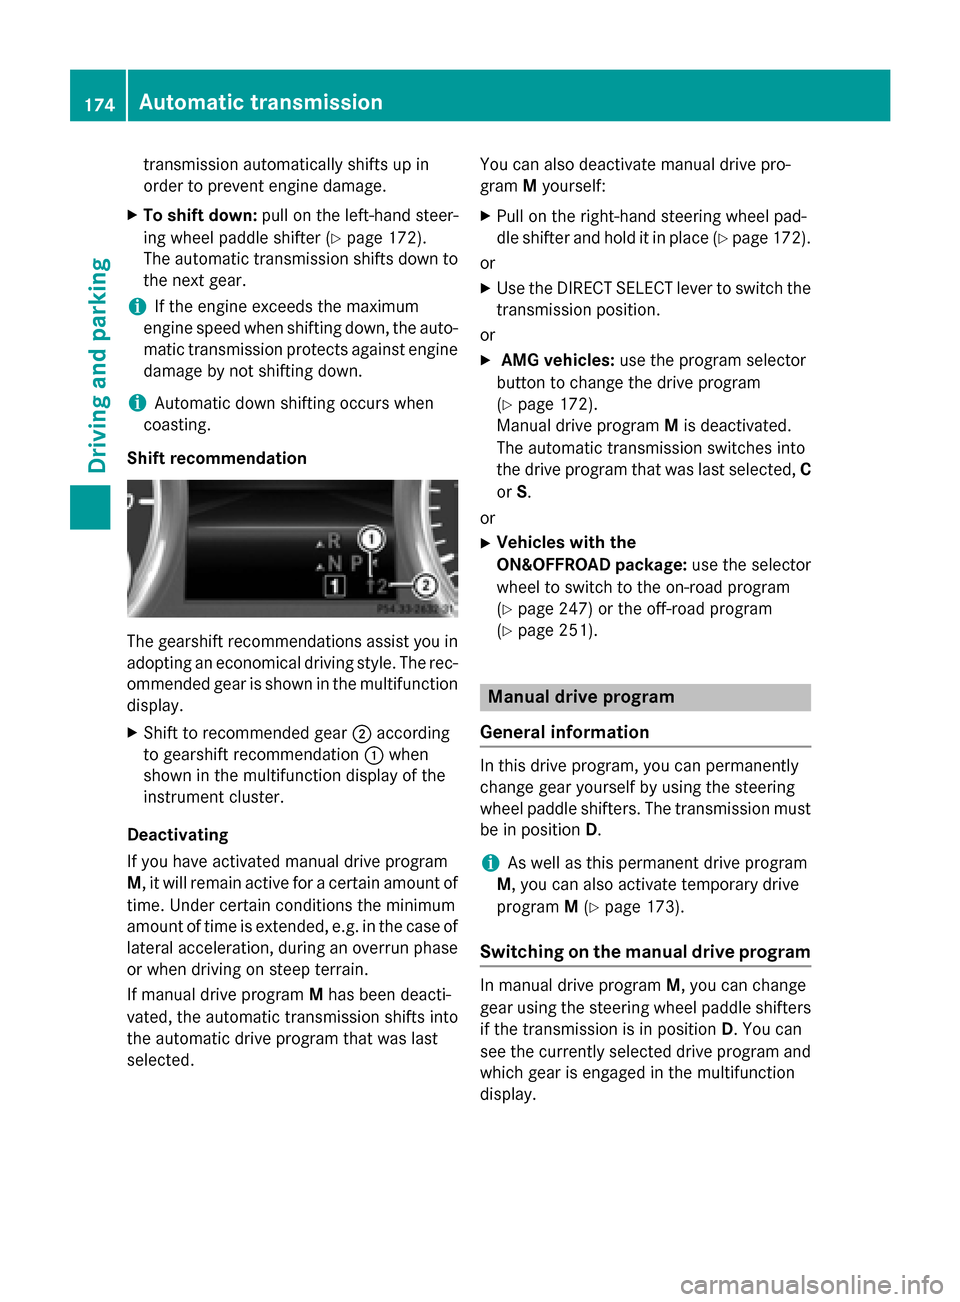
Shift recommendation The gearshift recommendations assist you in
adopting an economical driving style. The rec- ommended gear is shown in the multifunction
display.
X Shift to recommended gear 0044according
to gearshift recommendation 0043when
shown in the multifunction display of the
instrument cluster.
Deactivating
If you have activated manual drive program
M , it will remain active for a certain amount of
time. Under certain conditions the minimum
amount of time is extended, e.g. in the case of lateral acceleration, during an overrun phase
or when driving on steep terrain.
If manual drive program Mhas been deacti-
vated, the automatic transmission shifts into
the automatic drive program that was last
selected. You can also deactivate manual drive pro-
gram Myourself:
X Pull on the right-hand steering wheel pad-
dle shifter and hold it in place (Y page 172).
or X Use the DIRECT SELECT lever to switch the
transmission position.
or
X AMG vehicles: use the program selector
button to change the drive program
(Y page 172).
Manual drive program Mis deactivated.
The automatic transmission switches into
the drive program that was last selected, C
or S.
or
X Vehicles with the
ON&OFFROAD packag e:use the selector
wheel to switch to the on-road program
(Y page 247) or the off-road program
(Y page 251). Manual drive program
General information In this drive program, you can permanently
change gear yourself by using the steering
wheel paddle shifters. The transmission must
be in position D.
i As well as this permanent drive program
M, you can also activate temporary drive
program M(Y page 173).
Switching on the manual drive program In manual drive program
M, you can change
gear using the steering wheel paddle shifters
if the transmission is in position D. You can
see the currently selected drive program and
which gear is engaged in the multifunction
display. 174
Automatic transmissionDriving and pa
rking
Page 177 of 466

X
AMG vehicles: press the program selector
button (Y page 172) until Mappears in the
multifunction display.
X Vehicles with the ON&OFFROAD pack-
age: press the program selector button
(Y page 172).
The letter Mappears in the multifunction
display.
Shifting up (all vehicles except AMG
vehicles) X
If corresponding gearshift recommenda-
tion 0043appears in the multifunction display
on the instrument cluster, pull on the right- hand steering wheel paddle shifter
(Y page 172).
The automatic transmission shifts to rec-
ommended gear 0044.
Shifting up (AMG vehicles) !
In manual drive program
M, the automatic
transmission does not shift up automati-
cally even when the engine limiting speed
for the current gear is reached. When the
engine limiting speed is reached, the fuel
supply is cut to prevent the engine from
overrevving. Always make sure that the
engine speed does not reach the red area of
the tachometer. There is otherwise a risk of
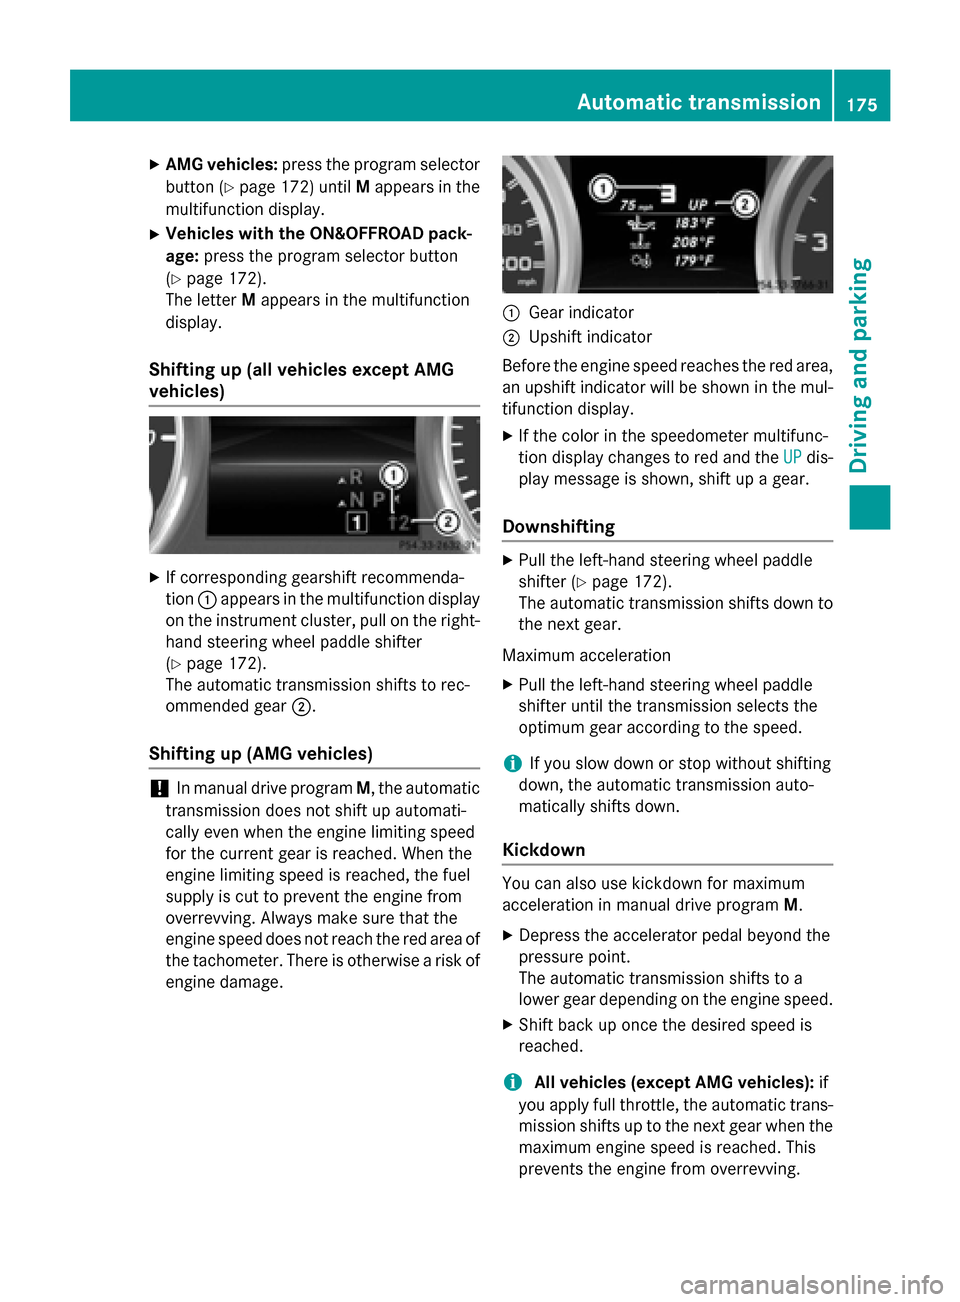
engine damage. 0043
Gear indicator
0044 Upshift indicator
Before the engine speed reaches the red area, an upshift indicator will be shown in the mul-
tifunction display.
X If the color in the speedometer multifunc-
tion display changes to red and the UP UPdis-
play message is shown, shift up a gear.
Downshifting X
Pull the left-hand steering wheel paddle
shifter (Y page 172).
The automatic transmission shifts down to
the next gear.
Maximum acceleration X Pull the left-hand steering wheel paddle
shifter until the transmission selects the
optimum gear according to the speed.
i If you slow down or stop without shifting
down, the automatic transmission auto-
matically shifts down.
Kickdown You can also use kickdown for maximum
acceleration in manual drive program
M.
X Depress the accelerator pedal beyond the
pressure point.
The automatic transmission shifts to a
lower gear depending on the engine speed.
X Shift back up once the desired speed is
reached.
i All vehicles (except AMG vehicles):
if
you apply full throttle, the automatic trans- mission shifts up to the next gear when the
maximum engine speed is reached. This
prevents the engine from overrevving. Automatic transmission
175Driving and parking Z
Page 180 of 466

If you or others come into contact with fuel,
observe the following:
R Wash away fuel from skin immediately
using soap and water.
R If fuel comes into contact with your eyes,
immediately rinse them thoroughly with
clean water. Seek medical assistance with- out delay.
R If fuel is swallowed, seek medical assis-
tance without delay. Do not induce vomit-
ing.
R Immediately change out of clothing which
has come into contact with fuel. G
WARNING
Electrostatic buildup can create sparks and
ignite fuel vapors. There is a risk of fire and
explosion.
Always touch the vehicle body before opening the fuel filler flap or touching the fuel pump
nozzle. Any existing electrostatic buildup is
thereby discharged. G
WARNING
Vehicles with a diesel engine:
If you mix diesel fuel with gasoline, the flash
point is lower than that of pure diesel fuel.
When the engine is running, exhaust system
components could overheat without being
noticed. There is a risk of fire.
Never refuel with gasoline. Never mix gasoline with diesel fuel.
! Do not use gasoline to refuel vehicles with
a diesel engine. Do not use diesel to refuel
vehicles with a gasoline engine. Do not
switch on the ignition if you accidentally
refuel with the wrong fuel. Otherwise, the
fuel will enter the fuel system. Even small
amounts of the wrong fuel could result in
damage to the fuel system and the engine. The repair costs are high. Notify a qualified
specialist workshop and have the fuel tank and fuel lines drained completely. !
Do not use diesel to refuel vehicles with a
gasoline engine. Do not switch on the igni-
tion if you accidentally refuel with the
wrong fuel. Otherwise, the fuel will enter
the fuel system. Even small amounts of the wrong fuel could result in damage to the
fuel system and the engine. Notify a quali-
fied specialist workshop and have the fuel
tank and fuel lines drained completely.
! Overfilling the fuel tank could damage the
fuel system.
! Take care not to spill any fuel on painted
surfaces. You could otherwise damage the
paintwork.
! Use a filter when refueling from a fuel can.
Otherwise, the fuel lines and/or injection
system could be blocked by particles from
the fuel can.
Do not get into the vehicle again during the
refueling process. Otherwise, electrostatic
charge could build up again.
If you overfill the fuel tank, fuel could spray
out when the fuel pump nozzle is removed.
i Flexible Fuel vehicles can be recognized
by the Ethanol up to E85 sticker on the
inside of the fuel filler flap.
For further information on fuel and fuel quality
(Y page 448). Refueling
General information Pay attention to the important safety notes
(Y
page 177).
The fuel filler flap is unlocked or locked auto-
matically when you open or close the vehicle
with the SmartKey or with KEYLESS-GO.
The position of the fuel filler cap is displayed
00B6 in the instrument cluster. The arrow
next to the filling pump indicates the side of
the vehicle. 178
RefuelingDriving and parking
Page 181 of 466

Opening the fuel filler flap
0043
To open the fuel filler flap
0044 To insert the fuel filler cap
0087 Fuel type to be used
0085 Tire pressure table
X Switch the engine off.
X Remove the SmartKey from the ignition
lock.
X KEYLESS-GO: open the driver’s door.
This corresponds to key position 0: "key
removed".
The driver’s door can be closed again.
X Press the fuel filler flap in the direction of
arrow 0043.
The fuel filler flap swings up.
X Turn the fuel filler flap counter-clockwise
and remove it.
X Insert the fuel filler cap into the holder
bracket on the inside of filler flap 0044.
X Completely insert the filler neck of the fuel
pump nozzle into the tank, hook in place
and refuel.
X Only fill the tank until the pump nozzle
switches off.
i Vehicles with a diesel engine: the filler
neck is designed for refueling at diesel fill-
ing pumps.
i Do not add any more fuel after the pump
stops filling for the first time. Otherwise,
fuel may leak out. Closing the fuel filler flap X
Replace the cap on the filler neck and turn
clockwise until it engages audibly.
X Close the fuel filler flap.
i Close the fuel filler flap before locking the
vehicle.
i If you are driving with the fuel filler cap
open, the 00B6reserve fuel warning lamp
flashes.
In addition, the 00B9Check Engine warning
lamp may light up (Y page 327).
A message appears in the multifunction
display (Y page 302).
For further information on warning and indi-
cator lamps in the instrument cluster, see
(Y page 327). Refueling
179Driving and parking Z