2015 MERCEDES-BENZ M-Class cruise control
[x] Cancel search: cruise controlPage 260 of 466

i
This also applies if you have activated
cruise control or DISTRONIC PLUS.
This will use the braking effect of the engine,
so that less braking will be required to main-
tain the speed. This relieves the load on the
brake system and prevents the brakes from
overheating and wearing too quickly. If you
need additional braking, depress the brake
pedal repeatedly rather than continuously.
Driving tips If the trailer swings from side to side:
X Do not accelerate.
X Do not counter-steer.
X Brake if necessary.
R Maintain a greater distance from the vehi-
cle in front than when driving without a
trailer.
R Avoid braking abruptly. If possible, brake
gently at first to allow the trailer to run on.
Then, increase the braking force rapidly.
R The values given for gradient-climbing
capabilities from a standstill refer to sea
level. When driving in mountainous areas,
note that the power output of the engine
and, consequently, the vehicle's gradient-
climbing capability, decreases with
increasing altitude. Installing the ball coupling
G
WARNING
If the ball coupling is not correctly installed
and secured, it can come loose during the
journey and endanger other road users. There is a risk of an accident and injury.
Always install and secure the ball coupling as
described. Before every journey, ensure that
the ball coupling is secured with the bolt and
the corresponding spring cotter. G
WARNING
If the ball coupling is not installed correctly or not secured with the bolt provided and the corresponding spring cotter, the trailer may
come loose. There is a risk of an accident.
Always install and secure the ball coupling as described. Before every journey, ensure that
the ball coupling is secured with the bolt and
the corresponding spring cotter. G
WARNING
If the ball coupling is not installed and secured
correctly the trailer may come loose. There is
a risk of an accident.
Install and secure the ball coupling as descri-
bed in the ball coupling installation instruc-
tions. Make sure that the ball coupling is
installed and secured correctly before every
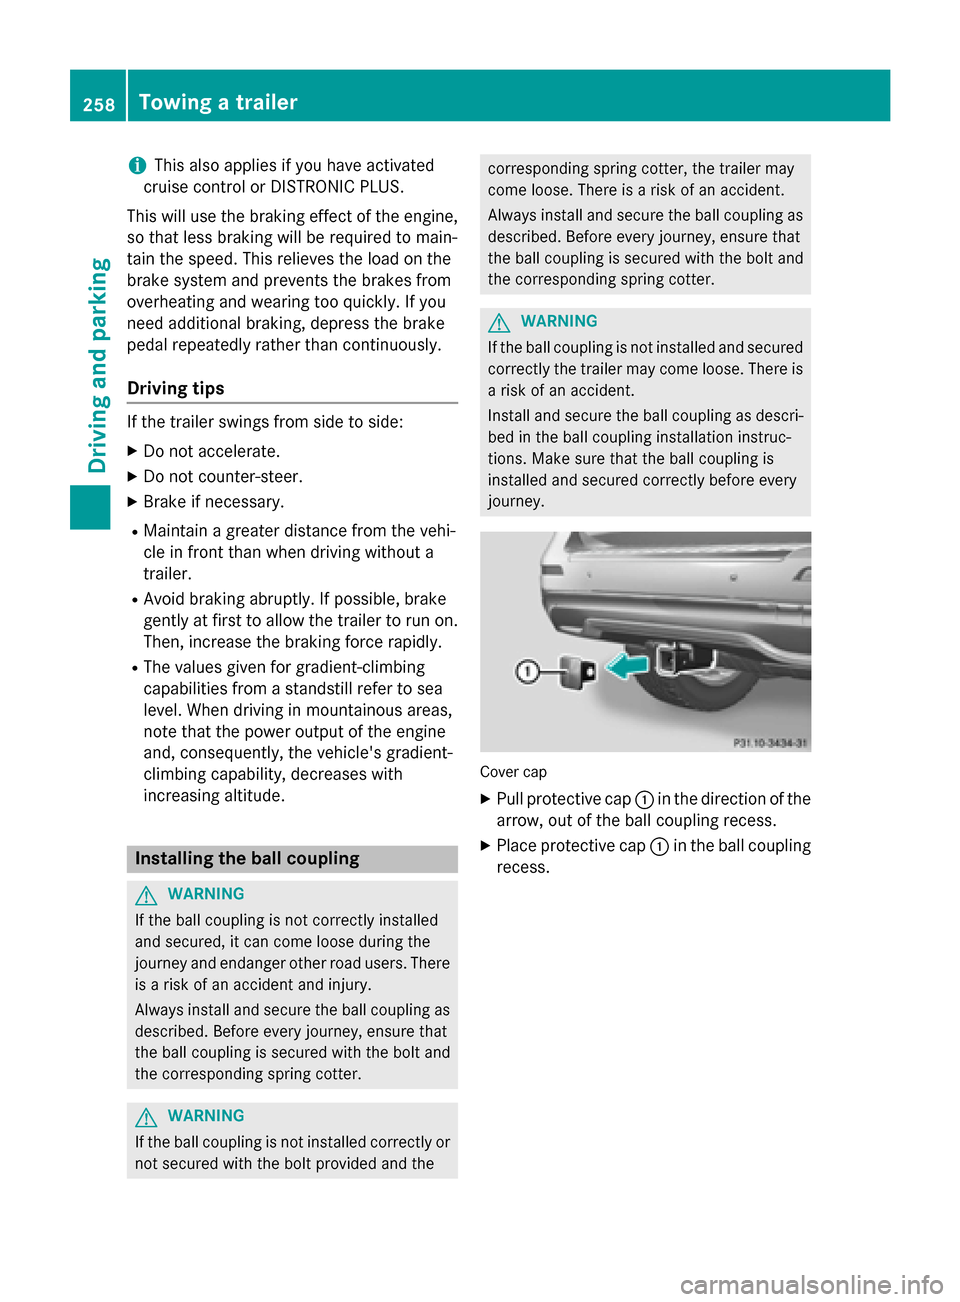
journey. Cover cap
X Pull protective cap 0043in the direction of the
arrow, out of the ball coupling recess.
X Place protective cap 0043in the ball coupling
recess. 258
Towing a trailerDriving and parking
Page 269 of 466

The coolant temperature gauge is in the
instrument cluster on the right-hand side
(Y page 35).
Under normal operating conditions and with
the specified coolant level, the coolant tem-
perature may rise to 248 ‡ (120 †). Tachometer
! Do not drive in the overrevving range, as
this could damage the engine.
The red band in the tachometer indicates the
engine's overrevving range.
The fuel supply is interrupted to protect the
engine when the red band is reached. Outside temperature display
You should pay special attention to road con-
ditions when temperatures are around freez-
ing point.
Bear in mind that the outside temperature
display indicates the temperature measured
and does not record the road temperature.
The outside temperature display is in the mul- tifunction display (Y page 268).
Changes in the outside temperature are dis-
played after a short delay. Speedometer with segments
The segments in the speedometer indicate
which speed range is available.
R Cruise control activated (Y page 195):
The segments light up from the stored
speed to the maximum speed.
R DISTRONIC PLUS activated (Y page 198):
One or two segments in the set speed
range light up.
R DISTRONIC PLUS detects a vehicle in front:
The segments between the speed of the
vehicle in front and the stored speed light
up. Operating the on-board computer
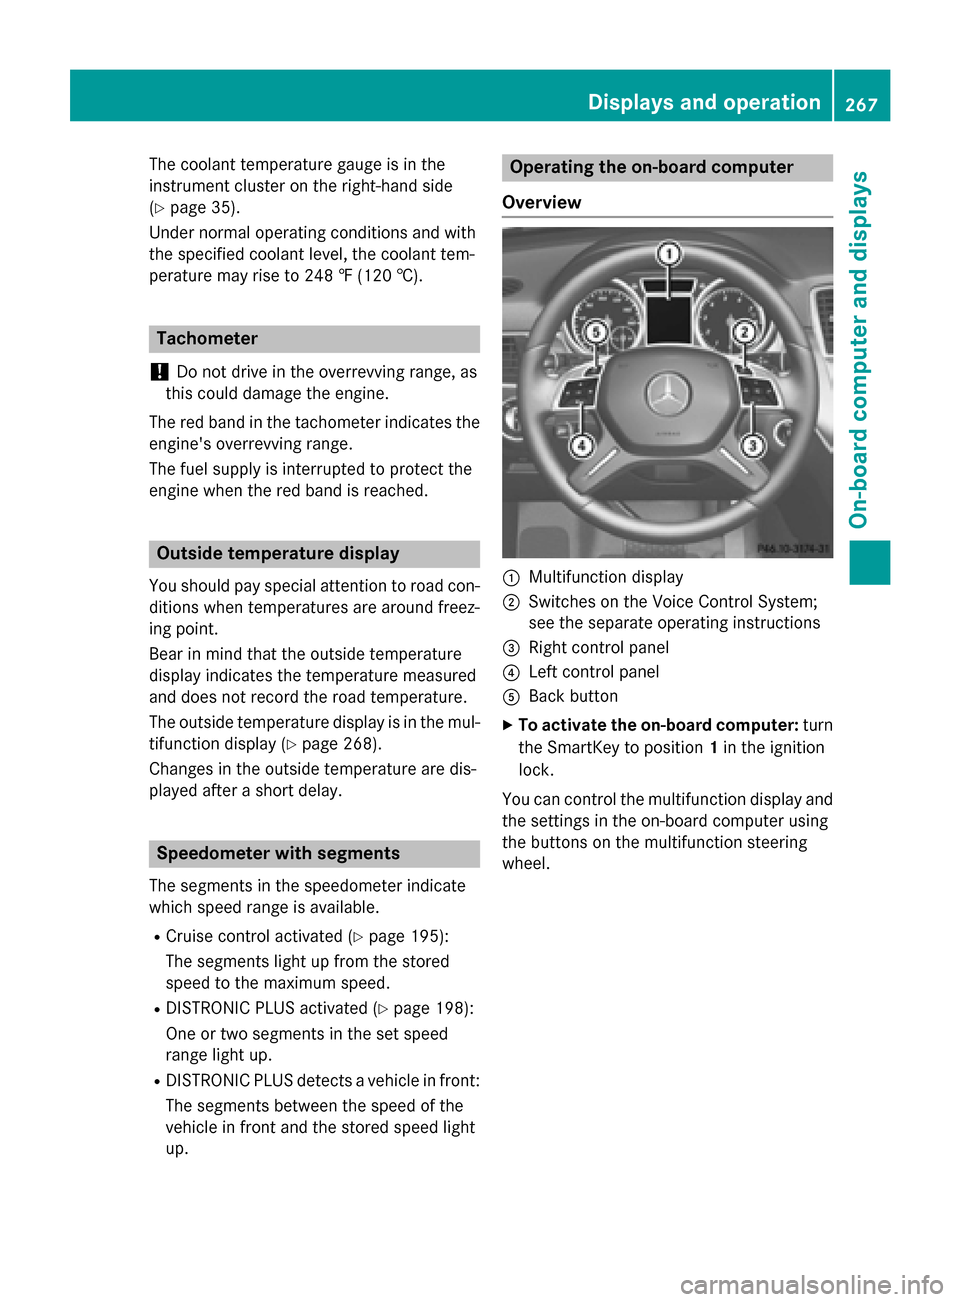
Overview 0043
Multifunction display
0044 Switches on the Voice Control System;
see the separate operating instructions
0087 Right control panel
0085 Left control panel
0083 Back button
X To activate the on-board computer: turn
the SmartKey to position 1in the ignition
lock.
You can control the multifunction display and
the settings in the on-board computer using
the buttons on the multifunction steering
wheel. Displays and operation
267On-board computer and displays Z
Page 271 of 466

0083
Drive program (Y page 168)
0084 Transmission position (Y page 168)
X To show menu bar 0085:press the 0059
or 0065 button on the steering wheel.
Menu bar 0085disappears after a few seconds.
Text field 0087shows the selected menu or
submenu as well as display messages.
i You can set the time using the audio sys-
tem or COMAND; see the separate operat-
ing instructions.
The following messages may appear in the
multifunction display:
0097 Gearshift recommendation, when
shifting manually (Y page 173)
0095005D0096 Active Parking Assist
(Ypage 220)
CRUISE
CRUISE Cruise control (Y
page 195)
LOW
LOW
RANGE RANGE LOW RANGE off-road gear
(Y
page 253)
00CE Adaptive Highbeam Assist
(Ypage 126)
00A7 ECO start/stop function
(Ypage 162)
00D9 HOLD function (Y page 210) Menus and submenus
Menu overview
Press the 0059or0065 button on the steer-
ing wheel to call up the menu bar and select a
menu.
Operating the on-board computer
(Y page 267).
Depending on the equipment installed in the
vehicle, you can call up the following menus:
R Trip Trip menu (Y page 269)
R Navi
Navi menu (navigation instructions)
(Y page 271)
R Audio
Audio menu (Y page 272)
R Tel
Tel menu (telephone) (Y page 273)R
DriveAssist
DriveAssist menu (assistance)
(Y page 275)
R Serv
Serv menu (Y page 276)
R Sett
Sett menu (settings) (Y page 277)
R ON&OFFROAD
ON&OFFROAD menu (Ypage 281)
R AMG
AMG menu in AMG vehicles (Y page 281) Trip menu
Standard display X
Press and hold the 0038button on the
steering wheel until the Trip
Tripmenu with
trip odometer 0043and odometer 0044is
shown.
Trip computer "From Start" or "From
Reset" Example: trip computer "From Start"
0043
Distance
0044 Time
0087 Average speed
0085 Average fuel consumption
X Press the 0059or0065 button on the steer-
ing wheel to select the Trip Tripmenu.
X Press 0063or0064 to select From Start
From Start
or From Reset
From Reset.
The values in the From Start
From Startsubmenu are
calculated from the start of a journey, while
the values in the From Reset
From Resetsubmenu are Menus and submenus
269On-board computer and displays Z
Page 279 of 466

R
Checking the tire pressure electronically
(Y page 408)
R Calling up the service due date
(Y page 371) Settings menu
Introduction In the
Sett. Sett. menu, you have the following
options:
R Changing the instrument cluster settings
(Y page 277)
R Changing the light settings (Y page 277)
R Changing the vehicle settings
(Y page 279)
R Changing the convenience settings
(Y page 279)
R Restoring the factory settings
(Y page 281)
Instrument cluster submenu Selecting the unit of measurement for dis-
tance
The Display Unit Speed-/Odometer: Display Unit Speed-/Odometer:
function allows you to choose whether cer-
tain displays appear in kilometers or miles in the multifunction display.
X Press the 0059or0065 button on the steer-
ing wheel to select the Settings Settingsmenu.
X Press the 0064or0063 button to select the
Instrument Cluster Instrument Cluster submenu.
X Press 0076to confirm. X
Press the 0064or0063 button to select the
Display Unit Speed-/Odometer Display Unit Speed-/Odometer func-
tion.
You will see the selected setting: km kmor
miles
miles.
X Press the 0076button to save the setting.
The selected unit of measurement for dis-
tance applies to: R Digital speedometer in the Trip
Trip menu
R Odometer and the trip odometer
R Trip computer
R Current consumption and the range
R Navigation messages in the Navi Navimenu
R Cruise control
R DISTRONIC PLUS
R ASSYST PLUS service interval display
Selecting the permanent display function
You can determine whether the multifunction
display permanently shows your speed or the outside temperature.
X Press the 0059or0065 button on the steer-
ing wheel to select the Sett Settmenu.
X Press the 0064or0063 button to select the
Instrument Cluster
Instrument Cluster submenu.
X Press 0076to confirm.
X Press the 0064or0063 button to select the
Permanent Display:
Permanent Display: function.
You will see the selected setting Outside
Outside
Temperature
Temperature orSpeedometer [mph]
Speedometer [mph]/
Speedometer [km/h]
Speedometer [km/h] .
X Press the 0076button to save the setting.
i The speed is highlighted in km/h or in
mph conversely to your speedometer.
Light submenu Setting the daytime running lamps
i This function is not available in Canada.
X Press the 0059or0065 button on the steer-
ing wheel to select the Sett.
Sett.menu.
X Press the 0064or0063 button to select the
Light
Light submenu. Menus and submenus
277On-board computer and displays Z
Page 313 of 466

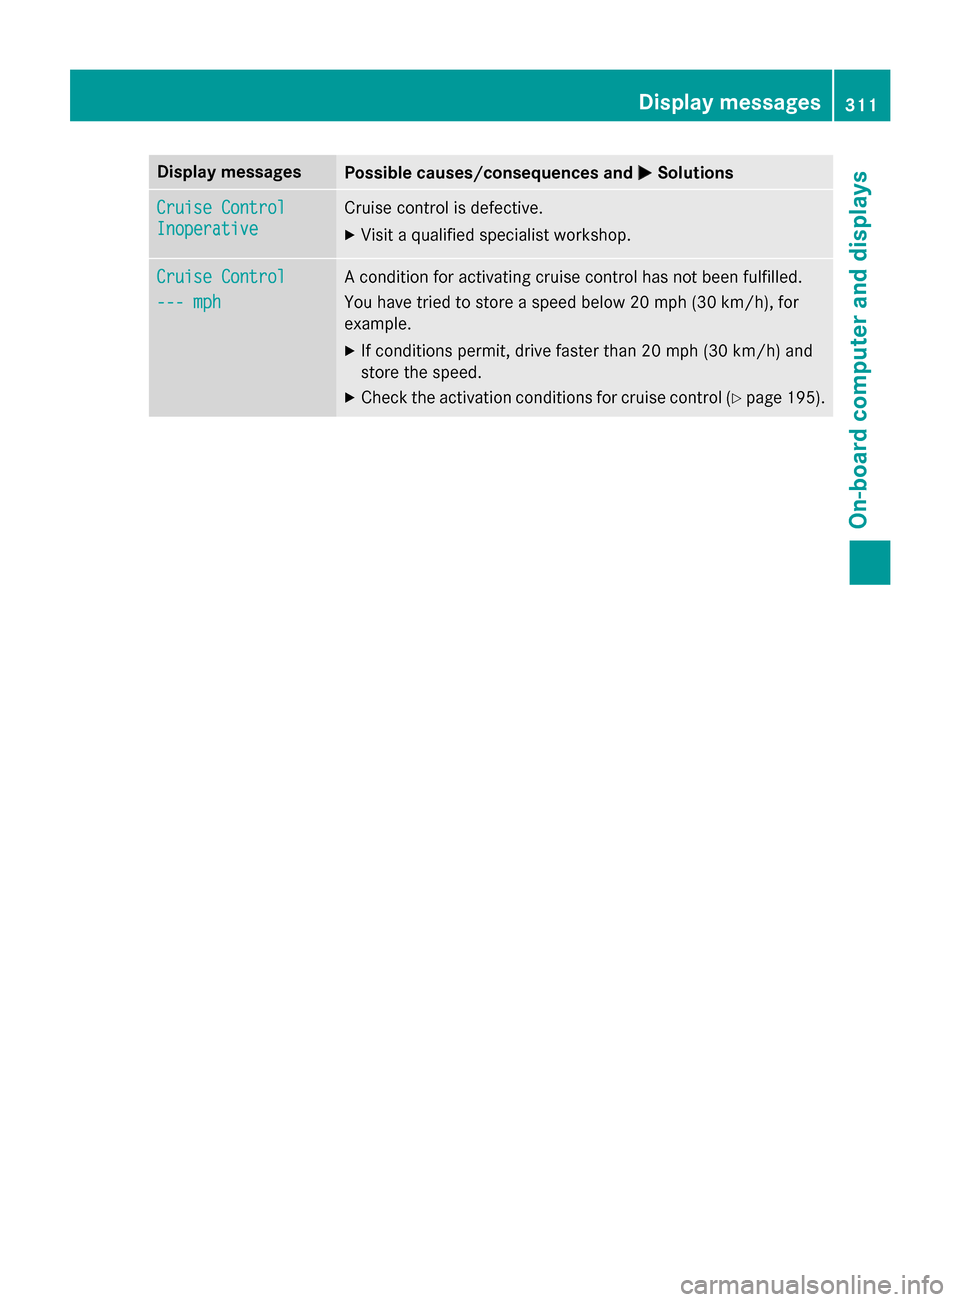
Display messages
Possible causes/consequences and
0050
0050Solutions Cruise Control
Cruise Control
Inoperative Inoperative Cruise control is defective.
X Visit a qualified specialist workshop. Cruise Control
Cruise Control
--- mph --- mph A condition for activating cruise control has not been fulfilled.
You have tried to store a speed below 20 mph
(30 km/h), for
example.
X If conditions permit, drive faster than 20 mph (30 km/ h)and
store the speed.
X Check the activation conditions for cruise control (Y page 195). Display messages
311On-board computer and displays Z
Page 326 of 466

Problem
Possible causes/consequences and
0050
0050Solutions 00E5
The yellow ESP
®
warn-
ing lamp flashes while
the vehicle is in motion. ESP
®
or traction control has intervened because there is a risk of
skidding or at least one wheel has started to spin.
Cruise control or DISTRONIC PLUS is deactivated.
X When pulling away, only depress the accelerator pedal as far as
necessary.
X Ease off the accelerator pedal while the vehicle is in motion.
X Adapt your driving style to suit the road and weather conditions.
X Do not deactivate ESP ®
.
In rare cases (Y page 73), it may be best to deactivate ESP ®
. 00BB
The yellow ESP
®
OFF
warning lamp is lit while the engine is running. ESP
®
is deactivated.
G WARNING
If ESP ®
is switched off, ESP ®
is unable to stabilize the vehicle.
There is an increased risk of skidding and an accident.
X Reactivate ESP ®
.
In rare cases (Y page 73), it may be best to deactivate ESP ®
.
X Adapt your driving style to suit the road and weather conditions.
If ESP ®
cannot be activated:
X Have ESP ®
checked at a qualified specialist workshop. 00E500BB
The yellow ESP
®
and
ESP ®
OFF warning
lamps are lit while the
engine is running. ESP
®
, BAS, BAS PLUS, PRE-SAFE ®
, PRE-SAFE ®
Brake, COLLISION
PREVENTION ASSIST, the HOLD function, hill start assist and
ESP ®
trailer stabilization are not available due to a malfunction.
ATTENTION ASSIST is deactivated.
G WARNING
The brake system continues to function normally, but without the functions listed above.
The braking distance in an emergency braking situation can thus
increase.
If ESP ®
is not operational, ESP ®
is unable to stabilize the vehicle.
There is an increased risk of skidding and an accident.
X Observe the additional display messages in the multifunction
display.
X Drive on carefully.
X Visit a qualified specialist workshop. 324
Warning and indicator lamps in the instrument clusterOn-board computer and displays