2015 MERCEDES-BENZ M-Class radiator cap
[x] Cancel search: radiator capPage 14 of 466

Refuelin
g ........................................ 177
Tank content/reserv e fuel .............448
Fuel filler flap
Opening ......................................... 179
Fuel filter (display message) ............ 303
Fuel level Calling up the range (on-board
computer) ...................................... 270
Fuel tank
Capacity ........................................ 448
Problem (malfunction) ................... 180
Fuses
Allocation chart ............................ .396
Before changing ............................ .396
Dashboard fuse box ....................... 397
Fuse box in the engine compart-
ment .............................................. 397
Fuse box under rear bench sea t.... 398
Important safety notes .................. 396 G
Garage door opener Clearing the memory ..................... 363
General notes ................................ 360
Important safety notes .................. 361
Opening/closing the garage doo r..3 63
Programming (button in the rear-
view mirror) ................................... 361
Gear indicator (on-board com-
puter) ................................................. .281
Genuine parts ...................................... 24
Glove box .......................................... .335
GTW (Gross Trailer Weight) (defini-
tion) .................................................... 421 H
Handbrake see Parking brake
Hazard warning lamps ......................124
Headlamps Cleaning system (function) ............ 125
Fogging up ..................................... 127
see Automatic headlamp mode
Head restraints
Adjusting ....................................... 106
Adjusting (electrically) ................... 107 Adjusting (manually) .....................
.107
Adjusting (rear) .............................. 108
Installing/removing (rear) .............. 108
Luxury ............................................ 107
Heating
see Climate control
High-beam headlamps
Adaptive Highbeam Assist ............. 126
Changing bulbs .............................. 131
Display message ............................ 298
Switching on/off ........................... 124
Hill start assist .................................. 161
HOLD function Deactivating ................................... 211
Display message ............................ 307
Function/notes ............................ .210
Hood
Closing .......................................... .367
Display message ............................ 316
Important safety notes .................. 366
Opening ......................................... 366
Horn ...................................................... 34
Hydroplaning ..................................... 190 I
Ignition lock see Key positions
Immobilizer .......................................... 77
Indicator lamps see Warning and indicator lamps
Indicators
see Turn signals
Insect protection on the radiator .... 367
Instrument cluster Overview .......................................... 35
Warning and indicator lamps ........... 36
Instrument cluster lighting .............. 266
Interior lighting Automatic control .......................... 128
Delayed switch-off (on-board
computer) ...................................... 279
Emergency lighting ........................ 129
Manual control ............................... 128
Overview ........................................ 127
Reading lamp ................................. 127 12
Index
Page 371 of 466

Example: engine oil cap
X Turn cap 0043counter-clockwise and remove
it.
X Add engine oil.
If the oil level is at or below the MIN mark on
the oil dipstick, add 1.1 US qt (1.0 l)of
engine oil.
X Replace cap 0043on the filler neck and turn
clockwise.
Ensure that the cap locks into place
securely.
X Check the oil level again with the oil dip-
stick (Y page 367).
Further information on engine oil
(Y page 452). Additional service products
Checking coolant level G
WARNING
Certain components in the engine compart-
ment, such as the engine, radiator and parts
of the exhaust system, can become very hot.
Working in the engine compartment poses a
risk of injury.
Where possible, let the engine cool down and touch only the components described in the
following. G
WARNING
The engine cooling system is pressurized, par- ticularly when the engine is warm. When
opening the cap, you could be scalded by hotcoolant spraying out. There is a risk of injury. Let the engine cool down before opening the
cap. Wear eye and hand protection when
opening the cap. Open the cap slowly half a
turn to allow pressure to escape.
X
Park the vehicle on a level surface.
Only check the coolant level when the vehi-
cle is on a level surface and the engine has
cooled down.
X Turn the SmartKey to position 2in the igni-
tion lock (Y page 157).
On vehicles with KEYLESS-GO, press the
Start/Stop button twice (Y page 158).
X Check the coolant temperature gauge in
the multifunction display.
The coolant temperature must be below
158 ‡ (70 †).
X Turn the SmartKey to position
0(Y page 157) in the ignition lock.
X Slowly turn cap 0043half a turn counter-
clockwise to allow excess pressure to
escape.
X Turn cap 0043further counter-clockwise and
remove it.
If the coolant is at the level of marker bar 0087
in the filler neck when cold, there is enough coolant in coolant expansion tank 0044.
If the coolant level is approximately 0.6 in
(1.5 cm) above marker bar 0087in the filler
neck when warm, there is enough coolant
in expansion tank 0044.
X If necessary, add coolant that has been tes-
ted and approved by Mercedes-Benz.
X Replace cap 0043and turn it clockwise as far
as it will go. Engine compartment
369Maintenance and care Z
Page 372 of 466

For further information on coolant, see
(Y page 453).
Adding washer fluid to the windshield
washer system G
WARNING
Certain components in the engine compart-
ment, such as the engine, radiator and parts
of the exhaust system, can become very hot.
Working in the engine compartment poses a
risk of injury.
Where possible, let the engine cool down and touch only the components described in the
following. G
WARNING
Windshield washer concentrate is highly flam- mable. If it comes into contact with hot engine
components or the exhaust system it could
ignite. There is a risk of fire and injury.
Make sure that no windshield washer con-
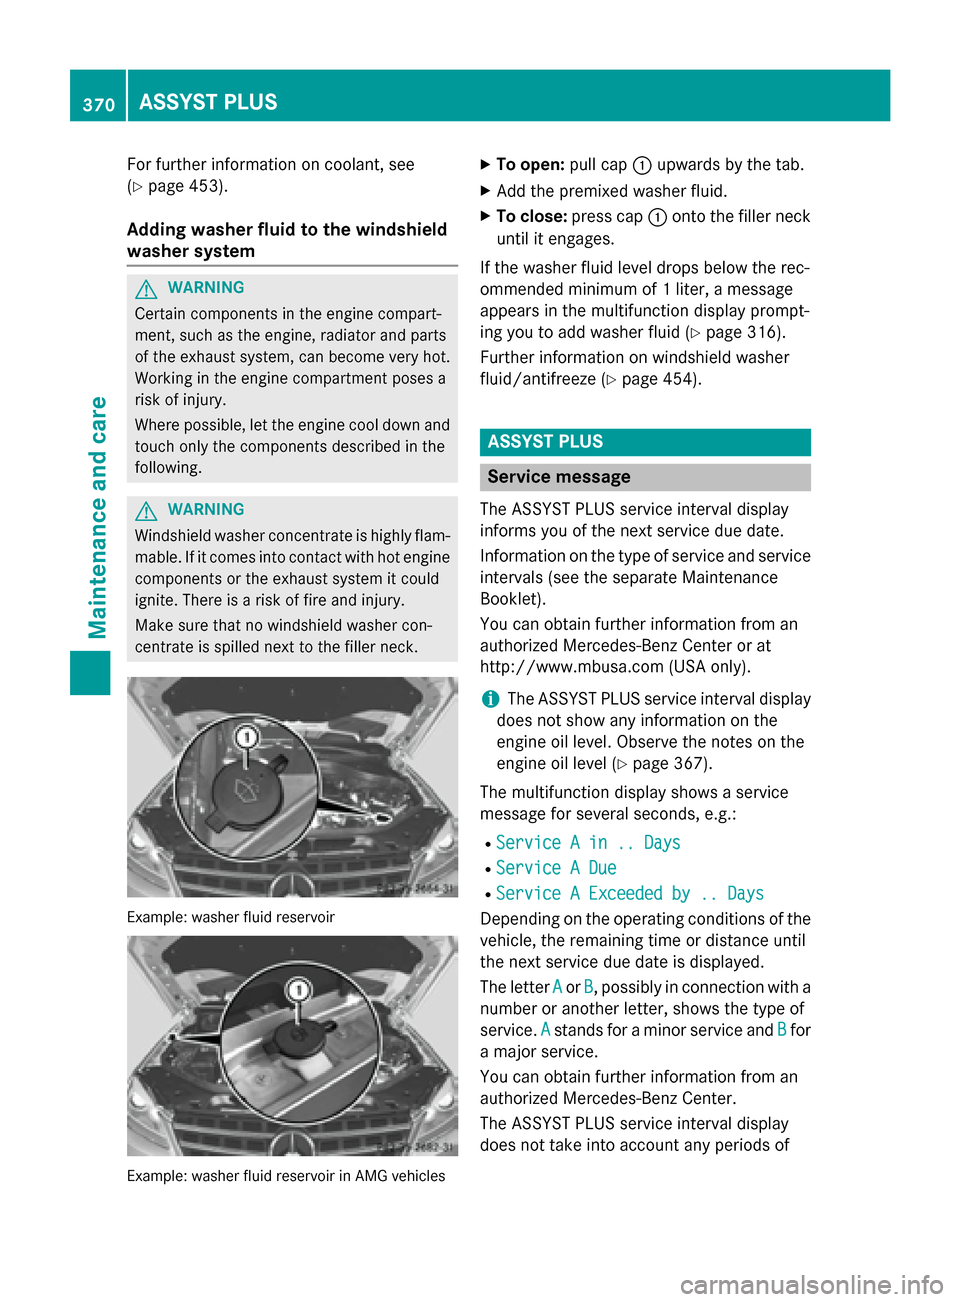
centrate is spilled next to the filler neck. Example: washer fluid reservoir
Example: washer fluid reservoir in AMG vehicles X
To open: pull cap0043upwards by the tab.
X Add the premixed washer fluid.
X To close: press cap 0043onto the filler neck
until it engages.
If the washer fluid level drops below the rec-
ommended minimum of 1 liter, a message
appears in the multifunction display prompt-
ing you to add washer fluid (Y page 316).
Further information on windshield washer
fluid/antifreeze (Y page 454). ASSYST PLUS
Service message
The ASSYST PLUS service interval display
informs you of the next service due date.
Information on the type of service and service
intervals (see the separate Maintenance
Booklet).
You can obtain further information from an
authorized Mercedes-Benz Center or at
http://www.mbusa.co m (USA only).
i The ASSYST PLUS service interval display
does not show any information on the
engine oil level. Observe the notes on the
engine oil level (Y page 367).
The multifunction display shows a service
message for several seconds, e.g.: R Service A in .. Days Service A in .. Days
R Service A Due
Service A Due
R Service A Exceeded by .. Days
Service A Exceeded by .. Days
Depending on the operating conditions of the vehicle, the remaining time or distance until
the next service due date is displayed.
The letter A Aor B
B, possibly in connection with a
number or another letter, shows the type of
service. A Astands for a minor service and B
Bfor
a major service.
You can obtain further information from an
authorized Mercedes-Benz Center.
The ASSYST PLUS service interval display
does not take into account any periods of 370
ASSYST PLUSMaintenance and care
Page 457 of 466

At temperatures above freezing:
X Fill the washer fluid reservoir with a mixture
of water and windshield washer fluid, e.g.
MB SummerFit.
Add 1 part MB SummerFit to 100 parts water.
At temperatures below freezing:
X Fill the washer fluid reservoir with a mixture
of water and washer fluid, e.g. MB Winter-
Fit.
Adapt the mixing ratio to the outside temper-
ature.
R Down to 14 ‡ (00F8 10 †): mix 1 part MB Win-
terFit to 2 parts water.
R Down to 00F84 ‡ (00F820 †): mix 1 part MB Win-
terFit to 1 part water.
R Down to 00F820.2 ‡ (00F8 29 †): mix 2 parts MB
WinterFit to 1 part water.
i Add windshield washer fluid, e.g. MB
SummerFit or MB WinterFit, to the washer
fluid all year round. Climate control system refrigerant
Important safety notes The climate control system of your vehicle is
filled with refrigerant R
‑134a.
The instruction label regarding the refrigerant
type used can be found on the radiator cross
member.
! Only the refrigerant R‑134a and the PAG
oil approved by Mercedes-Benz may be
used. The approved PAG oil may not be
mixed with any other PAG oil that is not
approved for R-134a refrigerant. Other-
wise, the climate control system may be
damaged.
Service work, such as topping up refrigerant
or replacing components, may only be carried
out by a qualified specialist workshop. All
applicable regulations must be adhered to,
SAE standard J639 included. Always have work on the climate control sys-
tem carried out at a qualified specialist work-
shop.
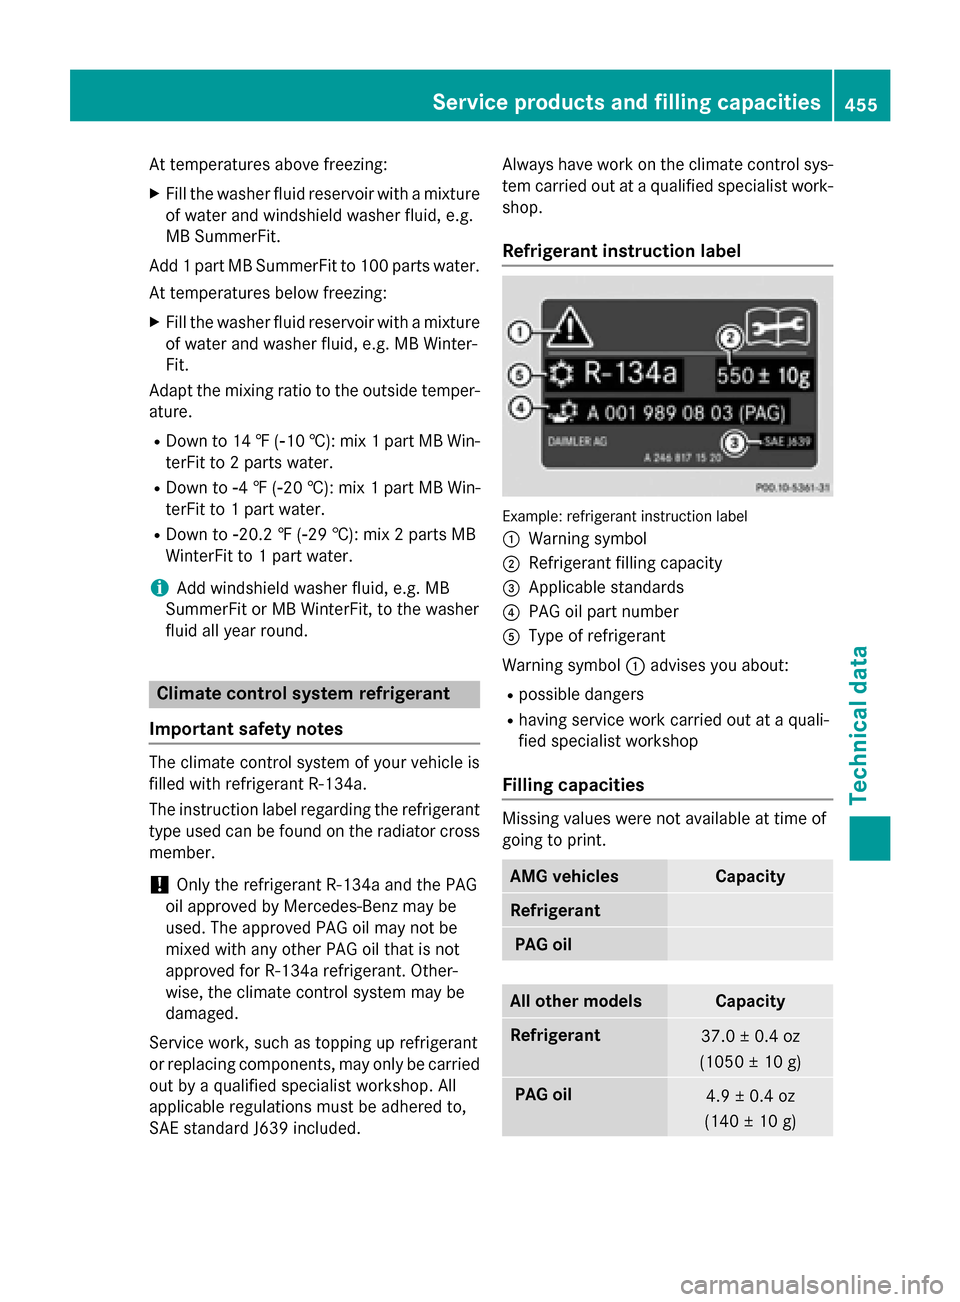
Refrigerant instruction label Example: refrigerant instruction label
0043 Warning symbol
0044 Refrigerant filling capacity
0087 Applicable standards
0085 PAG oil part number
0083 Type of refrigerant
Warning symbol 0043advises you about:
R possible dangers
R having service work carried out at a quali-
fied specialist workshop
Filling capacities Missing values were not available at time of
going to print.
AMG vehicles Capacity
Refrigerant
PAG oil
All other models Capacity
Refrigerant
37.0 ± 0.4 oz
(1050 ± 10 g) PA
G oil 4.9 ± 0.4 oz
(140 ± 10 g) Se
rvi ce products and filling capacities
455Technical da ta Z