2015 MERCEDES-BENZ GLK-CLASS SUV set clock
[x] Cancel search: set clockPage 88 of 386

Automatic locking feature
The vehicle is locked automatically when the
ignition is switched on and the vehicle's
wheels are turning at a speed in excess of
9 mph (15 km/h).
You could therefore be locked out if:R the vehicle is being pushed.
R the vehicle is being towed.
R the vehicle is on a roller dynamometer.
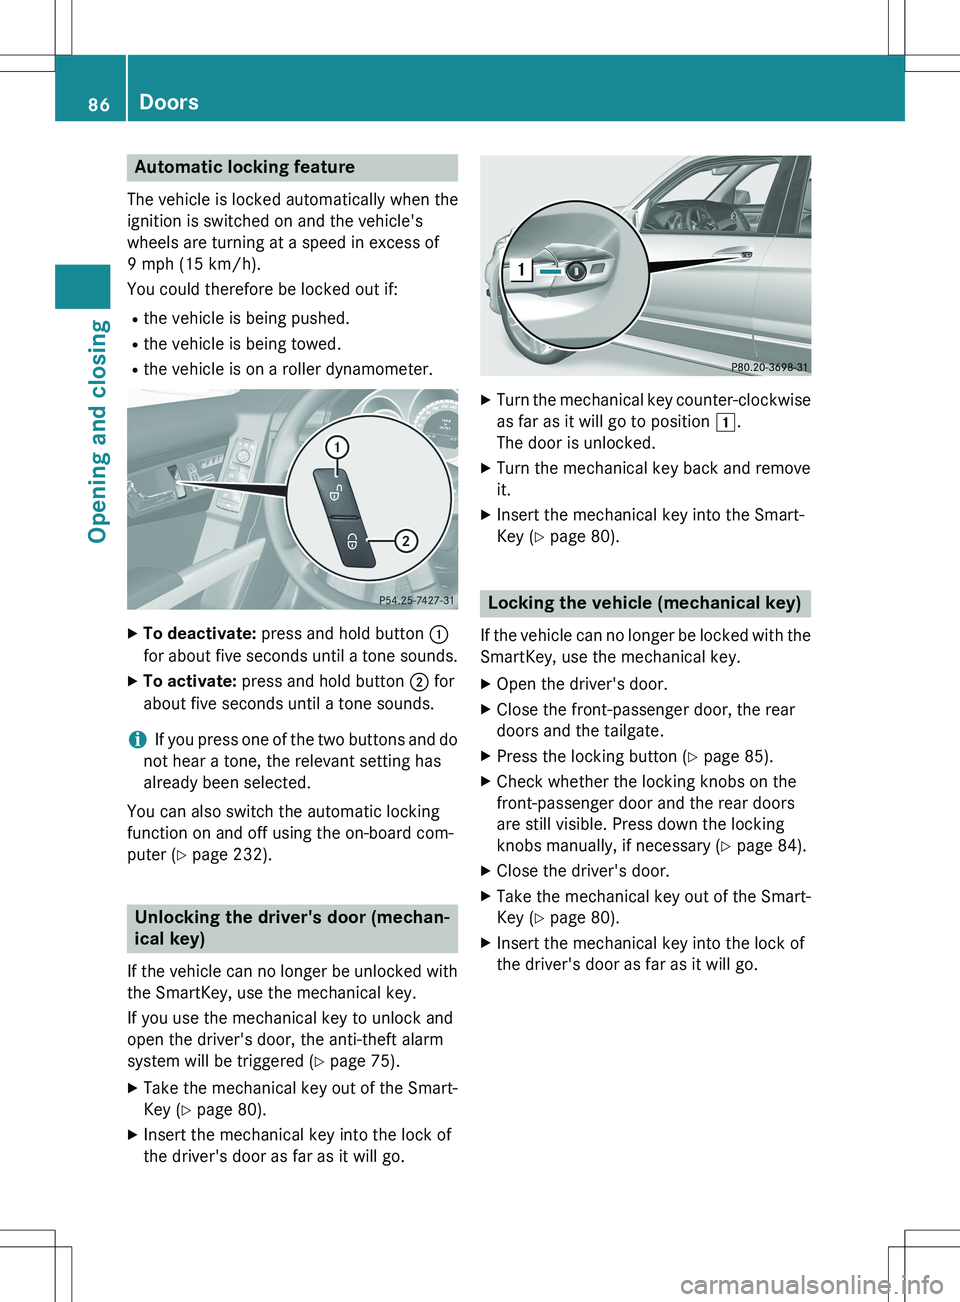
XTo deactivate: press and hold button :
for about five seconds until a tone sounds.
X To activate: press and hold button ; for
about five seconds until a tone sounds.
iIf you press one of the two buttons and do
not hear a tone, the relevant setting has
already been selected.
You can also switch the automatic locking
function on and off using the on-board com-
puter ( Y page 232).
Unlocking the driver's door (mechan-
ical key)
If the vehicle can no longer be unlocked with
the SmartKey, use the mechanical key.
If you use the mechanical key to unlock and
open the driver's door, the anti-theft alarm
system will be triggered ( Y page 75).
X Take the mechanical key out of the Smart-
Key ( Y page 80).
X Insert the mechanical key into the lock of
the driver's door as far as it will go.
XTurn the mechanical key counter-clockwise
as far as it will go to position 1.
The door is unlocked.
X Turn the mechanical key back and remove
it.
X Insert the mechanical key into the Smart-
Key ( Y page 80).
Locking the vehicle (mechanical key)
If the vehicle can no longer be locked with the
SmartKey, use the mechanical key.
X Open the driver's door.
X Close the front-passenger door, the rear
doors and the tailgate.
X Press the locking button ( Y page 85).
X Check whether the locking knobs on the
front-passenger door and the rear doors
are still visible. Press down the locking
knobs manually, if necessary ( Y page 84).
X Close the driver's door.
X Take the mechanical key out of the Smart-
Key ( Y page 80).
X Insert the mechanical key into the lock of
the driver's door as far as it will go.
86Doors
Opening and closing
Page 128 of 386

XBackup lamp :: remove the bulb from
bulb holder.
X Insert the new bulb into the bulb holder.
X Re-install bulb holder.
X Turn fender nut 90° clockwise.
X Insert the connector.
X Close the side trim panel ( Y page 125).
Windshield wipers
Switching the windshield wipers
on/off
!
Do not operate the windshield wipers
when the windshield is dry, as this could
damage the wiper blades. Moreover, dust
that has collected on the windshield can
scratch the glass if wiping takes place when the windshield is dry.
If it is necessary to switch on the windshield wipers in dry weather conditions, always
use washer fluid when operating the wind-
shield wipers.
! If the windshield wipers leave smears on
the windshield after the vehicle has been
washed in an automatic car wash, wax or
other residues may be the reason for this.
Clean the windshield using washer fluid
after washing the vehicle in an automatic
car wash.
Combination switch 1
$ Windshield wiper off
2Ä Intermittent wipe, low (rain sensor
set to low sensitivity)
3Å Intermittent wipe, high (rain sensor
set to high sensitivity)
4° Continuous wipe, slow
5¯ Continuous wipe, fast
Bí Single wipe/ î Wipes the wind-
shield using washer fluid
X Switch on the ignition.
X Turn the combination switch to the corre-
sponding position.
! Vehicles with a rain sensor: if the wind-
shield becomes dirty in dry weather condi-
tions, the windshield wipers may be activa-
ted inadvertently. This could then damage
the windshield wiper blades or scratch the
windshield.
For this reason, you should always switch
off the windshield wipers in dry weather.
If the wiper blades are worn, the windshield
will no longer be wiped properly. This could
prevent you from observing the traffic condi-
tions.
126Windshield wipers
Lights and windshield wipers
Page 144 of 386

XPress the à button.
The indicator lamp in the ¬ button goes
out. Airflow and air distribution are set to
automatic mode.
or X Turn temperature control : or B counter-
clockwise or clockwise ( Y page 133),
( Y page 136).
or
X Press the K or I button.
MAX COOL maximum cooling
The MAX COOL function is only available in
vehicles for the USA.
MAX COOL is only operational when the
engine is running.
When you activate MAX COOL, climate con-
trol switches to the following functions:
R maximum cooling
R maximum airflow
R air-recirculation mode on
X To activate: press the Ù button.
The indicator lamp in the Ù button lights
up.
X To deactivate: press the Ù button.
The indicator lamp in the Ù button goes
out. The previously selected settings are
restored.
Defrosting the windows
Windows fogged up on the inside
X Activate the ¿ cooling with air dehu-
midification function.
X Activate automatic mode Ã.
X Adjust the side air vents so that the warmed
air is directed to the side windows.
X If the windows continue to fog up, activate
the ¬ "Windshield defrosting" function.
iYou should only select this setting until
the windshield is clear again.
Windows fogged up on the outside
X Activate the windshield wipers.
X Press the _ button repeatedly until the
O or P symbol appears in the dis-
play.
X Adjust the side air vents so that no air is
directed to the side windows.
Rear window defroster
General notes
The rear window defroster has a high current draw. You should therefore switch it off as
soon as the rear window is clear. Otherwise,
the rear window defroster switches off auto-
matically after several minutes.
If the battery voltage is too low, the rear win-
dow defroster may switch off.
Switching on/off
X Turn the SmartKey to position 2 in the igni-
tion lock ( Y page 149).
X Press the ¤ button.
The indicator lamp in the ¤ button lights
up or goes out.
142Operating the climate control systems
Climate control
Page 323 of 386

Otherwise, the vehicle's electronic sys-
tem may be damaged.
R the transmission is locked in position P
after disconnecting the battery. The vehi-
cle is secured against rolling away. You
can then no longer move the vehicle.
The battery and the cover of the positive
terminal clamp must be installed securely
during operation.
Comply with safety precautions and take pro-
tective measures when handling batteries.
Risk of explosion.
Fire, open flames and smoking are
prohibited when handling the bat-
tery. Avoid creating sparks.
Battery acid is caustic. Avoid con-
tact with skin, eyes or clothing.
Wear suitable protective clothing,
especially gloves, apron and face-
guard.
Rinse any acid spills immediately
with clear water. Contact a physi-
cian if necessary.
Wear eye protection.
Keep children away.
Observe this Operator's Manual.
In order for the battery to achieve the maxi-
mum possible service life, it must always be
sufficiently charged.
Have the battery condition of charge checked
more frequently if you use the vehicle mainly for short trips or if you leave it standing idle
for a lengthy period. Consult a qualified spe- cialist workshop if you wish to leave your
vehicle parked for a long period of time.
Like other batteries, the vehicle battery may
discharge over time if you do not use the
vehicle. In this case, have the battery discon-
nected at a qualified specialist workshop. You can also charge the battery with a charger
recommended by Mercedes-Benz. Contact a
qualified specialist workshop for further infor-
mation.
iRemove the SmartKey if you park the
vehicle and do not require any electrical
consumers. The vehicle will then use very
little energy, thus conserving battery
power.
iIf the power supply has been interrupted,
e.g. if you reconnect the battery, you will
have to:
R set the clock; see the separate operating
instructions.
On vehicles with COMAND and a naviga- tion system, the clock is set automati-
cally.
R reset the panorama roof with power tilt/
sliding panel. ( Y page 97)
R reset the function for folding the exterior
mirrors in/out automatically by folding
the mirrors out once ( Y page 110) 12
.
Charging the battery
GWARNING
During charging and jump-starting, explosive
gases can escape from the battery. There is a
risk of an explosion.
Particularly avoid fire, open flames, creating
sparks and smoking. Ensure there is sufficient
ventilation while charging and jump-starting.
Do not lean over a battery.
GWARNING
Battery acid is caustic. There is a risk of injury.
12 This function is only available in vehicles for Canada.
Battery (vehicle)321
Roadside Assistance
Z