2015 MERCEDES-BENZ GLK-CLASS SUV display
[x] Cancel search: displayPage 21 of 386
TIN (Tire Identification Number)
(definition) ..................................... 354
Tire bead (definition) ...................... 354
Tire pressure (definition) ................ 354
Tire pressures (recommended) ...... 352
Tire size (data) ............................... 360
Tire size designation, load-bearing capacity, speed rating .................... 349
Tire tread ....................................... 333
Tire tread (definition) ..................... 354
Total load limit (definition) ............. 355
Traction ......................................... 34 7
Traction (definition) ....................... 354
Tread wear ..................................... 347
TWR (permissible trailer drawbar
noseweight) (definition) ................. 354
Uniform Tire Quality Grading
Standards ...................................... 347
Uniform Tire Quality Grading
Standards (definition) .................... 352
Wear indicator (definition) ............. 355
Wheel and tire combination ........... 362
Wheel rim (definition) .................... 352
see Flat tire
Top Tether ............................................ 65
Tow-starting
Emergency engine starting ............ 328
Important safety notes .................. 325
Towing a trailer
Active Parking Assist ..................... 193
Cleaning the trailer tow hitch ......... 310
Coupling up a trailer ...................... 214
Decoupling a trailer ....................... 216
Driving tips .................................... 212
Important safety notes .................. 212
Installing the ball coupling ............. 214
Lights display message .................. 243
Mounting dimensions .................... 381
Power supply ................................. 217
Removing the ball coupling ............ 217
Storing the ball coupling ................ 217
Trailer loads ................................... 381
Towing away
Important safety guidelines ........... 325
Installing the towing eye ................ 326
Removing the towing eye ............... 326
With both axles on the ground ....... 327
With the rear axle raised ................ 327 Trailer coupling
see Towing a trailer
Trailer loads and drawbar nose-
weights ............................................... 216
Trailer towing
Active Blind Spot Assist ................. 209
Active Lane Keeping Assist .... 206, 212
Blind Spot Assist ............................ 205
PARKTRONIC ................................. 188
Permissible trailer loads and
drawbar noseweights ..................... 216
Transfer case ..................................... 162
Transmission
see Automatic transmission
Transmission position display ......... 157
Transmission position display
(DIRECT SELECT lever) ...................... 157
Transporting the vehicle .................. 327
Trim pieces (cleaning instruc-
tions) .................................................. 3 11
Trip computer (on-board com-
puter) .................................................. 2 23
Trip odometer
Calling up ....................................... 223
Resetting (on-board computer) ...... 224
Turn signals
Changing bulbs (front) ................... 124
Display message ............................ 244
Switching on/off ........................... 118
TWR (Tongue Weight Rating) (defi-
nition) ................................................. 35 4
Type identification plate
see Vehicle identification plate
U
UnlockingEmergency unlocking ....................... 86
From inside the vehicle (central
unlocking button) ............................. 85
V
Vanity mirror (in the sun visor) ........ 283
Vehicle
Correct use ...................................... 27
Data acquisition ............................... 28
Display message ............................ 257
Index19
Page 22 of 386

Emergency locking ........................... 86
Emergency unlocking ....................... 86
Equipment ....................................... 23
Individual settings .......................... 230
Limited Warranty ............................. 28
Loading .......................................... 343
Locking (in an emergency) ............... 86
Locking (SmartKey) .......................... 78
Lowering ........................................ 359
Maintenance .................................... 24
Parking for a long period ................ 169
Pulling away ................................... 152
Raising ........................................... 35 7
Reporting problems ......................... 27
Securing from rolling away ............ 356
Towing away .................................. 325
Transporting .................................. 327
Unlocking (in an emergency) ........... 86
Unlocking (SmartKey) ...................... 78
Vehicle data ................................... 380
Vehicle data ....................................... 380
Vehicle dimensions ........................... 380
Vehicle emergency locking ................ 86
Vehicle identification number
see VIN
Vehicle identification plate .............. 372
Vehicle maintenance
see ASSYST PLUS
Vehicle tool kit .................................. 314
Video (DVD) ........................................ 227
VIN ................................................... ... 372
W
Warning and indicator lamps
ABS ................................................ 262
Brakes ........................................... 26 2
Check Engine ................................. 267
Coolant .......................................... 26 8
Distance warning ........................... 270
DISTRONIC PLUS ........................... 270
ESP ®
.............................................. 264
ESP ®
OFF ....................................... 265
Fuel tank ........................................ 267
Overview .......................................... 34
PASSENGER AIRBAG OFF ................ 49
Reserve fuel ................................... 267
Seat belt ........................................ 260 SRS ................................................
266
Tire pressure monitor .................... 271
Warranty .............................................. 23
Washer fluid
Display message ............................ 258
Wheel and tire combination
see Tires
Wheel bolt tightening torque ........... 359
Wheel chock ...................................... 356
Wheels
Changing a wheel .......................... 355
Checking ........................................ 333
Cleaning ......................................... 30 7
Emergency spare wheel ................. 366
General notes ................................ 360
Important safety notes .................. 332
Information on driving .................... 332
Interchanging/changing ................ 355
Mounting a new wheel ................... 358
Mounting a wheel .......................... 356
Removing a wheel .......................... 358
Storing ........................................... 3 55
Tightening torque ........................... 359
Wheel size/tire size ....................... 360
Window curtain air bag
Display message ............................ 240
Operation ......................................... 49
Windows
see Side windows
Windshield
Defrosting ...................................... 141
Windshield washer fluid
see Windshield washer system
Windshield washer system .............. 303
Notes ............................................. 37 9
Windshield wipers
Problem (malfunction) ................... 129
Rear window wiper ........................ 127
Replacing the wiper blades ............ 127
Switching on/off ........................... 126
Winter driving
Important safety notes .................. 334
Slippery road surfaces ................... 174
Snow chains .................................. 335
Winter tires
M+S tires ....................................... 335
Wiper blades
Cleaning ......................................... 30 8
20Index
Page 35 of 386
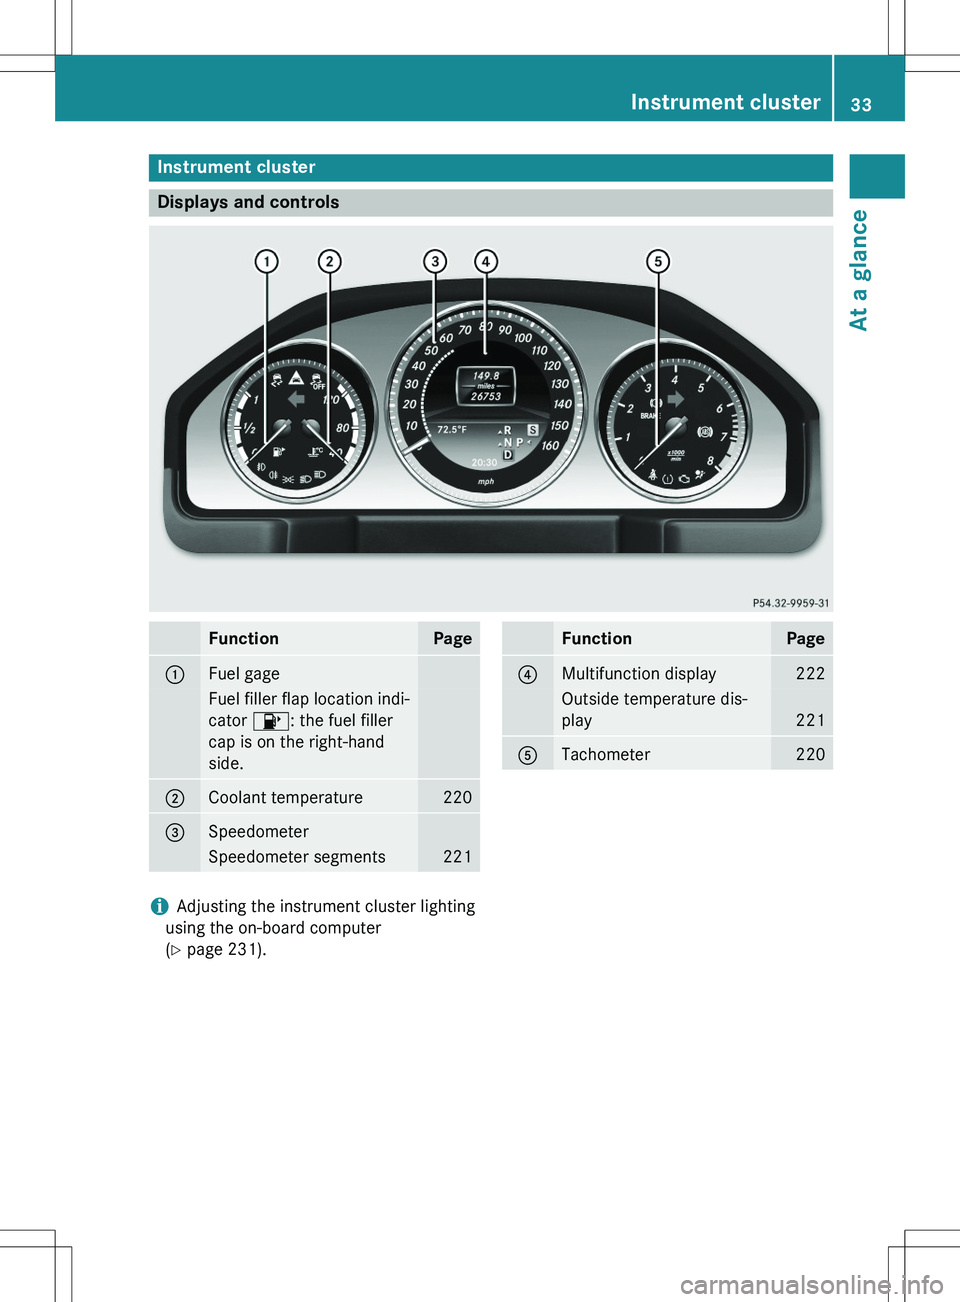
Instrument cluster
Displays and controls
FunctionPage
:Fuel gage
Fuel filler flap location indi-
cator 8: the fuel filler
cap is on the right-hand
side.
;Coolant temperature220
=Speedometer
Speedometer segments221
FunctionPage
?Multifunction display222
Outside temperature dis-
play
221
ATachometer220
iAdjusting the instrument cluster lighting
using the on-board computer
( Y page 231).
Instrument cluster33
At a glance
Page 37 of 386
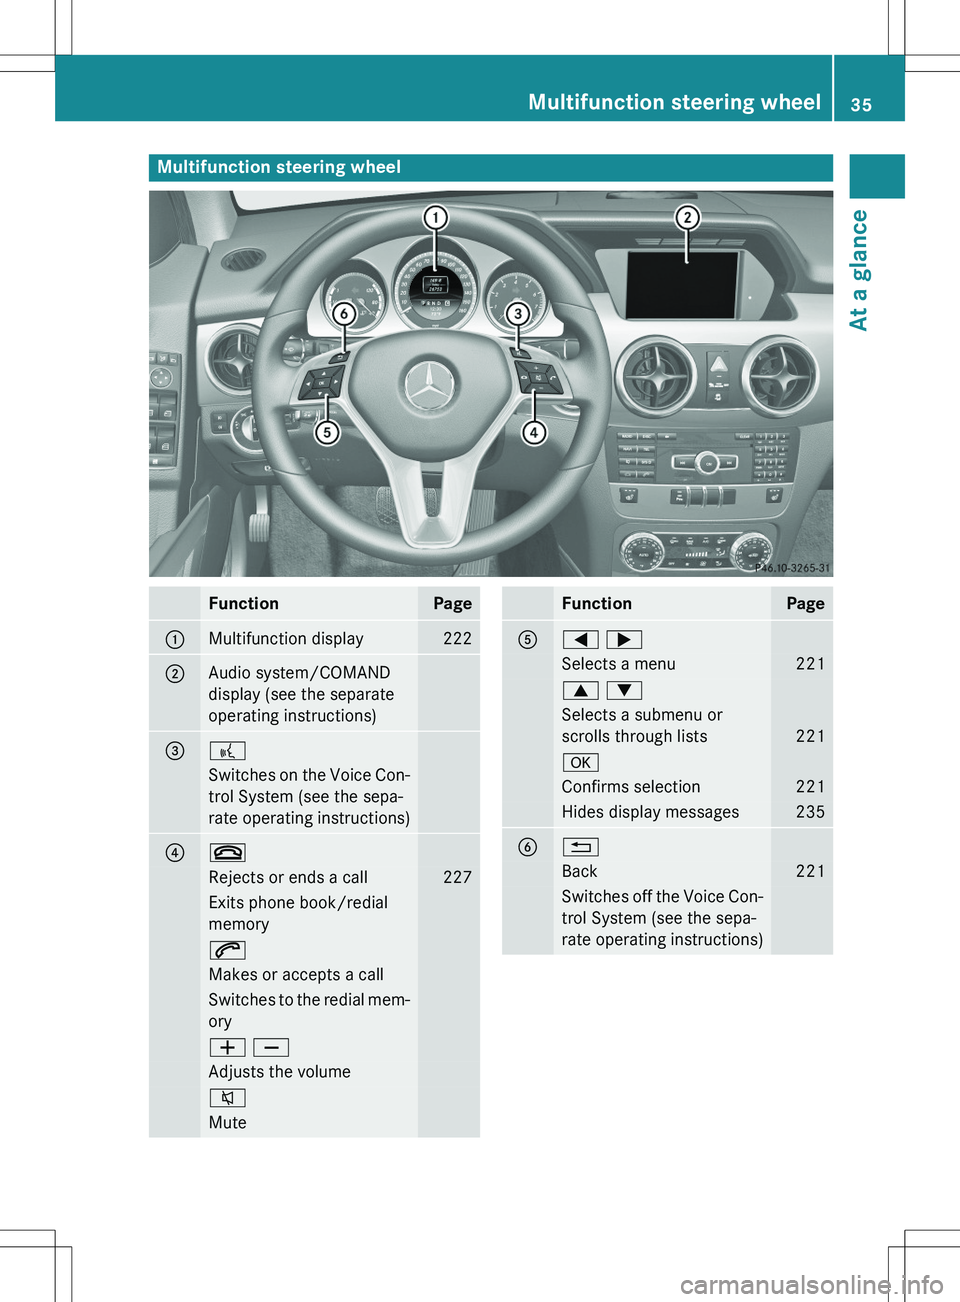
Multifunction steering wheel
FunctionPage
:Multifunction display222
;Audio system/COMAND
display (see the separate
operating instructions)
=?
Switches on the Voice Con-
trol System (see the sepa-
rate operating instructions)
?~
Rejects or ends a call227
Exits phone book/redial
memory
6
Makes or accepts a call
Switches to the redial mem- ory
W X
Adjusts the volume
8
Mute
FunctionPage
A= ;
Selects a menu221
9 :
Selects a submenu or
scrolls through lists
221
a
Confirms selection221
Hides display messages235
B%
Back221
Switches off the Voice Con-
trol System (see the sepa-
rate operating instructions)
Multifunction steering wheel35
At a glance
Page 52 of 386

For safety reasons, Mercedes-Benz recom-
mends that you only use seat accessories
that have been approved by Mercedes-Benz.
Both the driver and the front passenger
should always observe the PASSENGER AIR
BAG OFF indicator lamp as an indication of
whether or not the front passenger is posi-
tioned correctly. Observe also the air bag dis-play messages that can be displayed in the
instrument cluster ( Y page 242).
GWARNING
If the 45 indicator lamp illuminates
when an adult or someone larger than a small individual is in the front-passenger seat, have the front passenger reposition himself or her-
self in the seat until the 45 indicator
lamp goes out.
In the event of a collision, the air bag control
unit will not allow front-passenger front air
bag deployment when the OCS has classified
the front-passenger seat occupant as weigh-
ing as much as or less than a typical 12-
month-old child in a standard child restraint or if the front-passenger seat is classified as
being empty.
When the OCS senses that the front-
passenger seat occupant is classified as
being up to or less than the weight of a typical
12-month-old child in a standard child
restraint, the 45 indicator lamp will
illuminate when the engine is started and
remain illuminated, indicating that the front-
passenger front air bag is deactivated.
When the OCS senses that the front-
passenger seat is classified as being empty,
the 45 indicator lamp will illuminate
when the engine is started and remain illumi-
nated, indicating that the front-passenger
front air bag is deactivated.
When the OCS senses that the front-
passenger seat occupant is classified as
being heavier than the weight of a typical 12-
month-old child seated in a standard child
restraint or as being a small individual (such
as a young teenager or a small adult), the45 indicator lamp will illuminate for
approximately 6 seconds when the engine is
started and then, depending on occupant
weight sensor readings from the front-
passenger seat, remain illuminated or go out.
With the 45 indicator lamp illumina-
ted, the front-passenger front air bag is deac-
tivated. With the 45 indicator lamp
out, the front-passenger front air bag is acti-
vated.
When the OCS senses that the front-
passenger seat occupant is classified as an
adult or someone larger than a small individ-
ual, the 45 indicator lamp will illumi-
nate for approximately 6 seconds when the
engine is started and then go out, indicating
that the front-passenger front air bag is acti-
vated.
If the 45 indicator lamp is illuminated,
the front-passenger front air bag is deactiva-
ted and will not be deployed.
If the 45 indicator lamp is not illumi-
nated, the front-passenger front air bag is
activated and will be deployed:
R in the event of certain frontal impacts
R if impact exceeds a preset deployment
threshold
R independently of the side impact air bags
If the front-passenger front air bag is
deployed, the rate of inflation will be influ-
enced by: R the rate of relevant vehicle deceleration as
assessed by the air bag control unit
R the front passenger's weight category as
identified by OCS
GWARNING
According to accident statistics, children are
safer when properly restrained on the rear
seats than on the front-passenger seat. Thus,
we strongly recommend that children be
placed in the rear seats whenever possible.
Regardless of seating position, children 12
years old and under must be seated and prop- erly secured in an appropriate infant restraint,
50Occupant safety
Safety
Page 55 of 386
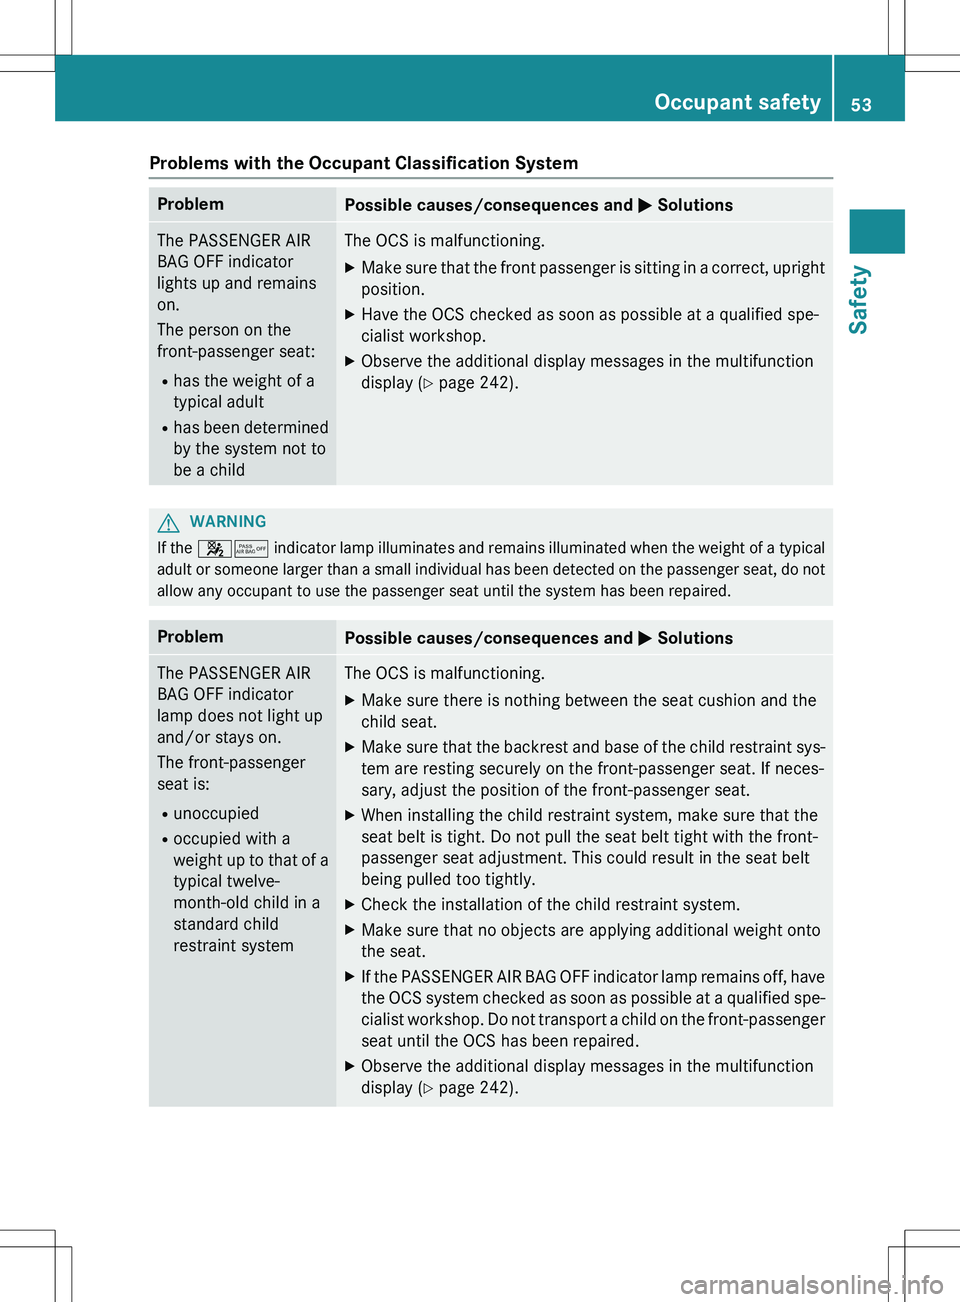
Problems with the Occupant Classification System
ProblemPossible causes/consequences and M Solutions
The PASSENGER AIR
BAG OFF indicator
lights up and remains
on.
The person on the
front-passenger seat: R
has the weight of a
typical adult
R has been determined
by the system not to
be a childThe OCS is malfunctioning.
X Make sure that the front passenger is sitting in a correct, upright
position.
X Have the OCS checked as soon as possible at a qualified spe-
cialist workshop.
X Observe the additional display messages in the multifunction
display ( Y page 242).
GWARNING
If the 45 indicator lamp illuminates and remains illuminated w hen the weight of a typical
adult or someone larger than a small individual has been detected on the passenger seat, do not
allow any occupant to use the passenger seat until the system has been rep aired.
ProblemPossible causes/consequences and M Solutions
The PASSENGER AIR
BAG OFF indicator
lamp does not light up
and/or stays on.
The front-passenger
seat is:
R unoccupied
R occupied with a
weight up to that of a
typical twelve-
month-old child in a
standard child
restraint systemThe OCS is malfunctioning.
X Make sure there is nothing between the seat cushion and the
child seat.
X Make sure that the backrest and base of the child restraint sys-
tem are resting securely on the front-passenger seat. If neces-
sary, adjust the position of the front-passenger seat.
X When installing the child restraint system, make sure that the
seat belt is tight. Do not pull the seat belt tight with the front-
passenger seat adjustment. This could result in the seat belt
being pulled too tightly.
X Check the installation of the child restraint system.
X Make sure that no objects are applying additional weight onto
the seat.
X If the PASSENGER AIR BAG OFF indicator lamp remains of f, have
the OCS system checked as soon as possible at a qualified spe-
cialist workshop. Do not transport a child on the front-p assenger
seat until the OCS has been repaired.
X Observe the additional display messages in the multifunction
display ( Y page 242).
Occupant safety53
Safety
Z
Page 70 of 386
Driving safety systems
Overview of driving safety systems
In this section, you will find information aboutthe following driving safety systems:
R ABS ( Anti-lock Braking System)
( Y page 68)
R BAS ( Brake Assist System) ( Y page 69)
R BAS PLUS ( Brake Assist System Plus)
( Y page 69)
R ESP ®
(E lectronic Stability Program)
( Y page 70)
R EBD ( Electronic Brake force Distribution)
( Y page 73)
R PRE-SAFE ®
Brake ( Y page 73)
Important safety notes
If you fail to adapt your driving style or if you
are inattentive, the driving safety systems can
neither reduce the risk of an accident nor
override the laws of physics. Driving safety
systems are merely aids designed to assist
driving. You are responsible for the distance
to the vehicle in front, for vehicle speed and
for braking in good time. Always adapt your
driving style to suit the prevailing road,
weather and traffic conditions and maintain a
safe distance from the vehicle in front. Drive
carefully.
The driving safety systems described only
work as effectively as possible when there is
adequate contact between the tires and the
road surface. Please pay special attention to
the notes on tires, recommended minimum
tire tread depths, etc. ( Y page 332).
In wintry driving conditions, always use winter
tires (M+S tires) and if necessary, snow
chains. Only in this way will the driving safety
systems described in this section work as
effectively as possible.
ABS (Anti-lock Braking System)
General information
ABS regulates brake pressure in such a way
that the wheels do not lock when you brake.
This allows you to continue steering the vehi- cle when braking.
The yellow ! ABS warning lamp in the
instrument cluster lights up when the ignition is switched on. It goes out when the engine is
running.
Important safety notes
iObserve the "Important safety notes" sec-
tion ( Y page 68).
GWARNING
If ABS is faulty, the wheels could lock when
braking. The steerability and braking charac-
teristics may be severely impaired. Addition-
ally, further driving safety systems are deac-
tivated. There is an increased danger of skid-
ding and accidents.
Drive on carefully. Have ABS checked imme-
diately at a qualified specialist workshop.
When ABS is malfunctioning, other systems,
including driving safety systems, will also
become inoperative. Observe the information on the ABS warning lamp ( Y page 262) and
display messages which may be shown in the
instrument cluster ( Y page 236).
ABS works from a speed of about 5 mph
(8 km/h), regardless of road-surface condi-
tions. ABS works on slippery surfaces, even if
you only brake gently.
Brakes
X If ABS intervenes: continue to depress the
brake pedal vigorously until the braking sit-
uation is over.
X To make a full brake application:
depress the brake pedal with full force.
If ABS intervenes when braking, you will feel a pulsing in the brake pedal.
68Driving safety systems
Safety
Page 73 of 386
Important safety notes
iObserve the "Important safety notes" sec-
tion ( Y page 68).
GWARNING
If ESP ®
is malfunctioning, ESP ®
is unable to
stabilize the vehicle. Additionally, further driv- ing safety systems are deactivated. This
increases the risk of skidding and an accident.
Drive on carefully. Have ESP ®
checked at a
qualified specialist workshop.
! If you test the parking brake using a brake
dynamometer, switch the ignition off.
Application of the brakes by ESP ®
may oth-
erwise destroy the brake system.
Vehicles without 4MATIC: observe the notes
on ESP ®
(Y page 327) when towing the vehi-
cle with a raised rear axle.
! Vehicles with 4MATIC: function or per-
formance tests may only be carried out on
a 2-axle dynamometer. Before you operate the vehicle on such a dynamometer, please
consult a qualified workshop. You could
otherwise damage the drive train or the
brake system.
ESP ®
is only deactivated if the å warning
lamp is lit continuously.
If the ÷ warning lamp and the å warn-
ing lamp are lit continuously, ESP ®
is not
available due to a malfunction.
Observe the information on warning lamps
( Y page 264) and display messages which
may be shown in the instrument cluster
( Y page 236).
iOnly use wheels with the recommended
tire sizes. Only then will ESP ®
function
properly.
Characteristics of ESP®
General information
If the ÷ ESP®
warning lamp goes out
before beginning the journey, ESP ®
is auto-
matically active.
If ESP ®
intervenes, the ÷ ESP®
warning
lamp flashes in the instrument cluster.
If ESP ®
intervenes:
X Do not deactivate ESP ®
under any circum-
stances.
X Only depress the accelerator pedal as far as
necessary when pulling away.
X Adapt your driving style to suit the prevail-
ing road and weather conditions.
ECO start/stop function
The ECO start/stop function switches the
engine off automatically when the vehicle
stops moving. The engine starts automati-
cally when the driver wants to pull away again. ESP ®
remains in its previously selected sta-
tus. Example: if ESP®
was deactivated before
the engine was switched off, ESP ®
remains
deactivated when the engine is switched on
again.
Deactivating/activating ESP®
Important safety notes
iObserve the "Important safety notes" sec-
tion ( Y page 68).
You can select between the following sta-
tuses of ESP:
R ESP ®
is activated.
R ESP ®
is deactivated.
GWARNING
If you deactivate ESP ®
, ESP ®
no longer sta-
bilizes the vehicle. There is an increased risk
of skidding and an accident.
Only deactivate ESP ®
in the situations descri-
bed in the following.
Driving safety systems71
Safety
Z