2015 MERCEDES-BENZ GLK-CLASS SUV warning lights
[x] Cancel search: warning lightsPage 62 of 386

Belt warning for the driver and front
passenger
Regardless of whether the driver's and front-passenger seat belts have already been fas-
tened, the 7 seat belt warning lamp lights
up for six seconds each time the engine is
started. It then goes out if the driver and the
front passenger have already fastened their
seat belts.
If the driver's seat belt is not fastened when
the engine is started, an additional warning
tone will sound. This warning tone stops after a maximum of six seconds or once the driv-
er's seat belt is fastened.
If after six seconds the driver or front
passenger have not fastened their seat belts
and the doors are closed, the 7 seat belt
warning lamp lights up:
R until the driver's or front passenger's seat
belt is fastened
R if a vehicle speed of 15 mph (25 km/h) is
exceeded, a warning tone also sounds with
increasing intensity for a maximum of
60 seconds or until the driver or front-
passenger seat belt has been fastened
If the driver/front passenger unfasten their
seat belt while the vehicle is in motion, the7 seat belt warning lamp lights up and a
warning tone sounds again.
The warning tone ceases even if the driver or
front-passenger seat belt has still not been
fastened after 60 seconds. The 7 seat belt
warning lamp stops flashing but remains illu-
minated.
After the vehicle comes to a standstill, the
warning tone is reactivated and the 7 seat
belt warning lamp flashes again if the vehicle
speed again exceeds 15 mph (25 km/h).
The 7 seat belt warning lamp only goes
out if:
R both the driver and the front passenger
have fastened their seat belts.
or R the vehicle is stationary and a door is open.
iFor more information on the 7 seat
belt warning lamp, see "Warning and indi-
cator lamps in the instrument cluster, seat
belts" ( Y page 260).
Emergency Tensioning Devices, seat
belt force limiters
GWARNING
Pyrotechnic Emergency Tensioning Devices
that have been deployed are no longer opera-
tional and are unable to perform their inten-
ded protective function. This poses an
increased risk of injury or even fatal injury.
Therefore, have pyrotechnic Emergency Ten-
sioning Devices which have been triggered
immediately replaced at a qualified specialist
workshop.
! If the front-passenger seat is unoccupied,
do not insert the belt tongue into the buckle of the front-passenger seat. This may oth-
erwise lead to the triggering of the Emer-
gency Tensioning Device in the event of an accident, which will then need to be
replaced.
iVehicles with PRE-SAFE ®
: an electric
motor is used by PRE-SAFE ®
to trigger the
tightening of the seat belt in hazardous sit- uations. This procedure is reversible.
The seat belts for the front seats and rear
outer seats are equipped with Emergency
Tensioning Devices and seat belt force limit-
ers.
The ETDs tighten the seat belts in an accident,
pulling them close against the body.
The ETDs do not correct incorrect seat posi-
tions or incorrectly fastened seat belts.
The ETDs do not pull vehicle occupants back
towards the backrest.
The ETDs can only be activated when: R the ignition is switched on
R the restraint systems are operational; see
"SRS warning lamp "( Y page 43)
60Occupant safety
Safety
Page 63 of 386
Rthe belt tongue is engaged in the buckle on
each of the lap-shoulder belts in the front
R the front-passenger seat is occupied and
the belt tongue is engaged in the buckle on
the front-passenger side
The ETDs on the outside seats in the rear
compartment are triggered independently of
the lock status of the seat belts.
The Emergency Tensioning Devices are trig-
gered depending on the type and severity of
an accident, if:
R in certain situations where the vehicle rolls
over and the system determines that it can
provide additional protection
R in the event of a head-on or rear-end colli-
sion, the vehicle decelerates or accelerates
rapidly in a longitudinal direction during the initial stages of the impact
R in the event of a side impact, the vehicle
decelerates or accelerates rapidly in a lat-
eral direction on the side opposite the
impact
If the ETDs are deployed, you will hear a bang,
and a small amount of powder may also be
released. Only in rare cases will the bang
affect your hearing. The powder that is
released generally does not constitute a
health hazard and does not indicate that there is a fire in the vehicle. The dust might cause
some temporary breathing difficulty for peo-
ple with asthma or other breathing trouble. To avoid this, you may wish to get out of the
vehicle or open the windows as soon as it is
safe to do so. The 6 SRS warning lamp
lights up.
If the seat belt is also equipped with a seat
belt force limiter and this is triggered, the
force exerted by the seat belt on the vehicle
occupant is reduced.
The seat belt force limiters for the front seats
are synchronized with the front air bags,
which absorb part of the deceleration force.
This results in the force exerted on the occu-
pant being distributed over a greater area.Children in the vehicle
Child restraint systems
Important safety notes
Mercedes-Benz recommends that you always
properly secure all infants and children with a child or infant seat restraint system for the
trip.
The use of seat belts and infant and child
restraint systems is required by law in: R all 50 states
R the U.S. territories
R the District of Columbia
R all Canadian provinces
Infants and children must always be seated in an appropriate infant or child restraint systemrecommended for the size and weight of the
child. The infant or child restraint system
must be properly secured in accordance with
the manufacturer's instructions.
All infant or child restraint systems must meet
the following standards:
R U.S. Federal Motor Vehicle Safety Stand-
ards 213 and 225
R Canadian Motor Vehicle Safety Standards
213 and 210.2
Confirmation that the child restraint system
corresponds to the standards can be found
on an instruction label on the child restraint
system. This confirmation can also be found
in the installation instructions that are inclu-
ded with the child restraint system.
Always read and follow the manufacturer's
instructions when using an infant or child
restraint system or booster seat.
Observe the warning labels in the vehicle inte-
rior or on the infant or child restraint.
GWARNING
According to accident statistics, children are
safer when properly restrained in the rear
seating positions than in the front seating
position. Thus, we strongly recommend that
children be placed in the rear seats whenever
Children in the vehicle61
Safety
Z
Page 70 of 386
Driving safety systems
Overview of driving safety systems
In this section, you will find information aboutthe following driving safety systems:
R ABS ( Anti-lock Braking System)
( Y page 68)
R BAS ( Brake Assist System) ( Y page 69)
R BAS PLUS ( Brake Assist System Plus)
( Y page 69)
R ESP ®
(E lectronic Stability Program)
( Y page 70)
R EBD ( Electronic Brake force Distribution)
( Y page 73)
R PRE-SAFE ®
Brake ( Y page 73)
Important safety notes
If you fail to adapt your driving style or if you
are inattentive, the driving safety systems can
neither reduce the risk of an accident nor
override the laws of physics. Driving safety
systems are merely aids designed to assist
driving. You are responsible for the distance
to the vehicle in front, for vehicle speed and
for braking in good time. Always adapt your
driving style to suit the prevailing road,
weather and traffic conditions and maintain a
safe distance from the vehicle in front. Drive
carefully.
The driving safety systems described only
work as effectively as possible when there is
adequate contact between the tires and the
road surface. Please pay special attention to
the notes on tires, recommended minimum
tire tread depths, etc. ( Y page 332).
In wintry driving conditions, always use winter
tires (M+S tires) and if necessary, snow
chains. Only in this way will the driving safety
systems described in this section work as
effectively as possible.
ABS (Anti-lock Braking System)
General information
ABS regulates brake pressure in such a way
that the wheels do not lock when you brake.
This allows you to continue steering the vehi- cle when braking.
The yellow ! ABS warning lamp in the
instrument cluster lights up when the ignition is switched on. It goes out when the engine is
running.
Important safety notes
iObserve the "Important safety notes" sec-
tion ( Y page 68).
GWARNING
If ABS is faulty, the wheels could lock when
braking. The steerability and braking charac-
teristics may be severely impaired. Addition-
ally, further driving safety systems are deac-
tivated. There is an increased danger of skid-
ding and accidents.
Drive on carefully. Have ABS checked imme-
diately at a qualified specialist workshop.
When ABS is malfunctioning, other systems,
including driving safety systems, will also
become inoperative. Observe the information on the ABS warning lamp ( Y page 262) and
display messages which may be shown in the
instrument cluster ( Y page 236).
ABS works from a speed of about 5 mph
(8 km/h), regardless of road-surface condi-
tions. ABS works on slippery surfaces, even if
you only brake gently.
Brakes
X If ABS intervenes: continue to depress the
brake pedal vigorously until the braking sit-
uation is over.
X To make a full brake application:
depress the brake pedal with full force.
If ABS intervenes when braking, you will feel a pulsing in the brake pedal.
68Driving safety systems
Safety
Page 74 of 386
It may be best to deactivate ESP®
in the fol-
lowing situations:
R when using snow chains
R in deep snow
R on sand or gravel
iActivate ESP ®
as soon as the situations
described above no longer apply. ESP ®
will
otherwise not be able to stabilize the vehi-
cle if the vehicle starts to skid or a wheel
starts to spin.
! Avoid spinning the driven wheels for an
extended period with ESP ®
deactivated.
You could otherwise damage the drivetrain.
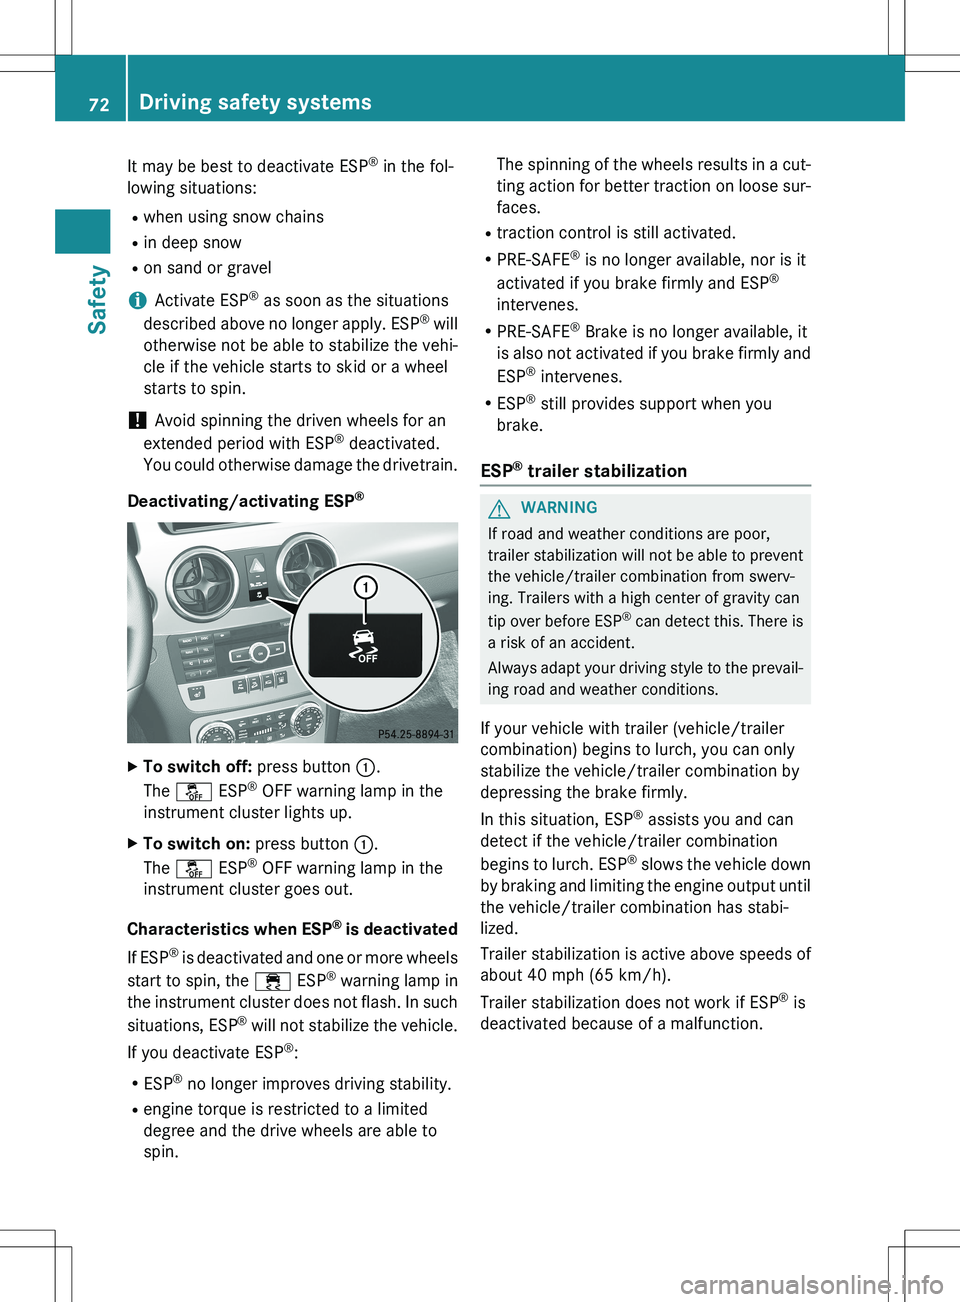
Deactivating/activating ESP ®
X
To switch off: press button :.
The å ESP®
OFF warning lamp in the
instrument cluster lights up.
X To switch on: press button :.
The å ESP®
OFF warning lamp in the
instrument cluster goes out.
Characteristics when ESP ®
is deactivated
If ESP ®
is deactivated and one or more wheels
start to spin, the ÷ ESP®
warning lamp in
the instrument cluster does not flash. In such
situations, ESP ®
will not stabilize the vehicle.
If you deactivate ESP ®
:
R ESP ®
no longer improves driving stability.
R engine torque is restricted to a limited
degree and the drive wheels are able to
spin. The spinning of the wheels results in a cut-
ting action for better traction on loose sur-faces.
R traction control is still activated.
R PRE-SAFE ®
is no longer available, nor is it
activated if you brake firmly and ESP ®
intervenes.
R PRE-SAFE ®
Brake is no longer available, it
is also not activated if you brake firmly and
ESP ®
intervenes.
R ESP ®
still provides support when you
brake.
ESP® trailer stabilization
GWARNING
If road and weather conditions are poor,
trailer stabilization will not be able to prevent the vehicle/trailer combination from swerv-
ing. Trailers with a high center of gravity can
tip over before ESP ®
can detect this. There is
a risk of an accident.
Always adapt your driving style to the prevail- ing road and weather conditions.
If your vehicle with trailer (vehicle/trailer
combination) begins to lurch, you can only
stabilize the vehicle/trailer combination by
depressing the brake firmly.
In this situation, ESP ®
assists you and can
detect if the vehicle/trailer combination
begins to lurch. ESP ®
slows the vehicle down
by braking and limiting the engine output until
the vehicle/trailer combination has stabi-
lized.
Trailer stabilization is active above speeds of
about 40 mph (65 km/h).
Trailer stabilization does not work if ESP ®
is
deactivated because of a malfunction.
72Driving safety systems
Safety
Page 83 of 386
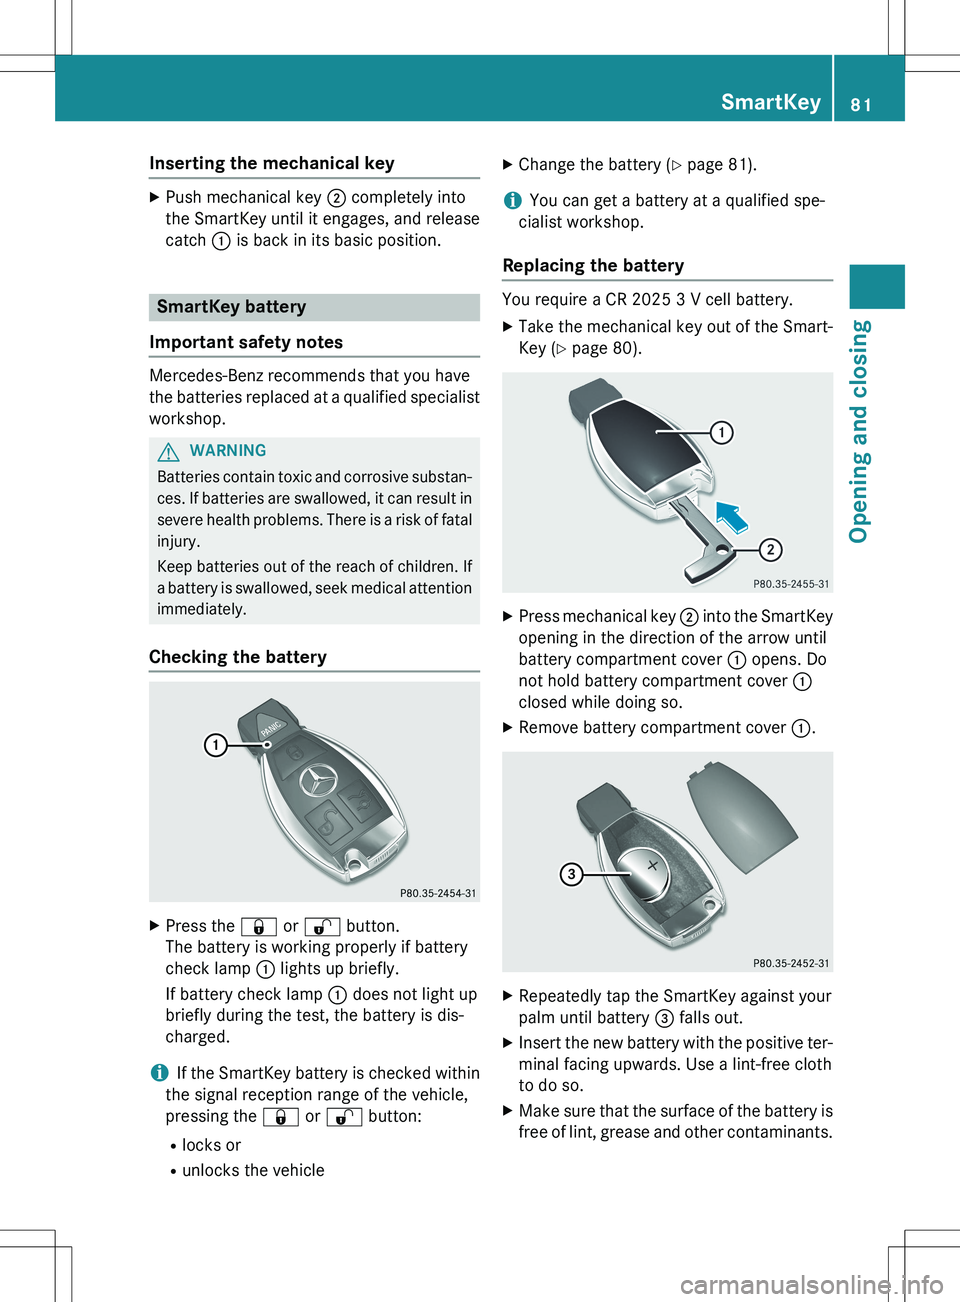
Inserting the mechanical key
XPush mechanical key ; completely into
the SmartKey until it engages, and release
catch : is back in its basic position.
SmartKey battery
Important safety notes
Mercedes-Benz recommends that you have
the batteries replaced at a qualified specialist workshop.
GWARNING
Batteries contain toxic and corrosive substan- ces. If batteries are swallowed, it can result in
severe health problems. There is a risk of fatal injury.
Keep batteries out of the reach of children. If
a battery is swallowed, seek medical attention immediately.
Checking the battery
X Press the & or % button.
The battery is working properly if battery
check lamp : lights up briefly.
If battery check lamp : does not light up
briefly during the test, the battery is dis-
charged.
iIf the SmartKey battery is checked within
the signal reception range of the vehicle,
pressing the & or % button:
R locks or
R unlocks the vehicle X
Change the battery ( Y page 81).
iYou can get a battery at a qualified spe-
cialist workshop.
Replacing the battery
You require a CR 2025 3 V cell battery.
X Take the mechanical key out of the Smart-
Key ( Y page 80).
X
Press mechanical key ; into the SmartKey
opening in the direction of the arrow until
battery compartment cover : opens. Do
not hold battery compartment cover :
closed while doing so.
X Remove battery compartment cover :.
X
Repeatedly tap the SmartKey against your
palm until battery = falls out.
X Insert the new battery with the positive ter-
minal facing upwards. Use a lint-free cloth
to do so.
X Make sure that the surface of the battery is
free of lint, grease and other contaminants.
SmartKey81
Opening and closing
Z
Page 111 of 386
Crash-responsive EASY-EXIT feature
If the crash-responsive EASY-EXIT feature is
triggered in an accident, the steering columnwill move upwards when the driver's door is
opened. This occurs irrespective of the posi-
tion of the SmartKey in the ignition lock. This
makes it easier to exit the vehicle and rescue
the occupants.
The crash-responsive EASY-EXIT feature is
only operational if the EASY-EXIT/ENTRY fea- ture is activated in the on-board computer.
Mirrors
Rear-view mirror
X Anti-glare mode: flick anti-glare lever :
forwards or back.
Exterior mirrors
Adjusting the exterior mirrors
GWARNING
You could lose control of your vehicle if you do the following while driving:
R adjust the driver's seat, head restraint,
steering wheel or mirrors
R fasten the seat belt
There is a risk of an accident.
Adjust the driver's seat, head restraint, steer-
ing wheel and mirror and fasten your seat belt before starting the engine.
GWARNING
The exterior mirror on the front-passenger
side reduces the size of the image. Visible
objects are actually closer than they appear.
This means that you could misjudge the dis-
tance from road users traveling behind, e.g.
when changing lane. There is a risk of an acci-
dent.
For this reason, always make sure of the
actual distance from the road users traveling
behind by glancing over your shoulder.
The convex exterior mirrors provide a larger
field of vision.
The exterior mirrors are automatically heated
after starting the vehicle if the rear window
defroster is switched on and the outside tem- perature is low. Heating takes a maximum of
10 minutes.
iYou can also heat up the exterior mirrors
manually by switching on the rear window
defroster.
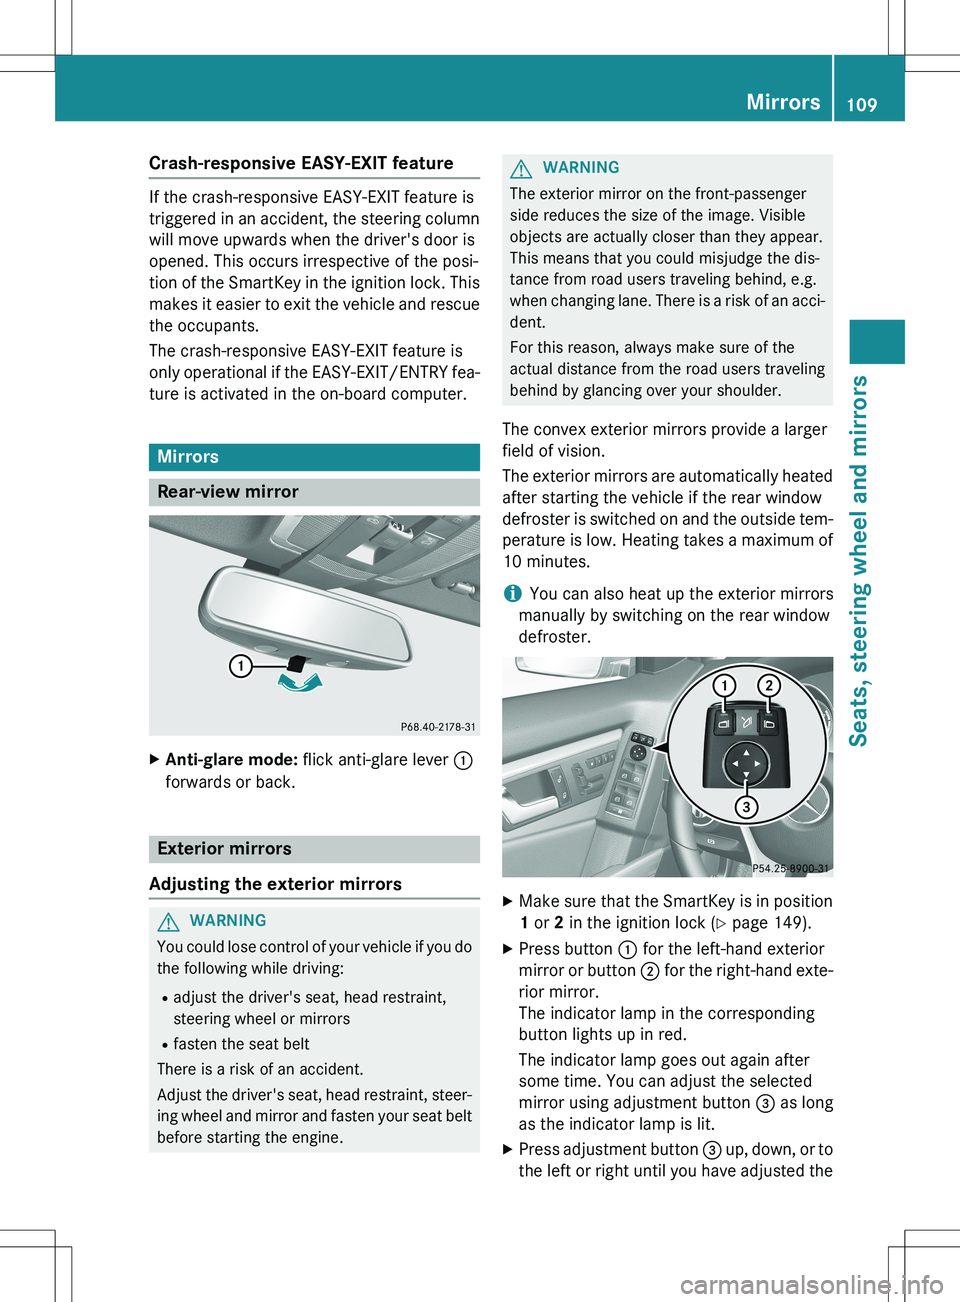
X Make sure that the SmartKey is in position
1 or 2 in the ignition lock ( Y page 149).
X Press button : for the left-hand exterior
mirror or button ; for the right-hand exte-
rior mirror.
The indicator lamp in the corresponding
button lights up in red.
The indicator lamp goes out again after
some time. You can adjust the selected
mirror using adjustment button = as long
as the indicator lamp is lit.
X Press adjustment button = up, down, or to
the left or right until you have adjusted the
Mirrors109
Seats, steering wheel and mirrors
Z
Page 118 of 386

Useful information
iThis Operator's Manual describes all
models and all standard and optional equip- ment of your vehicle available at the time of
publication of the Operator's Manual.
Country-specific differences are possible.
Please note that your vehicle may not be
equipped with all features described. This
also applies to safety-related systems and
functions.
iRead the information on qualified special-
ist workshops ( Y page 27).
Exterior lighting
General notes
For reasons of safety, Mercedes-Benz recom-
mends that you drive with the lights switchedon even during the daytime. In some coun-
tries, operation of the headlamps varies due
to legal requirements and self-imposed obli-
gations.
Setting the exterior lighting
Setting options
Exterior lighting can be set using: R the light switch
R the combination switch ( Y page 118)
R the on-board computer ( Y page 231)
Light switch
Operation
1 WLeft-hand standing lamps
2 XRight-hand standing lamps
3 TParking lamps, license plate and
instrument cluster lighting
4 ÃAutomatic headlamp mode, control-
led by the light sensor
5 LLow-beam/high-beam headlamps
B RRear fog lamp
C NFog lamp (only vehicles with front
fog lamps)
If you hear a warning tone when you leave the
vehicle, the lights may still be switched on. X Turn the light switch to Ã.
The exterior lighting (except the parking/
standing lamps) switches off automatically if
you: R remove the SmartKey from the ignition lock
R open the driver's door with the SmartKey in
position 0
Automatic headlamp mode
GWARNING
When the light switch is set to Ã, the low-
beam headlamps may not be switched on
automatically if there is fog, snow or other
causes of poor visibility due to the weather
conditions such as spray. There is a risk of an
accident.
In such situations, turn the light switch to L .
116Exterior lighting
Lights and windshield wipers
Page 119 of 386

The automatic headlamp feature is only an
aid. The driver is responsible for the vehicle'slighting at all times. Ã is the favored light switch setting. The
light setting is automatically selected accord- ing to the brightness of the ambient light
(exception: poor visibility due to weather con-
ditions such as fog, snow or spray):
R SmartKey in position 1 in the ignition lock:
the parking lamps are switched on or off
automatically depending on the brightness
of the ambient light.
R With the engine running: if you have acti-
vated the "Daytime running lamps" func-
tion via the on-board computer, the day-
time running lamps or the parking lamps
and the low-beam headlamps are switched
on or off automatically depending on the
brightness of the ambient light.
X To switch on automatic headlamp
mode: turn the light switch to Ã.
Canada only:
The daytime running lamps improve the visi-
bility of your vehicle during the day. The day-
time running lamps function is required by law in Canada. It cannot therefore be deactivated.
When the engine is running and the vehicle is
stationary: if you move the selector lever from
a drive position to P, the daytime running
lamps/low-beam headlamps go out after
three minutes.
When the engine is running, the vehicle is
stationary and in bright ambient light: if you
turn the light switch to T, the daytime
running lamps and parking lamps switch on.
If the engine is running and you turn the light switch to L, the manual settings take
precedence over the daytime running lamps.
USA only:
The daytime running lamps improve the visi-
bility of your vehicle during the day. To do this,
the daytime running lamps function must be
switched on using the on-board computer
( Y page 231). If the engine is running and you turn the light
switch to T or L , the manual settings
take precedence over the daytime running
lamps.
Low-beam headlamps
GWARNING
When the light switch is set to Ã, the low-
beam headlamps may not be switched on
automatically if there is fog, snow or other
causes of poor visibility due to the weather
conditions such as spray. There is a risk of an
accident.
In such situations, turn the light switch to L .
Even if the light sensor does not detect that it is dark, the parking lamps and low-beam
headlamps switch on when the ignition is
switched on and the light switch is set to the L position. This is a particularly useful
function in the event of rain and fog. X To switch on the low-beam headlamps:
turn the SmartKey in the ignition lock to
position 2 or start the engine.
X Turn the light switch to L.
The green L indicator lamp in the instru-
ment cluster lights up.
Front fog lamps
In conditions where visibility is poor due to
fog, snow or rain, the fog lamps improve vis-
ibility as well as making it easier for other road
users to see you. They can be operated
together with the parking lamps or together
with the parking lamps and low-beam head-
lamps. X To switch on the front fog lamps: turn
the SmartKey in the ignition lock to position
2 or start the engine.
X Turn the light switch to L or à .
Exterior lighting117
Lights and windshield wipers
Z