2015 MERCEDES-BENZ GLK-CLASS SUV key
[x] Cancel search: keyPage 166 of 386
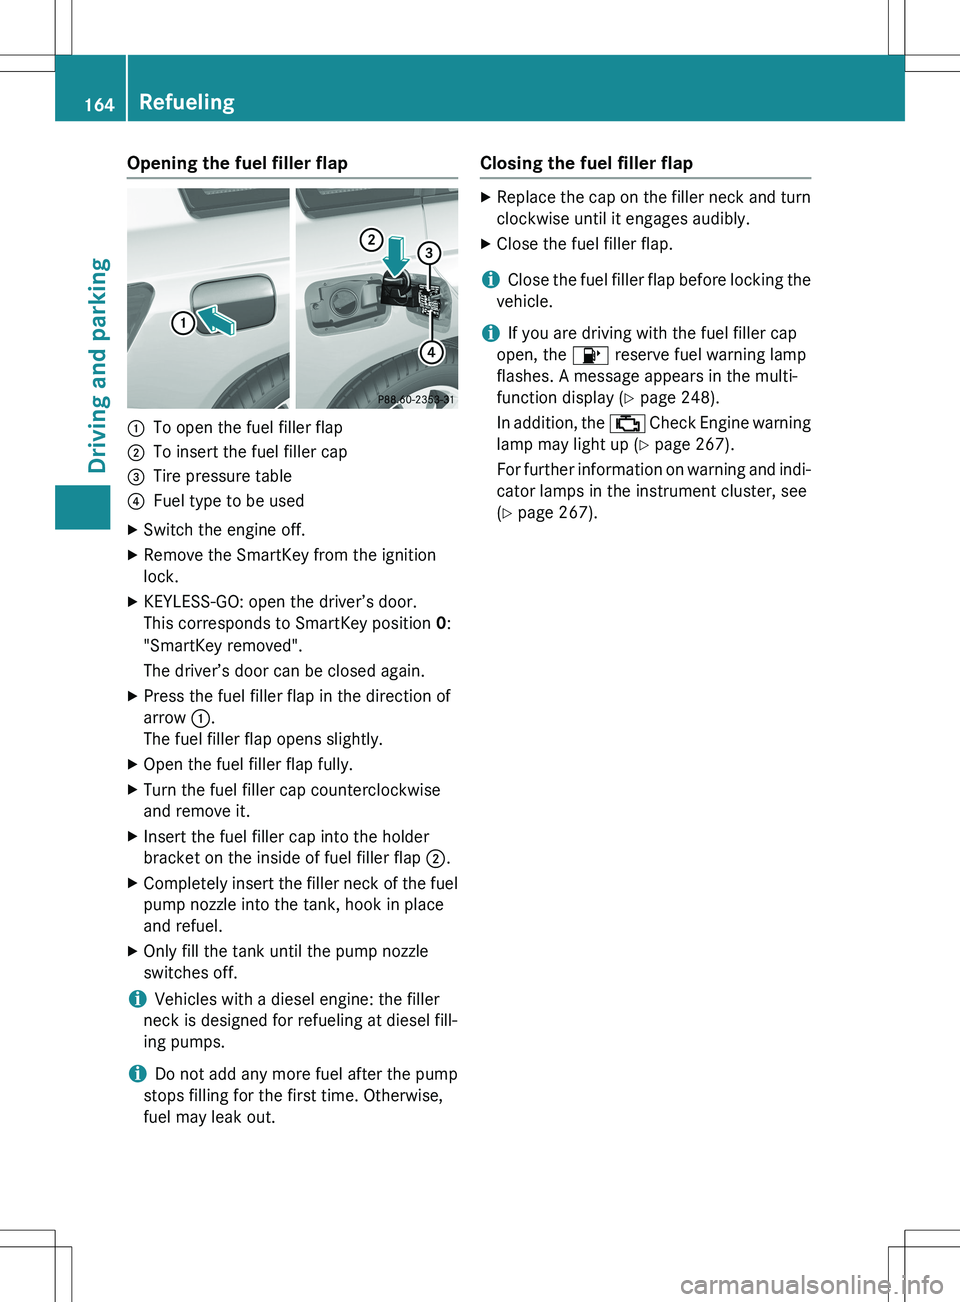
Opening the fuel filler flap
:To open the fuel filler flap
;To insert the fuel filler cap
=Tire pressure table
?Fuel type to be used
X Switch the engine off.
X Remove the SmartKey from the ignition
lock.
X KEYLESS-GO: open the driver’s door.
This corresponds to SmartKey position 0:
"SmartKey removed".
The driver’s door can be closed again.
X Press the fuel filler flap in the direction of
arrow :.
The fuel filler flap opens slightly.
X Open the fuel filler flap fully.
X Turn the fuel filler cap counterclockwise
and remove it.
X Insert the fuel filler cap into the holder
bracket on the inside of fuel filler flap ;.
X Completely insert the filler neck of the fuel
pump nozzle into the tank, hook in place
and refuel.
X Only fill the tank until the pump nozzle
switches off.
iVehicles with a diesel engine: the filler
neck is designed for refueling at diesel fill-
ing pumps.
iDo not add any more fuel after the pump
stops filling for the first time. Otherwise,
fuel may leak out.
Closing the fuel filler flap
X Replace the cap on the filler neck and turn
clockwise until it engages audibly.
X Close the fuel filler flap.
iClose the fuel filler flap before locking the
vehicle.
iIf you are driving with the fuel filler cap
open, the 8 reserve fuel warning lamp
flashes. A message appears in the multi-
function display ( Y page 248).
In addition, the ; Check Engine warning
lamp may light up ( Y page 267).
For further information on warning and indi- cator lamps in the instrument cluster, see
( Y page 267).
164Refueling
Driving and parking
Page 167 of 386
Problems with fuel and the fuel tank
ProblemPossible causes/consequences and M Solutions
Fuel is leaking from the
vehicle.The fuel line or the fuel tank is faulty.
GWARNING
Risk of explosion or fire.
X Turn the SmartKey to position 0 immediately and remove it
( Y page 149).
X Do not restart the engine under any circumstances.
X Consult a qualified specialist workshop.
The engine does not
start.The fuel tank of a vehicle with a diesel engine has been run com-
pletely dry.
X Refuel the vehicle with at least 5.3 US qt (5 liters) of diesel.
X Turn the ignition on for approximately ten seconds
(Y page 149).
X Start the engine continuously for up to ten seconds unt il it runs
smoothly.
If the engine does not start: X Turn the ignition on again for approximately ten seconds
(Y page 149).
X Start the engine again continuously for up to ten seco nds until it
runs smoothly.
If the engine does not start after three attempts:
X Consult a qualified specialist workshop.
The fuel filler flap can-
not be opened.The fuel filler flap is not unlocked.
X Unlock the vehicle ( Y page 78).
The SmartKey battery is discharged or nearly discharged.
X Unlock the vehicle using the mechanical key ( Y page 80).
The fuel filler flap is unlocked, but the opening mecha nism is jam-
med.
X Consult a qualified specialist workshop.
DEF (BlueTEC vehicles only)
Important notes on use
To function properly, BlueTEC exhaust gas
aftertreatment must be operated with the
reducing agent DEF. Adding DEF is one of the tasks performed during maintenance. Under
normal operating conditions, a tank of DEF
lasts until the next service due date.
When the supply of DEF is almost used up, theCheck Additive See Operator's Manual
Refueling165
Driving and parking
Z
Page 170 of 386
Parking
Important safety notes
GWARNING
Flammable material such as leaves, grass or
twigs may ignite if they come into contact withhot parts of the exhaust system or exhaust
gas flow. There is a risk of fire.
Park the vehicle so that no flammable mate-
rials come into contact with parts of the vehi- cle which are hot. Take particular care not to
park on dry grassland or harvested grain
fields.
GWARNING
If you switch off the ignition while driving,
safety-relevant functions are only available
with limitations, or not at all. This could affect, for example, the power steering and the brake
boosting effect. You will require considerably
more effort to steer and brake. There is a risk
of an accident.
Do not switch off the ignition while driving.
GWARNING
If you leave children unsupervised in the vehi- cle, they could set it in motion by, for example:
R release the parking brake.
R shift the automatic transmission out of the
parking position P.
R start the engine.
In addition, they may operate vehicle equip-
ment and become trapped. There is a risk of
an accident and injury.
When leaving the vehicle, always take the
SmartKey with you and lock the vehicle. Never
leave children unsupervised in the vehicle.
! Always secure the vehicle correctly
against rolling away. Otherwise, the vehicle
or its drivetrain could be damaged. To ensure that the vehicle is secured against
rolling away unintentionally:
R the parking brake must be applied.
R the transmission must be in position P and
the SmartKey must be removed from the
ignition lock.
R the front wheels must be turned towards
the curb on steep uphill or downhill gradi-
ents.
Switching off the engine
Important safety notes
GWARNING
The automatic transmission switches to neu-
tral position N when you switch off the engine.
The vehicle may roll away. There is a risk of an
accident.
After switching off the engine, always switch
to parking position P. Prevent the parked vehi-
cle from rolling away by applying the parking
brake.
Vehicles with automatic transmission
X Apply the parking brake firmly.
X Shift the transmission to position P.
Using the SmartKey
X Turn the SmartKey to position 0 in the igni-
tion lock and remove it.
The immobilizer is activated.
iThe SmartKey can only be removed if the
transmission is in position P.
Using KEYLESS-GO X Press the Start/Stop button ( Y page 149).
The engine stops and all the indicator
lamps in the instrument cluster go out.
iWhen the driver's door is closed, this cor-
responds to key position 1. When the driv-
er's door is open, this corresponds to key
position 0: "Key removed".
168Parking
Driving and parking
Page 171 of 386
iIn the event of an emergency, the engine
can be turned off while the vehicle is in
motion by pressing and holding the Start/
Stop button for three seconds.
Parking brake
GWARNING
If you must brake the vehicle with the parking brake, the braking distance is considerably
longer and the wheels could lock. There is an
increased danger of skidding and accidents.
Only use the parking brake to brake the vehi-
cle when the service brake is faulty. Do not
apply the parking brake too firmly. If the
wheels lock, release the parking brake until
the wheels begin turning again.
GWARNING
If you leave children unsupervised in the vehi- cle, they could set it in motion by, for example:
R release the parking brake.
R shift the automatic transmission out of the
parking position P.
R start the engine.
In addition, they may operate vehicle equip-
ment and become trapped. There is a risk of
an accident and injury.
When leaving the vehicle, always take the
SmartKey with you and lock the vehicle. Never
leave children unsupervised in the vehicle.
If you brake the vehicle with the parking
brake, the brake lamps will not light up.
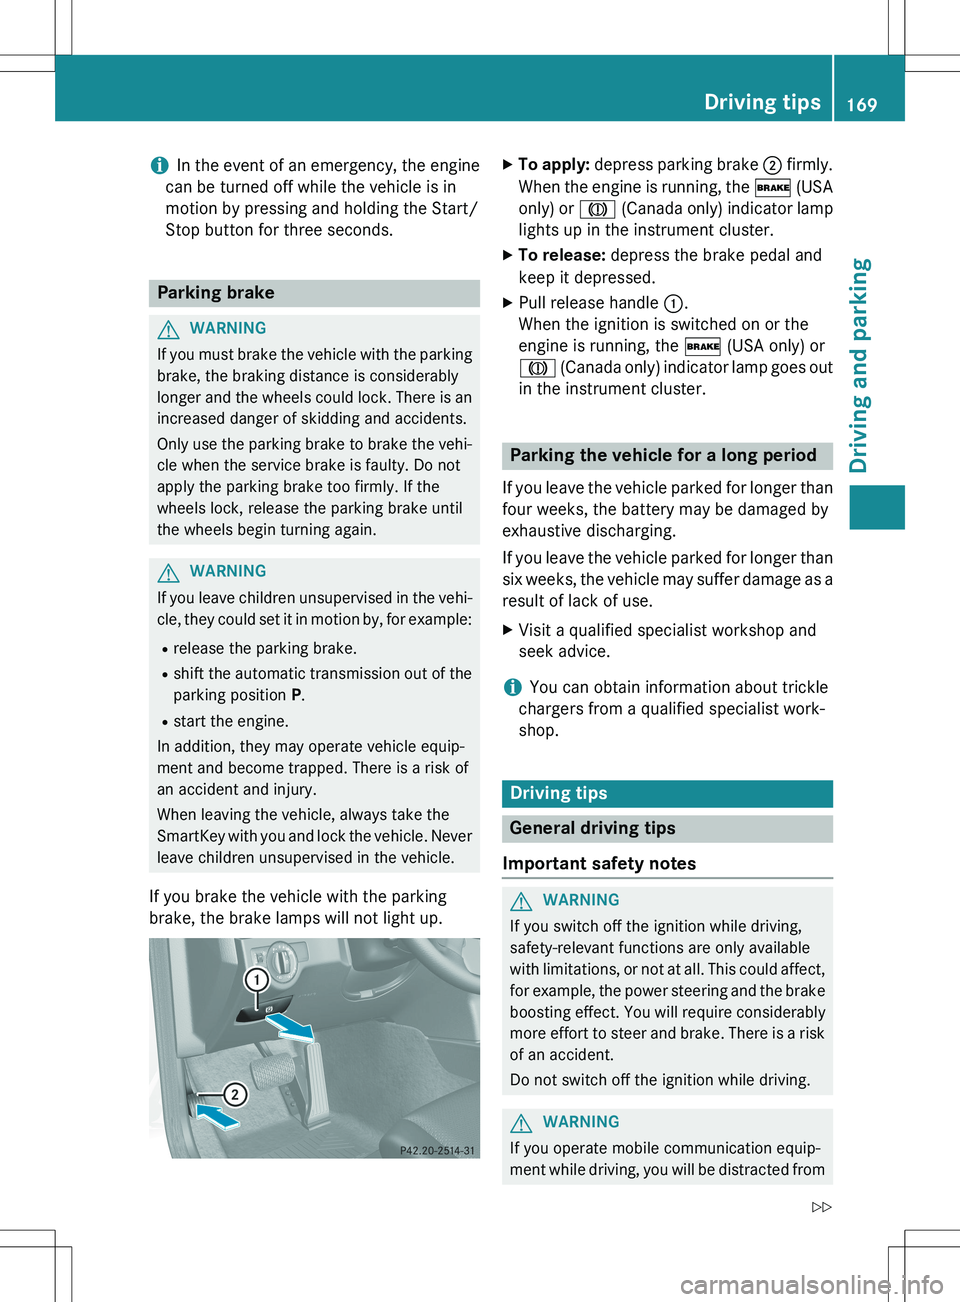
X To apply: depress parking brake ; firmly.
When the engine is running, the $ (USA
only) or J (Canada only) indicator lamp
lights up in the instrument cluster.
X To release: depress the brake pedal and
keep it depressed.
X Pull release handle :.
When the ignition is switched on or the
engine is running, the $ (USA only) or
J (Canada only) indicator lamp goes out
in the instrument cluster.
Parking the vehicle for a long period
If you leave the vehicle parked for longer than
four weeks, the battery may be damaged by
exhaustive discharging.
If you leave the vehicle parked for longer than six weeks, the vehicle may suffer damage as a
result of lack of use. X Visit a qualified specialist workshop and
seek advice.
iYou can obtain information about trickle
chargers from a qualified specialist work-
shop.
Driving tips
General driving tips
Important safety notes
GWARNING
If you switch off the ignition while driving,
safety-relevant functions are only available
with limitations, or not at all. This could affect, for example, the power steering and the brake
boosting effect. You will require considerably
more effort to steer and brake. There is a risk
of an accident.
Do not switch off the ignition while driving.
GWARNING
If you operate mobile communication equip-
ment while driving, you will be distracted from
Driving tips169
Driving and parking
Z
Page 175 of 386
fied specialist workshop. Consult a qualified
specialist workshop to arrange this.
Have brake pads installed and brake fluid
replaced at a qualified specialist workshop.
! Vehicles with 4MATIC: function or per-
formance tests may only be carried out on
a 2-axle dynamometer. If you are planning
to have the vehicle tested on such a dyna-
mometer, contact an authorized Mercedes- Benz Center to obtain further information
first. Otherwise, you could damage the
drive train or the brake system.
! As the ESP ®
system operates automati-
cally, the engine and the ignition must be
switched off (SmartKey in position 0 or 1 in
the ignition lock) when:
R testing the parking brake on a brake
dynamometer.
R you intend to have the vehicle towed with
the front or rear axle raised (not permit-
ted for vehicles with 4MATIC).
Braking maneuvers triggered automatically
by ESP ®
may seriously damage the brake
system.
If the brake system has only been subject to
moderate loads, you should test the function- ality of your brakes at regular intervals. To do so, press firmly on the brake pedal when driv-
ing at a high speed. This improves the grip of
the brake pads.
You can find a description of Brake Assist
(BAS) on ( Y page 69).
Mercedes-Benz recommends that you only
have brake pads/linings installed on your
vehicle which have been approved for
Mercedes-Benz vehicles or which correspond to an equivalent quality standard. Brake
pads/linings which have not been approved
for Mercedes-Benz vehicles or which are not
of an equivalent quality could affect your vehi-
cle's operating safety.
Mercedes-Benz recommends that you only
use brake fluid that has been specially
approved for your vehicle by Mercedes-Benz,
or which corresponds to an equivalent quality standard. Brake fluid which has not been
approved for Mercedes-Benz vehicles or
which is not of an equivalent quality could
affect your vehicle's operating safety.
Parking brake
GWARNING
If you must brake the vehicle with the parking
brake, the braking distance is considerably
longer and the wheels could lock. There is an
increased danger of skidding and accidents.
Only use the parking brake to brake the vehi-
cle when the service brake is faulty. Do not
apply the parking brake too firmly. If the
wheels lock, release the parking brake until
the wheels begin turning again.
If you brake the vehicle with the parking
brake, the brake lamps will not light up.
If you drive on wet roads or dirt-covered sur-
faces, road salt and/or dirt could get into the parking brake.
In order to prevent corrosion and a reduction
in the braking power of the parking brake,
observe the following:
R gently depress the parking brake from time
to time before beginning the journey.
R Drive for approximately 110 yds (100 m) at
a maximum speed of 12 mph (20 km/h).
Driving on wet roads
Hydroplaning
If water has accumulated to a certain depth
on the road surface, there is a danger of
hydroplaning occurring, even if: R you drive at low speeds.
R the tires have adequate tread depth.
For this reason, in the event of heavy rain or in
conditions in which hydroplaning may occur,
you must drive in the following manner:
R lower your speed.
R avoid ruts.
Driving tips173
Driving and parking
Z
Page 188 of 386

iIn wintry driving conditions, the maximum
effect of 4MATIC can only be achieved if
you use winter tires (M+S tires), with snow
chains if necessary.
! When testing the parking brake, operate
the vehicle only briefly (for a maximum of
ten seconds) on a brake test dynamometer. When doing this, turn the SmartKey to posi-
tion 0 or 1 in the ignition. Failure to do this
can cause damage to the drive train or the brake system.
! A function or performance test should
only be carried out on a two-axle dyna-
mometer. Before you operate the vehicle
on such a dynamometer, please consult a
qualified workshop. You could otherwise
damage the drive train or the brake system.
PARKTRONIC
Important safety notes
PARKTRONIC is an electronic parking aid with ultrasonic sensors. It monitors the area
around your vehicle using six sensors in the
front bumper and four sensors in the rear
bumper. PARKTRONIC indicates visually and
audibly the distance between your vehicle
and an object.
PARKTRONIC is only an aid. It is not a replace-
ment for your attention to your immediate
surroundings. You are always responsible for
safe maneuvering, parking and exiting a park-
ing space. When maneuvering, parking or
pulling out of a parking space, make sure that there are no persons, animals or objects in
the area in which you are maneuvering.
! When parking, pay particular attention to
objects above or below the sensors, such
as flower pots or trailer drawbars.
PARKTRONIC does not detect such objects
when they are in the immediate vicinity of
the vehicle. You could damage the vehicle
or the objects.
The sensors may not detect snow and other
objects that absorb ultrasonic waves. Ultrasonic sources such as an automatic
car wash, the compressed-air brakes on a
truck or a pneumatic drill could cause
PARKTRONIC to malfunction.
PARKTRONIC may not function correctly on
uneven terrain.
PARKTRONIC is activated automatically when you:
R switch on the ignition
R shift the transmission to position D, R or N
R release the parking brake
PARKTRONIC is deactivated at speeds above
11 mph (18 km/h). It is reactivated at lower
speeds.
:Sensors in the front bumper, left-hand
side (example)
Range of the sensors
General notes
PARKTRONIC does not take objects into con-
sideration that are:
R below the detection range, e.g. people, ani-
mals or objects
R above the detection range, e.g. overhang-
ing loads, truck overhangs or loading ramps
The sensors must be free from dirt, ice or
slush. They can otherwise not function cor-
rectly. Clean the sensors regularly, taking
care not to scratch or damage them
( Y page 309).
186Driving systems
Driving and parking
Page 190 of 386
Transmission
positionWarning display
DFront area activated
R, N or the vehicle
is rolling back-
wardsRear and front areas
activated
PNo areas activated
One or more segments light up as the vehicle
approaches an obstacle, depending on the
vehicle's distance from the obstacle.
From the:
R sixth segment onwards, you will hear an
intermittent warning tone for approx-
imately two seconds.
R seventh segment onwards, you will hear a
warning tone for approximately two sec-
onds. This indicates that you have now
reached the minimum distance.
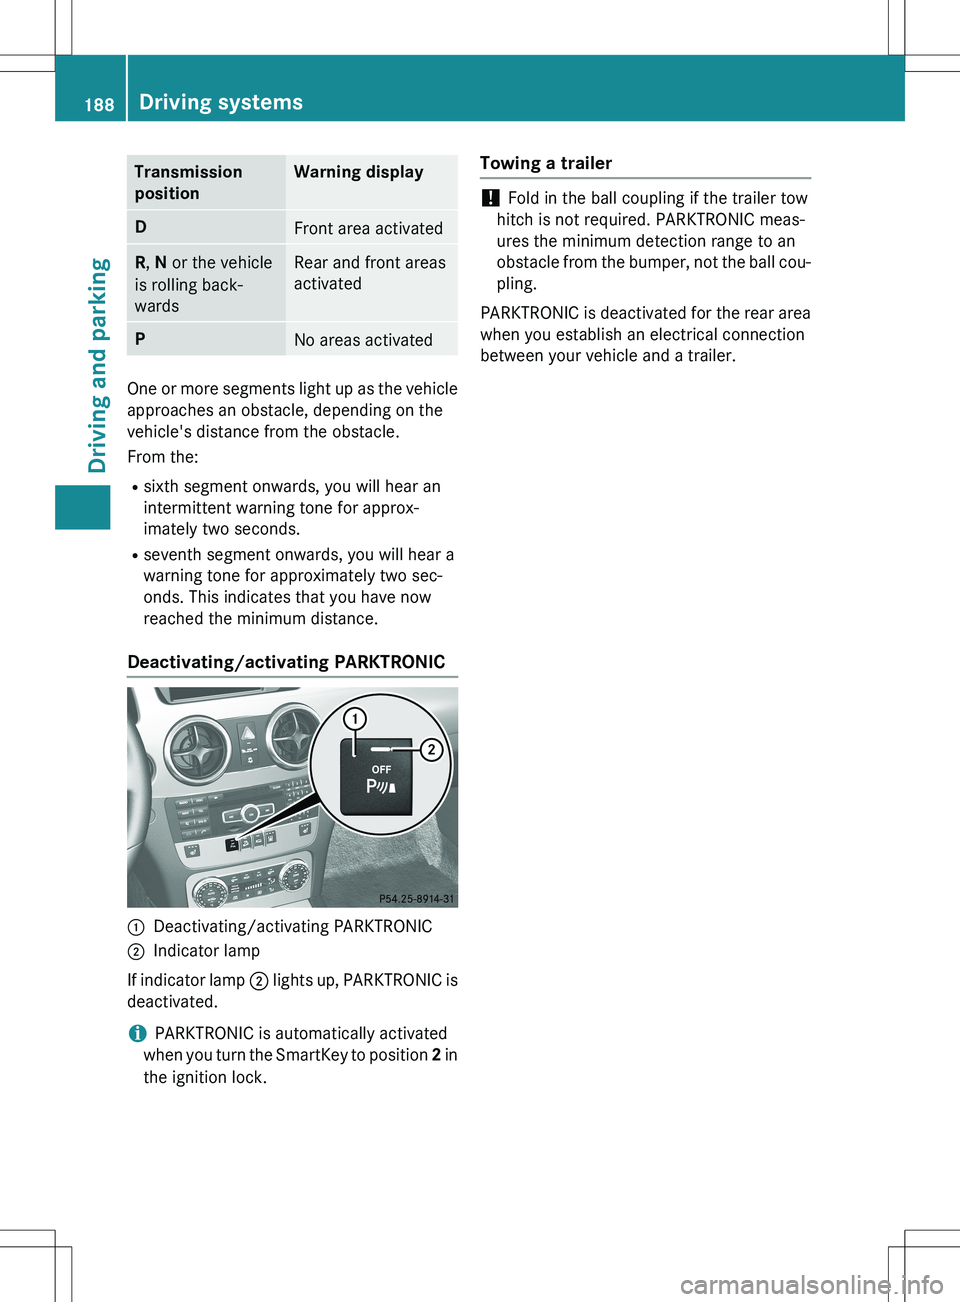
Deactivating/activating PARKTRONIC
:Deactivating/activating PARKTRONIC
;Indicator lamp
If indicator lamp ; lights up, PARKTRONIC is
deactivated.
iPARKTRONIC is automatically activated
when you turn the SmartKey to position 2 in
the ignition lock.
Towing a trailer
! Fold in the ball coupling if the trailer tow
hitch is not required. PARKTRONIC meas-
ures the minimum detection range to an
obstacle from the bumper, not the ball cou- pling.
PARKTRONIC is deactivated for the rear area
when you establish an electrical connection
between your vehicle and a trailer.
188Driving systems
Driving and parking
Page 196 of 386
Rif the area is lit by fluorescent bulbs or LED
lighting (the display may flicker)
R if there is a sudden change in temperature,
e.g. when driving into a heated garage in
winter
R if the camera lens is dirty or obstructed
R if the rear of your vehicle is damaged. In this
event, have the camera position and setting checked at a qualified specialist workshop
The field of vision and other functions of the
rear view camera may be restricted due to
additional accessories on the rear of the vehi-
cle (e.g. license plate holder, bicycle rack).
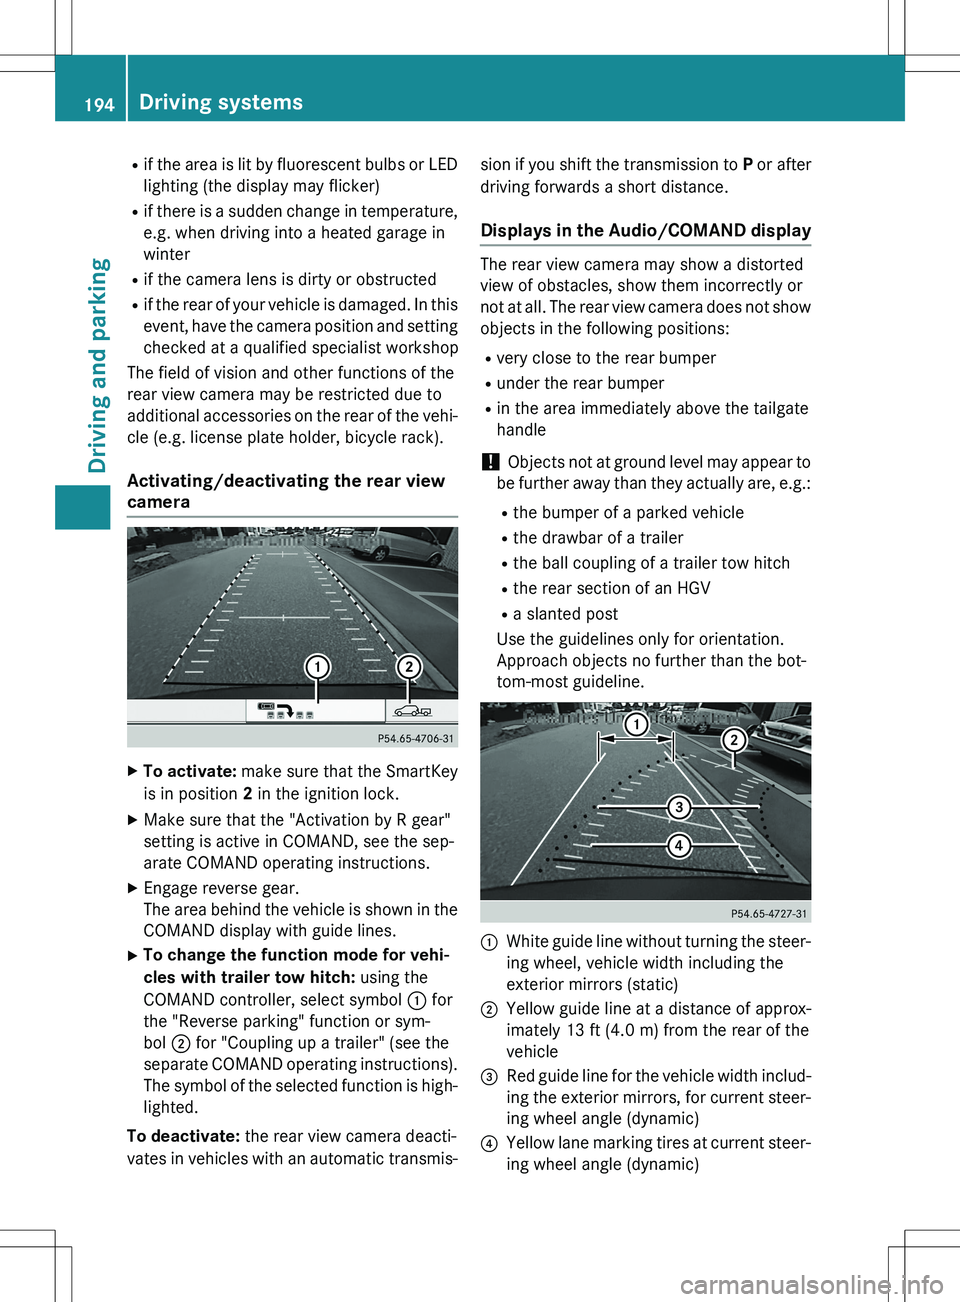
Activating/deactivating the rear view
camera
X To activate: make sure that the SmartKey
is in position 2 in the ignition lock.
X Make sure that the "Activation by R gear"
setting is active in COMAND, see the sep-
arate COMAND operating instructions.
X Engage reverse gear.
The area behind the vehicle is shown in the
COMAND display with guide lines.
X To change the function mode for vehi-
cles with trailer tow hitch: using the
COMAND controller, select symbol : for
the "Reverse parking" function or sym-
bol ; for "Coupling up a trailer" (see the
separate COMAND operating instructions).
The symbol of the selected function is high- lighted.
To deactivate: the rear view camera deacti-
vates in vehicles with an automatic transmis- sion if you shift the transmission to
P or after
driving forwards a short distance.
Displays in the Audio/COMAND display
The rear view camera may show a distorted
view of obstacles, show them incorrectly or
not at all. The rear view camera does not show
objects in the following positions:
R very close to the rear bumper
R under the rear bumper
R in the area immediately above the tailgate
handle
! Objects not at ground level may appear to
be further away than they actually are, e.g.: R the bumper of a parked vehicle
R the drawbar of a trailer
R the ball coupling of a trailer tow hitch
R the rear section of an HGV
R a slanted post
Use the guidelines only for orientation.
Approach objects no further than the bot-
tom-most guideline.
:White guide line without turning the steer-
ing wheel, vehicle width including the
exterior mirrors (static)
;Yellow guide line at a distance of approx-
imately 13 ft (4.0 m) from the rear of the
vehicle
=Red guide line for the vehicle width includ-
ing the exterior mirrors, for current steer-
ing wheel angle (dynamic)
?Yellow lane marking tires at current steer-
ing wheel angle (dynamic)
194Driving systems
Driving and parking