2015 MERCEDES-BENZ GLE SUV towing
[x] Cancel search: towingPage 432 of 453
You should regularly check the pressure of the
emergency spare wheel, particularly prior to
long trips, and correct the pressure as neces-
sary (Y page 408). The value on the wheel or as
given in the "Wheels and tyres" section is valid
(Y page 432).
An emergency spare wheel may also be fitted
against the direction of rotation. Observe the
time restriction on use as well as the speed lim-
itation specified on the emergency spare wheel.
Replace the tyres after six years at the latest,
regardless of wear. This also applies to the
emergency spare wheel.
i If you are driving with the emergency spare
wheel fitted, the tyre pressure loss warning
system or the tyre pressure monitor cannot
function reliably. Only restart the tyre pres-
sure loss warning system or tyre pressure
monitor when the defective wheel has been
replaced with a new wheel.
Vehicles with tyre pressure monitor: after
fitting an emergency spare wheel, the system
may still display the tyre pressure of the
removed wheel for a few minutes. The value
displayed for the position where the emer-
gency spare wheel is fitted is not the same as the current tyre pressure of the emergency
spare wheel. Removing/stowing the emergency
spare wheel
Vehicles with a "Minispare" emergency
spare wheel under the luggage com-
partment floor Observe the instructions and safety notes in the
"Fitting a wheel" section (Y page 414).
The "Minispare" emergency spare wheel can be found in the stowage well under the luggage
compartment floor. Removing the emergency spare wheel
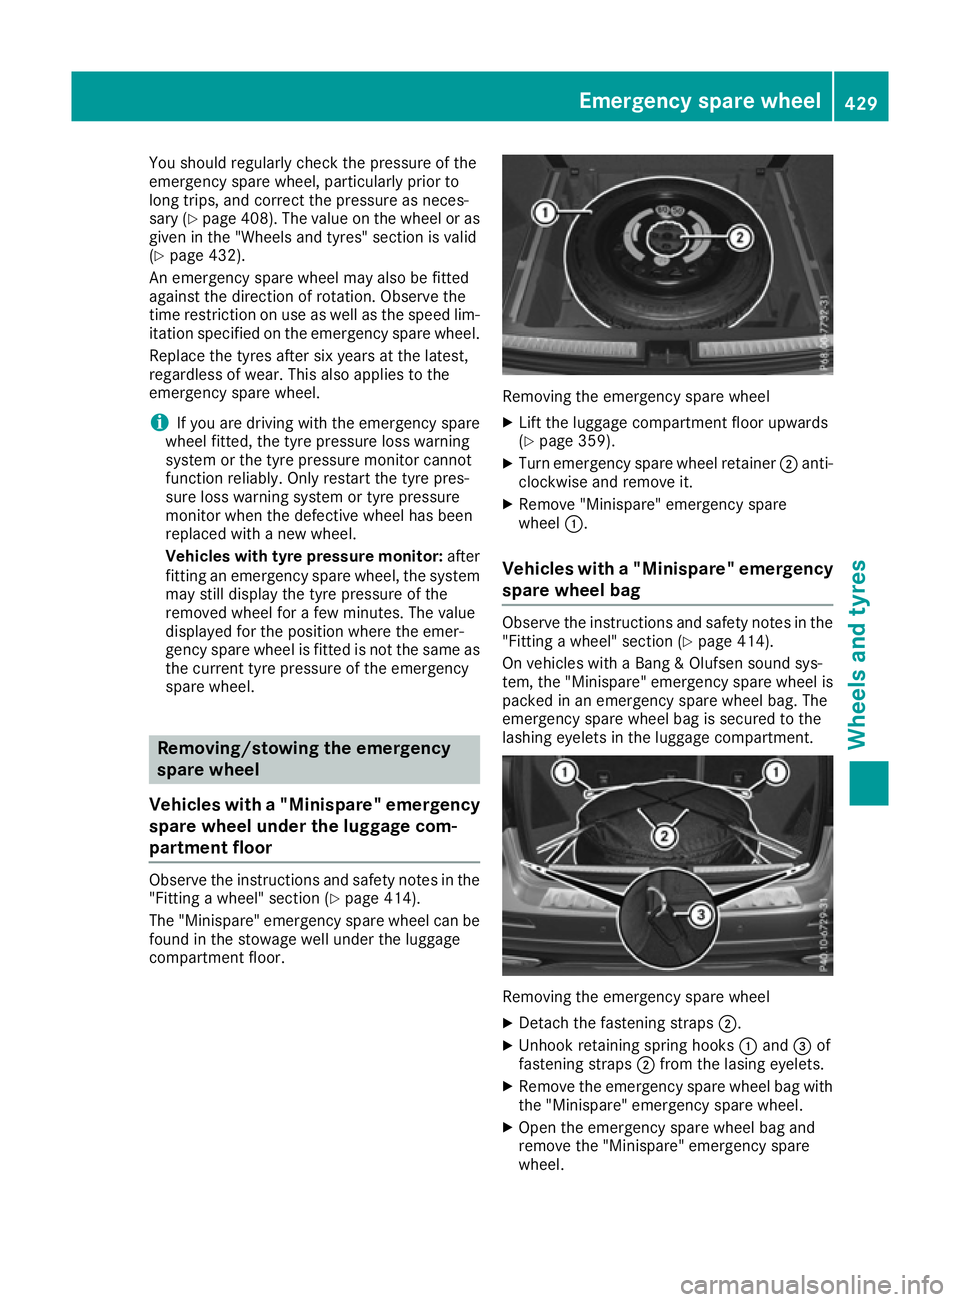
X Lift the luggage compartment floor upwards
(Y page 359).
X Turn emergency spare wheel retainer ;anti-
clockwise and remove it.
X Remove "Minispare" emergency spare
wheel :.
Vehicles with a "Minispare" emergency
spare wheel bag Observe the instructions and safety notes in the
"Fitting a wheel" section (Y page 414).
On vehicles with a Bang & Olufsen sound sys-
tem, the "Minispare" emergency spare wheel is
packed in an emergency spare wheel bag. The
emergency spare wheel bag is secured to the
lashing eyelets in the luggage compartment. Removing the emergency spare wheel
X Detach the fastening straps ;.
X Unhook retaining spring hooks :and =of
fastening straps ;from the lasing eyelets.
X Remove the emergency spare wheel bag with
the "Minispare" emergency spare wheel.
X Open the emergency spare wheel bag and
remove the "Minispare" emergency spare
wheel. Emergency spare wheel
429Wheels and tyres Z
Page 433 of 453
Stowing the emergency spare wheel
X Place the "Minispare" emergency spare wheel
into the emergency spare wheel bag and
close the emergency spare wheel bag.
X Place the emergency spare wheel bag with
the "Minispare" emergency spare wheel into
the luggage compartment with the carrying
strap at the back.
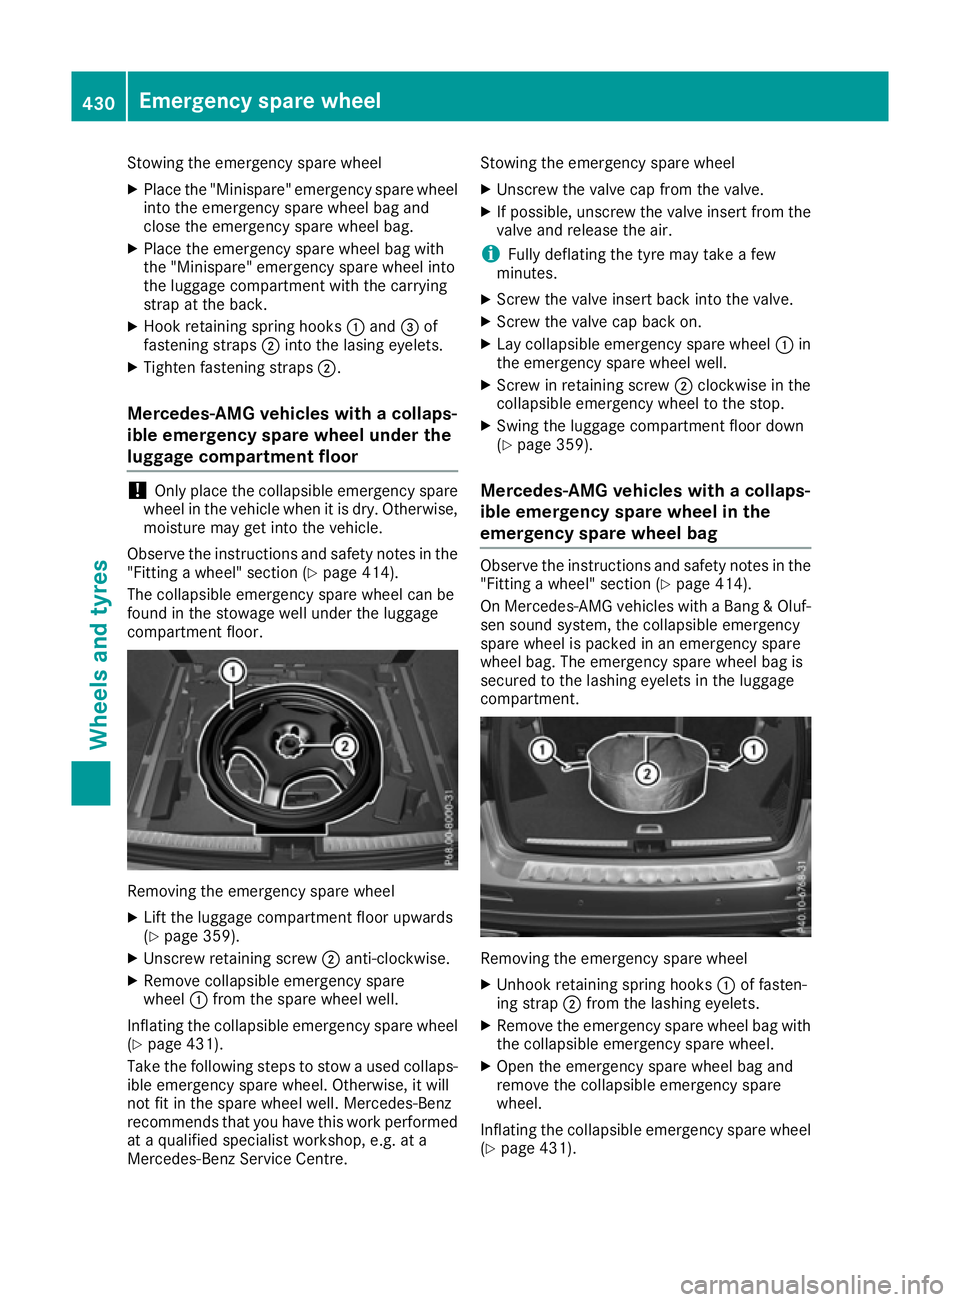
X Hook retaining spring hooks :and =of
fastening straps ;into the lasing eyelets.
X Tighten fastening straps ;.
Mercedes-AMG vehicles with a collaps-
ible emergency spare wheel under the
luggage compartment floor !
Only place the collapsible emergency spare
wheel in the vehicle when it is dry. Otherwise,
moisture may get into the vehicle.
Observe the instructions and safety notes in the "Fitting a wheel" section (Y page 414).
The collapsible emergency spare wheel can be
found in the stowage well under the luggage
compartment floor. Removing the emergency spare wheel
X Lift the luggage compartment floor upwards
(Y page 359).
X Unscrew retaining screw ;anti-clockwise.
X Remove collapsible emergency spare
wheel :from the spare wheel well.
Inflating the collapsible emergency spare wheel (Y page 431).
Take the following steps to stow a used collaps-
ible emergency spare wheel. Otherwise, it will
not fit in the spare wheel well. Mercedes-Benz
recommends that you have this work performed
at a qualified specialist workshop, e.g. at a
Mercedes-Benz Service Centre. Stowing the emergency spare wheel
X Unscrew the valve cap from the valve.
X If possible, unscrew the valve insert from the
valve and release the air.
i Fully deflating the tyre may take a few
minutes.
X Screw the valve insert back into the valve.
X Screw the valve cap back on.
X Lay collapsible emergency spare wheel :in
the emergency spare wheel well.
X Screw in retaining screw ;clockwise in the
collapsible emergency wheel to the stop.
X Swing the luggage compartment floor down
(Y page 359).
Mercedes-AMG vehicles with a collaps-
ible emergency spare wheel in the
emergency spare wheel bag Observe the instructions and safety notes in the
"Fitting a wheel" section (Y page 414).
On Mercedes-AMG vehicles with a Bang & Oluf-
sen sound system, the collapsible emergency
spare wheel is packed in an emergency spare
wheel bag. The emergency spare wheel bag is
secured to the lashing eyelets in the luggage
compartment. Removing the emergency spare wheel
X Unhook retaining spring hooks :of fasten-
ing strap ;from the lashing eyelets.
X Remove the emergency spare wheel bag with
the collapsible emergency spare wheel.
X Open the emergency spare wheel bag and
remove the collapsible emergency spare
wheel.
Inflating the collapsible emergency spare wheel (Y page 431). 430
Emergency spare wheelWheels and tyres
Page 434 of 453
Stowing the emergency spare wheel
X Place the collapsible emergency spare wheel
into the emergency spare wheel bag and
close the emergency spare wheel bag.
X Place the emergency spare wheel bag with
the collapsible emergency spare wheel into
the luggage compartment with the carrying
strap at the back.
X Hook retaining spring hooks :of fastening
strap ;into the lashing eyelets.
X Tighten fastening strap ;.Inflating the collapsible emergency
spare wheel (Mercedes-AMG GLE 63)
! Inflate the collapsible emergency spare
wheel using the tyre inflation compressor
before lowering the vehicle. The wheel rim
could otherwise be damaged.
! Do not operate the tyre inflation compres-
sor for longer than eight minutes at a time
without a break. It may otherwise overheat.
The tyre inflation compressor can be oper-
ated again once it has cooled down.
Comply with the manufacturer's safety instruc-
tions on the tyre inflation compressor label and
on the tyre sealant bottle.
X Mount the collapsible emergency spare wheel
as described (Y page 414).
The collapsible emergency spare wheel must
be mounted before it is inflated.
X Remove the tyre inflation compressor from
the stowage space under the luggage com-
partment floor (Y page 387). X
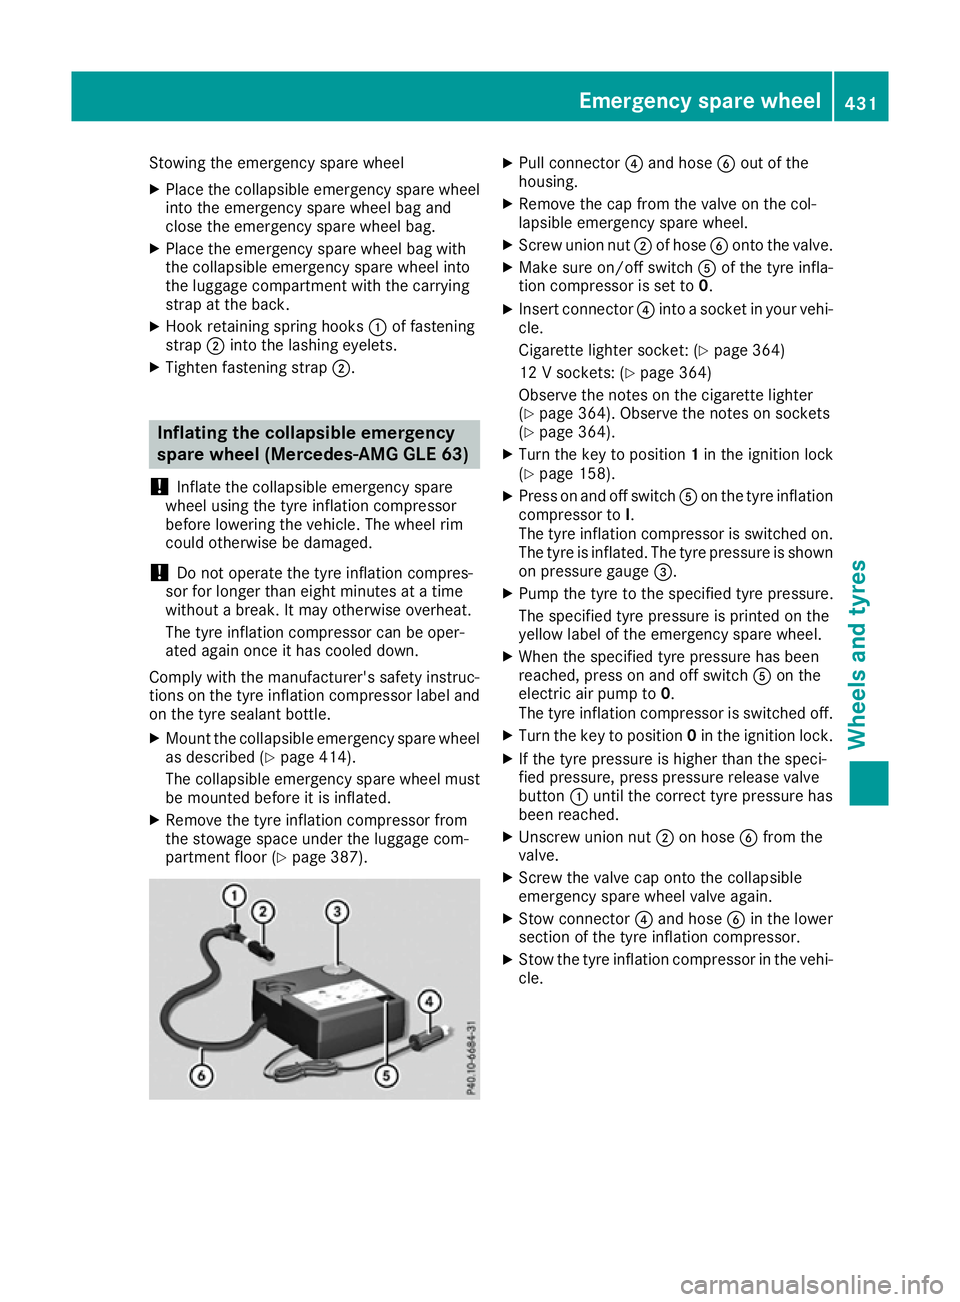
Pull connector ?and hose Bout of the
housing.
X Remove the cap from the valve on the col-
lapsible emergency spare wheel.
X Screw union nut ;of hose Bonto the valve.
X Make sure on/off switch Aof the tyre infla-
tion compressor is set to 0.
X Insert connector ?into a socket in your vehi-
cle.
Cigarette lighter socket: (Y page 364)
12 V sockets: (Y page 364)
Observe the notes on the cigarette lighter
(Y page 364). Observe the notes on sockets
(Y page 364).
X Turn the key to position 1in the ignition lock
(Y page 158).
X Press on and off switch Aon the tyre inflation
compressor to I.
The tyre inflation compressor is switched on.
The tyre is inflated. The tyre pressure is shown
on pressure gauge =.
X Pump the tyre to the specified tyre pressure.
The specified tyre pressure is printed on the
yellow label of the emergency spare wheel.
X When the specified tyre pressure has been
reached, press on and off switch Aon the
electric air pump to 0.
The tyre inflation compressor is switched off.
X Turn the key to position 0in the ignition lock.
X If the tyre pressure is higher than the speci-
fied pressure, press pressure release valve
button :until the correct tyre pressure has
been reached.
X Unscrew union nut ;on hose Bfrom the
valve.
X Screw the valve cap onto the collapsible
emergency spare wheel valve again.
X Stow connector ?and hose Bin the lower
section of the tyre inflation compressor.
X Stow the tyre inflation compressor in the vehi-
cle. Emergency spare wheel
431Wheels and tyres Z
Page 441 of 453
Diesel
Fuel grade
G
WARNING
If you mix diesel fuel with petrol, the flash
point of this fuel mixture is lower than that of pure diesel fuel. When the engine is running,
components in the exhaust system may over-
heat unnoticed. There is a risk of fire.
Never refuel with petrol. Never add petrol to
diesel fuel.
! When refuelling, only use diesel fuel that
conforms to the European standard EN 590 or is of equivalent quality. Fuel that does not
conform to EN 590 can lead to increased wear
as well as damage to the engine and exhaust system.
! Do not use the following:
R marine diesel
R heating oil
R bio-diesel
R vegetable oil
R petrol
R paraffin
R kerosene
Do not mix such fuels with diesel fuel and do
not use any special additives. Otherwise,
engine damage may occur.
! Vehicles with diesel particle filters:
in
countries outside the EU, only use low sulphur
Euro diesel with a sulphur content of under
50 ppm. Otherwise, the emission control sys- tem could be damaged.
! Vehicles without a diesel particle filte
r:
in countries where only diesel fuel with a high sulphur content is available, you will need to
carry out your vehicle's oil change at shorter
intervals. More information about the interval for oil change can be obtained from any quali-
fied specialist workshop.
Usually you will find information about the fuel
grade on the pump. If you cannot find the label
on the petrol pump, ask the filling station staff.
Information on refuelling (Y page 176).Low outside temperatures
In winter months, diesel fuel with an improved
cold flow quality is available. In Europe, the
EN 590 standard defines various climate-
dependent temperature categories. Malfunc-
tions can be avoided by refuelling with diesel
fuel that corresponds to the climatic specifica-
tions outlined in EN 590. At unusually low out-
side temperatures, it is possible that the flow
characteristics of the diesel fuel could be insuf- ficient. Accordingly, diesel fuel from warmer
areas may not be suitable for operation in colder
climatic conditions.
i Further information on country-specific fuel
properties and fuel types with low-tempera-
ture resistance can be obtained from oil com-
panies, e.g. at filling stations.
Fuel consumption information H
Environmental note
CO 2(carbon dioxide) is the gas which scien-
tists believe to be principally responsible for
global warming (the greenhouse effect). Your vehicle's CO 2emissions are directly related to
fuel consumption and therefore depend on:
R efficient use of the fuel by the engine
R driving style
R other non-technical factors, such as envi-
ronmental influences, road conditions or
traffic flow
You can minimise your vehicle's CO 2emis-
sions by driving carefully and having it serv-
iced regularly.
The vehicle will use more fuel than usual in the
following situations:
R at very low outside temperatures
R in urban traffic
R on short journeys
R in mountainous terrain
R when towing a trailer
i Only for certain countries: you can find the
current consumption and emission values of
your vehicle in the COC documents (EU CER-
TIFICATE OF CONFORMITY). These docu-
ments are delivered with your vehicle. 438
Service products and capacitiesTechnical data
Page 451 of 453
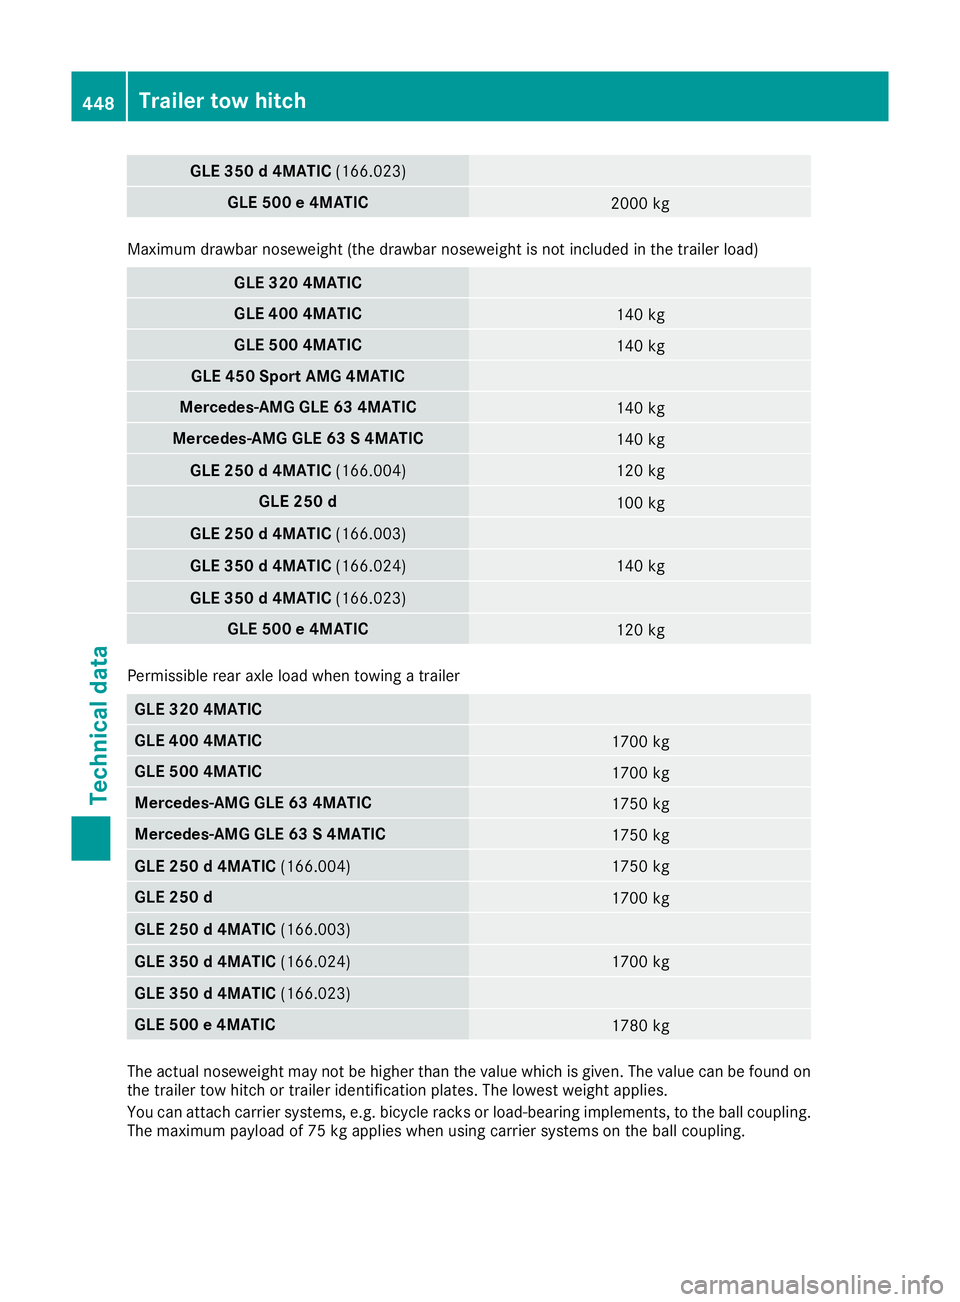
GLE 350 d 4MATIC
(166.023) GLE 500 e 4MATIC
2000 kg
Maximum drawbar noseweight (the drawbar noseweight is not included in the trailer load)
GLE 320 4MATIC
GLE 400 4MATIC
140 kg
GLE 500 4MATIC
140 kg
GLE 450 Sport AMG 4MATIC
Mercedes-AMG GLE 63 4MATIC
140 kg
Mercedes-AMG GLE 63 S 4MATIC
140 kg
GLE 250 d 4MATIC
(166.004) 120 kg
GLE 250 d
100 kg
GLE 250 d 4MATIC
(166.003) GLE 350 d 4MATIC
(166.024) 140 kg
GLE 350 d 4MATIC
(166.023) GLE 500 e 4MATIC
120 kg
Permissible rear axle load when towing a trailer
GLE 320 4MATIC
GLE 400 4MATIC
1700 kg
GLE 500 4MATIC
1700 kg
Mercedes-AMG GLE 63 4MATIC
1750 kg
Mercedes-AMG GLE 63 S 4MATIC
1750 kg
GLE 250 d 4MATIC
(166.004) 1750 kg
GLE 250 d
1700 kg
GLE 250 d 4MATIC
(166.003)GLE 350 d 4MATIC
(166.024) 1700 kg
GLE 350 d 4MATIC
(166.023)GLE 500 e 4MATIC
1780 kg
The actual noseweight may not be higher than the value which is given. The value can be found on
the trailer tow hitch or trailer identification plates. The lowest weight applies.
You can attach carrier systems, e.g. bicycle racks or load-bearing implements, to the ball coupling.
The maximum payload of 75 kg applies when using carrier systems on the ball coupling. 448
Trailer tow hitchTechnical data