2015 MERCEDES-BENZ GLE SUV warning light
[x] Cancel search: warning lightPage 129 of 453

Adaptive Highbeam Assist Plus
General notes With Adaptive Highbeam Assist Plus, you can
automatically switch between dipped-beam,
partial main-beam and main-beam headlamps.
Partial main-beam illumination is a form of illu-
mination whereby the main beam is directed
past other road users. Other road users are kept
out of the main-beam. This prevents glare. If
there is a vehicle in front, for example, the main- beam headlamps illuminate the areas to its right
and left, and the vehicle in front is illuminated by
the dipped-beam headlamps.
The system automatically adapts the dipped-
beam headlamp range depending on the dis-
tance to the other vehicle. Once the system no
longer detects any other vehicles, it switches on the main-beam headlamps again.
If the main-beam or partial main-beam head-
lamps are causing too much reflection from traf-fic signs, the lights are automatically dimmed
and glare for the driver caused by the reflections
is thus avoided.
The system's optical sensor is located behind
the windscreen near the overhead control
panel.
Vehicles with drive program S+(Sport Plus): the
speed at which Adaptive Highbeam Assist Plus
switches between full beam and dipped beam is
increased when the drive program is activated. Important safety notes G
WARNING
Adaptive Highbeam Assist Plus does not rec-
ognise road users:
R who have no lights, e.g. pedestrians
R who have poor lighting, e.g. cyclists
R whose lighting is blocked, e.g. by a barrier
In very rare cases, Adaptive Highbeam Assist
Plus may not recognise road users who do
have lights, or may recognise them too late. In this, or in similar situations, the automatic
main-beam headlamps will not be deactivated
or will be activated despite the presence of
other road users. There is a risk of an acci-
dent.
Always carefully observe the traffic conditions and switch off the main-beam headlamps in
good time.
Adaptive Highbeam Assist Plus cannot take into
account road, weather or traffic conditions.
Adaptive Highbeam Assist Plus is only an aid.
You are responsible for adjusting the vehicle's
lighting to the prevailing light, visibility and traf-
fic conditions.
In particular, the detection of obstacles can be
restricted if there is:
R poor visibility, e.g. due to fog, heavy rain or
snow
R dirt on the sensors or if the sensors are
obscured
Switching Adaptive Highbeam Assist
Plus on/off X
To switch on: turn the light switch to Ã.
X Press the combination switch beyond the
pressure point in the direction of arrow :.
The _ indicator lamp in the multifunction
display lights up when it is dark and the light
sensor switches on the dipped-beam head-
lamps.
At speeds above approx. 25 km/h: the
headlamp range is automatically controlled
according to the distance to other road users. 126
Exterior lightingLights and windscreen wipers
Page 131 of 453

Crash-responsive emergency lighting
The interior lighting is activated automatically if
the vehicle is involved in an accident.
X To switch off the crash-responsive emer-
gency lighting: press the hazard warning
lamp button.
or X Lock and then unlock the vehicle using the
key. Replacing bulbs (vehicles with LED
headlamps)
The front and rear light clusters of your vehicle
are equipped with LED light bulbs. Do not
replace the bulbs yourself. Contact a qualified
specialist workshop which has the necessary
specialist knowledge and tools to carry out the
work required.
Lamps are an important aspect of vehicle safety.
You must therefore make sure that these func-
tion correctly at all times. Have the headlamp
setting checked regularly. Replacing bulbs (vehicles with halo-
gen headlamps) Important safety notes
G
WARNING
Bulbs, lamps and plug connectors can
become very hot during use. When replacing a bulb, you could burn yourself on these com-
ponents. There is a risk of injury.
Allow these components to cool down before replacing the bulb.
Do not use a bulb that has been dropped or if its glass tube has been scratched.
The bulb may explode if:
R you touch it
R it is hot
R you drop it
R you scratch it
Only operate bulbs in enclosed lamps designed
for that purpose. Only fit spare bulbs of the same
type and the specified voltage. Marks on the glass tube reduce the service life
of the bulbs. Do not touch the glass tube with
your bare hands. If necessary, clean the glass
tube when cold with alcohol or spirit and rub it
off with a lint-free cloth.
Protect bulbs from moisture during operation.
Do not allow bulbs to come into contact with
liquids.
Only replace the bulbs listed (Y page 128).
Have the bulbs that you cannot replace yourself
replaced at a qualified specialist workshop.
If you require assistance replacing bulbs, con-
sult a qualified specialist workshop.
If the new bulb still does not light up, consult a
qualified specialist workshop.
Headlamps and lights are an important aspect of
vehicle safety. You must therefore make sure
that these function correctly at all times. Have
the headlamp setting checked regularly. Overview of bulb replacement – bulbs
You can replace the following bulbs. The details
for the bulb type can be found in the legend. Halogen headlamps
:
Dipped-beam headlamp: H7 55 W
; Main-beam headlamp: H7 55 W
= Turn signal: W 5 W BV 128
Replacing bulbs (vehicles with halogen headlamps)Lights and windscreen wipers
Page 134 of 453

Switching the rear window wiper on/
off Combination switch
:
è Rear window wiper switch
2 b Wipes with washer fluid
3 ISwitches on intermittent wiping
4 0Switches off intermittent wiping
5 b Wipes with washer fluid
X Turn the key to position 1or 2in the ignition
lock (Y page 158).
X Turn switch :on the combination switch to
the corresponding position.
When the rear window wiper is switched on,
the icon appears in the instrument cluster. Replacing the wiper blades
Important safety notes G
WARNING
If the windscreen wipers begin to move while
you are changing the wiper blades, you can be trapped by the wiper arm. There is a risk of
injury.
Always switch off the windscreen wipers and
ignition before changing the wiper blades.
! To avoid damaging the windscreen wiper
blades, make sure that you touch only the
wiper arm of the windscreen wiper.
! Never open the bonnet/tailgate if a wiper
arm is folded away from the windscreen/rear
window.
Never fold a windscreen wiper arm without a
wiper blade back onto the windscreen/rear
window. Hold the windscreen wiper arm firmly when
you change the wiper blade. If you release the
wiper arm without a wiper blade and it falls
onto the windscreen/rear window, the wind-
screen/rear window may be damaged by the
force of the impact.
Mercedes-Benz recommends that you have
the wiper blades changed at a qualified spe-
cialist workshop.
Replacing the windscreen wiper blades Moving the wiper blades to a vertical posi-
tion
On vehicles without KEYLESS-GO:
X Turn the key to position 0in the ignition lock
(Y page 158).
X Set the windscreen wipers to position °.
X Turn the key to position 1in the ignition lock
(Y page 158).
X As soon as the wiper arms are vertical to the
bonnet, turn the key to position 0in the igni-
tion lock (Y page 158).
X Remove the key.
X Fold the wiper arms away from the wind-
screen until you feel them snap into place.
On vehicles with KEYLESS-GO:
X Switch off the engine.
X Remove your foot from the brake pedal.
X Set the windscreen wipers to position °.
X Press the Start/Stop button repeatedly until
the windscreen wipers start.
X When the wiper arms have reached the verti-
cal position, press the Start/Stop button
repeatedly until the windscreen wipers stop.
X Fold the wiper arms away from the wind-
screen until you feel them snap into place.
Removing the wiper blades X Remove the key from the ignition lock.
X Fold the wiper arm away from the windscreen. Windscreen wipers
131Lights and windscreen wipers Z
Page 148 of 453

Problems with the rear window heating
Problem
Possible causes/consequences and
M
MSolutions The rear window heating
has switched off prema-
turely or cannot be
switched on. The battery has not been sufficiently charged.
X Switch off any consumers that are not required, e.g. reading lamps,
interior lighting or the seat heating.
When the battery is sufficiently charged, the rear window heating
can be switched on again. Switching air-recirculation mode
on/off
General notes You can deactivate the flow of fresh air tempo-
rarily if unpleasant odours are entering the vehi-
cle from outside. The air already inside the vehi- cle will then be recirculated.
If you switch on air-recirculation mode, the win-
dows can mist up more quickly, in particular at
low temperatures. Only use air-recirculation
mode briefly to prevent the windows from mist- ing up.
Switching on/off X
Turn the key to position 2in the ignition lock
(Y page 158).
X To activate: press thedbutton.
The indicator lamp in the dbutton lights
up.
i In the event of high pollution levels
(THERMOTRONIC automatic climate control
only) or at high outside temperatures, air-
recirculation mode is automatically activated.
When air-recirculation mode is activated
automatically, the indicator lamp in the d
button is not lit.
Outside air is added after about 30 minutes.
X To deactivate: press thedbutton.
The indicator lamp in the dbutton goes
out.
i Air-recirculation mode is deactivated auto-
matically:
R after approximately five minutes at outside
temperatures below approximately 5 †
R after approximately five minutes if cooling
with air dehumidification is deactivated
R after approximately 30 minutes at outside
temperatures above approximately 5 † if the "Cooling with air dehumidification"
function is activated Convenience opening/closing using
the air-recirculation button
G
WARNING
When the convenience closing feature is oper- ating, parts of the body could become trapped
in the closing area of the side window and the
sliding sunroof. There is a risk of injury.
Observe the complete closing procedure
when the convenience closing feature is oper-
ating. When closing make sure that no parts of the body are in the closing area. G
WARNING
During convenience opening parts of the body could be drawn in or become trapped
between the side window and window frame.
There is a risk of injury.
When opening, make sure that nobody is
touching the side window. If someone
becomes trapped, immediately press
the W switch in the door to stop the move-
ment of the side windows. To continue closing
the side window, pull on the Wswitch.
X Convenience closing feature (vehicles
with sliding sunroof or panorama sliding
sunroof):
press and hold the dbutton
until the side windows and the panorama slid- ing sunroof are closed.
The indicator lamp in the dbutton lights
up. Air-recirculation mode is activated.
X Convenience closing feature (vehicles
without sliding sunroof or panorama slid- Operating the climate control system
145Climate control Z
Page 152 of 453
Setting the departure time
You can set the departure time using the on-
board computer or via the Mercedes connect
me web App. The activation of the "Pre-entry
climate control at departure time" function can
be linked to this departure time. Your vehicle will then be cooled or heated until the desired tem-perature is reached in time for the set departure
time. "Pre-entry climate control at departure
time" will be activated a maximum of 55 minutes before departure. If the departure is delayed,
the vehicle will be heated or cooled for a further five minutes.
X To set the departure time: set the departure
time using the on-board computer
(Y page 292). Set the departure time using
the Mercedes connect me web App: http://
www.mercedes.me.
X To activate or deactivate "Pre-entry cli-
mate control at departure time": activate
or deactivate "Pre-entry climate control at
departure time" using the on-board com-
puter. Activate or deactivate "Pre-entry cli-
mate control at departure time" using the
Mercedes connect me web App: http://
www.mercedes.me.
The "Pre-entry climate control at departure
time" function is automatically deactivated
when the vehicle is started. The following func-
tions remain active:
R Seat heating
R Seat ventilation
R Ionisation
To deactivate "Pre-entry climate control at
departure time": the activated "Pre-entry cli-
mate control at departure time" can be deacti-
vated using the button (Y page 149).
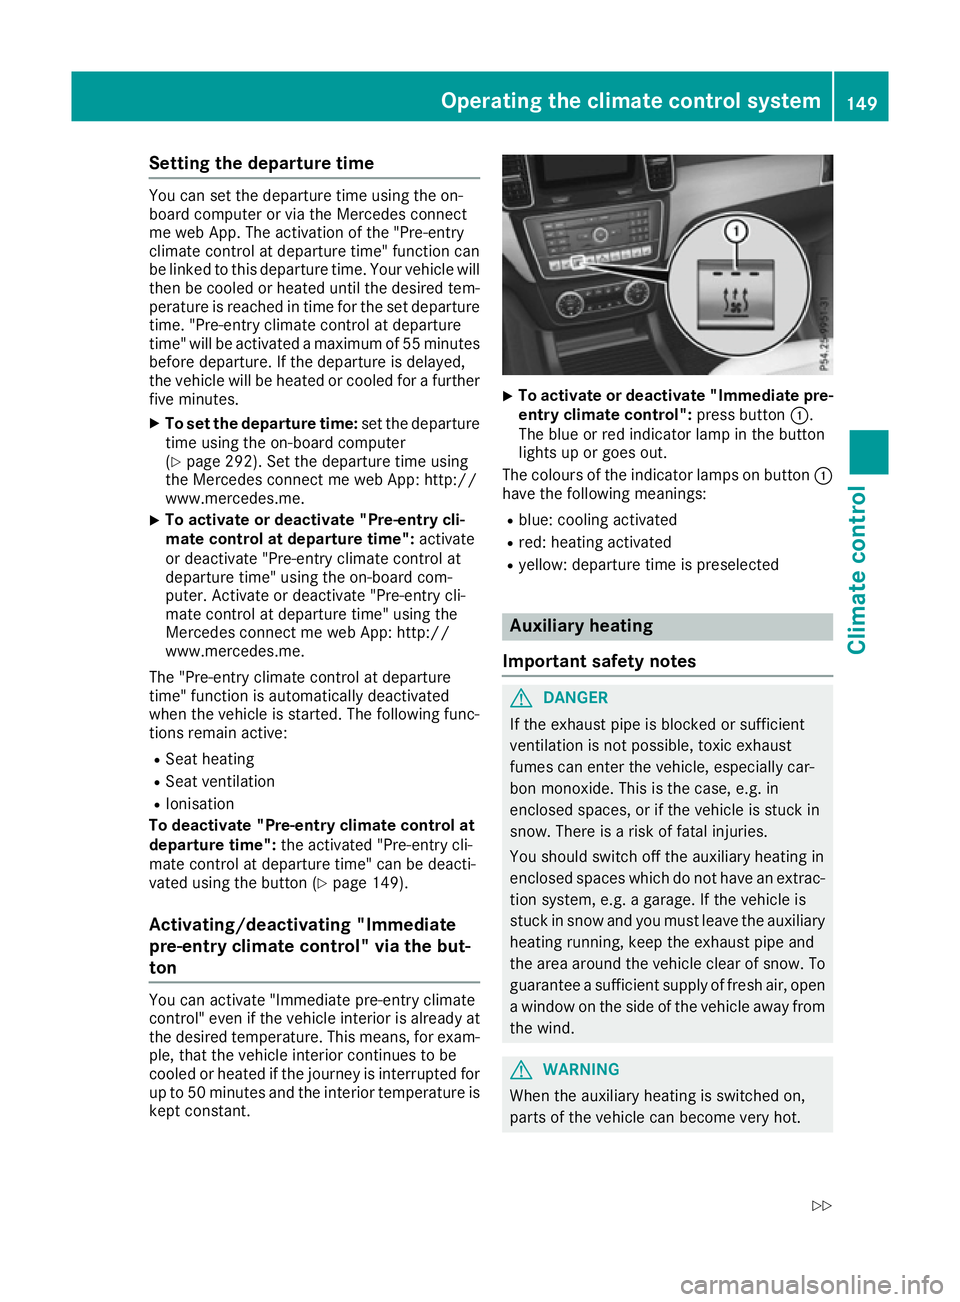
Activating/deactivating "Immediate
pre-entry climate control" via the but-
ton You can activate "Immediate pre-entry climate
control" even if the vehicle interior is already at
the desired temperature. This means, for exam- ple, that the vehicle interior continues to be
cooled or heated if the journey is interrupted for
up to 50 minutes and the interior temperature is kept constant. X
To activate or deactivate "Immediate pre-
entry climate control": press button:.
The blue or red indicator lamp in the button
lights up or goes out.
The colours of the indicator lamps on button :
have the following meanings:
R blue: cooling activated
R red: heating activated
R yellow: departure time is preselected Auxiliary heating
Important safety notes G
DANGER
If the exhaust pipe is blocked or sufficient
ventilation is not possible, toxic exhaust
fumes can enter the vehicle, especially car-
bon monoxide. This is the case, e.g. in
enclosed spaces, or if the vehicle is stuck in
snow. There is a risk of fatal injuries.
You should switch off the auxiliary heating in
enclosed spaces which do not have an extrac- tion system, e.g. a garage. If the vehicle is
stuck in snow and you must leave the auxiliary
heating running, keep the exhaust pipe and
the area around the vehicle clear of snow. To guarantee a sufficient supply of fresh air, open
a window on the side of the vehicle away from the wind. G
WARNING
When the auxiliary heating is switched on,
parts of the vehicle can become very hot. Operating the climate control system
149Climate control
Z
Page 163 of 453

Starting the vehicle
Important safety notes G
WARNING
If children are left unsupervised in the vehicle, they can:
R open doors and endanger other persons or
road users
R climb out and be injured by the traffic
R operate vehicle equipment and, for exam-
ple, trap themselves.
Children could also set the vehicle in motion, for example by:
R releasing the parking brake
R shifting the automatic transmission out of
park position P
R starting the engine.
There is a risk of an accident and injury.
When leaving the vehicle, always take the key
with you and lock the vehicle. Never leave
children unattended in the vehicle. Always
keep the key out of reach of children. G
WARNING
Combustion engines emit poisonous exhaust
gases such as carbon monoxide. Inhaling
these exhaust gases leads to poisoning. There is a risk of fatal injury. Therefore never leave
the engine running in enclosed spaces with-
out sufficient ventilation. G
WARNING
Flammable materials introduced through
environmental influence or by animals can
ignite if in contact with the exhaust system or parts of the engine that heat up. There is a risk
of fire.
Carry out regular checks to make sure that
there are no flammable foreign materials in
the engine compartment or in the exhaust
system.
! Do not depress the accelerator when start-
ing the engine. General notes Vehicles with a petrol engine:
the catalytic
converter is preheated for up to 30 seconds
after a cold start. The sound of the engine may
change during this time.
Automatic transmission X
Shift the transmission to position P
(Y page 168).
The transmission position indicator in the
multifunction display shows P(Y page 168).
i You can start the engine in transmission
position Pand N.
Starting procedure with the key X
To start a diesel engine: turn the key to
position 2in the ignition lock (Y page 158).
The % preglow indicator lamp in the instru-
ment cluster lights up.
X Turn the key to position 3in the ignition lock
(Y page 158) and release it as soon as the
engine is running.
i Vehicles with a diesel engine:
you can
start the engine without preglow if the engine
is warm.
Using KEYLESS-GO to start the engine The Start/Stop button can be used to start the
vehicle without inserting the key into the ignition
lock. The key must be in the vehicle and the
Start/Stop button must be inserted in the igni-
tion lock. This mode for starting the engine oper-
ates independently of the ECO start/stop auto- matic engine start function.
X Depress the brake pedal and keep it
depressed.
X Press the Start/Stop button once
(Y page 158).
Vehicles with a petrol engine: the engine
starts.
Vehicles with a diesel engine: preglow is
activated and the engine starts. 160
DrivingDriving and parking
Page 168 of 453

Problems with the engine
Problem
Possible causes/consequences and
M
MSolutions The engine does not
start. The starter motor
can be heard. R
There is a malfunction in the engine electronics.
R There is a malfunction in the fuel supply.
Before attempting to start the engine again:
X Turn the key back to position 0in the ignition lock.
or X Press the Start/Stop button repeatedly until all indicator lamps in
the instrument cluster go out.
X Try to start the engine again (Y page 160). Avoid excessively long
and frequent attempts to start the engine, as this will drain the
battery.
If the engine does not start after several attempts:
X Consult a qualified specialist workshop. The engine does not
start. The starter motor
can be heard. The
reserve fuel warning
lamp is lit and the fuel
gauge display shows
0. The fuel tank is empty.
X Refuel the vehicle. The engine does not
start. You cannot hear
the starter motor. The on-board voltage is too low because the battery is too weak or
discharged.
X Jump-start the vehicle (Y page 397).
If the engine does not start despite attempts to jump-start it:
X Consult a qualified specialist workshop. The starter motor was exposed to a thermal load that was too high.
X Allow the starter motor to cool down for approximately two minutes.
X Try to start the engine again.
If the engine still does not start: X Consult a qualified specialist workshop. Vehicles with a petrol
engine:
The engine is not running
smoothly and is misfir-
ing. There is a malfunction in the engine electronics or in a mechanical
component of the engine management system.
X Only depress the accelerator pedal slightly.
Otherwise, non-combusted fuel may get into the catalytic converter
and damage it.
X Have the cause rectified immediately at a qualified specialist work-
shop. Driving
165Driving and parking Z
Page 180 of 453

:
To open the fuel filler flap
; To insert the fuel filler cap
= Instruction label on the fuel type to be refu-
elled
? Tyre pressure tabl")
Opening the fuel filler flap (except
PLUG-IN HYBRID vehicles)
:
To open the fuel filler flap
; To insert the fuel filler cap
= Instruction label on the fuel type to be refu-
elled
? Tyre pressure table
X Press the fuel filler flap in the direction of
arrow :.
The fuel filler flap swings up.
X Turn the fuel filler cap anti-clockwise and
remove it.
X Insert the fuel filler cap into the holder on the
inside of the fuel filler flap.
X Completely insert the filler neck of the fuel
pump nozzle into the tank, hook in place and
refuel.
X Only fill the tank until the pump nozzle
switches off.
Do not add any more fuel after the pump stops filling for the first time. Otherwise, fuel may
leak out.
Vehicles with a diesel engine: the filler neck is
designed for refuelling at diesel filling pumps. Opening the fuel filler flap (PLUG-IN
HYBRID vehicles) X
Pull switch ;.
Indicator lamp :flashes and the Please Please
wait Depressurising tank
wait Depressurising tank message
appears in the multifunction display.
If the fuel filler cap is unlocked, indicator
lamp :lights up.
The Tank is depressurised Ready for Tank is depressurised Ready for
refuelling
refuelling message appears in the multi-
function display.
Please be sure to observe the information on refuelling on the fuel filler flap.
A malfunction has occurred if:
R indicator lamp :first flashes and then goes
out
R the yellow engine diagnostics warning lamp
lights up
i From a speed of 2 km/h, the fuel filler cap
can no longer be opened.
i The unlocking process for the fuel filler cap
may take up to 15 minutes. :
To open the fuel filler flap
; To insert the fuel filler cap Refuelling
177Driving and parking Z