2015 MERCEDES-BENZ GLE SUV engine
[x] Cancel search: enginePage 284 of 453
Useful information
i This Owner's Manual describes all models,
series and optional equipment for your vehi-
cle that were available at the time of going to
press. National variations are possible. Note
that your vehicle may not be equipped with all
of the functions described. This is also the
case for systems and functions relevant to
safety.
i Read the information on qualified specialist
workshops: (Y page 28). Important safety notes
G
WARNING
Operating the integrated information systems and communications equipment in the vehicle
while driving will distract you from traffic con-
ditions. You could then lose control of the
vehicle. There is a risk of an accident.
Only operate these devices if road traffic con-
ditions permit. If you are unsure about the
surrounding conditions, pull over to a safe
location and make entries only while the vehi-
cle is stationary.
You must observe the legal requirements for the country in which you are currently driving whenoperating the on-board computer.
PLUG-IN HYBRID vehicles only: G
WARNING
If the instrument cluster has failed or there is a malfunction, you may not know about
safety-related function restrictions. The oper-ating safety of your vehicle may be affected.
There is a risk of an accident.
Immediately stop the vehicle while paying
attention to the traffic conditions and consult
a qualified specialist workshop.
All vehicles, except PLUG-IN HYBRID vehi-
cles:
The on-board computer only shows messages or warnings from certain systems in the multifunc-
tion display. You should therefore make sure
your vehicle is operating safely at all times. For an overview, see the instrument cluster illus-
tration (Y page 32). Displays and operation
Instrument cluster lighting
The lighting in the instrument cluster, in the dis- plays and the controls in the vehicle interior can
be adjusted using the brightness control knob.
The brightness control knob is located on the
bottom left of the instrument cluster
(Y page 32).
X Turn the brightness control knob clockwise or
anti-clockwise.
If you turn the light switch to Ã,Tor
L, the brightness is dependent upon the
brightness of the ambient light.
i The light sensor in the instrument cluster
automatically controls the brightness of the
multifunction display.
In daylight, the displays in the instrument
cluster are not illuminated. Speedometer with segments
The speedometer is divided into segments only
on vehicles with DISTRONIC PLUS.
The segments in the speedometer indicate
which speed range is available.
R Variable SPEEDTRONIC activated
(Y page 205):
The segments light up from the start of the
scale to the selected limit speed.
R DISTRONIC PLUS activated (Y page 207):
One or two segments in the set speed range
light up.
R DISTRONIC PLUS detects a vehicle in front
moving more slowly than the stored speed:
The segments between the speed of the vehi- cle in front and the stored speed light up. Rev counter
! Do not drive in the overrevving range. Doing
so will damage the engine.
The red band in the rev counter indicates the
engine's overrevving range. Displays and operation
281On-board computer and displays Z
Page 285 of 453
The fuel supply is interrupted to protect the
engine when the red band is reached. Outside temperature display
You should pay special attention to road condi-
tions when temperatures are around freezing
point.
Bear in mind that the outside temperature dis-
play indicates the measured air temperature
and not the road surface temperature.
The outside temperature display is in the multi-
function display (Y page 283).
A change in the outside temperature is shown in the multifunction display after a delay. Coolant temperature gauge
G
WARNING
If you open the bonnet while the engine is
overheating or while there is a fire in the
engine compartment, you could come into
contact with hot gases or other leaking ser-
vice products. There is a danger of injury.
Allow an overheating engine to cool down
before opening the bonnet. If there is a fire in the engine compartment, leave the bonnet
closed and notify the fire brigade.
All vehicles except PLUG-IN HYBRID vehicles:
the coolant temperature gauge is in the instru-
ment cluster on the right-hand side (Y page 32).
PLUG-IN HYBRID vehicles: the multifunction dis- play shows the coolant temperature in the
Coolant
Coolant (Ypage 292) submenu.
Under normal operating conditions and with the specified coolant level, the coolant temperature
may rise to 120 †.
At high outside temperatures and when driving
uphill, the coolant temperature may rise to the
end of the scale. Operating the on-board computer
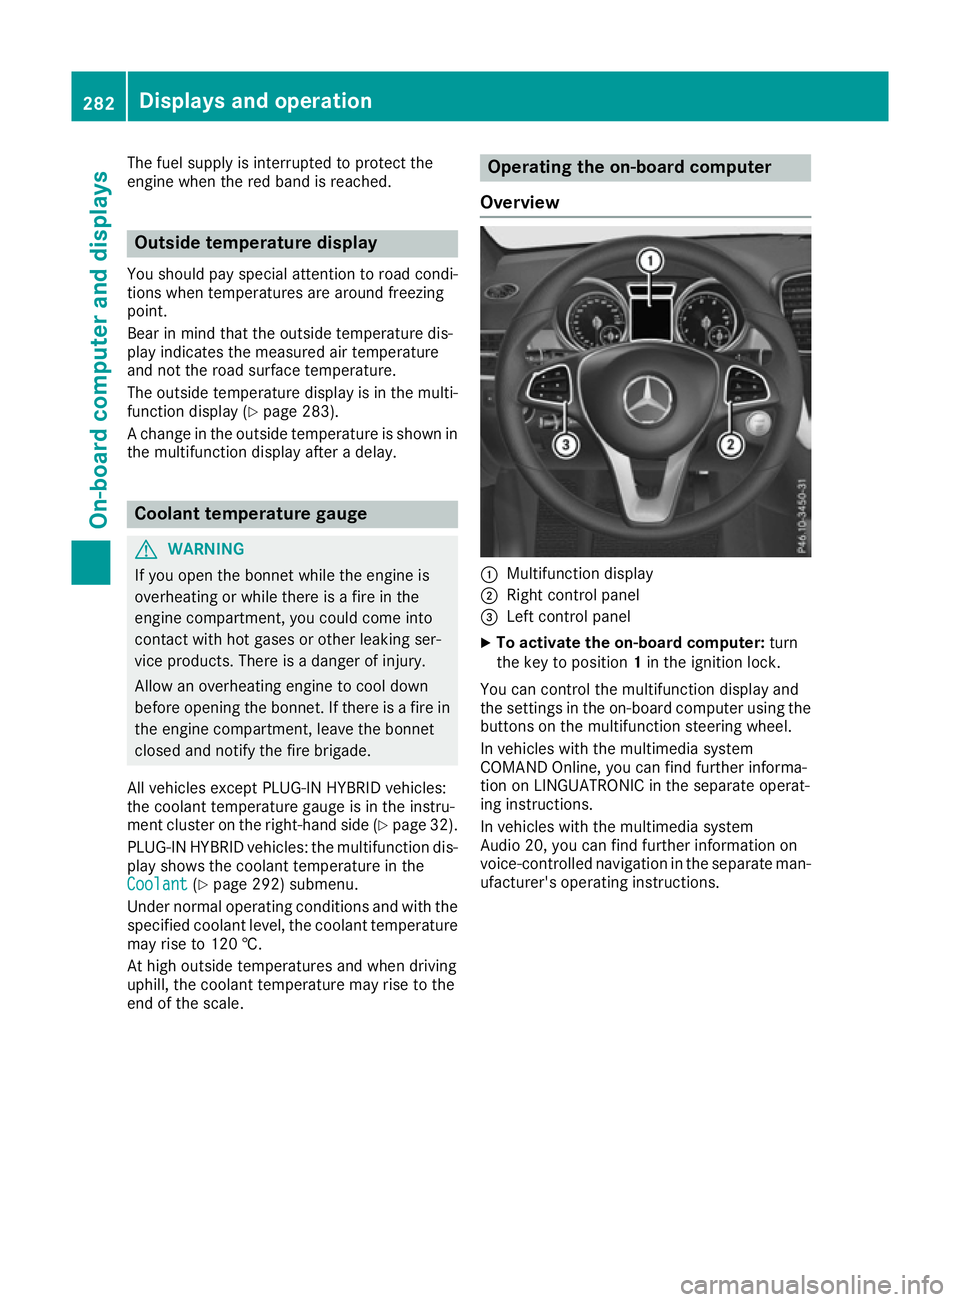
Overview :
Multifunction display
; Right control panel
= Left control panel
X To activate the on-board computer: turn
the key to position 1in the ignition lock.
You can control the multifunction display and
the settings in the on-board computer using the buttons on the multifunction steering wheel.
In vehicles with the multimedia system
COMAND Online, you can find further informa-
tion on LINGUATRONIC in the separate operat-
ing instructions.
In vehicles with the multimedia system
Audio 20, you can find further information on
voice-controlled navigation in the separate man-
ufacturer's operating instructions. 282
Displays and operationOn-board computer and displays
Page 288 of 453
ECO display
The ECO display is not available for Mercedes-
AMG vehicles.
X Press the =or; button on the steering
wheel to select the Trip Tripmenu.
X Press the 9or: button to select ECO
ECO
DISPLAY
DISPLAY.
If the ignition remains switched off for longer
than four hours, the ECO display will be auto-
matically reset.
Further information on the ECO display
(Y page 194).
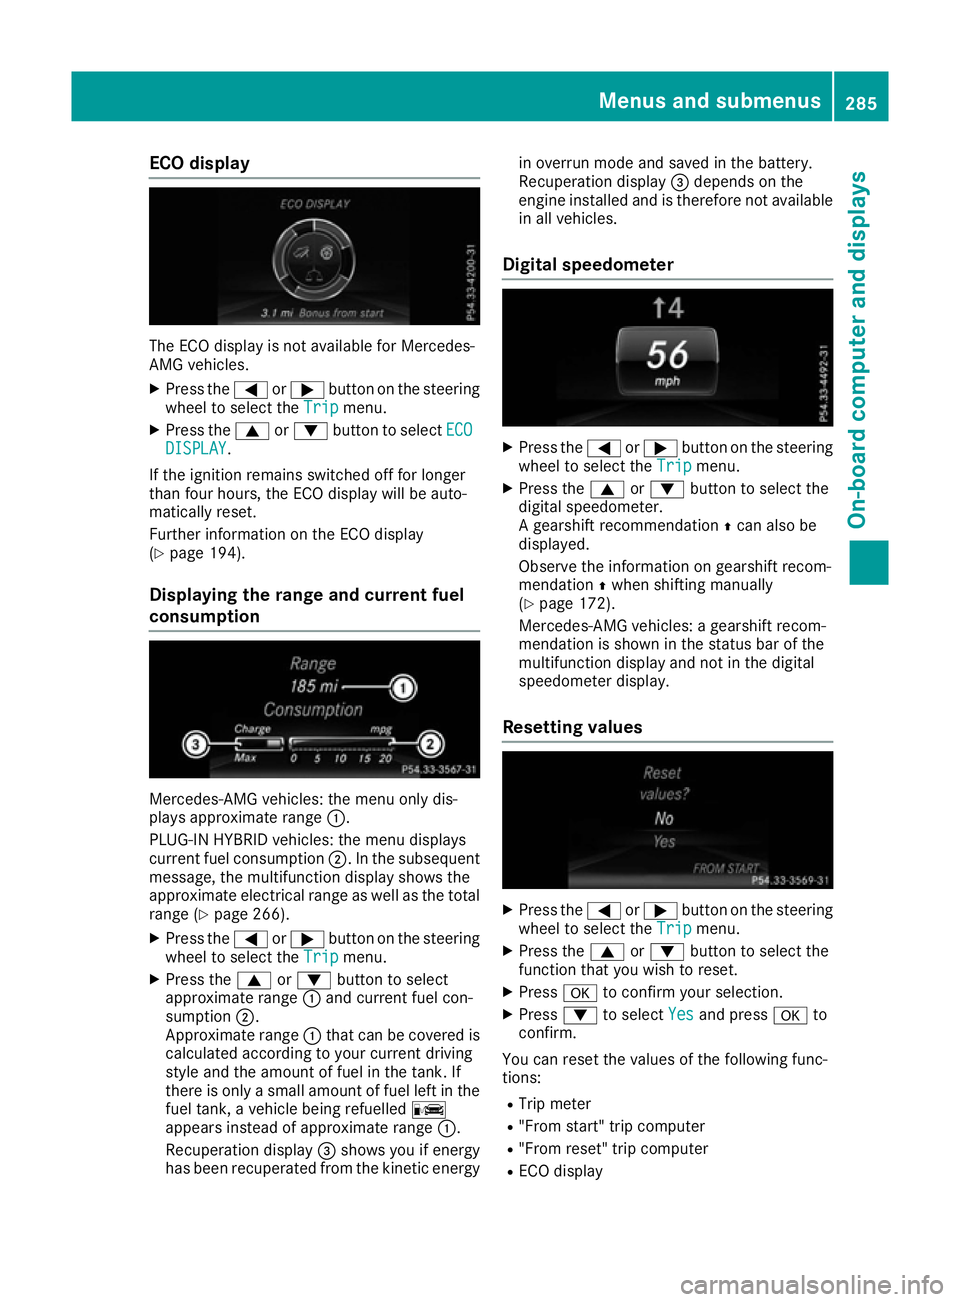
Displaying the range and current fuel
consumption Mercedes-AMG vehicles: the menu only dis-
plays approximate range
:.
PLUG-IN HYBRID vehicles: the menu displays
current fuel consumption ;. In the subsequent
message, the multifunction display shows the
approximate electrical range as well as the total range (Y page 266).
X Press the =or; button on the steering
wheel to select the Trip Tripmenu.
X Press the 9or: button to select
approximate range :and current fuel con-
sumption ;.
Approximate range :that can be covered is
calculated according to your current driving
style and the amount of fuel in the tank. If
there is only a small amount of fuel left in the fuel tank, a vehicle being refuelled C
appears instead of approximate range :.
Recuperation display =shows you if energy
has been recuperated from the kinetic energy in overrun mode and saved in the battery.
Recuperation display =depends on the
engine installed and is therefore not available in all vehicles.
Digital speedometer X
Press the =or; button on the steering
wheel to select the Trip
Tripmenu.
X Press the 9or: button to select the
digital speedometer.
A gearshift recommendation Zcan also be
displayed.
Observe the information on gearshift recom-
mendation Zwhen shifting manually
(Y page 172).
Mercedes-AMG vehicles: a gearshift recom-
mendation is shown in the status bar of the
multifunction display and not in the digital
speedometer display.
Resetting values X
Press the =or; button on the steering
wheel to select the Trip Tripmenu.
X Press the 9or: button to select the
function that you wish to reset.
X Press ato confirm your selection.
X Press :to select Yes
Yesand press ato
confirm.
You can reset the values of the following func-
tions: R Trip meter
R "From start" trip computer
R "From reset" trip computer
R ECO display Menus and submenus
285On-board computer and displays Z
Page 293 of 453
R
Activating/deactivating Blind Spot Assist or
Active Blind Spot Assist (Y page 291)
R Activating/deactivating Lane Keeping Assist
or Active Lane Keeping Assist (Y page 291)
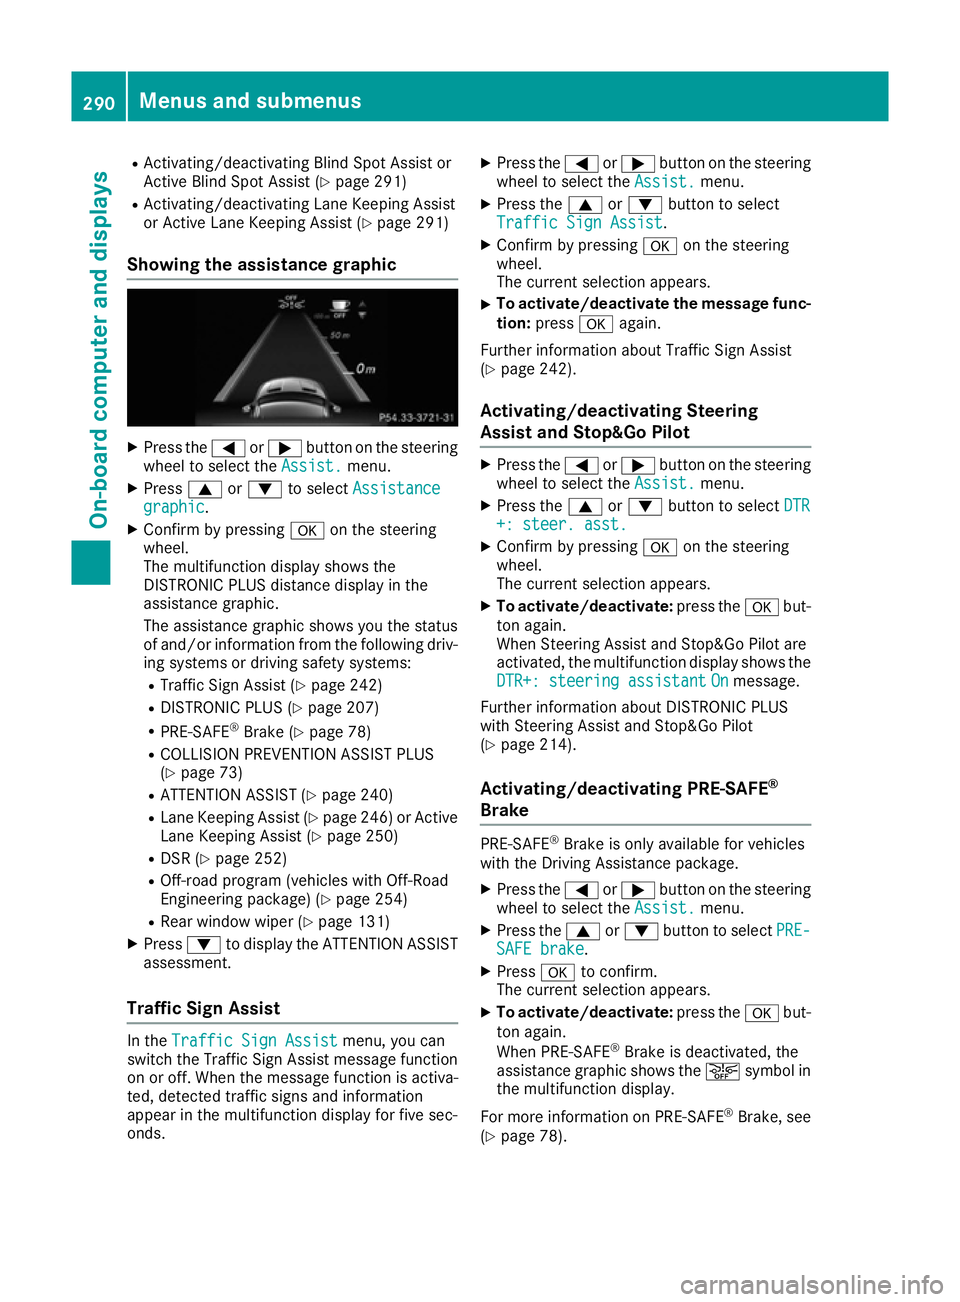
Showing the assistance graphic X
Press the =or; button on the steering
wheel to select the Assist. Assist.menu.
X Press 9or: to select Assistance
Assistance
graphic
graphic.
X Confirm by pressing aon the steering
wheel.
The multifunction display shows the
DISTRONIC PLUS distance display in the
assistance graphic.
The assistance graphic shows you the status
of and/or information from the following driv-
ing systems or driving safety systems:
R Traffic Sign Assist (Y page 242)
R DISTRONIC PLUS (Y page 207)
R PRE-SAFE ®
Brake (Y page 78)
R COLLISION PREVENTION ASSIST PLUS
(Y page 73)
R ATTENTION ASSIST (Y page 240)
R Lane Keeping Assist (Y page 246)or Active
Lane Keeping Assist (Y page 250)
R DSR (Y page 252)
R Off-road program (vehicles with Off-Road
Engineering package) (Y page 254)
R Rear window wiper (Y page 131)
X Press :to display the ATTENTION ASSIST
assessment.
Traffic Sign Assist In the
Traffic Sign Assist Traffic Sign Assist menu, you can
switch the Traffic Sign Assist message function
on or off. When the message function is activa-
ted, detected traffic signs and information
appear in the multifunction display for five sec-
onds. X
Press the =or; button on the steering
wheel to select the Assist.
Assist. menu.
X Press the 9or: button to select
Traffic Sign Assist Traffic Sign Assist.
X Confirm by pressing aon the steering
wheel.
The current selection appears.
X To activate/deactivate the message func-
tion: press aagain.
Further information about Traffic Sign Assist
(Y page 242).
Activating/deactivating Steering
Assist and Stop&Go Pilot X
Press the =or; button on the steering
wheel to select the Assist. Assist.menu.
X Press the 9or: button to select DTR
DTR
+: steer. asst.
+: steer. asst.
X Confirm by pressing aon the steering
wheel.
The current selection appears.
X To activate/deactivate: press theabut-
ton again.
When Steering Assist and Stop&Go Pilot are
activated, the multifunction display shows the DTR+: steering assistant
DTR+: steering assistant On Onmessage.
Further information about DISTRONIC PLUS
with Steering Assist and Stop&Go Pilot
(Y page 214).
Activating/deactivating PRE-SAFE ®
Brake PRE‑
SAFE ®
Brake is only available for vehicles
with the Driving Assistance package.
X Press the =or; button on the steering
wheel to select the Assist.
Assist.menu.
X Press the 9or: button to select PRE-
PRE-
SAFE brake
SAFE brake.
X Press ato confirm.
The current selection appears.
X To activate/deactivate: press theabut-
ton again.
When PRE-SAFE ®
Brake is deactivated, the
assistance graphic shows the æsymbol in
the multifunction display.
For more information on PRE‑SAFE ®
Brake, see
(Y page 78). 290
Menus and submenusOn-board computer and displays
Page 296 of 453
X
Press the =or; button on the steering
wheel to select the Settings
Settings menu.
X Press the :or9 button to select the
Hybrid
Hybrid submenu.
X Confirm by pressing aon the steering
wheel.
X Press the :or9 button to select the
Departure time:
Departure time: function.
You will see the selected setting.
X To set no departure time: press the:or
9 button to select No preselection
No preselection.
X Press ato confirm.
If you recharge the high-voltage battery, the
multifunction display also shows the time
when the high-voltage battery will be fully
charged.
or X To set a departure time: press:or9
A
A, B Bor C
Cto select the desired preset.
X Press ato confirm the selection.
X Press :or9 to set the hours.
X Press ato confirm.
X Press :or9 to set the minutes.
X Press ato confirm.
If you recharge the high-voltage battery, the
multifunction display shows the expected
charge status of the high-voltage battery for
the departure time set.
Further information on charging the high-volt-
age battery (PLUG-IN HYBRID vehicles)
(Y page 183).
Instrument cluster submenu Selecting the distance unit
The Display unit Speed-/odometer: Display unit Speed-/odometer: func-
tion allows you to choose whether certain dis-
plays appear in kilometres or miles in the mul-
tifunction display.
X Press the =or; button on the steering
wheel to select the Settings Settingsmenu.
X Press the :or9 button to select the
Instrument cluster
Instrument cluster submenu.
X Press ato confirm.
X Press the :or9 button to select the
Display unit Speed-/odometer
Display unit Speed-/odometer function.
You will see the selected setting: km
km ormiles miles.
X Press the abutton to save the setting. The selected unit of measurement for distance
applies to the:
R digital speedometer in the Trip Tripmenu
R total distance recorder and the trip meter
R trip computer
R current consumption and the range
R navigation instructions in the Navi
Navimenu
R cruise control
R SPEEDTRONIC
R DISTRONIC PLUS
R ASSYST PLUS service interval display
Selecting permanent display
United Kingdom: this function is unavailable.
The Permanent display: Permanent display: function allows you
to choose whether the multifunction display
always shows the outside temperature or the
speed.
The speed display is inverse to your speedome- ter.
X Press the =or; button on the steering
wheel to select the Settings
Settings menu.
X Press the :or9 button to select the
Instrument cluster Instrument cluster submenu.
X Confirm by pressing aon the steering
wheel.
X Press the :or9 button to select the
Permanent display:
Permanent display: function.
The current setting, outside temperature
outside temperature
or Dig. speedo [mph]:
Dig. speedo [mph]:, appears.
X To change the setting: pressaagain.
Light submenu Setting the daytime driving lights
The Daytime driving lights
Daytime driving lights function can
only be switched on with the engine turned off.
X Press the =or; button on the steering
wheel to select the Settings
Settings menu.
X Press the :or9 button to select the
Lights
Lights submenu.
X Press ato confirm.
X Press the :or9 button to select the
Daytime driving lights
Daytime driving lights function.
If the Daytime
Daytime driving
drivinglights
lightsfunction has
been switched on, the cone of light and the
W symbol in the multifunction display are
shown in orange.
X Press the abutton to save the setting. Menus and submenus
293On-board computer and displays Z
Page 300 of 453
X
Press the =or; button on the steering
wheel to select the Settings
Settings menu.
X Press the :or9 button to select the
Convenience
Convenience submenu.
X Press ato confirm.
X Press the :or9 button to select the
Auto. fold-in mirrors
Auto. fold-in mirrors function.
If the Auto. fold-in mirrors
Auto. fold-in mirrors function is
switched on, the multifunction display shows
the exterior mirror in orange.
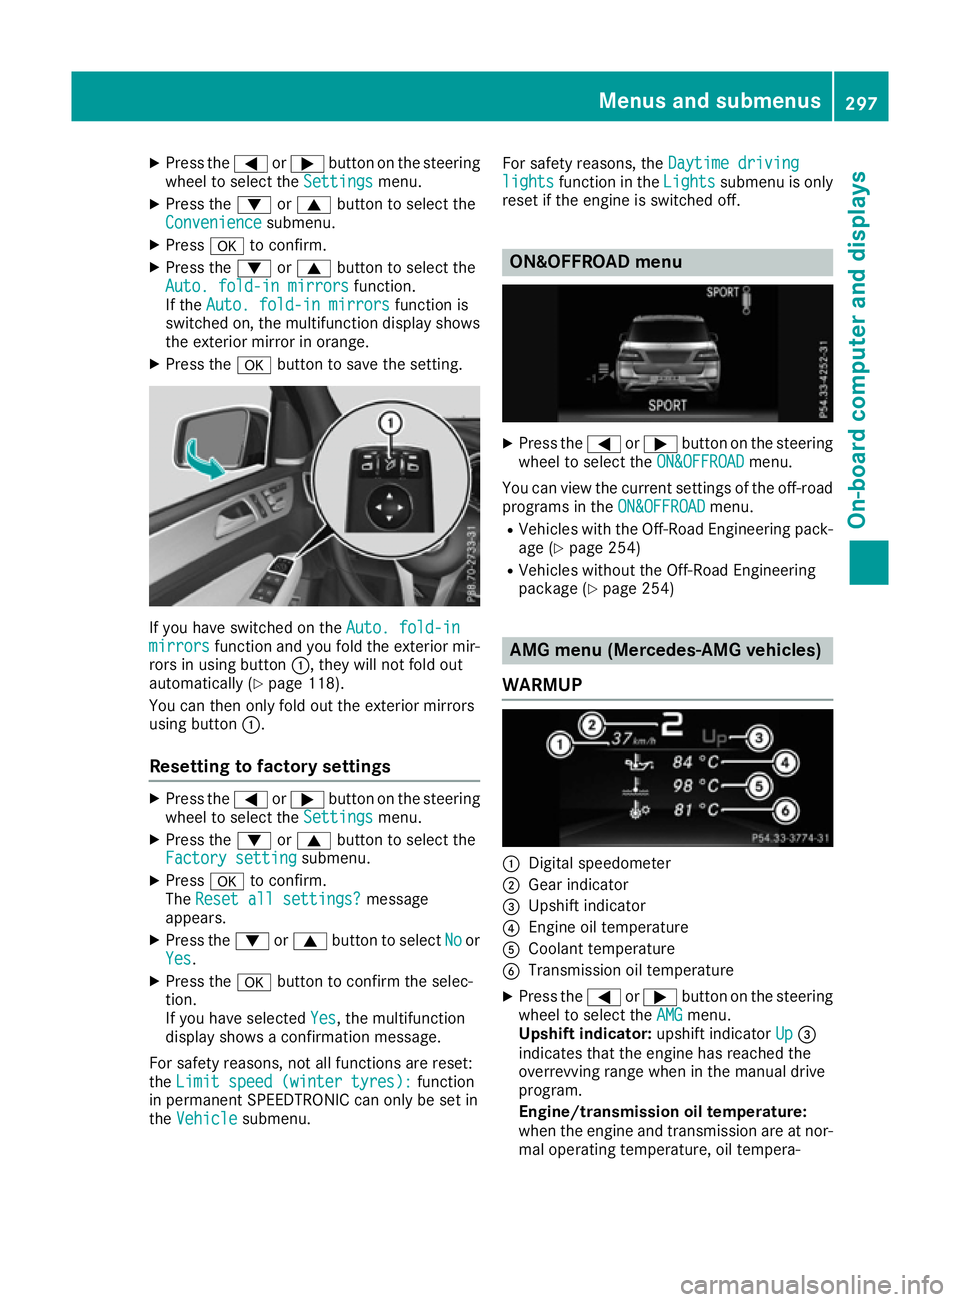
X Press the abutton to save the setting. If you have switched on the
Auto. fold-in
Auto. fold-in
mirrors
mirrors function and you fold the exterior mir-
rors in using button :, they will not fold out
automatically (Y page 118).
You can then only fold out the exterior mirrors
using button :.
Resetting to factory settings X
Press the =or; button on the steering
wheel to select the Settings
Settings menu.
X Press the :or9 button to select the
Factory setting Factory setting submenu.
X Press ato confirm.
The Reset all settings?
Reset all settings? message
appears.
X Press the :or9 button to select No
Noor
Yes
Yes.
X Press the abutton to confirm the selec-
tion.
If you have selected Yes Yes, the multifunction
display shows a confirmation message.
For safety reasons, not all functions are reset:
the Limit speed (winter tyres):
Limit speed (winter tyres): function
in permanent SPEEDTRONIC can only be set in
the Vehicle Vehicle submenu. For safety reasons, the
Daytime driving
Daytime driving
lights
lights function in the Lights
Lightssubmenu is only
reset if the engine is switched off. ON&OFFROAD menu
X
Press the =or; button on the steering
wheel to select the ON&OFFROAD
ON&OFFROADmenu.
You can view the current settings of the off-road programs in the ON&OFFROAD
ON&OFFROADmenu.
R Vehicles with the Off-Road Engineering pack-
age (Y page 254)
R Vehicles without the Off-Road Engineering
package (Y page 254) AMG menu (Mercedes-AMG vehicles)
WARMUP :
Digital speedometer
; Gear indicator
= Upshift indicator
? Engine oil temperature
A Coolant temperature
B Transmission oil temperature
X Press the =or; button on the steering
wheel to select the AMG AMGmenu.
Upshift indicator: upshift indicatorUp Up=
indicates that the engine has reached the
overrevving range when in the manual drive
program.
Engine/transmission oil temperature:
when the engine and transmission are at nor-
mal operating temperature, oil tempera- Menus and submenus
297On-board computer and displays Z
Page 301 of 453
ture
?and Bare displayed in white in the
multifunction display.
If the multifunction display shows oil temper- ature ?orB in blue, the engine or the
transmission are not yet at normal operating
temperature. Avoid using the full output of the engine during this time.
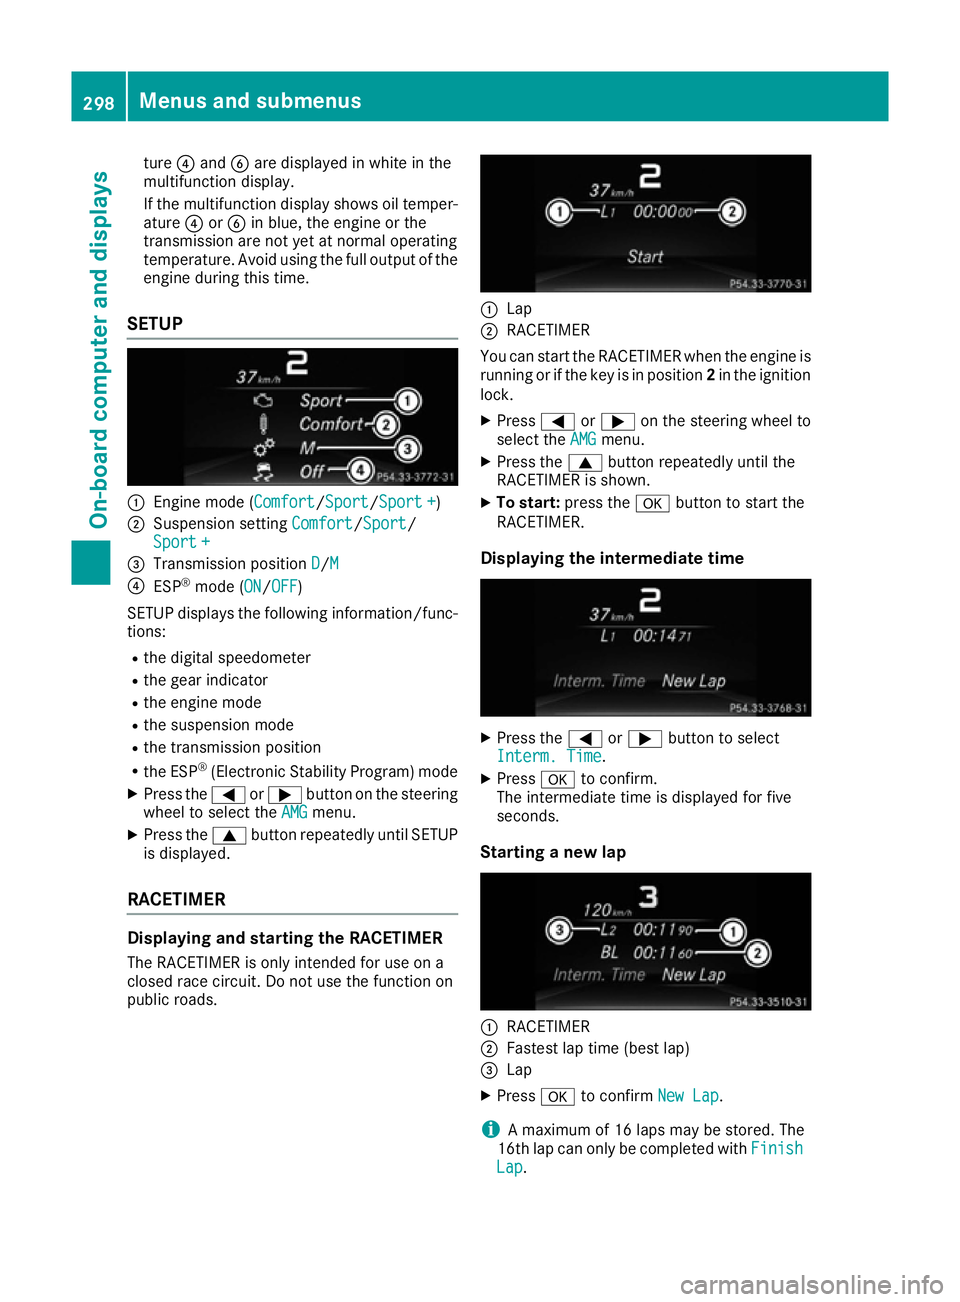
SETUP :
Engine mode (Comfort Comfort/Sport Sport/Sport +
Sport +)
; Suspension setting Comfort
Comfort/SportSport/
Sport +
Sport +
= Transmission position D
D/MM
? ESP ®
mode (ON ON/OFF
OFF )
SETUP displays the following information/func- tions:
R the digital speedometer
R the gear indicator
R the engine mode
R the suspension mode
R the transmission position
R the ESP ®
(Electronic Stability Program) mode
X Press the =or; button on the steering
wheel to select the AMG
AMG menu.
X Press the 9button repeatedly until SETUP
is displayed.
RACETIMER Displaying and starting the RACETIMER
The RACETIMER is only intended for use on a
closed race circuit. Do not use the function on
public roads. :
Lap
; RACETIMER
You can start the RACETIMER when the engine is running or if the key is in position 2in the ignition
lock.
X Press =or; on the steering wheel to
select the AMG
AMGmenu.
X Press the 9button repeatedly until the
RACETIMER is shown.
X To start: press the abutton to start the
RACETIMER.
Displaying the intermediate time X
Press the =or; button to select
Interm. Time
Interm. Time.
X Press ato confirm.
The intermediate time is displayed for five
seconds.
Starting a new lap :
RACETIMER
; Fastest lap time (best lap)
= Lap
X Press ato confirm New Lap
New Lap.
i A maximum of 16 laps may be stored. The
16th lap can only be completed with Finish
Finish
Lap
Lap . 298
Menus and submenusOn-board computer and displays
Page 302 of 453
Stopping the RACETIMER
X
Press the %button on the steering wheel.
X Confirm Yes
Yes with a.
The RACETIMER interrupts timing if you stop the
vehicle and turn the key to position 1in the igni-
tion lock. If you turn the key to position 3and
then press ato confirm Start
Start, timing is
continued.
Resetting the current lap
X Stop the RACETIMER.
X Press =or; to select Reset Lap
Reset Lap.
X Press ato reset the lap time to "0".
Deleting all laps If you switch off the engine, the RACETIMER is
reset to "0" after 30 seconds. All laps are
deleted.
You cannot delete individual stored laps. If you
have stopped 16 laps, the current lap does not
have to be reset.
X Reset the current lap.
X Press ato confirm Reset Reset.
Reset Race Timer?
Reset Race Timer? appears in the multi-
function display.
X Press :to select Yes
Yes and confirm with
a.
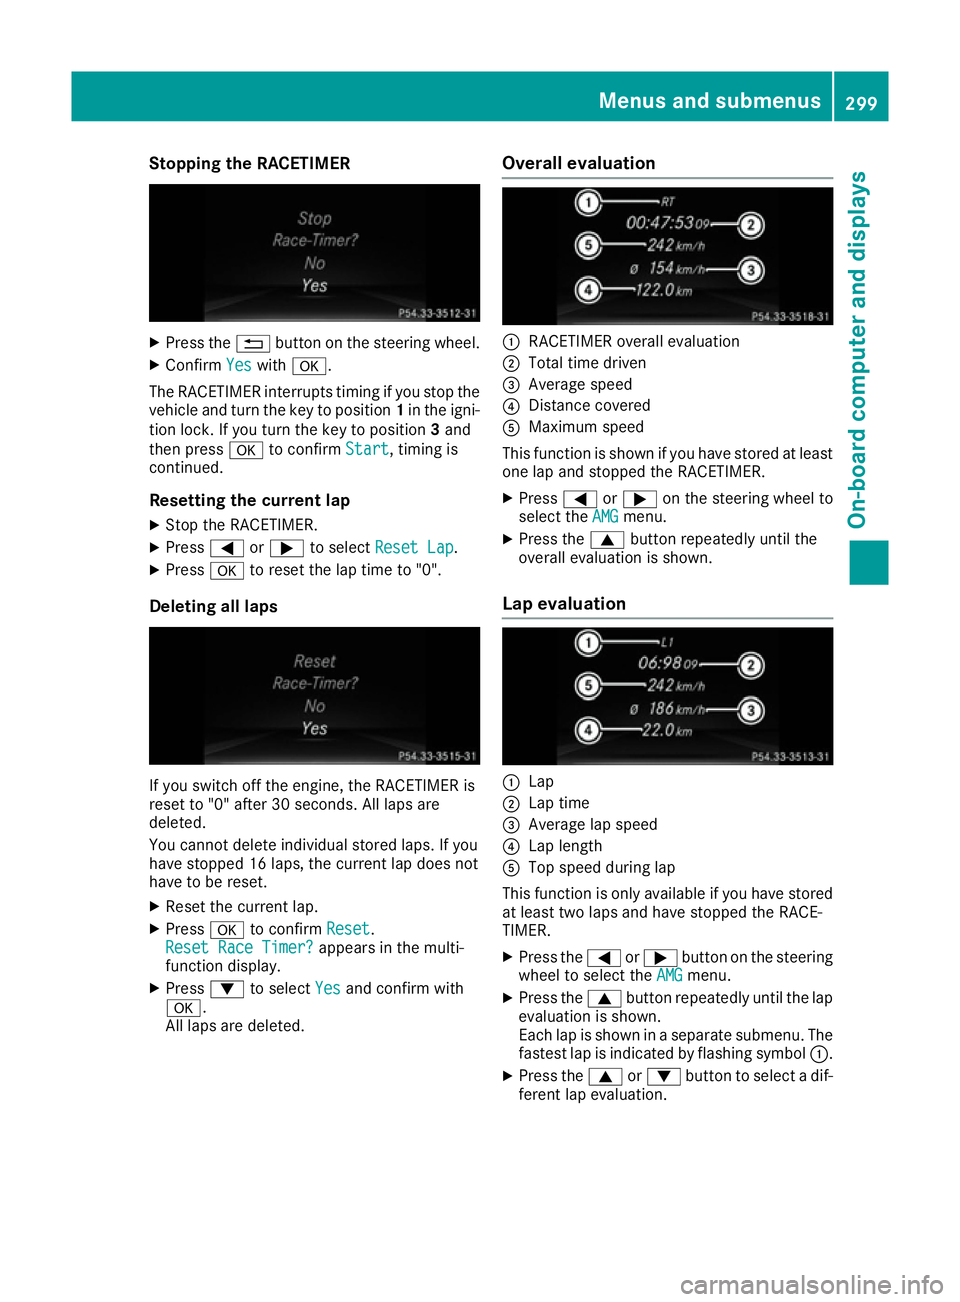
All laps are deleted. Overall evaluation :
RACETIMER overall evaluation
; Total time driven
= Average speed
? Distance covered
A Maximum speed
This function is shown if you have stored at least one lap and stopped the RACETIMER.
X Press =or; on the steering wheel to
select the AMG AMGmenu.
X Press the 9button repeatedly until the
overall evaluation is shown.
Lap evaluation :
Lap
; Lap time
= Average lap speed
? Lap length
A Top speed during lap
This function is only available if you have stored
at least two laps and have stopped the RACE-
TIMER.
X Press the =or; button on the steering
wheel to select the AMG
AMG menu.
X Press the 9button repeatedly until the lap
evaluation is shown.
Each lap is shown in a separate submenu. The fastest lap is indicated by flashing symbol :.
X Press the 9or: button to select a dif-
ferent lap evaluation. Menus and submenus
299On-board computer and displays Z