2015 MERCEDES-BENZ GLE SUV service indicator
[x] Cancel search: service indicatorPage 18 of 453
Mercedes-Benz Service Centre
see Qualified specialist workshop
Message memory (on-board com-
puter) .................................................. 300
Mirrors
see Exterior mirrors
see Rear-view mirror
see Vanity mirror (in sun visor)
Mobile phone
Frequencies ................................... 433
Installation ..................................... 433
Menu (on-board computer) ............ 288
Notes/placing in the bracket ......... 366
Transmission output (maximum) .... 433
Modifying the programming (key) ..... 86
MOExtended tyres ............................. 388
Motorway mode ................................ 125
MP3
Operating ....................................... 287
see Separate operating instructions
Multifunction display
Function/notes ............................. 283
Permanent display ......................... 293
Multifunction steering wheel
Operating the on-board computer .. 282
Overview .......................................... 35
Multimedia system
see Separate operating instructions N
Navigation Menu (on-board computer) ............ 286
see separate operating instructions
Notes on running in a new vehicle .. 157O
Occupant safety Airbags ............................................ 48
Automatic front-passenger front
airbag deactivation ......................... .51
Automatic measures after an acci-
dent ................................................. 58
Children in the vehicle ..................... 58
Important safety note s.................... 43
PASSENGER AIRBAG indicator
lamp ................................................. 44 Pets in the vehicle ........................... 70
PRE-SAFE
®
(anticipatory occu-
pant protection) ............................... 57
PRE-SAFE ®
PLUS (anticipatory
occupant protection PLUS) .............. 57
Restraint system introduction .......... 43
Restraint system warning lamp ........ 44
Odometer
see Total distance recorder
see Trip meter
Off-road driving
Approach/departure angle ............ 445
Checklist after driving off-road ...... 200
Checklist before driving off-road .... 200
Fording depth ................................ 444
General information ....................... 199
Important safety notes .................. 199
Maximum gradient climbing abil-
ity .................................................. 445
Travelling uphill .............................. 202
Off-road lights .................................... 125
Off-Road program (vehicles with-
out Off-Road Engineering package)
Function/note s............................. 254
Off-road programs (vehicles with
Off-Road Engineering package)
Function/note s............................. 254
Off-road drive program .................. 254
Offroad Plus drive progra m............ 255
Off-road programs (vehicles with
the Off-Road Engineering package)
Displays in the COMAND display ... 258
Off-road system
4MATIC .......................................... 252
DSR ............................................... 252
LOW RANGE off-road gear ............. 255
Off-road 4ETS .................................. 76
Off-road ABS .................................... 71
Off-road ESP ®
.................................. 77
Off-Road program (vehicles with-
out Off-Road Engineering pack-
age) ............................................... 254
Off-road programs (vehicles with
Off-Road Engineering package) ...... 254
Oil
see Engine oil Index
15
Page 19 of 453
On and Offroad menu (on-board
computer)
.......................................... 297
On-board computer
AMG menu .....................................2 97
Assistance menu ........................... 289
Audio menu ................................... 287
Convenience submenu .................. 296
Display messages .......................... 300
Displaying a service message ....... .378
DISTRONIC PLUS ........................... 213
Factory setting submenu .............. .297
Heating submenu ........................... 295
HYBRID menu ................................ 292
Important safety notes .................. 281
Instrument cluster submenu .......... 293
Light submenu ............................... 293
Menu overview .............................. 284
Message memory .......................... 300
Navigation menu ............................ 286
On and Offroad menu .................... 297
Operating the TV ............................ 288
Operating video DVD ..................... 288
Operation ....................................... 282
RACETIMER ................................... 298
Service menu ................................. 291
Settings menu ............................... 292
Standard displa y............................ 284
Telephone menu ............................ 288
Trip menu ...................................... 284
Vehicle submenu ........................... 294
Operating instructions
Vehicle equipment ........................... 26
Operating safety
Declaration of conformity ................ 27
Important safety note ...................... 26
Operating system
see On-board computer
Outside temperature display ........... 282
Overhead control panel ...................... 39
Override feature
Rear side window s........................... 69 P
Paint code .......................................... 434
Paintwork (cleaning instructions) ... 380
Panic alarm .......................................... 43 Panorama sliding sunroof
Important safety information ......... 101
Opening/closing the roller sun-
blind ............................................... 104
Operating ....................................... 103
Operating the roller sunblinds for
the sliding sunroof ......................... 103
Problem (malfunction) ................... 106
Rain closing feature ....................... 103
Reversing feature ........................... 102
Parking
Important safety notes .................. 191
Parking brake ................................ 192
Position of exterior mirror, front-
passenger side ............................... 119
Reversing camera .......................... 232
see PARKTRONIC
Parking aid
Active Parking Assist ..................... 228
see 360° camera
see Exterior mirrors
see PARKTRONIC
Parking assistance
see PARKTRONIC
Parking brake
Display message ............................ 304
Electric parking brake .................... 192
Warning lamp ................................. 346
Parking lamps
Display message ............................ 314
Switching on/of f........................... 122
PARKTRONIC
Deactivating/activating ................. 227
Driving system ............................... 225
Function/note s............................. 225
Important safety notes .................. 225
Problem (fault) ............................... 228
Sensor rang e................................. 225
Trailer towing ................................. 225
Warning display ............................. 226
PASSENGER AIR BAG
Display message ............................ 311
Indicator lamps ................................ 44
Problems (malfunctions) ................ 311
Pets in the vehicle ............................... 70
Plastic trim (cleaning instruc-
tions) .................................................. 384 16
Index
Page 22 of 453
Switching on/of
f........................... 233
Reversing feature
Panorama sliding sunroof .............. 102
Roller sunblind s............................. 104
Side windows ................................... 98
Sliding sunroof ............................... 102
Tailgate ............................................ 94
Reversing lamp (display message) .. 314
Roller sunblind
Panorama sliding sunroof .............. 103
Roof carrier ........................................ 360
Roof lining and carpets (cleaning
instructions) ...................................... 385
Roof load (maximum) ........................ 442
Route (navigation)
see Route guidance (navigation)
Route guidance (navigation) ............ 286S
Safety Children in the vehicle ..................... 58
Hybrid drive system ......................... 41
see Occupant safety
Safety net
Attaching ....................................... 358
Important safety information ......... 358
Safety notes
Hybrid vehicles ................................ 41
Safety system
see Driving safety systems
SD memory card
Selecting ........................................ 287
Seat belt
Correct usage .................................. 46
Switching belt adjustment on/off
(on-board computer) ...................... 296
Seat belts
Adjusting the driver's and front-
passenger seat belt ......................... 47
Adjusting the height ......................... 47
Cleaning ......................................... 385
Display message ............................ 308
Fastening ......................................... 47
Important safety guidelines ............. 45
Introduction ..................................... 45
Rear seat belt status indicator ......... 48
Releasing ......................................... 47 Warning lamp ................................. 337
Warning lamp (function) ................... 48
Seats
Adjusting (electrically) ................... 109
Adjusting the head restraint .......... 109
Cleaning the cover ......................... 385
Correct driver's seat position ........ 107
Folding the rear bench seat for-
wards/back ................................... 354
Important safety notes .................. 108
Overview ........................................ 108
Seat heating problem .................... 113
Seat ventilation problem ................ 114
Storing settings (memory func-
tion) ............................................... 120
Switching seat heating on/of f....... 112
Switching the seat ventilation on/ off .................................................. 113
Section
Sliding sunroof ............................... 101
Securing hooks .................................. 356
Selector lever
Cleaning ......................................... 384
Sensors (cleaning instructions) ....... 382
Service
see ASSYST PLUS
Service Centre
see Qualified specialist workshop
Service menu (on-board com-
puter) .................................................. 291
Service message
see ASSYST PLUS
Service products
AdBlue ®
special additive s.............. 439
Brake fluid ..................................... 441
Coolant (engine) ............................ 441
Engine oil ....................................... 439
Fuel ................................................ 436
Important safety notes .................. 435
Washer fluid ................................... 442
Setting the air distribution ............... 142
Setting the airflow ............................ 142
Setting the charge current (on-
board computer) ............................... 292
Setting the departure time (on-
board computer) ............................... 292 Index
19
Page 47 of 453
unexpectedly, for example. There is an
increased risk of injury, possibly even fatal.
Never modify parts of the restraint system. Do not attempt to modify the wiring as well as
electronic components or their software.
If it is necessary to modify an airbag system to
accommodate a person with disabilities, con-
tact a Mercedes-Benz Service Centre. Restraint system warning lamp
The functions of the restraint system are
checked after the ignition is switched on and at
regular intervals while the engine is running.
Therefore, malfunctions can be detected in
good time.
The 6 restraint system warning lamp in the
instrument cluster lights up when the ignition is switched on. It goes out no later than a few sec-
onds after the vehicle is started. The compo-
nents of the restraint system are in operational
readiness.
A malfunction has occurred if the 6restraint
system warning lamp:
R does not light up after the ignition is switched
on
R does not go out after a few seconds with the
engine running
R lights up again while the engine is running
All vehicles, except hybrid vehicles: G
WARNING
If the restraint system is malfunctioning,
restraint system components may be trig-
gered unintentionally or might not be trig-
gered at all in the event of an accident with a high rate of vehicle deceleration. This can
effect belt tensioners or airbags, for example. There is an increased risk of serious or even
fatal injuries.
Have the restraint system checked and
repaired immediately at a qualified specialist
workshop.
Hybrid vehicles: G
DANGER
If the restraint system is malfunctioning,
restraint system components may be trig-
gered unintentionally or might not be trig-
gered at all in the event of an accident with a high rate of vehicle deceleration. This can
effect belt tensioners or airbags, for example. In addition, the vehicle's high-voltage electri-
cal system may not be deactivated as inten-
ded in the event of an accident. Touching
damaged components of the vehicle's high-
voltage electrical system could result in an
electric shock. There is an increased risk of
injury, possibly even fatal.
Have the restraint system checked and
repaired immediately at a qualified specialist
workshop. After an accident, immediately
switch the ignition off and remove the key
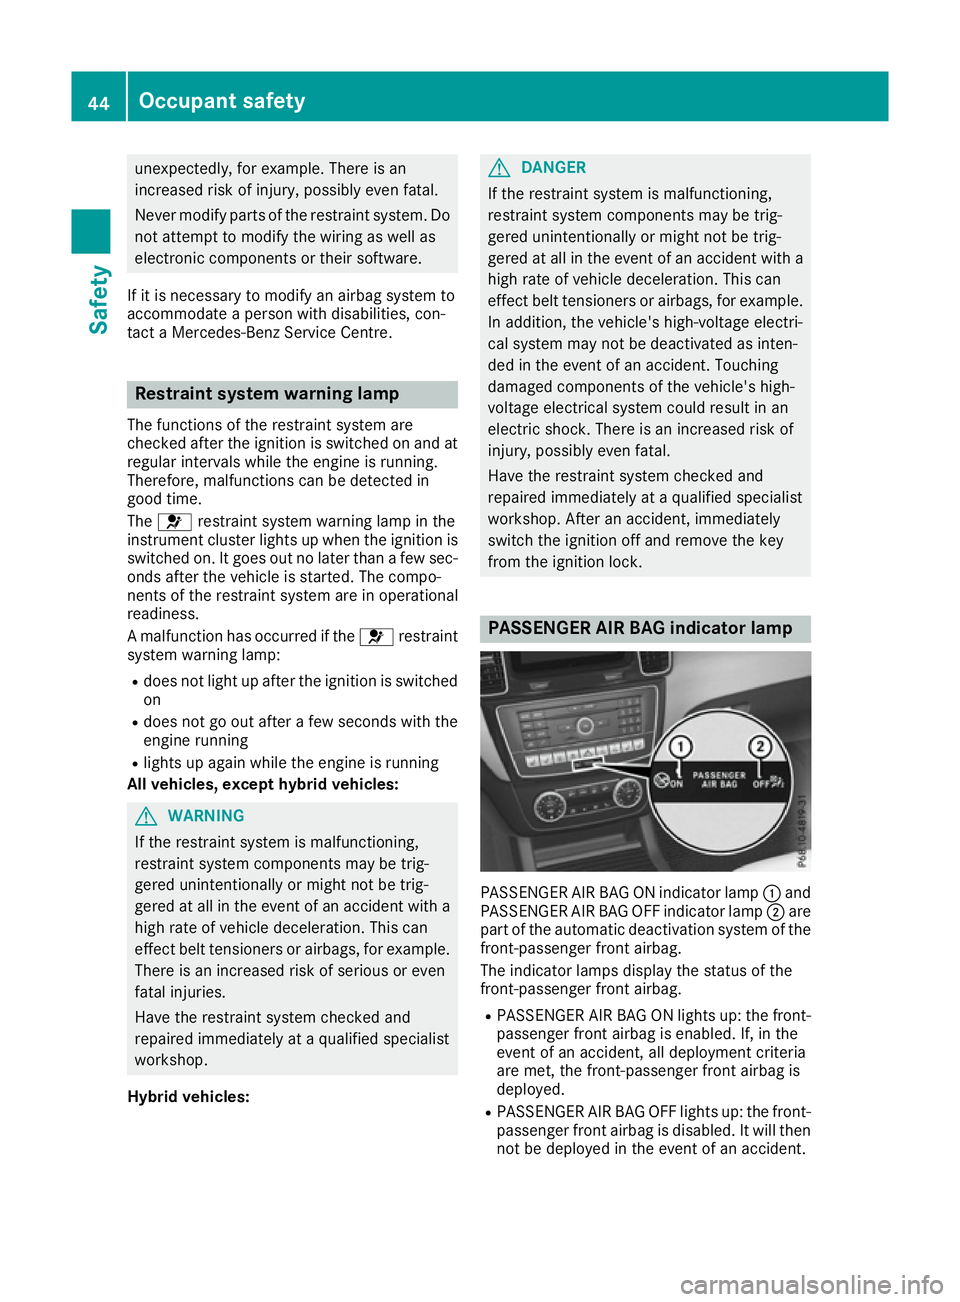
from the ignition lock. PASSENGER AIR BAG indicator lamp
PASSENGER AIR BAG ON indicator lamp
:and
PASSENGER AIR BAG OFF indicator lamp ;are
part of the automatic deactivation system of the front-passenger front airbag.
The indicator lamps display the status of the
front-passenger front airbag.
R PASSENGER AIR BAG ON lights up: the front-
passenger front airbag is enabled. If, in the
event of an accident, all deployment criteria
are met, the front-passenger front airbag is
deployed.
R PASSENGER AIR BAG OFF lights up: the front-
passenger front airbag is disabled. It will then
not be deployed in the event of an accident. 44
Occupant safetySafety
Page 56 of 453
G
WARNING
If you secure a child in a forward-facing child
restraint system on the front-passenger seat
and you position the front-passenger seat too close to the dashboard, in the event of an
accident, the child could:
R come into contact with the vehicle's inte-
rior if the PASSENGER AIR BAG OFF indi-
cator lamp is lit, for example
R be struck by the airbag if the PASSENGER
AIR BAG ON is lit up
This poses an increased risk of injury or even fatal injury.
Move the front-passenger seat as far back as
possible. Always make sure that the shoulder belt strap is correctly routed from the vehicle
belt outlet to the shoulder belt guide on the
child restraint system. The shoulder belt strap
must be routed forwards and downwards
from the vehicle belt outlet. If necessary,
adjust the vehicle belt outlet and the front-
passenger seat accordingly. Always observe
the information in this Owner's Manual on
suitable positioning of the child restraint sys- tem in addition to the child restraint system
manufacturer's installation instructions.
If the automatic front-passenger front airbag
deactivation system detects that: R the front-passenger seat is unoccupied, the
PASSENGER AIR BAG OFF indicator lamp
lights up after the system self-test and
remains lit. This indicates that the front-
passenger front airbag is disabled.
R the front-passenger seat is occupied by a
child in a rearward-facing child restraint sys-
tem, the PASSENGER AIR BAG OFF indicator
lamp lights up after the system self-test and
remains lit. This indicates that the front-
passenger front airbag is disabled.
But in the case of a child in a rearward-facing
child restraint, the PASSENGER AIR BAG ON
indicator lamp can light up after the system
self-test and remain lit. This indicates that the
front-passenger front airbag is enabled. The
result of the classification is dependent on,
among other factors, the child restraint sys-
tem and the child's build. It is recommended that you fit the child restraint system to a
suitable rear seat.
R the front-passenger seat is occupied by a
child in a forward-facing child restraint sys-
tem, either the PASSENGER AIR BAG ON or
PASSENGER AIR BAG OFF indicator lamp
lights up and remains lit after the system self-
test depending on the result of the classifica-
tion. The result of the classification is depend- ent on, among other factors, the child
restraint system and the child's build.
Move the front-passenger seat as far back as
possible. Always observe the information in
"Child restraint systems on the front-
passenger seat" (Y page 62) and in "Suita-
ble positioning of the child restraint system"
(Y page 63). Alternatively, you can fit the
child restraint system to a suitable rear seat.
R the front-passenger seat is occupied by a per-
son with a smaller build (e.g. a teenager or
small adult), either the PASSENGER AIR BAG
ON or PASSENGER AIR BAG OFF indicator
lamp lights up and remains lit after the system
self-test depending on the result of the clas-
sification.
- if the PASSENGER AIR BAG ON indicator
lamp lights up, move the front-passenger
seat as far back as possible. Alternatively, a
person with a small build can sit on a rear
seat.
- if the PASSENGER AIR BAG OFF indicator
lamp is lit, a person with a smaller build
should not use the front-passenger seat.
R the front-passenger seat is occupied by an
adult or a person with a build corresponding
to that of an adult, the PASSENGER AIR BAG
ON indicator lamp lights up after the system
self-test and remains lit. This indicates that
the front-passenger front airbag is enabled.
If children are travelling in the vehicle, be sure to
observe the notes on "Children in the vehicle"
(Y page 58).
If the automatic front-passenger front airbag
deactivation system is malfunctioning, the red
6 restraint system warning lamp in the
instrument cluster and the PASSENGER AIR
BAG OFF indicator lamp light up simultaneously.
The front-passenger front airbag is disabled in
this case and does not deploy during an acci-
dent. Have the system checked as soon as pos-
sible by qualified technicians. Consult a
Mercedes-Benz Service Centre. The front-
passenger seat should only be repaired at a
Mercedes-Benz Service Centre. Occupant safety
53Safety Z
Page 58 of 453
Problems with automatic front-passenger front airbag deactivation
Be sure to observe the notes on "System self-test" (Y
page 54).Problem
Possible causes/consequences and
M
MSolutions The PASSENGER AIR
BAG OFF indicator lamp
lights up and remains lit,
even though the front-
passenger seat is occu-
pied by an adult or a per-
son with a build corre-
sponding to that of an
adult. The classification of the person on the front-passenger seat is false.
X Make sure the conditions for a correct classification of the person
on the front-passenger seat are met (Y page 51).
X If the PASSENGER AIR BAG OFF indicator lamp remains lit, the front-
passenger seat may not be used.
X Have the automatic front-passenger front airbag deactivation sys-
tem checked as soon as possible at a Mercedes-Benz Service
Centre. The PASSENGER AIR
BAG OFF indicator lamp
does not light up and/or
does not stay on.
The front-passenger seatis:
R empty
R occupied with a rear-
ward-facing child
restraint system The automatic front-passenger front airbag deactivation system is
malfunctioning.
X Make sure there is nothing between the seat and the child restraint
system.
X Make sure that the entire base of the child restraint system rests on
the seat cushion of the front-passenger seat.
X When installing the child restraint system, make sure that the seat
belt is tight. Do not pull the seat belt tight with the front-passenger
seat adjustment. This could result in the seat belt and the child
restraint system being pulled too tightly.
X Check that the child restraint system is installed correctly.
X Make sure that no objects are applying additional weight to the
seat.
X If the PASSENGER AIR BAG OFF indicator lamp remains off and/or
the PASSENGER AIR BAG ON indicator lamp lights up, do not install
a rearward-facing child restraint system on the front-passenger
seat. It is recommended that you fit the child restraint system to a suitable rear seat.
X Have the automatic front-passenger front airbag deactivation sys-
tem checked as soon as possible at a Mercedes-Benz Service
Centre. Deployment of belt tensioners and air-
bags
Important safety notes G
WARNING
After the airbag deploys, the airbag parts are
hot. There is a risk of injury.
Do not touch the airbag parts. Have a
deployed airbag replaced at a qualified spe-
cialist workshop as soon as possible. G
WARNING
Pyrotechnic seat belt tensioners that have
been deployed are no longer operational and
are unable to perform their intended protec-
tive function. This poses an increased risk of
injury or even fatal injury.
Therefore, have pyrotechnic belt tensioners
which have been triggered immediately
replaced at a qualified specialist workshop.
Mercedes-Benz recommends that you have the
vehicle towed to a qualified specialist workshop
after an accident. Take this into account, par- Occupant safety
55Safety Z
Page 197 of 453
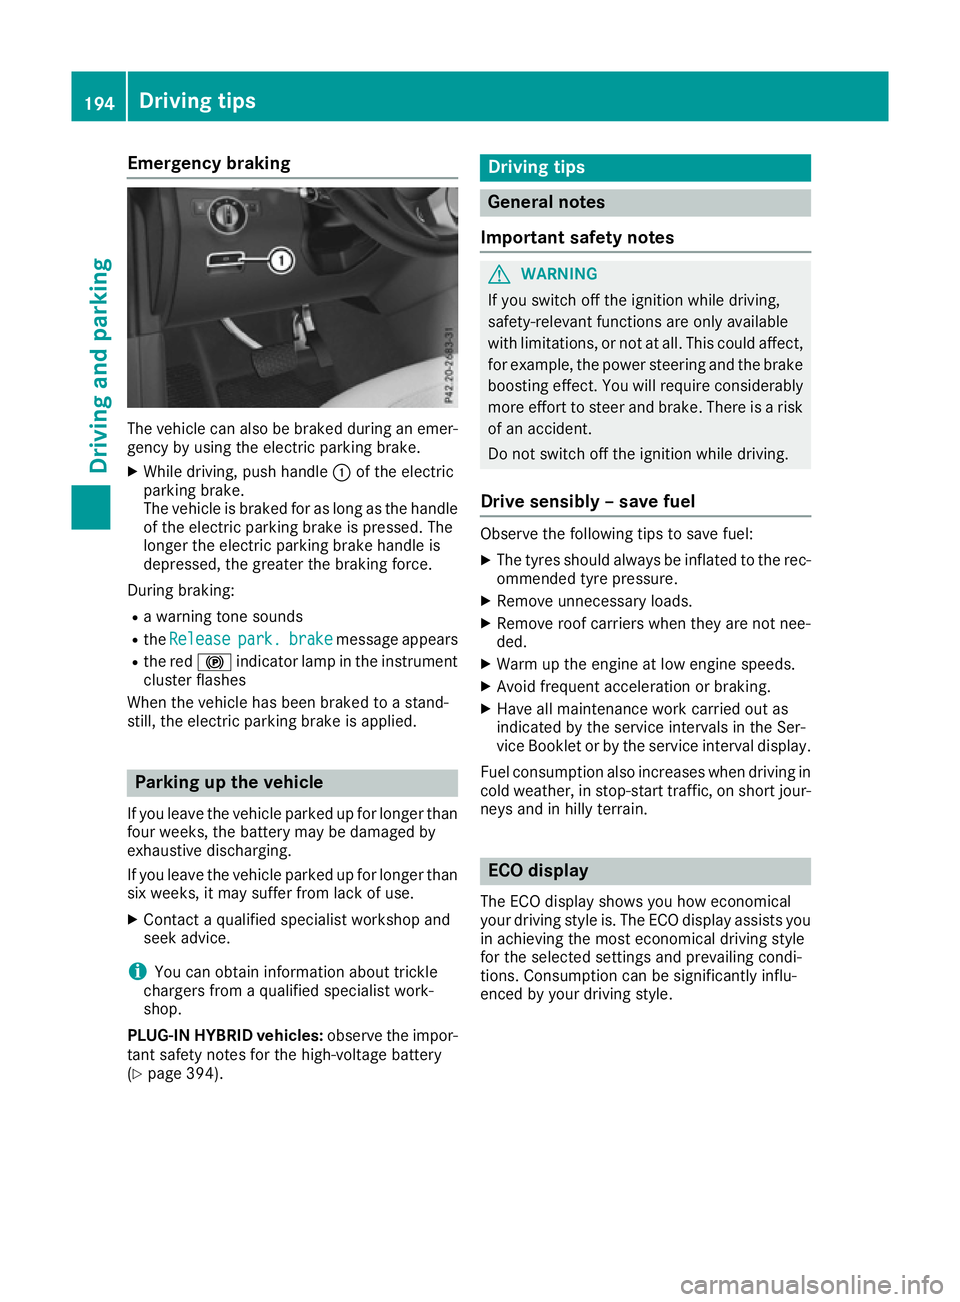
Emergency braking
The vehicle can also be braked during an emer-
gency by using the electric parking brake.
X While driving, push handle :of the electric
parking brake.
The vehicle is braked for as long as the handle of the electric parking brake is pressed. The
longer the electric parking brake handle is
depressed, the greater the braking force.
During braking:
R a warning tone sounds
R the Release
Release park. park.brake
brakemessage appears
R the red !indicator lamp in the instrument
cluster flashes
When the vehicle has been braked to a stand-
still, the electric parking brake is applied. Parking up the vehicle
If you leave the vehicle parked up for longer than
four weeks, the battery may be damaged by
exhaustive discharging.
If you leave the vehicle parked up for longer than
six weeks, it may suffer from lack of use.
X Contact a qualified specialist workshop and
seek advice.
i You can obtain information about trickle
chargers from a qualified specialist work-
shop.
PLUG-IN HYBRID vehicles: observe the impor-
tant safety notes for the high-voltage battery
(Y page 394). Driving tips
General notes
Important safety notes G
WARNING
If you switch off the ignition while driving,
safety-relevant functions are only available
with limitations, or not at all. This could affect, for example, the power steering and the brake
boosting effect. You will require considerably
more effort to steer and brake. There is a risk of an accident.
Do not switch off the ignition while driving.
Drive sensibly – save fuel Observe the following tips to save fuel:
X The tyres should always be inflated to the rec-
ommended tyre pressure.
X Remove unnecessary loads.
X Remove roof carriers when they are not nee-
ded.
X Warm up the engine at low engine speeds.
X Avoid frequent acceleration or braking.
X Have all maintenance work carried out as
indicated by the service intervals in the Ser-
vice Booklet or by the service interval display.
Fuel consumption also increases when driving in
cold weather, in stop-start traffic, on short jour- neys and in hilly terrain. ECO display
The ECO display shows you how economical
your driving style is. The ECO display assists you in achieving the most economical driving style
for the selected settings and prevailing condi-
tions. Consumption can be significantly influ-
enced by your driving style. 194
Driving tipsDriving and parking
Page 398 of 453
G
WARNING
If the housing of the high-voltage battery has
been damaged, electrolyte and gases may
leak out. These are poisonous and caustic.
There is a risk of injury.
Avoid contact with the skin, eyes or clothing. Immediately rinse electrolyte splashes off
with water and seek medical attention
straight away.
! Exhaustive discharge caused by the vehicle
standing idle for lengthy periods can damage
the high-voltage battery. If the vehicle is idle
for lengthy periods leave the high-voltage bat- tery connected to a charging station.
Consult a Mercedes-Benz Service Centre if you
wish to leave your vehicle parked up for a long
period of time. Charging the 12 V battery
G
WARNING
During charging and jump-starting, explosive
gases can escape from the battery. There is a risk of an explosion.
Particularly avoid fire, naked flames, creating
sparks and smoking. Ensure there is sufficient
ventilation while charging and jump-starting.
Do not lean over a battery. G
WARNING
Battery acid is caustic. There is a risk of injury. Avoid contact with the skin, eyes or clothing.
Do not breathe in any battery gases. Do not
lean over the battery. Keep the batteries out
of the reach of children. Immediately rinse off
battery acid thoroughly with plenty of clean
water and seek medical attention at once. G
WARNING
A discharged battery can freeze at tempera-
tures below freezing point. When jump-start-
ing the vehicle or charging the battery, gases can escape from the battery. There is a risk of
an explosion. Allow the frozen battery to thaw out before
charging it or jump-starting.
! Only use battery chargers with a maximum
charging voltage of 14.8 V.
! Only
charge the battery using the jump-start
connection point.
The jump-starting connection point is in the
engine compartment (Y page 397).
X Open the bonnet.
X Connect the battery charger in the same
order as when connecting the donor battery
during jump-starting: to the positive terminal
and earth point (Y page 397).
Keep away from fire and open flames. Do not
lean over the battery. Never charge the battery
if it is still fitted to the vehicle, unless you use a
battery charger which has been tested and
approved by Mercedes-Benz. A battery charger
unit specially adapted for Mercedes-Benz vehi-
cles and tested and approved by Mercedes-
Benz is available as an accessory. This device
permits charging of the battery in position. Con- tact a Mercedes-Benz Service Centre for infor-
mation and availability. Read the battery charg-
er's operating instructions before charging the
battery.
If the indicator/warning lamps do not light up at
low temperatures, it is very likely that the dis-
charged battery has frozen. In this case you may
neither jump-start the vehicle nor charge the
battery. The service life of a battery that has
been thawed may be reduced. The starting char-
acteristics may be impaired, especially at low
temperatures. Have the thawed battery
checked at a qualified specialist workshop.
PLUG-IN HYBRID vehicles: if the battery
charge is sufficient, the high-voltage battery can also supply the 12 V battery. This only happens
if the battery charge of the 12 V battery requires this, e.g. after using electrical consumers for anextended period with the engine switched off.
As the on-board voltage is continuously moni-
tored this can also be performed when the
engine is switched off. The battery charge of the
12 V battery and the on-board voltage are
thereby kept stable for longer. Battery (vehicle)
395Breakdown assistance Z