2015 MERCEDES-BENZ GLE SUV fog light
[x] Cancel search: fog lightPage 17 of 453
Foglamps (extended range) ........... 125
Hazard warning lamps ................... 124
Headlamp flashe r........................... 124
Headlamp range ............................ 123
Light switch ................................... 121
Main-beam headlamp s................... 123
Motorway mode ............................. 125
Off-road lights ................................ 125
Parking lamps ................................ 122
Rear foglamp ................................. 122
Side lamps ..................................... 122
Switching the daytime driving
lights on/off (on-board com-
puter) ............................................. 293
Turn signals ................................... 123
see Interior lighting
LIM indicator lamp
Cruise control ................................ 203
DISTRONIC PLUS ........................... 208
Variable SPEEDTRONIC ................. 205
Limiting the speed
see SPEEDTRONIC
Loading guidelines ............................ 351
Locking
see Central locking
Locking (doors)
Automatic ........................................ 92
Emergency locking ........................... 93
From inside (central locking but-
ton) .................................................. 91
Locking centrally
see Central locking
Locking verification signal (on-
board computer) ............................... 295
LOW RANGE
Display message ............................ 324
Off-road gear ................................. 255
LOW RANGE off-road gear ................ 255
Luggage compartment cover
Notes/function .............................. 356
Luggage compartment enlarge-
ment
Important safety notes .................. 354
Luggage compartment floor
Important safety notes .................. 359
opening/closing ............................ 359
stowage well, under ....................... 359 Lumbar support
Adjusting (on the seat) .................. 112
Luxury head restraint ....................... 110 M
M+S tyres ........................................... 407
Main-beam headlamps
Adaptive Highbeam Assist PLUS .... 126
Changing bulb s.............................. 129
Display message ............................ 314
Switching on/of f........................... 123
Maintenance
see ASSYST PLUS
Matt finish (cleaning instructions) .. 381
Maximum charge current
Setting (charging cable) ................. 186
Setting (on-board computer) .......... 292
Media Interface
USB port in the armrest of the
centre console ............................... 352
see Separate operating instructions
Memory card (audio) ......................... 287
Memory function ............................... 120
Mercedes-Benz Contact
Display message ............................ 306
Mercedes-Benz emergency call
system
Switch in the overhead control
panel .............................................. 365
Mercedes-Benz Intelligent Drive
360°camera .................................. 236
Active Blind Spot Assist ................. 247
Active Lane Keeping Assist ............ 250
Active Parking Assist ..................... 228
ATTENTION ASSIST ........................ 240
Blind Spot Assist ............................ 244
DISTRONIC PLUS ........................... 207
DISTRONIC PLUS with Steering
Assist and Stop&Go Pilot ............... 214
General notes ................................ 203
Lane Keeping Assist ...................... 246
PARKTRONIC ................................. 225
PRE-SAFE ®
PLUS (anticipatory
occupant protection PLUS) .............. 57
Reversing camera .......................... 232
Traffic Sign Assist .......................... 242 14
Index
Page 124 of 453
Useful information
i This Owner's Manual describes all models,
series and optional equipment for your vehi-
cle that were available at the time of going to
press. National variations are possible. Note
that your vehicle may not be equipped with all
of the functions described. This is also the
case for systems and functions relevant to
safety.
i Read the information on qualified specialist
workshops: (Y page 28). Exterior lighting
General notes
For reasons of safety, Mercedes-Benz recom-
mends that you drive with the lights switched on
even during the daytime. In some countries,
operation of the headlamps varies due to legal
requirements and self-imposed obligations. Driving abroad
General notes If your journey takes you to countries where
vehicles are driven on the opposite side of the
road to the country in which the vehicle is reg-
istered, your headlamps must be switched to
symmetrical dipped beam as soon as possible
after crossing the border. This prevents oncom-
ing traffic from being dazzled. Symmetrical
lights do not illuminate as large an area of the
edge of the carriageway.
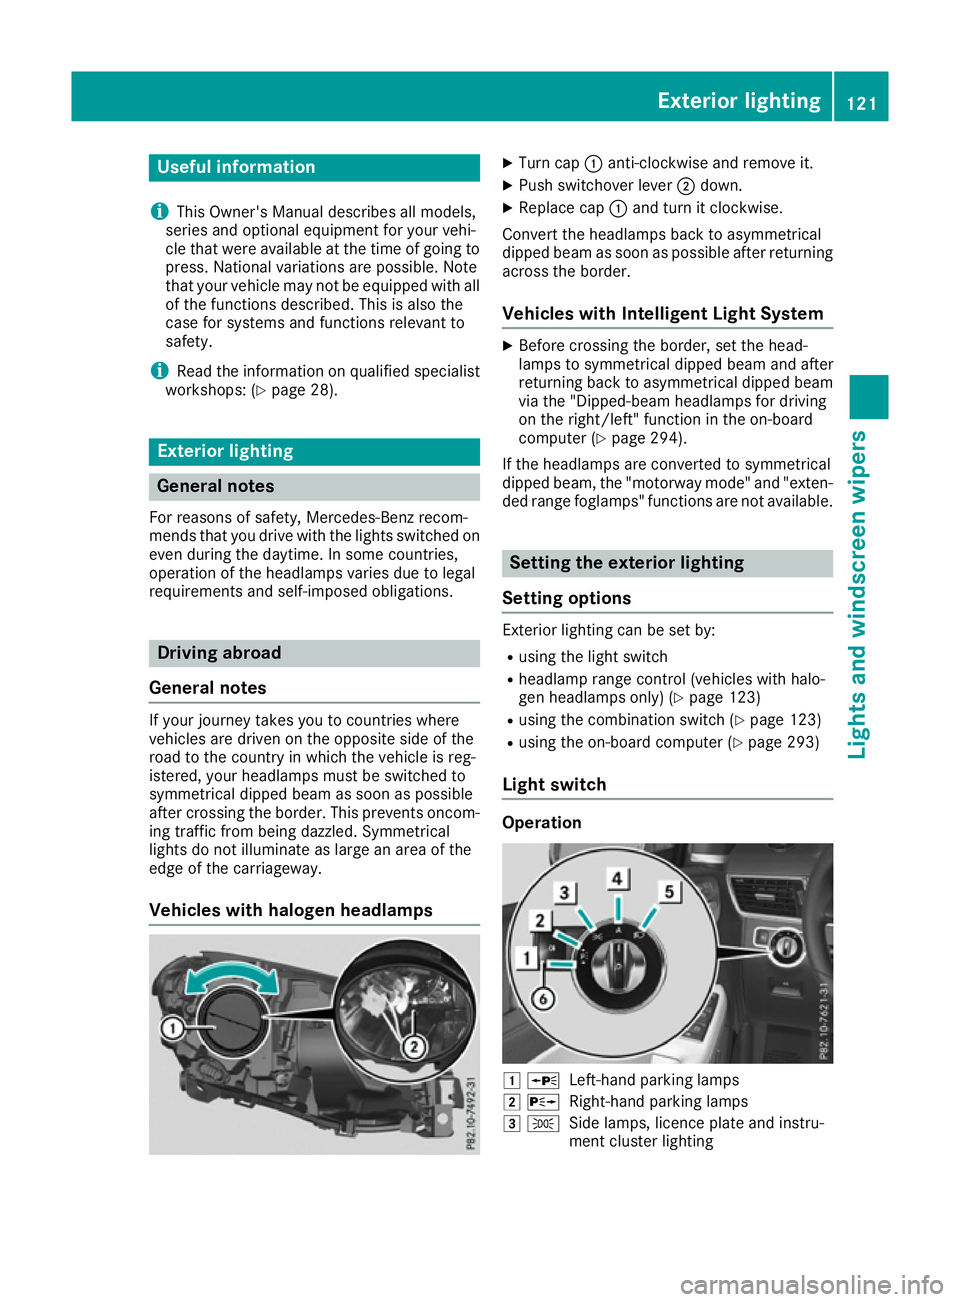
Vehicles with halogen headlamps X
Turn cap :anti-clockwise and remove it.
X Push switchover lever ;down.
X Replace cap :and turn it clockwise.
Convert the headlamps back to asymmetrical
dipped beam as soon as possible after returning
across the border.
Vehicles with Intelligent Light System X
Before crossing the border, set the head-
lamps to symmetrical dipped beam and after
returning back to asymmetrical dipped beam
via the "Dipped-beam headlamps for driving
on the right/left" function in the on-board
computer (Y page 294).
If the headlamps are converted to symmetrical
dipped beam, the "motorway mode" and "exten- ded range foglamps" functions are not available. Setting the exterior lighting
Setting options Exterior lighting can be set by:
R using the light switch
R headlamp range control (vehicles with halo-
gen headlamps only) (Y page 123)
R using the combination switch (Y page 123)
R using the on-board computer (Y page 293)
Light switch Operation
1
W
Left-hand parking lamps
2 X
Right-hand parking lamps
3 T
Side lamps, licence plate and instru-
ment cluster lighting Exterior lighting
121Lights and windscreen wipers
Page 125 of 453
4
Ã
Automatic headlamp mode, controlled
by the light sensor
5 L
Dipped-beam/main-beam headlamps
B R
Rear fog lamp
If you hear a warning tone when you leave the
vehicle, the lights may still be switched on.
X Turn the light switch to Ã.
The exterior lighting (except the side lamps/
parking lamps) switches off automatically if you: R remove the key from the ignition lock
R open the driver's door with the key in posi-
tion 0in the ignition lock
Automatic headlamp mode
à is the preferred light switch setting. The
light setting is automatically selected according to the brightness of the ambient light (excep-
tion: poor visibility due to weather conditions
such as fog, snow or spray):
R Key in position 1in the ignition lock: the side
lamps are switched on or off automatically
depending on the brightness of the ambient
light
R With the engine running: depending on the
ambient light conditions, the daytime driving
lights or the side lamps and dipped-beam
headlamps are switched on or off automati-
cally
X To switch on automatic headlamp mode:
turn the light switch to Ã.G
WARNING
When the light switch is set to Ã, the
dipped-beam headlamps may not be switched on automatically if there is fog, snow or othercauses of poor visibility due to the weather
conditions such as spray. There is a risk of an
accident.
In such situations, turn the light switch to
L.
The automatic headlamp feature is only an aid.
The driver is responsible for the vehicle lighting at all times.
The daytime driving lights improve the detecta-
bility of your vehicle during the day.
When the side lamps and dipped-beam head-
lamps are switched on, the green T(side
lamps) and L(dipped-beam headlamps) indicator lamps in the instrument cluster light
up.
Dipped-beam headlamps When the ignition is switched on and the light
switch is in the Lposition, the side lamps
and dipped-beam headlamps are switched on
even if the light sensor does not sense dark
ambient light conditions. This is advantageous
when there is fog or rain.
X To switch on the dipped-beam headlamps:
turn the key in the ignition lock to position 2
or start the engine.
X Turn the light switch to L.
The green Lindicator lamp in the instru-
ment cluster lights up.
Rear fog lamp The rear foglamp improves the visibility of your
vehicle in heavy fog for the following traffic.
Please observe the country-specific laws on the
use of rear foglamps.
X To switch on the rear foglamp: turn the key
in the ignition lock to position 2or start the
engine.
X Turn the light switch to LorÃ.
X Press the Rbutton.
The yellow Rindicator lamp in the instru-
ment cluster lights up.
X To switch off the rear foglamp: press the
R button.
The yellow Rindicator lamp in the instru-
ment cluster goes out.
Side lamps ! If the battery has been excessively dis-
charged, the side lamps or parking lamps are
automatically switched off to enable the next engine start. Always park your vehicle safely
and sufficiently lit according to legal stand-
ards. Avoid the continuous use of the T
side lamps for several hours. If possible,
switch on the Xright or the Wleft
parking lamp.
X To switch on: turn the light switch to T.
The green Tindicator lamp in the instru-
ment cluster lights up.
Parking lamps Switches on the parking lamps ensures that the
corresponding side of the vehicle is illuminated. 122
Exterior lightingLights and
windscreen wipers
Page 127 of 453
deactivation of the main-beam headlamps
(Y page 126).
Headlamp flasher X
To switch on: turn the key in the ignition lock
to position 1or 2, or start the engine.
X Pull the combination switch in the direction of
arrow =. Hazard warning lamps
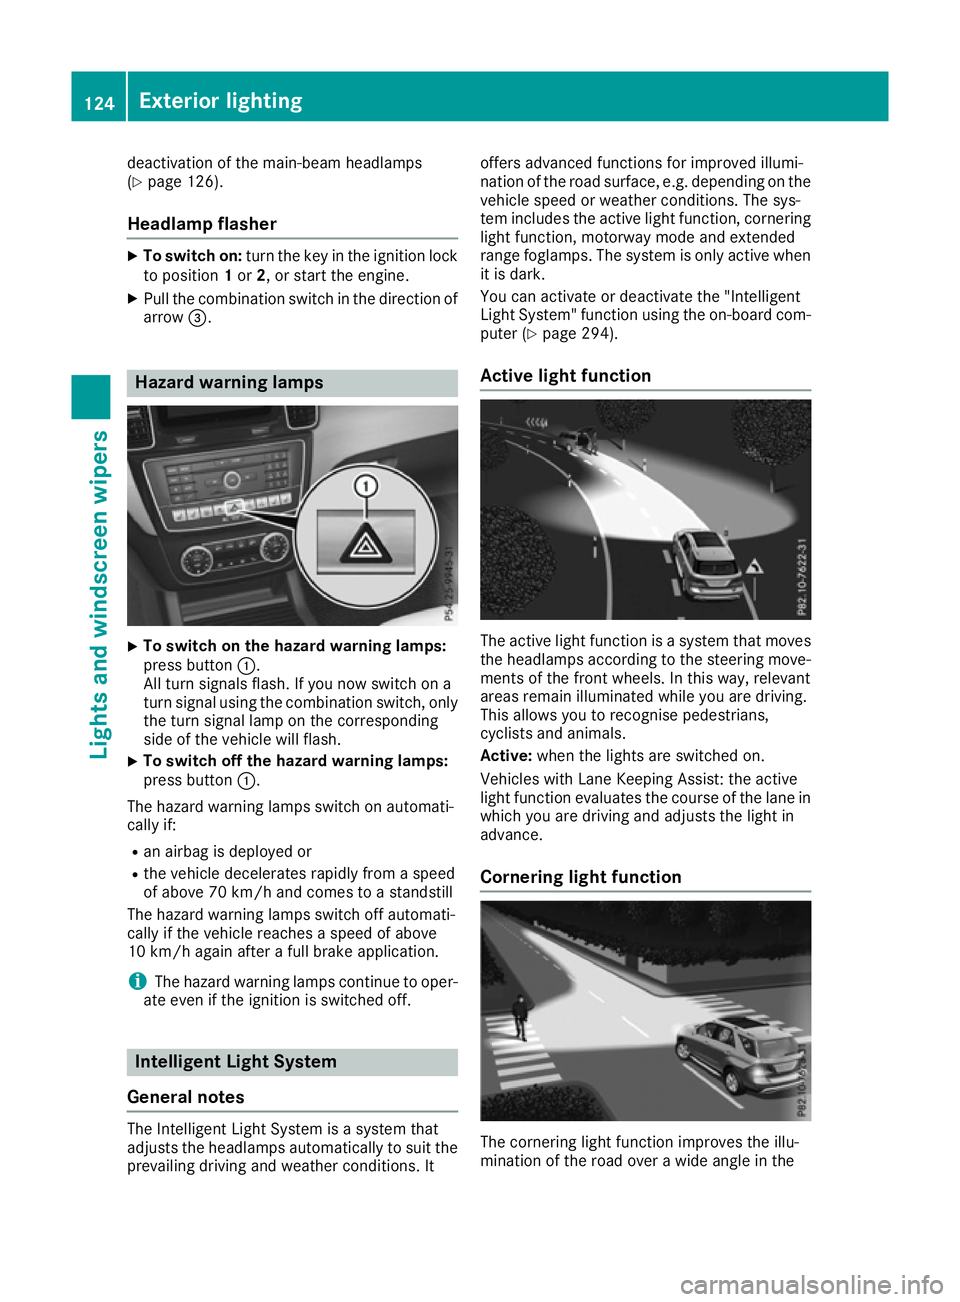
X
To switch on the hazard warning lamps:
press button
:.
All turn signals flash. If you now switch on a
turn signal using the combination switch, only the turn signal lamp on the corresponding
side of the vehicle will flash.
X To switch off the hazard warning lamps:
press button
:.
The hazard warning lamps switch on automati-
cally if:
R an airbag is deployed or
R the vehicle decelerates rapidly from a speed
of above 70 km/h and comes to a standstill
The hazard warning lamps switch off automati-
cally if the vehicle reaches a speed of above
10 km/ hagain after a full brake application.
i The hazard warning lamps continue to oper-
ate even if the ignition is switched off. Intelligent Light System
General notes The Intelligent Light System is a system that
adjusts the headlamps automatically to suit the
prevailing driving and weather conditions. It offers advanced functions for improved illumi-
nation of the road surface, e.g. depending on the
vehicle speed or weather conditions. The sys-
tem includes the active light function, corneringlight function, motorway mode and extended
range foglamps. The system is only active when it is dark.
You can activate or deactivate the "Intelligent
Light System" function using the on-board com-
puter (Y page 294).
Active light function The active light function is a system that moves
the headlamps according to the steering move-
ments of the front wheels. In this way, relevant
areas remain illuminated while you are driving.
This allows you to recognise pedestrians,
cyclists and animals.
Active: when the lights are switched on.
Vehicles with Lane Keeping Assist: the active
light function evaluates the course of the lane in which you are driving and adjusts the light in
advance.
Cornering light function The cornering light function improves the illu-
mination of the road over a wide angle in the124
Exterior lightingLights and windscreen wipers
Page 128 of 453
direction you are turning, enabling better visi-
bility in tight bends, for example. It can only be
activated when the dipped-beam headlamps are
switched on.
Active:
R if you are driving at speeds below 40 km/h
and switch on the turn signal or turn the steer- ing wheel.
R if you are driving at speeds between 40 km/h
and 70 km/ hand turn the steering wheel.
The cornering light function may remain lit for a
short time, but is automatically switched off
after no more than three minutes.
Cornering light function with roundabout
function:
The cornering light function is activated on both sides before entering a roundabout through an
evaluation of the current GPS position of the
vehicle. It remains active until after the vehicle
has left the roundabout. In this way, pedestrians crossing the road, for example, are illuminated
by your vehicle in good time.
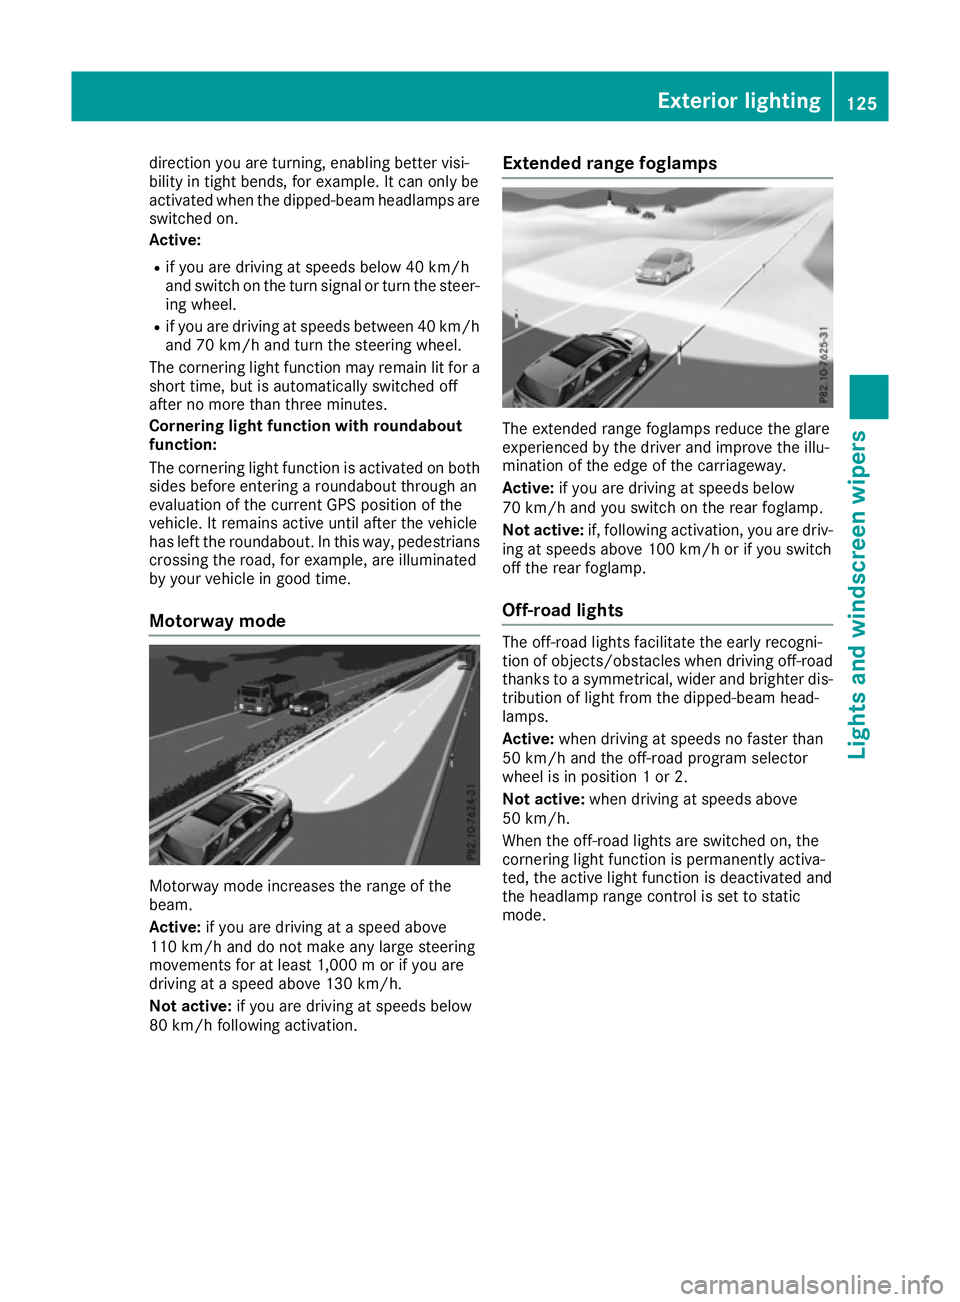
Motorway mode Motorway mode increases the range of the
beam.
Active: if you are driving at a speed above
110 km/h and do not make any large steering
movements for at least 1,000 m or if you are
driving at a speed above 130 km/h.
Not active: if you are driving at speeds below
80 km/h following activation. Extended range foglamps The extended range foglamps reduce the glare
experienced by the driver and improve the illu-
mination of the edge of the carriageway.
Active:
if you are driving at speeds below
70 km/h and you switch on the rear foglamp.
Not active: if, following activation, you are driv-
ing at speeds above 100 km/h or if you switch
off the rear foglamp.
Off-road lights The off-road lights facilitate the early recogni-
tion of objects/obstacles when driving off-road
thanks to a symmetrical, wider and brighter dis-
tribution of light from the dipped-beam head-
lamps.
Active: when driving at speeds no faster than
50 km/h and the off-road program selector
wheel is in position 1 or 2.
Not active: when driving at speeds above
50 km/h.
When the off-road lights are switched on, the
cornering light function is permanently activa-
ted, the active light function is deactivated and
the headlamp range control is set to static
mode. Exterior lighting
125Lights and windscreen wipers Z
Page 129 of 453
Adaptive Highbeam Assist Plus
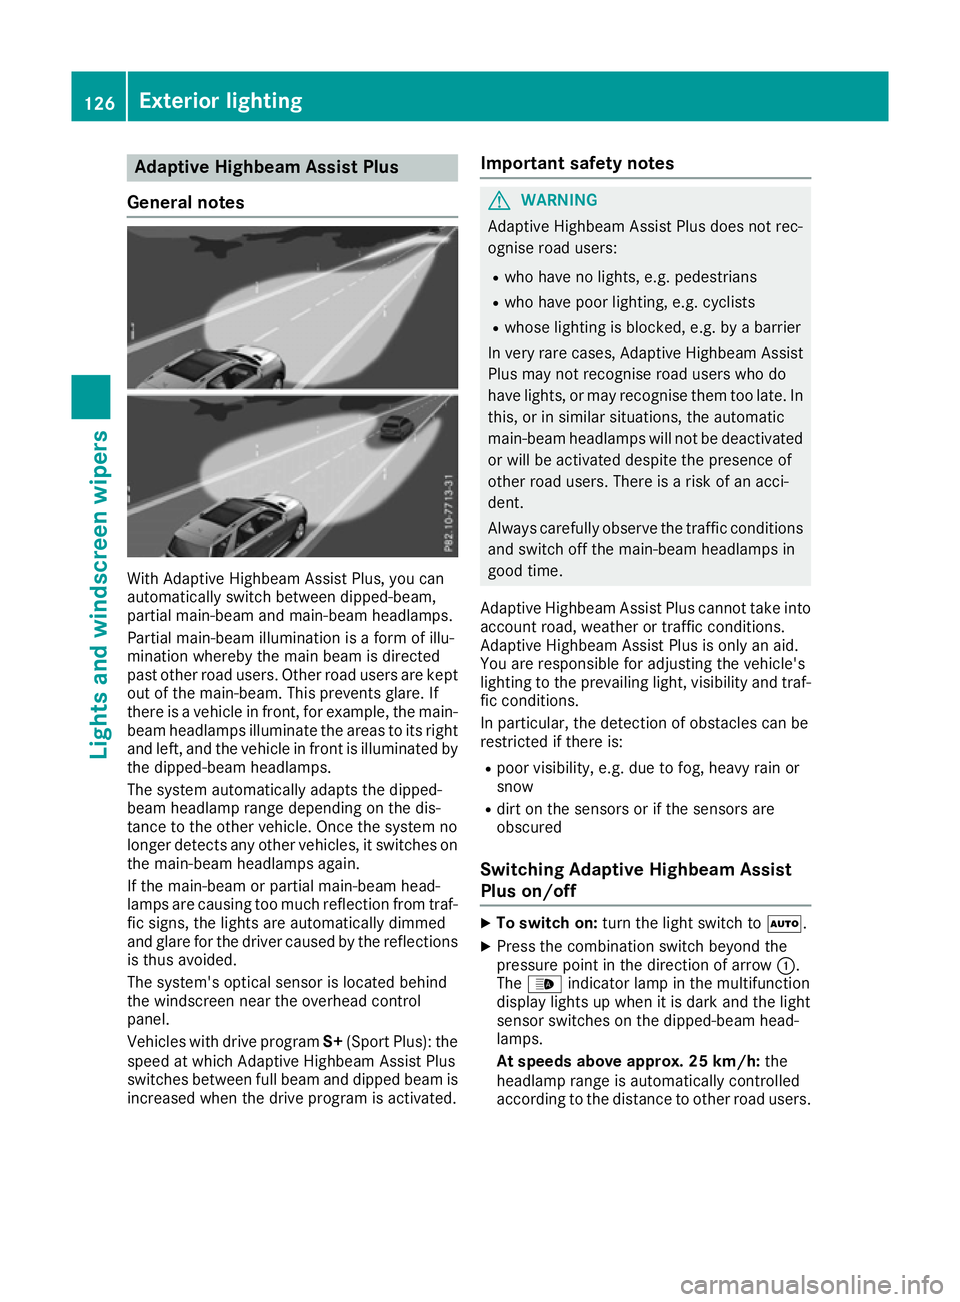
General notes With Adaptive Highbeam Assist Plus, you can
automatically switch between dipped-beam,
partial main-beam and main-beam headlamps.
Partial main-beam illumination is a form of illu-
mination whereby the main beam is directed
past other road users. Other road users are kept
out of the main-beam. This prevents glare. If
there is a vehicle in front, for example, the main- beam headlamps illuminate the areas to its right
and left, and the vehicle in front is illuminated by
the dipped-beam headlamps.
The system automatically adapts the dipped-
beam headlamp range depending on the dis-
tance to the other vehicle. Once the system no
longer detects any other vehicles, it switches on the main-beam headlamps again.
If the main-beam or partial main-beam head-
lamps are causing too much reflection from traf-fic signs, the lights are automatically dimmed
and glare for the driver caused by the reflections
is thus avoided.
The system's optical sensor is located behind
the windscreen near the overhead control
panel.
Vehicles with drive program S+(Sport Plus): the
speed at which Adaptive Highbeam Assist Plus
switches between full beam and dipped beam is
increased when the drive program is activated. Important safety notes G
WARNING
Adaptive Highbeam Assist Plus does not rec-
ognise road users:
R who have no lights, e.g. pedestrians
R who have poor lighting, e.g. cyclists
R whose lighting is blocked, e.g. by a barrier
In very rare cases, Adaptive Highbeam Assist
Plus may not recognise road users who do
have lights, or may recognise them too late. In this, or in similar situations, the automatic
main-beam headlamps will not be deactivated
or will be activated despite the presence of
other road users. There is a risk of an acci-
dent.
Always carefully observe the traffic conditions and switch off the main-beam headlamps in
good time.
Adaptive Highbeam Assist Plus cannot take into
account road, weather or traffic conditions.
Adaptive Highbeam Assist Plus is only an aid.
You are responsible for adjusting the vehicle's
lighting to the prevailing light, visibility and traf-
fic conditions.
In particular, the detection of obstacles can be
restricted if there is:
R poor visibility, e.g. due to fog, heavy rain or
snow
R dirt on the sensors or if the sensors are
obscured
Switching Adaptive Highbeam Assist
Plus on/off X
To switch on: turn the light switch to Ã.
X Press the combination switch beyond the
pressure point in the direction of arrow :.
The _ indicator lamp in the multifunction
display lights up when it is dark and the light
sensor switches on the dipped-beam head-
lamps.
At speeds above approx. 25 km/h: the
headlamp range is automatically controlled
according to the distance to other road users. 126
Exterior lightingLights and windscreen wipers
Page 218 of 453
and right), only focusing on the vehicle in front if
detected lane markings are not present.
If these conditions are not present, Steering
Assist and Stop&Go Pilot cannot provide assis-
tance.
DISTRONIC PLUS must be active in order for the
function to be available.
Important safety notes If you fail to adapt your driving style, DISTRONIC PLUS with Steering Assist and Stop&Go Pilot
can neither reduce the risk of an accident nor
override the laws of physics. It cannot take into
account road, weather or traffic conditions.
DISTRONIC PLUS with Steering Assist and
Stop&Go Pilot is only an aid. You are responsible
for the distance to the vehicle in front, for vehi- cle speed, for braking in good time and for stay-
ing in lane.
DISTRONIC PLUS with Steering Assist and
Stop&Go Pilot does not detect road and traffic
conditions and does not detect all road users. If you are following a vehicle which is driving
towards the edge of the carriageway, your vehi-cle could come into contact with the kerb or
other road boundaries. Be particularly aware of
other road users, e.g. cyclists, that are directly
next to your vehicle.
Obstacles such as traffic pylons on the lane or
projecting out into the lane are not detected.
An inappropriate steering intervention, e.g. after
intentionally driving over a lane marking, can be
corrected at any time if you steer slightly in the opposite direction.
DISTRONIC PLUS with Steering Assist and
Stop&Go Pilot cannot continuously keep your
vehicle in lane. In some cases, the steering
intervention is not sufficient to bring the vehicle back to the lane. In such cases, you must steer
the vehicle yourself to ensure that it does not
leave the lane.
The support offered by the system may be
impaired if:
R there is poor visibility, e.g. due to insufficient
illumination of the road, or due to snow, rain,fog or spray
R there is glare, e.g. from oncoming traffic, the
sun or reflection from other vehicles (e.g. if
the road surface is wet)
R the windscreen is dirty, misted up, damaged
or covered, for instance by a sticker, in the
vicinity of the camera R
no or several, unclear lane markings are pres-
ent for one lane, e.g. in a construction area
R the lane markings are worn away, dark or cov-
ered up, e.g. by dirt or snow
R the distance to the vehicle in front is too small
and the lane markings thus cannot be detec-
ted
R the lane markings change quickly, e.g. lanes
branch off, cross one another or merge
R the road is narrow and winding
R there are highly variable shade conditions on
the road
The system is switched to passive and no longer assists you by performing steering interventions
if:
R you actively change lane
R you switch on the turn signal
R you take your hands off the steering wheel or
do not steer for a prolonged period of time
i After you have finished changing lanes,
Steering Assist and Stop&Go Pilot are auto-
matically active again.
Steering Assist and Stop&Go Pilot cannot pro-
vide assistance:
R on very sharp corners
R when towing a trailer
R a loss of tyre pressure or a defective tyre has
been detected and displayed
Pay attention also to the important safety notes
for DISTRONIC PLUS (Y page 207).
The steering interventions are carried out with a limited steering moment. The system requires
the driver to keep his hands on the steering
wheel and to steer himself.
If you do not steer yourself or if you take your
hands off the steering wheel for a prolonged
period of time, the system will first alert you with
a visual warning. A steering wheel symbol
appears in the multifunction display. If you have
still not started to steer and have not taken hold of the steering wheel after five seconds at the
latest, a warning tone also sounds to remind you
to take control of the vehicle. Steering Assist
and Stop&Go Pilot switch to passive mode.
DISTRONIC PLUS remains active. Driving systems
215Driving and parking Z
Page 235 of 453
Cancelling Active Parking Assist
X
Stop the movement of the multifunction
steering wheel or steer yourself.
Active Parking Assist will be cancelled at
once. The Park Assist cancelled
Park Assist cancelled mes-
sage appears in the multifunction display.
or X Press the PARKTRONIC button (Y page 227).
PARKTRONIC is switched off and Active Park-
ing Assist is immediately cancelled. The
Park Assist cancelled Park Assist cancelled message appears
in the multifunction display.
Active Parking Assist is cancelled automatically if:
R the electric parking brake is applied
R transmission position Pis selected
R parking using Active Parking Assist is no lon-
ger possible
R you are driving faster than 10 km/h
R a wheel spins and ESP ®
intervenes or fails.
The ÷ warning lamp lights up in the instru-
ment cluster.
A warning tone sounds. The parking symbol dis-
appears and the multifunction display shows the
Park Assist cancelled
Park Assist cancelled message.
When Active Parking Assist is cancelled, you
must steer and brake again yourself.
If a system malfunction occurs, the vehicle is
braked to a standstill. To drive on, depress the
accelerator pedal again. Reversing camera
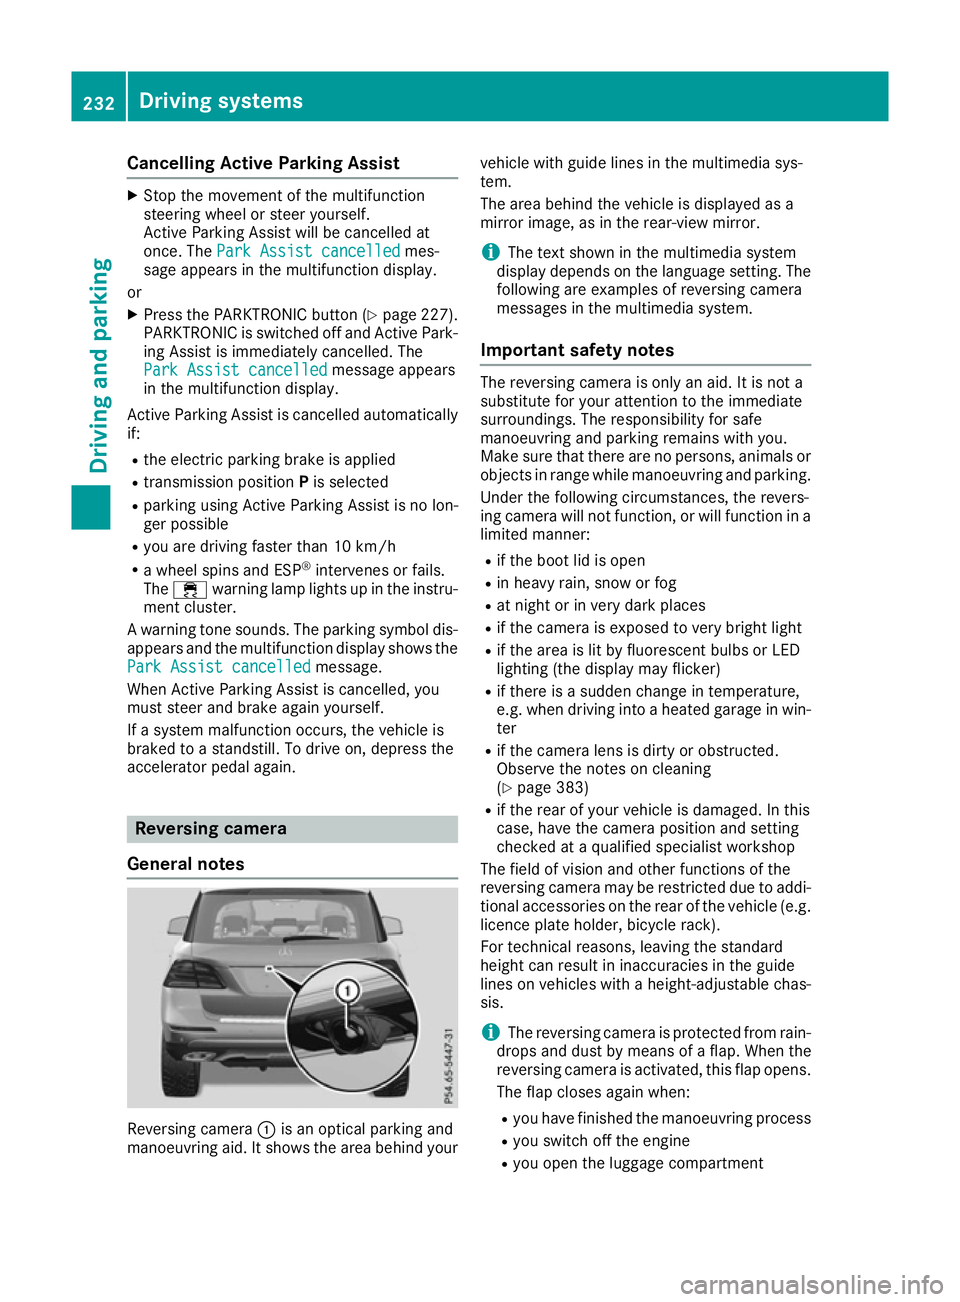
General notes Reversing camera
:is an optical parking and
manoeuvring aid. It shows the area behind your vehicle with guide lines in the multimedia sys-
tem.
The area behind the vehicle is displayed as a
mirror image, as in the rear-view mirror.
i The text shown in the multimedia system
display depends on the language setting. The
following are examples of reversing camera
messages in the multimedia system.
Important safety notes The reversing camera is only an aid. It is not a
substitute for your attention to the immediate
surroundings. The responsibility for safe
manoeuvring and parking remains with you.
Make sure that there are no persons, animals or
objects in range while manoeuvring and parking.
Under the following circumstances, the revers-
ing camera will not function, or will function in a limited manner:
R if the boot lid is open
R in heavy rain, snow or fog
R at night or in very dark places
R if the camera is exposed to very bright light
R if the area is lit by fluorescent bulbs or LED
lighting (the display may flicker)
R if there is a sudden change in temperature,
e.g. when driving into a heated garage in win-
ter
R if the camera lens is dirty or obstructed.
Observe the notes on cleaning
(Y page 383)
R if the rear of your vehicle is damaged. In this
case, have the camera position and setting
checked at a qualified specialist workshop
The field of vision and other functions of the
reversing camera may be restricted due to addi-
tional accessories on the rear of the vehicle (e.g. licence plate holder, bicycle rack).
For technical reasons, leaving the standard
height can result in inaccuracies in the guide
lines on vehicles with a height-adjustable chas-
sis.
i The reversing camera is protected from rain-
drops and dust by means of a flap. When the
reversing camera is activated, this flap opens.
The flap closes again when:
R you have finished the manoeuvring process
R you switch off the engine
R you open the luggage compartment 232
Driving systemsDriving and parking