2015 MERCEDES-BENZ GLE SUV buttons
[x] Cancel search: buttonsPage 23 of 453
Settings
Factory (on-board computer) ......... 297
On-board computer ....................... 292
SETUP (on-board computer) .............298
Side lamps
Switching on/off ........................... 122
Side marker lamp Display mes-
sage .................................................... 314
Side windows
Convenience closing ........................ 99
Convenience opening ..................... .99
Important safety notes .................... 98
Opening/closing .............................. 98
Overview .......................................... 98
Problem (malfunction) ................... 101
Resetting ....................................... 100
Reversing feature .............................98
Sidebag ................................................ 50
Sliding sunroof
Important safety information ......... 101
Opening/closing ............................1 02
Problem (malfunction) ................... 106
Rain closing feature ....................... 102
Resetting ....................................... 103
see Panorama sliding sunroof
Snow chains
Information ................................... .408
Socket
Luggage compartment ................... 365
Sockets
Centre console .............................. 365
General notes ................................ 364
Rear compartment ......................... 365
Specialist workshop ............................ 28
Spectacles compartment ................. 353
Speed, controlling
see Cruise control
Speedometer
Digital ............................................ 285
In the Instrument cluster ................. 32
Segments ...................................... 281
Selecting a display unit .................. 293
SPEEDTRONIC
Activating variable ......................... 206
Deactivating variable ..................... 207
Display message ............................ 328
Function/notes ............................ .205 Important safety notes .................. 205
LIM indicator lamp ......................... 205
Permanent ..................................... 207
Selecting ........................................ 206
Storing the current spee d.............. 205
Variabl e......................................... 205
Start/stop function
see ECO start/stop function
Starting (engine) ................................ 160
STEER CONTROL .................................. 80
Steering
Display message ............................ 335
Steering Assist and Stop&Go Pilot
(DISTRONIC PLUS)
Activating/deactivating ................. 290
Display message ............................ 328
Steering assistant STEER CON-
TROL
see STEER CONTROL
Steering wheel
Adjusting (electrically) ................... 115
Adjusting (manually) ...................... 114
Button overview ............................... 35
Buttons (on-board computer) ......... 282
Cleaning ......................................... 384
Important safety notes .................. 114
Steering wheel heating .................. 115
Storing settings (memory func-
tion) ............................................... 120
Steering wheel gearshift paddles .... 172
Steering wheel heating
Problem (malfunction) ................... 116
Switching on/of f........................... 115
Stopwatch (RACETIMER) ................... 298
Stowage areas ................................... 351
Stowage compartments
Armrest (under) ............................. 352
Centre console .............................. 353
Centre console (rear) ..................... 353
Cup holde r..................................... 361
Glove compartment ....................... 352
Important safety information ......... 351
Spectacles compartment ............... 353
Stowage net ....................................... 353
Stowage space
Stowage net ................................... 353
Summer tyres .................................... 40720
Index
Page 42 of 453
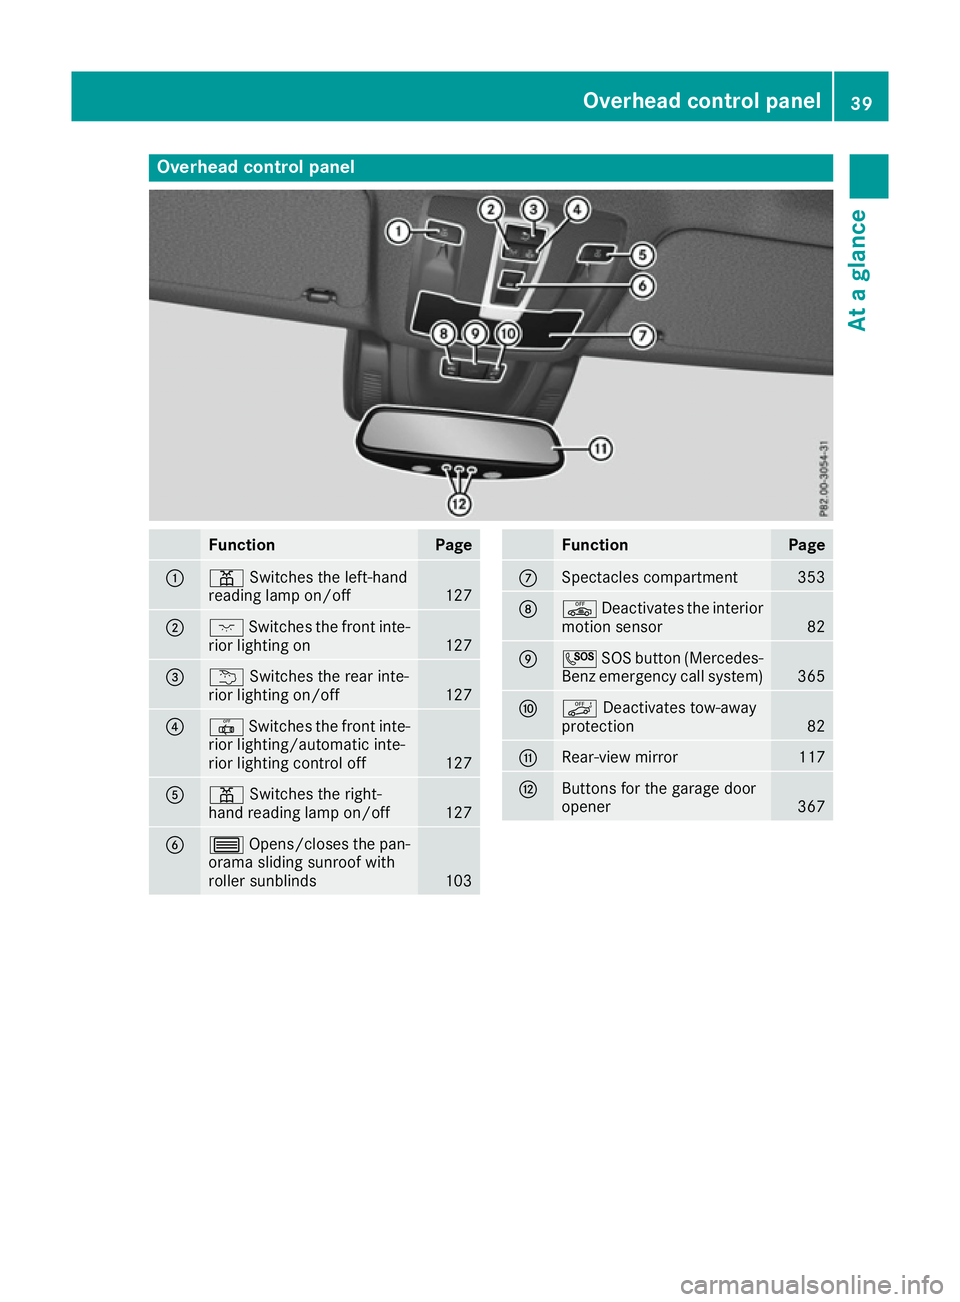
Overhead control panel
Function Page
:
p
Switches the left-hand
reading lamp on/off 127
;
c
Switches the front inte-
rior lighting on 127
=
u
Switches the rear inte-
rior lighting on/off 127
?
|
Switches the front inte-
rior lighting/automatic inte-
rior lighting control off 127
A
p
Switches the right-
hand reading lamp on/off 127
B
3
Opens/closes the pan-
orama sliding sunroof with
roller sunblinds 103 Function Page
C
Spectacles compartment 353
D
ê
Deactivates the interior
motion sensor 82
E
G
SOS button (Mercedes-
Benz emergency call system) 365
F
ë
Deactivates tow-away
protection 82
G
Rear-view mirror 117
H
Buttons for the garage door
opener
367Overhead control panel
39At a glance
Page 89 of 453
X
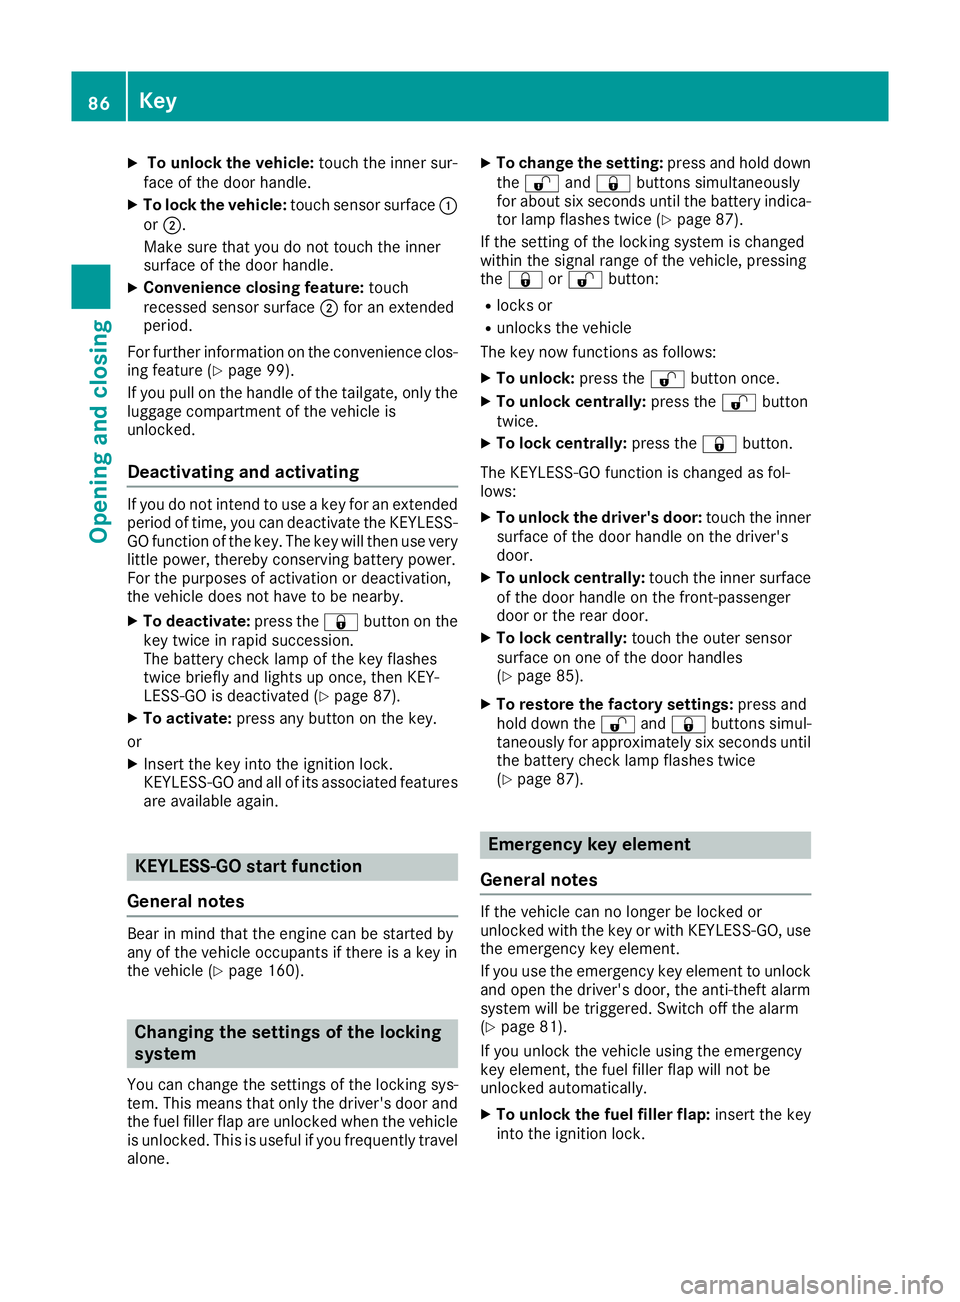
To unlock the vehicle: touch the inner sur-
face of the door handle.
X To lock the vehicle: touch sensor surface :
or ;.
Make sure that you do not touch the inner
surface of the door handle.
X Convenience closing feature: touch
recessed sensor surface ;for an extended
period.
For further information on the convenience clos-
ing feature (Y page 99).
If you pull on the handle of the tailgate, only the
luggage compartment of the vehicle is
unlocked.
Deactivating and activating If you do not intend to use a key for an extended
period of time, you can deactivate the KEYLESS-
GO function of the key. The key will then use very little power, thereby conserving battery power.
For the purposes of activation or deactivation,
the vehicle does not have to be nearby.
X To deactivate: press the&button on the
key twice in rapid succession.
The battery check lamp of the key flashes
twice briefly and lights up once, then KEY-
LESS-GO is deactivated (Y page 87).
X To activate: press any button on the key.
or
X Insert the key into the ignition lock.
KEYLESS-GO and all of its associated features
are available again. KEYLESS-GO start function
General notes Bear in mind that the engine can be started by
any of the vehicle occupants if there is a key in
the vehicle (Y page 160). Changing the settings of the locking
system
You can change the settings of the locking sys-
tem. This means that only the driver's door and
the fuel filler flap are unlocked when the vehicle is unlocked. This is useful if you frequently travel
alone. X
To change the setting: press and hold down
the % and& buttons simultaneously
for about six seconds until the battery indica-
tor lamp flashes twice (Y page 87).
If the setting of the locking system is changed
within the signal range of the vehicle, pressing
the & or% button:
R locks or
R unlocks the vehicle
The key now functions as follows:
X To unlock: press the%button once.
X To unlock centrally: press the%button
twice.
X To lock centrally: press the&button.
The KEYLESS-GO function is changed as fol-
lows:
X To unlock the driver's door: touch the inner
surface of the door handle on the driver's
door.
X To unlock centrally: touch the inner surface
of the door handle on the front-passenger
door or the rear door.
X To lock centrally: touch the outer sensor
surface on one of the door handles
(Y page 85).
X To restore the factory settings: press and
hold down the %and& buttons simul-
taneously for approximately six seconds until the battery check lamp flashes twice
(Y page 87). Emergency key element
General notes If the vehicle can no longer be locked or
unlocked with the key or with KEYLESS-GO, use
the emergency key element.
If you use the emergency key element to unlock
and open the driver's door, the anti-theft alarm
system will be triggered. Switch off the alarm
(Y page 81).
If you unlock the vehicle using the emergency
key element, the fuel filler flap will not be
unlocked automatically.
X To unlock the fuel filler flap: insert the key
into the ignition lock. 86
KeyOpening and closing
Page 91 of 453
X
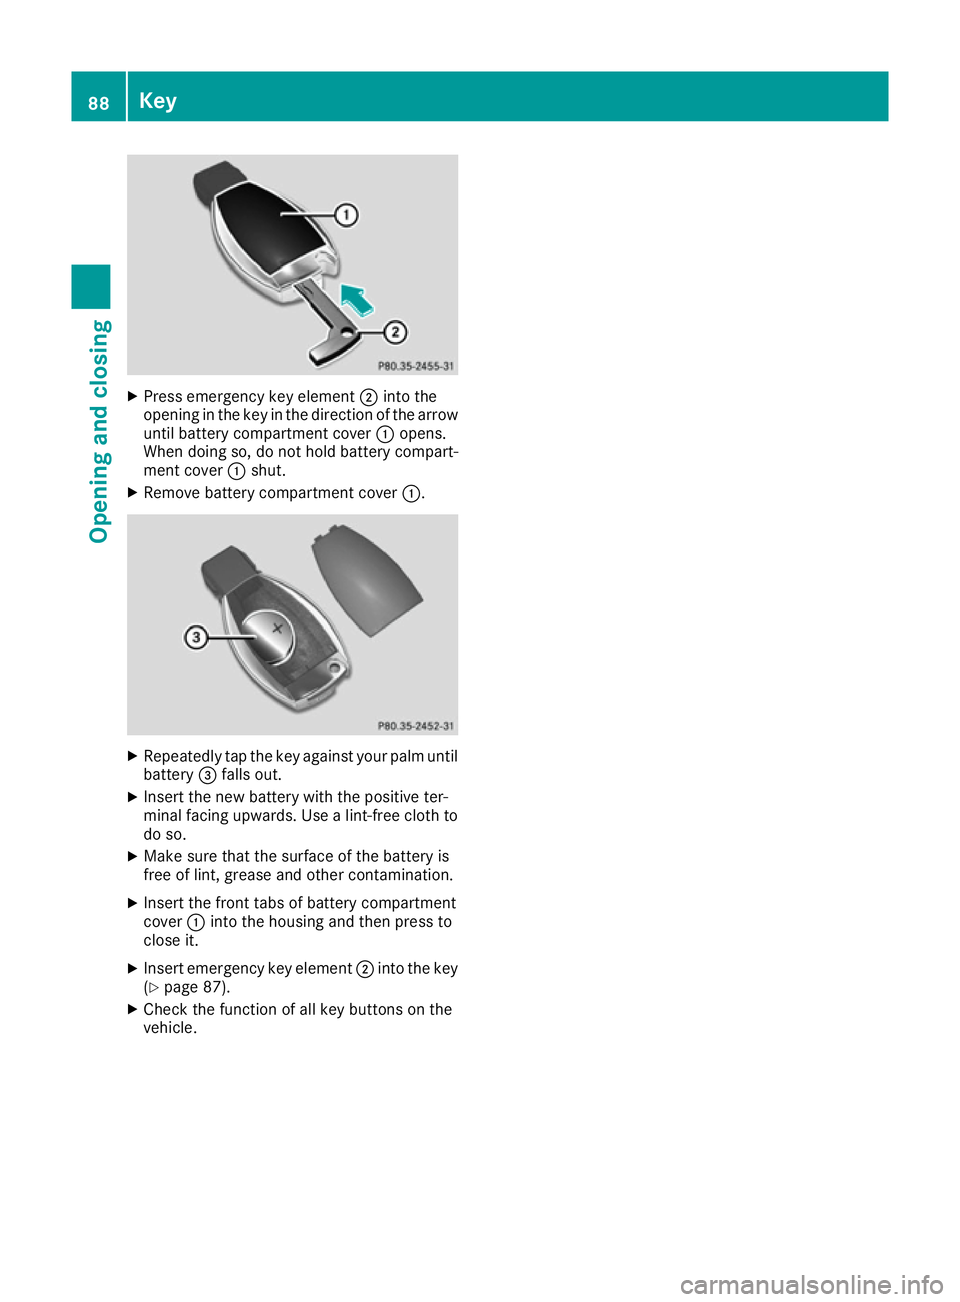
Press emergency key element ;into the
opening in the key in the direction of the arrow
until battery compartment cover :opens.
When doing so, do not hold battery compart-
ment cover :shut.
X Remove battery compartment cover :.X
Repeatedly tap the key against your palm until
battery =falls out.
X Insert the new battery with the positive ter-
minal facing upwards. Use a lint-free cloth to
do so.
X Make sure that the surface of the battery is
free of lint, grease and other contamination.
X Insert the front tabs of battery compartment
cover :into the housing and then press to
close it.
X Insert emergency key element ;into the key
(Y page 87).
X Check the function of all key buttons on the
vehicle. 88
KeyOpening and closing
Page 94 of 453
G
WARNING
When the double locks are activated, the
doors can no longer be opened from the
inside. People in the vehicle can no longer get out, e.g. in hazardous situations. There is a
risk of injury.
Therefore, do not leave any people unsuper-
vised in the vehicle, particularly children, eld-
erly people or people in need of special assis-
tance. Do not activate the double lock when
people are in the vehicle.
If the vehicle has been locked with the key or
with KEYLESS-GO, the double lock function is
activated as standard. It is then not possible to
open the doors from inside the vehicle. You can deactivate the double lock function by deacti-
vating the interior motion sensor (Y page 82).
The doors can then be opened from the inside
after the vehicle has been locked from the out-
side. You can only open the rear doors from
inside the vehicle if they are not secured by the child-proof locks (Y page 69). The anti-theft
alarm system is triggered if the door is opened
from the inside. Switch off the alarm
(Y page 81). Unlocking and opening the doors
from the inside
For all countries except the United Kingdom: you can open a door from inside the vehicle even
if it has been locked. You can only open the rear doors from inside the vehicle if they are not
secured by the child-proof locks (Y page 69).
If the vehicle has previously been locked from
the outside, opening a door from the inside will
trigger the anti-theft alarm system. Switch off
the alarm (Y page 81).
Only for the United Kingdom: if the vehicle
has been locked with the key from the outside,
the double lock function is activated as stand-
ard. It is then not possible to open the doors
from inside the vehicle. You can deactivate the
double lock function by deactivating the interior motion sensor (Y page 82). The doors can then
be opened from the inside after the vehicle has
been locked from the outside. The anti-theft
alarm system is triggered if the door is opened
from the inside. Switch off the alarm
(Y page 81). For all countries except Mexico:
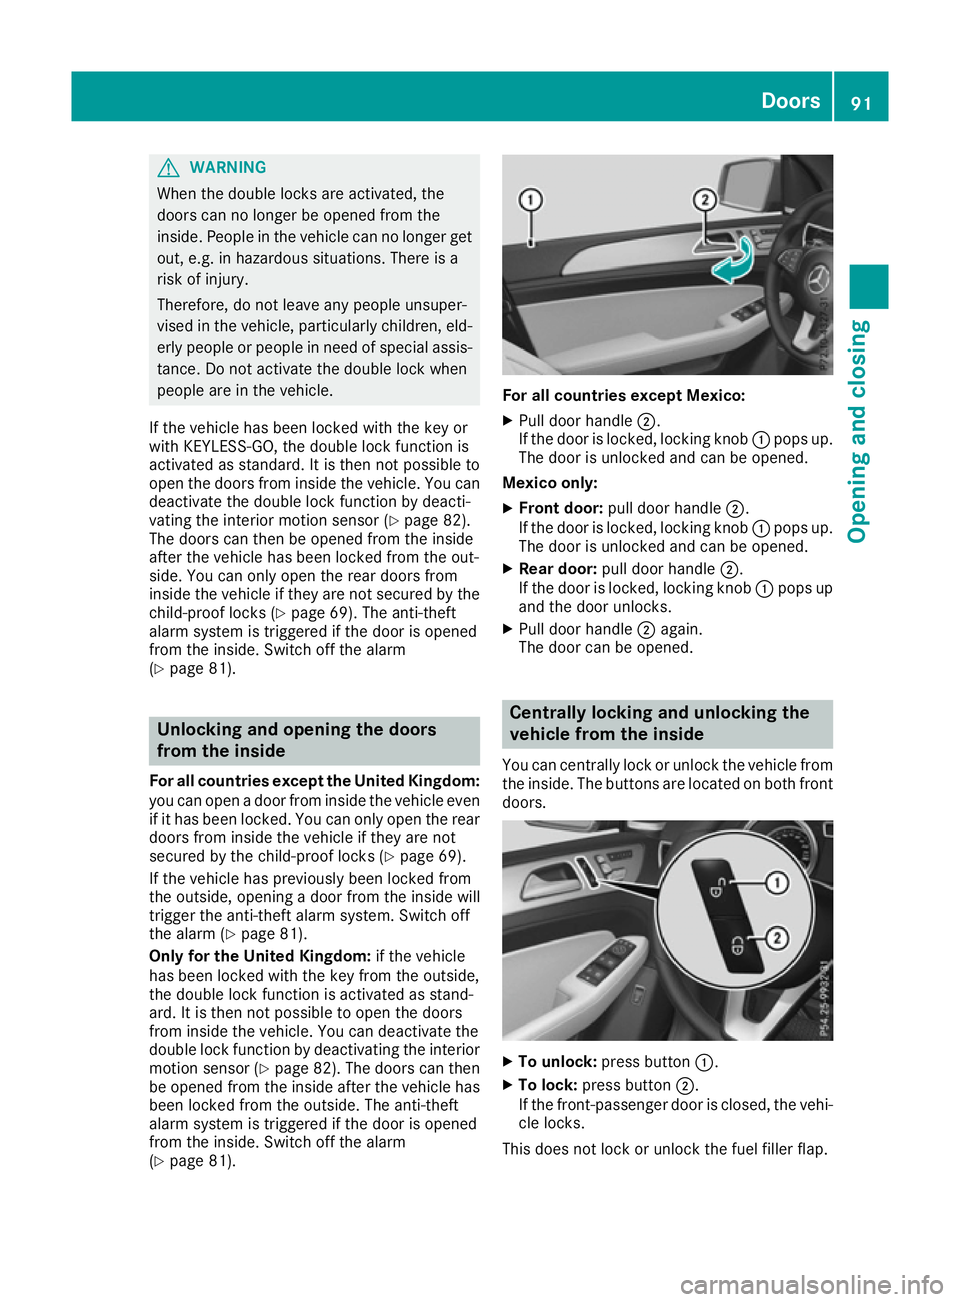
X Pull door handle ;.
If the door is locked, locking knob :pops up.
The door is unlocked and can be opened.
Mexico only: X Front door: pull door handle ;.
If the door is locked, locking knob :pops up.
The door is unlocked and can be opened.
X Rear door: pull door handle ;.
If the door is locked, locking knob :pops up
and the door unlocks.
X Pull door handle ;again.
The door can be opened. Centrally locking and unlocking the
vehicle from the inside
You can centrally lock or unlock the vehicle from the inside. The buttons are located on both frontdoors. X
To unlock: press button :.
X To lock: press button ;.
If the front-passenger door is closed, the vehi-
cle locks.
This does not lock or unlock the fuel filler flap. Doors
91Opening and closing Z
Page 95 of 453
You cannot unlock the vehicle centrally from the
inside if the vehicle has been locked from the
outside.
For all countries except the United Kingdom:
you can open a door from inside the vehicle evenif it has been locked.
Only for the United Kingdom: if the vehicle
has been locked with the key from the outside,
the double lock function is activated as stand-
ard. It is then not possible to open the doors
from inside the vehicle. You can deactivate the
double lock function by deactivating the interior
motion sensor (Y page 82). The doors can then
be opened from the inside after the vehicle has been locked from the outside.
For all countries: when a locked door is opened
from inside the vehicle, the previous unlocking
process will be observed if the vehicle has been:
R locked with the locking button for the central
locking or
R locked automatically
The vehicle will be fully unlocked if it had previ-
ously been fully unlocked. Only the door which
has been opened from the inside is unlocked if
only the driver's door had been previously
unlocked. Automatic locking feature
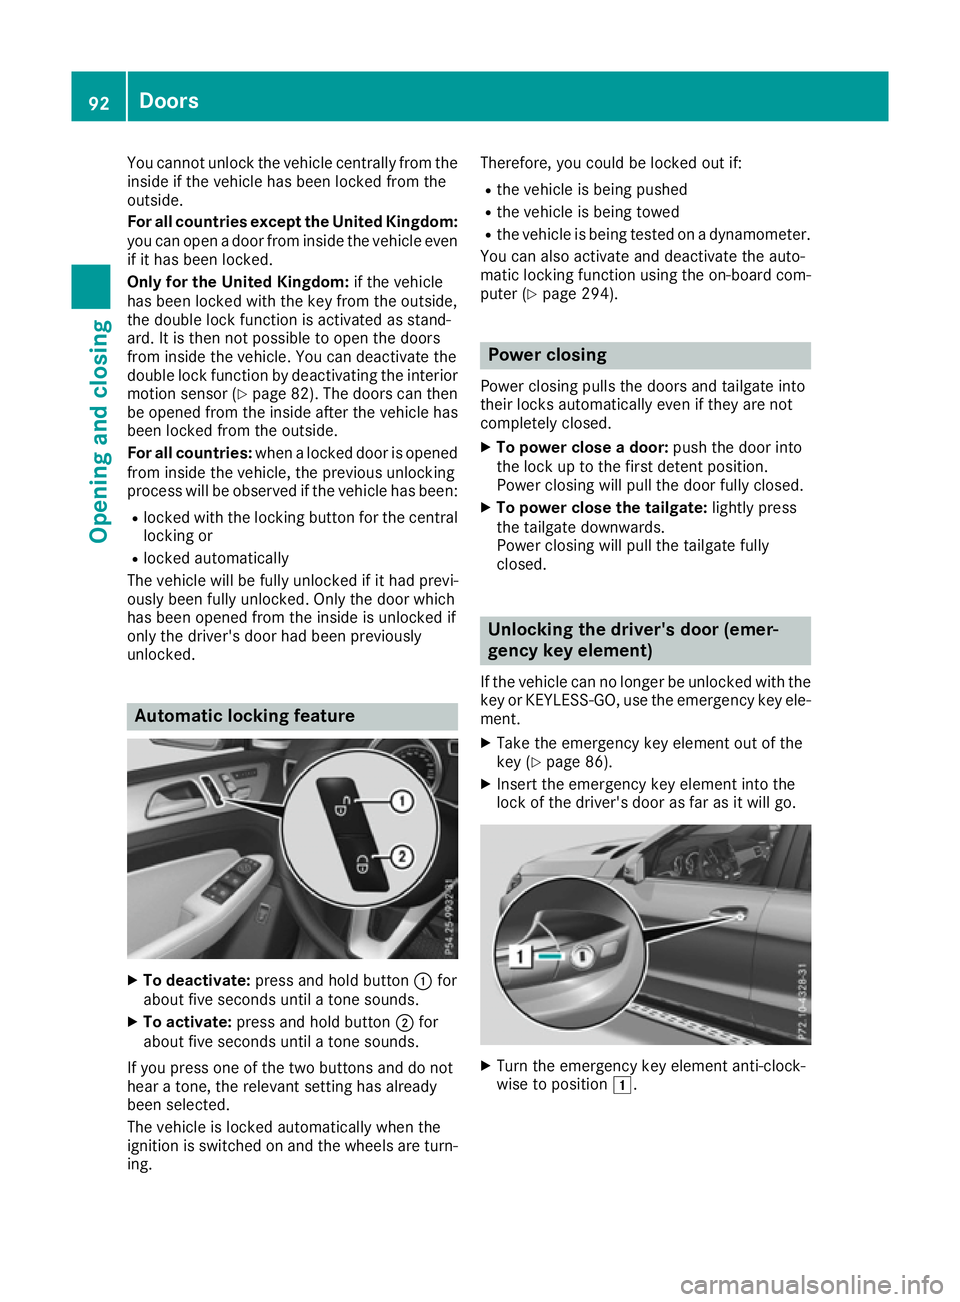
X
To deactivate: press and hold button :for
about five seconds until a tone sounds.
X To activate: press and hold button ;for
about five seconds until a tone sounds.
If you press one of the two buttons and do not
hear a tone, the relevant setting has already
been selected.
The vehicle is locked automatically when the
ignition is switched on and the wheels are turn-
ing. Therefore, you could be locked out if:
R the vehicle is being pushed
R the vehicle is being towed
R the vehicle is being tested on a dynamometer.
You can also activate and deactivate the auto-
matic locking function using the on-board com- puter (Y page 294). Power closing
Power closing pulls the doors and tailgate into
their locks automatically even if they are not
completely closed.
X To power close a door: push the door into
the lock up to the first detent position.
Power closing will pull the door fully closed.
X To power close the tailgate: lightly press
the tailgate downwards.
Power closing will pull the tailgate fully
closed. Unlocking the driver's door (emer-
gency key element)
If the vehicle can no longer be unlocked with the key or KEYLESS-GO, use the emergency key ele-ment.
X Take the emergency key element out of the
key (Y page 86).
X Insert the emergency key element into the
lock of the driver's door as far as it will go. X
Turn the emergency key element anti-clock-
wise to position 1.92
DoorsOpening and closing
Page 111 of 453
Seats
Important safety notes
G
WARNING
If children adjust the seats, they could
become trapped, especially if they are unat-
tended. There is a risk of injury.
When leaving the vehicle, always take the key with you and lock the vehicle. Never leave
children unattended in the vehicle.
The seats can still be adjusted when there is no
key in the ignition lock. G
WARNING
When adjusting a seat, you or another vehicle occupant could become trapped by the guiderail of the seat, for instance. There is a risk of
injury.
Make sure that no one has any part of their
body within the sweep of the seat when
adjusting it.
Observe the safety notes on "Airbags"
(Y page 48) and "Children in the Vehicle"
(Y page 58). G
WARNING
You could lose control of the vehicle while
driving if you:
R adjust the driver's seat, steering wheel or
mirrors
R fasten the seat belt
There is a risk of an accident.
Adjust the driver's seat, head restraint, steer-
ing wheel and mirrors and fasten your seat
belt before starting the engine. G
WARNING
If you adjust the seat height carelessly, you or other vehicle occupants could be trapped andthereby injured. Children in particular could
accidentally press the electrical seat adjust-
ment buttons and become trapped. There is a
risk of injury.
While moving the seats, make sure that your
hands or other body parts do not get under the lever assembly of the seat adjustment sys-
tem.
G
WARNING
The head restraints cannot provide the inten-
ded protection unless they are fitted and
adjusted correctly. There is an increased risk of injury to the head and neck in the event of
an accident or sudden braking, for example.
Always drive with the head restraints fitted.
Ensure that the centre of the head restraints
support the back of each vehicle occupant's
head at eye level before driving off. G
WARNING
The seat belt does not offer the intended level of protection if you have not moved the back-
rest to an almost vertical position. When brak-
ing or in the event of an accident, you could
slide underneath the seat belt and sustain
abdomen or neck injuries, for example. This
poses an increased risk of injury or even fatal injury.
Adjust the seat properly before beginning
your journey. Always ensure that the backrest
is in an almost vertical position and that the
shoulder section of your seatbelt is routed
across the centre of your shoulder.
! To avoid damage to the seats and the seat
heating, observe the following information:
R do not spill any liquids on the seats. If liquid
is spilled on the seats, dry them as soon as possible.
R if the seat covers are damp or wet, do not
switch on the seat heating. The seat heat-
ing should also not be used to dry the seats.
R clean the seat covers as recommended;
see "Interior care".
R do not transport heavy loads on the seats.
Do not place sharp objects on the seat
cushions, e.g. knives, nails or tools. The
seats should only be occupied by passen-
gers, if possible.
R when the seat heating is in operation, do
not cover the seats with insulating materi-
als, e.g. blankets, coats, bags, seat covers,
child seats or booster seats. 108
SeatsSeats, steering wheel and mirrors
Page 116 of 453
Problems with the seat heating
Problem
Possible causes/consequences and
M
MSolutions The seat heating has
switched off prematurely
or cannot be switched
on. The on-board voltage is too low because too many electrical consum-
ers are switched on.
X Switch off electrical consumers that you do not need, such as the
rear window heating or interior lighting.
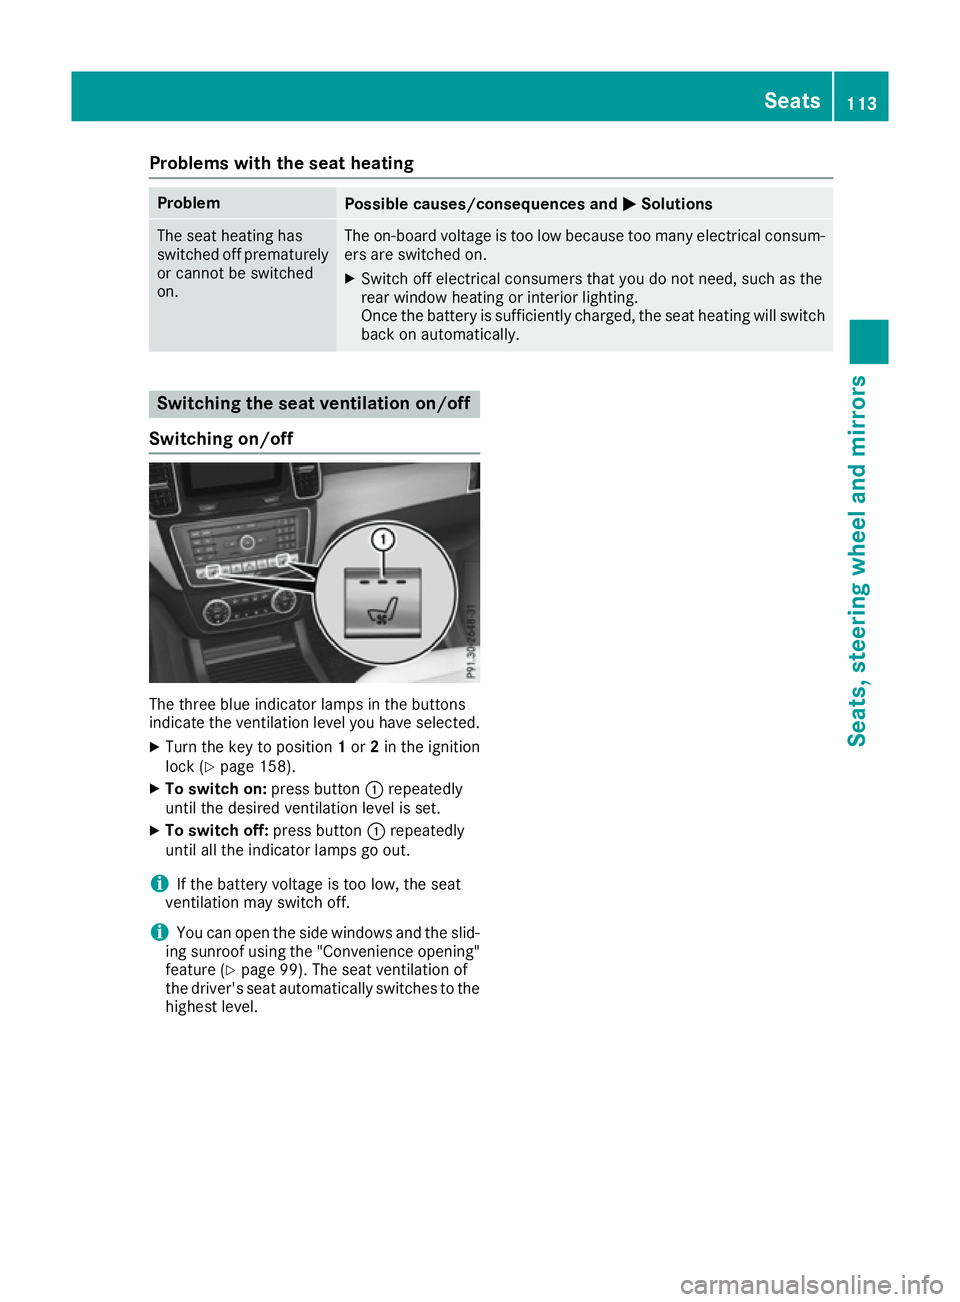
Once the battery is sufficiently charged, the seat heating will switch back on automatically. Switching the seat ventilation on/off
Switching on/off The three blue indicator lamps in the buttons
indicate the ventilation level you have selected.
X Turn the key to position 1or 2in the ignition
lock (Y page 158).
X To switch on: press button:repeatedly
until the desired ventilation level is set.
X To switch off: press button:repeatedly
until all the indicator lamps go out.
i If the battery voltage is too low, the seat
ventilation may switch off.
i You can open the side windows and the slid-
ing sunroof using the "Convenience opening" feature (Y page 99). The seat ventilation of
the driver's seat automatically switches to the
highest level. Seats
113Seats, steering wheel and mirrors Z