2015 MERCEDES-BENZ GLE COUPE trailer
[x] Cancel search: trailerPage 347 of 393
tance a distance so that the tow rope does
not sag.
R Do not use steel cables or chains to tow
your vehicle. You could otherwise damage
the vehicle.
! Do not use the trailer tow hitch for recovery
or towing. Do not use the towing eye for
recovery. This could damage the vehicle. If in doubt, have the vehicle recovered using a
crane.
! When towing, pull away slowly and
smoothly. Pull the towed vehicle as straight as possible and not at an acute angle. If the trac-
tive power is too high, the vehicles could be
damaged.
When towing, it is preferable to use a rigid tow- ing bar as opposed to a tow rope. A rigid towing
bar helps to keep the tractive power low.
! To tow vehicles with KEYLESS-GO, use the
key instead of the Start/Stop button. The
automatic transmission may otherwise
switch to position Pwhen you open the driv-
er's or front-passenger door which could
damage the transmission.
! Vehicles with differential locks: make sure
the differential locks are in automatic mode.
When towing, the differential locks must not
be switched on. The transmission may other- wise be damaged.
! You may tow the vehicle for a maximum of
50km. A towing speed of 50 km/h must not
be exceeded.
For towing distances over 50 km, the entire
vehicle must be lifted up and transported.
Observe the legal requirements for the relevant countries when towing.
It is better to have the vehicle transported than
to have it towed.
If the vehicle has suffered transmission damage, have it transported on a transporter or trailer.
The automatic transmission must be in position
N when the vehicle is being towed away.
The battery must be connected and charged.
Otherwise, you:
R cannot turn the key to position 2in the igni-
tion lock
R cannot release the electric parking brake
R cannot shift the automatic transmission to
position N Deactivate the automatic locking feature before
towing the vehicle (Y page 247). You could oth-
erwise be locked out when pushing or towing
the vehicle.
Deactivate tow-away protection before the vehi-
cle is towed away (Y page 75). Fitting/removing the towing eye
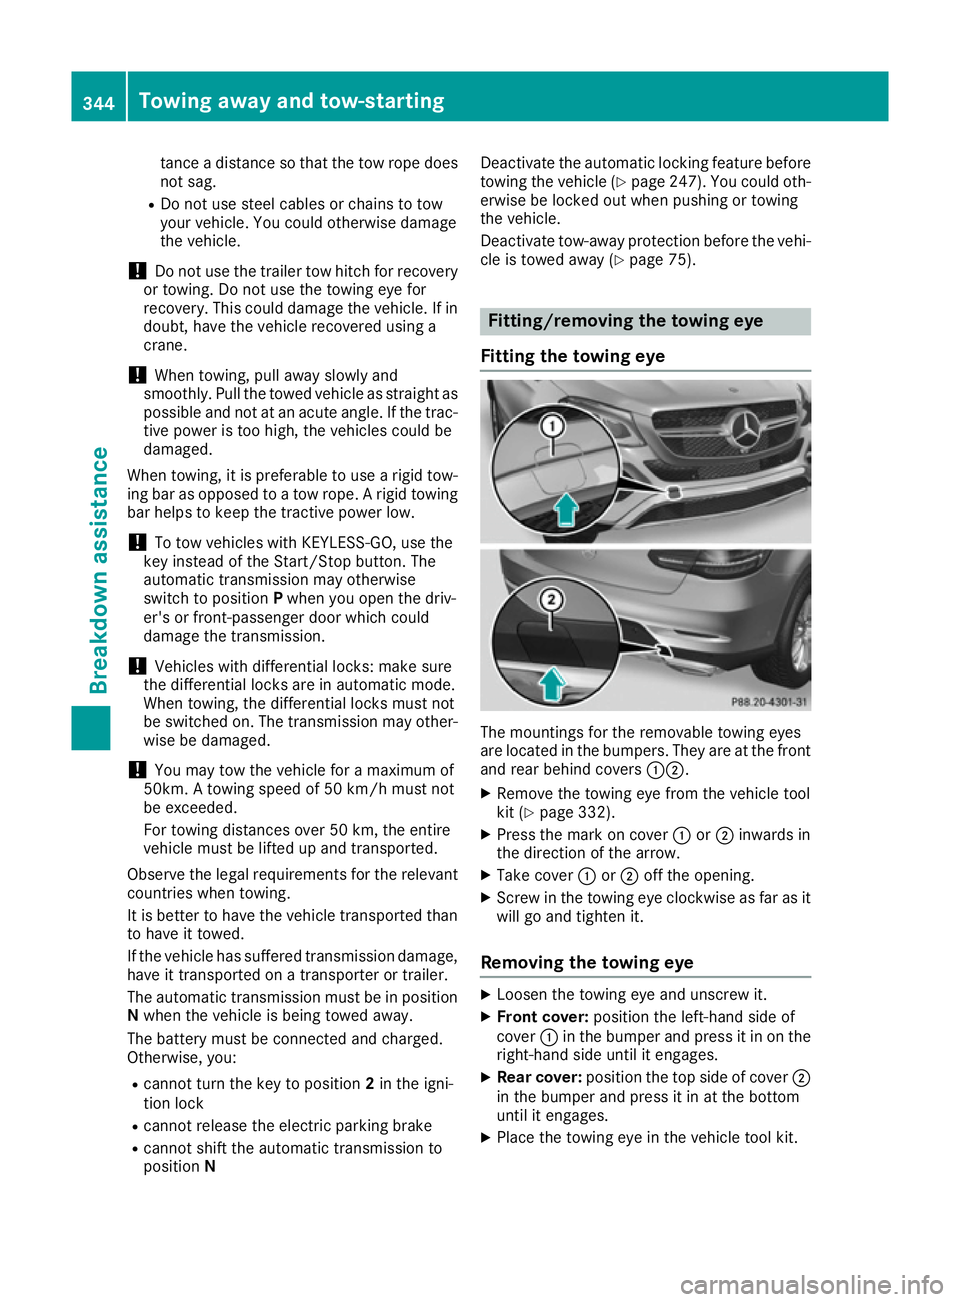
Fitting the towing eye The mountings for the removable towing eyes
are located in the bumpers. They are at the front and rear behind covers :;.
X Remove the towing eye from the vehicle tool
kit (Y page 332).
X Press the mark on cover :or; inwards in
the direction of the arrow.
X Take cover :or; off the opening.
X Screw in the towing eye clockwise as far as it
will go and tighten it.
Removing the towing eye X
Loosen the towing eye and unscrew it.
X Front cover: position the left-hand side of
cover :in the bumper and press it in on the
right-hand side until it engages.
X Rear cover: position the top side of cover ;
in the bumper and press it in at the bottom
until it engages.
X Place the towing eye in the vehicle tool kit. 344
Towing away and tow-startingBreakdown assistance
Page 348 of 393
Towing the vehicle with both axles on
the ground
The automatic transmission automatically shifts to position Pwhen you open the driver's or front-
passenger door or when you remove the key
from the ignition lock.
In order to ensure that the automatic transmis-
sion stays in position Nwhen towing away the
vehicle, you must observe the following points:
X Make sure that the vehicle is stationary.
X Turn the key to position 2in the ignition lock.
X Depress the brake pedal and keep it
depressed.
X Shift the automatic transmission to position
N.
X Leave the key in position 2in the ignition lock.
X Release the brake pedal.
X Release the electric parking brake.
X Switch on the hazard warning lamps
(Y page 117).
In order to signal a change of direction when
towing the vehicle with the hazard warning
lamps switched on, use the combination switch
as usual. In this case, only the turn signals for
the desired direction flash. When you reset the
combination switch, the hazard warning lamps
start flashing again. Transporting the vehicle
4MATIC vehicles/vehicles with auto-
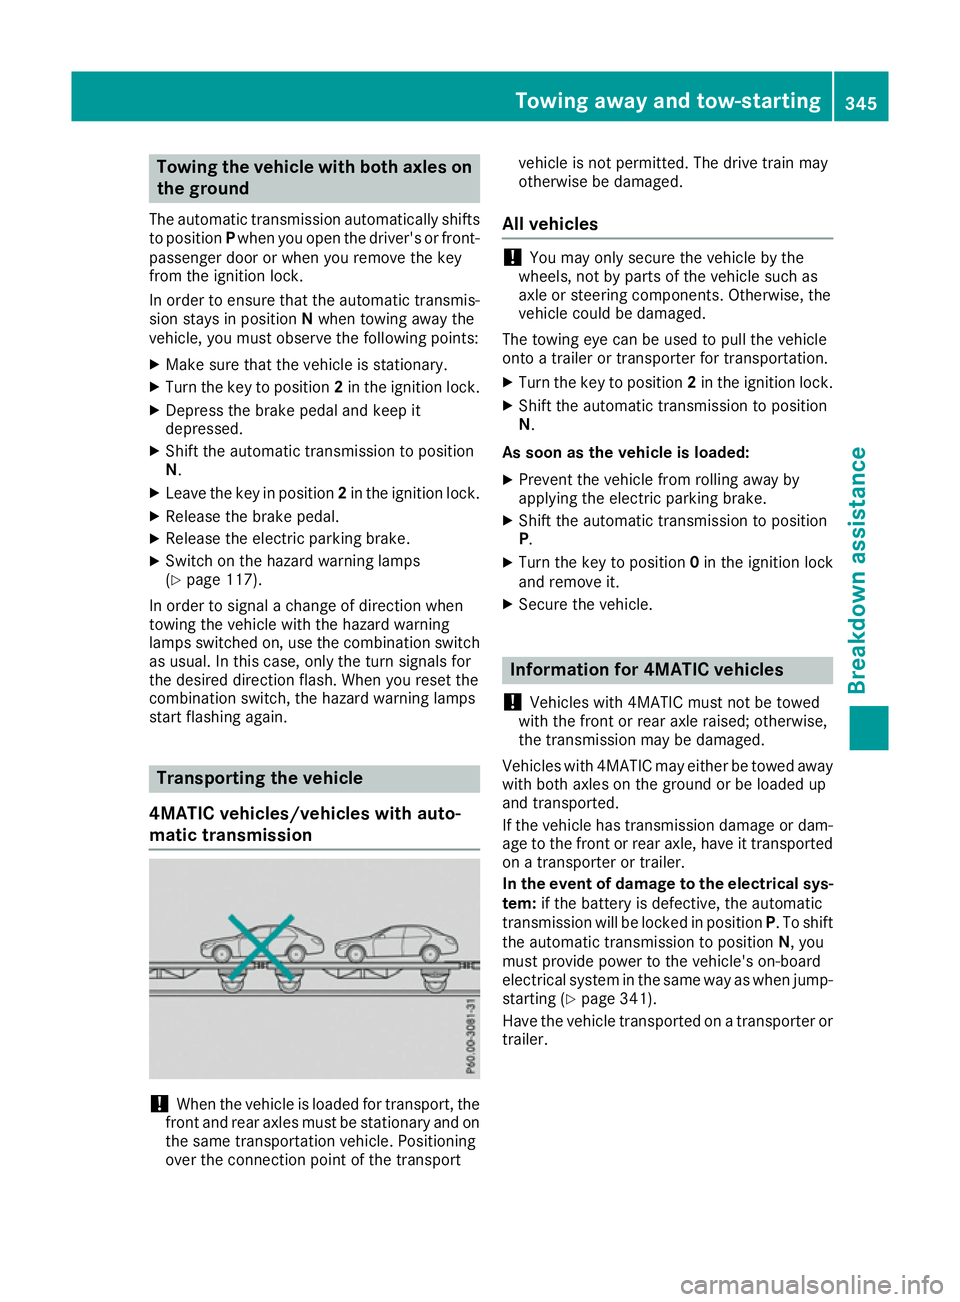
matic transmission !
When the vehicle is loaded for transport, the
front and rear axles must be stationary and on
the same transportation vehicle. Positioning
over the connection point of the transport vehicle is not permitted. The drive train may
otherwise be damaged.
All vehicles !
You may only secure the vehicle by the
wheels, not by parts of the vehicle such as
axle or steering components. Otherwise, the
vehicle could be damaged.
The towing eye can be used to pull the vehicle
onto a trailer or transporter for transportation.
X Turn the key to position 2in the ignition lock.
X Shift the automatic transmission to position
N.
As soon as the vehicle is loaded:
X Prevent the vehicle from rolling away by
applying the electric parking brake.
X Shift the automatic transmission to position
P.
X Turn the key to position 0in the ignition lock
and remove it.
X Secure the vehicle. Information for 4MATIC vehicles
! Vehicles with 4MATIC must not be towed
with the front or rear axle raised; otherwise,
the transmission may be damaged.
Vehicles with 4MATIC may either be towed away
with both axles on the ground or be loaded up
and transported.
If the vehicle has transmission damage or dam- age to the front or rear axle, have it transportedon a transporter or trailer.
In the event of damage to the electrical sys-
tem: if the battery is defective, the automatic
transmission will be locked in position P. To shift
the automatic transmission to position N, you
must provide power to the vehicle's on-board
electrical system in the same way as when jump- starting (Y page 341).
Have the vehicle transported on a transporter or trailer. Towing away and tow-starting
345Breakdown assistance Z
Page 355 of 393
can also result in tyre pressure loss. There is a
risk of accident.
Only screw standard valve caps or valve caps
specifically provided by Mercedes-Benz for
your vehicle onto the tyre valve. G
WARNING
If the tyre pressure drops repeatedly, the
wheel, valve or tyre may be damaged. Tyre
pressure that is too low may result in a tyre
blow-out. There is a risk of accident.
R Check the tyre for foreign objects.
R Check whether the wheel is losing air or the
valve is leaking.
If you are unable to rectify the damage, con-
tact a qualified specialist workshop. H
Environmental note
Check the tyre pressure regularly, at least
every 14 days.
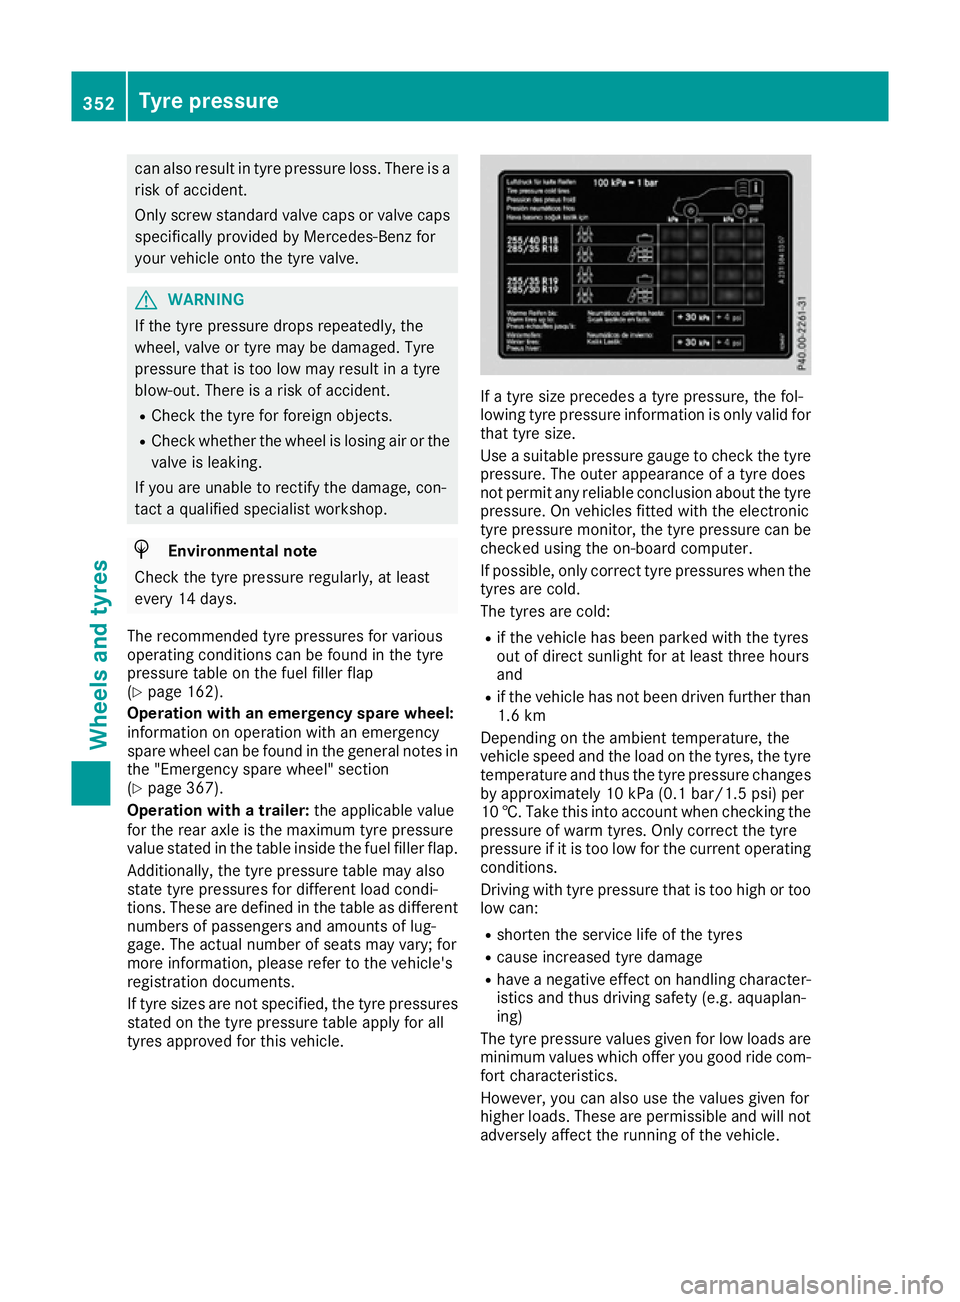
The recommended tyre pressures for various
operating conditions can be found in the tyre
pressure table on the fuel filler flap
(Y page 162).
Operation with an emergency spare wheel:
information on operation with an emergency
spare wheel can be found in the general notes in the "Emergency spare wheel" section
(Y page 367).
Operation with a trailer: the applicable value
for the rear axle is the maximum tyre pressure
value stated in the table inside the fuel filler flap.
Additionally, the tyre pressure table may also
state tyre pressures for different load condi-
tions. These are defined in the table as different numbers of passengers and amounts of lug-
gage. The actual number of seats may vary; for
more information, please refer to the vehicle's
registration documents.
If tyre sizes are not specified, the tyre pressures
stated on the tyre pressure table apply for all
tyres approved for this vehicle. If a tyre size precedes a tyre pressure, the fol-
lowing tyre pressure information is only valid for that tyre size.
Use a suitable pressure gauge to check the tyre
pressure. The outer appearance of a tyre does
not permit any reliable conclusion about the tyre
pressure. On vehicles fitted with the electronic
tyre pressure monitor, the tyre pressure can be checked using the on-board computer.
If possible, only correct tyre pressures when the
tyres are cold.
The tyres are cold:
R if the vehicle has been parked with the tyres
out of direct sunlight for at least three hours
and
R if the vehicle has not been driven further than
1.6 km
Depending on the ambient temperature, the
vehicle speed and the load on the tyres, the tyre temperature and thus the tyre pressure changes
by approximately 10 kPa (0.1 ba r/1.5 psi) per
10 †. Ta ke this into account when checking the
pressure of warm tyres. Only correct the tyre
pressure if it is too low for the current operating conditions.
Driving with tyre pressure that is too high or too
low can:
R shorten the service life of the tyres
R cause increased tyre damage
R have a negative effect on handling character-
istics and thus driving safety (e.g. aquaplan-
ing)
The tyre pressure values given for low loads are minimum values which offer you good ride com-
fort characteristics.
However, you can also use the values given for
higher loads. These are permissible and will not adversely affect the running of the vehicle. 352
Tyre pressureWheels and tyres
Page 356 of 393
Tyre pressure loss warning system
General notes While the vehicle is in motion, the tyre pressure
loss warning system monitors the set tyre pres-
sure using the rotational speed of the wheels.
This enables the system to detect significant
pressure loss in a tyre. If the speed of rotation of a wheel changes as a result of a loss of pressure,
a corresponding warning message will appear in
the multifunction display.
You can recognise the tyre pressure loss warn-
ing by the Run Flat Indicator active
Run Flat Indicator active
Restart with OK
Restart with OK message which appears in
the Serv.
Serv. menu of the multifunction display.
Information on the message display can be
found in the "Restarting the tyre pressure loss
warning system" section (Y page 353).
Important safety notes The tyre pressure warning system does not warn
you of an incorrectly set tyre pressure. Observe the notes on the recommended tyre pressure
(Y page 351).
The tyre pressure loss warning does not replace the need to regularly check the tyre pressures.
An even loss of pressure on several tyres at the
same time cannot be detected by the tyre pres-
sure loss warning system.
The tyre pressure monitor is not able to warn
you of a sudden loss of pressure, e.g. if the tyre is penetrated by a foreign object. In the event of
a sudden loss of pressure, bring the vehicle to a halt by braking carefully. Avoid abrupt steering
manoeuvres.
The function of the tyre pressure loss warning
system is limited or delayed if:
R snow chains are fitted to your vehicle's tyres.
R road conditions are wintry.
R you are driving on sand or gravel.
R you adopt a very sporty driving style (corner-
ing at high speeds or driving with high rates of
acceleration).
R you are towing a very heavy or large trailer.
R you are driving with a heavy load (in the vehi-
cle or on the roof). Restarting the tyre pressure loss warn-
ing system Restart the tyre pressure loss warning system if
you have:
R changed the tyre pressure
R changed the wheels or tyres
R fitted new wheels or tyres
X Before restarting, make sure that the tyre
pressures are set properly on all four tyres for
the respective operating conditions. The rec-
ommended tyre pressures can be found in the
tyre pressure table on the fuel filler flap.
The tyre pressure loss warning system can
only give reliable warnings if you have set the correct tyre pressure. If an incorrect tyre
pressure is set, these incorrect values will be
monitored.
X Observe the notes in the section on tyre pres-
sures (Y page 351).
X Make sure that the key is in position 2in the
ignition lock (Y page 146).
X Press the =or; button on the steering
wheel to select the Serv. Serv.menu.
X Press the 9or: button to select
Tyre pressure
Tyre pressure.
X Press the abutton.
The Run Flat Indicator active
Run Flat Indicator active
Restart with OK
Restart with OK message appears in the
multifunction display.
If you wish to confirm the restart:
X Press the abutton.
The Tyre
Tyre press.
press. now
nowOK?
OK?message appears
in the multifunction display.
X Press the 9or: button to select Yes
Yes.
X Press the abutton.
The Run Flat Indicator restarted
Run Flat Indicator restarted mes-
sage appears in the multifunction display.
After a teach-in period, the tyre pressure loss warning system will monitor the set tyre pres-
sures of all four tyres.
If you wish to cancel the restart: X Press the %button.
or X When the Tyre press. now OK? Tyre press. now OK? message
appears, press the 9or: button to
select Cancel Cancel . Tyre pressure
353Wheels and tyres Z
Page 377 of 393
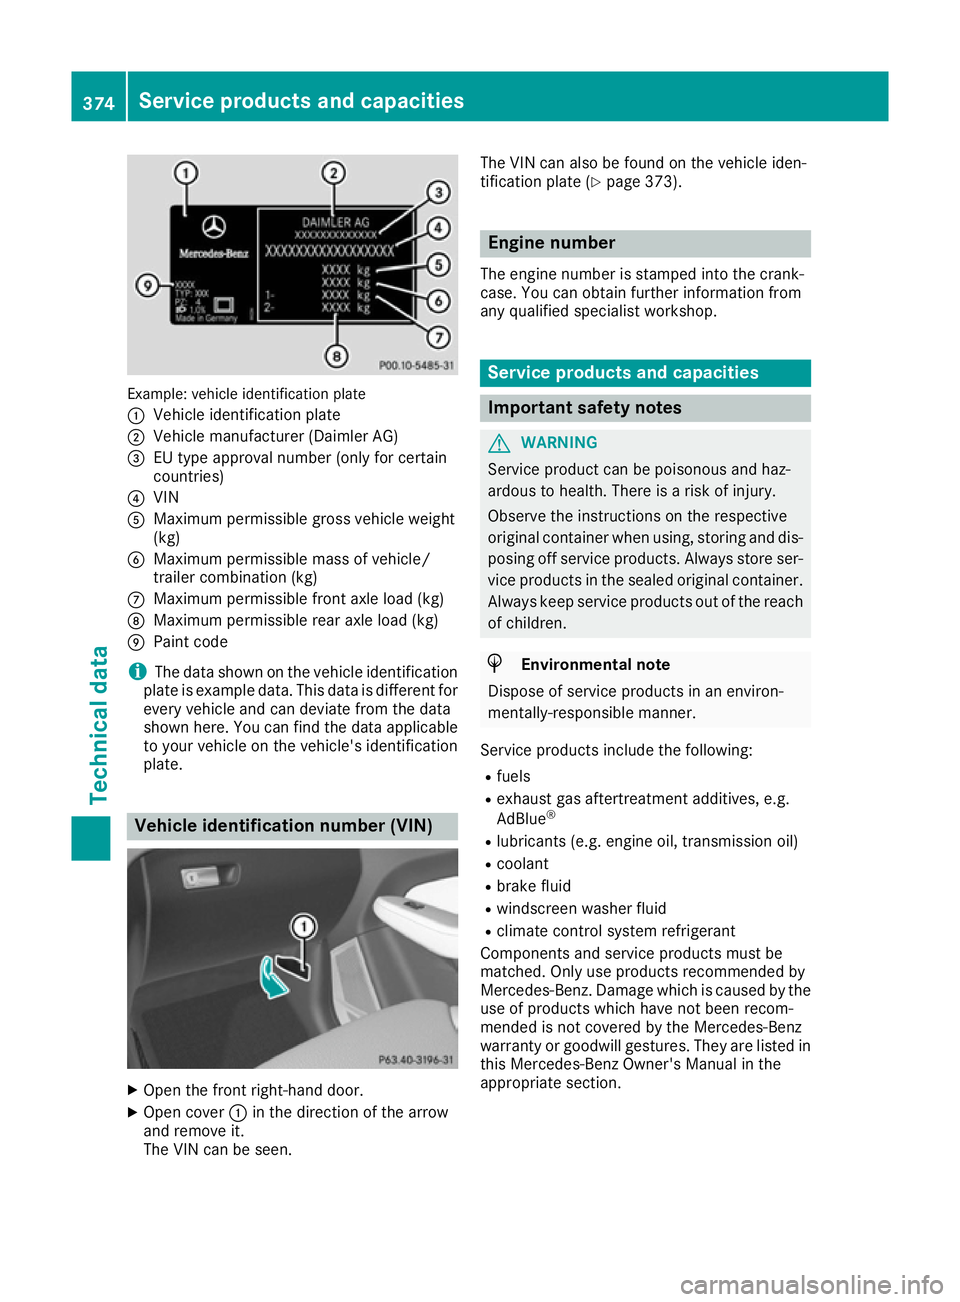
Example: vehicle identification plate
:
Vehicle identification plate
; Vehicle manufacturer (Daimler AG)
= EU type approval number (only for certain
countries)
? VIN
A Maximum permissible gross vehicle weight
(kg)
B Maximum permissible mass of vehicle/
trailer combination (kg)
C Maximum permissible front axle load (kg)
D Maximum permissible rear axle load (kg)
E Paint code
i The data shown on the vehicle identification
plate is example data. This data is different for
every vehicle and can deviate from the data
shown here. You can find the data applicable to your vehicle on the vehicle's identification
plate. Vehicle identification number (VIN)
X
Open the front right-hand door.
X Open cover :in the direction of the arrow
and remove it.
The VIN can be seen. The VIN can also be found on the vehicle iden-
tification plate (Y
page 373). Engine number
The engine number is stamped into the crank-
case. You can obtain further information from
any qualified specialist workshop. Service products and capacities
Important safety notes
G
WARNING
Service product can be poisonous and haz-
ardous to health. There is a risk of injury.
Observe the instructions on the respective
original container when using, storing and dis- posing off service products. Always store ser-
vice products in the sealed original container. Always keep service products out of the reach
of children. H
Environmental note
Dispose of service products in an environ-
mentally-responsible manner.
Service products include the following:
R fuels
R exhaust gas aftertreatment additives, e.g.
AdBlue ®
R lubricants (e.g. engine oil, transmission oil)
R coolant
R brake fluid
R windscreen washer fluid
R climate control system refrigerant
Components and service products must be
matched. Only use products recommended by
Mercedes-Benz. Damage which is caused by the
use of products which have not been recom-
mended is not covered by the Mercedes-Benz
warranty or goodwill gestures. They are listed in this Mercedes-Benz Owner's Manual in the
appropriate section. 374
Service products and capacitiesTechnical data
Page 380 of 393
!
When refuelling, only use diesel fuel that
conforms to the European standard EN 590 or is of equivalent quality. Fuel that does not
conform to EN 590 can lead to increased wear
as well as damage to the engine and exhaust
system.
! Do not use the following:
R marine diesel
R heating oil
R bio-diesel
R vegetable oil
R petrol
R paraffin
R kerosene
Do not mix such fuels with diesel fuel and do
not use any special additives. Otherwise,
engine damage may occur.
! Vehicles with diesel particle filters:
in
countries outside the EU, only use low sulphur
Euro diesel with a sulphur content of under
50 ppm. Otherwise, the emission control sys- tem could be damaged.
Usually you will find information about the fuel
grade on the pump. If you cannot find the label
on the petrol pump, ask the filling station staff.
Information on refuelling (Y page 162).
Low outside temperatures In winter months, diesel fuel with an improved
cold flow quality is available. In Europe, the
EN 590 standard defines various climate-
dependent temperature categories. Malfunc-
tions can be avoided by refuelling with diesel
fuel that corresponds to the climatic specifica-
tions outlined in EN 590. At unusually low out-
side temperatures, it is possible that the flow
characteristics of the diesel fuel could be insuf- ficient. Accordingly, diesel fuel from warmer
areas may not be suitable for operation in colder
climatic conditions.
i Further information on country-specific fuel
properties and fuel types with low-tempera-
ture resistance can be obtained from oil com-
panies, e.g. at filling stations. Fuel consumption information H
Environmental note
CO 2(carbon dioxide) is the gas which scien-
tists believe to be principally responsible for
global warming (the greenhouse effect). Your
vehicle's CO 2emissions are directly related to
fuel consumption and therefore depend on:
R efficient use of the fuel by the engine
R driving style
R other non-technical factors, such as envi-
ronmental influences, road conditions or
traffic flow
You can minimise your vehicle's CO 2emis-
sions by driving carefully and having it serv-
iced regularly.
The vehicle will use more fuel than usual in the
following situations:
R at very low outside temperatures
R in urban traffic
R on short journeys
R in mountainous terrain
R when towing a trailer
i Only for certain countries: you can find the
current consumption and emission values of
your vehicle in the COC documents (EU CER-
TIFICATE OF CONFORMITY). These docu-
ments are delivered with your vehicle.
The consumption figures were, in each case,
based on the currently applicable version:
R for vehicles that comply with standards up
to and including the EURO 4 standard, in
accordance with EU Directive
80/1268/EEC
R for vehicles that comply with or exceed the
EURO 5 standard, in accordance with Reg- ulation (EC) No. 715/2007
Deviations from these values may occur
under normal operating conditions. AdBlue
®
Important safety notes Comply with the important safety notes for ser-
vice products when handling AdBlue ®
(Y page 374). Service products and capacities
377Technical data Z
Page 387 of 393
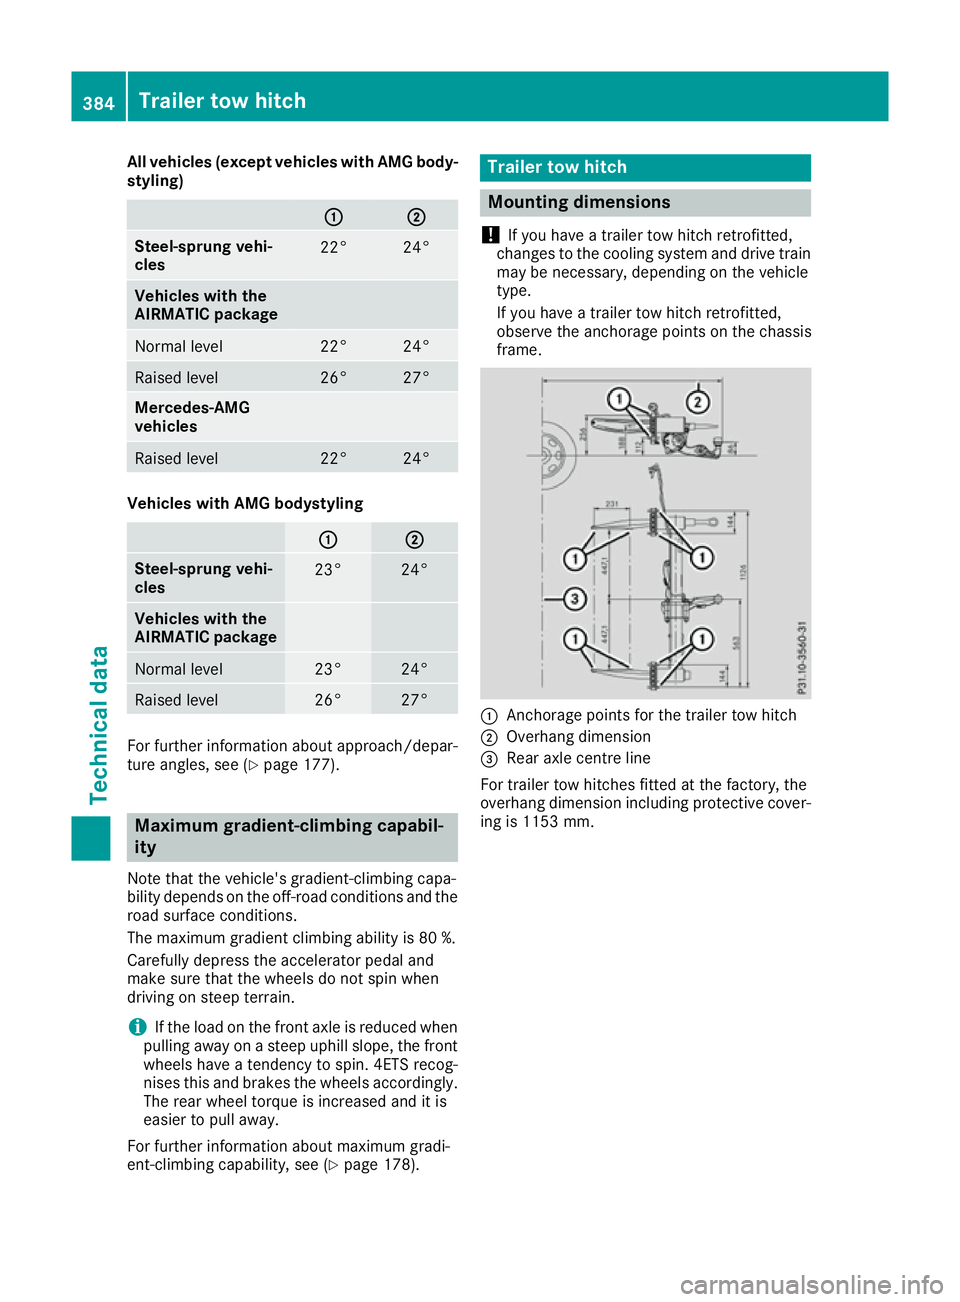
All vehicles (except vehicles with AMG body-
styling) :
: ;
;
Steel-sprung vehi-
cles
22° 24°
Vehicles with the
AIRMATIC package Normal level 22° 24°
Raised level 26° 27°
Mercedes-AMG
vehicles
Raised level 22° 24°
Vehicles with AMG bodystyling
: : ;
;
Steel-sprung vehi-
cles
23° 24°
Vehicles with the
AIRMATIC package
Normal level 23° 24°
Raised level 26° 27°
For further information about approach/depar-
ture angles, see (Y
page 177).Maximum gradient-climbing capabil-
ity
Note that the vehicle's gradient-climbing capa-
bility depends on the off-road conditions and the road surface conditions.
The maximum gradient climbing ability is 80 %.
Carefully depress the accelerator pedal and
make sure that the wheels do not spin when
driving on steep terrain.
i If the load on the front axle is reduced when
pulling away on a steep uphill slope, the front
wheels have a tendency to spin. 4ETS recog-
nises this and brakes the wheels accordingly. The rear wheel torque is increased and it is
easier to pull away.
For further information about maximum gradi-
ent-climbing capability, see (Y page 178). Trailer tow hitch
Mounting dimensions
! If you have a trailer tow hitch retrofitted,
changes to the cooling system and drive train
may be necessary, depending on the vehicle
type.
If you have a trailer tow hitch retrofitted,
observe the anchorage points on the chassis
frame. :
Anchorage points for the trailer tow hitch
; Overhang dimension
= Rear axle centre line
For trailer tow hitches fitted at the factory, the
overhang dimension including protective cover- ing is 1153 mm. 384
Trailer tow hitchTechnical data
Page 388 of 393
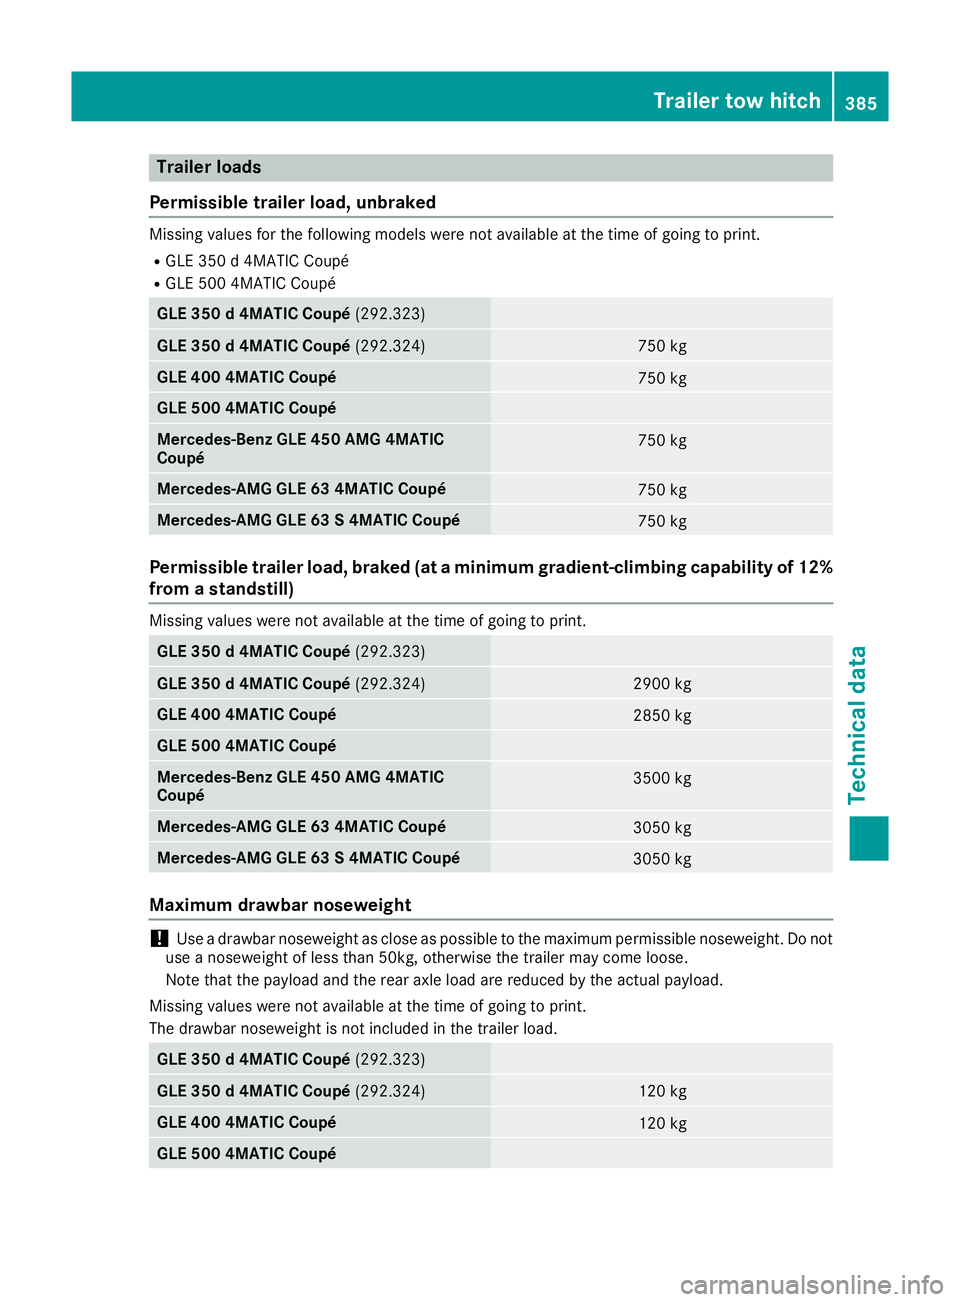
Trailer loads
Permissible trailer load, unbraked Missing values for the following models were not available at the time of going to print.
R GLE 350 d 4MATIC Coupé
R GLE 500 4MATIC Coupé GLE 350 d 4MATIC Coupé
(292.323)GLE 350 d 4MATIC Coupé
(292.324) 750 kg
GLE 400 4MATIC Coupé
750 kg
GLE 500 4MATIC Coupé
Mercedes-Benz GLE 450 AMG 4MATIC
Coupé
750 kg
Mercedes-AMG GLE 63 4MATIC Coupé
750 kg
Mercedes-AMG GLE 63 S 4MATIC Coupé
750 kg
Permissible trailer load, braked (at a minimum gradient-climbing capability of 12%
from a standstill) Missing values were not available at the time of going to print.
GLE 350 d 4MATIC Coupé
(292.323)GLE 350 d 4MATIC Coupé
(292.324) 2900 kg
GLE 400 4MATIC Coupé
2850 kg
GLE 500 4MATIC Coupé
Mercedes-Benz GLE 450 AMG 4MATIC
Coupé
3500 kg
Mercedes-AMG GLE 63 4MATIC Coupé
3050 kg
Mercedes-AMG GLE 63 S 4MATIC Coupé
3050 kg
Maximum drawbar noseweight
!
Use a drawbar noseweight as close as possible to the maximum permissible noseweight. Do not
use a noseweight of less than 50kg, otherwise the trailer may come loose.
Note that the payload and the rear axle load are reduced by the actual payload.
Missing values were not available at the time of going to print.
The drawbar noseweight is not included in the trailer load. GLE 350 d 4MATIC Coupé
(292.323)GLE 350 d 4MATIC Coupé
(292.324) 120 kg
GLE 400 4MATIC Coupé
120 kg
GLE 500 4MATIC Coupé Trailer tow hitch
385Technical data Z