2015 MERCEDES-BENZ GLE COUPE sensor
[x] Cancel search: sensorPage 98 of 393
handle again until the roller sunblinds of the
panorama sliding sunroof close.
X To interrupt convenience closing: release
recessed sensor surface :on the door han-
dle. Resetting the side windows
If a side window can no longer be closed fully,
you must reset it.
X Close all doors.
X Turn the key to position 1or 2in the ignition
lock.
X Pull the corresponding switch on the door
control panel until the side window is com-
pletely closed (Y page 93).
X Hold the switch for an additional second.
If the side window opens again slightly: X Immediately pull the corresponding switch on
the door control panel until the side window is completely closed (Y page 93).
X Hold the switch for an additional second.
X If the corresponding side window remains
closed after the button has been released, the
side window has been reset correctly. If this is
not the case, repeat the steps above again. Side windows
95Opening and closing Z
Page 101 of 393
roof, the sunroof will lower slightly but remain
raised in the rear.
Rain-closing feature when the engine is
switched off The rain-closing feature is only available for vehi-
cles with a rain sensor.
When the key is in position 0in the ignition lock
or is removed, the panorama sliding sunroof
closes automatically:
R if it starts to rain
R at extreme outside temperatures
R after six hours
R if there is a malfunction in the power supply
The panorama sliding sunroof remains raised at the rear in order to allow ventilation of the vehi-
cle interior.
If the panorama sliding sunroof is obstructed
when being closed by the rain-closing feature, it opens again slightly. The rain-closing feature is
then deactivated.
The panorama sliding sunroof does not close if:
R it is raised at the rear.
R it is blocked.
R no rain is falling on the area of the windscreen
being monitored by the rain sensor, e.g.
because the vehicle is under a bridge or in a
carport.
Rain-closing feature when driving The raised panorama sliding sunroof automati-
cally lowers when driving if it starts to rain. The
sliding sunroof is lowered depending on:
R the road speed and
R the intensity of the rain
You can manually cancel the automatic closing
procedure. Press or pull the 3switch in any
direction.
To raise the panorama sliding sunroof again,
press the 3switch in direction :. The rain-
closing feature remains activated. Operating the roller sunblind for the
panorama sliding sunroof
Important safety notes G
WARNING
Parts of the body could become trapped
between the roller sunblind and frame or slid- ing sunroof during automatic opening or clos-
ing. There is a risk of injury.
When opening or closing, make sure that no
body parts are in the sweep of the roller sun- blind.
If someone is trapped:
R release the switch immediately or
R press the switch in any direction during the
automatic opening/closing process
The opening/closing process is stopped.
The roller sunblind shields the vehicle interior
from sunlight. The roller sunblind can only be
closed when the panorama sliding sunroof is
closed.
Roller sunblind reversing feature The roller sunblind is equipped with an auto-
matic reversing feature. If an object blocks or
restricts the roller sunblind during the closing
process, the roller sunblind opens again auto-
matically. The automatic reversing feature is,
however, only an aid and is no substitute for your
attention when closing the roller sunblind. G
WARNING
The reversing feature does not react:
R to soft, light and thin objects, e.g. small fin-
gers
R when closing the roller sunblind again man-
ually immediately after automatic reversing
This means that the reversing feature cannot
prevent someone being trapped in these sit-
uations. There is a risk of injury.
When closing the roller sunblind, make sure
that no body parts are in the sweep. 98
Sliding sunroofOpening and closing
Page 118 of 393
Useful information
i This Owner's Manual describes all models,
series and optional equipment for your vehi-
cle that were available at the time of going to
press. National variations are possible. Note
that your vehicle may not be equipped with all
of the functions described. This is also the
case for systems and functions relevant to
safety.
i Read the information on qualified specialist
workshops: (Y page 25). Exterior lighting
General notes
For reasons of safety, Mercedes-Benz recom-
mends that you drive with the lights switched on
even during the daytime. In some countries,
operation of the headlamps varies due to legal
requirements and self-imposed obligations. Driving abroad
General notes If your journey takes you to countries where
vehicles are driven on the opposite side of the
road to the country in which the vehicle is reg-
istered, your headlamps must be switched to
symmetrical dipped beam as soon as possible
after crossing the border. This prevents oncom-
ing traffic from being dazzled. Symmetrical
lights do not illuminate as large an area of the
edge of the carriageway.
Vehicles with Intelligent Light System X
Before crossing the border, set the head-
lamps to symmetrical dipped beam and after
returning back to asymmetrical dipped beam via the "Dipped-beam headlamps for driving
on the right/left" function in the on-board
computer (Y page 246).
If the headlamps are converted to symmetrical
dipped beam, the "motorway mode" and "exten- ded range foglamps" functions are not available. Setting the exterior lighting
Setting options Exterior lighting can be set by:
R using the light switch
R using the combination switch (Y page 117)
R using the on-board computer (Y page 246)
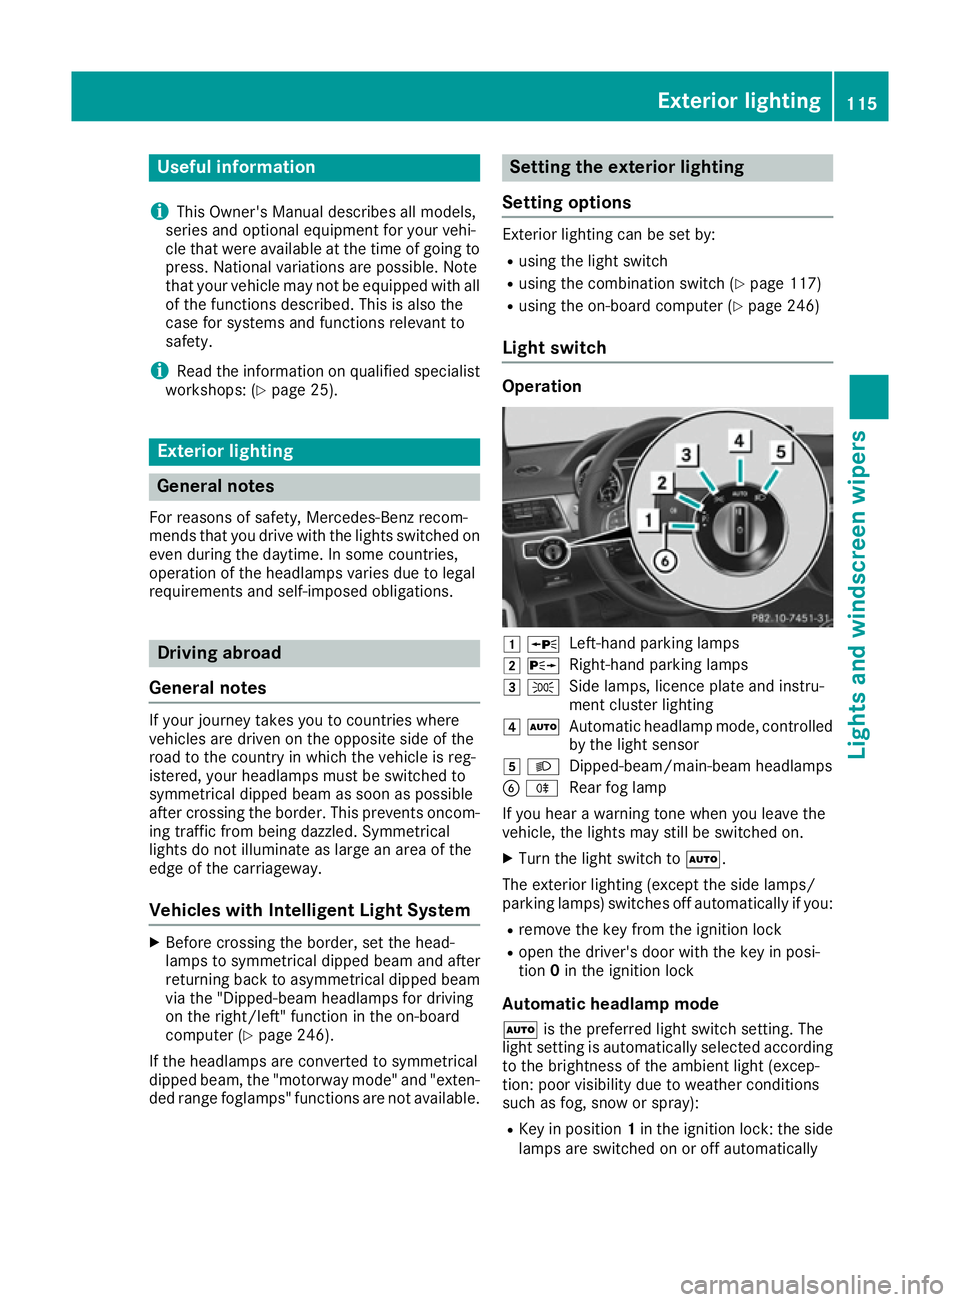
Light switch Operation
1
W
Left-hand parking lamps
2 X
Right-hand parking lamps
3 T
Side lamps, licence plate and instru-
ment cluster lighting
4 Ã
Automatic headlamp mode, controlled
by the light sensor
5 L
Dipped-beam/main-beam headlamps
B R
Rear fog lamp
If you hear a warning tone when you leave the
vehicle, the lights may still be switched on.
X Turn the light switch to Ã.
The exterior lighting (except the side lamps/
parking lamps) switches off automatically if you: R remove the key from the ignition lock
R open the driver's door with the key in posi-
tion 0in the ignition lock
Automatic headlamp mode
à is the preferred light switch setting. The
light setting is automatically selected according to the brightness of the ambient light (excep-
tion: poor visibility due to weather conditions
such as fog, snow or spray):
R Key in position 1in the ignition lock: the side
lamps are switched on or off automatically Exterior lighting
115Lights and windscreen wipers
Page 119 of 393
depending on the brightness of the ambient
light
R With the engine running: depending on the
ambient light conditions, the daytime driving
lights or the side lamps and dipped-beam
headlamps are switched on or off automati-
cally
X To switch on automatic headlamp mode:
turn the light switch to Ã.G
WARNING
When the light switch is set to Ã, the
dipped-beam headlamps may not be switched on automatically if there is fog, snow or othercauses of poor visibility due to the weather
conditions such as spray. There is a risk of an
accident.
In such situations, turn the light switch to
L.
The automatic headlamp feature is only an aid.
The driver is responsible for the vehicle lighting at all times.
The daytime driving lights improve the detecta-
bility of your vehicle during the day.
When the side lamps and dipped-beam head-
lamps are switched on, the green T(side
lamps) and L(dipped-beam headlamps)
indicator lamps in the instrument cluster light
up.
Dipped-beam headlamps When the ignition is switched on and the light
switch is in the Lposition, the side lamps
and dipped-beam headlamps are switched on
even if the light sensor does not sense dark
ambient light conditions. This is advantageous
when there is fog or rain.
X To switch on the dipped-beam headlamps:
turn the key in the ignition lock to position 2
or start the engine.
X Turn the light switch to L.
The green Lindicator lamp in the instru-
ment cluster lights up.
Rear fog lamp The rear foglamp improves the visibility of your
vehicle in heavy fog for the following traffic.
Please observe the country-specific laws on the
use of rear foglamps. X
To switch on the rear foglamp: turn the key
in the ignition lock to position 2or start the
engine.
X Turn the light switch to LorÃ.
X Press the Rbutton.
The yellow Rindicator lamp in the instru-
ment cluster lights up.
X To switch off the rear foglamp: press the
R button.
The yellow Rindicator lamp in the instru-
ment cluster goes out.
Side lamps ! If the battery has been excessively dis-
charged, the side lamps or parking lamps are
automatically switched off to enable the next engine start. Always park your vehicle safely
and sufficiently lit according to legal stand-
ards. Avoid the continuous use of the T
side lamps for several hours. If possible,
switch on the Xright or the Wleft
parking lamp.
X To switch on: turn the light switch to T.
The green Tindicator lamp in the instru-
ment cluster lights up.
Parking lamps Switches on the parking lamps ensures that the
corresponding side of the vehicle is illuminated.
X To switch on the parking lamps: the key
should not be in the ignition lock or it should
be in position 0.
X Turn the light switch to W(left-hand side of
the vehicle) or X(right-hand side of the
vehicle). 116
Exterior lightingLights and windscreen wipers
Page 122 of 393
Motorway mode increases the range of the
beam.
Active: if you are driving at a speed above
110 km/h and do not make any large steering
movements for at least 1,000 m or if you are
driving at a speed above 130 km/h.
Not active: if you are driving at speeds below
80 km/h following activation.
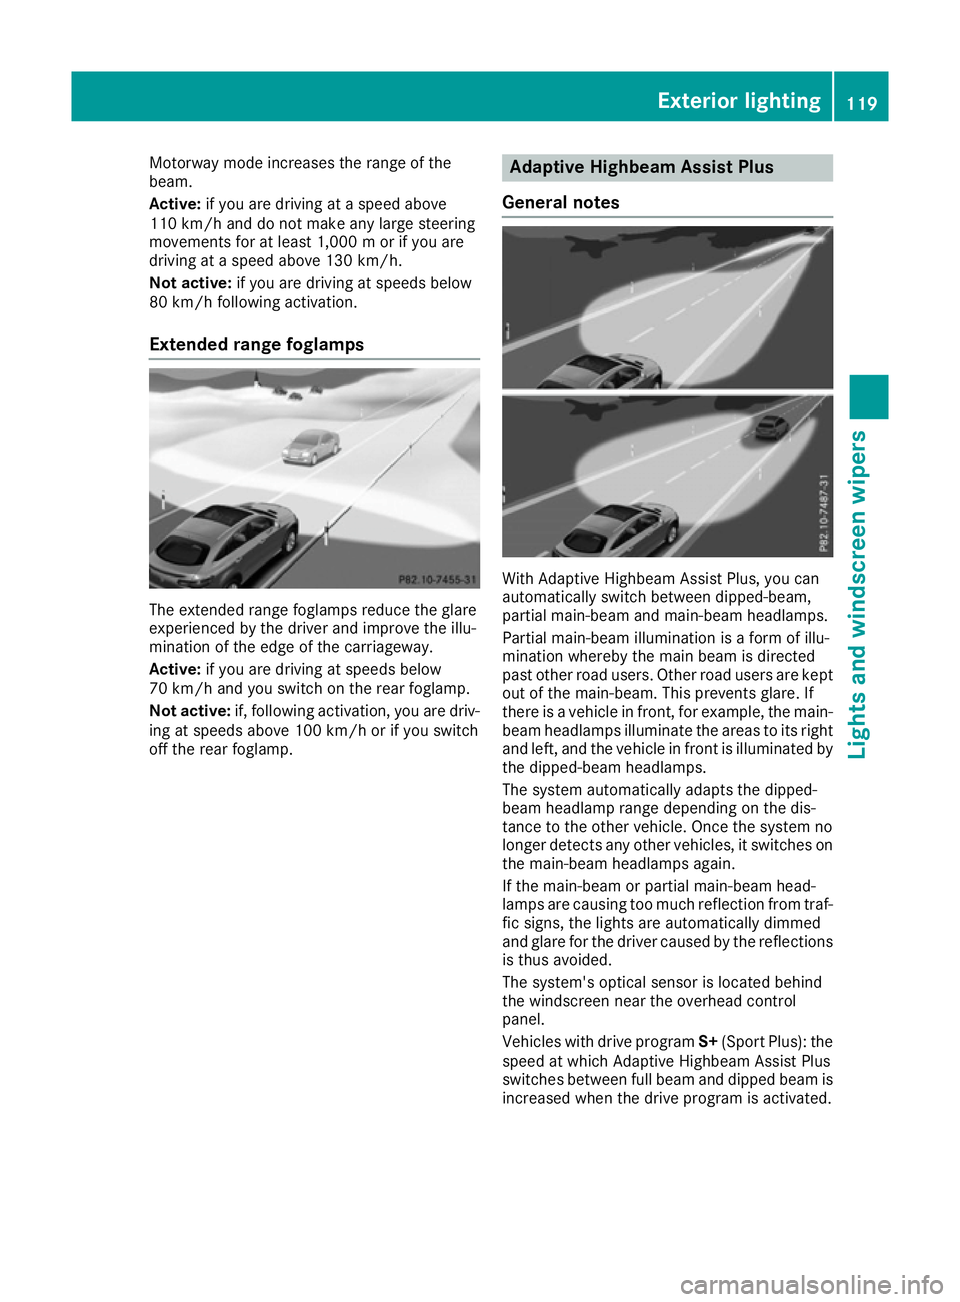
Extended range foglamps The extended range foglamps reduce the glare
experienced by the driver and improve the illu-
mination of the edge of the carriageway.
Active: if you are driving at speeds below
70 km/h and you switch on the rear foglamp.
Not active: if, following activation, you are driv-
ing at speeds above 100 km/h or if you switch
off the rear foglamp. Adaptive Highbeam Assist Plus
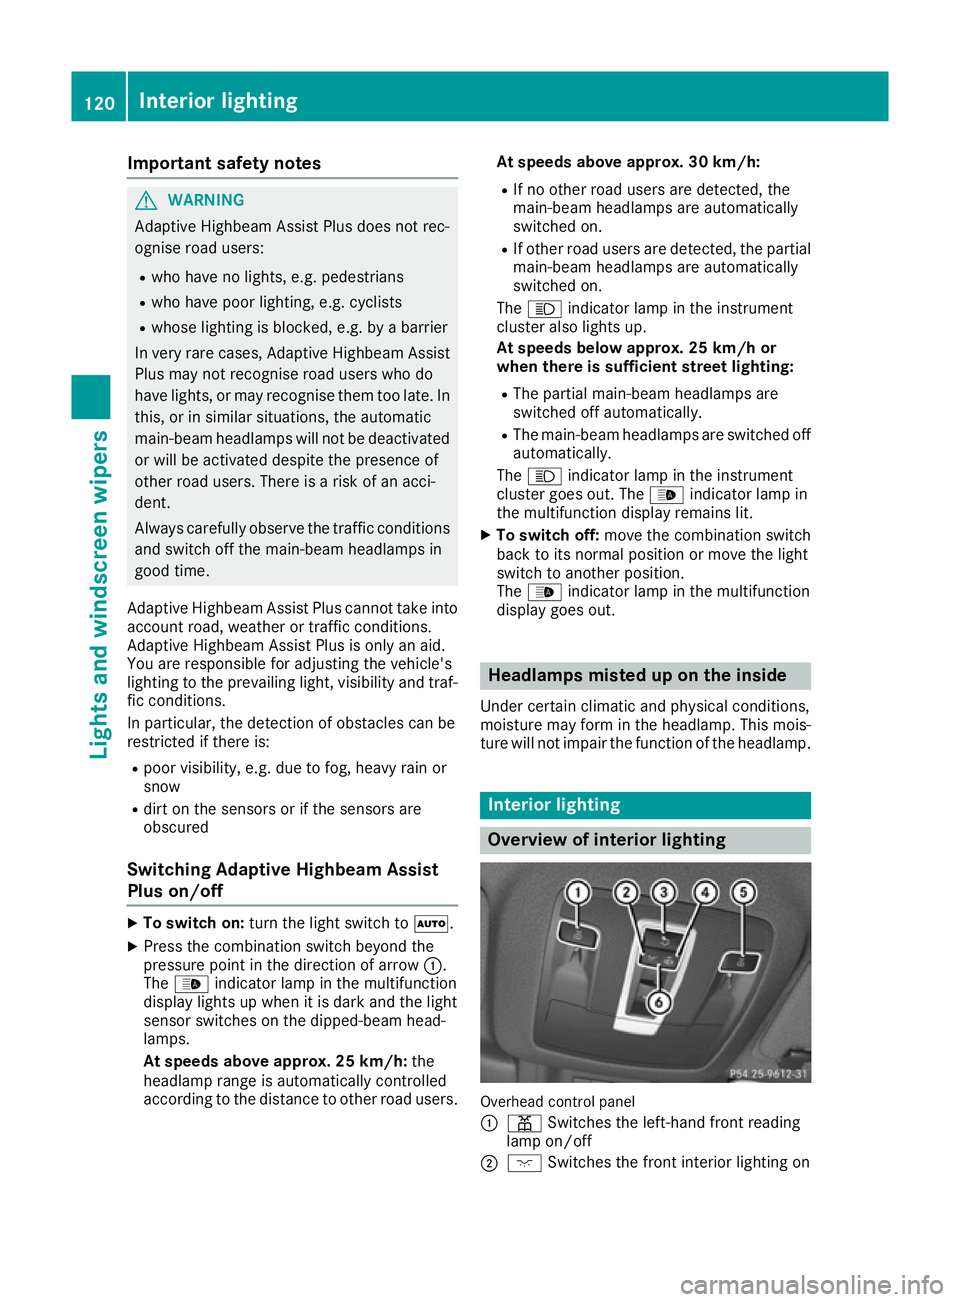
General notes With Adaptive Highbeam Assist Plus, you can
automatically switch between dipped-beam,
partial main-beam and main-beam headlamps.
Partial main-beam illumination is a form of illu-
mination whereby the main beam is directed
past other road users. Other road users are kept
out of the main-beam. This prevents glare. If
there is a vehicle in front, for example, the main- beam headlamps illuminate the areas to its right
and left, and the vehicle in front is illuminated by
the dipped-beam headlamps.
The system automatically adapts the dipped-
beam headlamp range depending on the dis-
tance to the other vehicle. Once the system no
longer detects any other vehicles, it switches on the main-beam headlamps again.
If the main-beam or partial main-beam head-
lamps are causing too much reflection from traf-fic signs, the lights are automatically dimmed
and glare for the driver caused by the reflections
is thus avoided.
The system's optical sensor is located behind
the windscreen near the overhead control
panel.
Vehicles with drive program S+(Sport Plus): the
speed at which Adaptive Highbeam Assist Plus
switches between full beam and dipped beam is
increased when the drive program is activated. Exterior lighting
119Lights and windscreen wipers Z
Page 123 of 393
Important safety notes
G
WARNING
Adaptive Highbeam Assist Plus does not rec-
ognise road users:
R who have no lights, e.g. pedestrians
R who have poor lighting, e.g. cyclists
R whose lighting is blocked, e.g. by a barrier
In very rare cases, Adaptive Highbeam Assist
Plus may not recognise road users who do
have lights, or may recognise them too late. In this, or in similar situations, the automatic
main-beam headlamps will not be deactivated
or will be activated despite the presence of
other road users. There is a risk of an acci-
dent.
Always carefully observe the traffic conditions and switch off the main-beam headlamps in
good time.
Adaptive Highbeam Assist Plus cannot take into
account road, weather or traffic conditions.
Adaptive Highbeam Assist Plus is only an aid.
You are responsible for adjusting the vehicle's
lighting to the prevailing light, visibility and traf-
fic conditions.
In particular, the detection of obstacles can be
restricted if there is:
R poor visibility, e.g. due to fog, heavy rain or
snow
R dirt on the sensors or if the sensors are
obscured
Switching Adaptive Highbeam Assist
Plus on/off X
To switch on: turn the light switch to Ã.
X Press the combination switch beyond the
pressure point in the direction of arrow :.
The _ indicator lamp in the multifunction
display lights up when it is dark and the light
sensor switches on the dipped-beam head-
lamps.
At speeds above approx. 25 km/h: the
headlamp range is automatically controlled
according to the distance to other road users. At speeds above approx. 30 km/h:
R If no other road users are detected, the
main-beam headlamps are automatically
switched on.
R If other road users are detected, the partial
main-beam headlamps are automatically
switched on.
The K indicator lamp in the instrument
cluster also lights up.
At speeds below approx. 25 km/h or
when there is sufficient street lighting:
R The partial main-beam headlamps are
switched off automatically.
R The main-beam headlamps are switched off
automatically.
The K indicator lamp in the instrument
cluster goes out. The _indicator lamp in
the multifunction display remains lit.
X To switch off: move the combination switch
back to its normal position or move the light
switch to another position.
The _ indicator lamp in the multifunction
display goes out. Headlamps misted up on the inside
Under certain climatic and physical conditions,
moisture may form in the headlamp. This mois-
ture will not impair the function of the headlamp. Interior lighting
Overview of interior lighting
Overhead control panel
:
p Switches the left-hand front reading
lamp on/off
; c Switches the front interior lighting on 120
Interior lightingLights and windscreen wipers
Page 124 of 393
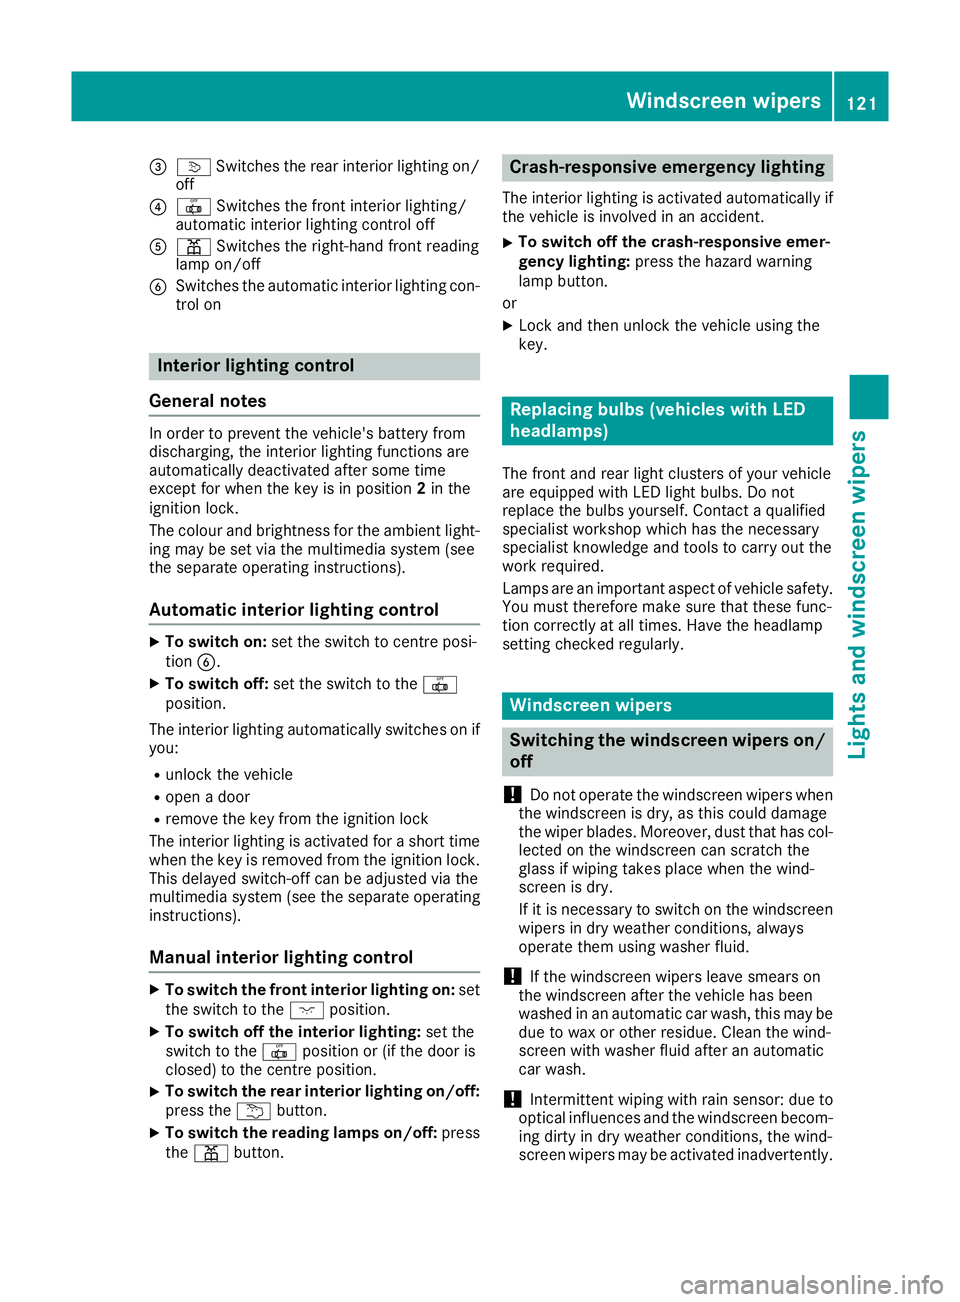
=
v Switches the rear interior lighting on/
off
? | Switches the front interior lighting/
automatic interior lighting control off
A p Switches the right-hand front reading
lamp on/off
B Switches the automatic interior lighting con-
trol on Interior lighting control
General notes In order to prevent the vehicle's battery from
discharging, the interior lighting functions are
automatically deactivated after some time
except for when the key is in position 2in the
ignition lock.
The colour and brightness for the ambient light-
ing may be set via the multimedia system (see
the separate operating instructions).
Automatic interior lighting control X
To switch on: set the switch to centre posi-
tion B.
X To switch off: set the switch to the |
position.
The interior lighting automatically switches on if you:
R unlock the vehicle
R open a door
R remove the key from the ignition lock
The interior lighting is activated for a short time
when the key is removed from the ignition lock.
This delayed switch-off can be adjusted via the
multimedia system (see the separate operating
instructions).
Manual interior lighting control X
To switch the front interior lighting on: set
the switch to the cposition.
X To switch off the interior lighting: set the
switch to the |position or (if the door is
closed) to the centre position.
X To switch the rear interior lighting on/off:
press the ubutton.
X To switch the reading lamps on/off: press
the p button. Crash-responsive emergency lighting
The interior lighting is activated automatically if
the vehicle is involved in an accident.
X To switch off the crash-responsive emer-
gency lighting: press the hazard warning
lamp button.
or X Lock and then unlock the vehicle using the
key. Replacing bulbs (vehicles with LED
headlamps)
The front and rear light clusters of your vehicle
are equipped with LED light bulbs. Do not
replace the bulbs yourself. Contact a qualified
specialist workshop which has the necessary
specialist knowledge and tools to carry out the
work required.
Lamps are an important aspect of vehicle safety.
You must therefore make sure that these func-
tion correctly at all times. Have the headlamp
setting checked regularly. Windscreen wipers
Switching the windscreen wipers on/
off
! Do not operate the windscreen wipers when
the windscreen is dry, as this could damage
the wiper blades. Moreover, dust that has col- lected on the windscreen can scratch the
glass if wiping takes place when the wind-
screen is dry.
If it is necessary to switch on the windscreen
wipers in dry weather conditions, always
operate them using washer fluid.
! If the windscreen wipers leave smears on
the windscreen after the vehicle has been
washed in an automatic car wash, this may be
due to wax or other residue. Clean the wind-
screen with washer fluid after an automatic
car wash.
! Intermittent wiping with rain sensor: due to
optical influences and the windscreen becom- ing dirty in dry weather conditions, the wind-
screen wipers may be activated inadvertently. Windscreen wipers
121Lights and windscreen wipers Z
Page 125 of 393
This could damage the windscreen wiper
blades or scratch the windscreen.
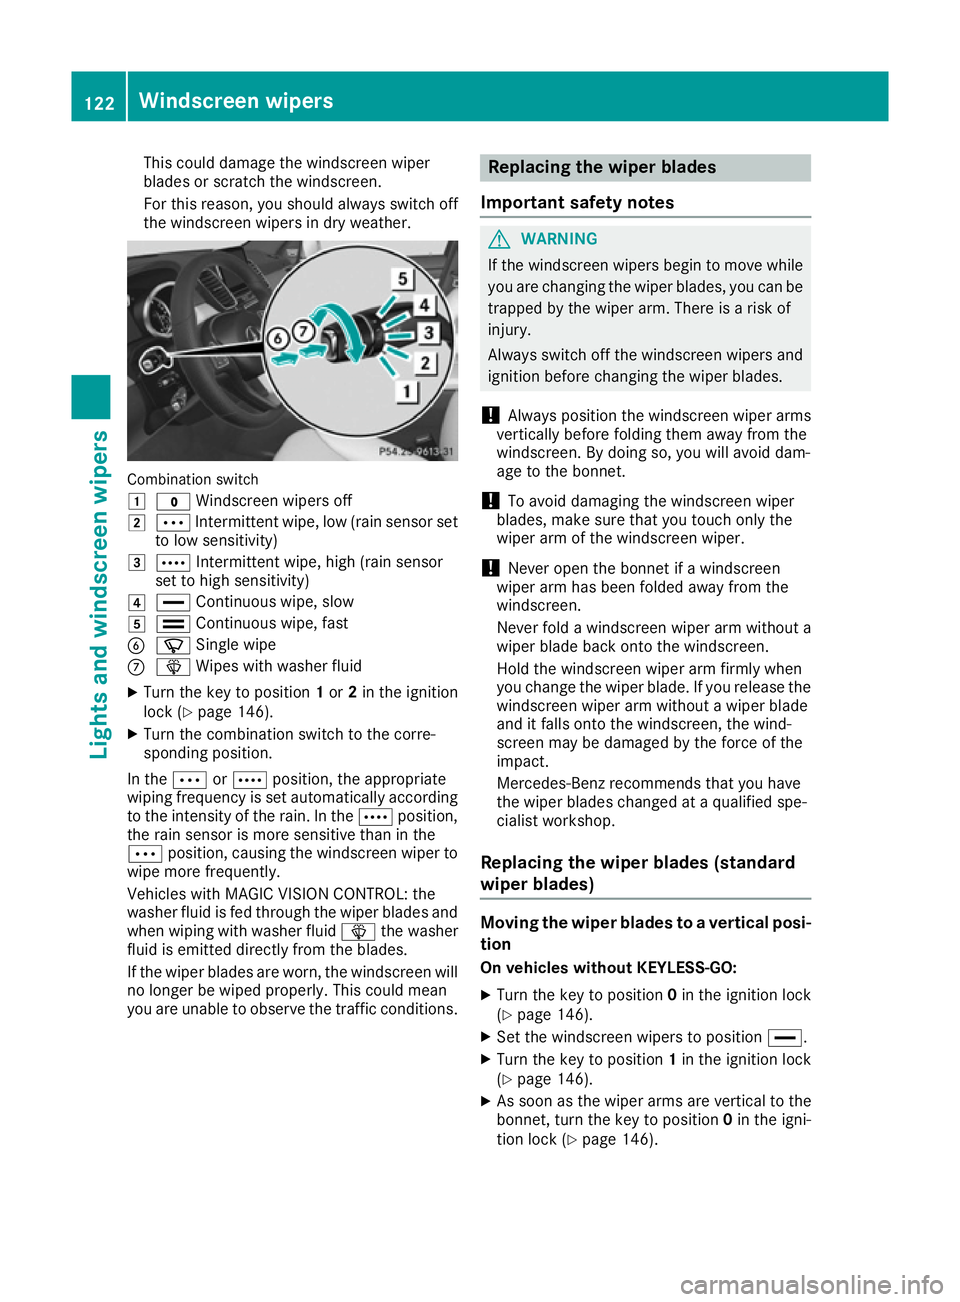
For this reason, you should always switch off the windscreen wipers in dry weather. Combination switch
1
$ Windscreen wipers off
2 Ä Intermittent wipe, low (rain sensor set
to low sensitivity)
3 Å Intermittent wipe, high (rain sensor
set to high sensitivity)
4 ° Continuous wipe, slow
5 ¯ Continuous wipe, fast
B í Single wipe
C î Wipes with washer fluid
X Turn the key to position 1or 2in the ignition
lock (Y page 146).
X Turn the combination switch to the corre-
sponding position.
In the ÄorÅ position, the appropriate
wiping frequency is set automatically according to the intensity of the rain. In the Åposition,
the rain sensor is more sensitive than in the
Ä position, causing the windscreen wiper to
wipe more frequently.
Vehicles with MAGIC VISION CONTROL: the
washer fluid is fed through the wiper blades and when wiping with washer fluid îthe washer
fluid is emitted directly from the blades.
If the wiper blades are worn, the windscreen will
no longer be wiped properly. This could mean
you are unable to observe the traffic conditions. Replacing the wiper blades
Important safety notes G
WARNING
If the windscreen wipers begin to move while
you are changing the wiper blades, you can be trapped by the wiper arm. There is a risk of
injury.
Always switch off the windscreen wipers and
ignition before changing the wiper blades.
! Always position the windscreen wiper arms
vertically before folding them away from the
windscreen. By doing so, you will avoid dam-
age to the bonnet.
! To avoid damaging the windscreen wiper
blades, make sure that you touch only the
wiper arm of the windscreen wiper.
! Never open the bonnet if a windscreen
wiper arm has been folded away from the
windscreen.
Never fold a windscreen wiper arm without a
wiper blade back onto the windscreen.
Hold the windscreen wiper arm firmly when
you change the wiper blade. If you release the windscreen wiper arm without a wiper blade
and it falls onto the windscreen, the wind-
screen may be damaged by the force of the
impact.
Mercedes-Benz recommends that you have
the wiper blades changed at a qualified spe-
cialist workshop.
Replacing the wiper blades (standard
wiper blades) Moving the wiper blades to a vertical posi-
tion
On vehicles without KEYLESS-GO:
X Turn the key to position 0in the ignition lock
(Y page 146).
X Set the windscreen wipers to position °.
X Turn the key to position 1in the ignition lock
(Y page 146).
X As soon as the wiper arms are vertical to the
bonnet, turn the key to position 0in the igni-
tion lock (Y page 146).122
Windscreen wipersLights and windscreen wipers