2015 MERCEDES-BENZ GLE COUPE steering
[x] Cancel search: steeringPage 67 of 393
Pets in the vehicle
G
WARNING
If you leave animals unsupervised or unse-
cured in the vehicle, they may push a button
or a switch, for example.
They could:
R activate vehicle equipment and become
trapped, for example
R switch vehicle systems on or off, thus
endangering other road users
In the event of an accident, sudden braking or
abrupt changes of direction, unsecured ani-
mals could be flung around the vehicle, injur-
ing the vehicle occupants. There is a risk of an accident and injury.
Never leave animals unattended in the vehi-
cle. Always secure animals correctly during a
journey, e.g. in an animal transport box. Driving safety systems
Driving safety systems overview
In this section, you will find information about
the following driving safety systems:
R ABS (Anti-lock BrakingSystem)
(Y page 64)
R BAS ( Brake Assist System) (Y page 65)
R BAS PLUS with Cross-Traffic Assist ( Brake
Assist System PLUS with Cross-Traffic Assist)
(Y page 65)
R COLLISION PREVENTION ASSIST PLUS
(Y page 67)
R Adaptive brake lights (Y page 69)
R ESP ®
(Electronic StabilityProgram)
(Y page 70)
R EBD ( electronic brake force distribution)
(Y page 72)
R ADAPTIVE BRAKE (Y page 72)
R PRE-SAFE ®
Brake (Y page 72)
R STEER CONTROL (Y page 74) Important safety notes
If you fail to adapt your driving style or if you are
inattentive, the driving safety systems can nei-
ther reduce the risk of an accident nor override the laws of physics. Driving safety systems are
merely aids designed to assist driving. You are
responsible for maintaining the distance to the
vehicle in front, for vehicle speed, for braking in
good time, and for staying in lane. Always adapt your driving style to suit the prevailing road and
weather conditions and maintain a safe distance from the vehicle in front. Drive carefully.
The driving safety systems described only work
as effectively as possible when there is ade-
quate contact between the tyres and the road
surface. Pay particular attention to the informa- tion regarding tyres, recommended minimum
tyre tread depths etc. in the "Wheels and tyres" section (Y page 348).
In wintry driving conditions, always use winter
tyres (M+S tyres) and, if necessary, snow
chains. Only in this way will the driving safety
systems described in this section work as effec-
tively as possible. ABS (Anti-lock Braking System)
General notes ABS regulates brake pressure in such a way that
the wheels do not lock when you brake. This
allows you to continue steering the vehicle when braking.
The ! ABS warning lamp in the instrument
cluster lights up when the ignition is switched
on. It goes out when the engine is running.
ABS works from a speed of about 8 km/h,
regardless of road-surface conditions. ABS
works on slippery surfaces, even when you only brake gently.
Important safety notes i
Observe the "Important safety notes" sec-
tion (Y page 64). G
WARNING
If ABS is faulty, the wheels could lock when
braking. The steerability and braking charac-
teristics may be severely impaired. Addition-
ally, further driving safety systems are deac- 64
Driving safety systemsSafety
Page 77 of 393
Following damage to the windscreen, have the
configuration and operation of the camera sys-
tem checked at a qualified specialist workshop.
Function X
To activate/deactivate: activate or deacti-
vate PRE-SAFE ®
Brake in the on-board com-
puter (Y page 244).
If the PRE-SAFE ®
Brake is not activated, the
æ symbol appears in the multifunction dis-
play.
If you have activated DSR (Y page 193), PRE-
SAFE ®
Brake is also deactivated.
This function will issue a warning if:
R at a speed of approximately 30 km/h or
higher, the distance maintained to the vehicle
travelling in front is insufficient for several
seconds.
The · distance warning lamp then lights
up in the instrument cluster.
R at a speed of around 7 km/h or more, you
rapidly approach a vehicle in front or a pedes-
trian
An intermittent warning tone will then sound
and the ·distance warning lamp lights up
in the instrument cluster.
X Brake immediately to defuse the situation.
or X Take evasive action provided it is safe to do
so.
The PRE-SAFE ®
Brake function can also brake
the vehicle automatically under the following
conditions:
R the driver and front passenger have their seat
belts fastened
and
R the vehicle speed is between approximately
7 km/h and 200 km/h
At a speed of up to approximately 70 km/h,
PRE-SAFE ®
Brake can also detect:
R stationary objects in the path of your vehicle,
e.g. stopped or parked vehicles
R pedestrians in the path of your vehicle
i If there is an increased risk of a collision,
preventive passenger protection measures
(PRE-SAFE ®
) are triggered (Y page 51).
If the risk of a collision with the vehicle in front
remains and you do not brake, take evasive action or accelerate significantly, the vehicle
may perform automatic emergency braking, up
to the point of full brake application. Automatic
emergency braking is not performed until imme- diately prior to an imminent accident.
You can prevent the intervention of PRE-SAFE ®
Brake at any time by:
R depressing the accelerator pedal further
R activating kickdown
R releasing the brake pedal
The braking action of PRE-SAFE ®
Brake is ended
automatically if:
R you manoeuvre to avoid the obstacle
R there is no longer any danger of a collision
R there is no longer an obstacle detected in
front of your vehicle STEER CONTROL
General notes STEER CONTROL helps you by transmitting a
noticeable steering force to the steering wheel
in the direction required for vehicle stabilisation.
This steering support is provided in particular if:
R both right wheels or both left wheels are on a
wet or slippery road surface when you brake
R the vehicle starts to skid
Important safety notes i
Observe the "Important safety notes" sec-
tion (Y page 64).
No steering support is provided from STEER
CONTROL, if: R ESP ®
is deactivated
R ESP ®
is malfunctioning
R the steering is faulty
If ESP ®
is malfunctioning, you will be assisted
further by the electrical power steering. 74
Driving safety systemsSafety
Page 104 of 393
Useful information
i This Owner's Manual describes all models,
series and optional equipment for your vehi-
cle that were available at the time of going to
press. National variations are possible. Note
that your vehicle may not be equipped with all
of the functions described. This is also the
case for systems and functions relevant to
safety.
i Read the information on qualified specialist
workshops: (Y page 25). Correct driver's seat position
G
WARNING
You could lose control of the vehicle while
driving if you:
R adjust the driver's seat, steering wheel or
mirrors
R fasten the seat belt
There is a risk of an accident.
Adjust the driver's seat, head restraint, steer-
ing wheel and mirrors and fasten your seat
belt before starting the engine. X
Observe the safety guidelines on seat adjust-
ment (Y page 102).
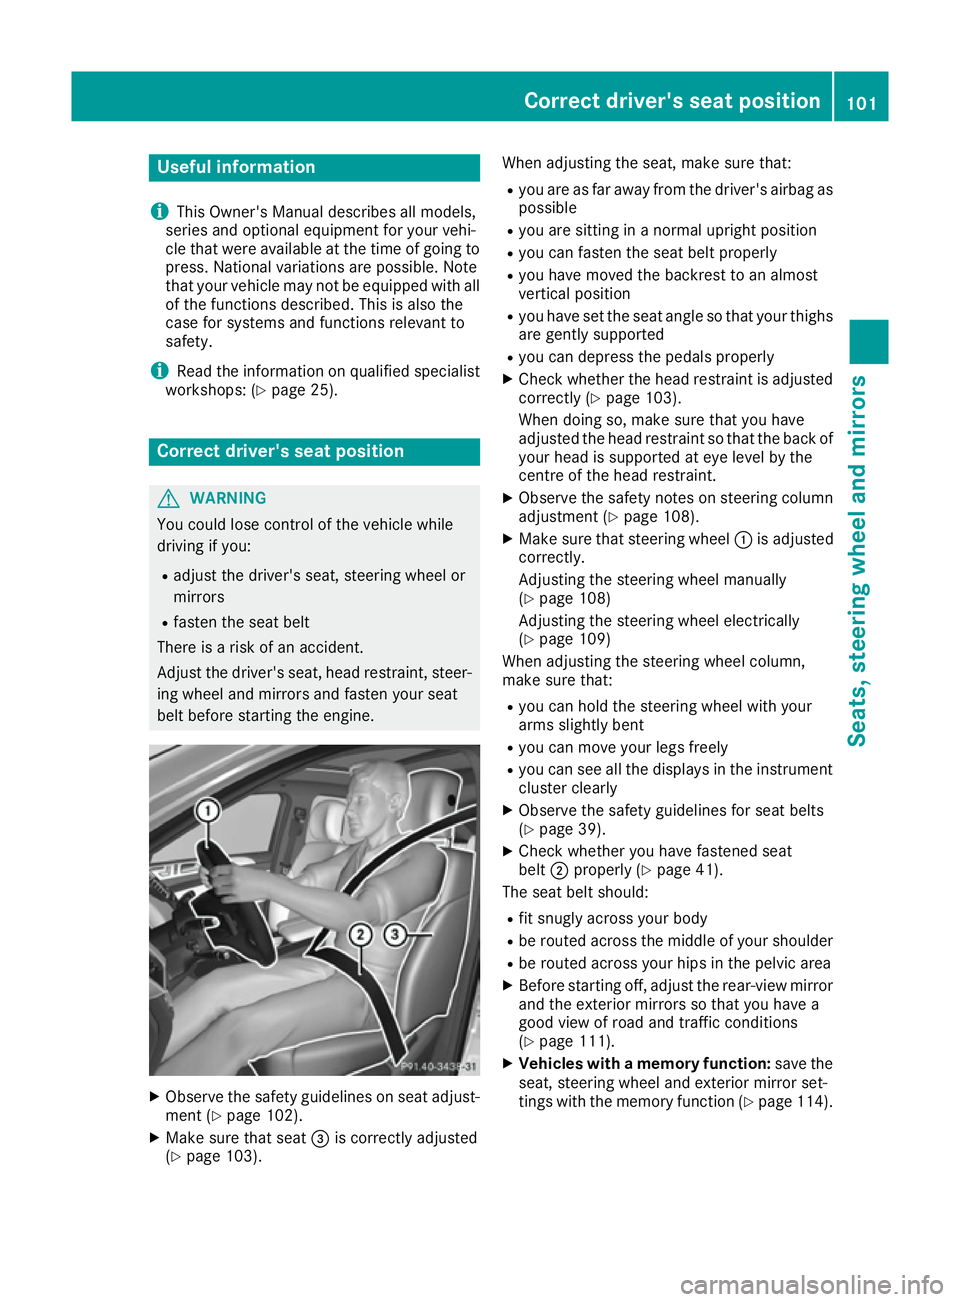
X Make sure that seat =is correctly adjusted
(Y page 103). When adjusting the seat, make sure that:
R you are as far away from the driver's airbag as
possible
R you are sitting in a normal upright position
R you can fasten the seat belt properly
R you have moved the backrest to an almost
vertical position
R you have set the seat angle so that your thighs
are gently supported
R you can depress the pedals properly
X Check whether the head restraint is adjusted
correctly (Y page 103).
When doing so, make sure that you have
adjusted the head restraint so that the back of
your head is supported at eye level by the
centre of the head restraint.
X Observe the safety notes on steering column
adjustment (Y page 108).
X Make sure that steering wheel :is adjusted
correctly.
Adjusting the steering wheel manually
(Y page 108)
Adjusting the steering wheel electrically
(Y page 109)
When adjusting the steering wheel column,
make sure that:
R you can hold the steering wheel with your
arms slightly bent
R you can move your legs freely
R you can see all the displays in the instrument
cluster clearly
X Observe the safety guidelines for seat belts
(Y page 39).
X Check whether you have fastened seat
belt ;properly (Y page 41).
The seat belt should:
R fit snugly across your body
R be routed across the middle of your shoulder
R be routed across your hips in the pelvic area
X Before starting off, adjust the rear-view mirror
and the exterior mirrors so that you have a
good view of road and traffic conditions
(Y page 111).
X Vehicles with a memory function: save the
seat, steering wheel and exterior mirror set-
tings with the memory function (Y page 114). Correct driver's seat position
101Seats, steering wheel and mirrors Z
Page 105 of 393
Seats
Important safety notes
G
WARNING
If children adjust the seats, they could
become trapped, especially if they are unat-
tended. There is a risk of injury.
When leaving the vehicle, always take the key with you and lock the vehicle. Never leave
children unattended in the vehicle.
The seats can still be adjusted when there is no
key in the ignition lock. G
WARNING
When adjusting a seat, you or another vehicle occupant could become trapped by the guiderail of the seat, for instance. There is a risk of
injury.
Make sure that no one has any part of their
body within the sweep of the seat when
adjusting it.
Observe the safety notes on "Airbags"
(Y page 42) and "Children in the Vehicle"
(Y page 52). G
WARNING
You could lose control of the vehicle while
driving if you:
R adjust the driver's seat, steering wheel or
mirrors
R fasten the seat belt
There is a risk of an accident.
Adjust the driver's seat, head restraint, steer-
ing wheel and mirrors and fasten your seat
belt before starting the engine. G
WARNING
If you adjust the seat height carelessly, you or other vehicle occupants could be trapped andthereby injured. Children in particular could
accidentally press the electrical seat adjust-
ment buttons and become trapped. There is a
risk of injury.
While moving the seats, make sure that your
hands or other body parts do not get under the lever assembly of the seat adjustment sys-
tem.
G
WARNING
The head restraints cannot provide the inten-
ded protection unless they are fitted and
adjusted correctly. There is an increased risk of injury to the head and neck in the event of
an accident or sudden braking, for example.
Always drive with the head restraints fitted.
Ensure that the centre of the head restraints
support the back of each vehicle occupant's
head at eye level before driving off. G
WARNING
The seat belt does not offer the intended level of protection if you have not moved the back-
rest to an almost vertical position. When brak-
ing or in the event of an accident, you could
slide underneath the seat belt and sustain
abdomen or neck injuries, for example. This
poses an increased risk of injury or even fatal injury.
Adjust the seat properly before beginning
your journey. Always ensure that the backrest
is in an almost vertical position and that the
shoulder section of your seatbelt is routed
across the centre of your shoulder.
! To avoid damage to the seats and the seat
heating, observe the following information:
R do not spill any liquids on the seats. If liquid
is spilled on the seats, dry them as soon as possible.
R if the seat covers are damp or wet, do not
switch on the seat heating. The seat heat-
ing should also not be used to dry the seats.
R clean the seat covers as recommended;
see "Interior care".
R do not transport heavy loads on the seats.
Do not place sharp objects on the seat
cushions, e.g. knives, nails or tools. The
seats should only be occupied by passen-
gers, if possible.
R when the seat heating is in operation, do
not cover the seats with insulating materi-
als, e.g. blankets, coats, bags, seat covers,
child seats or booster seats. 102
SeatsSeats, steering wheel and mirrors
Page 106 of 393
!
Make sure that there are no objects in the
footwell under or behind the seats when mov-
ing the seats back. There is a risk that the
seats and/or the objects could be damaged.
i The head restraints cannot be removed from
the front and rear seats.
For more information, contact a qualified spe-
cialist workshop.
i Further related subjects:
R Luggage compartment enlargement (fold-
ing down the rear bench seat)
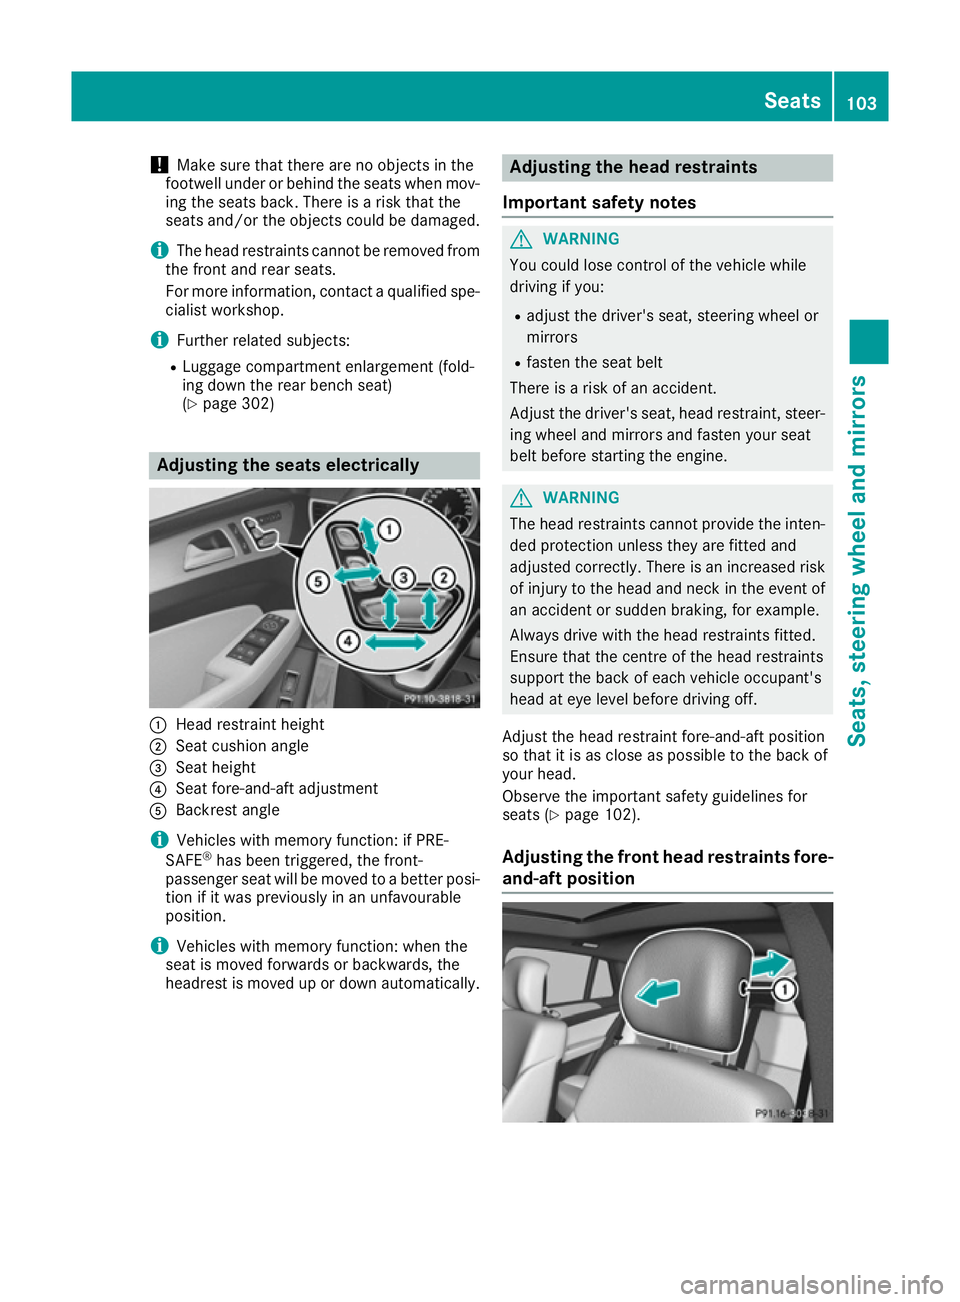
(Y page 302) Adjusting the seats electrically
:
Head restraint height
; Seat cushion angle
= Seat height
? Seat fore-and-aft adjustment
A Backrest angle
i Vehicles with memory function: if PRE-
SAFE ®
has been triggered, the front-
passenger seat will be moved to a better posi- tion if it was previously in an unfavourable
position.
i Vehicles with memory function: when the
seat is moved forwards or backwards, the
headrest is moved up or down automatically. Adjusting the head restraints
Important safety notes G
WARNING
You could lose control of the vehicle while
driving if you:
R adjust the driver's seat, steering wheel or
mirrors
R fasten the seat belt
There is a risk of an accident.
Adjust the driver's seat, head restraint, steer-
ing wheel and mirrors and fasten your seat
belt before starting the engine. G
WARNING
The head restraints cannot provide the inten-
ded protection unless they are fitted and
adjusted correctly. There is an increased risk of injury to the head and neck in the event of
an accident or sudden braking, for example.
Always drive with the head restraints fitted.
Ensure that the centre of the head restraints
support the back of each vehicle occupant's
head at eye level before driving off.
Adjust the head restraint fore-and-aft position
so that it is as close as possible to the back of
your head.
Observe the important safety guidelines for
seats (Y page 102).
Adjusting the front head restraints fore-
and-aft position Seats
103Seats, steering wheel and mirrors Z
Page 107 of 393
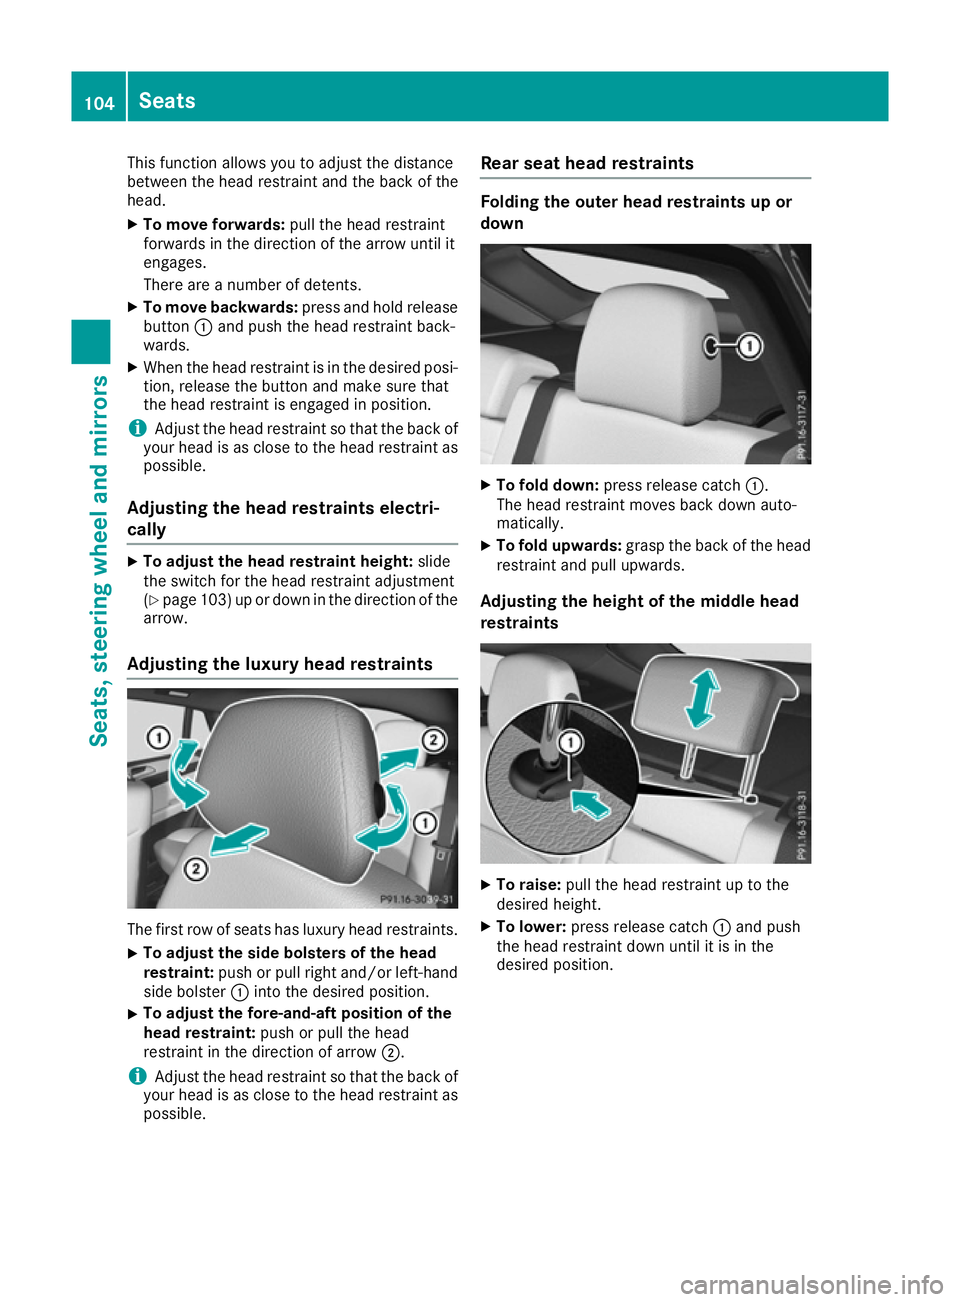
This function allows you to adjust the distance
between the head restraint and the back of the
head.
X To move forwards: pull the head restraint
forwards in the direction of the arrow until it
engages.
There are a number of detents.
X To move backwards: press and hold release
button :and push the head restraint back-
wards.
X When the head restraint is in the desired posi-
tion, release the button and make sure that
the head restraint is engaged in position.
i Adjust the head restraint so that the back of
your head is as close to the head restraint as possible.
Adjusting the head restraints electri-
cally X
To adjust the head restraint height: slide
the switch for the head restraint adjustment
(Y page 103) up or down in the direction of the
arrow.
Adjusting the luxury head restraints The first row of seats has luxury head restraints.
X To adjust the side bolsters of the head
restraint: push or pull right and/or left-hand
side bolster :into the desired position.
X To adjust the fore-and-aft position of the
head restraint:
push or pull the head
restraint in the direction of arrow ;.
i Adjust the head restraint so that the back of
your head is as close to the head restraint as possible. Rear seat head restraints Folding the outer head restraints up or
down
X
To fold down: press release catch :.
The head restraint moves back down auto-
matically.
X To fold upwards: grasp the back of the head
restraint and pull upwards.
Adjusting the height of the middle head
restraints X
To raise: pull the head restraint up to the
desired height.
X To lower: press release catch :and push
the head restraint down until it is in the
desired position. 104
SeatsSeats, steering wheel and mirrors
Page 108 of 393
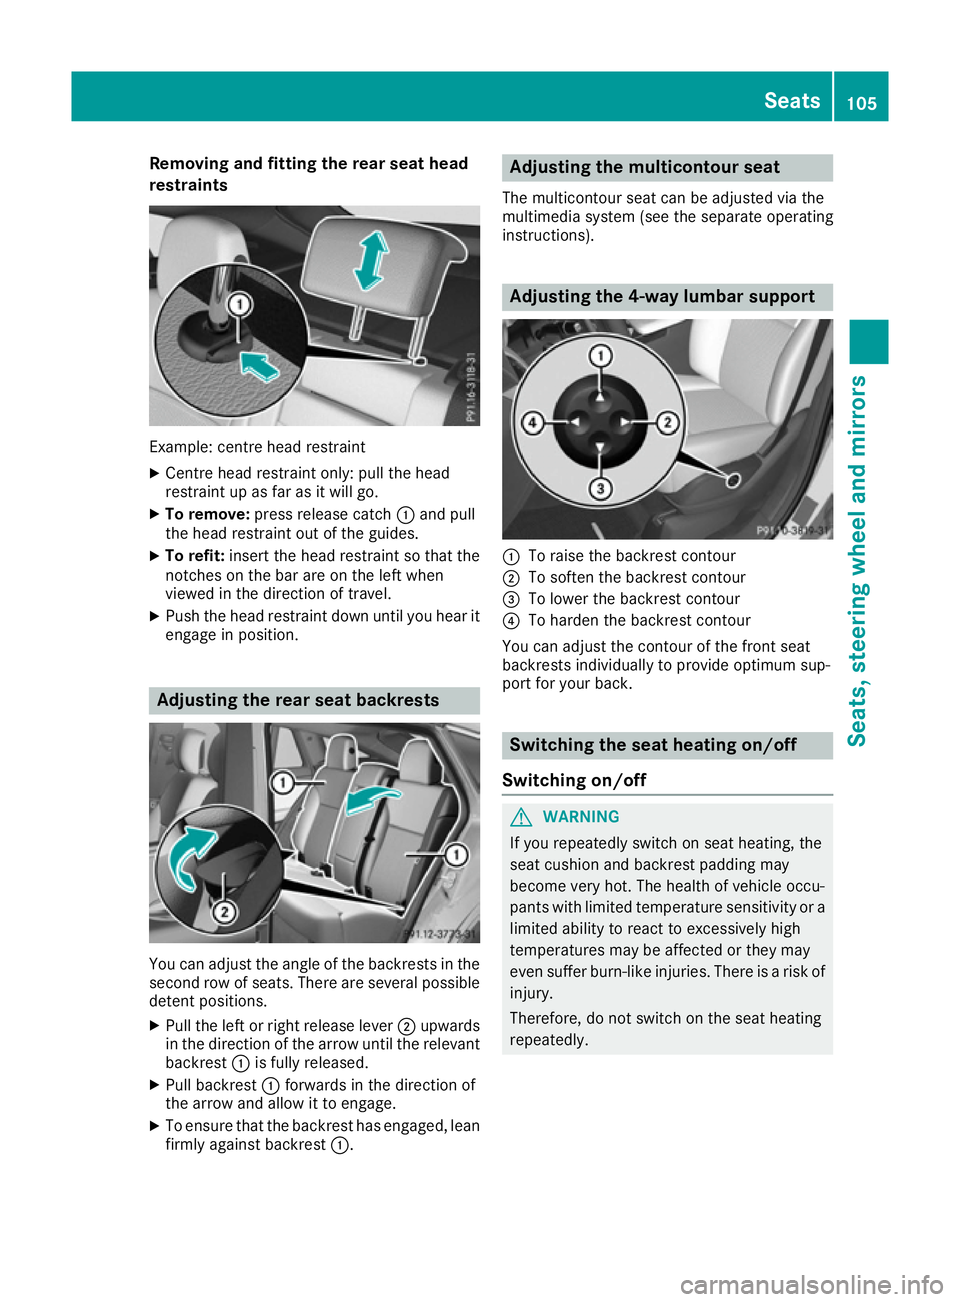
Removing and fitting the rear seat head
restraints Example: centre head restraint
X Centre head restraint only: pull the head
restraint up as far as it will go.
X To remove: press release catch :and pull
the head restraint out of the guides.
X To refit: insert the head restraint so that the
notches on the bar are on the left when
viewed in the direction of travel.
X Push the head restraint down until you hear it
engage in position. Adjusting the rear seat backrests
You can adjust the angle of the backrests in the
second row of seats. There are several possible
detent positions.
X Pull the left or right release lever ;upwards
in the direction of the arrow until the relevant
backrest :is fully released.
X Pull backrest :forwards in the direction of
the arrow and allow it to engage.
X To ensure that the backrest has engaged, lean
firmly against backrest :. Adjusting the multicontour seat
The multicontour seat can be adjusted via the
multimedia system (see the separate operating
instructions). Adjusting the 4-way lumbar support
:
To raise the backrest contour
; To soften the backrest contour
= To lower the backrest contour
? To harden the backrest contour
You can adjust the contour of the front seat
backrests individually to provide optimum sup-
port for your back. Switching the seat heating on/off
Switching on/off G
WARNING
If you repeatedly switch on seat heating, the
seat cushion and backrest padding may
become very hot. The health of vehicle occu-
pants with limited temperature sensitivity or a limited ability to react to excessively high
temperatures may be affected or they may
even suffer burn-like injuries. There is a risk of
injury.
Therefore, do not switch on the seat heating
repeatedly. Seats
105Seats, steering wheel and mirrors Z
Page 109 of 393
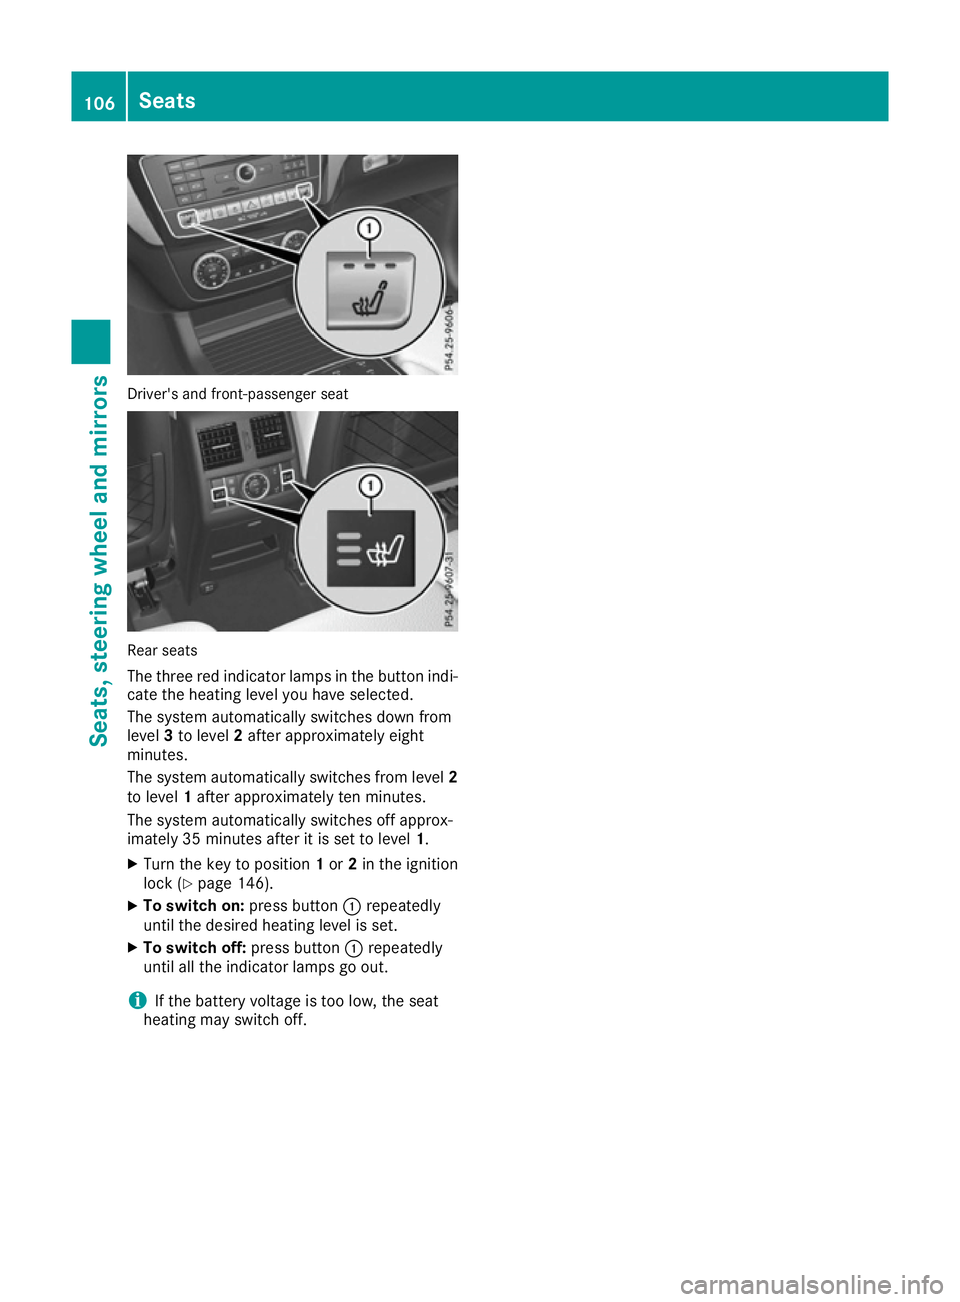
Driver's and front-passenger seat
Rear seats
The three red indicator lamps in the button indi- cate the heating level you have selected.
The system automatically switches down from
level 3to level 2after approximately eight
minutes.
The system automatically switches from level 2
to level 1after approximately ten minutes.
The system automatically switches off approx-
imately 35 minutes after it is set to level 1.
X Turn the key to position 1or 2in the ignition
lock (Y page 146).
X To switch on: press button:repeatedly
until the desired heating level is set.
X To switch off: press button:repeatedly
until all the indicator lamps go out.
i If the battery voltage is too low, the seat
heating may switch off. 106
SeatsSeats, steering
wheel and mirrors