2015 MERCEDES-BENZ GLC SUV stop start
[x] Cancel search: stop startPage 119 of 497
opened and closed when the panorama slid-
ing sunroof is closed.
Roller sunblind reversing feature The roller sunblinds are equipped with an
automatic reversing feature. If a solid object
blocks or restricts the roller blind during the
closing process, the roller blind opens again
automatically. However, the automatic
reversing feature is only an aid, not a substi-
tute for your attention when closing the roller sunblind. G
WARNING
The reversing function does not react in par-
ticular to soft, light and thin objects, e.g. small fingers. This means that the reversing featurecannot prevent someone being trapped in
these situations. There is a risk of injury.
When closing the roller sunblind, make sure
that no body parts are in the sweep.
If someone is trapped:
R release the switch immediately or
R press the switch in any direction during the
automatic closing process
The closing process is stopped.
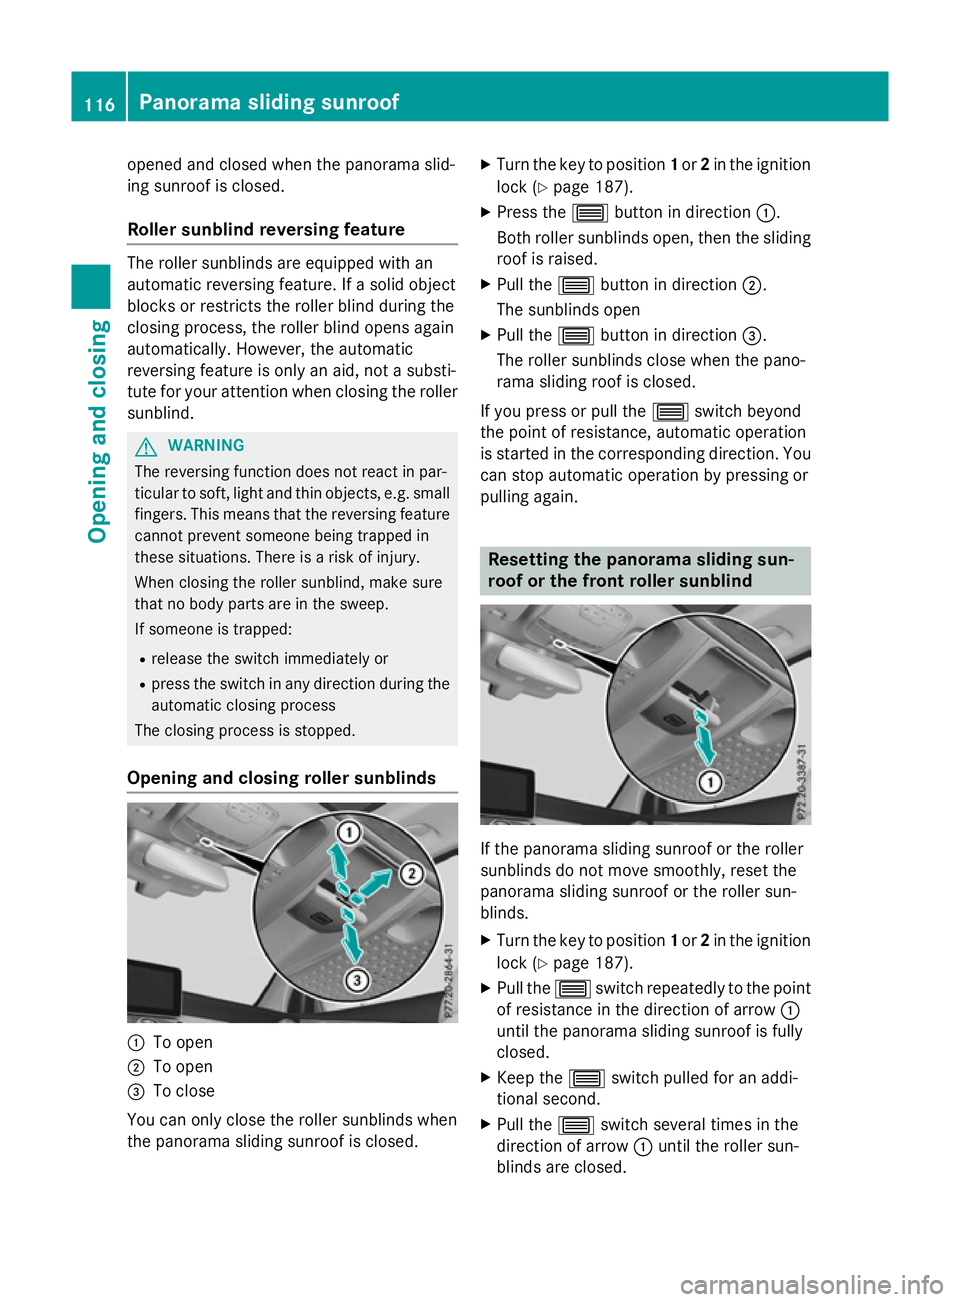
Opening and closing roller sunblinds :
To open
; To open
= To close
You can only close the roller sunblinds when
the panorama sliding sunroof is closed. X
Turn the key to position 1or 2in the ignition
lock (Y page 187).
X Press the 3button in direction :.
Both roller sunblinds open, then the sliding
roof is raised.
X Pull the 3button in direction ;.
The sunblinds open
X Pull the 3button in direction =.
The roller sunblinds close when the pano-
rama sliding roof is closed.
If you press or pull the 3switch beyond
the point of resistance, automatic operation
is started in the corresponding direction. You
can stop automatic operation by pressing or
pulling again. Resetting the panorama sliding sun-
roof or the front roller sunblind
If the panorama sliding sunroof or the roller
sunblinds do not move smoothly, reset the
panorama sliding sunroof or the roller sun-
blinds.
X Turn the key to position 1or 2in the ignition
lock (Y page 187).
X Pull the 3switch repeatedly to the point
of resistance in the direction of arrow :
until the panorama sliding sunroof is fully
closed.
X Keep the 3switch pulled for an addi-
tional second.
X Pull the 3switch several times in the
direction of arrow :until the roller sun-
blinds are closed. 116
Panorama sliding sunroofOpening and closing
Page 134 of 497
Position of the steering wheel for driv-
ing The steering wheel is moved to the previously
set position if:
R the driver's door is closed and you insert
the key into the ignition lock
R you close the driver's door when the igni-
tion is switched on
R you press the Start/Stop button once on
vehicles with KEYLESS-GO
i The steering wheel only returns to the last
set position if the driving position is stored
after the seat or steering column has been adjusted (Y page 135).
The most recent driving position of the steer-
ing wheel is stored if:
R the ignition is switched off
R the setting is stored using the memory
function (Y page 135)
Crash-responsive EASY-EXIT feature If the crash-responsive EASY-EXIT feature is
triggered in an accident, the steering column will move upwards when the driver's door is
opened or the key is removed from the igni-
tion lock. This makes it easier to exit the vehi-
cle and rescue the occupants.
The crash-responsive EASY-EXIT feature is
only operational if the EASY-EXIT/ENTRY fea- ture is activated in Audio 20/COMAND
Online; see the separate Audio 20/COMAND Online operating instructions. Mirrors
Rear-view mirror
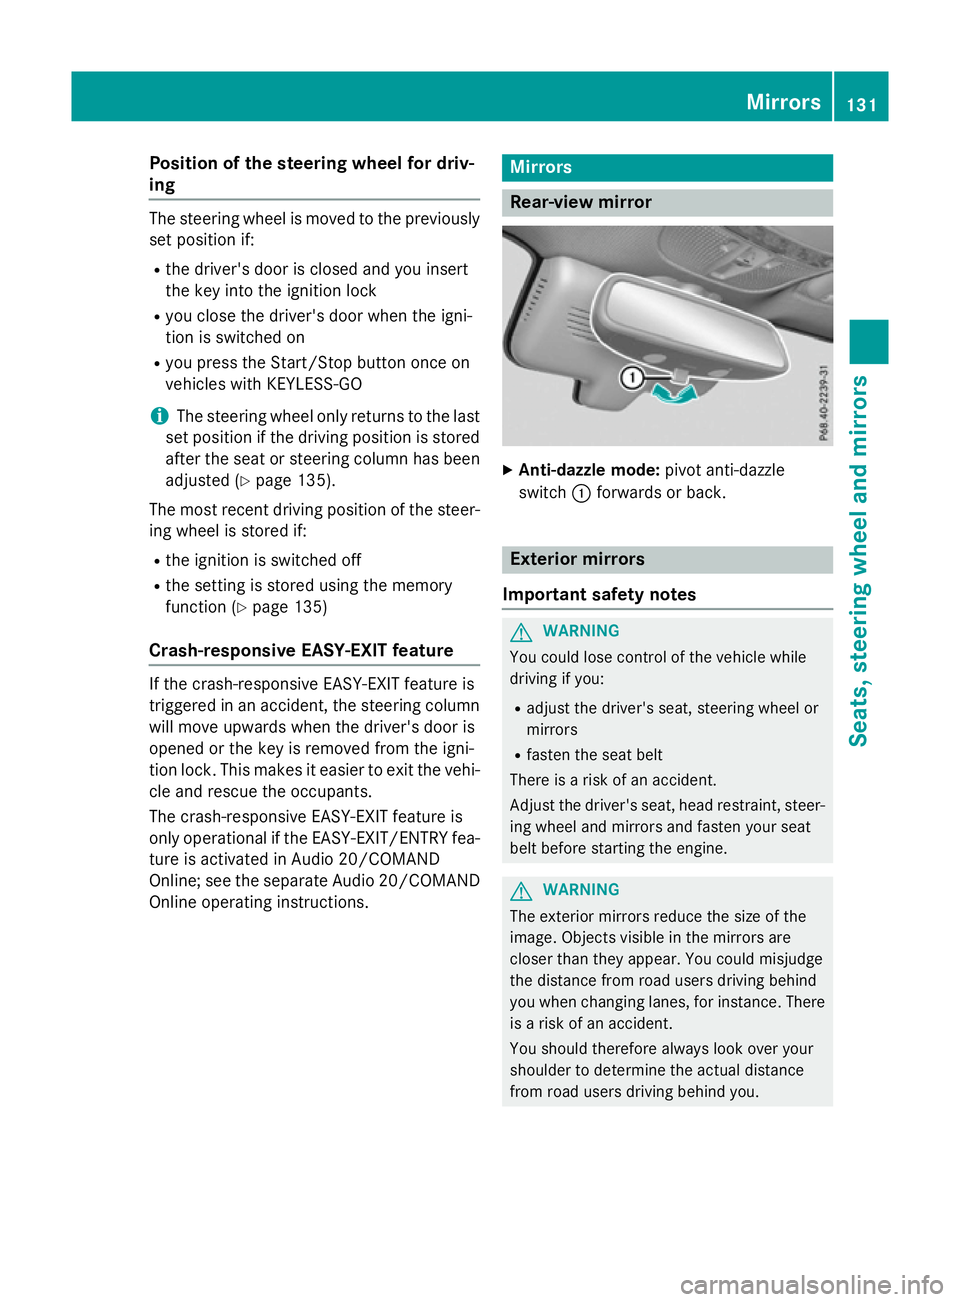
X
Anti-dazzle mode: pivot anti-dazzle
switch :forwards or back. Exterior mirrors
Important safety notes G
WARNING
You could lose control of the vehicle while
driving if you:
R adjust the driver's seat, steering wheel or
mirrors
R fasten the seat belt
There is a risk of an accident.
Adjust the driver's seat, head restraint, steer-
ing wheel and mirrors and fasten your seat
belt before starting the engine. G
WARNING
The exterior mirrors reduce the size of the
image. Objects visible in the mirrors are
closer than they appear. You could misjudge
the distance from road users driving behind
you when changing lanes, for instance. There is a risk of an accident.
You should therefore always look over your
shoulder to determine the actual distance
from road users driving behind you. Mirrors
131Seats, steering wheel and mirrors Z
Page 154 of 497
position, causing the windscreen wiper to
wipe more frequently.
If the wiper blades are worn, the windscreen
will no longer be wiped properly. This could
prevent you from observing the traffic condi-
tions. Switching the rear window wiper on/
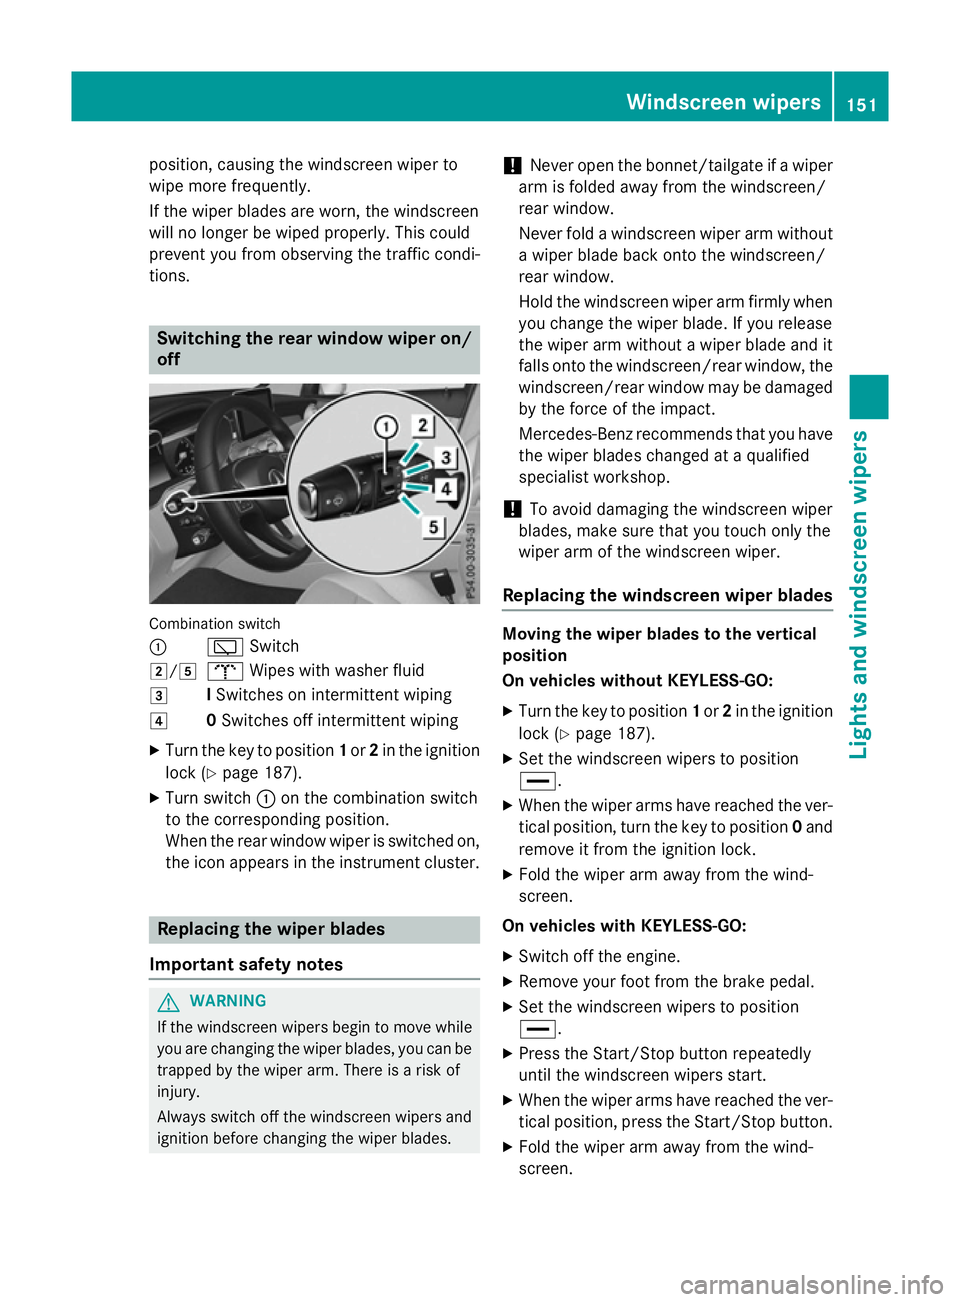
off Combination switch
:
èSwitch
2/5 bWipes with washer fluid
3 ISwitches on intermittent wiping
4 0Switches off intermittent wiping
X Turn the key to position 1or 2in the ignition
lock (Y page 187).
X Turn switch :on the combination switch
to the corresponding position.
When the rear window wiper is switched on,
the icon appears in the instrument cluster. Replacing the wiper blades
Important safety notes G
WARNING
If the windscreen wipers begin to move while
you are changing the wiper blades, you can be trapped by the wiper arm. There is a risk of
injury.
Always switch off the windscreen wipers and
ignition before changing the wiper blades. !
Never open the bonnet/tailgate if a wiper
arm is folded away from the windscreen/
rear window.
Never fold a windscreen wiper arm without a wiper blade back onto the windscreen/
rear window.
Hold the windscreen wiper arm firmly when
you change the wiper blade. If you release
the wiper arm without a wiper blade and it
falls onto the windscreen/rear window, the windscreen/rear window may be damaged
by the force of the impact.
Mercedes-Benz recommends that you have the wiper blades changed at a qualified
specialist workshop.
! To avoid damaging the windscreen wiper
blades, make sure that you touch only the
wiper arm of the windscreen wiper.
Replacing the windscreen wiper blades Moving the wiper blades to the vertical
position
On vehicles without KEYLESS-GO:
X Turn the key to position 1or 2in the ignition
lock (Y page 187).
X Set the windscreen wipers to position
°.
X When the wiper arms have reached the ver-
tical position, turn the key to position 0and
remove it from the ignition lock.
X Fold the wiper arm away from the wind-
screen.
On vehicles with KEYLESS-GO:
X Switch off the engine.
X Remove your foot from the brake pedal.
X Set the windscreen wipers to position
°.
X Press the Start/Stop button repeatedly
until the windscreen wipers start.
X When the wiper arms have reached the ver-
tical position, press the Start/Stop button.
X Fold the wiper arm away from the wind-
screen. Windscreen wipers
151Lights and windscreen wipers Z
Page 157 of 497
Problems with the windscreen wipers
Problem
Possible causes/consequences and
M
MSolutions The windscreen wipers
are jammed. Leaves or snow, for example, may be obstructing the windscreen
wiper movement. The wiper motor has been deactivated.
X For safety reasons, you should remove the key from the ignition
lock.
or
X Switch off the engine using the Start/Stop button and open the
driver's door.
X Remove the cause of the obstruction.
X Switch the windscreen wipers back on. The windscreen wipers
fail completely. The windscreen wiper drive is malfunctioning.
X Select another wiper speed on the combination switch.
X Have the windscreen wipers checked at a qualified specialist
workshop. The windscreen washer
fluid from the spray
nozzles no longer hits
the centre of the wind-
screen. The spray nozzles are misaligned.
X Have the spray nozzles adjusted at a qualified specialist work-
shop. 154
Windscreen wipersLights and windscreen wipers
Page 162 of 497
DYNAMIC SELECT switch
You can choose between various drive pro-
grams with the DYNAMIC SELECT switch
(Y page 195).
If you have selected drive program E:
R the cooling output is reduced when cooling
R when heating, the electrical heater booster
is deactivated and heat output is reduced
as a result
R the rear window heating running time is
reduced
If you have selected drive program C,Sor S+ ,
the current climate settings are maintained.
ECO start/stop function During automatic engine switch-off, the cli-
mate control only operates at a reduced capa- city. If you require the full climate control out-
put, you can switch off the ECO start/stop
function by pressing the ECO button
(Y page 193). Overview of climate cont
rol systems
159Climate control
Page 165 of 497
mode. If necessary, activate this function
(Y
page 162).
R Set the temperature to 22 †.
R Only use the "Windscreen demisting" func-
tion briefly until the windscreen is clear
again.
R Only use air-recirculation mode briefly, e.g.
if there are unpleasant outside odours or
when in a tunnel. The windows could oth-
erwise mist up as no fresh air is drawn into the vehicle in air-recirculation mode.
R Use the residual heat function if you want to
heat or ventilate the vehicle interior when
the ignition is switched off. The residual
heat function can only be activated or deac-
tivated with the ignition switched off. The
residual heat function is deactivated when
the ignition is switched on.
DYNAMIC SELECT switch You can choose between various drive pro-
grams with the DYNAMIC SELECT switch
(Y
page 195).
If you have selected drive program E:
R the cooling output is reduced when cooling
R when heating, the electrical heater booster
is deactivated and heat output is reduced
as a result
R the rear window heating running time is
reduced
If you have selected drive program C,Sor S+,
the current climate settings are maintained.
ECO start/stop function During automatic engine switch-off, the cli-
mate control only operates at a reduced capa-
city. If you require the full climate control out-
put, you can switch off the ECO start/stop
function by pressing the ECO button
(Y page 193). Operating the climate control system
Switching the climate control on/off
General notes When the climate control is switched off, the
air supply and air circulation are also
switched off. The windows could mist up.
Therefore, only switch off climate control
briefly.
Switch on climate control primarily using the à rocker switch (Y page 164).
Activating/deactivating X
Turn the key to position 2in the ignition
lock (Y page 187).
X To switch on: press thetor!
rocker switch up or down.
The Audio 20 or COMAND Online climate
control menu opens.
X Switch on climate control via the air-condi-
tioning function bar; see the separate oper- ating instructions.
or
X Set the airflow to level 1 or higher using the
H rocker switch.
X To switch off: press thetor!
rocker switch up or down.
The Audio 20 or COMAND Online climate
control menu opens.
X Switch off climate control via the air-con-
ditioning function bar; see the separate
operating instructions.
or
X Set the airflow to level 0 using the H
rocker switch. Activating/deactivating cooling with
air dehumidification
General notes If you deactivate the "Cooling with air dehu-
midification" function, the air inside the vehi- cle will not be cooled. The air inside the vehi- 162
Operating the climate control systemClimate control
Page 174 of 497
When opening, make sure that nobody is
touching the side window. If someone
becomes trapped, immediately press
the W switch in the door to stop the move-
ment of the side windows. To continue closing
the side window, pull on the Wswitch.
X Convenience closing feature (vehicles
with a panorama sliding sunroof): press
and hold the grocker switch up or
down until the side windows and the pan-
orama sliding sunroof start to close auto-
matically.
The indicator lamp above the grocker
switch lights up. Air-recirculation mode is
activated.
X Convenience closing feature (vehicles
without a sliding sunroof/panorama
sliding sunroof): press and hold the g
rocker switch up or down until the side win- dows start to close automatically.
The indicator lamp above the grocker
switch lights up. Air-recirculation mode is
activated.
If you open the side windows or the pano-
rama sliding sunroof manually after closing
with the convenience closing feature, they
will remain in this position when opened
using the convenience opening feature.
If parts of the body are in the closing area
during convenience closing, proceed as fol-
lows:
X Press the Wbutton to stop the side win-
dows.
The side windows stop.
X To then open the side windows, press the
W button again.
X Only vehicles with panorama sliding
sunroof: press the 3button to stop the
panorama sliding sunroof.
The panorama sliding sunroof stops.
X To then open the panorama sliding sunroof,
pull back on the 3button. Notes on the automatic reversing feature for:
R the side windows (Y page 110)
R the panorama sliding sunroof
(Y page 114)
X Convenience opening feature (vehicles
with a panorama sliding sunroof): press
and hold the grocker switch up or
down until the side windows and the pan-
orama sliding sunroof start to open auto-
matically.
The indicator lamp above the grocker
switch goes out. Air-recirculation mode is
deactivated.
X Convenience opening feature (vehicles
without a panorama sliding sunroof):
press and hold the grocker switch up
or down until the side windows start to
open automatically.
The indicator lamp above the grocker
switch goes out. Air-recirculation mode is
deactivated. Switching the residual heat on/off
General notes The residual heat function is only available
with THERMOTRONIC automatic climate con- trol and THERMATIC automatic climate con-
trol with auxiliary heating.
When the engine is switched off, it is possible
to make use of the residual heat of the engine to continue heating or ventilating the front
compartment of the vehicle for approximately
30 minutes. The heating or ventilation time
depends on the set interior temperature.
Switching on/off X
Turn the key to position 0in the ignition
lock or remove it (Y page 187).
X To switch on: press the!rocker
switch up or down.
The indicator lamp above the !rocker
switch lights up. Operating the climate control system
171Climate control Z
Page 190 of 497
for example, the power steering and the brake
boosting effect. You will require considerably
more effort to steer and brake. There is a risk of an accident.
Do not switch off the ignition while driving. G
WARNING
If the parking brake has not been fully
released when driving, the parking brake can:
R overheat and cause a fire
R lose its hold function.
There is a risk of fire and an accident. Release
the parking brake fully before driving off.
! Do not warm up the engine when the vehi-
cle is stationary. Drive off immediately.
Avoid high engine speeds and driving at full throttle until the engine has reached its
operating temperature.
Only shift the automatic transmission to
the desired drive position when the vehicle is stationary.
Where possible, avoid spinning the drive
wheels when pulling away on slippery
roads. You could otherwise damage the
drive train.
Observe the important safety notes for PLUG-
IN HYBRID vehicles (Y page 44). Key positions
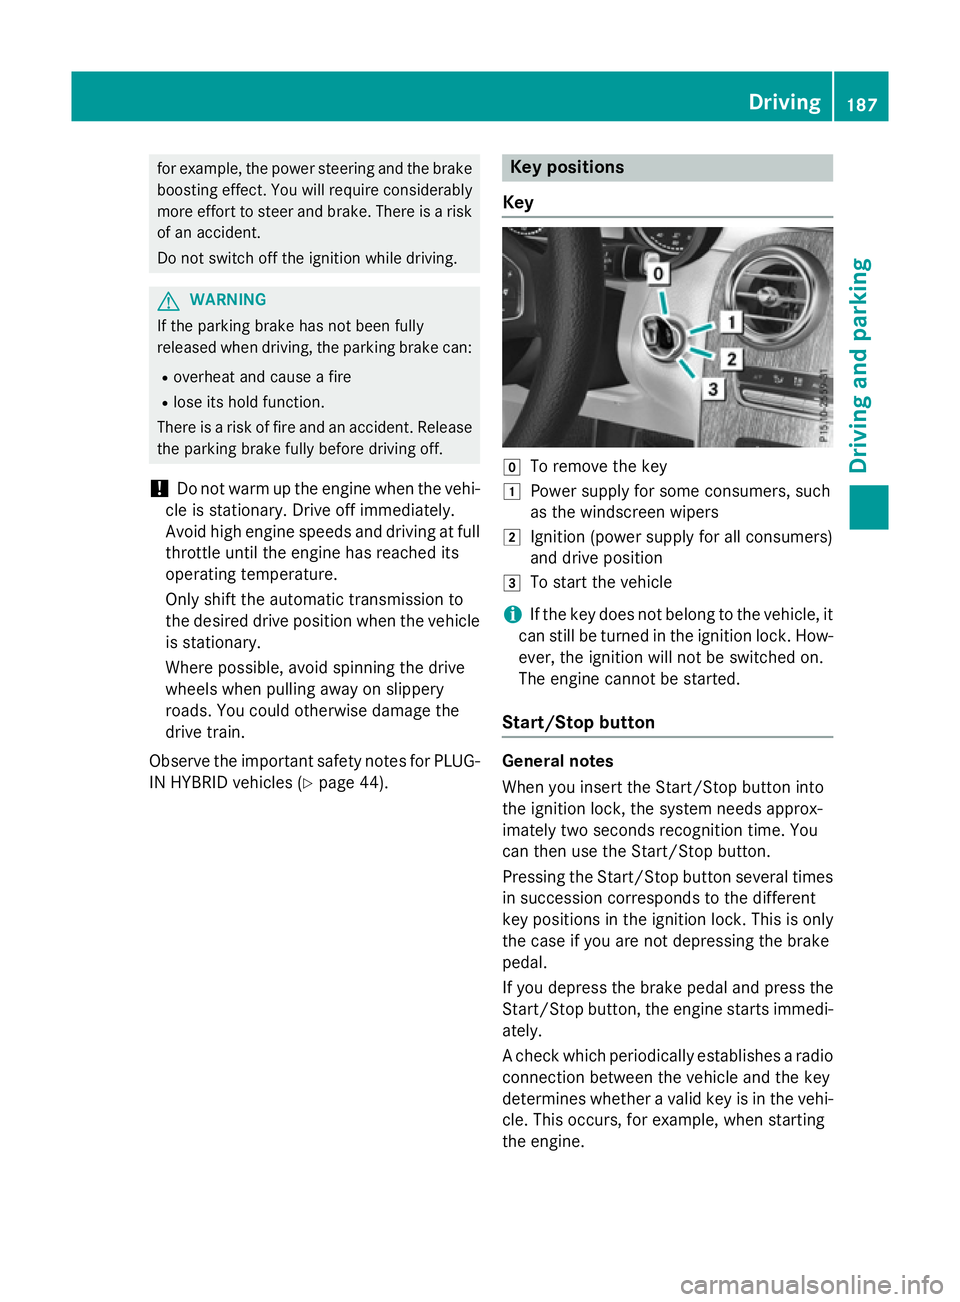
Key g
To remove the key
1 Power supply for some consumers, such
as the windscreen wipers
2 Ignition (power supply for all consumers)
and drive position
3 To start the vehicle
i If the key does not belong to the vehicle, it
can still be turned in the ignition lock. How-
ever, the ignition will not be switched on.
The engine cannot be started.
Start/Stop button General notes
When you insert the Start/Stop button into
the ignition lock, the system needs approx-
imately two seconds recognition time. You
can then use the Start/Stop button.
Pressing the Start/Stop button several times
in succession corresponds to the different
key positions in the ignition lock. This is only
the case if you are not depressing the brake
pedal.
If you depress the brake pedal and press the
Start/Stop button, the engine starts immedi-
ately.
A check which periodically establishes a radio connection between the vehicle and the key
determines whether a valid key is in the vehi-
cle. This occurs, for example, when starting
the engine. Driving
187Driving and parking Z