2015 MERCEDES-BENZ GLC SUV lock
[x] Cancel search: lockPage 397 of 497
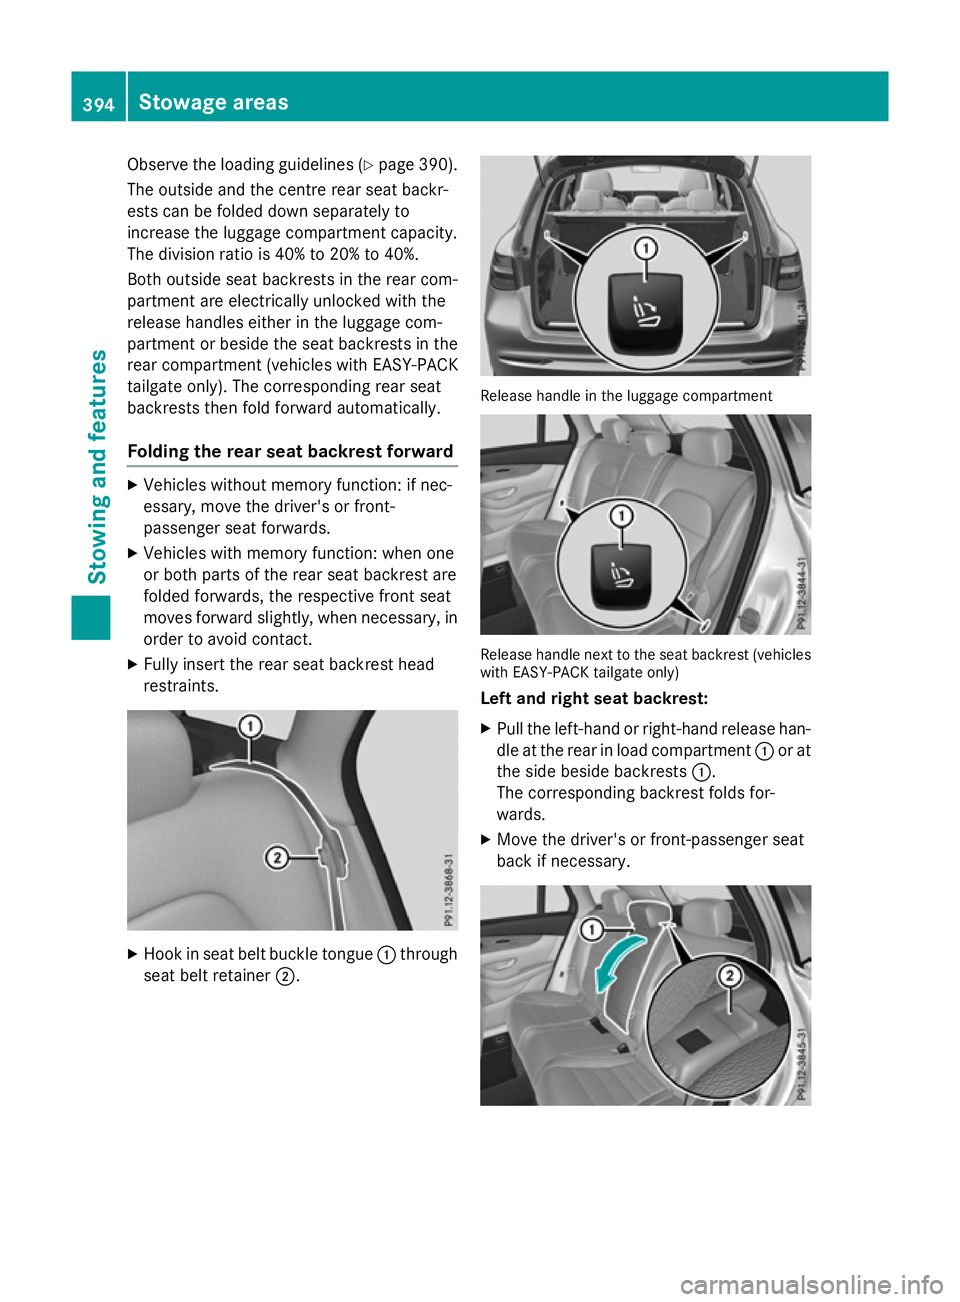
Observe the loading guidelines (Y
page 390).
The outside and the centre rear seat backr-
ests can be folded down separately to
increase the luggage compartment capacity.
The division ratio is 40% to 20% to 40%.
Both outside seat backrests in the rear com-
partment are electrically unlocked with the
release handles either in the luggage com-
partment or beside the seat backrests in the
rear compartment (vehicles with EASY-PACK
tailgate only). The corresponding rear seat
backrests then fold forward automatically.
Folding the rear seat backrest forward X
Vehicles without memory function: if nec-
essary, move the driver's or front-
passenger seat forwards.
X Vehicles with memory function: when one
or both parts of the rear seat backrest are
folded forwards, the respective front seat
moves forward slightly, when necessary, in order to avoid contact.
X Fully insert the rear seat backrest head
restraints. X
Hook in seat belt buckle tongue :through
seat belt retainer ;. Release handle in the luggage compartment
Release handle next to the seat backrest (vehicles
with EASY-PACK tailgate only)
Left and right seat backrest:
X Pull the left-hand or right-hand release han-
dle at the rear in load compartment :or at
the side beside backrests :.
The corresponding backrest folds for-
wards.
X Move the driver's or front-passenger seat
back if necessary. 394
Stowage areasStowing and features
Page 398 of 497
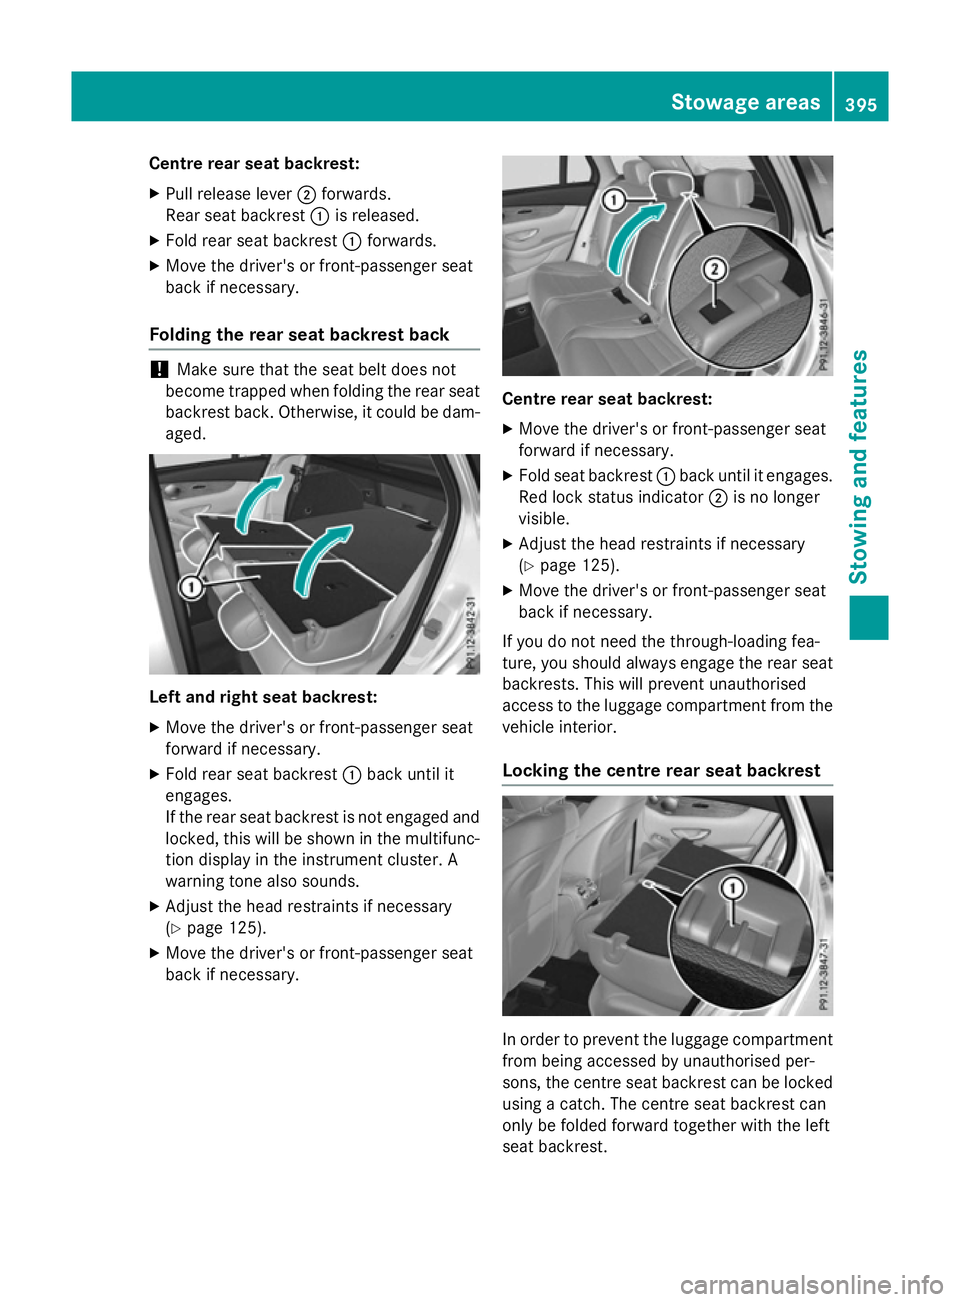
Centre rear seat backrest:
X Pull release lever ;forwards.
Rear seat backrest :is released.
X Fold rear seat backrest :forwards.
X Move the driver's or front-passenger seat
back if necessary.
Folding the rear seat backrest back !
Make sure that the seat belt does not
become trapped when folding the rear seat backrest back. Otherwise, it could be dam- aged. Left and right seat backrest:
X Move the driver's or front-passenger seat
forward if necessary.
X Fold rear seat backrest :back until it
engages.
If the rear seat backrest is not engaged and locked, this will be shown in the multifunc-
tion display in the instrument cluster. A
warning tone also sounds.
X Adjust the head restraints if necessary
(Y page 125).
X Move the driver's or front-passenger seat
back if necessary. Centre rear seat backrest:
X Move the driver's or front-passenger seat
forward if necessary.
X Fold seat backrest :back until it engages.
Red lock status indicator ;is no longer
visible.
X Adjust the head restraints if necessary
(Y page 125).
X Move the driver's or front-passenger seat
back if necessary.
If you do not need the through-loading fea-
ture, you should always engage the rear seat
backrests. This will prevent unauthorised
access to the luggage compartment from the
vehicle interior.
Locking the centre rear seat backrest In order to prevent the luggage compartment
from being accessed by unauthorised per-
sons, the centre seat backrest can be locked using a catch. The centre seat backrest can
only be folded forward together with the left
seat backrest. Stowage areas
395Stowing and features Z
Page 399 of 497
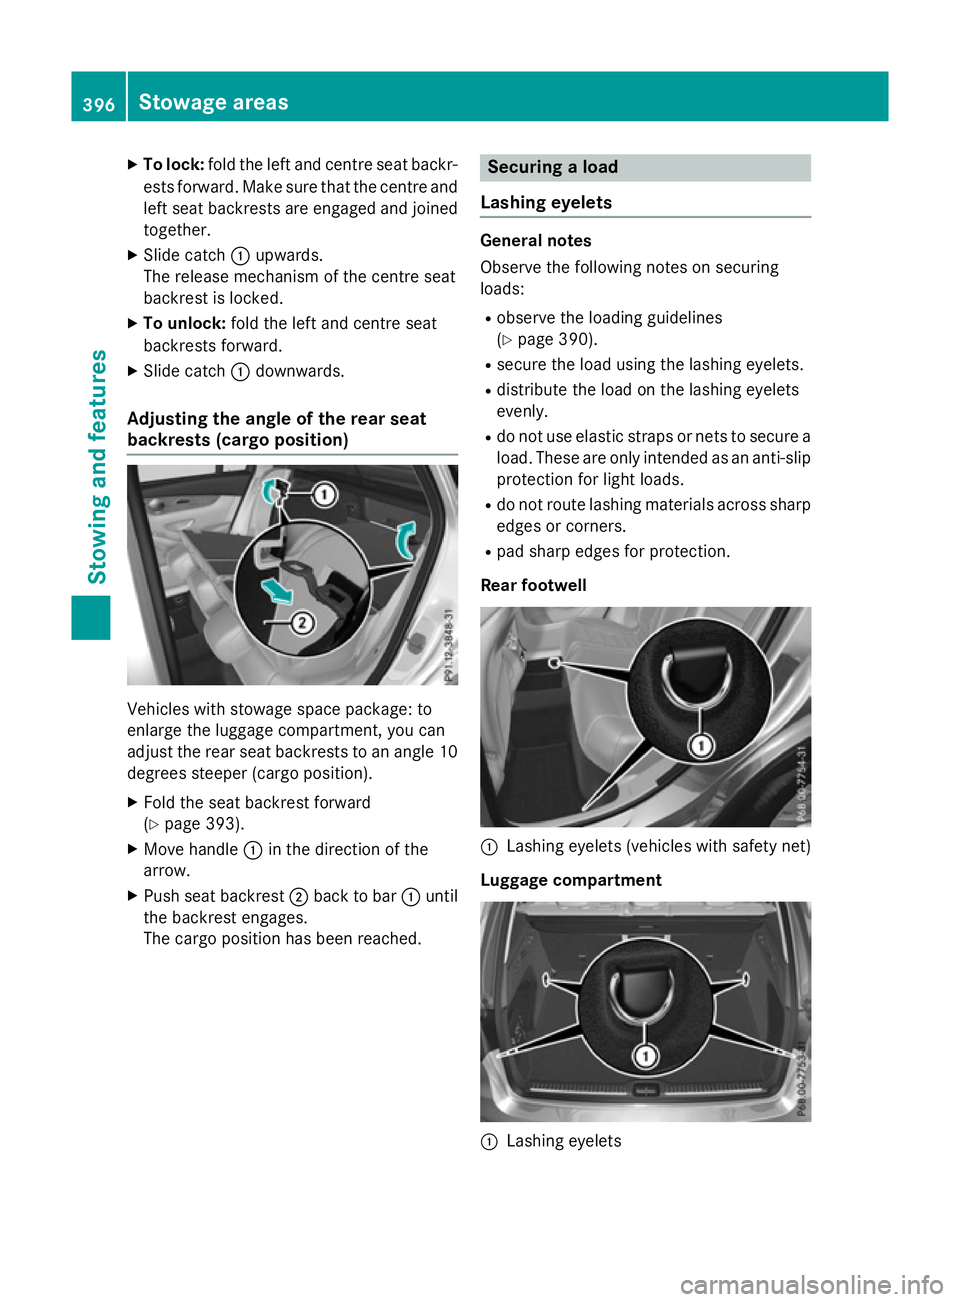
X
To lock: fold the left and centre seat backr-
ests forward. Make sure that the centre and
left seat backrests are engaged and joined together.
X Slide catch :upwards.
The release mechanism of the centre seat
backrest is locked.
X To unlock: fold the left and centre seat
backrests forward.
X Slide catch :downwards.
Adjusting the angle of the rear seat
backrests (cargo position) Vehicles with stowage space package: to
enlarge the luggage compartment, you can
adjust the rear seat backrests to an angle 10 degrees steeper (cargo position).
X Fold the seat backrest forward
(Y page 393).
X Move handle :in the direction of the
arrow.
X Push seat backrest ;back to bar :until
the backrest engages.
The cargo position has been reached. Securing a load
Lashing eyelets General notes
Observe the following notes on securing
loads:
R observe the loading guidelines
(Y page 390).
R secure the load using the lashing eyelets.
R distribute the load on the lashing eyelets
evenly.
R do not use elastic straps or nets to secure a
load. These are only intended as an anti-slip protection for light loads.
R do not route lashing materials across sharp
edges or corners.
R pad sharp edges for protection.
Rear footwell :
Lashing eyelets (vehicles with safety net)
Luggage compartment :
Lashing eyelets 396
Stowage areasSto
wing an d features
Page 405 of 497
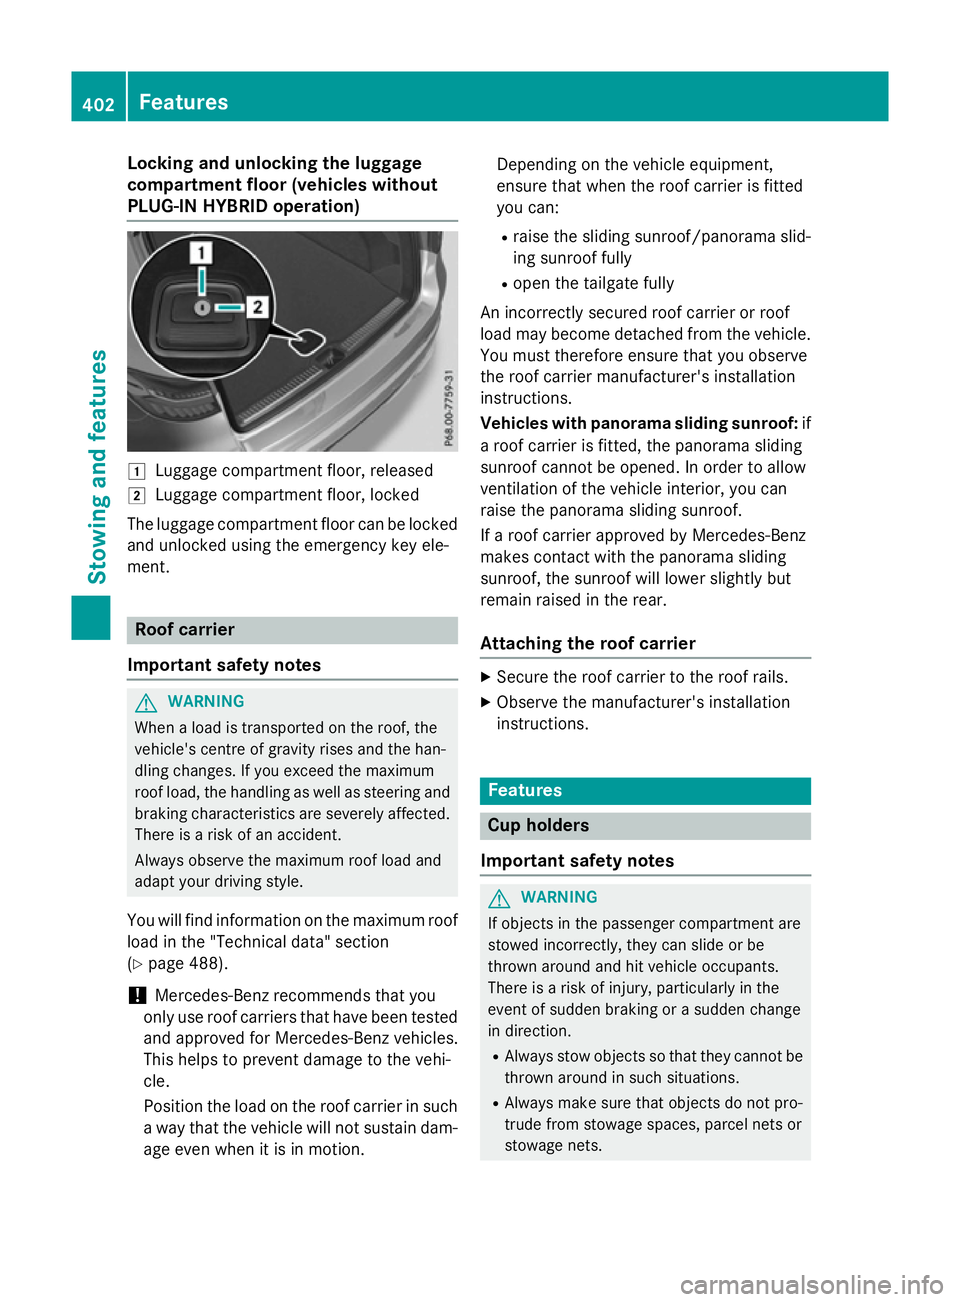
Locking and unlocking the luggage
compartment floor (vehicles without
PLUG-IN HYBRID operation) 1
Luggage compartment floor, released
2 Luggage compartment floor, locked
The luggage compartment floor can be locked
and unlocked using the emergency key ele-
ment. Roof carrier
Important safety notes G
WARNING
When a load is transported on the roof, the
vehicle's centre of gravity rises and the han-
dling changes. If you exceed the maximum
roof load, the handling as well as steering and braking characteristics are severely affected.
There is a risk of an accident.
Always observe the maximum roof load and
adapt your driving style.
You will find information on the maximum roof
load in the "Technical data" section
(Y page 488).
! Mercedes-Benz recommends that you
only use roof carriers that have been tested
and approved for Mercedes-Benz vehicles.
This helps to prevent damage to the vehi-
cle.
Position the load on the roof carrier in such
a way that the vehicle will not sustain dam-
age even when it is in motion. Depending on the vehicle equipment,
ensure that when the roof carrier is fitted
you can:
R raise the sliding sunroof/panorama slid-
ing sunroof fully
R open the tailgate fully
An incorrectly secured roof carrier or roof
load may become detached from the vehicle. You must therefore ensure that you observe
the roof carrier manufacturer's installation
instructions.
Vehicles with panorama sliding sunroof: if
a roof carrier is fitted, the panorama sliding
sunroof cannot be opened. In order to allow
ventilation of the vehicle interior, you can
raise the panorama sliding sunroof.
If a roof carrier approved by Mercedes-Benz
makes contact with the panorama sliding
sunroof, the sunroof will lower slightly but
remain raised in the rear.
Attaching the roof carrier X
Secure the roof carrier to the roof rails.
X Observe the manufacturer's installation
instructions. Features
Cup holders
Important safety notes G
WARNING
If objects in the passenger compartment are
stowed incorrectly, they can slide or be
thrown around and hit vehicle occupants.
There is a risk of injury, particularly in the
event of sudden braking or a sudden change
in direction.
R Always stow objects so that they cannot be
thrown around in such situations.
R Always make sure that objects do not pro-
trude from stowage spaces, parcel nets or
stowage nets. 402
FeaturesStowing and features
Page 406 of 497
R
Close the lockable stowage spaces before
starting a journey.
R Stow and secure objects that are heavy,
hard, pointed, sharp-edged, fragile or too
large in the luggage compartment.
! Only use the cup holders for containers of
the right size and which have lids. The
drinks could otherwise spill.
! Do not expose drinks bottles in the cup
holder in the centre console to continuous,
strong and direct sunlight. The passenger
compartment in the area of the centre con- sole can otherwise be damaged by the con-
centrated and reflected sunlight.
Observe the loading guidelines (Y page 390).
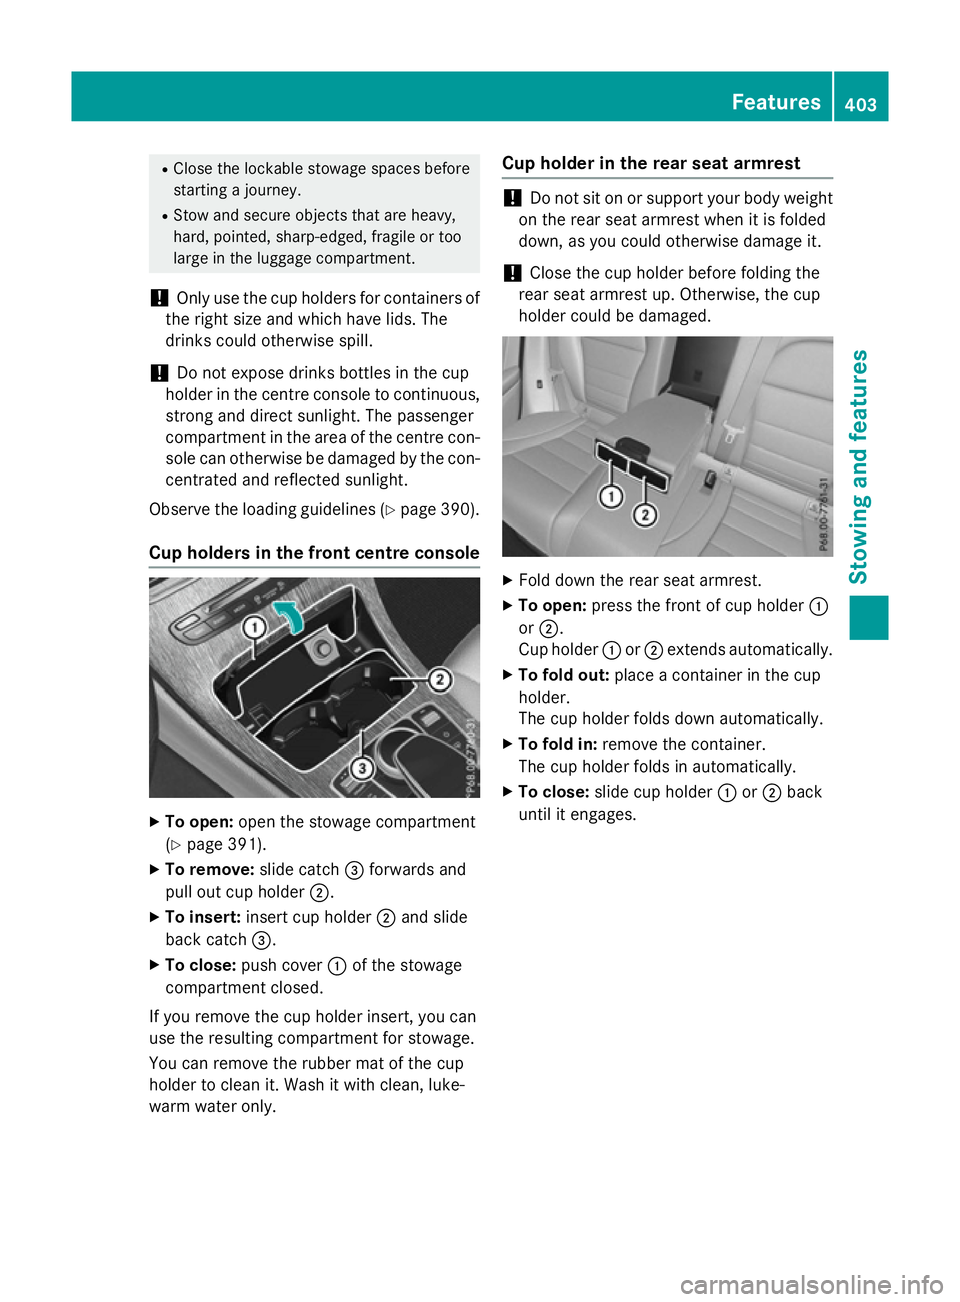
Cup holders in the front centre console X
To open: open the stowage compartment
(Y page 391).
X To remove: slide catch=forwards and
pull out cup holder ;.
X To insert: insert cup holder ;and slide
back catch =.
X To close: push cover :of the stowage
compartment closed.
If you remove the cup holder insert, you can
use the resulting compartment for stowage.
You can remove the rubber mat of the cup
holder to clean it. Wash it with clean, luke-
warm water only. Cup holder in the rear seat armrest !
Do not sit on or support your body weight
on the rear seat armrest when it is folded
down, as you could otherwise damage it.
! Close the cup holder before folding the
rear seat armrest up. Otherwise, the cup
holder could be damaged. X
Fold down the rear seat armrest.
X To open: press the front of cup holder :
or ;.
Cup holder :or; extends automatically.
X To fold out: place a container in the cup
holder.
The cup holder folds down automatically.
X To fold in: remove the container.
The cup holder folds in automatically.
X To close: slide cup holder :or; back
until it engages. Features
403Stowing and features Z
Page 408 of 497
X
To refit the insert: press insert?into the
holder until it engages.
X To close: close the cover of the ashtray.
X Push cover :of the stowage compart-
ment closed.
i You can remove the ashtray insert and
use the resulting compartment for stow-
age.
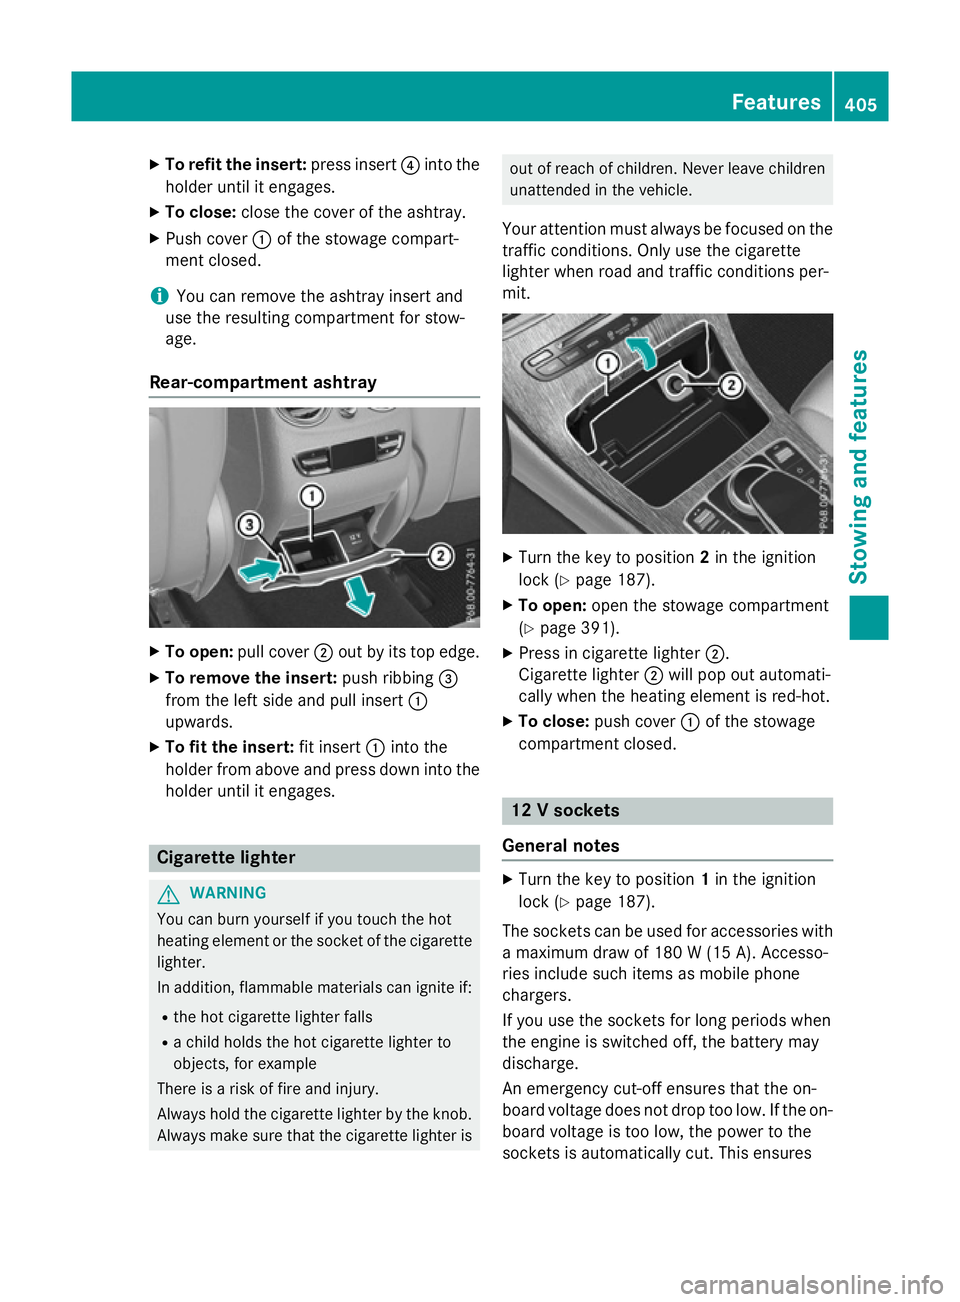
Rear-compartment ashtray X
To open: pull cover ;out by its top edge.
X To remove the insert: push ribbing=
from the left side and pull insert :
upwards.
X To fit the insert: fit insert:into the
holder from above and press down into the
holder until it engages. Cigarette lighter
G
WARNING
You can burn yourself if you touch the hot
heating element or the socket of the cigarette lighter.
In addition, flammable materials can ignite if:
R the hot cigarette lighter falls
R a child holds the hot cigarette lighter to
objects, for example
There is a risk of fire and injury.
Always hold the cigarette lighter by the knob.
Always make sure that the cigarette lighter is out of reach of children. Never leave children
unattended in the vehicle.
Your attention must always be focused on the traffic conditions. Only use the cigarette
lighter when road and traffic conditions per-
mit. X
Turn the key to position 2in the ignition
lock (Y page 187).
X To open: open the stowage compartment
(Y page 391).
X Press in cigarette lighter ;.
Cigarette lighter ;will pop out automati-
cally when the heating element is red-hot.
X To close: push cover :of the stowage
compartment closed. 12 V sockets
General notes X
Turn the key to position 1in the ignition
lock (Y page 187).
The sockets can be used for accessories with a maximum draw of 180 W(15 A). Accesso-
ries include such items as mobile phone
chargers.
If you use the sockets for long periods when
the engine is switched off, the battery may
discharge.
An emergency cut-off ensures that the on-
board voltage does not drop too low. If the on-
board voltage is too low, the power to the
sockets is automatically cut. This ensures Features
405Stowing and fea tures Z
Page 409 of 497
that there is sufficient power to start the
engine.
If you have connected a device to the 12 V
socket, leave the cover of the stowage com-
partment open. This prevents the cover from
being blocked.
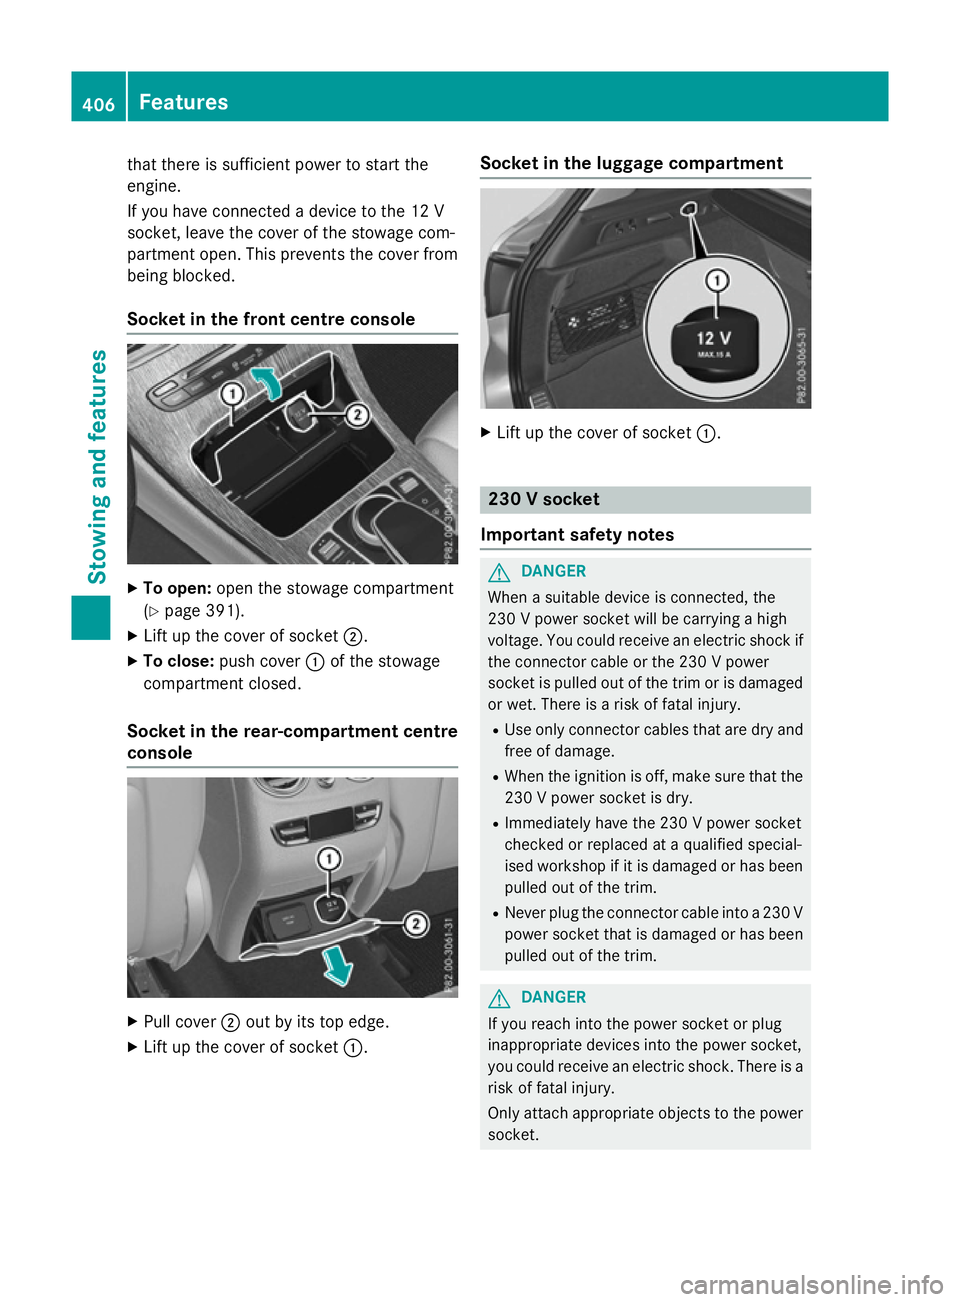
Socket in the front centre console X
To open: open the stowage compartment
(Y page 391).
X Lift up the cover of socket ;.
X To close: push cover :of the stowage
compartment closed.
Socket in the rear-compartment centre
console X
Pull cover ;out by its top edge.
X Lift up the cover of socket :.Socket in the luggage compartment
X
Lift up the cover of socket :. 230 V socket
Important safety notes G
DANGER
When a suitable device is connected, the
230 V powe r socket will be carrying a high
voltage. You could receive an electric shock if the connector cable or the 230 V power
socket is pulled out of the trim or is damaged
or wet. There is a risk of fatal injury.
R Use only connector cables that are dry and
free of damage.
R When the ignition is off, make sure that the
230 V powe r socket is dry.
R Immediately have the 230 V power socket
checked or replaced at a qualified special-
ised workshop if it is damaged or has been
pulled out of the trim.
R Never plug the connector cable into a 230 V
power socket that is damaged or has beenpulled out of the trim. G
DANGER
If you reach into the power socket or plug
inappropriate devices into the power socket,
you could receive an electric shock. There is a risk of fatal injury.
Only attach appropriate objects to the power socket. 406
FeaturesStowing and features
Page 412 of 497
separate COMAND Online operating instruc-
tions. Mercedes-Benz Contact
General notes Mercedes-Benz Contact offers fast assis-
tance at the touch of a button – around the
clock. For any queries about the vehicle,
Mercedes-Benz Contact offers a fast and easy connecting call to the Mercedes-Benz Cus-
tomer Centre. You can, for example, request
an appointment or call for help in the event of
a breakdown.
Voice output is not available in this case.
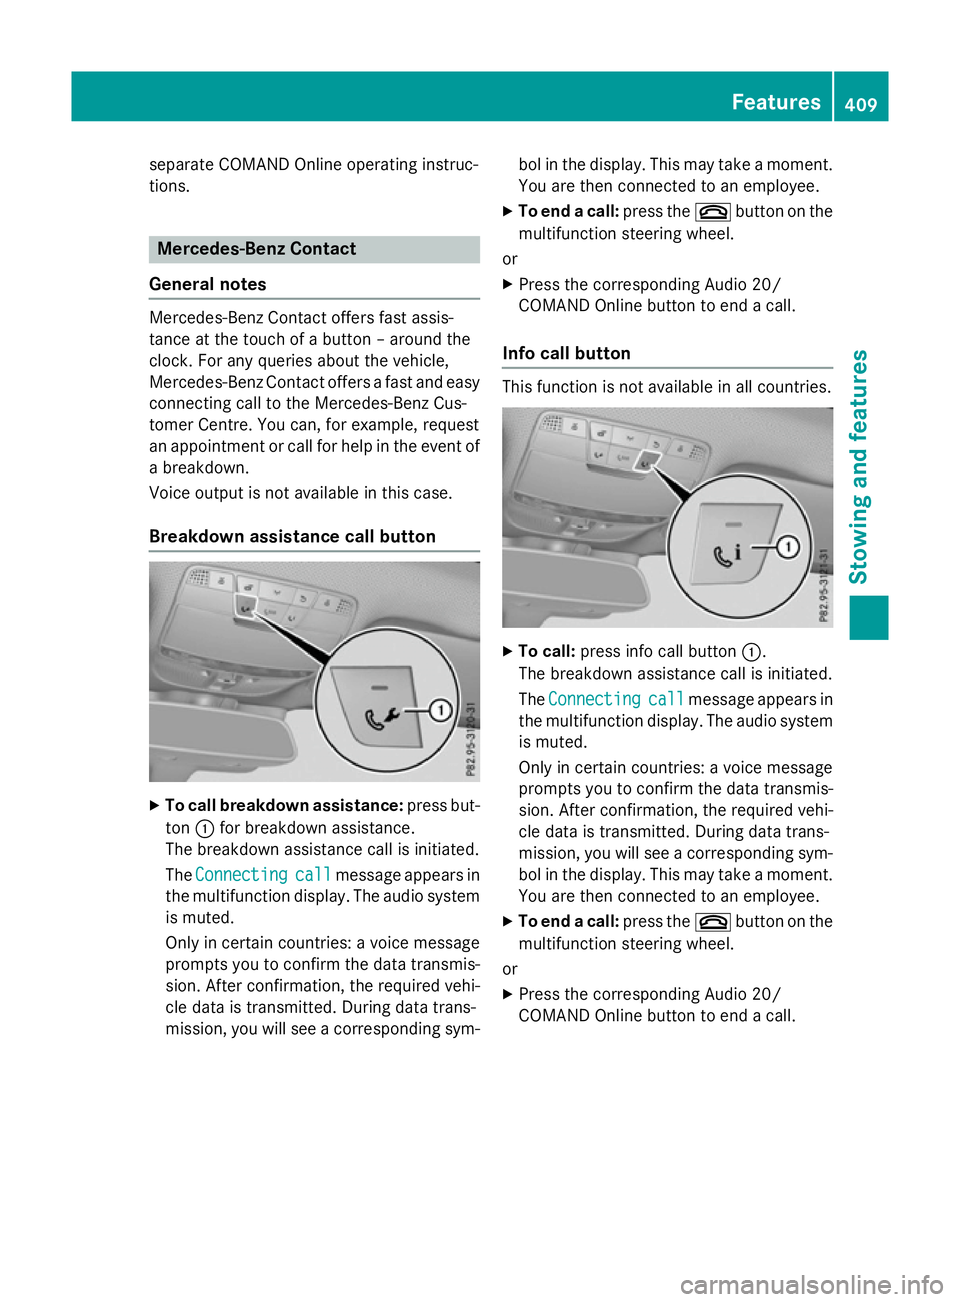
Breakdown assistance call button X
To call breakdown assistance: press but-
ton :for breakdown assistance.
The breakdown assistance call is initiated.
The Connecting Connecting call
callmessage appears in
the multifunction display. The audio system is muted.
Only in certain countries: a voice message
prompts you to confirm the data transmis-
sion. After confirmation, the required vehi-
cle data is transmitted. During data trans-
mission, you will see a corresponding sym- bol in the display. This may take a moment.
You are then connected to an employee.
X To end a call: press the~button on the
multifunction steering wheel.
or X Press the corresponding Audio 20/
COMAND Online button to end a call.
Info call button This function is not available in all countries.
X
To call: press info call button :.
The breakdown assistance call is initiated.
The Connecting Connecting call
callmessage appears in
the multifunction display. The audio system is muted.
Only in certain countries: a voice message
prompts you to confirm the data transmis-
sion. After confirmation, the required vehi- cle data is transmitted. During data trans-
mission, you will see a corresponding sym-
bol in the display. This may take a moment.
You are then connected to an employee.
X To end a call: press the~button on the
multifunction steering wheel.
or
X Press the corresponding Audio 20/
COMAND Online button to end a call. Features
409Stowing and features Z