2015 MERCEDES-BENZ G-CLASS SUV fold seats
[x] Cancel search: fold seatsPage 17 of 274

Opening ...........................................76
Rear fog lamp
Display messag e............................ 148
Switching on/of f.............................. 91
Rear lamps
see Lights
Rear seat bench
Folding into an upright position ..... 195
Rear seats
Display message ............................ 148
Rear view camera
Cleaning instructions ..................... 211
Function/note s............................. 131
Rear window defroster ..................... 100
Problem (malfunction) ................... 100
Switching on/of f........................... 100
Rear window wiper
Switching on/of f.............................. 95
Rear-view mirror
Anti-glare (manual) .......................... 87
Dipping (automatic) ......................... 87
Refrigerant (air-conditioning sys-tem)
Important safety notes .................. 263
Refueling
Fuel gaug e..................................... 146
Important safety notes .................. 107
Refueling process .......................... 108
see Fuel
Remote control
Programming (garage door
opener) .......................................... 197
Replacing bulbs
Important safety notes .................... 92
Overview of bulb types .................... 94
Rescue card ......................................... 29
Reserve (fuel tank)
see Fuel
Reserve fuel
Display message ............................ 148
Residual heat
Switching on/of f........................... 100
Restraint system
Display message ............................ 152
Introduction ..................................... 42
Warning lamp ................................. 167
Warning lamp (function) ................... 42 Reversing lamps (display mes-
sage)
................................................... 148
Roof
Display message ............................ 148
Roof lining and carpets (cleaning
guidelines) ......................................... 212
Route (navigation)
see Route guidance (navigation)
Route guidance
see also Digital Operator's Man-
ual .................................................. 172
Route guidance (navigation) ............ 147
S
Safety
Children in the vehicle ..................... 55
Safety system
see Driving safety systems
SD memory card
see also Digital Operator's Man-
ual .................................................. 172
Search & Send
see also Digital Operator's Man-
ual .................................................. 172
Seat backrest
Folding back .................................. 194
Seat belts
Adjusting the height ......................... 46
center rear-compartment sea t......... 46
Cleaning ......................................... 212
Correct usage .................................. 45
Display message ............................ 148
Fastening ......................................... 46
Important safety guidelines ............. 44
Introduction ..................................... 43
Releasing ......................................... 47
Switching belt adjustment on/off
(on-board computer) ...................... 147
Warning lamp ................................. 161
Warning lamp (function) ................... 48
Seat heating
Indicator lamp (malfunction) ............ 86
Seats
Adjusting (electrically) ..................... 84
Adjusting the 4-way lumbar sup-
port .................................................. 84
Adjusting the head restraint ............ 84
Index15
Page 41 of 274

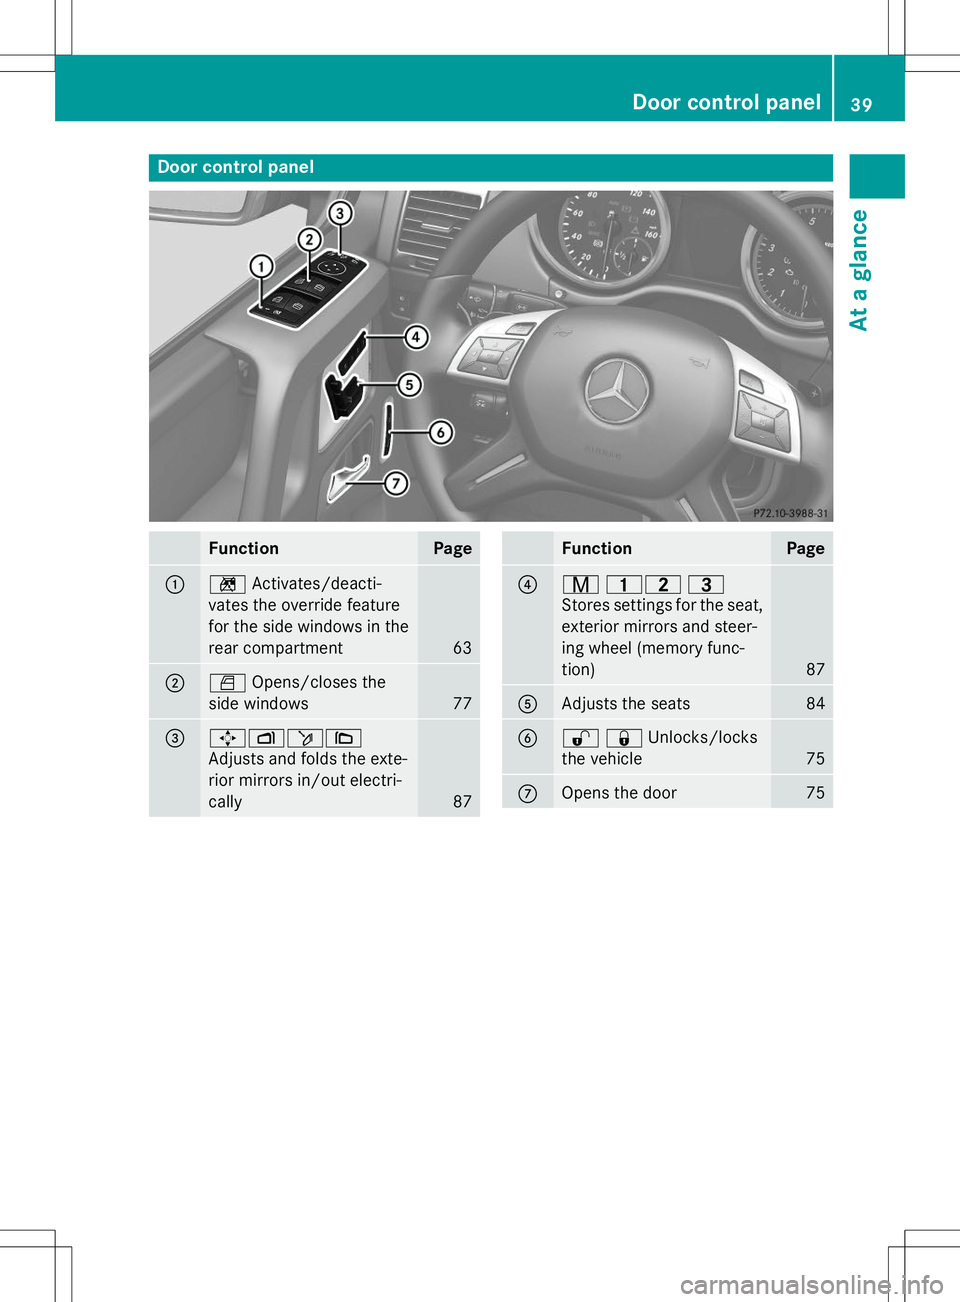
Door control panel
FunctionPage
:nActivates/deacti-
vates the override feature
for the side windows in the
rear compartment
63
;W Opens/closes the
side windows
77
=7 Zö\
Adjusts and folds the exte-
rior mirrors in/out electri-
cally
87
FunctionPage
?r 45 =
Stores settings for the seat, exterior mirrors and steer-
ing wheel (memory func-
tion)
87
AAdjusts the seats84
B%& Unlocks/locks
the vehicle
75
COpens the door75
Door control panel39
At a glance
Page 60 of 274

:LATCH-type (ISOFIX) securing rings
X Install the LATCH-type (ISOFIX) child
restraint system on both LATCH-type (ISO-
FIX) securing rings :.
ISOFIX is a standardized securing system for
specially designed child restraint systems on
the rear seats. LATCH-type (ISOFIX) securing rings :for two LATCH-type (ISOFIX) child
restraint systems are installed on the left and
right rear seats.
Non-LATCH-type (ISOFIX) child seats may
also be used and can be installed using the
vehicle's seat belt system. Install the child
seat according to the manufacturer's instruc-
tions.
Top Tether
Introduction
Top Tether provides an additional connection between the child restraint system secured
with a LATCH-type (ISOFIX) child seat mount
and the vehicle. This helps reduce the risk of
injury even further. If the child restraint sys-
tem is equipped with a Top Tether belt, this
should always be used.
Important safety notes
GWARNING
If the rear seats or the rear seat backrests are not locked, they could fold forwards in the
event of an accident, heavy braking or suddenchanges of direction. As a result, child
restraint systems cannot perform their inten-
ded protective function. Rear seats and rear
seat backrests that are not locked can also
cause additional injuries, e.g. in the event of
an accident. This poses an increased risk of
injury or even fatal injury.
Always lock the rear seats and rear seat
backrests after installing a Top Tether belt.
Observe the lock verification indicator. Adjust
the rear seat backrests so that they are in an upright position.
Top Tether anchorages
Top Tether anchorages ;are on the cargo
compartment floor.
X Remove cargo compartment cover (Y page 197).
X Move the head restraint upwards.
X Install the LATCH-type (ISOFIX) child
restraint system with Top Tether. Always
comply with the child restraint system
manufacturer's installation instructions
when doing so.
58Children in the vehicle
Safety
Page 85 of 274

restraint supports the back of the head at
about eye level.
Make sure that you do not rotate the head
restraints of the front and rear seats when
adjusting the head restraints. Otherwise, you cannot adjust the height and angle of the
head restraints correctly.
Adjust the head restraint so that it is as close as possible to your head.
GWARNING
You could lose control of your vehicle if you do the following while driving:
R adjust the driver's seat, head restraint,
steering wheel or mirrors
R fasten the seat belt
There is a risk of an accident.
Adjust the driver's seat, head restraint, steer-
ing wheel and mirror and fasten your seat belt before starting the engine.
GWARNING
According to accident statistics, children are
safer when properly restrained on the rear
seats than on the front-passenger seat. Thus,we strongly recommend that children be
placed in the rear seat whenever possible.
Regardless of seating position, children 12
years old and under must be seated and prop- erly secured in an appropriately sized child
restraint system or booster seat recommen-
ded for the size and weight of the child. For
additional information, see the "Children in
the vehicle" section.
A child's risk of serious or fatal injuries is sig-
nificantly increased if the child restraints are
not properly secured in the vehicle and/or the child is not properly secured in the child
restraint.
!To avoid damage to the seats and the seat
heating, observe the following information:
R keep liquids from spilling on the seats. If
liquid is spilled on the seats, dry them as
soon as possible.
R if the seat covers are damp or wet, do not
switch on the seat heating. The seat
heating should also not be used to dry
the seats.
R clean the seat covers as recommended;
see the "Interior care" section.
R do not transport heavy loads on the
seats. Do not place sharp objects on the
seat cushions, e.g. knives, nails or tools. The seats should only be occupied by
passengers, if possible.
R when the seat heating is in operation, do
not cover the seats with insulating mate- rials, e.g. blankets, coats, bags, seat cov-
ers, child seats or booster seats.
!Make sure that there are no objects in the
footwell under or behind the seats when
moving the seats back. There is a risk that
the seats and/or the objects could be dam-
aged.
!When the rear bench seat is folded for-
wards, the front seats cannot be moved to their rearmost position. You could other-
wise damage the seats and the rear bench
seat.
!Make sure that the sun visor is folded up
before adjusting the backrest and head
restraint height. The head restraint and sun visor could otherwise collide when the head
restraint is fully extended.
iIf the front door is open, the seats can be
adjusted for up to 30 minutes after the igni- tion has been switched off.
iThe rear-compartment head restraints
can be removed ( Ypage 84).
For more information, contact a qualified
specialist workshop.
Seats83
Seats, steering wheel and mirrors
Z
Page 86 of 274

iYou can find further information about
enlarging the cargo compartment (folding
the rear bench seat forwards) on( Y page 195).
Information in the Digital Operator's
Manual
In the Digital Operator's Manual you will find
information on the following topics:
R Adjusting the seats
R Adjusting the head restraints
R Removing/installing head restraints in therear
R Adjusting the multicontour seat
R Adjusting the 4-way lumbar support
R Switching the seat ventilation on/off
Adjusting the head restraints
Important safety notes
GWARNING
If head restraints are not installed and adjus-
ted correctly, they cannot provide protection
as intended. There is an increased risk of
injury in the head and neck area, e.g. in the
event of an accident or when braking.
Always drive with the head restraints instal-
led. Before driving off, make sure for every
vehicle occupant that the center of the head
restraint supports the back of the head at
about eye level.
Observe the following when adjusting the
head restraints: X Do not rotate the head restraints of the
front and rear seats.
Otherwise, you cannot adjust the height
and angle of the head restraints correctly.
X Adjust the head restraint so that it is as
close as possible to your head.
Adjusting the front seat head restraintheight
:Head restraint height
;Seat cushion angle
=Seat height
?Seat fore-and-aft adjustment
ABackrest angle
X Slide head restraint adjustment button :
up or down in the direction of the arrow.
Adjusting the luxury head restraints
X To adjust the side bolsters of the head
restraint: push or pull right and/or left-
hand side bolster :into the desired posi-
tion.
X To adjust the angle of the head
restraint: push or pull the head restraint in
the direction of arrow ;.
Resetting the front seat head restraints
It is necessary to reset the front seat head
restraints after the voltage supply has been
84Seats
Seats, steering wheel and mirrors
Page 87 of 274

interrupted, e.g. if the battery has been com-pletely discharged or disconnected.
X Make sure that the cup holder on the center
console is folded down ( Ypage 197).
X Move the seat as far forward as possible
and the head restraint in as far as possible.
Rear seat head restraints
Important safety notes
GWARNING
If head restraints are not installed and adjus-
ted correctly, they cannot provide protection
as intended. There is an increased risk of
injury in the head and neck area, e.g. in the
event of an accident or when braking.
Always drive with the head restraints instal-
led. Before driving off, make sure for every
vehicle occupant that the center of the head
restraint supports the back of the head at
about eye level.
Observe the following when adjusting the
head restraints: X Do not rotate the head restraints of the
front and rear seats.
Otherwise, you cannot adjust the height
and angle of the head restraints correctly.
X Adjust the head restraint so that it is as
close as possible to your head.
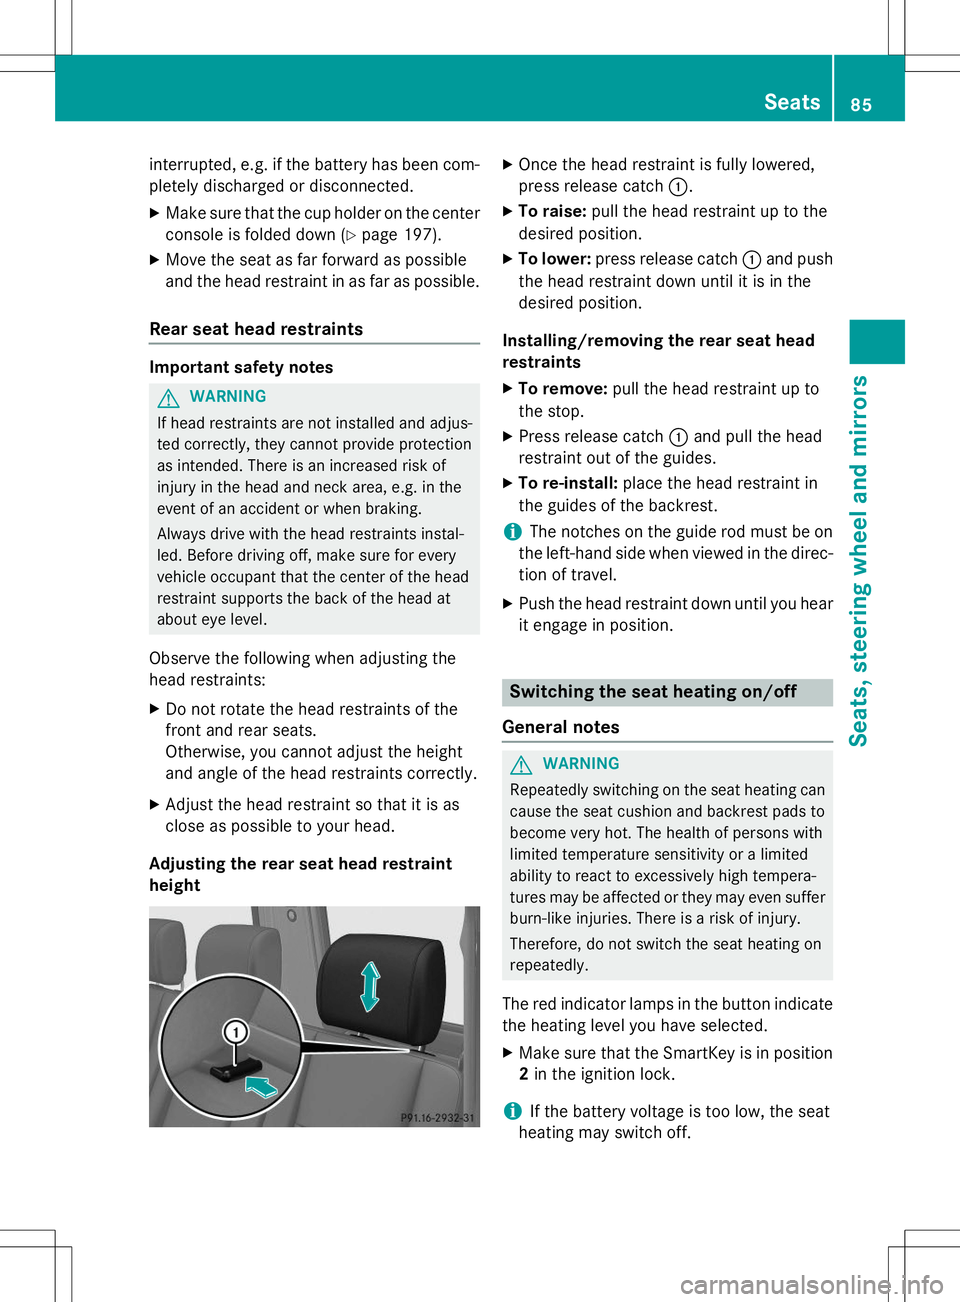
Adjusting the rear seat head restraintheight
X Once the head restraint is fully lowered,
press release catch :.
X To raise: pull the head restraint up to the
desired position.
X To lower: press release catch :and push
the head restraint down until it is in the
desired position.
Installing/removing the rear seat head
restraints
X To remove: pull the head restraint up to
the stop.
X Press release catch :and pull the head
restraint out of the guides.
X To re-install: place the head restraint in
the guides of the backrest.
iThe notches on the guide rod must be on
the left-hand side when viewed in the direc- tion of travel.
X Push the head restraint down until you hear
it engage in position.
Switching the seat heating on/off
General notes
GWARNING
Repeatedly switching on the seat heating can
cause the seat cushion and backrest pads to
become very hot. The health of persons with
limited temperature sensitivity or a limited
ability to react to excessively high tempera-
tures may be affected or they may even suffer burn-like injuries. There is a risk of injury.
Therefore, do not switch the seat heating on
repeatedly.
The red indicator lamps in the button indicate the heating level you have selected.
X Make sure that the SmartKey is in position
2 in the ignition lock.
iIf the battery voltage is too low, the seat
heating may switch off.
Seats85
Seats, steering wheel and mirrors
Z
Page 196 of 274

Cargo compartment enlargement
Important safety notes
GWARNING
If the rear bench seat/rear seat and seat
backrest are not engaged they could fold for- wards, e.g. when braking suddenly or in the
event of an accident. R The vehicle occupant would thereby be
pushed into the seat belt by the rear bench
seat/rear seat or by the seat backrest. The
seat belt can no longer offer the intended
level of protection and could even cause
injuries.
R Objects or loads in the trunk/cargo com-
partment cannot be restrained by the seat
backrest.
There is an increased risk of injury.
Before every trip, make sure that the seat
backrests and the rear bench seat/rear seat
are engaged.
GWARNING
Combustion engines emit poisonous exhaust
gases such as carbon monoxide. If the rear
door is open when the engine is running, par- ticularly if the vehicle is moving, exhaust
fumes could enter the passenger compart-
ment. There is a risk of poisoning.
Turn off the engine before opening the rear
door. Never drive with the rear door open.
!Ensure that you remove all containers
from the cup holder in the rear before fold- ing the seat backrest and the seat cushionof the rear bench seat forwards.
Observe the loading guidelines ( Ypage 192).
The rear bench seat is split symmetrically.
The left-hand and right-hand rear bench seats
can be folded forward to increase the capa-
city of the rear compartment. The following
changes are possible:
R fold the seat backrests forward
R fold the rear bench seat back fully
Folding the seat backrest forward
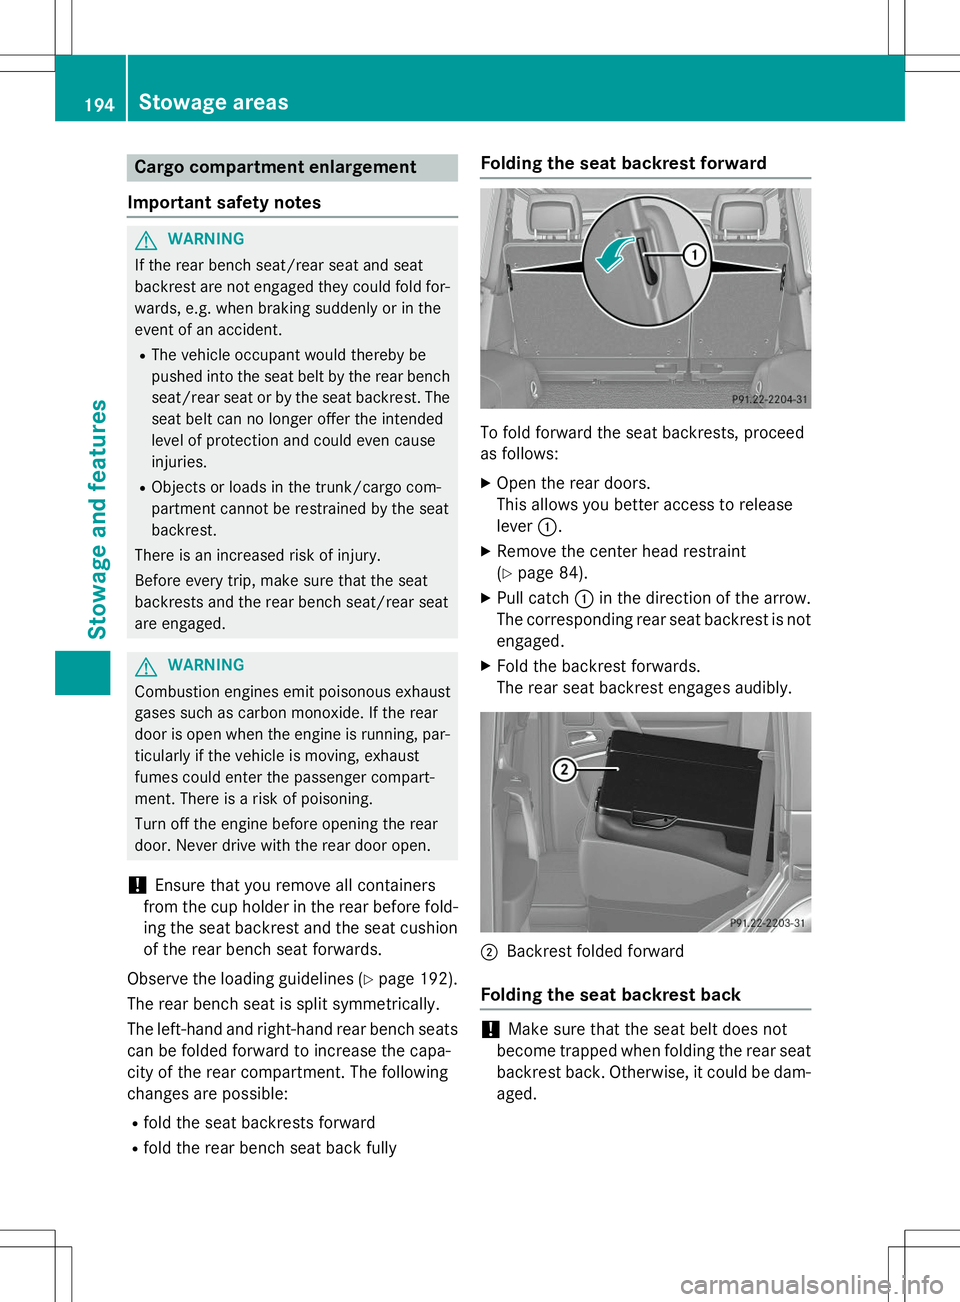
To fold forward the seat backrests, proceed
as follows:
X Open the rear doors.
This allows you better access to release
lever :.
X Remove the center head restraint(Y page 84).
X Pull catch :in the direction of the arrow.
The corresponding rear seat backrest is not
engaged.
X Fold the backrest forwards.
The rear seat backrest engages audibly.
;Backrest folded forward
Folding the seat backrest back
!Make sure that the seat belt does not
become trapped when folding the rear seat backrest back. Otherwise, it could be dam- aged.
194Stowage areas
Stowage and features
Page 221 of 274

little energy, thus conserving battery power.
iIf the power supply has been interrupted,
e.g. due to a discharged battery, you will
have to: R set the clock. Information on setting the
clock can be found in the Digital Opera-
tor's Manual.
On vehicles with COMAND and a naviga-
tion system, the clock is set automati- cally.
R reset the head restraints on the front
seats. Information on resetting the head
restraints can be found in the Digital
Operator's Manual.
R reset the function for folding the exterior
mirrors in/out automatically, by folding
the mirrors out once ( Ypage 87).
Charging the battery
GWARNING
During charging and jump-starting, explosive
gases can escape from the battery. There is a
risk of an explosion.
Particularly avoid fire, open flames, creating
sparks and smoking. Ensure there is sufficient
ventilation while charging and jump-starting.
Do not lean over a battery.
GWARNING
Battery acid is caustic. There is a risk of injury.
Avoid contact with skin, eyes or clothing. Do
not inhale any battery gases. Do not lean over
the battery. Keep children away from batter-
ies. Wash away battery acid immediately with
plenty of clean water and seek medical atten- tion.
GWARNING
A discharged battery can freeze at tempera-
tures below freezing point. When jump-start-
ing the vehicle or charging the battery, gases can escape from the battery. There is a risk of
an explosion.
Allow the frozen battery to thaw out before
charging it or jump-starting.
!Only charge the battery using the jump-
starting connection point.
!Only use battery chargers with a maxi-
mum charging voltage of 14.8 V.
!Only charge the installed battery with a
battery charger which has been tested and
approved by Mercedes-Benz. These battery
chargers allow the battery to be charged
while still installed in the vehicle.
If, at low temperatures, the indicator lamps/
warning lamps in the instrument cluster do
not light up, it is highly likely that the dis-
charged battery has frozen. In this case you
may neither jump-start the vehicle nor charge the battery. The service life of a thawed-out
battery may be shorter. The starting charac-
teristics can be impaired, particularly at low
temperatures. Have the thawed-out battery
checked at a qualified specialist workshop.
A battery charger unit specially adapted for
Mercedes-Benz vehicles and tested and
approved by Mercedes-Benz is available as an
accessory. Contact an authorized Mercedes-
Benz Center for information and availability.
Charge the battery in accordance with the
operating instructions for the battery
charger.
The jump-starting connection point is in the
engine compartment ( Ypage 220).
X Read the operating instructions for the bat-
tery charger.
X Open the hood ( Ypage 205).
X Connect the battery charger to the positive
terminal and ground point in the same
order as when connecting the donor bat-
tery in the jump-starting procedure( Y page 220).
Battery (vehicle)219
Roadside Assistance
Z