2015 MERCEDES-BENZ G-CLASS SUV roof
[x] Cancel search: roofPage 64 of 274

Problems with the BabySmart™ air bag deactivation system
ProblemPossible causes/consequences andMSolutions
The PASSENGER AIR
BAG OFF indicator
lamp on the center con-
sole is lit.A special Mercedes-Benz child restraint system with a trans-
ponder for the BabySmart™ air bag deactivation system has been
installed on the front-passenger seat. The front-passenger air bag has therefore been deactivated as desired.
GWARNING
There is no child restraint system installed on the front-passenger
seat. The BabySmart™ air bag deactivation system is malfunc-
tioning, for example due to electronic devices on the front-
passenger seat.
There is a risk of injury. X Remove electronic equipment from the front-passenger seat,
for example:
R Laptop
R Mobile phone
R Card with a transponder, such as a ski pass or access pass
If the PASSENGER AIR BAG OFF indicator lamp remains lit, the
front-passenger seat may not be used.
X Visit a qualified specialist workshop.
The 6 restraint sys-
tem warning lamp
lights up and/or the
PASSENGER AIR BAG
OFF indicator lamp
does not light up briefly
when you switch the
ignition on.GWARNING
The BabySmart™ air bag deactivation system is malfunctioning.
Do not install a child restraint system on the front-passenger seat.
It is recommended that you install the child restraint system on a suitable rear seat.
X Visit a qualified specialist workshop.
X Please also refer to the notes about the restraint system warning
lamp ( Ypage 167).
Child-proof locks
Important safety notes
GWARNING
When children ride on the vehicle's rear seats, activate the override switch. Otherwise, the
children could be injured, e.g. by trapping
themselves in the rear side window.
62Children in the vehicle
Safety
Page 65 of 274
GWARNING
When leaving the vehicle, always remove the
SmartKey from the ignition lock. Always take
the SmartKey with you and lock the vehicle.
Do not leave children unattended in the vehi-cle, even if they are secured in a child restraint
system, or with access to an unlocked vehicle. A child's unsupervised access to a vehicle
could result in an accident and/or serious
personal injury. The children could: R injure themselves on parts of the vehicle
R be seriously or fatally injured through
excessive exposure to extreme heat or cold
R injure themselves or cause an accident with
vehicle equipment that can be operated
even if the SmartKey is removed from the
ignition lock or removed from the vehicle,
such as seat adjustment, steering wheel
adjustment, or the memory function
If children open a door, they could injure other
persons or get out of the vehicle and injure
themselves or be injured by following traffic.
Do not expose the child restraint system to
direct sunlight. The child restraint system's
metal parts, for example, could become very
hot, and the child could be burned on theseparts.
Child-proof locks for the rear doors
GWARNING
Children could open a rear door from inside
the vehicle. This could result in serious inju-
ries or an accident. Therefore, when children
ride in the rear always secure the rear doors
with the child-proof locks.
You secure each door individually with the
child-proof locks on the rear doors. A door
secured with a child-proof lock cannot be
opened from inside the vehicle. When the
vehicle is unlocked, the door can be opened
from the outside.
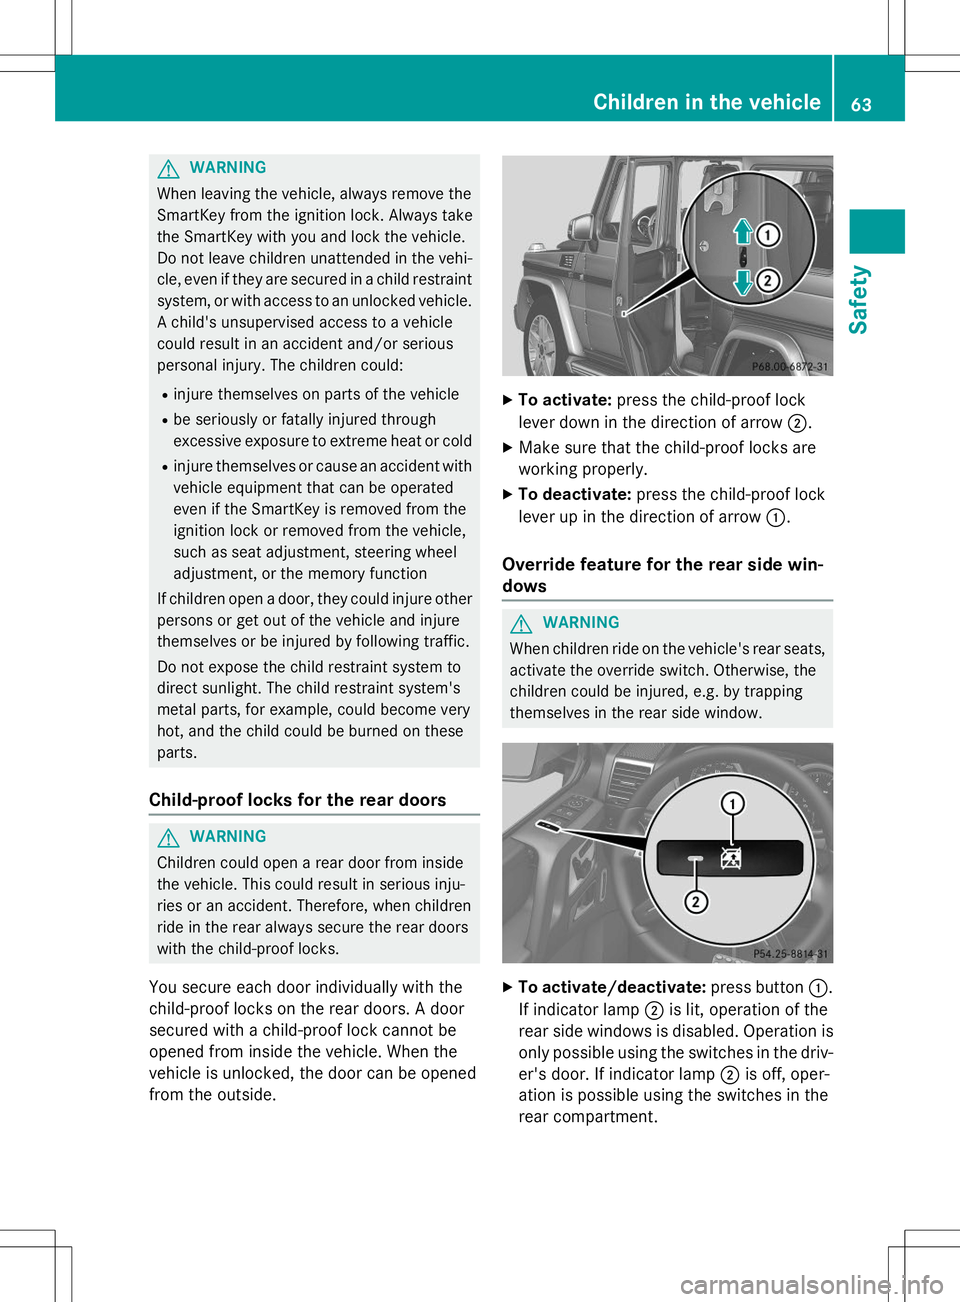
X To activate: press the child-proof lock
lever down in the direction of arrow ;.
X Make sure that the child-proof locks are
working properly.
X To deactivate: press the child-proof lock
lever up in the direction of arrow :.
Override feature for the rear side win-dows
GWARNING
When children ride on the vehicle's rear seats,
activate the override switch. Otherwise, the
children could be injured, e.g. by trapping
themselves in the rear side window.
X To activate/deactivate: press button:.
If indicator lamp ;is lit, operation of the
rear side windows is disabled. Operation is
only possible using the switches in the driv- er's door. If indicator lamp ;is off, oper-
ation is possible using the switches in the
rear compartment.
Children in the vehicle63
Safety
Z
Page 73 of 274
Useful information..............................72
SmartKey ............................................. 72
Doors .................................................... 75
Rear door ............................................. 76
Side windows ...................................... 77
Sliding sunroof .................................... 77
71
Opening and closing
Page 79 of 274
Side windows
Important safety notes
GWARNING
While closing the side windows, body parts inthe closing area could become trapped. There is a risk of injury.
When closing make sure that no parts of the
body are in the closing area. If somebody
becomes trapped, release the switch or press
the switch to open the side window again.
GWARNING
While opening the side windows, body parts
could become trapped between the side win- dow and the door frame as the side window
moves. There is a risk of injury.
Make sure that nobody touches the side win-
dow during the opening procedure. If some-
body becomes trapped, release the switch or pull the switch to close the side window again.
Information in the Digital Operator's Manual
In the Digital Operator's Manual you will find
information on the following topics:
R Opening and closing the side windows
R Opening and closing all side windows
Problems with the side windows
GWARNING
Closing the side windows with increased force
or without the anti-entrapment feature could
lead to serious or even fatal injury. Make sure
that nobody can become trapped when clos-
ing the side windows.
Problem: a side window cannot be closed because objects are trapped between the
side window and the door frame.
X Remove the objects.
X Close the side window. Problem: a side window cannot be closed
and you cannot see the cause.
If a side window is obstructed during closing
and reopens again slightly:
X Immediately after the window blocks, pull
the corresponding switch again until the
side window has closed.
If a side window is obstructed again during
closing and reopens again slightly: X Immediately after the window blocks, pull
the corresponding switch again until the
side window has closed.
iIf a side window no longer opens or closes
due to a malfunction, contact a qualified
specialist workshop.
Sliding sunroof
Important safety notes
!
Only open the sliding sunroof if it is free of
snow and ice. Otherwise, malfunctions may
occur.
Do not allow anything to protrude from the sliding sunroof. Otherwise, the seals could
be damaged.
!If the sliding sunroof still cannot be
opened or closed as a result of a malfunc-
tion, contact a qualified specialist work-shop.
!The weather can change abruptly. It could
start to rain or snow. Make sure that the
sliding sunroof is closed when you leave the
vehicle. The vehicle electronics can be
damaged if water enters the vehicle inte-rior.
iResonance noises can occur in addition to
the usual airflow noises when the sliding
sunroof is open. They are caused by minor
pressure fluctuations in the vehicle interior.
Change the position of the sliding sunroof
or open a side window slightly to reduce or
eliminate these noises.
Sliding sunroof77
Opening and closing
Z
Page 80 of 274
Opening and closing the sliding sun- roof
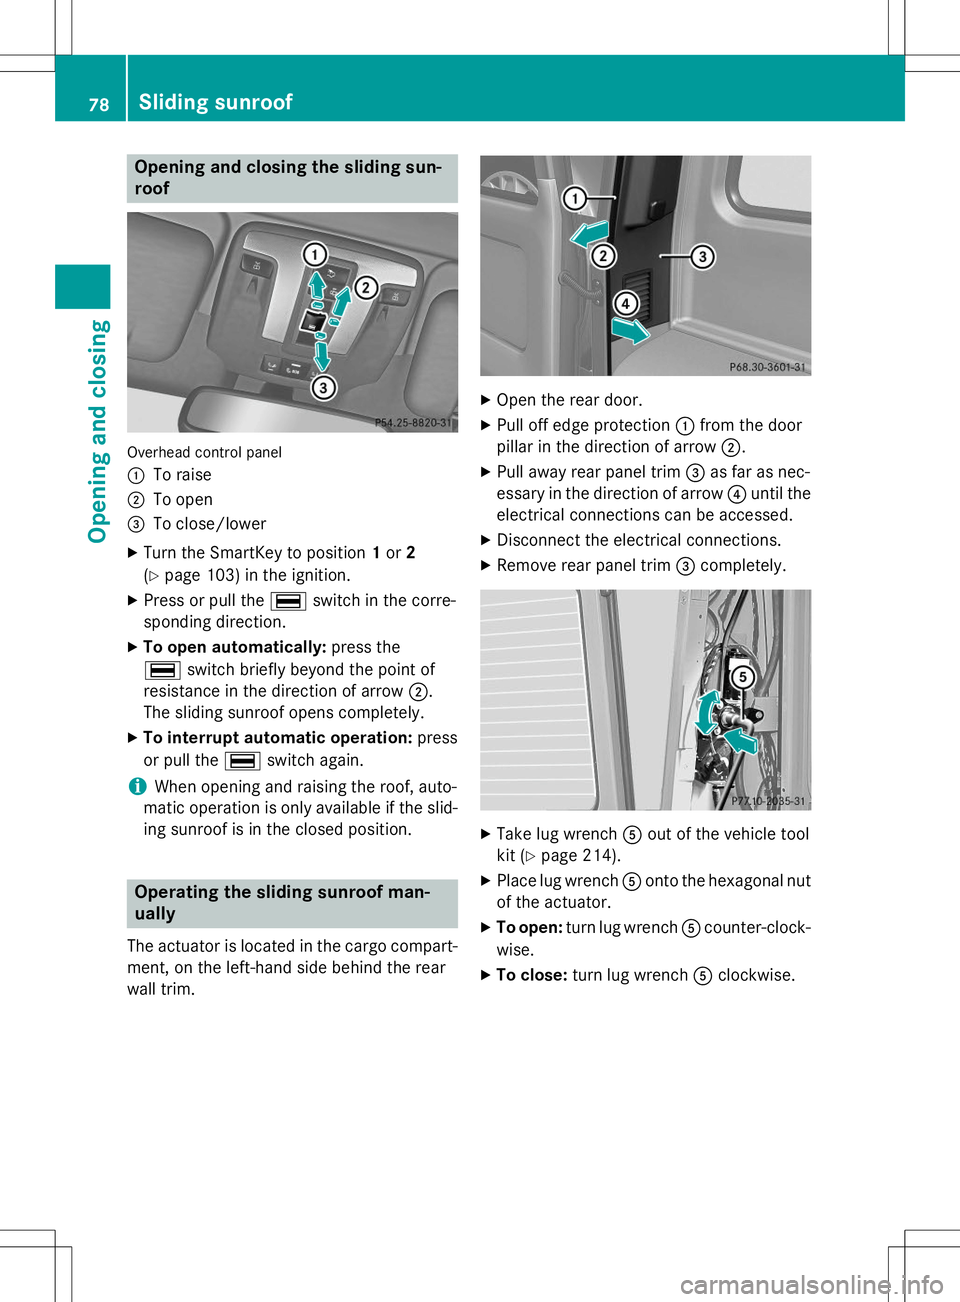
Overhead control panel :
To raise
;To open
=To close/lower
X Turn the SmartKey to position 1or 2
( Y page 103) in the ignition.
X Press or pull the ¡switch in the corre-
sponding direction.
X To open automatically: press the
¡ switch briefly beyond the point of
resistance in the direction of arrow ;.
The sliding sunroof opens completely.
X To interrupt automatic operation: press
or pull the ¡switch again.
iWhen opening and raising the roof, auto-
matic operation is only available if the slid- ing sunroof is in the closed position.
Operating the sliding sunroof man- ually
The actuator is located in the cargo compart-
ment, on the left-hand side behind the rear
wall trim.
X Open the rear door.
X Pull off edge protection :from the door
pillar in the direction of arrow ;.
X Pull away rear panel trim =as far as nec-
essary in the direction of arrow ?until the
electrical connections can be accessed.
X Disconnect the electrical connections.
X Remove rear panel trim =completely.
X
Take lug wrench Aout of the vehicle tool
kit ( Ypage 214).
X Place lug wrench Aonto the hexagonal nut
of the actuator.
X To open: turn lug wrench Acounter-clock-
wise.
X To close: turn lug wrench Aclockwise.
78Sliding sunroof
Opening and closing
Page 81 of 274

XReconnect the electrical connections.
X Re-install rear panel trim =.
When doing so, hook lugs Bof rear panel
trim =into vehicle side wall C.
X Re-install edge protection :.
X Close the rear door.
Sliding sun roof79
Opening and closing
Z
Page 100 of 274

Useful information
iThis Operator's Manual describes all
models and all standard and optional equip- ment of your vehicle available at the time of
publication of the Operator's Manual.
Country-specific differences are possible.
Please note that your vehicle may not be
equipped with all features described. This
also applies to safety-related systems and
functions.
iRead the information on qualified special-
ist workshops: ( Ypage 28).
Overview of climate control systems
Important safety notes
Observe the settings recommended on the
following pages. The windows could other-
wise fog up. This could prevent you from
observing the traffic conditions, thereby
causing an accident.
Climate control regulates the temperature
and the humidity in the vehicle interior and
filters undesirable substances from the air.
Dual-zone automatic climate control is only
operational when the engine is running. Opti-
mum operation is only achieved if you drive
with the side windows and sliding sunroofclosed.
The climatic comfort deteriorates whilst the
sliding sunroof is open. The automatic climate control cannot maintain the set temperature
with the sliding sunroof open. You have to
adjust the climate control manually.
iVentilate the vehicle for a brief period
during warm weather, e.g. using the con-
venience opening feature ( Ypage 77). This
will speed up the cooling process and the
desired vehicle interior temperature will be
reached more quickly.
iThe integrated filter can filter out most
particles of dust, and completely filters out
pollen. A clogged filter reduces the amount of air supplied to the vehicle interior. For
this reason, you should always observe the
interval for replacing the filter, which is
specified in the Maintenance Booklet. As it
depends on environmental conditions, e.g. heavy air pollution, the interval may be
shorter than stated in the Maintenance
Booklet.
98Overview of climate control systems
Climate control
Page 199 of 274
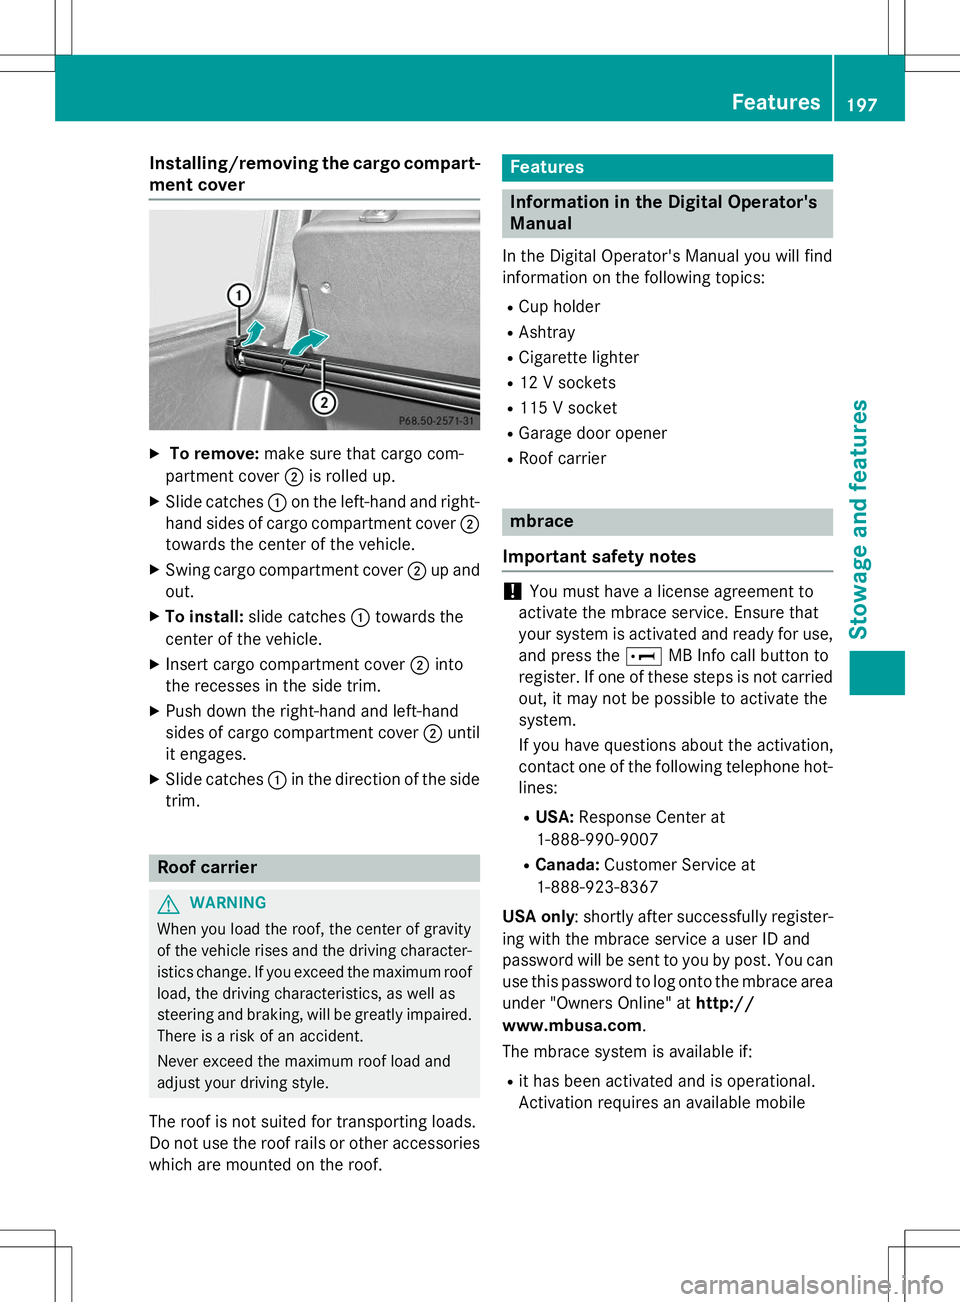
Installing/removing the cargo compart-
ment cover
X To remove: make sure that cargo com-
partment cover ;is rolled up.
X Slide catches :on the left-hand and right-
hand sides of cargo compartment cover ;
towards the center of the vehicle.
X Swing cargo compartment cover ;up and
out.
X To install: slide catches :towards the
center of the vehicle.
X Insert cargo compartment cover ;into
the recesses in the side trim.
X Push down the right-hand and left-hand
sides of cargo compartment cover ;until
it engages.
X Slide catches :in the direction of the side
trim.
Roof carrier
GWARNING
When you load the roof, the center of gravity
of the vehicle rises and the driving character- istics change. If you exceed the maximum roof
load, the driving characteristics, as well as
steering and braking, will be greatly impaired.There is a risk of an accident.
Never exceed the maximum roof load and
adjust your driving style.
The roof is not suited for transporting loads.
Do not use the roof rails or other accessories
which are mounted on the roof.
Features
Information in the Digital Operator's
Manual
In the Digital Operator's Manual you will find
information on the following topics: R Cup holder
R Ashtray
R Cigarette lighter
R 12 V sockets
R 115 V socket
R Garage door opener
R Roof carrier
mbrace
Important safety notes
!You must have a license agreement to
activate the mbrace service. Ensure that
your system is activated and ready for use,
and press the EMB Info call button to
register. If one of these steps is not carried out, it may not be possible to activate the
system.
If you have questions about the activation,
contact one of the following telephone hot-lines:
R USA: Response Center at
1-888-990-9007
R Canada: Customer Service at
1-888-923-8367
USA only : shortly after successfully register-
ing with the mbrace service a user ID and
password will be sent to you by post. You can use this password to log onto the mbrace area
under "Owners Online" at http://
www.mbusa.com .
The mbrace system is available if:
R it has been activated and is operational.
Activation requires an available mobile
Features197
Stowage and featu res
Z