2015 MERCEDES-BENZ E-CLASS SALOON tow
[x] Cancel search: towPage 275 of 497
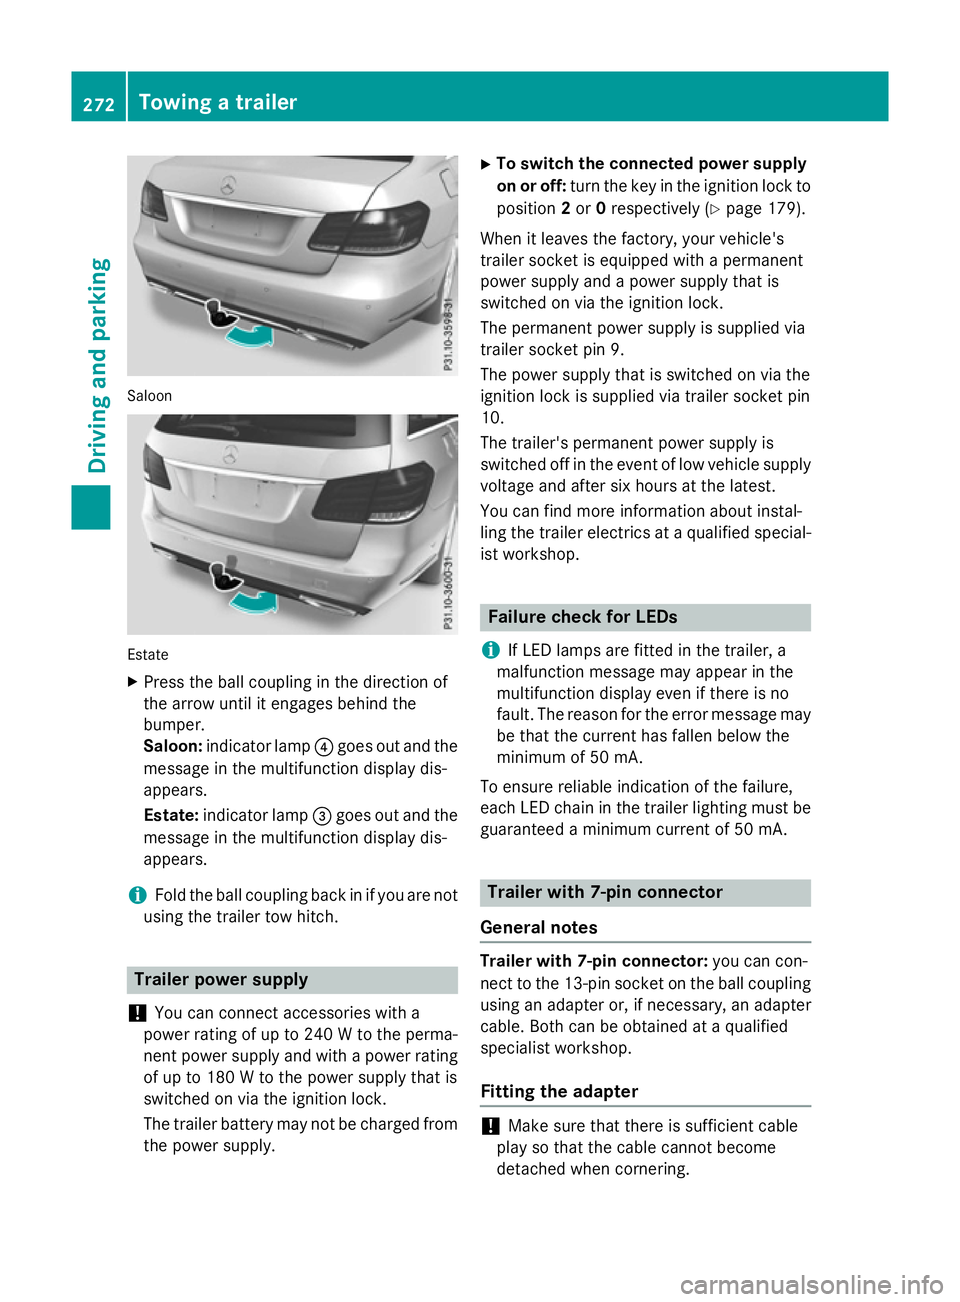
Saloon
Estate
X Press the ball coupling in the direction of
the arrow unti litengages behind the
bumper.
Saloon: indicator lamp ?goe soutand the
messag einthe multifunction display dis-
appears.
Estate: indicator lamp =goe soutand the
messag einthe multifunction display dis-
appears.
i Fol
dthe ball coupling back in if yo uare not
using the traile rtow hitch. Traile
rpower supply
! You can connect accessorie
switha
power rating of up to 240 Wtothe perma-
nent power suppl yand with apower rating
of up to 180 Wtothe power suppl ythat is
switched on via the ignition lock.
The traile rbattery may not be charge dfrom
the power supply. X
To switc hthe connecte dpower supply
on or off: turn the key in the ignition lock to
position 2or 0respectivel y(Ypage 179).
Whe nitleavest he factory, your vehicle's
traile rsocke tise quipped with apermanent
power suppl yand apower suppl ythat is
switched on via the ignition lock.
The permanent power suppl yissupplie dvia
traile rsocke tpin9.
The power suppl ythat is switched on via the
ignition lock is supplie dvia traile rsocke tpin
10.
The trailer's permanent power suppl yis
switched off in the event of low vehicle supply
voltage and afte rsix hours at the latest.
You can find more information abou tinstal-
ling the traile relectrics at aquali fied special-
ist workshop. Failure check for LEDs
i If LED lamps are fitted in the trailer, a
malfunction messag emay appea rinthe
multifunction display eve nifthere is no
fault. The reason for the erro rmessag emay
be that the current ha sfalle nbelow the
minimum of 50 mA.
To ensure reliabl eindication of the failure,
each LED chain in the traile rlighting mus tbe
guaranteed aminimum current of 50 mA. Traile
rwith7 -pinc onnector
General notes Traile
rwith7 -pinc onnector: youc an con-
nect to the 13-pi nsocke tont he ball coupling
using an adapter or, if necessary, an adapter
cable .Both can be obtained at aquali fied
specialist workshop.
Fitting the adapter !
Make sure that there is sufficient cable
play so that the cable cannot become
detached when cornering. 272
Towin
gatrailerDrivin gand parking
Page 276 of 497
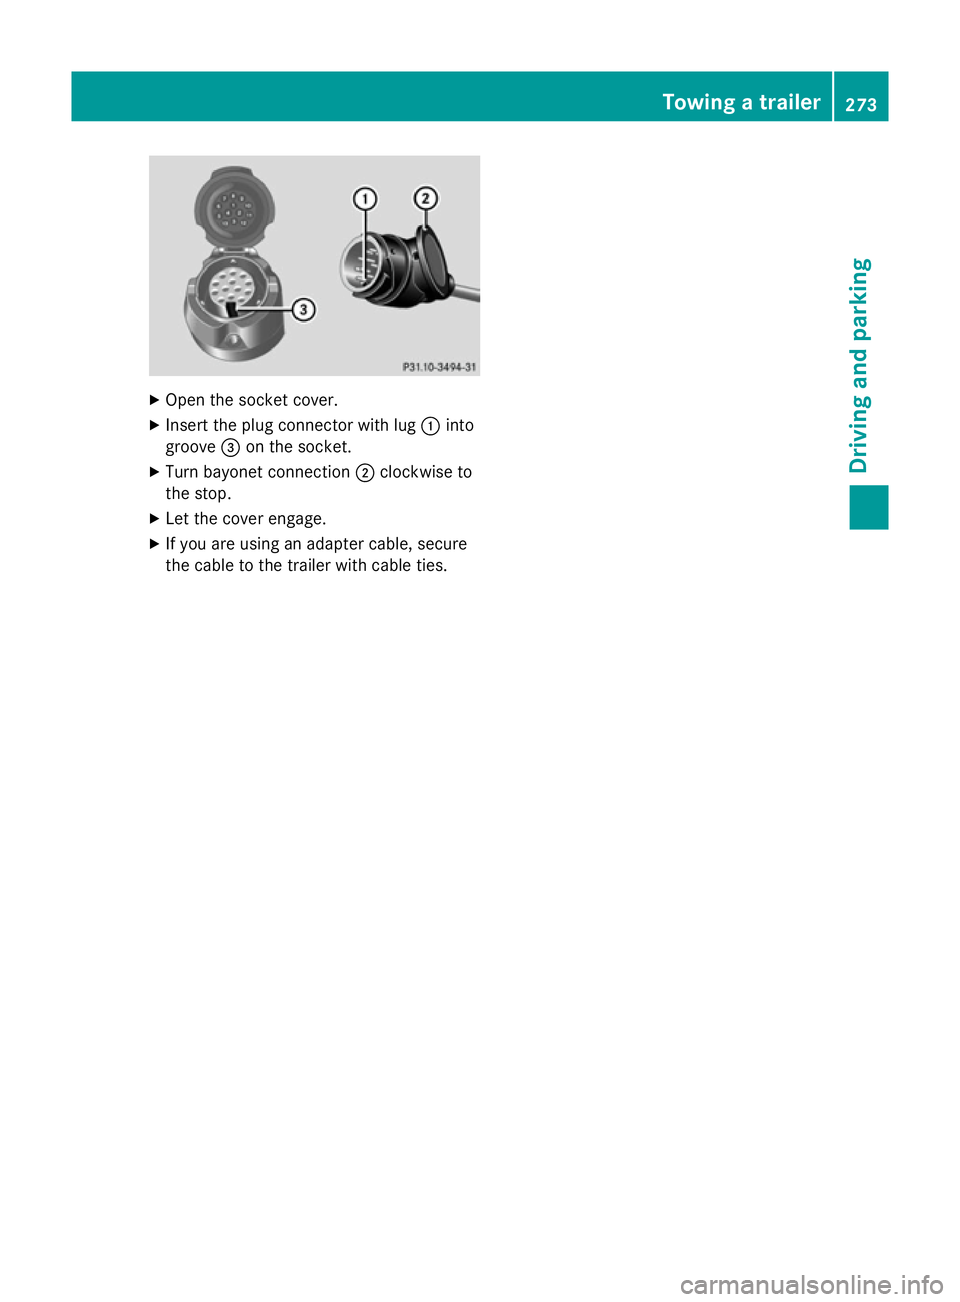
X
Open the socket cover.
X Insert the plug connector with lug :into
groove =on the socket.
X Turn bayonet connection ;clockwise to
the stop.
X Let the cover engage.
X If you are using an adapter cable, secure
the cable to the trailer with cable ties. Towing
atrailer
273Driving and parking Z
Page 285 of 497
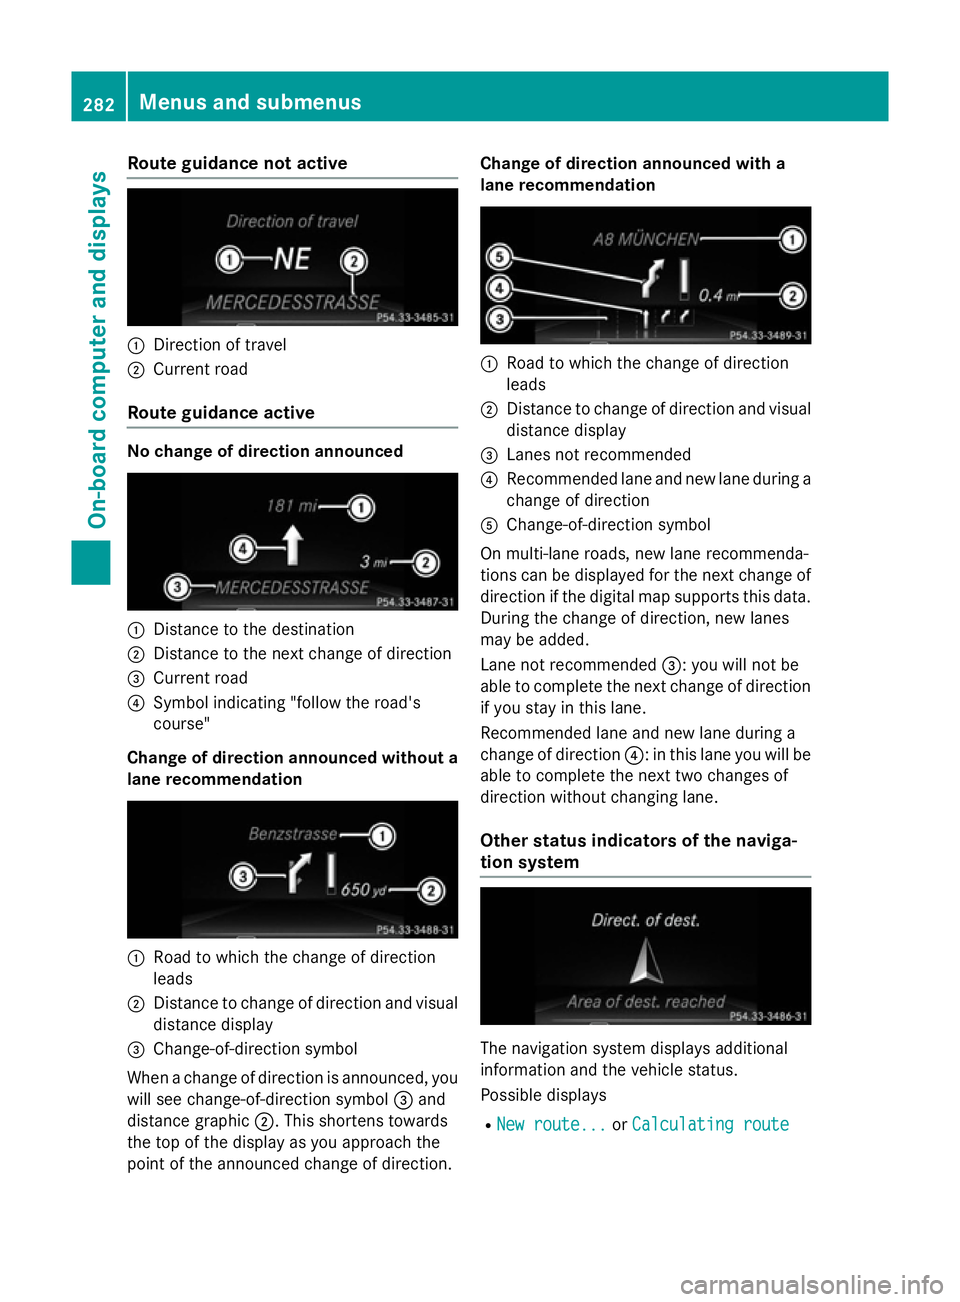
Route guidanc
enotactive :
Direction of travel
; Current road
Route guidanc eactive No chang
eofdirection announced :
Distance to the destination
; Distance to the next change of direction
= Current road
? Symbol indicating "follow the road's
course"
Chang eofdirection announce dwithout a
lan erecommendation :
Road to which the change of direction
leads
; Distance to change of direction and visual
distance display
= Change-of-direction symbol
Whe nac hange of direction is announced, you
will see change-of-direction symbol =and
distance graphic ;.Thiss hortens towards
the top of the display as yo uapproach the
point of the announce dchange of direction. Chang
eofdirection announce dwitha
lan erecommendation :
Road to which the change of direction
leads
; Distance to change of direction and visual
distance display
= Lane snot recommended
? Recommended lane and new lane during a
change of direction
A Change-of-direction symbol
On multi-lane roads, new lane recommenda-
tions can be displayed for the next change of
direction if the digital map supports this data. During the change of direction, new lanes
may be added.
Lane not recommended =:youwill not be
able to complete the next change of direction
if yo ustay in this lane.
Recommended lane and new lane during a
change of direction ?:inthis lane yo uwillbe
able to complete the next two changes of
direction withou tchanging lane.
Othe rstatus indicators of the naviga-
tio ns ystem The navigation system display
saddit ional
information and the vehicl estatus.
Possible displays
R New route... New route... orCalculating route
Calculating route 282
Menus and submenusOn-board computer and displays
Page 321 of 497
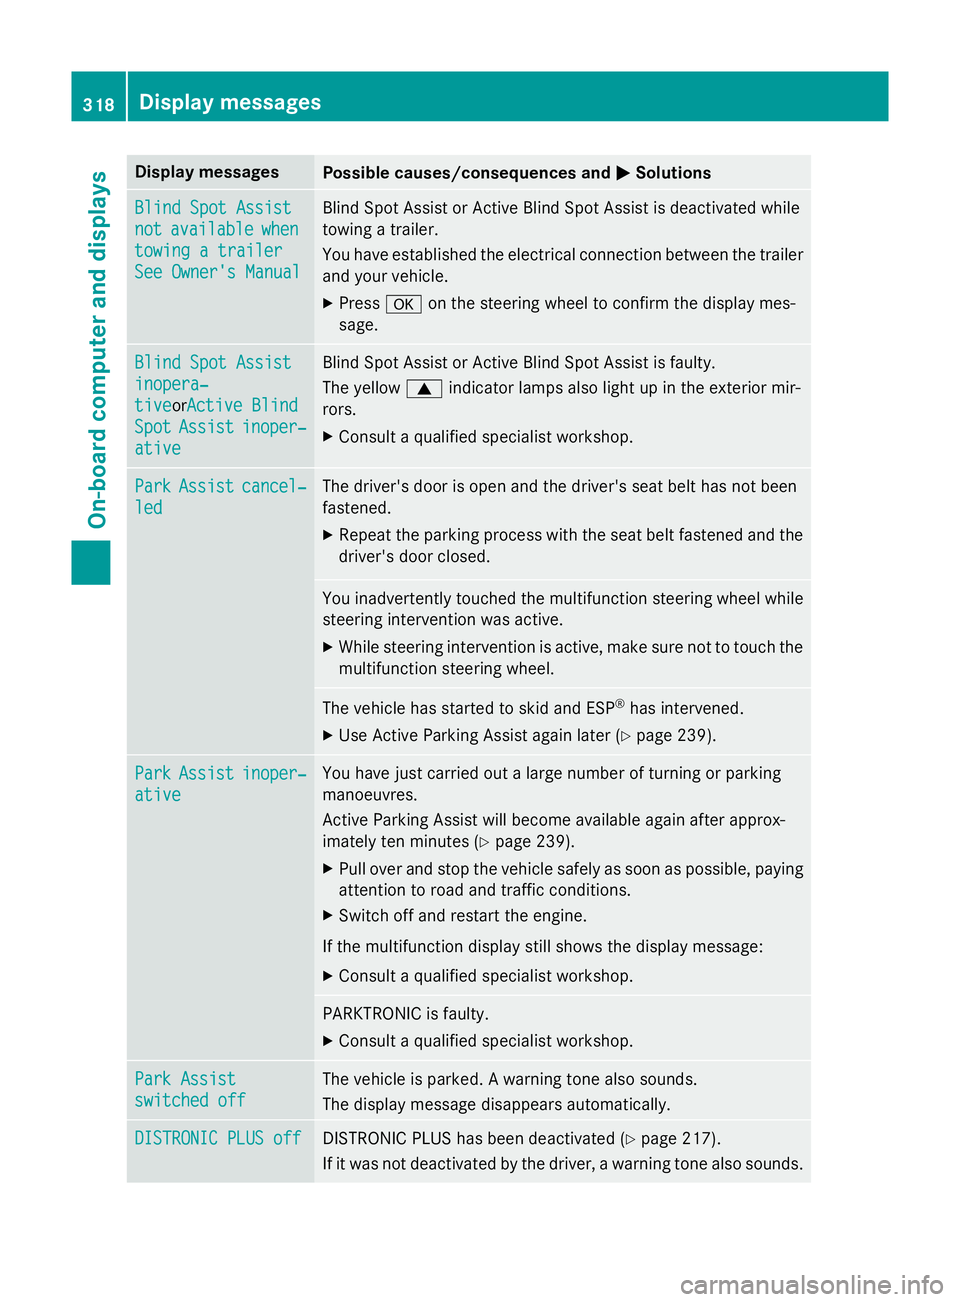
Display messages
Possible causes/consequences and
M
MSolutions Blind Spo
tAssist
Blind Spo tAssist
not
not available
available when
when
towing atrailer
towing atrailer
See Owner' sManual
See Owner' sManual Blind Spot Assis
torActiveBlind Spot Assis tisdeactivated while
towin gatrailer.
You hav eestablished th eelectrica lconnectio nbetween th etrailer
and your vehicle.
X Press aon thesteerin gwhee ltoc onfir mthedisplay mes-
sage. Blind Spo
tAssist
Blind Spo tAssist
inopera‐
inopera‐
tive tiveor Active Blind
Active Blind
Spot
Spot Assist
Assist inoper‐
inoper‐
ative
ative Blind Spot Assis
torActiveBlind Spot Assis tisfaulty.
The yellow 9indicato rlamp salso ligh tupint heexterio rmir-
rors.
X Consult aqualified specialist workshop. Park
Park
Assist
Assist cancel‐
cancel‐
led
led The driver's doo
risopen and th edriver's seat belt has no tbeen
fastened.
X Repea tthe parkin gprocess wit hthe seat belt fastene dand the
driver's doo rclosed. You inadvertentl
ytou ched th emultifunction steerin gwhee lwhile
steerin ginterventio nwas active.
X Whil esteerin ginterventio nisactive,makes uren otto touch the
multifunction steerin gwheel. The vehicl
ehas started to skid and ESP ®
has intervened.
X Use Active Parking Assis tagain later (Y page 239). Park
Park
Assist
Assist inoper‐
inoper‐
ative
ative You hav
ejustc arrie doutalarg enumber of turning or parking
manoeuvres.
Active Parking Assis twill become available again after approx-
imately te nminute s(Ypage 239).
X Pull ove rand stop th evehicl esafely as soo naspossible, paying
attention to roa dand traffic conditions.
X Switc hoffand restar tthe engine.
If th emultifunction display still shows th edisplay message:
X Consult aqualified specialist workshop. PARKTRONI
Cisfaulty.
X Consult aqualified specialist workshop. Par
kA ssist
Par kA ssist
switched off switched off The vehicl
eisparked. Awarnin gtonea lso sounds.
The display message disappear sautomatically. DISTRONIC PLU
Soff
DISTRONIC PLU Soff DISTRONIC PLU
Shas been deactivated (Y page 217).
If it was no tdeactivated by th edriver ,awarnin gton ea lso sounds. 318
Display
messagesOn-boardcomputer an ddisplays
Page 333 of 497
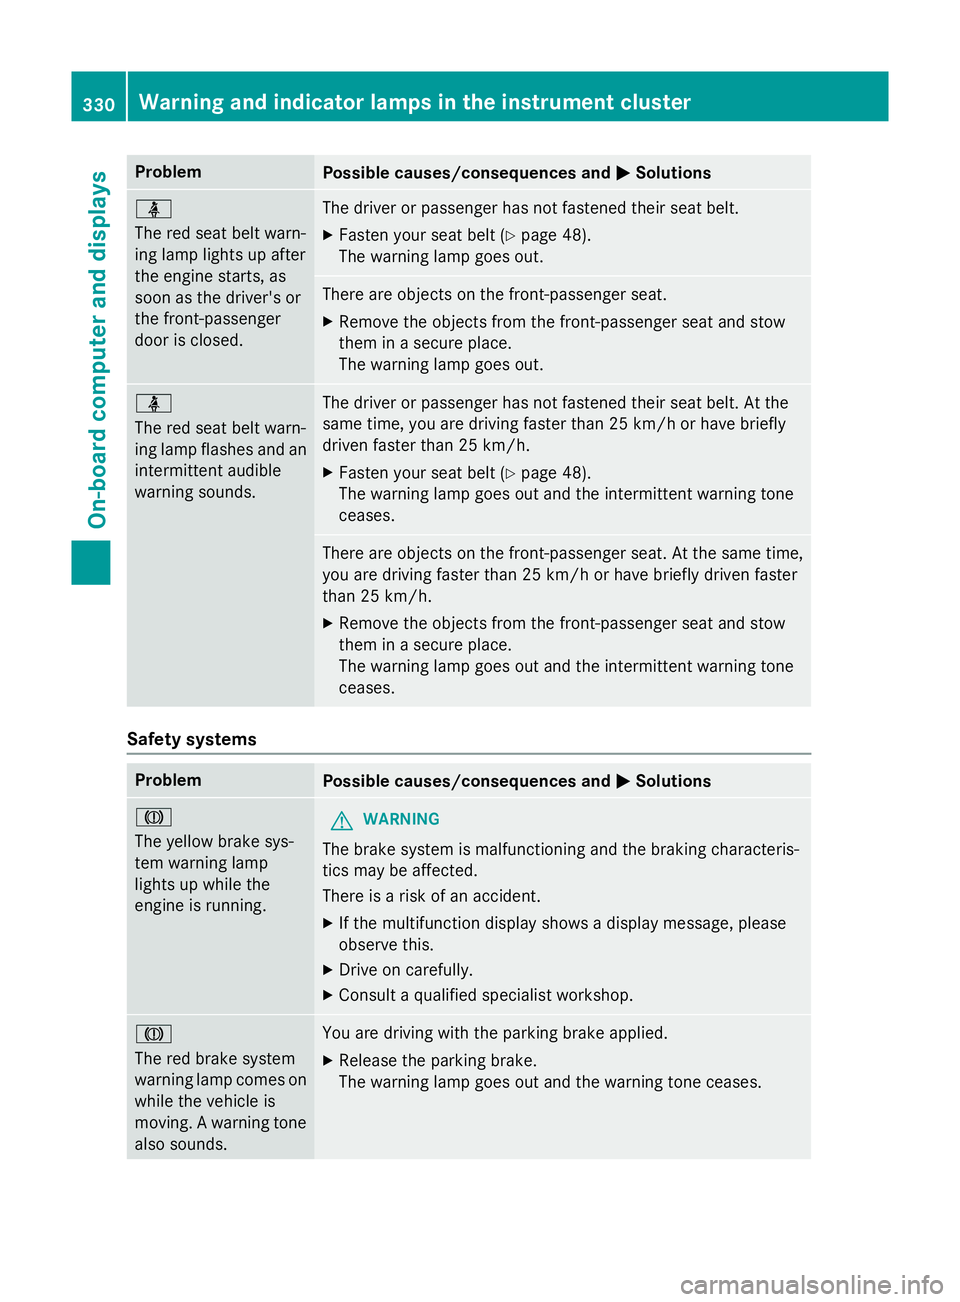
Problem
Possible causes/consequences and
M
MSolutions ü
The red seat belt warn-
ing lamp lights up after
the engine starts, as
soon as the driver's or
the front-passenger
door is closed.
The driver or passenger has not fastened their seat belt.
X Fasten your seat belt (Y page 48).
The warning lamp goes out. There are objectsont
he front-passenger seat.
X Remove the objectsf rom the front-passenger seat and stow
them in asecure place.
The warning lamp goes out. ü
The red seat belt warn-
ing lamp flashes and an
intermittenta udible
warning sounds. The driver or passenger has not fastened their seat belt. At the
same time, you are driving faster than 25 km/ho rhave briefly
driven faster than 25 km/h.
X Fasten your seat belt (Y page 48).
The warning lamp goes out and the intermittentw arning tone
ceases. There are objectsont
he front-passenger seat. At the same time,
you are driving faster than 25 km/ho rhave briefly driven faster
than 25 km/h.
X Remove th eobjects from th efront-pa ssenger seat and stow
them in asecure place.
The warnin glamp goe sout and th eintermitten twarnin gtone
ceases. Safet
ysystems Problem
Possible causes/consequences and
M MSolutions J
The yellow brak
esys-
te mw arnin glamp
lights up while the
engin eisrunning. G
WARNING
The brak esystem is malfunctionin gand th ebrakin gcharacteris-
tics may be affected.
There is ariskofana ccident.
X If th emultifunction display shows adisplay message ,please
observ ethis.
X Drive on carefully.
X Consult aqualified specialist workshop. J
The red brak
esystem
warnin glamp comes on
while th evehicl eis
moving. Awarnin gtone
also sounds. You are drivin
gwitht he parkin gbrak eapplied.
X Releas ethe parkin gbrake.
The warnin glamp goe sout and th ewarnin gtonec eases. 330
Wa
rning an dindicator la mpsint he instrument clusterOn-board computera nd displays
Page 344 of 497
Useful information
............................342
Stowage areas ................................... 342
Features ............................................. 360 341Stowing and features
Page 345 of 497
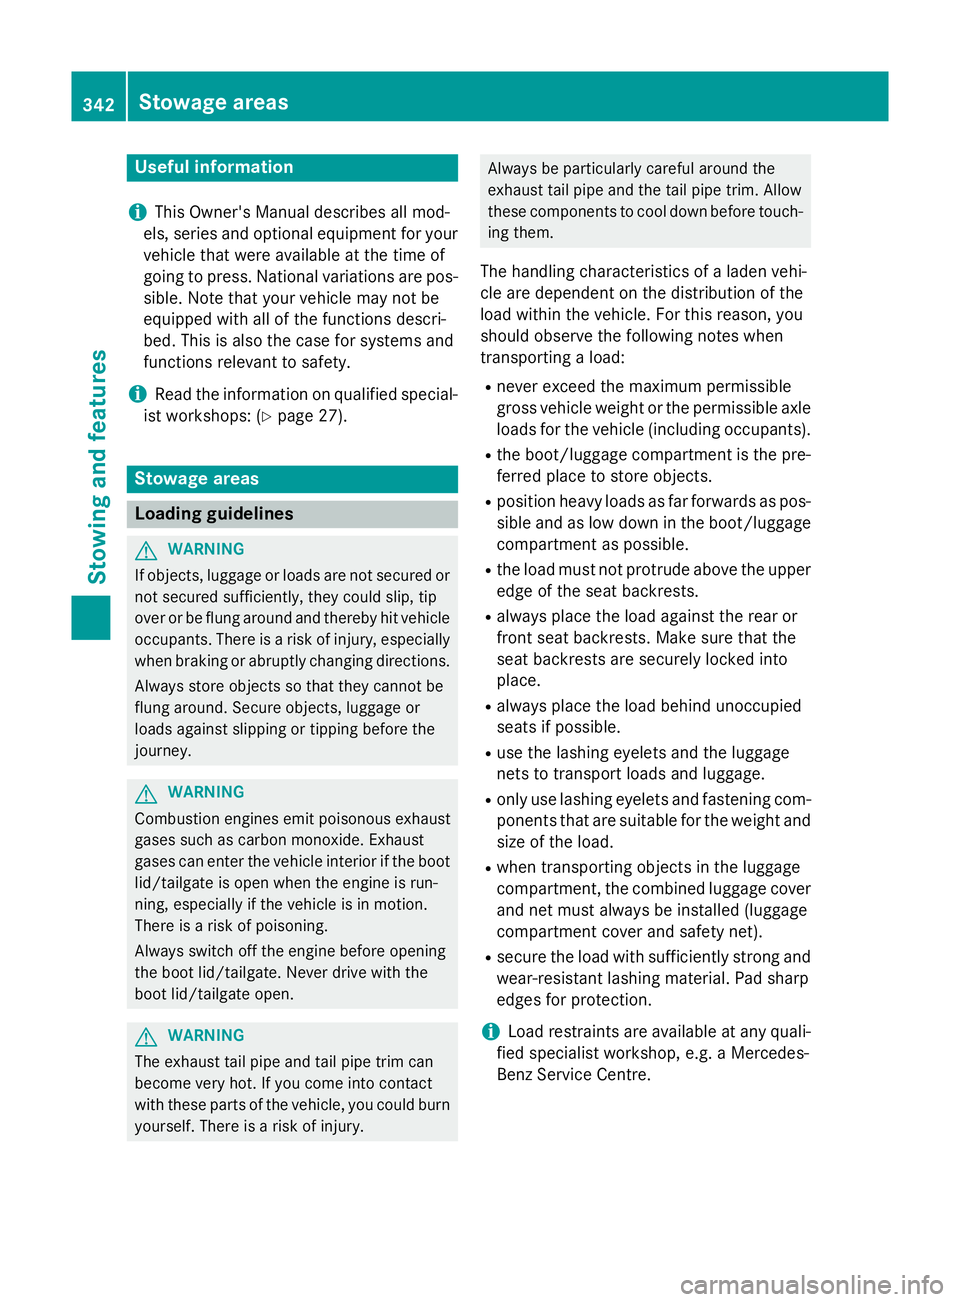
Useful information
i This Owner's Manual describes all mod-
els, series and optional equipment for your
vehicle that were available at the time of
going to press. National variation sare pos-
sible. Not ethat your vehicle may not be
equipped with all of the function sdescri-
bed. This is also the case for system sand
function srelevan ttosafety.
i Read the information on qualified special-
ist workshops: (Y page 27). Stowage areas
Loading guidelines
G
WARNING
If objects, luggage or loads are not secured or not secured sufficiently, they could slip, tip
over or be flung around and thereby hit vehicle
occupants .There is arisk of injury, especially
when brakin gorabruptly changing directions.
Always stor eobjects so that they cannot be
flung around. Secure objects, luggage or
loads against slipping or tippin gbefore the
journey. G
WARNING
Combustion engines emit poisonous exhaust
gases such as carbon monoxide. Exhaust
gases can enter the vehicle interior if the boot
lid/tailgat eisopen when the engin eisrun-
ning, especially if the vehicle is in motion.
There is arisk of poisoning.
Always switc hoff the engin ebefore opening
the boot lid/tailgate. Never drive with the
boot lid/tailgat eopen. G
WARNING
The exhaust tail pipe and tail pipe trim can
becom every hot. If you come int ocontact
with thes eparts of the vehicle, you could burn
yourself. There is arisk of injury. Always be particularly careful around the
exhaust tail pipe and the tail pipe trim .Allow
thes ecomponents to cool down before touch-
ing them.
The handling characteristic sofaladen vehi-
cle are dependen tonthe distribution of the
load within the vehicle. For this reason ,you
should observ ethe following notes when
transporting aload:
R neve rexceed the maximum permissible
gross vehicle weight or the permissible axle loads for the vehicle (includin goccupants).
R the boot/luggage compartment is the pre-
ferred place to stor eobjects.
R position heavy loads as far forwards as pos-
sible and as low down in the boot/luggagecompartment as possible.
R the load must not protrude above the upper
edge of the seat backrests.
R always place the load against the rear or
fron tseat backrests .Make sure that the
seat backrests are securely locked into
place.
R always place the load behind unoccupied
seats if possible.
R use the lashing eyelets and the luggage
net stot ransport loads and luggage.
R only use lashing eyelets and fastenin gcom-
ponents that are suitable for the weight and size of the load.
R when transporting objects in the luggage
compartment,t he combined luggage cover
and net must always be installed (luggage
compartment cove rand safet ynet).
R secure the load with sufficiently strong and
wear-resistan tlashing material. Pad sharp
edges for protection.
i Load restraint
sare available at any quali-
fied specialist workshop, e.g. aMercedes-
Ben zService Centre. 342
Stowage areasStowing and features
Page 346 of 497
Stowage compartments
Important safety notes G
WARNING
If objectsint he passenger compartmen tare
stowed incorrectly, they can slide or be
thrown around and hit vehicle occupants.
There is arisk of injury, particularly in the
event of sudden braking or asudden change
in direction.
R Always stow objectssot hat they cannot be
thrown around in such situations.
R Always make sure that objectsdon ot pro-
trude from stowage spaces, luggage nets or stowage nets.
R Close the lockable stowage spaces while
driving.
R Always stow and secure heavy, hard, poin-
ted, sharp-edged, fragile or bulky objectsin
the boot/luggage compartment.
Observe the loading guidelines (Y page 342).
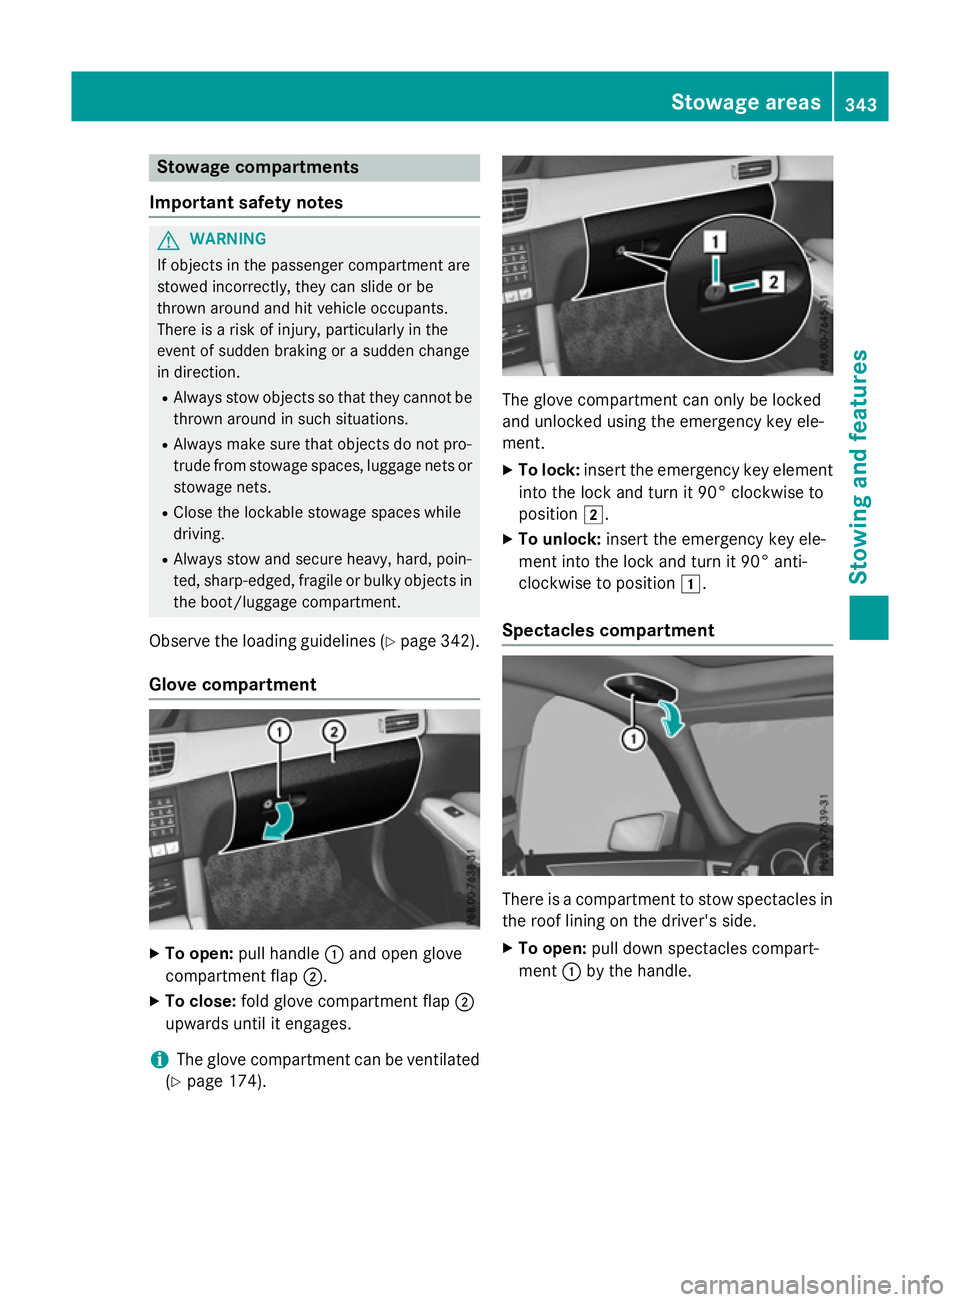
Glove compartment X
To open: pull handle :and open glove
compartmen tflap ;.
X To close: fold glove compartmen tflap ;
upwards until it engages.
i The glove compartmen
tcan be ventilated
(Y page 174). The glove compartmen
tcan only be locked
and unlocked using the emergency key ele-
ment.
X To lock: insert the emergency key element
into the lock and turn it 90° clockwise to
position 2.
X To unlock: insert the emergency key ele-
ment into the lock and turn it 90° anti-
clockwise to position 1.
Spectacles compartment There is
acompartmen ttostow spectacles in
the roof lining on the driver's side.
X To open: pull down spectacles compart-
ment :by the handle. Stowage areas
343Stowing and features Z