2015 MERCEDES-BENZ E-CLASS SALOON warning
[x] Cancel search: warningPage 395 of 497
Cleaning wooden trim and trim ele-
ments !
Do no
tuse solvent-based cleanin gagents
suc hast ar remover, wheel cleaners, pol-
ishe sorw axes. Ther eisotherwise ariskof
damaging th esurface.
X Wipe th ewoode ntrima nd trim elements
wit had amp, lint-free cloth ,e.g.am icrofi-
bre cloth.
X Heavy soiling: use car careand cleaning
product srecommended and approved by
Mercedes-Benz.
Cleaning th eseat covers General notes
! Do no
tuse microfibre cloth stoclean gen-
uine leather ,artificial leather or DINAMICA
covers. If used often ,the se can damag ethe
cover.
i Not
ethatregular car eisessential to
mak esure that th eappearanc eand com-
for toft hecover sare retaine dovertime.
Genuine leather seat covers
Leather is anatural product.
It has natural surface properties, e.g.: R unevenness in structure
R marks caused by growth and injury
R subtle colour differences
Thes eare characteristic sofleather and not
material faults.
! To retain th
enatural appearanc eofthe
leather ,observ ethe followin gcleaning
instructions:
R Clean genuine leather cover scarefully
wit had amp cloth and then wipe th ecov-
ers down wit hadry cloth.
R Mak esure that th eleather does not
become soaked. It may otherwise
become roug hand cracked.
R Only use leather car eagents that have
been tested and approved by Mercedes- Benz. You can obtain these from
aquali-
fied specialist workshop.
Seat cover sfromo ther materials
! Observ
ethe followin gwhen cleaning:
R clean artificial leather cover swithac loth
moistene dwithas olution containing 1%
detergen t(e.g. washing-up liquid).
R clean cloth cover switham icrofibre cloth
moistene dwithas olution containing 1%
detergen t(e.g. washing-up liquid). Rub
carefully, and always wipe entir eseat
sections to avoid leavin gvisible lines.
Leav ethe seat to dry afterwards. Clean-
ing results depen donthetype of dirt and
how lon githas been there.
R Clean DINAMICA cover swithad amp
cloth .Makes ure that you wipe entire
seat sections to avoid leavin gvisible
lines.
Cleaning th eseat belts G
WARNING
Seat belt smay be severely weakened if
bleached or coloured. This may lead to the
seat belts, for example ,tea rin gorf ailinginan
accident. Ther eisanincreased ris kofinjury,
possibly eve nfatal.
Never bleac horcolour seat belts.
! Do no
tclean th eseat belt susin gchemical
cleanin gagents .Donotdry th eseat belt sat
temperatures abov e80†or in direct sun-
light.
X Use clean, lukewarm wate rand soap solu-
tion.
Cleaning th eroof lining and carpets X
Roof lining: if it is verydirty, use asoft
brus hord ry shampoo.
X Carpets: use thecarpet and textile clean-
ing agents recommended and approved by
Mercedes-Benz. 392
CareMaintenance and care
Page 397 of 497
Useful information
i This Owner's Manual describes all mod-
els, series and optional equipment for your
vehicle that were available at the time of
going to press. National variation sare pos-
sible. Not ethat your vehicle may not be
equipped with all of the function sdescri-
bed. This is also the case for system sand
function srelevan ttosafety.
i Read the information on qualified special-
ist workshops: (Y page 27). Wher
ewillIfind...? Warning triangle
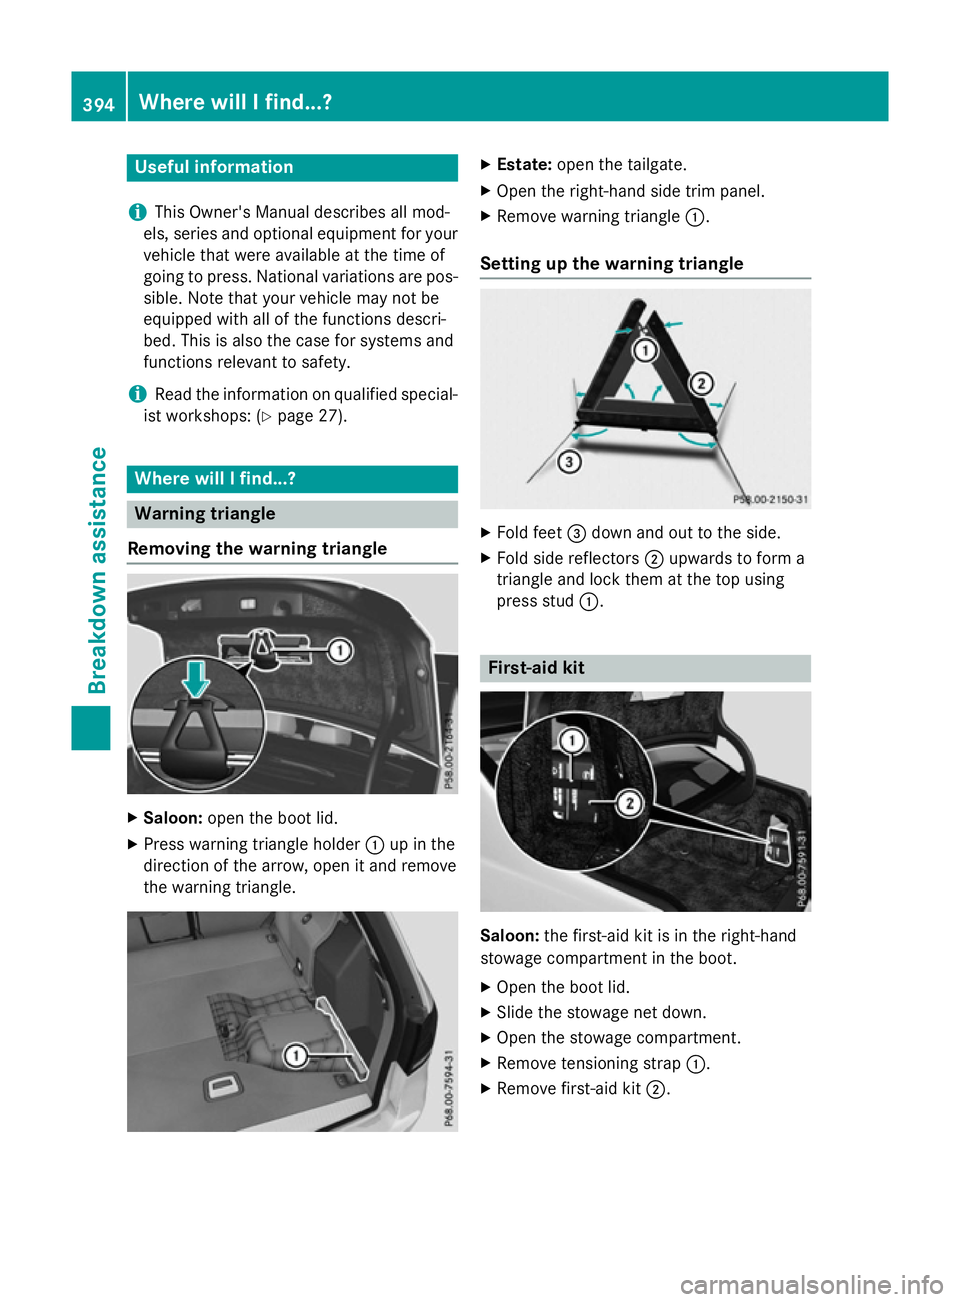
Removing the warning triangle X
Saloon: open the boot lid.
X Press warnin gtriangle holder :up in the
direction of the arrow, open it and remove
the warnin gtriangle. X
Estate: open the tailgate.
X Open the right-han dside trim panel.
X Remove warnin gtriangle :.
Setting up the warning triangle X
Fold feet =down and out to the side.
X Fold side reflectors ;upwards to form a
triangle and lock them at the top using
press stud :. First-aid kit
Saloon:
the first-aid kit is in the right-hand
stowage compartment in the boot.
X Open the boot lid.
X Slide the stowage net down.
X Open the stowage compartment.
X Remove tensionin gstrap :.
X Remove first-aid kit ;.394
Wher
ewillIfind...?Breakdown assistance
Page 400 of 497
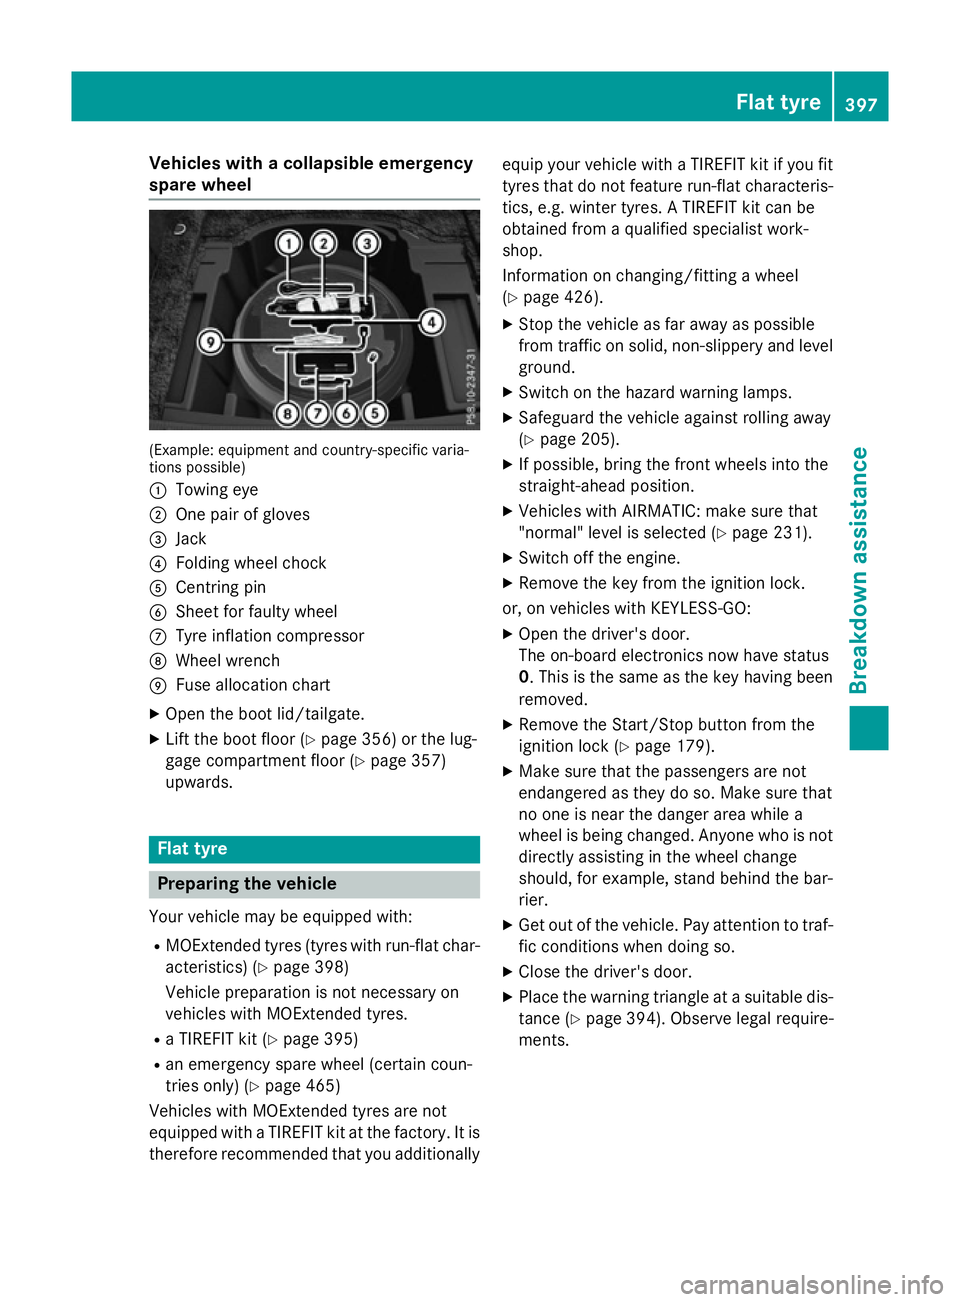
Vehicles with
acolla psibl eemergency
spare wheel (Example: equipment and country-specifi
cvaria-
tions possible)
: Towing eye
; One pair of gloves
= Jack
? Folding whee lchock
A Centring pin
B Shee tfor faulty wheel
C Tyre inflation compressor
D Wheel wrench
E Fusealloc ation chart
X Ope nthe boot lid/tailgate.
X Lif tthe boot floor (Y page 356)orthe lug-
gage compartment floor (Y page 357)
upwards. Flat tyre
Preparin
gthe vehicle
Your vehicl emaybe equipped with:
R MOExtende dtyres (tyres with run-fla tchar-
acteristics )(Ypage 398)
Vehicl epreparatio nisn ot necessary on
vehicles with MOExtende dtyres.
R aT IREFIT kit (Y page 395)
R an emergency spare whee l(certai ncoun-
trie sonly) (Y page 465)
Vehicles with MOExtende dtyres ar enot
equipped with aTIREFIT kit at the factory .Itis
therefore recommende dthatyou additionally equi
pyourvehicl ewithaT IREFIT kit if yo ufit
tyres tha tdon ot feature run-fla tcharacteris-
tics ,e.g.w inter tyres. ATIREFIT kit can be
obtained from aquali fied specialist work-
shop.
Informatio nonchanging/fitting awheel
( Y page 426).
X Stop the vehicl easfar away as possible
from traffic on solid ,non-slippery and level
ground.
X Switch on the hazard warning lamps.
X Safeguar dthe vehicl eagain st rolling away
(Y page 205).
X If possible, bring the front wheels into the
straight-ahea dposition.
X Vehicles with AIRMATIC: make sure that
"normal" level is selecte d(Ypage 231).
X Switch off the engine.
X Remove the key from the ignition lock.
or, on vehicles with KEYLESS‑ GO:
X Ope nthe driver' sdoor.
The on-boar delectronics now have status
0.T hisist he same as the key having been
removed.
X Remove the Start/Sto pbutton from the
ignition lock (Y page 179).
X Make sure tha tthe passenger sarenot
endangere dasthey do so. Make sure that
no one is nea rthe danger area whil ea
whee lisbeing changed .Anyone wh oisnot
directl yassis ting in the whee lchange
should, for example, stand behind the bar-
rier.
X Ge toutof the vehicle. Pa yattentio ntotraf-
fic conditions when doing so.
X Close the driver' sdoor.
X Place the warning triangl eatasuitabl edis-
tance (Y page 394). Observe lega lrequire-
ments. Flat tyre
397Breakdown assis tance
Page 401 of 497
MOExtended tyres (tyres with run-flat
characteristics)
General notes With MOExtended tyres (tyre
swith run-flat
characteristics), you can continue to drive
yourv ehicleeven if there is atotal loss of
pressure in one or more tyres. The affected
tyre must not show any clearly visible dam-
age.
You can recognise MOExtended tyres by the
MOExtended marking which appears on the
tyre wall. You willf ind this marking next to the
tyre size designation, the load-bearing capa-
city and the spee dindex.
MOExtended tyres may only be usedinc on-
junction with an activated tyre pressure loss
warning system or tyre pressure monitor.
If ap ressure lossw arningmessage
appears in the multifunction display:
R observe the instructions in the display mes-
sage s(Ypage3 22)
R check the tyre for damage
R if driving on, observe the following notes
The driving distance possible in run-fla tmode
is approximately 80 km when the vehicl eis
partiallyl aden and approximately 30 km
when the vehicl eisfullyladen.
In addition to the vehicl eload, the driving dis-
tance possible depends upon:
R vehicl espeed
R road condition
R outside temperature
The driving distance possible in run-fla tmode
may be reduced by extreme driving condi-
tions/manoeuvres ,oritcan be increased
through amoderate style of driving.
The driving distance possible in run-fla tmode
is counted from the moment the tyre pressure loss warning appears in the multifunction dis-
play.
You must not exceed amaximu mspee dof
80 km/h. When replacing one or all tyres, observe the
following specifications for yourv
ehicle's
tyres:
R size
R the type and
R the "MOExtended "mark.
If at yre has gone flat and cannot be replaced
with an MOExtended tyre, astandard tyre
may be usedasat emporary measure. Make
sure that you use the prope rsize and type
(summer or winter tyre).
Vehicles with MOExtended tyres are not
equipped with aTIREFIT kit at the factory. It is
therefore recommende dthat you additionally
equip yourv ehiclewithaTIREFIT kit if you fit
tyres that do not feature run-fla tcharacteris-
tics, e.g. winter tyres. ATIREFIT kit can be
obtained from aqualified specialist work-
shop.
Important safety notes G
WARNING
When driving in emergency mode, the driving characteristics deteriorate, e.g. when corner-
ing, accelerating quickly and when braking.
There is arisk of accident.
Do not exceed the stated maximu mspeed.
Avoid abrupt steering and driving manoeu-
vres, and driving over obstacles (kerbs, pot-
holes, off-road). This appliesinp articulartoa
laden vehicle.
Stop driving in emergency mode if:
R you hearb anging noises.
R the vehicl estarts to shake.
R you see smoke and smell rubber.
R ESP ®
is intervening constantly.
R there are tears in the sidewalls of the tyre.
After driving in emergency mode, have the
whee lrims checked at aqualified specialist
worksho pwith regard to their further use .The
faulty tyre must be replaced. 398
Flat tyreBreakdown assistance
Page 402 of 497
TIREFI
Tkit
Important safety notes TIREFIT is
atyres ealan t.
Yo uc an us eTIREFIT to seal punctures of up to
4m m, particularly thos einthe tyr etread. You
can us eTIREFIT at outside temperatures
down to Ò20 †. G
WARNING
In the following situations, the tyr esealant is
unabl etop rovidesufficient breakdow nassis-
tance ,asitisu nabletos ealthe tyr eproperly:
R there ar ecuts or punctures in the tyre
large rtha nt hos em entione dabove.
R the whee lrim is damaged.
R youh aved riven at ver ylow tyrep ressures
or on aflatt yre.
There is ariskofana ccident.
Do not drive any further. Contact aquali fied
specialis tworkshop. G
WARNING
The tyr esealant is harmfu land causes irrita-
tion. It must not come into contact with your
skin, eyes or clothing or be swallowed. Do not inhal eTIREFIT fumes .Keept yres ealant away
fro mc hildren. There is ariskofi njury.
If yo ucome into contact with the tyr esealant,
observe the following:
R Rinse off the tyr esealant fro myours kin
immediatel ywithw ater.
R If the tyr esealant come sinto contact with
your eyes, immediatel yrinse the mthor-
oughl ywithc lean water.
R If tyr esealant is swallowed, immediately
rinse your mouth ou tthoroughl yand drink
plenty of water. Do not induce vomiting,
and see kmedica lattentio nimmediately.
R Immediately change ou tofclothing which
ha sc ome into contact with tyr esealant.
R If an allergi creactio noccurs, see kmedical
attentio nimmediately. !
Do not operate the tyr
einflation com-
presso rfor longe rtha ne ight minute sata
time withou tabreak. It ma yotherwise
overheat.
The tyr einflation compressor can be oper-
ate dagain once it ha scoole ddown.
Compl ywitht he manufacturer's safety
instructions on the sticker on the tyr einfla-
tio nc ompressor.
Usin gthe TIREFI Tkit X
Do not remove any foreign objects which
have penetrated the tyre, e.g .screws or
nails.
X Remov ethe tyr esealan tbottle ,the accom-
panying TIREFIT sticker and the tyr einfla-
tio nc ompressor fro mthe stowag espace
under the boot floor/luggage compart-
ment floor (Y page 395).
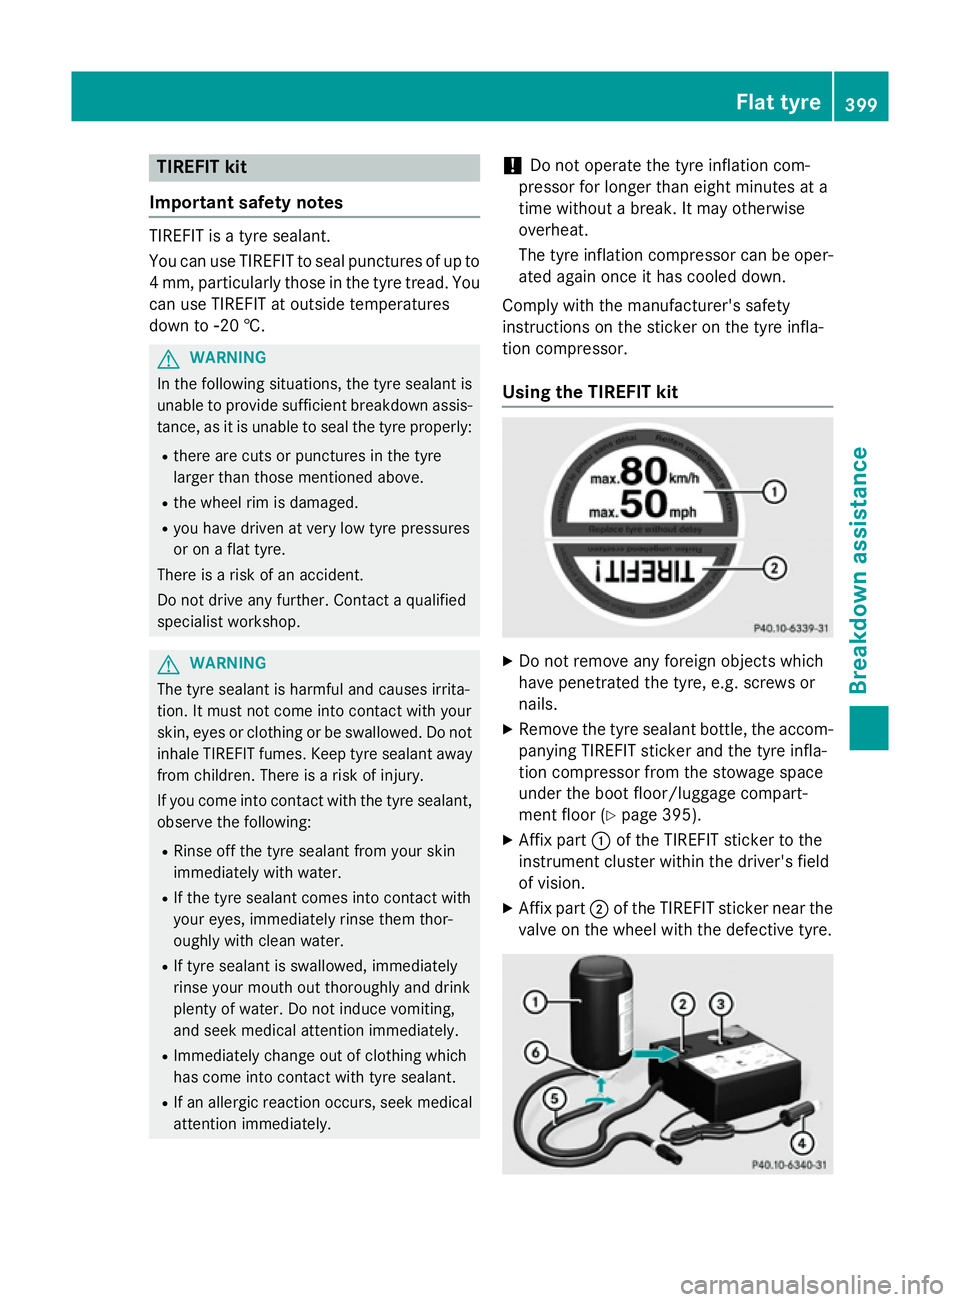
X Affi xpart :of the TIREFIT sticker to the
instrument cluster withi nthe driver's field
of vision.
X Affi xpart ;of the TIREFIT sticker nea rthe
valve on the whee lwitht he defective tyre. Flat tyre
399Breakdow nassistance Z
Page 403 of 497
X
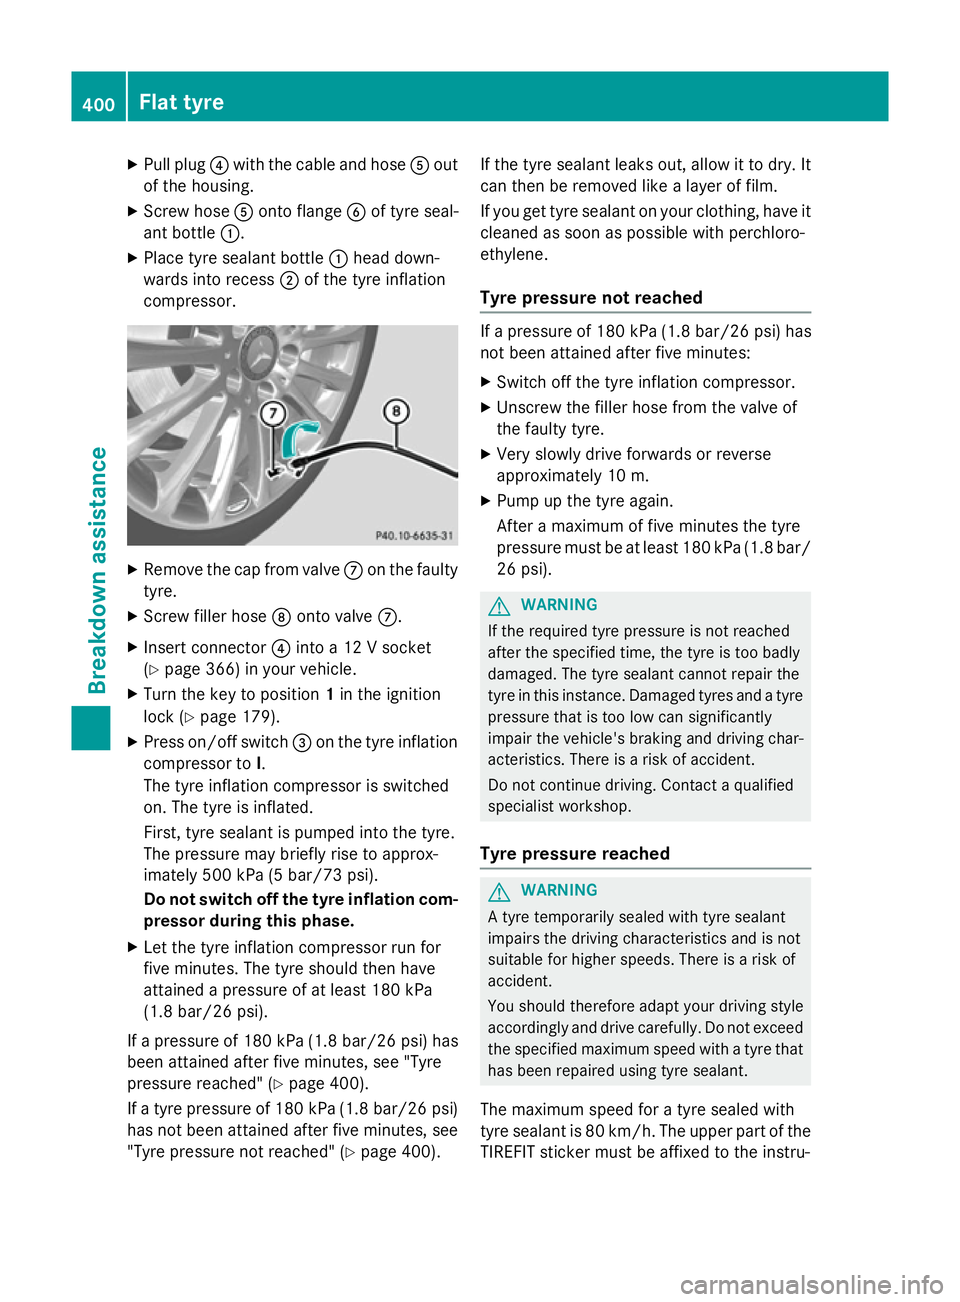
Pull plug ?with the cable and hose Aout
of the housing.
X Screw hose Aontof lange Bof tyre seal-
ant bottle :.
X Place tyre sealant bottle :head down-
wards into recess ;of the tyre inflation
compressor. X
Remove the cap from valve Con the faulty
tyre.
X Screw filler hose Dontov alveC.
X Inser tconnector ?into a12V socket
(Y page 366) in your vehicle.
X Turn the key to position 1in the ignition
lock (Y page 179).
X Press on/of fswitch =on the tyre inflation
compressor to I.
The tyre inflation compressor is switched
on. The tyre is inflated.
First ,tyre sealant is pumped into the tyre.
The pressure may briefly rise to approx-
imately 500 kPa (5 bar/73 psi).
Do not switch off the tyrei nflation com-
pressor during this phase.
X Let the tyre inflation compressor run for
five minutes. The tyre should then have
attained apressure of at least 180 kPa
(1.8 bar/26 psi).
If ap ressure of 180 kPa (1.8 bar/26 psi )has
been attained after five minutes, see "Tyre
pressure reached" (Y page 400).
If at yre pressure of 180 kPa (1.8 bar/26 psi)
has not been attained after five minutes, see "Tyre pressure not reached" (Y page 400).If the tyre sealant leaks out, allow it to dry. It
can then be removed like alayer of film.
If you get tyre sealant on your clothing, have it cleaned as soon as possible with perchloro-
ethylene.
Tyrep ressure not reached If
ap ressure of 180 kPa (1.8 bar/26 psi )has
not been attained after five minutes:
X Switc hoff the tyre inflation compressor.
X Unscrew the filler hose from the valve of
the faulty tyre.
X Very slowly drive forwards or reverse
approximately 10 m.
X Pump up the tyre again.
After amaximum of five minutes the tyre
pressure must be at least 180 kPa (1.8 bar/
26 psi). G
WARNING
If the required tyre pressure is not reached
after the specified time, the tyre is too badly
damaged. The tyre sealant cannot repair the
tyre in this instance. Damaged tyres and atyre
pressure that is too low can significantly
impair the vehicle's braking and driving char-
acteristics. There is arisk of accident.
Do not continue driving. Contact aqualified
specialist workshop.
Tyrep ressure reached G
WARNING
At yre temporarily sealed with tyre sealant
impairs the driving characteristics and is not
suitable for higher speeds. There is arisk of
accident.
You should therefore adapt your driving style
accordingly and drive carefully. Do not exceed the specified maximum speed with atyre that
has been repaired using tyre sealant.
The maximum speed for atyre sealed with
tyre sealant is 80 km/h. The upper part of the
TIREFI Tsticker must be affixed to the instru- 400
Flat tyreBreakdown assistance
Page 404 of 497
ment cluster where it willbee
asily seen by
the driver.
! After use, excess tyre sealant may run out
of the filler hose. This could caus estains.
Therefore, place the filler hose in the plastic
bag which contained the TIREFIT kit. H
Environmental note
Have the used tyre sealant bottle disposed of
professionally, e.g. at aqualified specialist
workshop.
If at yre pressure of 180 kPa (1.8 bar/26 psi)
has been attained after five minutes:
X Switch off the tyre inflation compressor.
X Unscrew the filler hose from the valve of
the faulty tyre.
X Stow the tyre sealant bottle, the tyre infla-
tion compresso rand the warning triangle.
X Pull away immediately.
X Stop after driving for approximatel yten
minutes and check the tyre pressure with
the tyre inflation compressor.
The tyre pressure must now be at least
130 kPa (1.3 bar/19 psi). G
WARNING
If the required tyre pressure is not reached
after driving for ashort period, the tyre is too
badly damaged. The tyre sealant cannot
repair the tyre in this instance. Damage dtyres
and atyre pressure that is too low can signif-
icantly impair the vehicle's braking and driv-
ing characteristics. There is arisk of accident.
Do not continue driving. Contact aqualified
specialist workshop.
i In yourv
ehicle, you willf indasticker with
the Mercedes-Benz Service24h telephone
number, e.g. on the B-pillar on the driver's
side.
X Correct the tyre pressure if it is still at least
130 kPa (1.3 bar/19 psi). See the fuel filler
flap for values.
X To increase the tyre pressure: switch on
the tyre inflation compressor. X
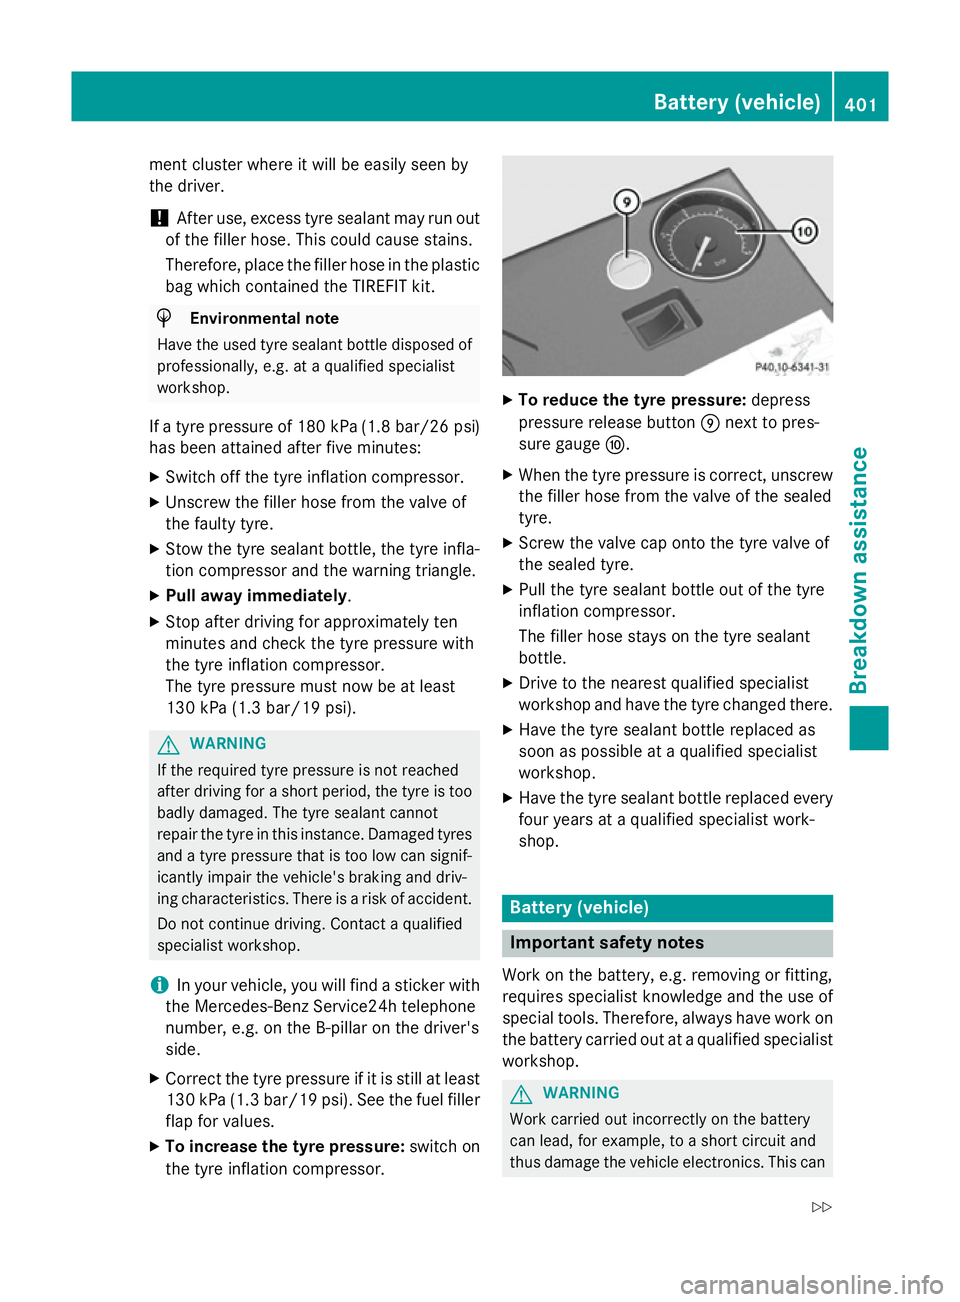
To reduce the tyre pressure: depress
pressure release button Enext to pres-
sure gauge F.
X When the tyre pressure is correct, unscrew
the filler hose from the valve of the sealed
tyre.
X Screw the valve cap onto the tyre valve of
the sealed tyre.
X Pullt he tyre sealant bottle out of the tyre
inflation compressor.
The filler hose stays on the tyre sealant
bottle.
X Drive to the nearest qualified specialist
workshop and have the tyre changed there.
X Have the tyre sealant bottle replaced as
soon as possible at aqualified specialist
workshop.
X Have the tyre sealant bottle replaced every
four years at aqualified specialist work-
shop. Battery (vehicle)
Important safety notes
Work on the battery ,e.g. removing or fitting,
requires specialist knowledge and the use of
specia ltools. Therefore, alwaysh ave work on
the battery carrie dout at aqualified specialist
workshop. G
WARNING
Work carried out incorrectly on the battery
can lead, for example, to ashort circuit and
thus damage the vehicl eelectronics. This can Battery (vehicle)
401Breakdown assistance
Z
Page 405 of 497
lead to function restrictions applying to
safety-relevant systems, e.g the lighting sys-
tem ,the AB S(anti-loc kbraking system) or the
ESP ®
(Electronic Stability Program). The oper-
atin gsafet yofy our vehicle may be restricted.
You could lose control of the vehicle, for
example:
R when braking
R in the even tofabrupt steerin gmanoeuvres
and/or when the vehicle's speed is not
adapted to the road conditions
There is arisk of an accident.
In the even tofashortcircuit or asimilar inci-
dent ,contac taqualified specialist workshop
immediately. Do not drive any further. Always have work on the battery carried out at a
qualified specialist workshop.
Further information about AB S(Ypage 77)
and ESP ®
(Y page 83). G
WARNING
Electrostatic build-up can lead to the creation of sparks, which could ignit ethe highly explo-
sive gases of abattery. There is arisk of an
explosion.
Before handlin gthe battery, touc hthe vehicle
body to remove any existin gelectrostatic
build-up.
The highly flammable gas mixture is created
while the battery is charging and when jump-
starting.
Always make sure that neither you nor the
battery is electrostatically charged. Electro-
static charge is created, for example:
R by wearing synthetic fibre clothing
R due to friction betwee nclothing and the
seat
R when you pull or push the battery across
carpe torother synthetic materials
R when you rub the battery with acloth G
WARNING
Durin gthe charging process, abattery produ-
ces hydroge ngas. If ashor tcircuit occurs or spark
sare created, the hydroge ngas can
ignite. There is arisk of an explosion.
R Make sure that the positive terminal of a
connected battery does not com eintoc on-
tac twith vehicle parts.
R Never place metal object sortools on abat-
tery.
R It is importan tthat you observe the descri-
bed order of the battery terminals when
connectin gand disconnecting abattery.
R When jump-starting, make sure that the
battery poles with identical polarit yare
connected.
R It is particularly importan ttoobserve the
described order when connectin gand dis-
connectin gthe jump leads.
R Never connec tordisconnect the battery
terminals while the engin eisrunning. G
WARNING
Batter yacid is caustic. There is arisk of injury.
Avoid contac twith the skin ,eyes or clothing.
Do not breathe in any battery gases. Do not
lean over the battery. Keep the batteries out
of the reach of children. Immediately rinse off
battery acid thoroughly with plent yofclean
water and seek medical attention at once. H
Environmental note Batteries contain pollutants.
It is illegal to dispose of them
with the household rubbish.
They must be collected sep-
arately and dispose dofinan
environmentally responsible
recyclin gsystem. Dispose of batteries in an
environmentally responsible
manner. Take discharged
batteries to
aqualified spe-
cialist workshop or to acol-
lection point for used batter-
ies.
! Have the battery checked regularly at a
qualified specialist workshop. 402
Battery (vehicle)Breakdown assistance