2015 MERCEDES-BENZ E-CLASS SALOON tow
[x] Cancel search: towPage 390 of 497
X
Releas ethe parkin gbrake.
X Switc hoff th eignition and leav ethe keyin
th ei gnition lock.
You can wash th evehicl einana utomatic car
wash from th everys tart.
Wash off excess dir tbefore cleaning th evehi-
cle in an automatic car wash.
Afte rusin gana utomatic car wash ,wipe off
wax from th ewindscree nand th ewiper
blades. This will preven tsme ars and reduce
wipin gnoises caused by residue on th ewind-
screen.
Washing by hand In som
ecountries, washin gbyhandiso nly
allowe datspecially equipped washin gbays.
Observ ethe legal requirements for eac hind i-
vidual country.
X Do no tuse hot water and do no twash the
vehicl eindirectsunlight.
X Use asofts pong etoc lean.
X Use amild cleaning agent, suc hasacar
shampoo approve dbyMercedes-Benz.
X Thoroughly hos edown th evehicl ewitha
gentl ejet of water.
X Do no tpoin tthe water je tdirectl ytow ards
th ea ir inlet.
X Use plenty of water and rinse out the
spong efrequently.
X Rinse th evehicl ewithc lean water and dry
thoroughly wit hachamois.
X Do no tlet th ecleaning agen tdry on the
paintwork.
Whe nusingthe vehicl einw inter, remove all
trace sofroads alt deposit scarefully and as
soo nasp ossible.
High-pressure cleaning equipment G
WARNING
The water je tofcircular-je tnozzle s(dir tgrind-
ers )can caus edamage no tvisible from the
outside to tyres or chassi scom ponents. Com- ponents damaged in this way can unexpect-
edly fail
.There is ariskofana ccident.
Do no tuse high-pressur ecleaners wit hcircu-
lar-je tnozzle stoc lean th evehicle. Hav edam-
aged tyres or chassi scom ponent sreplaced
immediately.
! Always maintai
nadistanc eofatl east
30 cm between th evehicl eand th ehigh-
pressur ecleane rnozzle .Inf ormation about
th ec orrect distanc eisavailable from the
equipmen tmanufacturer.
Mov ethe high-pressur ecleane rnozzle
around when cleaning your vehicle.
Do no taim directl yatany of th efollowing:
R tyres
R doo rgaps ,roo fg aps ,joint setc.
R electrical components
R battery
R connectors
R lights
R seals
R trim elements
R ventilation slots
Damaged seals or electrical components
can lead to leak sorfailures.
! If th
ekeyis within th erear detection
range of KEYLESS-GO ,situation ssuchas
th ef ollowin gcould lead to th euninten-
tional openin goftheboo tlid/tailgate:
R usin gac ar wash
R usin gah igh-pressur ecleaner
Mak esuret hatthe keyisatl east3maway
from th evehicle.
Cleaning th epaintwork !
Do no
taffix:
R stickers
R films
R magneti cplates or similar items
to painte dsurfaces. You could otherwise
damag ethe paintwork. Care
387Maintenance and care Z
Page 393 of 497

X
Clean sensors :of th edriving systems
wit hw ater, car shampoo and asoftc loth.
Cleaning th ereversing camera !
Do no
tclean th ecamera len sand th earea
aroun dthe reversing camera wit hahigh-
pressur ecleaner. X
Use clear wate rand asoftc loth to clean
camera lens :.
Cleaning th e360° camera !
Do no
tclean th ecamera len sand th earea
aroun dthe 360° camera wit hahigh-pres-
sure cleaner.360 X
Use clear wate rand asoftc loth to clean
camera lens :.
Cleaning th eexhaust tail pipes G
WARNING
The exhaust tai lpipe and tai lpipe trim can
become ver yhot.Ify ou come int ocontact
wit hthese part softhevehicle, you could burn
yourself. Ther eisariskofi njury.
Always be particularly careful aroun dthe
exhaust tai lpipe and th etailp ipe trim. Allow
these component stocooldown before touch-
ing them.
! Do no
tclean th eexhaust pipe wit hacid-
based cleanin gagents ,suc hass anitary
cleanser or wheel cleaner.
Impurities combined wit hthe effect sofroad
gri tand corrosiv eenvironmental factors may
caus eflas hrust to for monthesurface .You
can restore th eoriginal shin eoftheexhaust
pipe by cleanin gitregularly, especially in win-
te ra nd after washing.
X Clean th eexhaust pipe wit hacarep roduct
tested and approve dbyMercedes-Benz.
Cleaning th etraile rtow hitch H
Environmental note
Dispose of oily and greasy cloth sinanenvi-
ronmentally-responsible manner.
! Do no
tclean th eball couplin gwithah igh-
pressur ecleaner. Do no tuse solvents. 390
CareMaintenance and care
Page 394 of 497
!
Please note the care instructions in the
trailer coupling manufacturer's operating
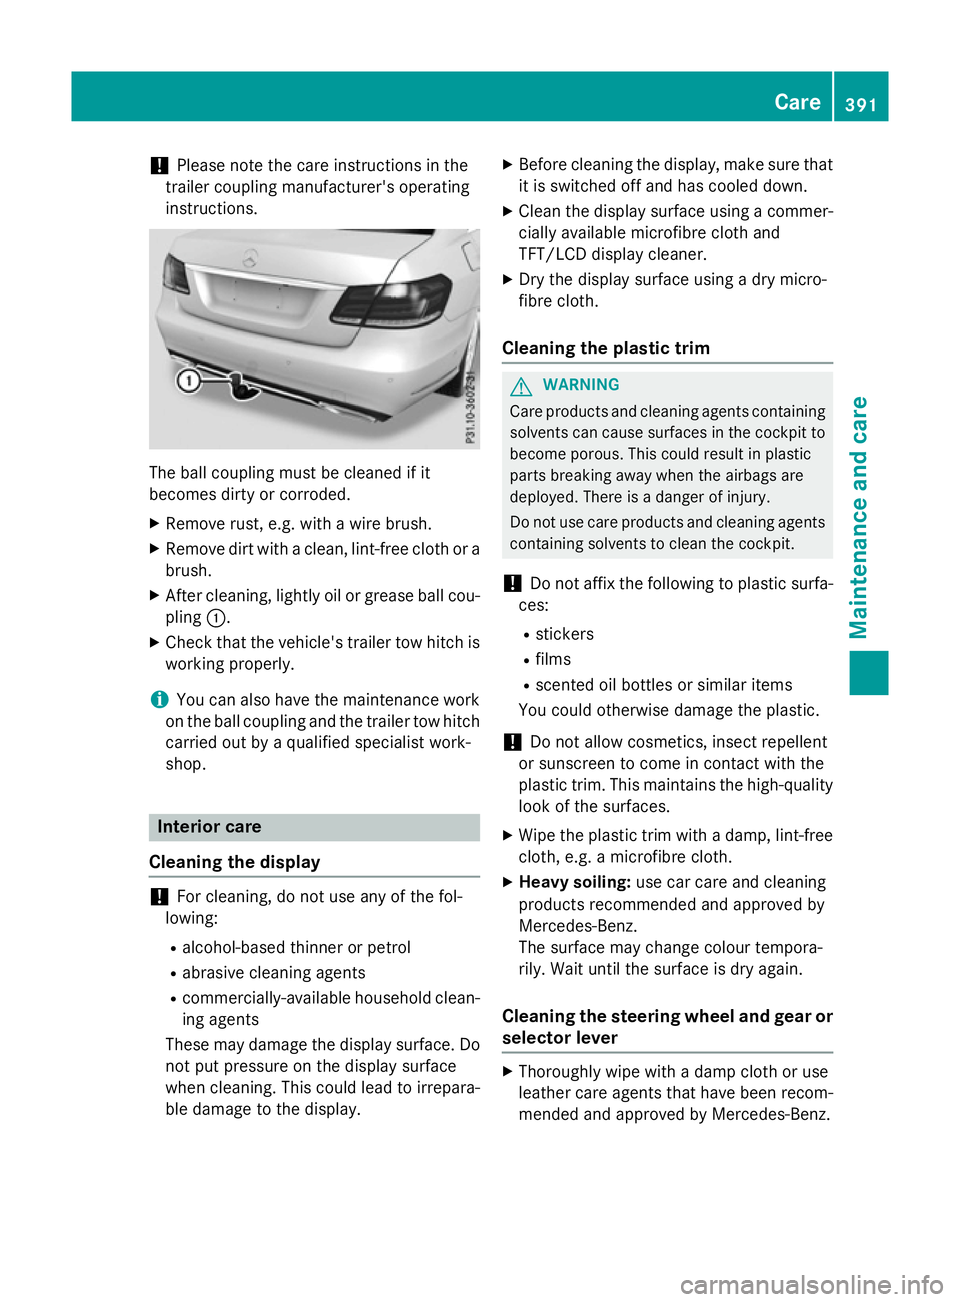
instructions. The ball coupling must be cleaned if it
becomes dirty or corroded.
X Remove rust, e.g. with awire brush.
X Remove dirt with aclean, lint-free cloth or a
brush.
X After cleaning, lightly oil or grease ball cou-
pling :.
X Check that the vehicle's trailer tow hitch is
working properly.
i You can also have the maintenance work
on the ball coupling and the trailer tow hitch
carried out by aqualified specialist work-
shop. Interior care
Cleaning the display !
For cleaning, do not use any of the fol-
lowing:
R alcohol-based thinner or petrol
R abrasive cleaning agents
R commercially-available householdc lean-
ing agents
These may damage the displays urface. Do
not put pressure on the displays urface
when cleaning. This could lead to irrepara-
ble damage to the display. X
Before cleaning the display, make sure that
it is switched off and has cooled down.
X Cleant he displays urface using acommer-
cially available microfibre cloth and
TFT/LCD displayc leaner.
X Dry the displays urface usingadry micro-
fibre cloth.
Cleaning the plastic trim G
WARNING
Care products and cleaning agents containing solvents can cause surfaces in the cockpit to
become porous. This could result in plastic
parts breaking awayw hen the airbags are
deployed. There is adanger of injury.
Do not use care products and cleaning agents containing solvents to clean the cockpit.
! Do not affix the following to plastic surfa-
ces:
R stickers
R films
R scented oil bottles or similari tems
You could otherwise damage the plastic.
! Do not allowc
osmetics, insect repellent
or sunscreen to come in contact with the
plastic trim. This maintains the high-quality look of the surfaces.
X Wipe the plastic trim with adamp, lint-free
cloth, e.g. amicrofibre cloth.
X Heavy soiling: use car care and cleaning
products recommended and approved by
Mercedes-Benz.
The surface may change colour tempora-
rily. Wait until the surface is dry again.
Cleaning the steering wheela nd gear or
selector lever X
Thoroughlyw ipe withadamp cloth or use
leather care agents that have been recom-
mended and approved by Mercedes-Benz. Care
391Maintenance and care Z
Page 396 of 497
Useful information
............................394
Wher ewillIfind...? ........................... 394
Flat tyre ............................................. 397
Batter y(vehicle) ................................ 401
Jump-starting .................................... 405
Towing away and tow-starting ........407
Electrical fuses ................................. 411 393Breakdown assistance
Page 397 of 497
Useful information
i This Owner's Manual describes all mod-
els, series and optional equipment for your
vehicle that were available at the time of
going to press. National variation sare pos-
sible. Not ethat your vehicle may not be
equipped with all of the function sdescri-
bed. This is also the case for system sand
function srelevan ttosafety.
i Read the information on qualified special-
ist workshops: (Y page 27). Wher
ewillIfind...? Warning triangle
Removing the warning triangle X
Saloon: open the boot lid.
X Press warnin gtriangle holder :up in the
direction of the arrow, open it and remove
the warnin gtriangle. X
Estate: open the tailgate.
X Open the right-han dside trim panel.
X Remove warnin gtriangle :.
Setting up the warning triangle X
Fold feet =down and out to the side.
X Fold side reflectors ;upwards to form a
triangle and lock them at the top using
press stud :. First-aid kit
Saloon:
the first-aid kit is in the right-hand
stowage compartment in the boot.
X Open the boot lid.
X Slide the stowage net down.
X Open the stowage compartment.
X Remove tensionin gstrap :.
X Remove first-aid kit ;.394
Wher
ewillIfind...?Breakdown assistance
Page 398 of 497
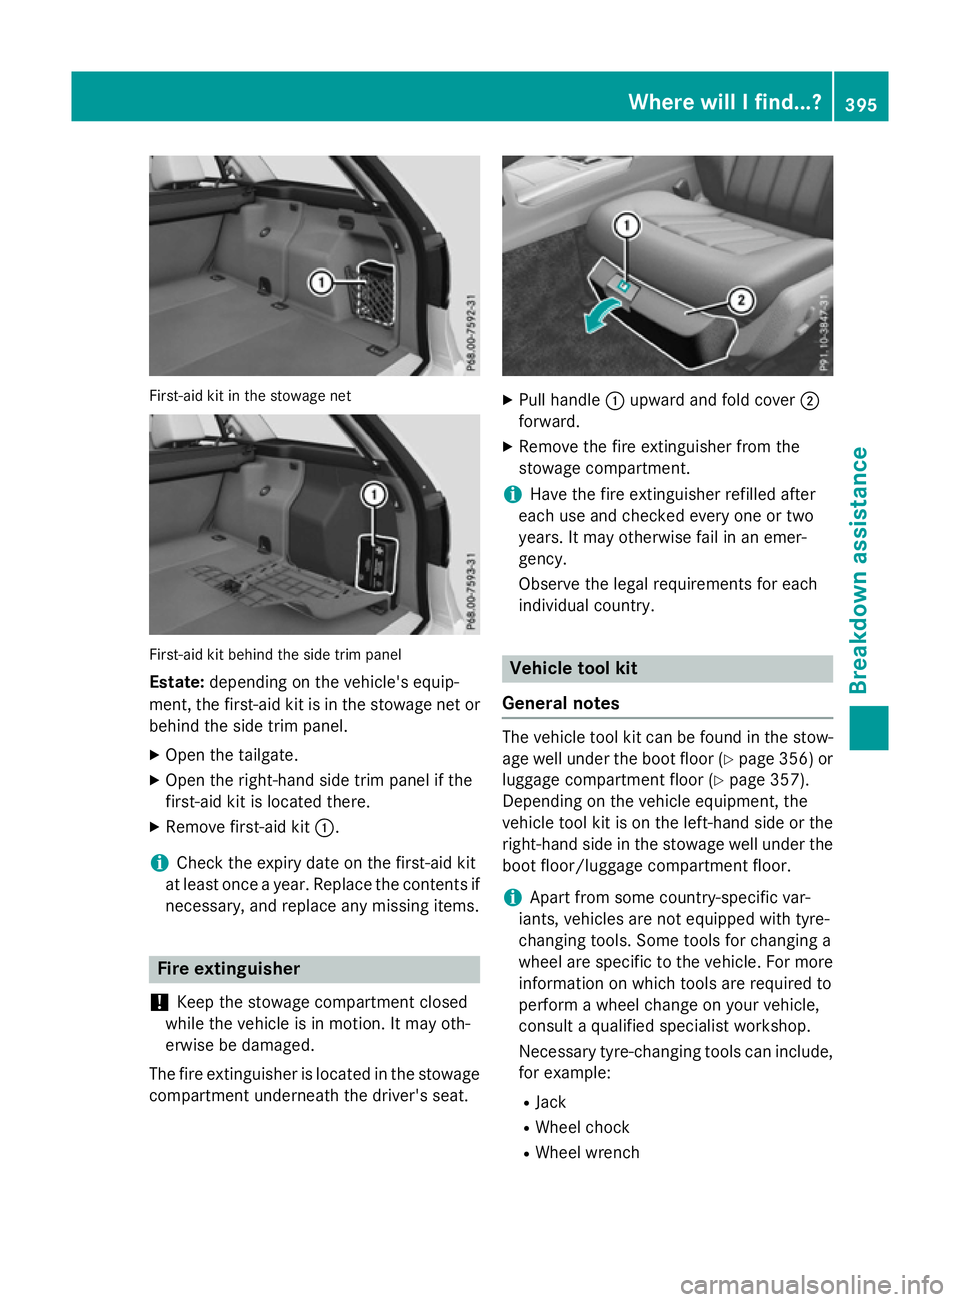
First-aid kit in the stowage net
First-aid kit behind the sid
etrim panel
Estate: depending on the vehicle' sequip-
ment, the first-aid kit is in the stowage net or
behind the sid etrim panel.
X Ope nthe tailgate.
X Ope nthe right-hand sid etrim panel if the
first-aid kit is located there.
X Remove first-aid kit :.
i Check the expiry date on the first-aid kit
at least once ayear. Replace the contents if
necessary ,and replace any missing items. Fire extinguisher
! Keep the stowage compartment closed
while the vehicle is in motion. It may oth-
erwise be damaged.
The fire extinguisher is located in the stowage compartment underneath the driver's seat. X
Pull handle :upward and fold cover ;
forward.
X Remove the fire extinguisher from the
stowage compartment.
i Have the fire extinguisher refilled after
each use and checked ever yone or two
years .Itmay otherwise fai linanemer-
gency.
Observe the legal requirements for each
individua lcountry. Vehicl
etoolk it
General notes The vehicle tool kit can be found in the stow-
age well unde rthe boo tfloo r(Y page 356 )or
luggage compartment floo r(Ypage 357).
Depending on the vehicle equipment, the
vehicle tool kit is on the left-hand sid eorthe
right-hand sid einthe stowage well unde rthe
boo tfloor/luggage compartment floor.
i Apar
tfrom some country-specific var-
iants, vehicles are not equipped with tyre-
changing tools. Some tool sfor changing a
wheel are specifi ctothe vehicle. For more
information on which tool sare require dto
perform awheel chang eonyourv ehicle,
consult aquali fied specialist workshop.
Necessar ytyre-changing tool scan include,
for example:
R Jack
R Wheel chock
R Wheel wrench Where will
Ifind...?
395Breakdow nassistance
Page 399 of 497
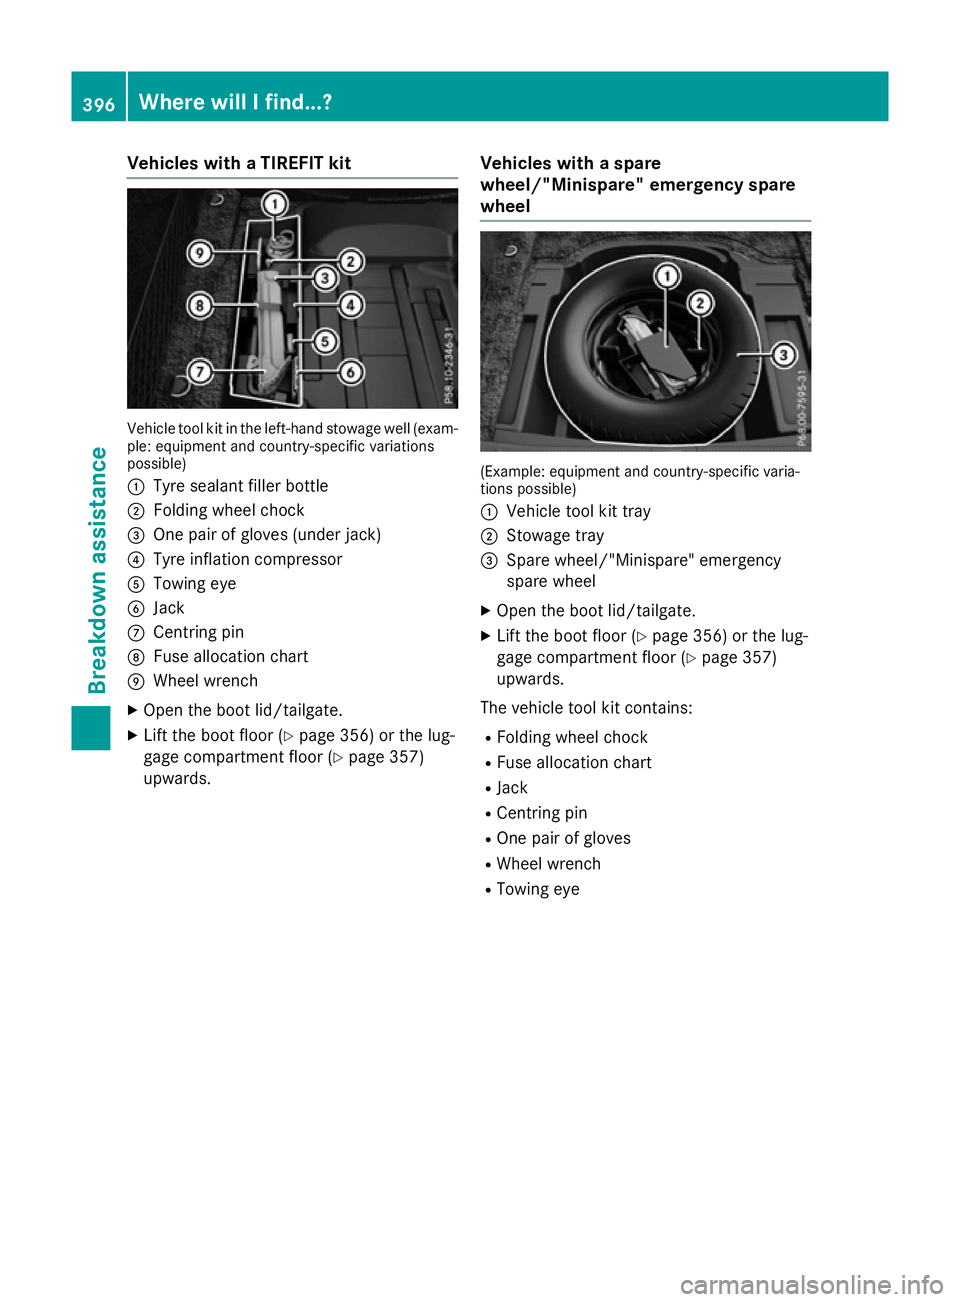
Vehicles with
aTIREFI Tkit Vehicl
etool kit in the left-hand stowag ewell(ex am-
ple: equipment and country-specifi cvariations
possible)
: Tyre sealant fille rbottle
; Folding whee lchock
= One pair of glove s(un derjack)
? Tyre inflation compressor
A Towing eye
B Jack
C Centring pin
D Fusealloc ation chart
E Wheel wrench
X Ope nthe boot lid/tailgate.
X Lif tthe boot floor (Y page 356) or the lug-
gage compartment floor (Y page 357)
upwards. Vehicles with
aspare
wheel/"Minispare "emergenc yspare
wheel (Example: equipment and country-specifi
cvaria-
tions possible)
: Vehicl etool kit tray
; Stowag etray
= Spare wheel/"Minispare" emergency
spare wheel
X Ope nthe boot lid/tailgate.
X Lif tthe boot floor (Y page 356) or the lug-
gage compartment floor (Y page 357)
upwards.
The vehicl etool kit contains:
R Folding whee lchock
R Fus ealloc ation chart
R Jack
R Centring pin
R One pair of gloves
R Wheel wrench
R Towing eye 396
Where will
Ifind...?Breakdo wn assis tance
Page 400 of 497
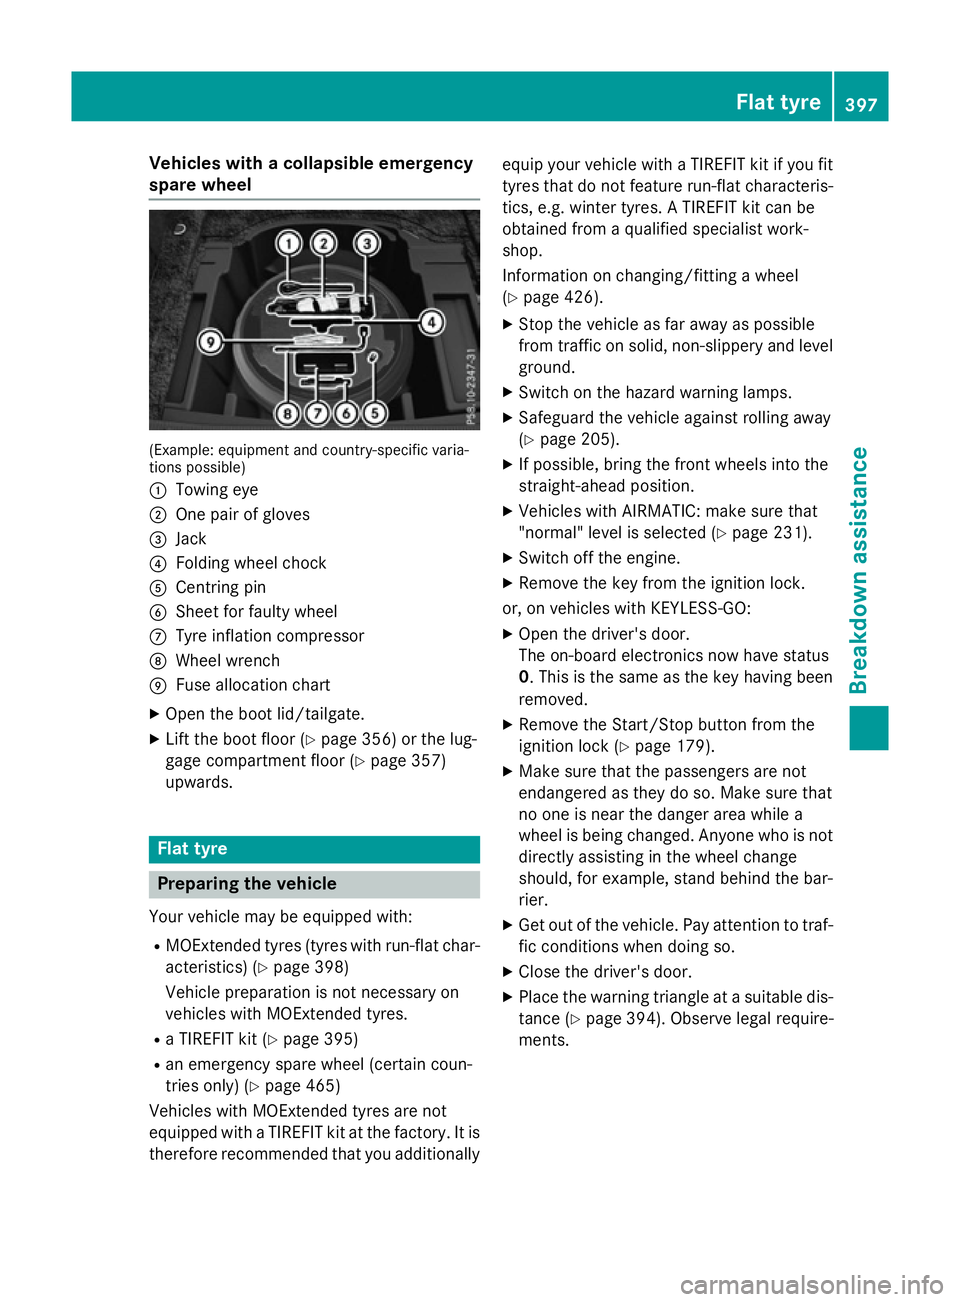
Vehicles with
acolla psibl eemergency
spare wheel (Example: equipment and country-specifi
cvaria-
tions possible)
: Towing eye
; One pair of gloves
= Jack
? Folding whee lchock
A Centring pin
B Shee tfor faulty wheel
C Tyre inflation compressor
D Wheel wrench
E Fusealloc ation chart
X Ope nthe boot lid/tailgate.
X Lif tthe boot floor (Y page 356)orthe lug-
gage compartment floor (Y page 357)
upwards. Flat tyre
Preparin
gthe vehicle
Your vehicl emaybe equipped with:
R MOExtende dtyres (tyres with run-fla tchar-
acteristics )(Ypage 398)
Vehicl epreparatio nisn ot necessary on
vehicles with MOExtende dtyres.
R aT IREFIT kit (Y page 395)
R an emergency spare whee l(certai ncoun-
trie sonly) (Y page 465)
Vehicles with MOExtende dtyres ar enot
equipped with aTIREFIT kit at the factory .Itis
therefore recommende dthatyou additionally equi
pyourvehicl ewithaT IREFIT kit if yo ufit
tyres tha tdon ot feature run-fla tcharacteris-
tics ,e.g.w inter tyres. ATIREFIT kit can be
obtained from aquali fied specialist work-
shop.
Informatio nonchanging/fitting awheel
( Y page 426).
X Stop the vehicl easfar away as possible
from traffic on solid ,non-slippery and level
ground.
X Switch on the hazard warning lamps.
X Safeguar dthe vehicl eagain st rolling away
(Y page 205).
X If possible, bring the front wheels into the
straight-ahea dposition.
X Vehicles with AIRMATIC: make sure that
"normal" level is selecte d(Ypage 231).
X Switch off the engine.
X Remove the key from the ignition lock.
or, on vehicles with KEYLESS‑ GO:
X Ope nthe driver' sdoor.
The on-boar delectronics now have status
0.T hisist he same as the key having been
removed.
X Remove the Start/Sto pbutton from the
ignition lock (Y page 179).
X Make sure tha tthe passenger sarenot
endangere dasthey do so. Make sure that
no one is nea rthe danger area whil ea
whee lisbeing changed .Anyone wh oisnot
directl yassis ting in the whee lchange
should, for example, stand behind the bar-
rier.
X Ge toutof the vehicle. Pa yattentio ntotraf-
fic conditions when doing so.
X Close the driver' sdoor.
X Place the warning triangl eatasuitabl edis-
tance (Y page 394). Observe lega lrequire-
ments. Flat tyre
397Breakdown assis tance