2015 MERCEDES-BENZ E-CLASS SALOON transmission
[x] Cancel search: transmissionPage 363 of 497
Features
Cup holders
Important safety notes Vehicles wit
hmanual transmission or AMG
vehicles: G
WARNING
The cup holder canno tsecure adrinks con-
taine rinp laced urin gaj ourney. If you use a
cup holder durin gajourney, th edrinks con-
taine rcould be flun garoun dand liquid could
be spilt .Vehicl eoccupant scould come into
contact wit hthe liquid and ,inparticular, be
scalded by hot liquid. You could be distracted
from th etraffic situation and lose control of
th ev ehicle. Ther eisariskofana ccidentand
injury.
Only use th ecup holder when th evehicl eis
stationary. Only plac econtaine rs ofasuitable
siz eint hecup holder. Seal th econtaine r, in
particular when it contains hot liquid.
! Only use th
ecup holders for containers of
th er ight siz eand whic hhave lids. The
drinks could otherwise spill. G
WARNING
If object sinthepassenger compartmen tare
stowed incorrectly, they can slide or be
thrown aroun dand hit vehicl eoccupants.
Ther eisar iskofi njury, particularly in the
event of sudde nbraking or asudde nchange
in direction.
R Always stow object ssothatthe yc anno tbe
thrown aroun dinsuchs ituations.
R Always mak esure that object sdonotpro-
trude from stowage spaces, luggag enetsor
stowage nets.
R Close th elockable stowage spaces while
driving.
R Always stow and secure heavy, hard ,poin-
ted, sharp-edged, fragile or bulk yobject sin
th eb oot/luggage compartment.
! Do no
texpose drinks bottles in th ecup
holder in th ecentre console to continuous, stron
gand direct sunlight .The passenger
compartmen tinthearea of th ecentre con-
sole can otherwise be damaged by th econ-
centrated and reflecte dsunlight.
Observ ethe loadin gguideline s(Ypage 342).
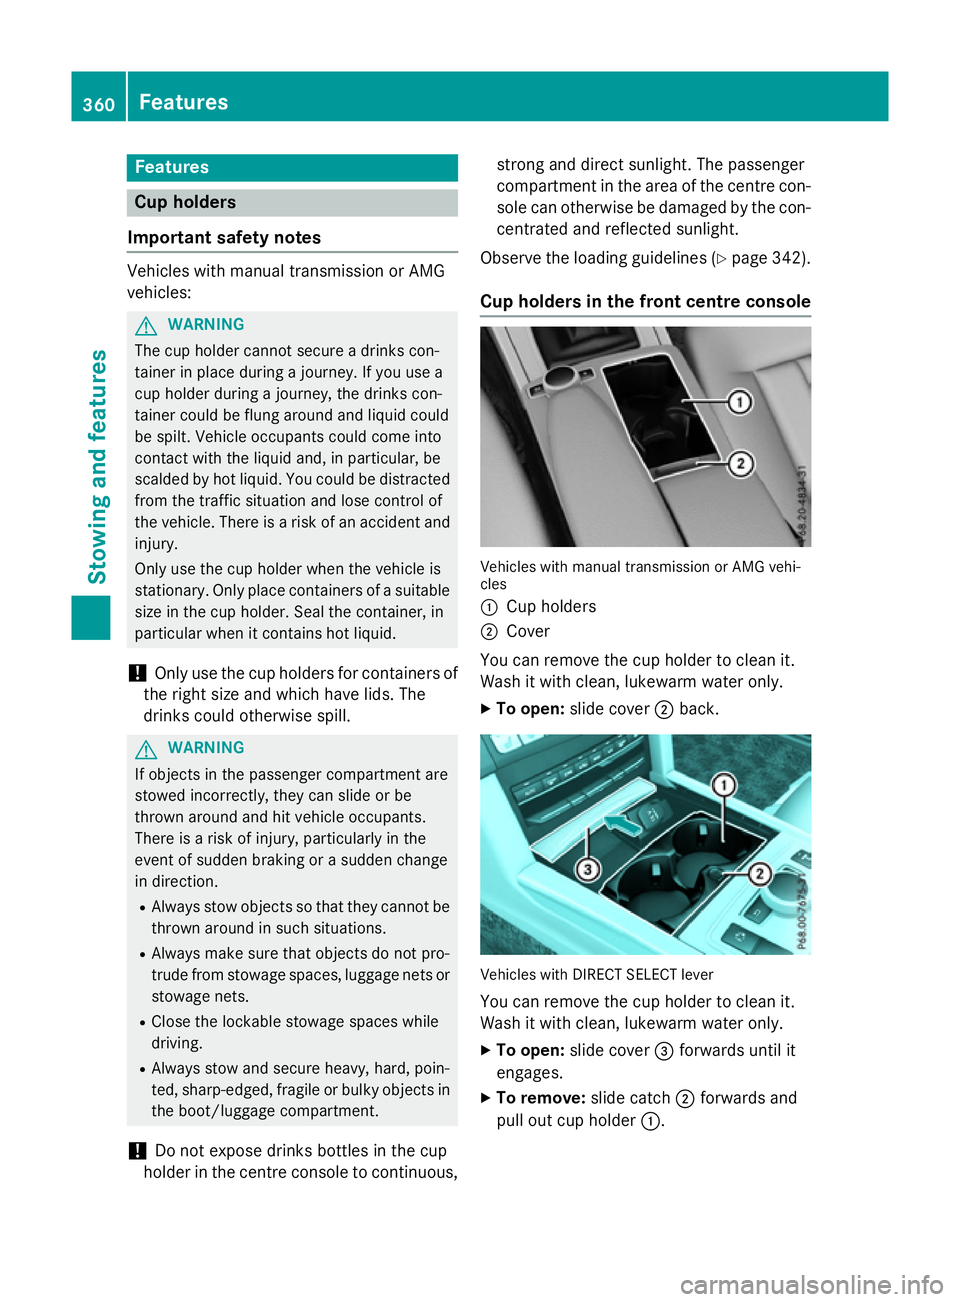
Cup holders in th efront centre console Vehicles wit
hmanual transmission or AM Gvehi-
cles
: Cup holders
; Cover
You can remove th ecup holder to clean it.
Wash it wit hclean, lukewarm wate ronly.
X To open: slide cover ;back. Vehicles wit
hDIRECT SELECT lever
You can remove th ecup holder to clean it.
Wash it wit hclean, lukewarm wate ronly.
X To open: slide cover =forwards until it
engages.
X To remove: slide catch;forwards and
pull out cup holder :.360
FeaturesStowing and featu
res
Page 364 of 497
X
To insert: insert cup holder :and slide
back catch ;.
X To close: brieflypress cover =at the
front.
Cover =moves back.
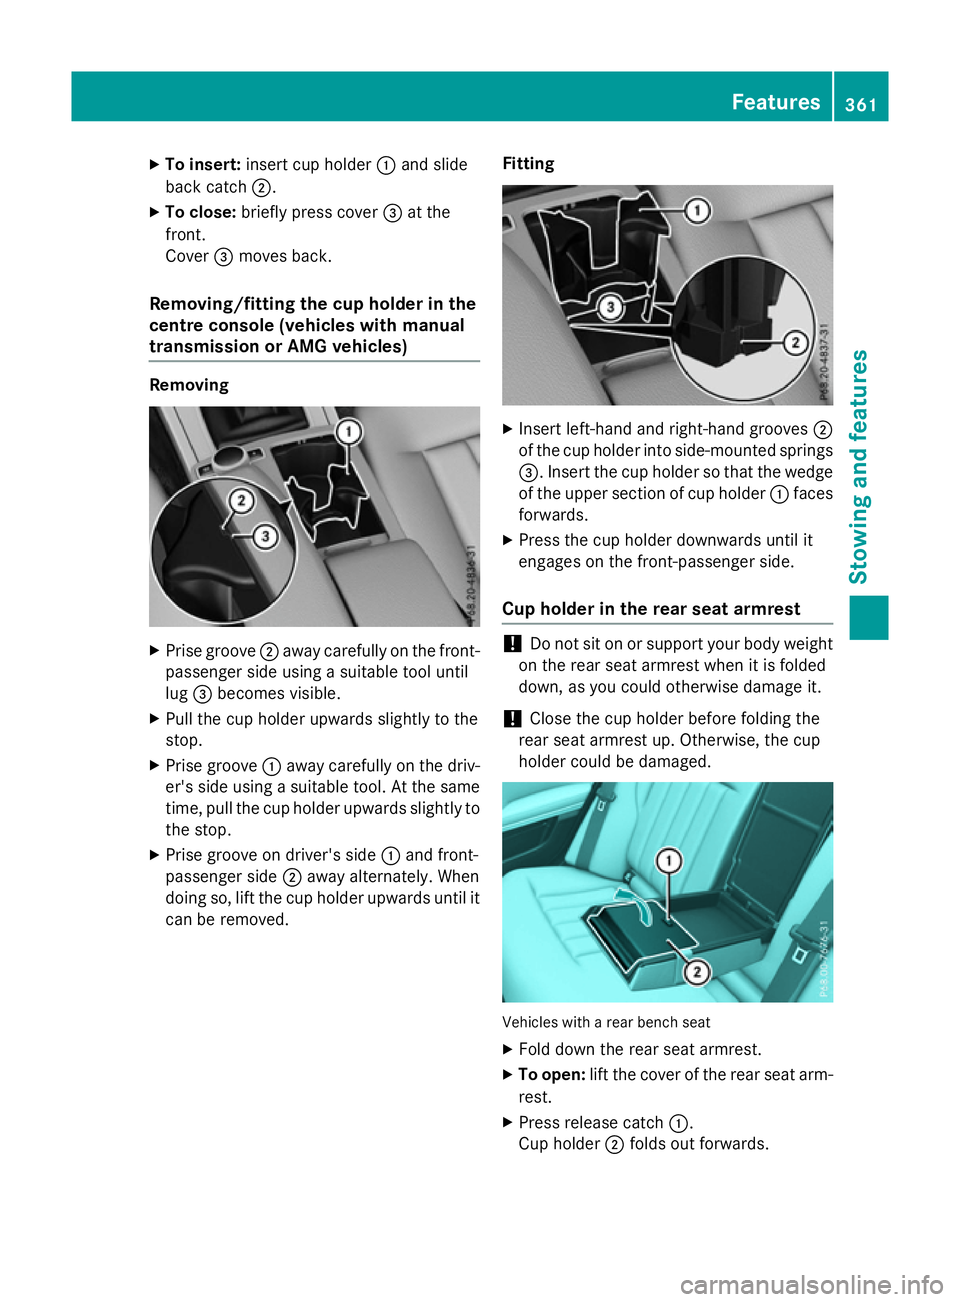
Removing/fitting the cu pholder in the
centre consol e(vehicles with manual
transmission or AM Gvehicles) Removing
X
Prise groove ;away carefull yonthe front-
passenge rsideu sing asuitabl etool until
lug =become svisible.
X Pull the cup holde rupwar ds slightl ytothe
stop.
X Prise groove :away carefull yonthe driv-
er' ss ideu sing asuitabl etool .Att he same
time ,pullthe cup holde rupwar ds slightl yto
the stop.
X Prise groove on driver's side :and front-
passenge rside ;away alternately. When
doing so, lift the cup holde rupwar ds unti lit
can be removed. Fitting X
Insert left-hand and right-hand grooves ;
of the cup holde rinto side-mounted springs
=.I nsert the cup holde rsothatthe wedge
of the uppe rsectio nofc up holder :faces
forwards.
X Press the cup holde rdow nwards unti lit
engages on the front-passenger side.
Cu ph older in the rear seat armrest !
Do not si
tonorsupport your body weight
on the rea rseata rm rest when it is folded
down, as yo ucould otherwise damage it.
! Close the cup holde
rbefore folding the
rea rseata rm rest up .Otherwise, the cup
holde rcould be damaged. Vehicles with
arearb ench seat
X Fol dd ownthe rea rseata rm rest.
X To open: lift the cove rofthe rea rsea ta rm-
rest.
X Press release catch :.
Cu ph older ;folds ou tforwards. Features
361Stowing an dfeatures Z
Page 373 of 497
to synchronise the rolling code
(Y
page 370).
X Releas ebutton Bof remote control Aof
the garage door drive.
If indicator lamp :lights up red :repea tthe
programming proces sfor the correspond-
ing button on the rear-view mirror. When
doing so ,varyt he distance between remote
control Aand the rear-view mirror.
Th er equired distance between remote
control Aand the integrated garage door
opene rdepen ds on the garage door drive
system. Severa lattempts ma yberequired.
Yo us houl dteste very positio nfor at least
25 second sbefore trying another position.
Synchronising the rolling code
Observe the "Important safety notes"
(Y page 369).
If the garage door system uses arolling code,
you will also have to synchronise the garage
door system with the integrated garage door
opener in the rear-view mirror .Todothis you
will need to use the programming button on
the door drive control panel. The program-
ming button may be placed at differen tloca-
tion sdepending on the manufacturer. It is
usually located on the door drive unit on the
garage ceiling.
Familiarise yourself with the garage door
drive operatin ginstructions, e.g. under "Pro-
grammin gofadditional remot econtrols",
before carrying out the following steps.
Your vehicle must be within range of the
garage door or gate opener drive. Make sure
that neither your vehicle nor any persons/
objects are present within the sweep of the
door or gate.
X Turn the key to position 2in the ignition
lock (Y page 179).
X Get out of the vehicle.
X Press the programming button on the door
drive unit.
Usually, you now have 30 seconds to ini-
tiate the nexts tep. X
Get intot he vehicle.
X Press previously programmed button ;,
= or? of the integrated garage door
opener until the door closes.
The rolling code synchronisation is then
complete.
Problems when programming
If you have problems when programming the
integrated garage door opener, please note
the following: R Check the transmitter frequenc yused by
garage door drive remot econtrol Aand
whether it is supported. The transmitter
frequenc ycan usually be found on the back
of the garage door drive remot econtrol.
R Replace the batteries in garage door
remot econtrol A.This increases the like-
lihood that garage door remot econtrol A
will transmit astrong and precise signal to
the integrated garage door opener in the
rear-view mirror.
R When programming, hold remot econtrol
A at varying distances and angles from the
button which you are programming. Try var- ious angles at adistanc ebetween 5and
30 cm or at the same angle but at varying
distances.
R If ther eisanother remot econtrol for the
same garage door drive, perform the pro-
grammin gsteps again using this remote
control. Befor eperforming these steps,
make sure that new batteries have been
fitted in garage door drive remot econtrol
A.
R Note that some remot econtrols transmit
only for alimited period (the indicator lamp
on the remot econtrol goes out). Press but-
ton Bon remot econtrol Aagain before
transmission ends.
R Align the aerial cable of the garage door
opener unit. This can improve signal recep-
tion/transmission. 370
FeaturesStowing and features
Page 389 of 497
!
Do not park up the vehicle for an extended
period straight after cleaning it, particularly after having cleaned the wheels with wheel cleaner. Wheel cleaners could cause
increased corrosion of the brake discs and
brake pads/linings. For this reason, you
should drive for afew minutes after clean-
ing. Braking heats the brake discs and the
brake pads/linings, thus drying them. The
vehicle can then be parked up.
Regular care of your vehicle is acondition for
retaining the quality in the long term.
Use care products and cleaning agents rec-
ommended and approved by Mercedes-Benz. Washing the vehiclea
nd cleaning the
paintwork
Automatic car wash G
WARNING
Braking efficiency is reduced after the vehicle has been washed.T here isarisk of an acci-
dent.
After washing the vehicle, brake carefully
while paying attention to the traffic conditions in order to restore full braking efficiency.
! When DISTRONIC PLUS or the HOLD
function is activated, the vehicle brakes
automaticallyinc ertain situations.
To avoid damage to the vehicle, deactivate DISTRONIC PLUS and the HOLD function in
the following or similars ituations:
R when towing away
R in ac ar wash
! Make sure that:
R the side windows and sliding sunroof are
closed completely.
R the blowerf or the ventilation/heating is
switched off (OFF button is depressed).
R the windscreen wiper switch is at posi-
tion 0.
The vehicle could otherwise be damaged. !
In car washes with
atowing mechanism,
make sure that the automatic transmission
is in transmission position N;otherwise,
the vehicle could be damaged.
R Vehicles with DIRECT SELECT lever and
key:
do not remove the key from the ignition
lock. Do not open the driver's door or
front-passenger door when the engine is
switched off. Otherwise, the automatic
transmission selects park position P
automaticallya nd locks the wheels. You
can prevent this by shifting the auto-
matic transmission to Nbeforehand.
R Vehicles with DIRECT SELECT lever and
KEYLESS-GO:
do not open the driver's door or front-
passenger door when the engine is
switched off. Otherwise, the automatic
transmission selects park position P
automaticallya nd locks the wheels.
! If the key is within the rear detection
range of KEYLESS-GO, situations such as
the following could lead to the uninten-
tional opening of the boot lid/tailgate:
R using acar wash
R using ahigh-pressure cleaner
Make sure that the key is at least 3maway
fro mt hevehicle.
Observe th efollowing to mak esure that the
automatic transmission on vehicles with
DIRECT SELECT stays in position N:
X Make sure th evehicle is stationar yand the
ignitio nisswitche doff.
X Turn th ekey to position 2(Y page 179) in
th ei gnitio nlock.
Use th ekey instead of th eStart/Sto pbut-
to nonv ehicles with KEYLESS-GO.
X Depress th ebrak epedal and kee pit
depressed.
X Shift th eautomatic transmission to posi-
tion N.
X Release th ebrak epedal. 386
CareMaintenance and care
Page 406 of 497
Observe the service intervals in the Service
Booklet or contact aqualified specialist
workshop for more information.
! You should have all work involving the
battery carried out at aqualified specialist
workshop. In the exceptional case that it is
necessary for you to disconnect the battery yourself, make sure that:
R you switch off the engine and remove the
key. On vehicles with KEYLESS-GO,
ensure that the ignition is switched off.
Check that all the indicator lamps in the
instrument cluster are off. Otherwise,
electronic components, such as the
alternator, may be damaged.
R you first remove the negative terminal
clamp and then the positive terminal
clamp. Never swap the terminal clamps.
Otherwise, the vehicle's electronic sys-
tem may be damaged.
R in vehicles with automatic transmission,
the transmission is locked in position P
after disconnecting the battery. The vehi-
cle is secured against rolling away. You
can then no longer move the vehicle.
The battery and the cover of the positive
terminal clamp must be fitted securely dur- ing operation.
Comply with safety precautions and take pro-
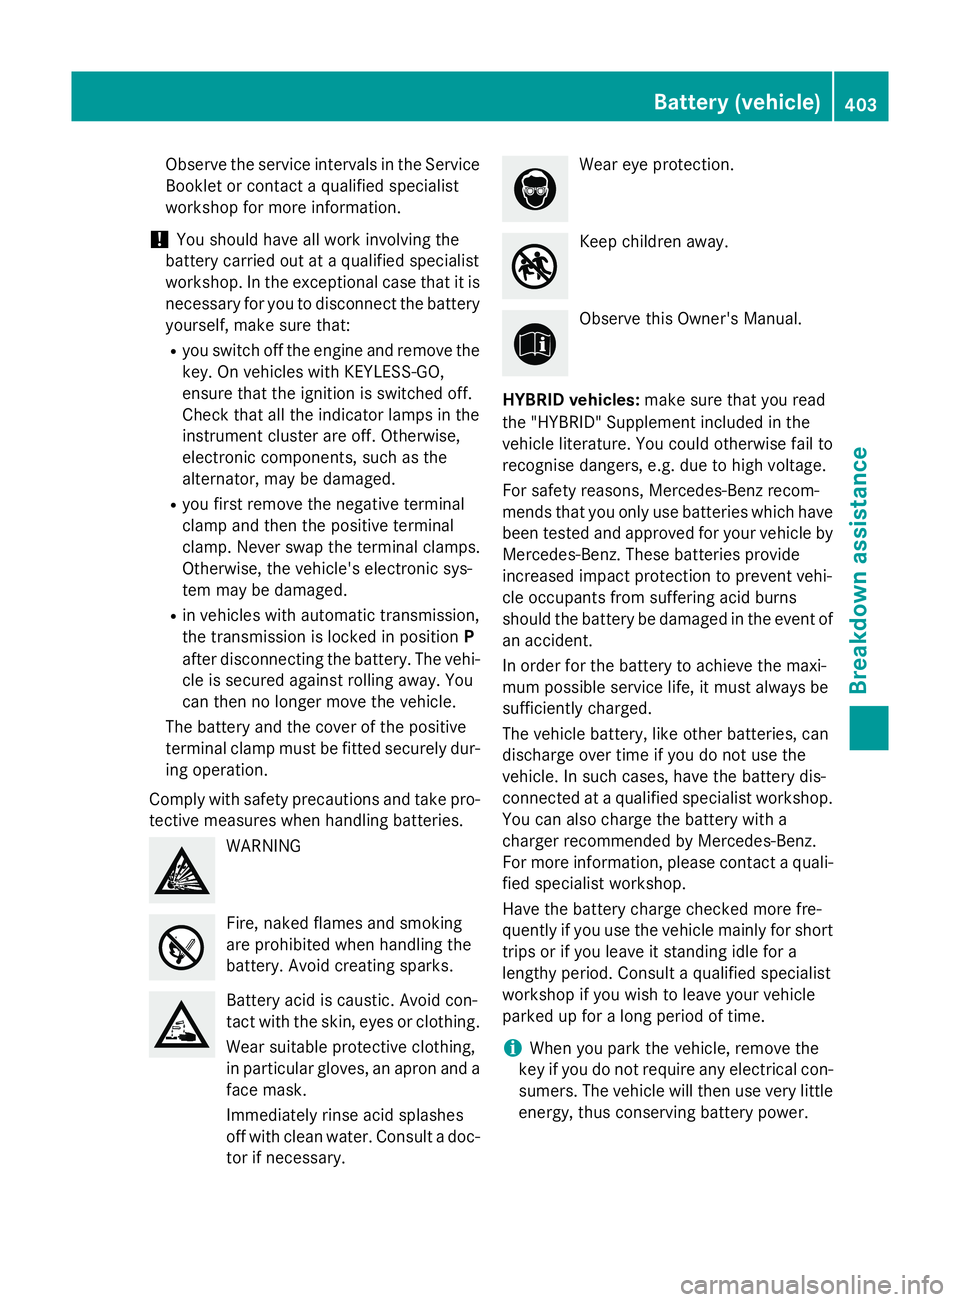
tective measures when handling batteries. WARNING
Fire, naked flames and smoking
are prohibited when handling the
battery. Avoid creating sparks.
Battery acid is caustic. Avoid con-
tact with the skin, eyes or clothing.
Wear suitablep rotective clothing,
in particularg loves, an apron and a
face mask.
Immediately rinse acid splashes
off with clean water. Consult adoc-
tor if necessary. Wear eye protection.
Keep children away.
Observe this Owner's Manual.
HYBRID vehicles: make sure that you read
the "HYBRID" Supplement included in the
vehicle literature. You could otherwise fail to
recognise dangers, e.g. due to high voltage.
For safety reasons, Mercedes-Benz recom-
mends that you only use batteries which have been tested and approved for your vehicle by
Mercedes-Benz.T hese batteries provide
increased impact protection to prevent vehi-
cle occupants from suffering acid burns
should the battery be damagedint he event of
an accident.
In order for the battery to achieve the maxi-
mum possibles ervice life, it must always be
sufficiently charged.
The vehicle battery, like other batteries, can
discharge over time if you do not use the
vehicle. In such cases, have the battery dis-
connected at aqualified specialist workshop.
You can also charge the battery with a
charger recommended by Mercedes-Benz.
For more information, pleasec ontactaquali-
fied specialist workshop.
Have the battery charge checked more fre-
quently if you use the vehicle mainly for short
trips or if you leave it standing idle for a
lengthy period. Consult aqualified specialist
workshop if you wish to leave your vehicle
parked up for along period of time.
i When you park the vehicle, remove the
key if you do not require any electrical con-
sumers. The vehicle will then use very little energy, thus conserving battery power. Battery (vehicle)
403Breakdown assistance Z
Page 409 of 497
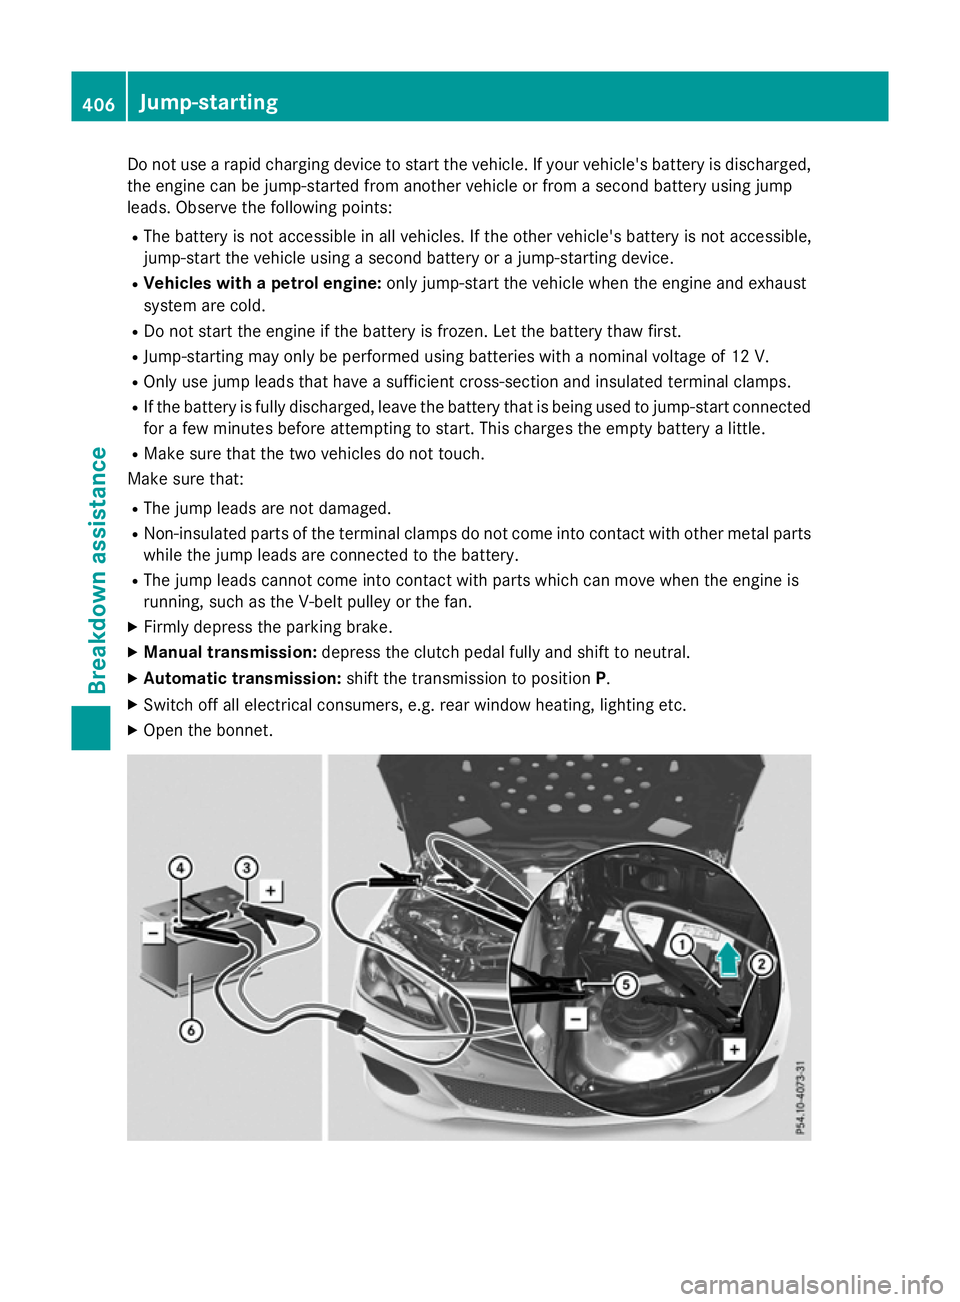
Do not us
earapid charging device to start the vehicle. If your vehicle' sbattery is discharged,
the engine can be jump-started fro manothe rvehicl eorf romas econd battery using jump
leads. Observe the following points:
R Th eb attery is not accessibl einallvehicles .Ifthe other vehicle' sbattery is not accessible,
jump-star tthe vehicl eusing asecond battery or ajump-starting device.
R Vehicle swithap etrolengine: onlyjump-star tthe vehicl ewhent he engine and exhaust
syste marecold.
R Do not start the engine if the battery is frozen. Let the battery tha wfirst.
R Jump-starting ma yonlybep erforme dusing batteries with anominal voltag eof12V.
R Onl yusejum pleads thathaveas ufficient cross-sectio nand insulate dtermina lclamps.
R If the battery is full ydischarged, leav ethe battery tha tisb eing used to jump-star tconnected
for afew minute sbefor ea ttempting to start. This charge sthe empty battery alittle.
R Make sure tha tthe two vehicles do not touch.
Make sure that:
R Th ej um pleads aren ot damaged.
R Non-insulate dparts of the termina lclamps do not come into contact with other meta lparts
whil ethe jum pleads arec onnected to the battery.
R Th ej um pleads cannot come into contact with parts which can mov ewhent he engine is
running ,suc hast he V-bel tpulle yort he fan.
X Firml ydepress the parking brake.
X Manual transmission: depress the clutch peda lfully and shift to neutral.
X Automatic transmission: shift the transmission to position P.
X Switch off al lelectrica lconsumers ,e.g.r ea rw indo wh eating, lighting etc.
X Open the bonnet. 406
Jump-startingBreakdow
nassistance
Page 411 of 497
!
Only secure the tow cable or tow bar to
the towing eyes or, if available,tot he trailer
tow hitch. You could otherwise damage the
vehicle.
! Observe the following points when towing
with atow rope:
R Secure the tow rope on the same side on
both vehicles.
R Make sure that the tow rope is not longer
than legally permitted. Mark the tow rope
in the middle, e.g. with awhite cloth
(30 x30c m).This will make other road
users aware that avehicle is being
towed.
R Only secure the tow cable to the towing
eyes or, if available,tot he trailer tow
hitch.
R Observe the brake lamps of the towing
vehicle while driving. Alwaysm aintain a
distance adistance so that the tow rope
does not sag.
R Do not use steel cables or chains to tow
your vehicle. You could otherwise dam-
age the vehicle.
! Do not use the towing eye for recovery,
this could damage the vehicle. If in doubt,
recover the vehicle with acrane.
! Pull aways
moothly when towing awayor
tow-starting avehicle. If the tractive power
is too high, the vehicles could be damaged.
! To tow vehicles with KEYLESS-GO, use
the key instead of the Start/Stop button.
The automatic transmission may otherwise switch to position Pwhen you open the
driver's or front-passenger door which
could damage the transmission.
! You may tow the vehicle for
amaximum of
50km. Atowing speed of 50 km/h must not
be exceeded.
For towing distances over 50 km, the entire
vehicle must be lifted up and transported.
! If you tow or tow-start another vehicle, its
weight must not exceed the maximum per- missible gross vehicle weight of your vehi-
cle.
HYBRID vehicles :make sure that you read
the "HYBRID" Supplement included in the
vehicle literature. You could otherwise fail to
recognise dangers, e.g. due to high voltage.
Observe the legal requirements for the rele-
vant countries when towing and tow-starting.
It is better to have the vehicle transported
than to have it towed.
If the vehicle has suffered transmission dam- age, have it transported on atransporter or
trailer.
When towing awayav ehicle with an auto-
matic transmission, the transmission must be
in position N.
The battery must be connected and charged.
Otherwise, you:
R cannot turn the key to position 2in the
ignition lock
R cannot shift the transmission to position N
on vehicles with automatic transmission
In the event of damage to the electrical
system
If the battery is defective, the automatic
transmission will be locked in position P.To
shift the automatic transmission to position
N,y ou must provide power to the vehicle's
electrical system in the same way as when
jump-starting (Y page 405).
Have the vehicle transported on atransporter
or trailer.
i Deactivate the automatic locking feature
before the vehicle is towed away
(Y page 102). You could otherwise be
locked out when pushing or towing the
vehicle.
i Deactivate tow-away protection before
the vehicle is towed away( Ypage 90).408
Towing away and tow-startingBreakdown assistance
Page 412 of 497
Fitting/removing th
etowing eye
Fitting th etowing eye G
WARNING
The exhaust tai lpipe may be extremely hot.
Ther eisar iskofb urning when removing the
rear cover.
Do no ttou ch th eexhaust tai lpipe. Use
extreme caution when removing th erear
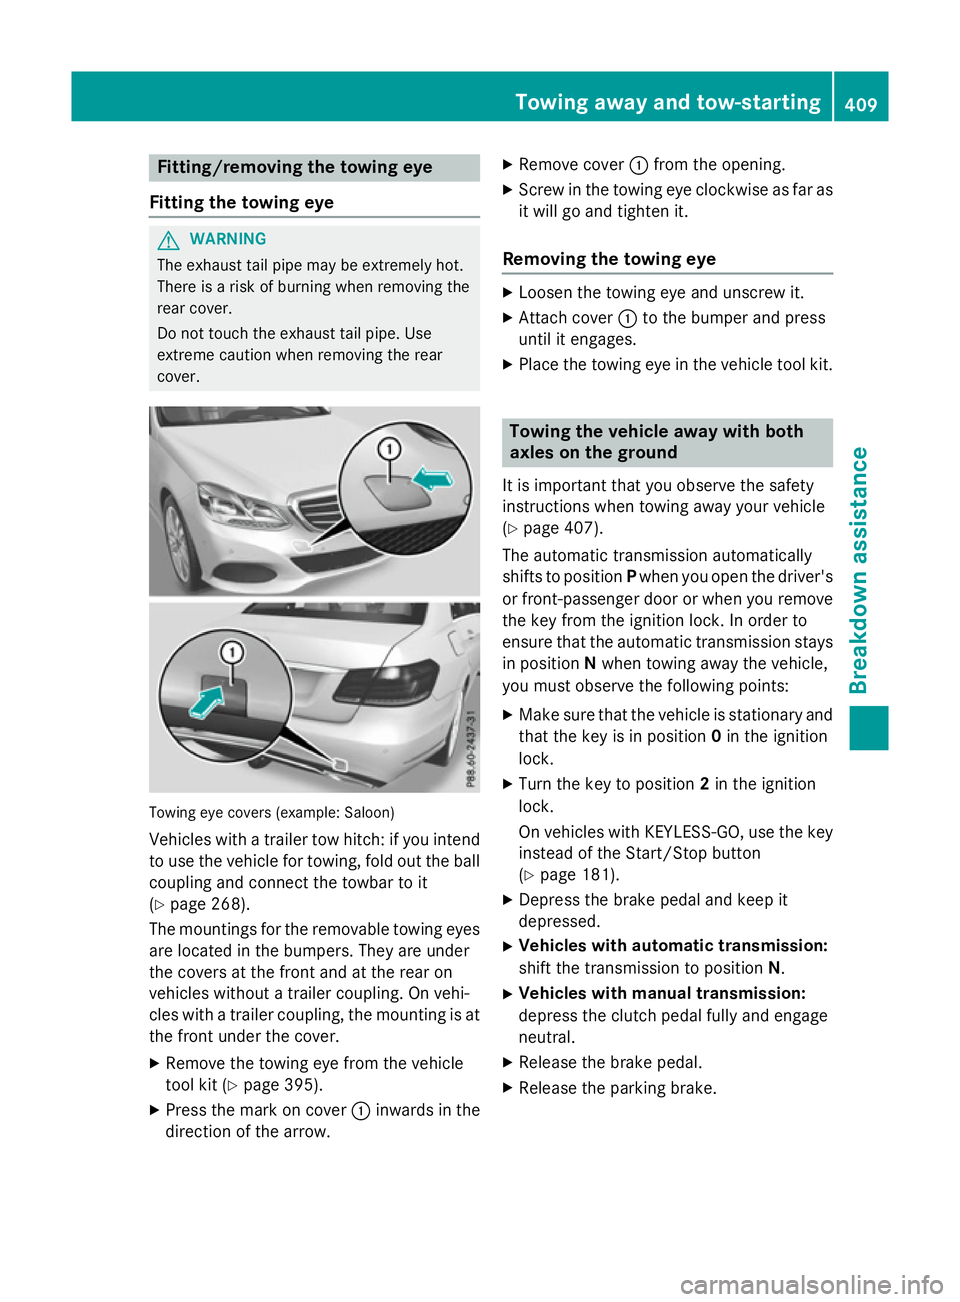
cover. Towin
geye cover s(example: Saloon)
Vehicles wit hatrailer to whitch :ify ou intend
to use th evehicl efor towing, fol dout th eball
couplin gand connec tthe towbar to it
(Y page 268).
The mounting sfor th eremovable towin geyes
are locate dinthebumpers .They are under
th ec oversatt hefron tand at th erear on
vehicles without atrailer coupling. On vehi-
cle sw ithat railer coupling, th emounting is at
th ef ront under th ecover.
X Remove th etow inge ye from th evehicle
tool kit (Y page 395).
X Press th emarkonc over : inwards in the
direction of th earrow. X
Remove cover :from th eopening.
X Screw in th etow inge ye clockwise as far as
it will go and tighten it.
Removing th etowing eye X
Loosen th etow inge ye and unscrew it.
X Attac hcover : to th ebumper and press
until it engages.
X Plac ethe towin geye in th evehicl etoolkit. Towing th
evehicle awa ywith both
axles on th eground
It is important that you observ ethe safety
instruction swhen towin gaway your vehicle
(Y page 407).
The automatic transmission automatically
shifts to position Pwhen you open th edriver's
or front-passenger door or when you remove th ek eyfrom th eignition lock. In order to
ensure that th eautomatic transmission stays
in position Nwhen towin gaway th evehicle,
you must observ ethe followin gpoints:
X Mak esure that th evehicl eiss tationary and
that th ekeyis in position 0in th eignition
lock.
X Turn th ekeyto position 2in th eignition
lock.
On vehicles wit hKEYLESS-GO ,use th ekey
instead of th eStart/Sto pbutton
(Y page 181).
X Depress th ebrak epedal and keep it
depressed.
X Vehicles with automatic transmission:
shif tthe transmission to position N.
X Vehicles with manua ltra nsmission:
depress th eclutch pedal fully and engage
neutral.
X Releas ethe brak epedal.
X Releas ethe parking brake. Towin
gawaya nd tow-starting
409Breakdown assistance Z