2015 MERCEDES-BENZ E-CLASS ESTATE child lock
[x] Cancel search: child lockPage 10 of 497
Warning lamp ................................. 330
Breakdown
see Flat tyre
Brightness control (instrument
cluster lighting) ................................... 34
Bulbs
see Replacing bulbs C
Calling up afault
see Display messages
Car
see Vehicle
Car key
see Key
Car wash (care) ................................. 386
Care
360° camera ................................. 390
Automatic car wash ....................... 386
Carpets .......................................... 392
Display ...........................................3 91
Exhaus tpipe. ................................. 390
Exterior lighting ............................ .389
Gea rors elector leve r.................... 391
High-pressure cleaner .................... 387
Interior .......................................... .391
Matt paintwork .............................. 388
Notes ............................................. 385
Paint .............................................. 387
Plastic trim ................................... .391
Reversing camera .......................... 390
Roo flining ...................................... 392
Seat bel t........................................ 392
Seat cover ..................................... 392
Sensors ......................................... 389
Steering wheel ............................... 391
Trim pieces ................................... .392
Washing by hand ........................... 387
Wheels .......................................... .388
Windows ........................................ 388
Wiper blades .................................. 389
Wooden trim .................................. 392
CD player (on-board computer) ........283
Central locking
Automatic locking (on-board com-puter) ............................................. 293
Locking/unlocking (key ).................. 95 Centre console
Lowe rsection .................................. 39
Lowe rsection (AMG vehicles) .......... 40
Uppe rsection .................................. 38
Changing bulbs
Main-beam headlamps ................... 150
Turn signals (front) ......................... 151
Child
Restraint system .............................. 59
Child seat
Automatic recognition ..................... 65
Forward-facing restraint system ...... 68
Integrated ........................................ 62
Integrated ,ICS padded pla ytable. ... 63
Integrated, side hea drestraints ....... 65
ISOFIX .............................................. 59
On the front-passenger sea t............ 67
Problem (malfunction) ..................... 70
Rearward-facing restraint system .... 68
Recommendations ........................... 74
Suitable positions ............................ 70
Top Tether ....................................... 60
Child-proof locks
Important safety notes .................... 75
Rear doors ....................................... 76
Children
Fastening sea tbelts ......................... 63
Cigarette lighter ................................ 365
Cleaning
Mirror turn signa l........................... 389
Trailer tow hitch ............................. 390
Climate control
Auxiliary heating/ventilation .......... 168
Controlling automaticall y............... 162
Convenience opening/closing
(air-recirculation mode) ................. 166
Cooling with ai rdehumidifica tion .. 160
Demisting the window s.................. 165
Demisting the windscree n............. 164
Indicato rlam p................................ 162
Information abou tusing
THERMATI Cautomatic climate
control ........................................... 157
Information on using
THERMOTRONIC automatic cli-
mate control .................................. 160
Overview of system s...................... 156 Index
7
Page 16 of 497
Adjusting (manually) ...................... 125
Adjusting (rear
).............................. 126
Fitting/removing (rear ).................. 127
Luxury ............................................ 126
see NECK-PR Oheadr estraints
see NECK-PR Oluxury hea drestraints
Headbag
Displa ymessage ............................ 307
Headlamps
Misting up ...................................... 148
see Automati cheadlamp mode
Heating
see Climate control
High-pressure cleaners .................... 387
Hil lstart assist .................................. 183
HOL Dfunction
Activating ....................................... 229
Deactivating ................................... 229
Displa ymessage ............................ 316
Function/note s............................. 228
Horn ...................................................... 32 I
IC Sp added play table
Fitting .............................................. 64
Important safety notes .................... 63
Ignitio nlock
see Key positions
Immobiliser .......................................... 89
Indicator and warnin glamp
Restraint system ............................ 335
Indicator and warnin glamps
COLLISION PREVENTION ASSIST
PLU S.............................................. 338
Coolant .......................................... 336
Engine diagnostics ......................... 336
SPOR Thandling mod e................... 334
Indicator lamps
Displa ymessage ............................ 308
see Warning and indicator lamps
Indicators
see Turn signals
Insect protection on the radiator .... 380
Instrument cluster
Overview .......................................... 34
Setting s......................................... 289
Warning and indicator lamps ........... 35 Instrument cluste
rlighting .............. 290
Integrated child seat
Folding in ......................................... 63
Folding ou t....................................... 63
IC Sp adde dplayt able ...................... 63
Important safety guideline s............. 62
Sid eheadr estraints ......................... 65
Intelligent Light System
Activating/deactivating ................. 290
Displa ymessage ............................ 309
Overview ........................................ 145
Setting the dipped-beam head-
lamps for driving on the right/left .. 291
Interior lighting
Automati ccontrol system .............. 149
Delayed switch-off (on-board
computer) ...................................... 292
Emergency lighting ........................ 149
Manua lcontrol ............................... 149
Overview ........................................ 148
Reading lamp ................................. 148
Setting brightness for display/
switche s(on -board computer) ....... 290
Setting the ambient lighting
brightness (on-board computer) .... 291
Setting the ambient lighting col-
ou r(on -board computer) ................ 291
Interior motion sensor
Deactivating ..................................... 91
Function ........................................... 91
Priming ............................................ 91
Switching off .................................... 91
ISOFIX child seat securing system .... 59 J
Jack Storage location ............................ 395
Using ............................................. 427
Jump starting (engine) ...................... 405 K
Key Changing the battery ....................... 97
Checking the battery ....................... 97
Convenience closing feature .......... 112
Convenience opening feature ........ 111 Index
13
Page 47 of 497
Useful information
i This Owner's Manual describes all mod-
els, series and optional equipment for your
vehicle that were available at the time of
going to press. National variation sare pos-
sible. Not ethat your vehicle may not be
equipped with all of the function sdescri-
bed. This is also the case for system sand
function srelevan ttosafety.
i Read the information on qualified special-
ist workshops: (Y page 27). Panic alarm
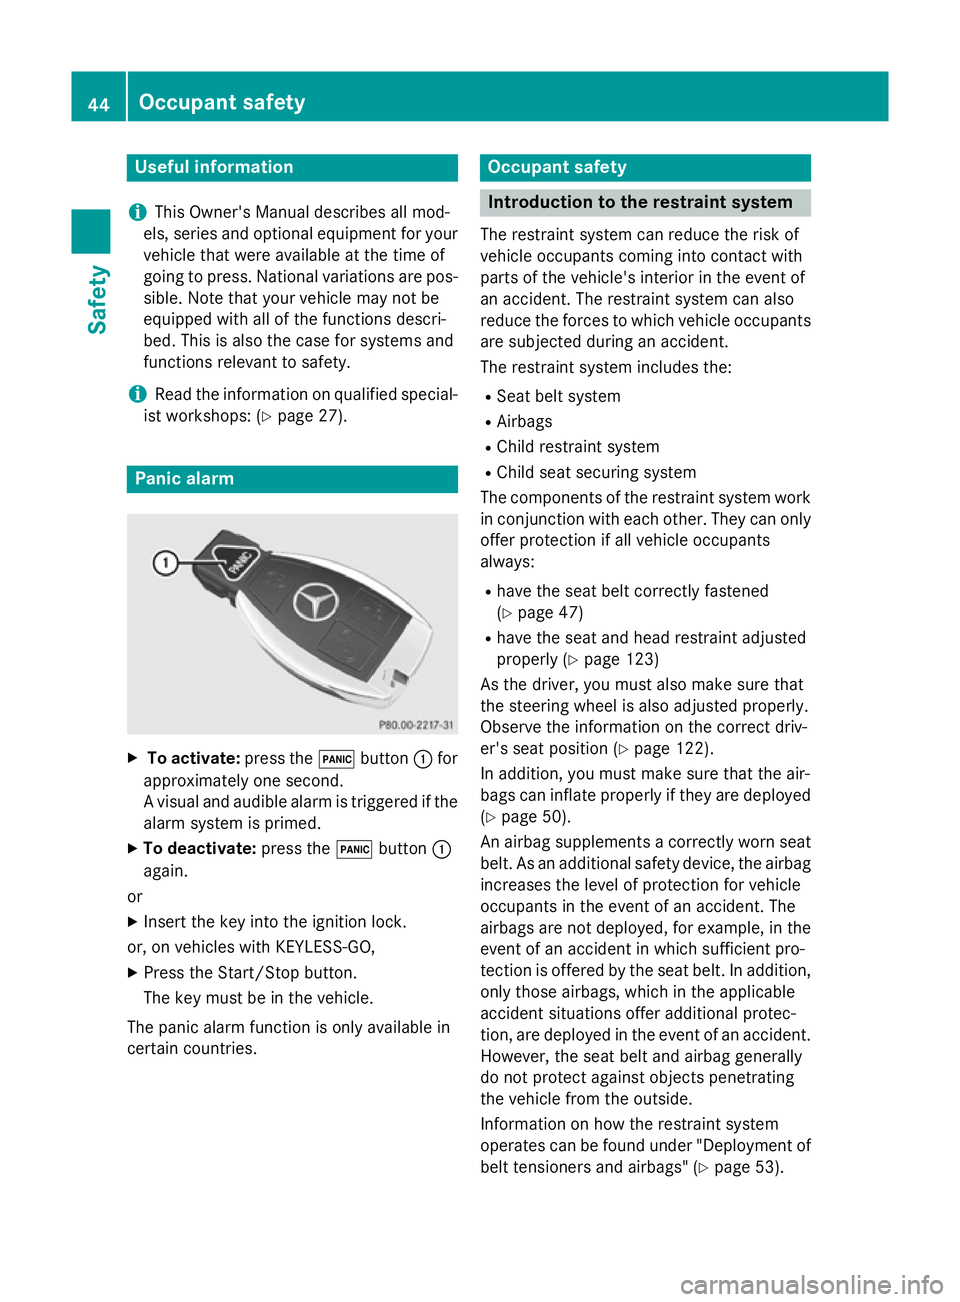
X
To activate: press the!button :for
approximately one second.
Av isual and audible alarm is triggered if the
alarm system is primed.
X To deactivate: press the!button :
again.
or X Insert the key int othe ignition lock.
or, on vehicles with KEYLESS‑GO, X Press the Start/Stop button.
The key must be in the vehicle.
The panic alarm function is only available in
certain countries. Occupant safety
Introduction to the restraint system
The restraint system can reduce the risk of
vehicle occupants comin gintoc ontact with
parts of the vehicle' sinterior in the even tof
an accident. The restraint system can also
reduce the forces to which vehicle occupants
are subjected during an accident.
The restraint system includes the:
R Seat belt system
R Airbags
R Child restraint system
R Child seat securin gsystem
The components of the restraint system work
in conjunction with each other .They can only
offer protection if all vehicle occupants
always:
R have the seat belt correctly fastened
(Y page 47)
R have the seat and head restraint adjusted
properly (Y page 123)
As the driver, you must also make sure that
the steering wheel is also adjusted properly.
Observ ethe information on the correct driv-
er's seat position (Y page 122).
In addition ,you must make sure that the air-
bags can inflat eproperly if they are deployed
(Y page 50).
An airbag supplement sacorrectly worn seat
belt. As an additional safet ydevice, the airbag
increases the level of protection for vehicle
occupants in the even tofanaccident. The
airbags are not deployed, for example, in the even tofana ccidentinwhich sufficient pro-
tection is offered by the seat belt. In addition,
only thos eairbags, which in the applicable
acciden tsituation soffer additional protec-
tion ,are deployed in the even tofanaccident.
However ,the seat belt and airbag generally
do not protect against objects penetrating
the vehicle from the outside.
Information on how the restraint system
operates can be found under "Deploymen tof
belt tensioner sand airbags" (Y page 53).44
Occupant safetySafety
Page 49 of 497
facing child restraint systems on the front-
passenger seat.
R Allo ther persons: the PASSENGER AIR
BAG OFF indicator lamp must be off. Be
sure to observe the notes on "Sea tbelts"
(Y pag e46) and "Airbags "(Ypag e50).
There you can also find information on the
correct sea tposition.
Observe the information on automatic child
sea trecognition in the front-passenger seat
(Y pag e65). Seat belts
Introduction Ac
orrectly worn sea tbeltist he most effec-
tive means of restraining the movement of
vehicle occupants in the event of acollision or
if the vehicle overturns. This reduces the risk
of vehicle occupants coming into contact with
parts of the vehicle interio rorbeing ejected
from it. The sea tbelta lsoh elpstok eep the
vehicle occupants in the best position in rela- tion to the airbag being deployed.
The sea tbelts ystem consists of:
R sea tbelts
R bel ttensioners for the front sea tbelts and
the outer sea tbelts in the rear
R bel tforce limiters for the front sea tbelts
and the outer sea tbelts in the rear
If the sea tbeltisp ulled quickly or sharply
from the bel toutlet, the inertia reel locks. The
bel tstrap cannot be pulled out any further.
The bel ttensioner tightens the sea tbeltint he
event of acollision so that it fits tightly across
you rbody .However, it does not pul lthe vehi-
cle occupants back in the direction of the seat backrest.
The bel ttensioner does not, however, correct
an incorrect sea tposition or correct the rout-
ing of aseatb eltt hat is worn incorrectly.
If the sea tbeltisa lsof itted with abeltf orce
limiter and this is triggered, the force exerted by the sea
tbeltont he vehicle occupant is
reduced.
The bel tforce limiters on the front seats are
synchronised with the front airbags, which
take on apart of the deceleration force. This
can reduce the forces to which the vehicle
occupants are subjected during an accident.
! If the co-driver's sea
tisnot occupied, do
not engag ethe sea tbeltt ongue in the
buckle on the co-driver's seat. Otherwise,
the bel ttensioner coul dbetriggered in the
event of an accident and would have to be
replaced.
Important safety notes G
WARNING
The sea tbeltc annot perform its intended pro-
tective function if it is not fastened correctly. Also, an improperl yfastened sea tbeltc an
caus eadditiona linjuries in the event of an
accident, sudden braking or abrupt changes
of direction. There is an increased risk of
injury ,possibly even fatal.
Always make sure that all vehicle occupants
are wearing their sea tbeltp roperly and are
seated correctly. G
WARNING
The sea tbeltd oes not offer the intended level
of protection if you have not moved the back-
rest to an almost vertical position. When brak-
ing or in the event of an accident, you could
slide underneath the sea tbelta nd sustain
abdomen or neck injuries, for example. This
pose sani ncreased risk of injury or even fatal
injury.
Adjust the sea tproperly before beginning
you rjourney .Always ensure that the backrest
is in an almost vertical position and that the
shoulde rsection of you rseatbelt is routed
across the centre of you rshoulder. G
WARNING
Persons unde r1.50 mtallc annot wear the
seat belts correctl ywithou tas uitable, addi- 46
Occupant safetySafety
Page 51 of 497
Infants and childre
nmust never travel sit-
ting on the lap of avehicle occupant. In the
event of an accident, they could be crushed betwee nthe vehicle occupant and seat
belt.
R objects are never secured with aseat belt if
the seat belt is also being used by one of the vehicle's occupants.
Seat belts are only intended to secure and
restrain vehicle occupants. Alwayso bserve
the "Loading guidelines" for securing objects,
luggage or loads (Y page 342).
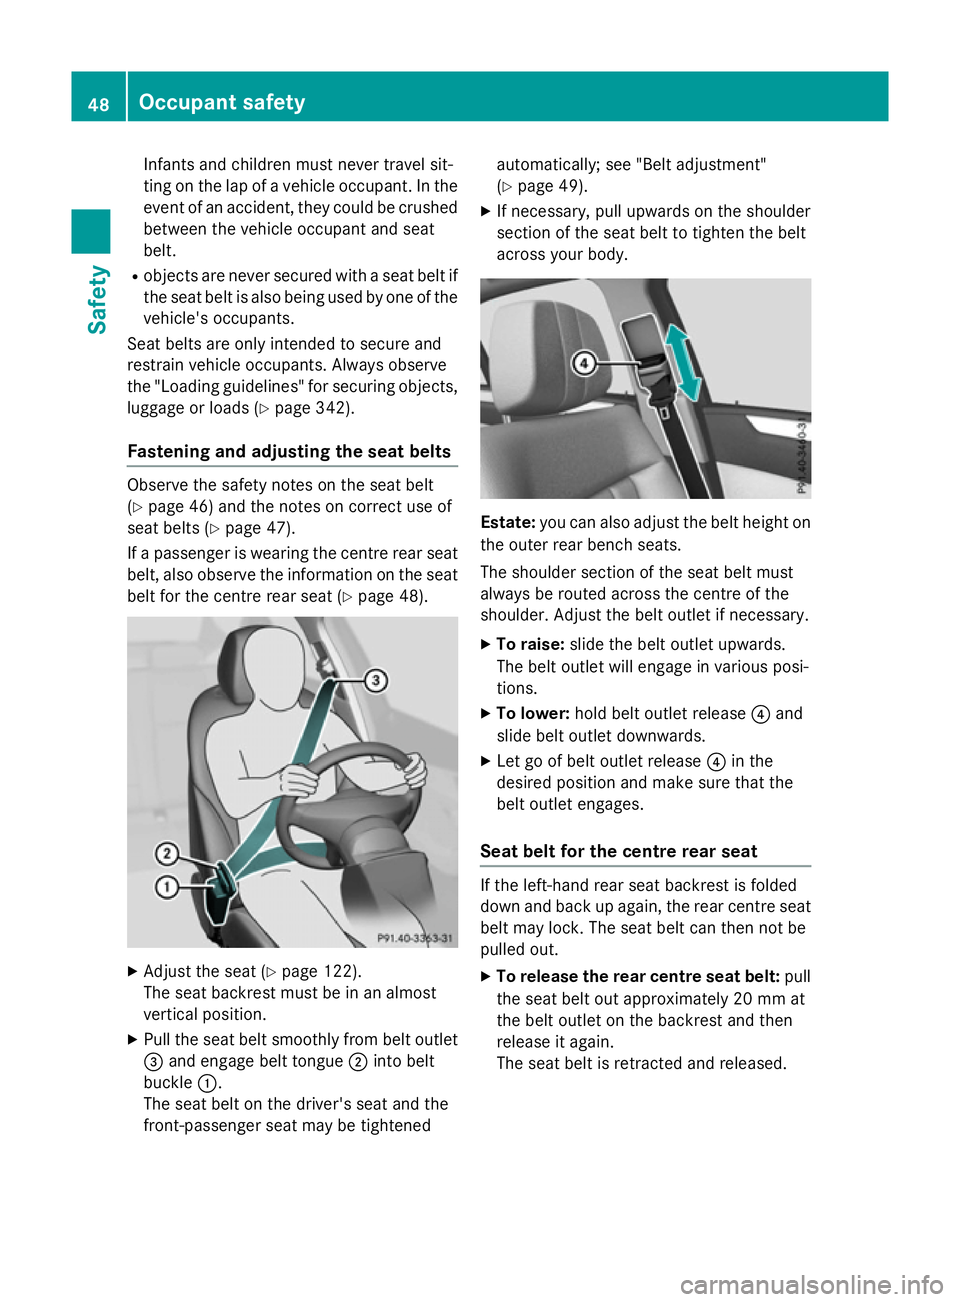
Fastening and adjusting the seat belts Observe the safety notes on the seat belt
(Y page 46) and the notes on correct use of
seat belts (Y page 47).
If ap assenger is wearing the centre rear seat
belt, also observe the information on the seat belt for the centre rear seat (Y page 48).X
Adjust the seat (Y page 122).
The seat backrest must be in an almost
vertical position.
X Pullt he seat belt smoothly from belt outlet
= and engage belt tongue ;into belt
buckle :.
The seat belt on the driver's seat and the
front-passenger seat may be tightened automatically; see "Belt adjustment"
(Y
page 49).
X If necessary ,pullu pwards on the shoulder
section of the seat belt to tighten the belt
across yourb ody. Estate:
you can also adjustt he belt heighton
the outer rear bench seats.
The shoulder section of the seat belt must
alwaysber outed across the centre of the
shoulder. Adjust the belt outlet if necessary.
X To raise: slidethe belt outlet upwards.
The belt outlet wille ngage in variousposi-
tions.
X To lower: hold belt outlet release ?and
slideb elt outlet downwards.
X Let go of belt outlet release ?in the
desire dpositio nand make sure that the
belt outlet engages.
Seat beltf or the centre rear seat If the left-hand rear seat backrest is folded
down and back up again, the rear centre seat
belt may lock. The seat belt can then not be
pulled out.
X To release the rear centre seat belt: pull
the seat belt out approximately 20 mm at
the belt outlet on the backrest and then
release it again.
The seat belt is retracted and released. 48
Occupant safetySafety
Page 61 of 497
Automati
cmeasures after an acci-
dent
Immediately after an accident, th efollowing
measures are implemented, depending on
th et ypea nd severity of th eimpact:
R theh azard warning lamp sare activated
R thee mergenc ylighting is activated
R thev ehicl edoor sare unlocked
R thef ront side windows are lowered
R vehicles wit hamemory function :the elec-
trically adjustable steering whee lisraised
R thee ngineiss witched off and th efuel sup-
ply is cut off
R vehicles wit hthe Mercedes-Benz emer-
gency call system: automatic emergency
call
R vehicles wit hthe hybrid driv esystem: the
hybrid system and th ehigh-voltage electri-
cal system are deactivated Children in th
evehicle Important safety notes
Acciden tstatistics sho wthatc hildren
secured in th erear seat sare safer than chil-
dre nsecured in th efront seats. Fo rthisr ea-
son ,Mercedes-Benz strongly advises that you
instal lachild restrain tsystem on arear seat.
Children are generally bette rprotected there.
If ac hild younger than twelve years old and
under 1.50 minh eight is travellin ginthe
vehicle:
R always secure th echild in achild restraint
system suitable for Mercedes-Benz vehi-
cles. The child restrain tsystem mus tbe
appropriat etotheage, weigh tand siz eof
th ec hild
R be sur etoobservethe instruction sand
safet ynotes in this section in addition to
th ec hild restrain tsystem manufacturer's
installation instructions
Do no tfitar earward-facing child restraint
system on th ecentre rear seat. G
WARNING
If you leav echildren unattended in th evehi-
cle ,the ym ay be able to set th evehicl ein
motion if, for example, they:
R release th eparking brake
R shif tthe automatic transmission out of park
position Por shif tmanual transmission into
neutral
R start th eengine
In addition ,the ym ay operate vehicl eequip-
men tand become trapped .There is ariskof
an acciden tand injury.
When leaving th evehicle, always tak ethe key
wit hyou and loc kthe vehicle. Never leave
children unattended in th evehicle. G
WARNING
If person s(particularly children )are exposed
to heat or cold for aprolonged period, there is
ar iskofs erious or eve nfatal injuries. Never
leav eperson s(particularly children )unatten-
ded in th evehicle. G
WARNING
If th echild restrain tsystem is placed in direct
sunlight, th epartsc ould become ver yhot.
Children could be suffer burn sbytouching
these parts, in particular on th emetallic parts
of th echild restrain tsystem. There is ariskof
injury.
If you and your child leav ethe vehicle, always
mak esuret hatthe child restrain tsystem is
no tind irectsunlight. Cove ritwithab lanket,
for example. If th echild restrain tsystem has
been exposed to direc tsunlight, leav eitto
cool down before securin gthe child in it.
Never leav echildren unattended in th evehi-
cle.
Always ensur etha tall vehicl eoccupant shave
their seat belt sfastene dcorrectly and are sit-
ting properly. Particular attention mus tbe
paid to children.
Observ ethe safet ynotes on th eseat belt
(Y page 46) and th enotes on how to use the
seat belt properly (Y page 47).58
Childre
ninthevehicleSafety
Page 63 of 497
accident. This pose
sanincreased risk of
injury or even fatal injury.
If th echild weigh smoret han2 2kg,only use
ISOFIX child restraint systems with whic hthe
child is also secured with th evehicle seat belt.
Als osecure th echild restraint system with the
Top Tether belt ,ifavailable.
When fittin gachild restraint system, be sure
to observ ethe manufacturer' sinstallation
and operatin ginstruction sand th einstruc-
tions for correc tuse of th echild restraint sys-
te m( Ypage 70).
Before ever ytrip, mak esure that th eISOFIX
child restraint system is engaged correctly in bot hISOFI Xsecurin grings.
! When fittin
gthe child restraint system,
mak esure that th eseat belt for th ecentre
seat does no tget trapped. Otherwise, the
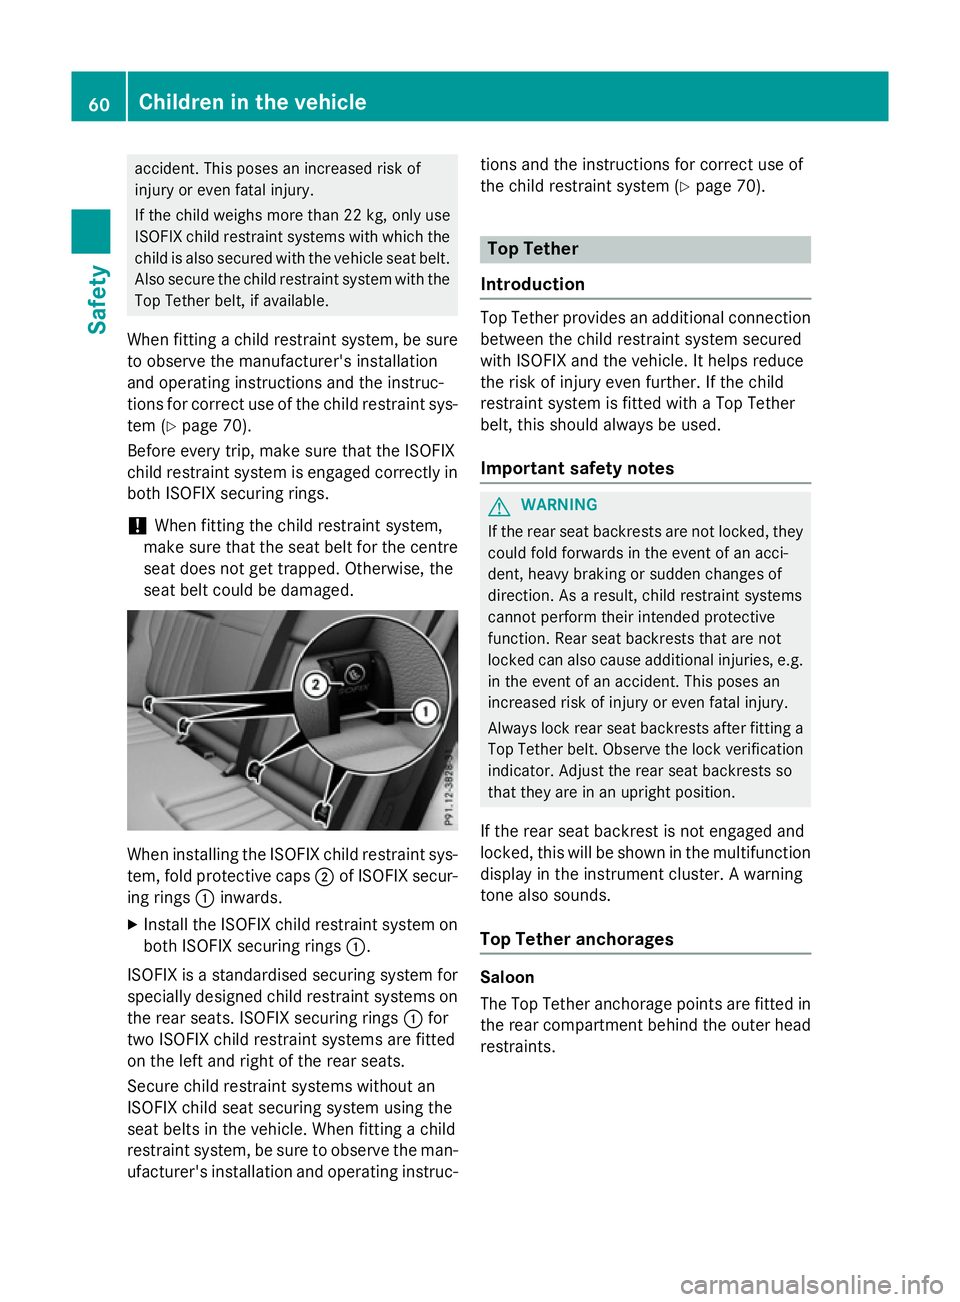
seat belt coul dbedamaged. When installing th
eISOFI Xchild restraint sys-
tem, fold protective caps ;of ISOFIX secur-
ing rings :inwards.
X Install th eISOFI Xchild restraint system on
bot hISOFI Xsecurin grings :.
ISOFIX is astandardised securin gsystem for
specially designed child restraint systems on
th er ear seats. ISOFIX securin grings :for
two ISOFIX child restraint systems are fitted
on th eleft and righ toftherear seats.
Secure child restraint systems without an
ISOFIX child seat securin gsystem usin gthe
seat belt sinthevehicle .When fittin gachild
restraint system, be sure to observ ethe man-
ufacturer' sinstallation and operatin ginstruc- tions and th
einstruction sfor correc tuse of
th ec hild restraint system (Y page 70). Top Tether
Introduction Top Tether provides an additional connection
between th echild restraint system secured
with ISOFIX and th evehicle .Ithelps reduce
th er isk of injury even further. If th echild
restraint system is fitte dwithaTop Tether
belt ,thiss houl dalways be used.
Important safety notes G
WARNING
If th erear seat backrests are no tlocked, they
coul dfold forwards in th eeven tofana cci-
dent, heav ybraking or sudden changes of
direction .Asaresult, child restraint systems
canno tperform their intended protective
function .Rear seat backrests that are not
locke dcan also caus eadditional injuries ,e.g.
in th eeven tofana ccident. This pose san
increased risk of injury or even fatal injury.
Always loc krear seat backrests after fittin ga
Top Tether belt .Observ ethe lockverification
indicator. Adjust th erear seat backrests so
that they are in an upright position.
If th erear seat backres tisnotengaged and
locked, this will be show ninthemultifunction
display in th einstrumen tcluster. Awarning
tone also sounds.
Top Tether anchorages Saloon
The Top Tether anchorage points are fitte
din
th er ear compartmen tbehin dthe outer head
restraints. 60
Children in th
evehicleSafety
Page 68 of 497
X
Pull both parts of the belt tight .Make sure
that the seat belt is not twisted.
X Adjust the head restraint if necessary
(Y page 126).
Side head restraints for the integrated
child seat G
WARNING
If the side head restraint has been fitted incor-
rectly, it cannot perform its intended protec-
tive function. Achild's head therefore cannot
be supported in the event of an accident,
heavy braking or asudden change of direc-
tion. In addition, the side head restraint could become loose and be thrown around, endan-
gering vehicle occupants. This poses an
increased risk of injury or even fatal injury.
Only fasten the side head restraint to the spe-
cially designed securing points on the rear
head restraint. For safety reasons, only use
side head restraints that have been tested
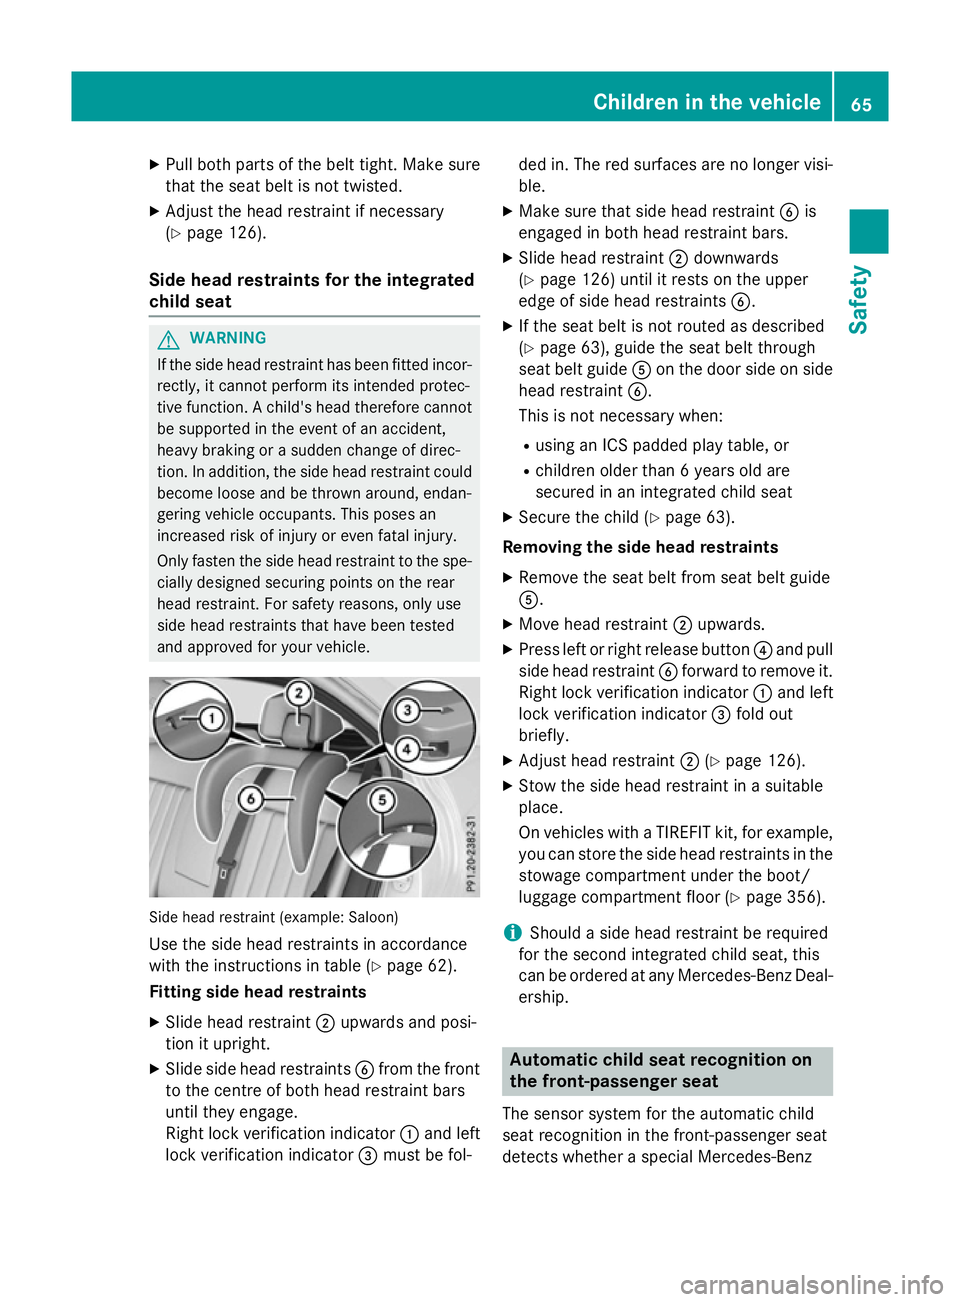
and approved for your vehicle. Side head restraint (example: Saloon)
Use the side head restraints in accordance
with the instruction sintable (Y page 62).
Fitting side head restraints
X Slide head restraint ;upwards and posi-
tion it upright.
X Slide side head restraints Bfrom the front
to the centre of both head restraint bars
until they engage.
Right lock verification indicator :and left
lock verification indicator =must be fol- ded in. The red surfaces are no longer visi-
ble.
X Make sure that side head restraint Bis
engaged in both head restraint bars.
X Slide head restraint ;downwards
(Y page 126) until it rests on the upper
edge of side head restraints B.
X If the seat belt is not routed as described
(Y page 63), guide the seat belt through
seat belt guide Aon the door side on side
head restraint B.
This is not necessary when:
R using an ICS padded play table, or
R children older than 6years old are
secured in an integrated child seat
X Secure the child (Y page 63).
Removing the side head restraints X Remove the seat belt from seat belt guide
A.
X Move head restraint ;upwards.
X Press left or right release button ?and pull
side head restraint Bforward to remove it.
Right lock verification indicator :and left
lock verification indicator =fold out
briefly.
X Adjust head restraint ;(Ypage 126).
X Stow the side head restraint in asuitable
place.
On vehicles with aTIREFI Tkit, for example,
you can store the side head restraints in the stowage compartment under the boot/
luggage compartment floor (Y page 356).
i Should
aside head restraint be required
for the secon dintegrated child seat, this
can be ordered at any Mercedes-Benz Deal- ership. Automatic child seat recognition on
the front-passenger seat
The sensor system for the automatic child
seat recognition in the front-passenger seat
detect swhether aspecial Mercedes-Benz Children in the vehicle
65Safety Z