2015 MERCEDES-BENZ E-CLASS ESTATE window
[x] Cancel search: windowPage 138 of 497
Problems with the steering wheel heating
Problem
Possible causes/consequences and
M
MSolutions The steering wheel
heating has switched
itself off prematurely or
cannot be switched on. The on-board voltage is too low because too many electrical con-
sumers are switched on.
X Switch off electrical consumers that you do not need, such as
the rear window heating or interior lighting.
Once the battery is sufficiently charged, the steering wheel
heating will switch back on automatically. EASY-ENTRY/EXIT feature
Important safety notes G
WARNING
When the EASY-ENTRY/EXIT feature adjusts
the steering wheel, you and other vehicle
occupants –particularly children –could
become trapped. There is arisk of injury.
While the EASY-ENTRY/EXIT feature is mak-
ing adjustments, make sure that no one has
any body parts in the sweep of the steering
wheel.
Move the steering wheel adjustment lever if
there is arisk of entrapment by the steering
wheel. The adjustment process is stopped.
Vehicles with amemory function: if there is a
risk of becoming trapped by the steering
wheel, you can also press one of the memory
function position buttons.T he adjustment
process is stopped. G
WARNING
If children activate the EASY-ENTRY/EXIT fea- ture, they can become trapped, particularly
when unattended. There is arisk of injury.
When leaving the vehicle, always take the key with you and lock the vehicle. Never leave
children unattended in the vehicle. G
WARNING
If you drive off while the EASY-ENTRY/EXIT
feature is making adjustments, you could lose
control of the vehicle. There is arisk of an
accident. Always wait until the adjustment process is
complete before driving off.
The EASY-ENTRY/EXIT feature makes getting in and out of your vehicle easier.
You can activate and deactivate the EASY-
ENTRY/EXI Tfeature in the on-board com-
puter (Y page 294).
Position of the steering wheel when the
EASY-ENTRY/EXIT featureisa ctive The steering wheel tilts upwards if you:
R remove the key from the ignition lock
R with KEYLESS-GO: open the driver's door;
KEYLESS-GO must be in position 1
R with the key: open the driver's door; the
key must be in position 0or 1in the ignition
lock (Y page 179)
i The steering wheel only moves upwards if
it has not already reached the upper stop.
Position of the steering wheel for driv-
ing The steering wheel is moved to the previously
set position if:
R the driver's door is closed and
R with KEYLESS-GO: you press the Start/
Stop button once
or
R with the key: you insert the key into the
ignition lock Steering wheel
135Seats, steering wheela nd mirrors Z
Page 140 of 497
mirror using adjustment button
=as long
as the indicator lamp is lit.
X Press adjustment button =up, down, or to
the left or right until you have adjusted the
exterior mirror to the correct position. You
should have agood overvie woftraffic con-
ditions.
The convex exterior mirrors provid ealarger
fiel dofv ision.
After the engine has been started, the exte-
rior mirrors are automatically heated if the
rear windo wheating is switched on and the
outsid etemperature is low.H eating takes a
maximu moften minutes.
i The exterior mirrors can alsobeh
eated
manually by switching on the rear window
heating.
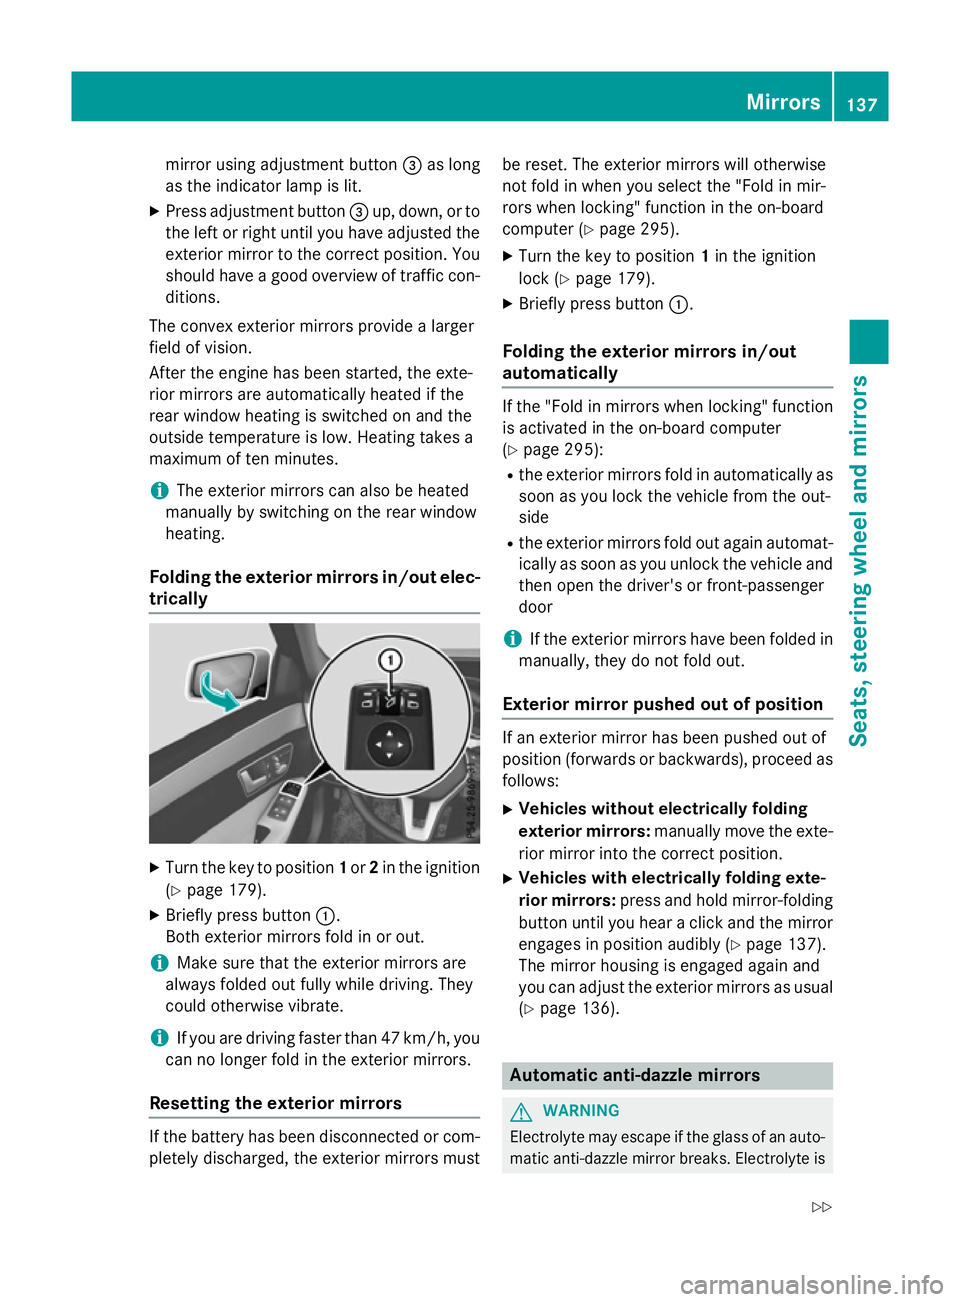
Folding the exterio rmirrors in/out elec-
trically X
Turn the key to position 1or 2in the ignition
(Y page1 79).
X Briefly press button :.
Both exterior mirrors fold in or out.
i Make sure that the exterior mirrors are
alwaysf oldedout full ywhile driving. They
could otherwise vibrate.
i If you are driving faster than 47 km/h, you
can no longer fold in the exterior mirrors.
Resetting the exterio rmirrors If the battery has been disconnected or com-
pletely discharged, the exterior mirrors must be reset. The exterior mirrors willo
therwise
not fold in when you select the "Fol dinmir-
rors when locking" function in the on-board
computer (Y page295).
X Turn the key to position 1in the ignition
lock (Y page179).
X Briefly press button :.
Folding the exterio rmirrors in/out
automatically If the "Fol
dinmirrors when locking" function
is activated in the on-board computer
(Y page2 95):
R the exterior mirrors fold in automatically as
soon as you lock the vehicl efrom the out-
side
R the exterior mirrors fold out again automat-
ically as soon as you unlock the vehicl eand
then open the driver' sorfront-passenger
door
i If the exterior mirrors have been folde
din
manually,t hey do not fold out.
Exterio rmirror pushed out of position If an exterior mirror has been pushed out of
position (forwards or backwards), proceed as
follows:
X Vehicles without electrically folding
exterio rmirrors: manually move the exte-
rior mirror into the correct position.
X Vehicles with electrically folding exte-
rior mirrors: press and hold mirror-folding
button until you hear aclick and the mirror
engage sinposition audibly (Y page137).
The mirror housing is engage dagain and
you can adjust the exterior mirrors as usual
(Y page1 36). Automatic anti-dazzle mirrors
G
WARNING
Electrolyte may escap eifthe glass of an auto-
matic anti-dazzle mirror breaks. Electrolyte is Mirrors
137Seats, steering wheel and mirrors
Z
Page 155 of 497
If the wiper blades are worn, the windscreen
willnol onger be wiped properly. This could
prevent you from observing the traffic condi-
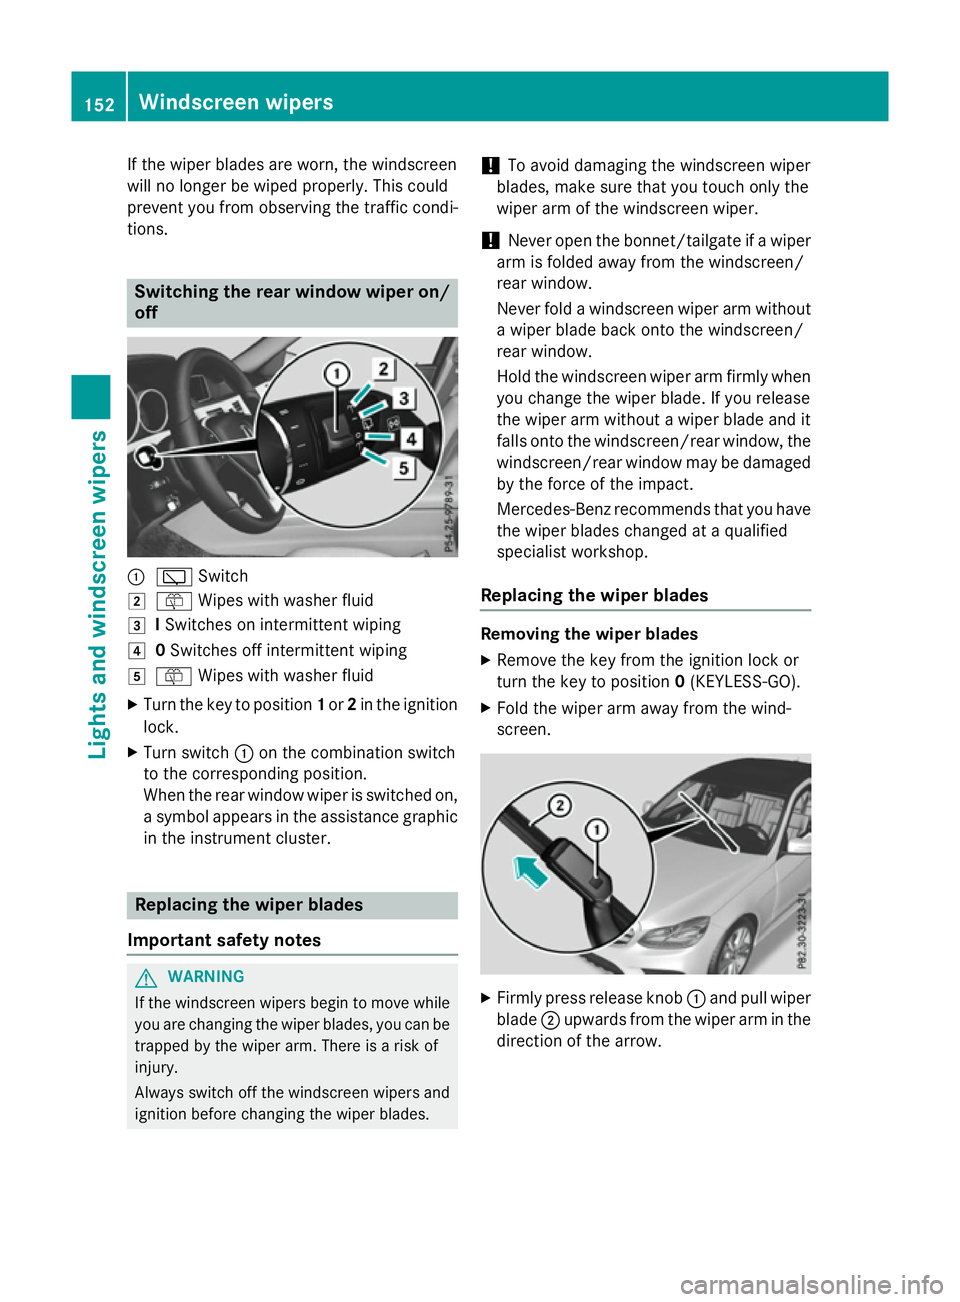
tions. Switching the rear window wipero
n/
off :
è Switch
2 ô Wipesw ith washer fluid
3 ISwitches on intermittent wiping
4 0Switches off intermittent wiping
5 ô Wipesw ith washer fluid
X Turn the key to position 1or 2in the ignition
lock.
X Turn switch :on the combination switch
to the corresponding position.
When the rear window wiper is switched on,
as ymbola ppears in the assistance graphic
in the instrument cluster. Replacing the wiperb
lades
Important safety notes G
WARNING
If the windscree nwipers begintom ove while
you are changing the wiper blades, you can be trapped by the wiper arm. There is arisk of
injury.
Alwayss witch off the windscree nwipers and
ignition before changing the wiper blades. !
To avoid damaging the windscree
nwiper
blades, make sure that you touch only the
wiper arm of the windscree nwiper.
! Never open the bonnet/tailgate if
awiper
arm is folded awayf rom the windscreen/
rear window.
Never fold awindscree nwiper arm without
aw iper blade back onto the windscreen/
rear window.
Hold the windscree nwiper arm firmly when
you change the wiper blade. If you release
the wiper arm withou tawiper blade and it
fallso nto the windscreen/rear window ,the
windscreen/rear window may be damaged
by the force of the impact.
Mercedes-Benz recommends that you have
the wiper blades changed at aqualified
specialist workshop.
Replacing the wiperb lades Removing the wiperb
lades
X Remove the key from the ignition lock or
turn the key to position 0(KEYLESS-GO).
X Fold the wiper arm awayf rom the wind-
screen. X
Firmly press release knob :and pullw iper
blade ;upwards from the wiper arm in the
direction of the arrow. 152
Windscreen wipersLights and windscreenw
ipers
Page 156 of 497
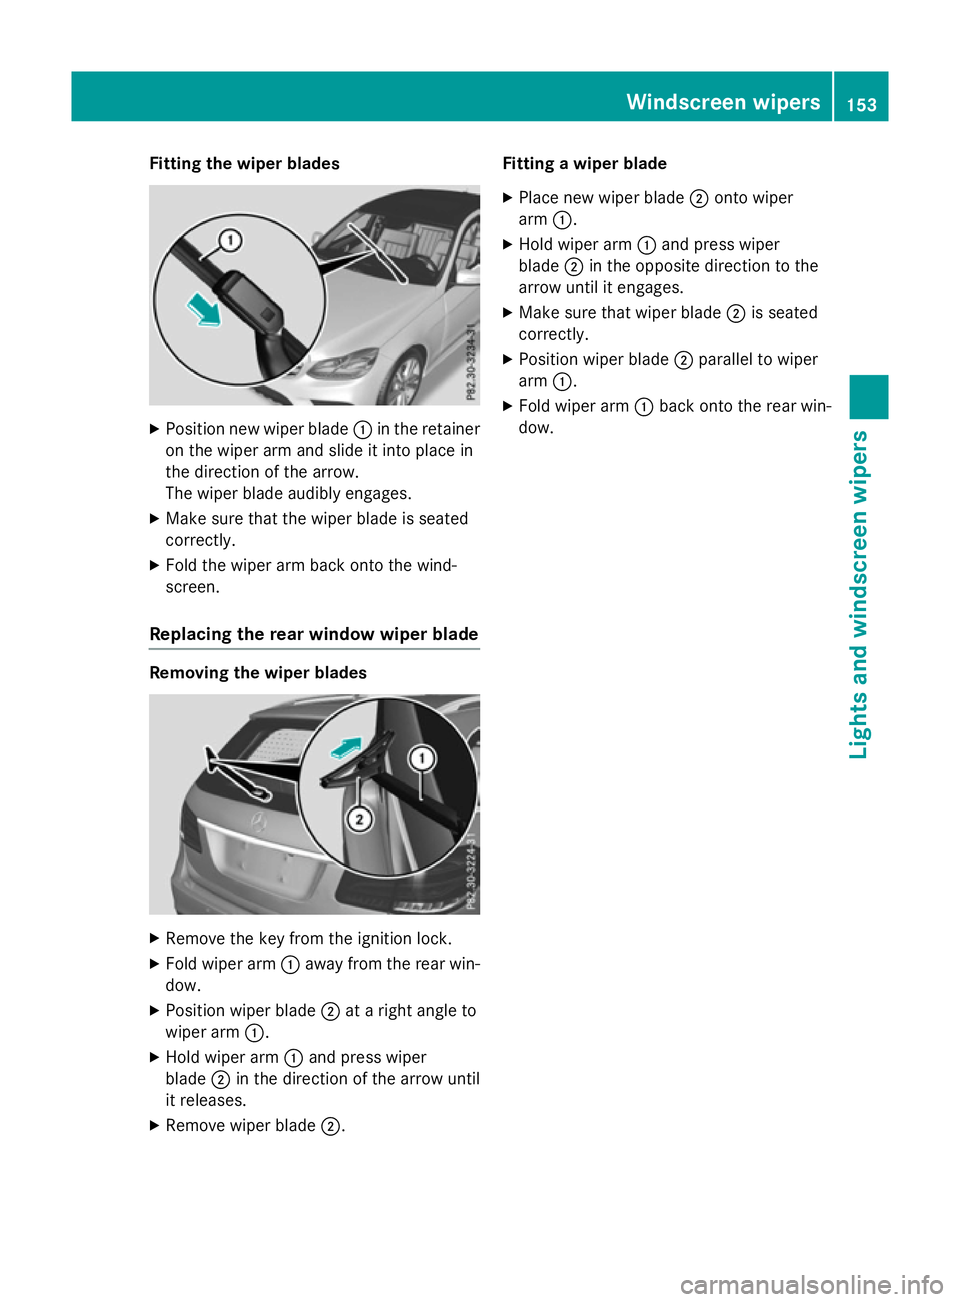
Fitting th
ewiper blades X
Positio nnew wiper blade :in th eretainer
on th ewiper arm and slide it int oplacein
th ed irection of th earrow.
The wiper blade audibly engages.
X Mak esure that th ewiper blade is seated
correctly.
X Fold th ewiper arm back onto th ewind-
screen.
Replacin gthe rea rwindow wiper blade Removing th
ewiper blades X
Remove th ekeyfrom th eignition lock.
X Fold wiper arm :away from th erear win-
dow.
X Positio nwiper blade ;atar igh tangle to
wiper arm :.
X Hol dw iper arm :and press wiper
blade ;in th edirection of th earrow until
it releases.
X Remove wiper blade ;. Fitting
awiper blade
X Plac enew wiper blade ;onto wiper
arm :.
X Hol dw iper arm :and press wiper
blade ;in th eopposit edirection to the
arrow until it engages.
X Mak esure that wiper blade ;is seated
correctly.
X Positio nwiper blade ;parallel to wiper
arm :.
X Fold wiper arm :back onto th erear win-
dow. Windscreen wipers
153Lightsand windscreen wipers Z
Page 159 of 497
Useful information
i This Owner's Manual describes all mod-
els, series and optional equipment for your
vehicle that were available at the time of
going to press. National variation sare pos-
sible. Not ethat your vehicle may not be
equipped with all of the function sdescri-
bed. This is also the case for system sand
function srelevan ttosafety.
i Read the information on qualified special-
ist workshops: (Y page 27). Overview of climat
econtrol systems Genera
lnotes
Observ ethe settings recommende donthe
following pages. The windows could other-
wise mist up.
To preven tthe windows from misting up:
R switc hoff climat econtro lonly briefly
R switc hona ir-recirculation mode only
briefly
R switc hont he coolin gwith air dehumidifi-
cation function
R switc hont he windscreen demisting func-
tion briefly, if required
Climate contro lregulates the temperature
and the humidity in the vehicle interior and
filter sundesirable substances out of the air.
Climate contro lisonly operational when the
engin eisrunning. Optimum operation is only
achieved when the side windows and the roof
are closed.
The residual heat function can only be acti-
vated or deactivated with the ignition
switched off (Y page 167).
i Ventilate the vehicle for
abrief period
during warm weather, e.g. using the con-
venience openin gfeature (Y page 111).
This will speed up the coolin gprocess and
the desired interior temperature will be
reached more quickly. i
The integrated filter filter
sout most par-
ticles of dust and soot and completely fil-
ter sout pollen. It also reduces gaseous pol-
lutant sand odours. Aclogged filter reduces
the amount of air supplied to the vehicle
interior. For this reason ,you should always
observ ethe interval for replacin gthe filter,
which is specified in the Service Booklet. As this depends on environmental conditions,
e.g. heavy air pollution, the interval may be shorter than stated in the Service Booklet.
i It is possible that the residual heat func-
tion may be activated automatically an hour
after the key has been removed. The vehi-
cle is then ventilated for 30 minutes to dry the automatic climat econtrol. 156
Overview of climat
econtrol systemsClimat econtrol
Page 160 of 497
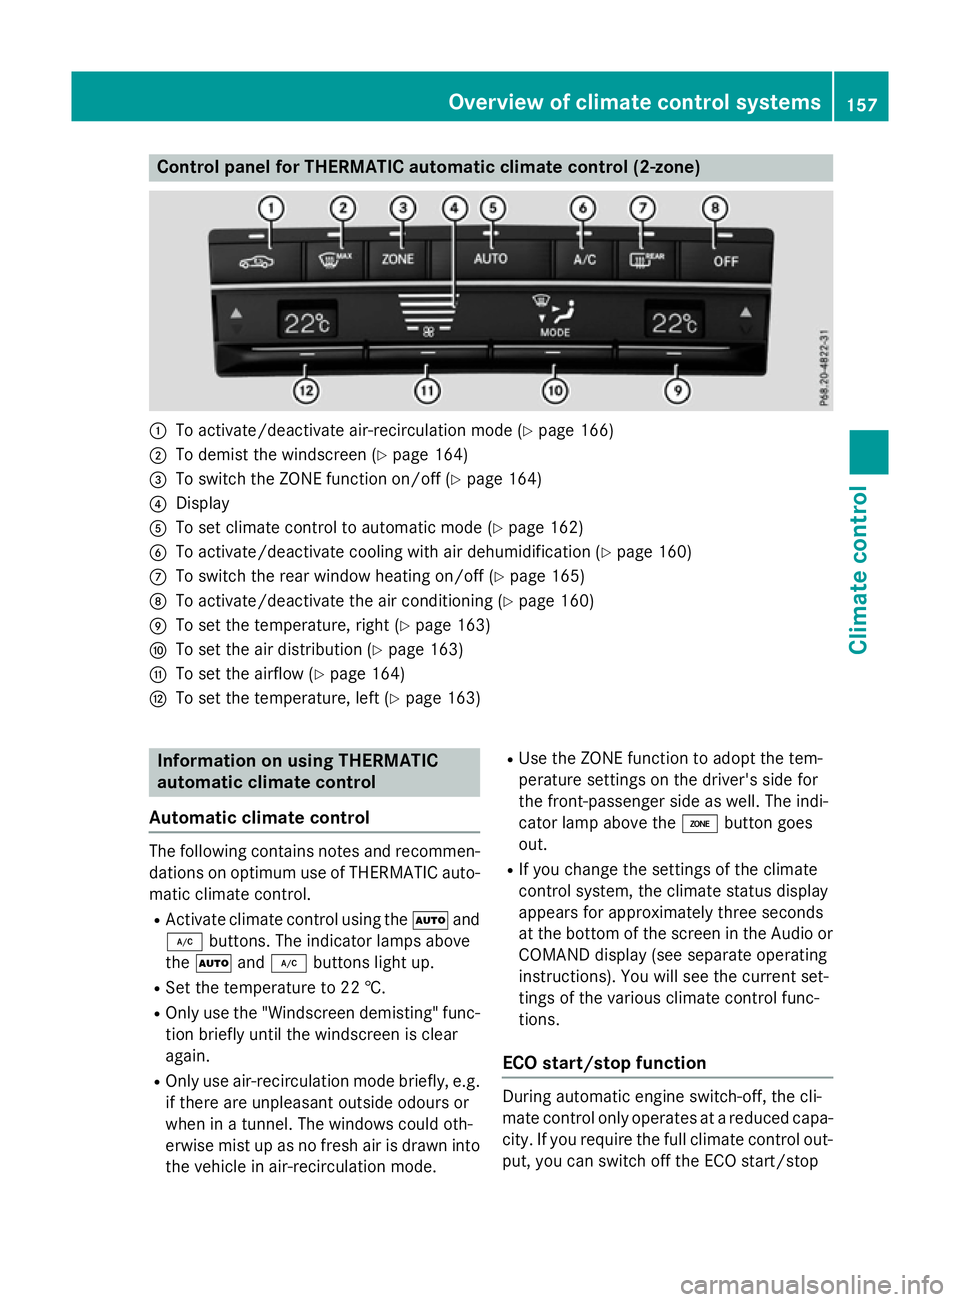
Control panel for THERMATIC automatic climat
econtrol (2-zone) :
To activate/deactivat eair-recirculation mod e(Ypage 166)
; To demist th ewindscree n(Ypage 164)
= To switch th eZONE function on/of f(Y page 164)
? Display
A To set climate control to automatic mod e(Ypage 162)
B To activate/deactivat ecoolingw itha ir dehumidification (Y page 160)
C To switch th erear window heating on/of f(Ypage 165)
D To activate/deactivat ethe air conditionin g(Ypage 160)
E To set th etem perature, righ t(Ypage 163)
F To set th eair distribution (Y page 163)
G To set th eairflow (Y page 164)
H To set th etem perature, left (Y page 163) Information on usin
gTHERMATIC
automatic climat econtrol
Automatic climat econtrol The followin
gcontai ns note sand recommen-
dation sonoptimum use of THERMATIC auto-
matic climate control.
R Activate climate control usin gthe à and
¿ buttons .The indicator lamps above
the à and¿ buttons light up.
R Set th etem peratur eto22†.
R Only use th e"Windscree ndemisting "func-
tio nb riefly until th ewindscree nisclear
again.
R Only use air-recirculation mod ebriefly, e.g.
if there are unpleasan toutside odour sor
when in atunnel. The windows could oth-
erwis emistupasnof resh air is drawn into
th ev ehicle in air-recirculation mode. R
Use th eZONE function to adopt th etem-
perature settings on th edriver' sside for
th ef ront-pa ssenger side as well. The indi-
cator lamp abov ethe á buttongoes
out.
R If you chang ethe settings of th eclimate
control system, th eclimate status display
appear sfor approximately three seconds
at th ebotto moft hescree nintheAudi oor
COMAND display (see separate operating
instructions). You will see th ecurren tset-
tings of th evarious climate control func-
tions.
ECO start/stop function During automatic engin
eswitch-off ,the cli-
mat econtro lonlyo perate satareduced capa-
city. If you require th efull climate control out-
put ,you can switch off th eECO start/stop Overview of climat
econtrol systems
157Climate control
Page 162 of 497
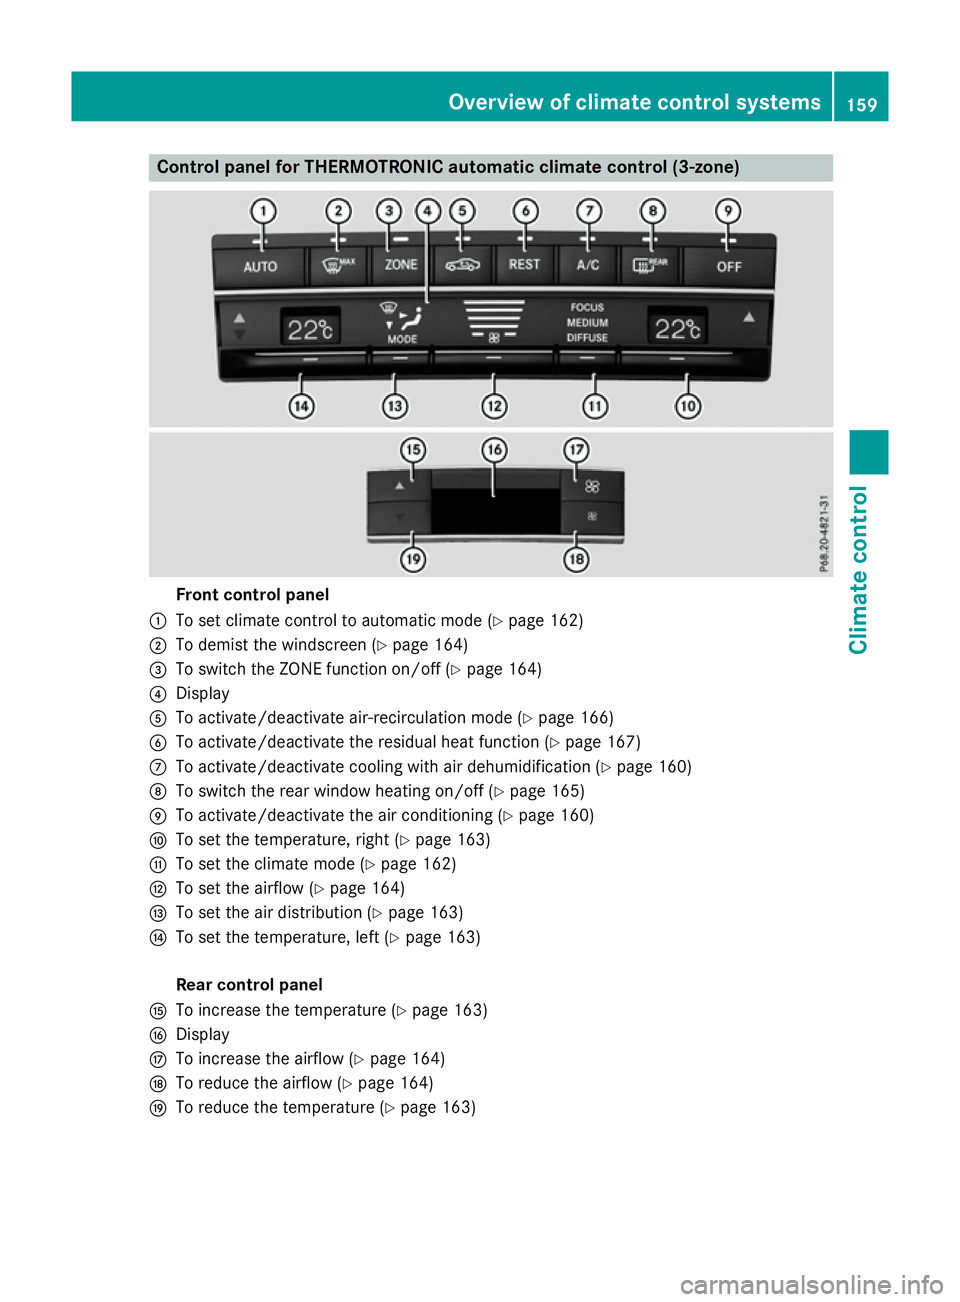
Control panel for THERMOTRONIC automatic climat
econtrol (3-zone) Fron
tcontrol panel
: To set climate control to automatic mod e(Ypage 162)
; To demist th ewindscree n(Ypage 164)
= To switch th eZONE function on/of f(Y page 164)
? Display
A To activate/deactivat eair-recirculation mod e(Ypage 166)
B To activate/deactivat ethe residual heat function (Y page 167)
C To activate/deactivat ecoolingw itha ir dehumidification (Y page 160)
D To switch th erear window heating on/of f(Ypage 165)
E To activate/deactivat ethe air conditionin g(Ypage 160)
F To set th etem perature, righ t(Ypage 163)
G To set th eclimate mod e(Ypage 162)
H To set th eairflow (Y page 164)
I To set th eair distribution (Y page 163)
J To set th etem perature, left (Y page 163)
Rea rcontrol panel
K To increas ethe temperatur e(Ypage 163)
L Display
M To increas ethe airflow (Y page 164)
N To reduc ethe airflow (Y page 164)
O To reduc ethe temperatur e(Ypage 163) Overview of climat
econtrol systems
159Climate control
Page 163 of 497
Information on using THERMOTRONIC
automatic climat econtrol
automatic climat econtrol The followin
gcontai ns instruction sand rec-
ommendation stoenable you to get th emost
out of your THERMOTRONI Cautomatic cli-
mat econtrol.
R Activat eclimat econtro lusin gthe à and
¿ buttons .The indicator lamps above
the à and¿ buttons ligh tup.
R In automatic mode, you can also set the
climat emode( FOCUS ,MEDIU MorD IF-
FUSE). The MEDIUM leve lisrecommended.
R Se tthe temperature to 22 †.
R Only use th e"Windscree ndemisting "func-
tion briefly until th ewindscree nisclear
again.
R Only use air-recirculation mod ebriefly, e.g.
if there are unpleasan toutside odour sor
when in atunnel. The windows could oth-
erwise mis tupasnof resh air is drawn into
th ev ehicl eina ir-recirculation mode.
R Use th eZON Efunction to adopt th etem-
peratur esetting sonthedriver' sside for
th ef ront-pa ssenger side and th erear com-
partmen taswell. The indicator lamp above
the á buttongoes out.
R Use th eresidual heat function if you want to
heat or ventilat ethe vehicl einterio rwhen
th ei gnition is switched off .The residual
heat function can only be activated or deac- tivated wit hthe ignition switched off.
R If you chang ethe setting softheclimate
control system, th eclimat estatus display
appear sfor approximately three seconds
at th ebotto moft hescree nintheAudio or
COMAND display (see th eseparate oper-
ating instructions). You will see th ecurrent
setting softhevarious climat econtro lfunc-
tions.
ECO start/stop function During automatic engin
eswitch-off ,the cli-
mat econtro lonlyo perate satareducedcapa- city. If you require th
efull climat econtro lout-
put ,you can switch off th eECO start/stop
function by pressin gthe ECO button
(Y page 185). Operating th
eclimat econtrol system Activating/deactivating th
eair condi-
tioning
General notes When th
eclimat econtro lisswitched off ,the
air suppl yand air circulation are also
switched off .The windows could mis tup.
Therefore, only switch off climat econtrol
briefly.
i Switc
honc limatecontro lprimarily using
the à button(Ypage 162).
Switchin gon/off X
Turn th ekeyto position 2in th eignition
loc k(Ypage 179).
X To switch on: press theÃbutton.
The indicator lamp abov ethe à button
lights up. Airflo wand air distribution are set
to automatic mode.
or
X Press the ^button.
The indicator lamp abov ethe ^ button
goes out .The previous setting sare reacti-
vated.
X To deactivate: press the^button.
The indicator lamp abov ethe ^ button
lights up. Switchin
gcooling with air dehumidi-
fication on/off
General notes If you deactivat
ethe "Coolin gwitha ir-dehu-
midification "function ,the air inside th evehi-
cle will no tbecooled. The air inside th evehi-
cle will also no tbedehumidified. The win-
dows can mis tupmoreq uickly. Therefore, 160
Operating th
eclimat econtrol systemClimat econt rol