2015 MERCEDES-BENZ E-CLASS ESTATE child seat
[x] Cancel search: child seatPage 111 of 497
R
press the closin gorlocking button on the
tailgate or
R press the Fbutton on the key
If the tailgate closin gprocedure has been
stopped:
R move your foot under the bumper again and
the tailgate will open
If the tailgate openin gprocedure has been
stopped:
R move your foot under the bumper again and
the tailgate will close Opening/closing automatically from
the inside
Importan tsafet ynotes G
WARNING
Parts of the body could become trapped dur-
ing automatic closin gofthe boot lid or tail-
gate. Moreover, people, e.g. children ,may be
standing in the closin garea or may enter the
closin garea during the closin gprocess. There
is ar isk of injury.
Make sure that nobody is in the vicinity of the closin garea during the closin gprocess.
Use one of the following option stostop the
closin gprocess:
R press the Fbutton on the key
R pull or press the remot eoperatin gswitch
on the driver' sdoor
R press the closin gorlocking button on the
boot lid/tailgate
R pull the handle on the boot lid/tailgate
! The boot lid/tailgate swings upwards and
to the rear when opened. Therefore, make
sure that ther eissufficient clearance
above and behind the boot lid/tailgate.
i Boot lid/tailgate openin
gdimensions
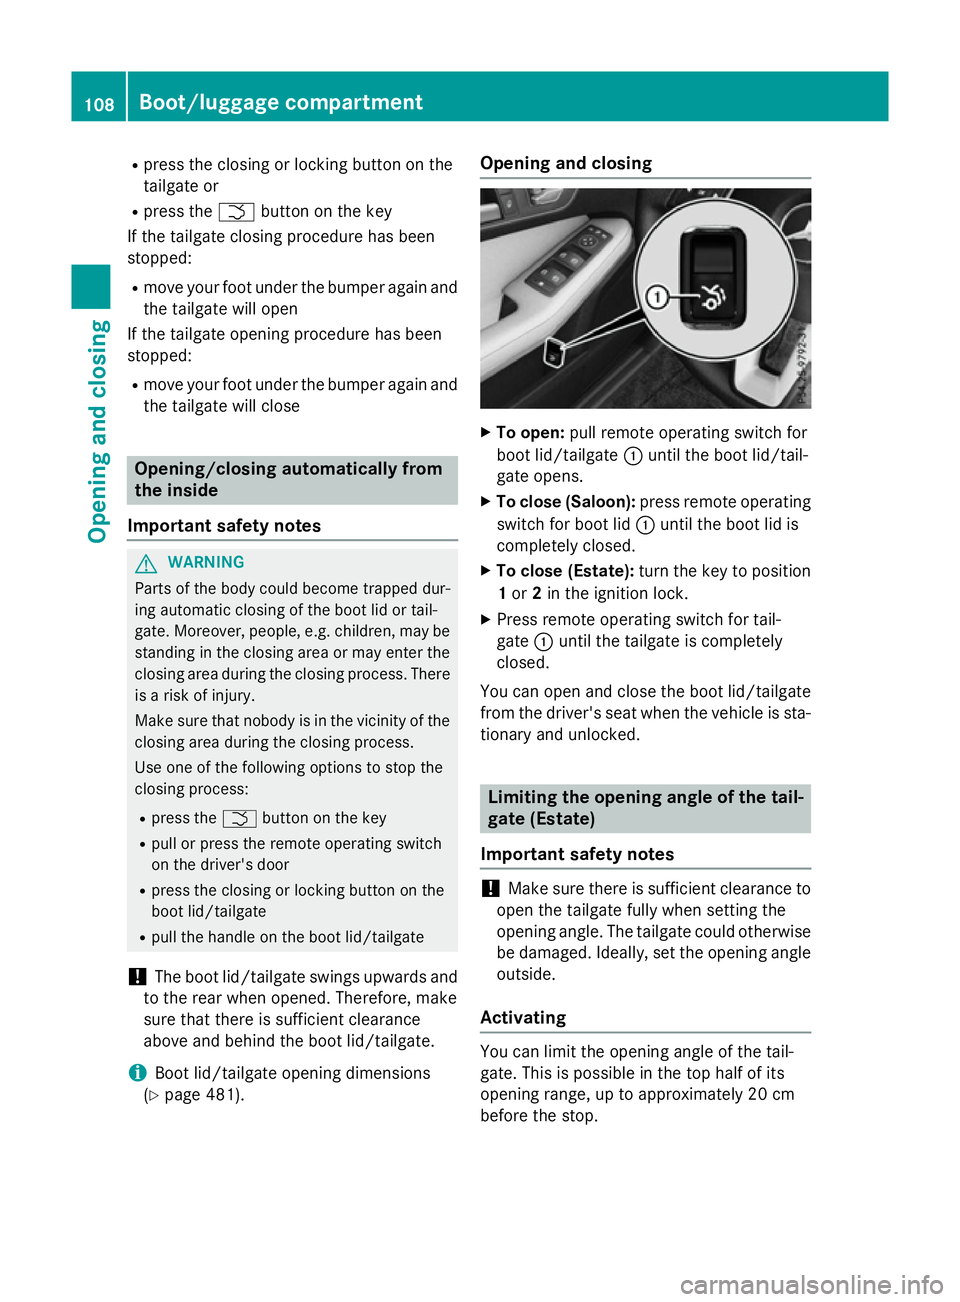
(Y page 481). Opening and closing
X
To open: pull remot eoperatin gswitc hfor
boot lid/tailgate :until the boot lid/tail-
gate opens.
X To close (Saloon): press remoteoperating
switc hfor boot lid :until the boot lid is
completely closed.
X To close (Estate): turn the key to position
1 or 2in the ignition lock.
X Press remot eoperatin gswitc hfor tail-
gate :until the tailgate is completely
closed.
You can open and close the boot lid/tailgate from the driver' sseat when the vehicle is sta-
tionary and unlocked. Limiting the opening angle of the tail-
gate (Estate)
Importan tsafet ynotes !
Make sure ther
eissufficient clearanc eto
open the tailgate fully when setting the
openin gangle. The tailgate could otherwise
be damaged. Ideally, set the openin gangle
outside.
Activating You can limit the openin
gangle of the tail-
gate. This is possible in the top half of its
openin grange, up to approximately 20 cm
before the stop. 108
Boot/luggage compartmentOpening and closing
Page 113 of 497
Tailgate emergenc
yreleas e(Estate)
General notes !
The tailgate swing
supwar ds and to the
rea rwheno pened. Therefore ,makes ure
tha tther eiss ufficient clearance above and
behind the tailgate.
i Tailgate opening dimensions
(Y page 481).
If the tailgate can no longe rbeopenedf rom
outside the vehicle, us ethe emergency
release on the insid eofthe tailgate.
On vehicles with afolding bench seat, yo ucan
open the tailgate fro minsid ethe vehicl eusing
the handl e(Ypage 104).
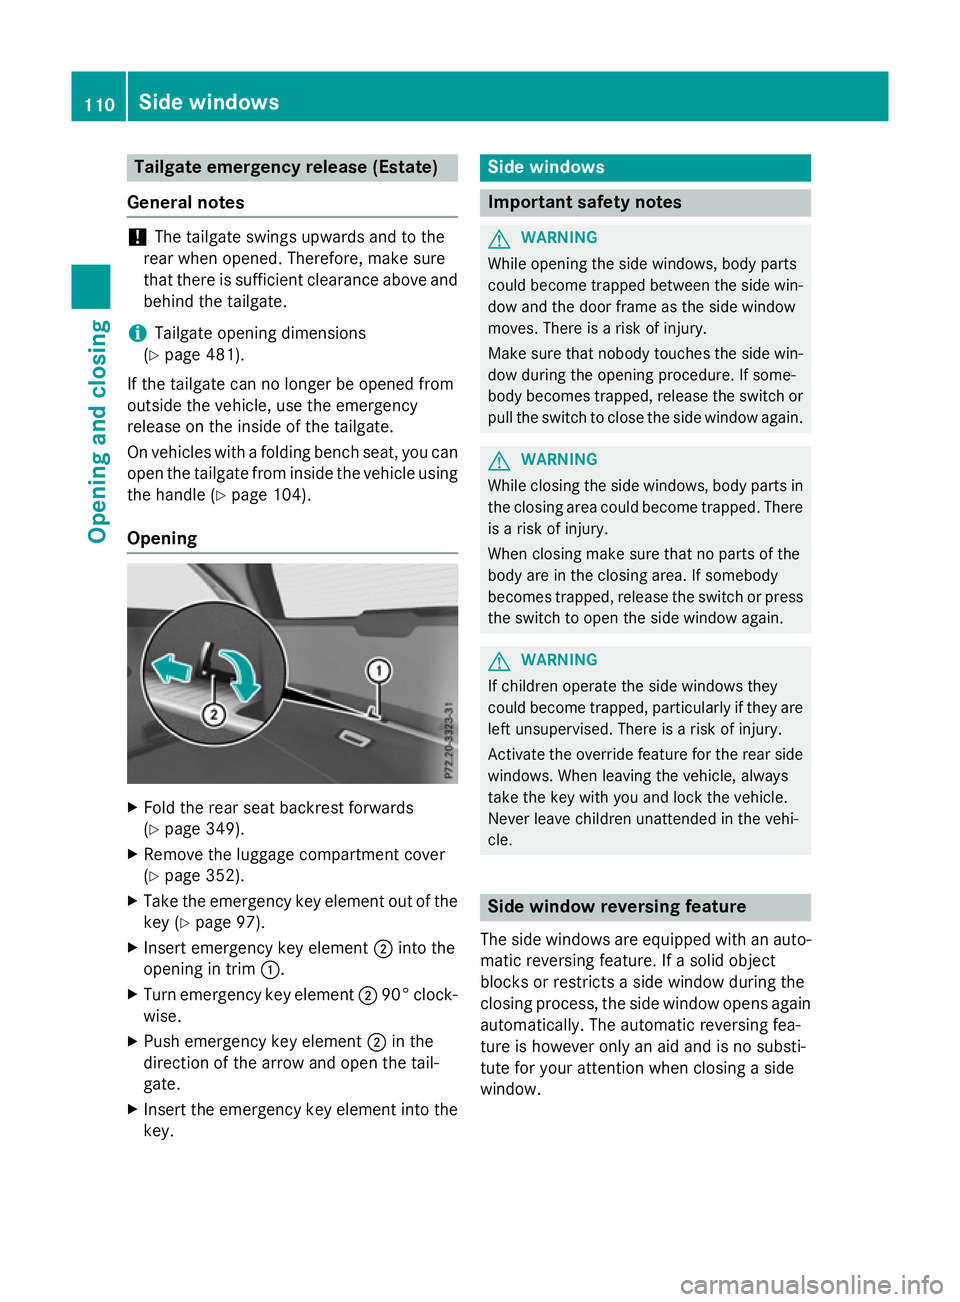
Opening X
Fol dthe rea rseatb ackres tforwards
(Y page 349).
X Remov ethe luggag ecompartment cover
(Y page 352).
X Take the emergency key element ou tofthe
key (Y page 97).
X Insert emergency key element ;into the
opening in trim :.
X Turn emergency key element ;90° clock-
wise.
X Push emergency key element ;in the
direction of the arrow and open the tail-
gate.
X Insert the emergency key element into the
key. Side windows
Important safety notes
G
WARNING
Whil eopening the side windows ,bod yp arts
could become trapped between the side win- do wa nd the door frame as the side window
moves. There is ariskofi njury.
Make sure tha tnobod ytouche sthe side win-
do wd uringt he opening procedure. If some-
body become strapped ,release the switch or
pull the switch to close the side windo wagain. G
WARNING
Whil eclosing the side windows ,bod yp arts in
the closing area could become trapped .There
is ar iskofi njury.
When closing make sure tha tnoparts of the
body ar einthe closing area .Ifsomebody
become strapped ,release the switch or press
the switch to open the side windo wagain. G
WARNING
If children operate the side windows they
could become trapped ,particularly if the yare
left unsupervised .There is ariskofi njury.
Activate the override featur efor the rea rside
windows .Whenleavi ng the vehicle, always
take the key with yo uand lock the vehicle.
Never leav echildren unattended in the vehi-
cle. Side windo
wreversin gfeature
The side windows ar eequippe dwithana uto-
matic reversing feature. If asolid object
blocks or restricts asidew indo wd uring the
closing process, the side windo wopens again
automatically. The automatic reversing fea-
tur eish oweve ronlyana idand is no substi-
tute for your attentio nwhenc losing aside
window. 110
Side
windowsOpenin gand closing
Page 126 of 497
The seat belt should:
R fit snugly across your body
R be routed across the middle of your shoul-
der
R be routed across your hips in the pelvic
area
X Before starting off, adjust the rear-view mir-
ror and the exterior mirrors so that you
have agood view of road and traffic condi-
tions (Y page 136).
X Vehicles with amemor yfunction: save
the seat, steerin gwheel and exterior mirror
settings with the memory function
(Y page 139). Seats
Important safety notes
G
WARNING
If children adjust the seats, they could
become trapped, especially if they are unat-
tended. There is arisk of injury.
When leaving the vehicle, alway stake the key
with you and lock the vehicle. Never leave
children unattended in the vehicle.
The seats can still be adjusted when there is
no key in the ignition lock. G
WARNING
The head restraints cannot provide the inten-
ded protection unless they are fitted and
adjusted correctly. There is an increased risk of injury to the head and neck in the event of
an accident or sudden braking, for example.
Always drive with the head restraints fitted.
Ensure that the centre of the head restraints
support the back of each vehicle occupant's
head at eye level before driving off.
Observe the safety notes on "Airbags"
(Y page 50) and "Children in the vehicle"
(Y page 58). G
WARNING
You could lose control of the vehicle while
driving if you:
R adjust the driver's seat, steerin gwheel or
mirrors
R fasten the seat belt
There is arisk of an accident.
Adjust the driver's seat, head restraint, steer-
ing wheel and mirrors and fasten your seat
belt before starting the engine. G
WARNING
If you adjust the seat height carelessly, you or other vehicle occupant scould be trapped and
thereby injured. Children in particular could
accidentally press the electrical seat adjust-
ment button sand become trapped. There is a
risk of injury.
While moving the seats, make sure that your
hands or other body parts do not get under the
lever assembly of the seat adjustmen tsys-
tem. G
WARNING
When adjusting aseat, you or another vehicle
occupant could become trapped by the guide rail of the seat, for instance. There is arisk of
injury.
Make sure that no one has any part of their
body within the sweep of the seat when
adjusting it.
! To avoid damage to the seats and the seat
heating, observe the following information:
R do not spill any liquids on the seats. If
liquid is spilled on the seats, dry them as
soon as possible.
R if the seat covers are damp or wet, do not
switch on the seat heating. The seat
heating should also not be used to dry
the seats.
R clean the seat covers as recommended;
see "Interior care".
R do not transport heavy loads on the
seats. Do not place sharp object sonthe Seats
123Seats, steering wheel and mirrors Z
Page 127 of 497
seat cushions, e.g. knives, nails or tools.
The seats should only be occupied by
passengers, if possible.
R when the seat heating is in operation, do
not cover the seats with insulating mate-
rials, e.g. blankets, coats, bags, seat cov- ers, child seats or booster seats.
! Make sure that there are no objects in the
footwell under or behind the seats when
moving the seats back. There is arisk that
the seats and/or the objects could be dam- aged.
i The head restraints in the front seats are
fitted with the NECK-PRO system
(Y page 55). For this reason, it is not pos-
sible to remove the head restraints from
the front seats.
Vehicles without the through-loading fea-
ture: the head restraints cannot be
removed from the rear-compartment
seats.
For more information, contact aqualified
specialist workshop.
i Further related subjects:
R Through-loading facility in the rear bench
seat (Saloon)
R EASY-PACK through-loading facility in
the rear bench seat (Estate)
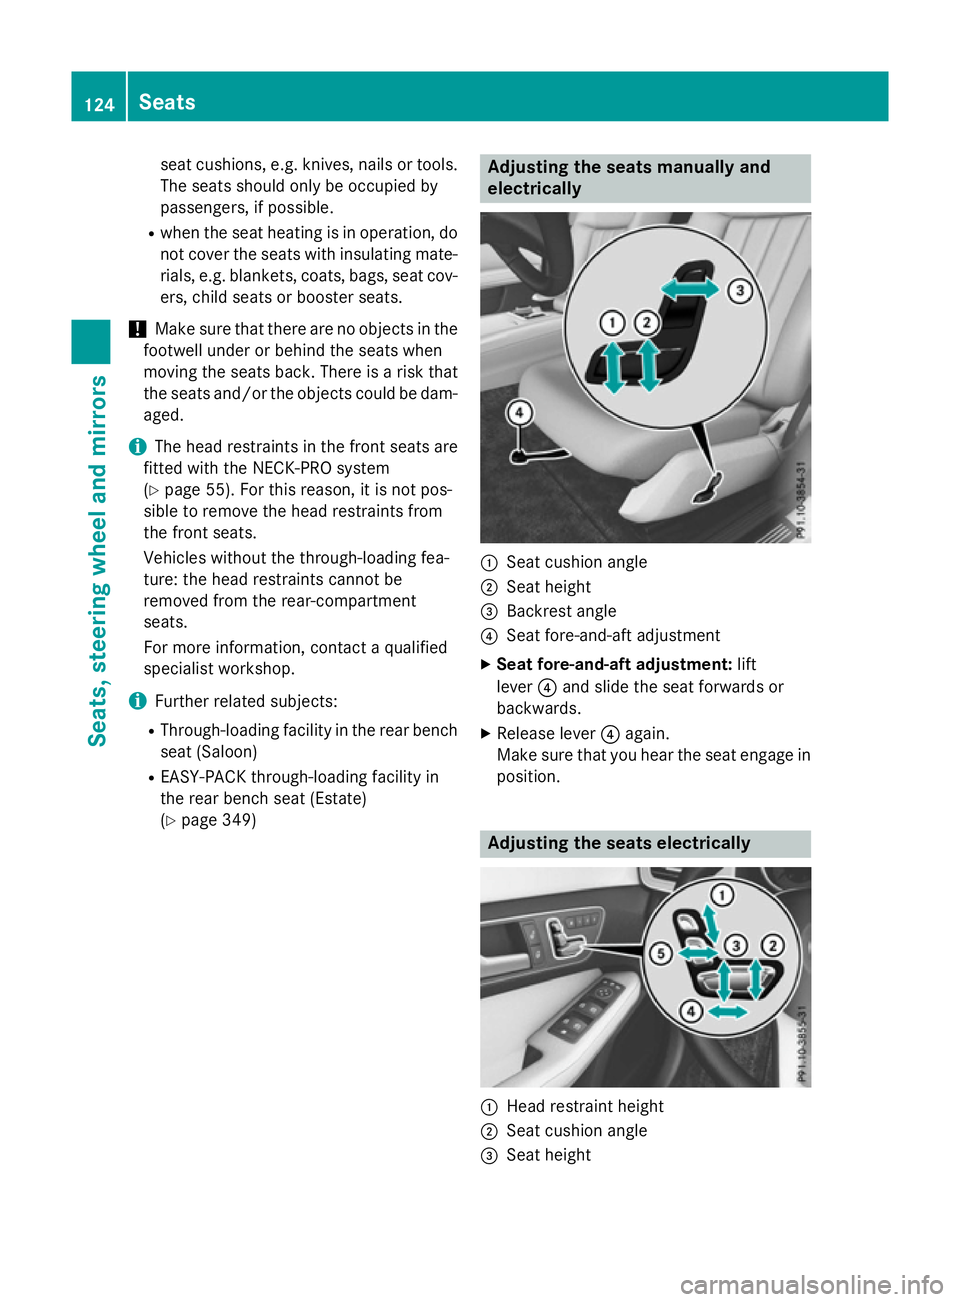
(Y page 349) Adjusting the seats manually and
electrically
:
Seat cushion angle
; Seat height
= Backrest angle
? Seat fore-and-aft adjustment
X Seat fore-and-aft adjustment: lift
lever ?and slide the seat forwards or
backwards.
X Release lever ?again.
Make sure that you hear the seat engage in
position. Adjusting the seats electrically
:
Head restraint height
; Seat cushion angle
= Seat height 124
SeatsSeats, steering wheela
nd mirrors
Page 136 of 497
Problems with the seat ventilation
Problem
Possible causes/consequences and
M
MSolutions The seat ventilation has
switched off prema-
turely or cannot be
switched on. The on-board voltage is too low because too many electrical con-
sumers are switched on.
X Switch off electrical consumers that you do not need, such as
the rear window heating or interior lighting.
Once the battery is sufficiently charged, the seat ventilation will
switch back on automatically. Steering wheel
Important safety notes
G
WARNING
You could lose control of the vehicle while
driving if you:
R adjust the driver's seat, steering wheel or
mirrors
R fasten the seat belt
There is arisk of an accident.
Adjust the driver's seat, head restraint ,steer-
ing wheel and mirrors and fasten your seat
belt before startingt he engine. G
WARNING
Children could become trapped by the steer-
ing wheel if they adjust it. There is arisk of
injury.
When leaving the vehicle, always take the key with you and lock the vehicle. Never leave
children unattended in the vehicle.
The electrically adjustable steering wheel can
still be adjusted when there is no key in the
ignition lock. Adjusting the steering wheel man-
ually
G
WARNING
The steering wheel may move unexpectedly if you adjust it while driving. This could cause you to lose control of the vehicle. There is a
risk of an accident.
Make sure that the steering wheel is locked
before driving off. Never unlock the steering
wheel when the vehicle is in motion.
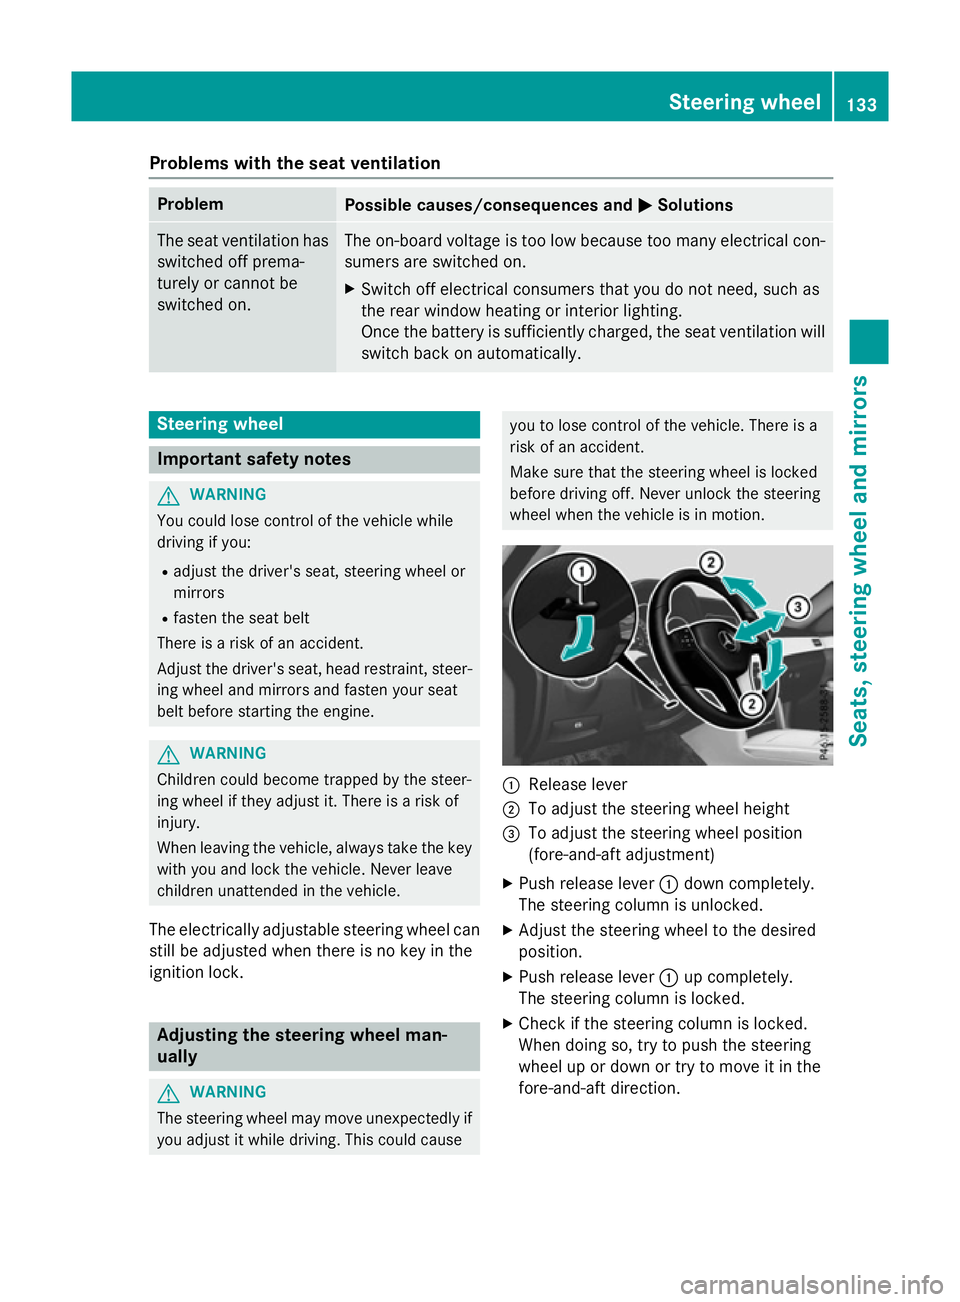
:
Release lever
; To adjust the steering wheel height
= To adjust the steering wheel position
(fore-and-aft adjustment)
X Push release lever :down completely.
The steering column is unlocked.
X Adjust the steering wheel to the desired
position.
X Push release lever :up completely.
The steering column is locked.
X Check if the steering column is locked.
When doing so, try to push the steering
wheel up or down or try to move it in the
fore-and-aft direction. Steering wheel
133Seats, steering wheela nd mirrors Z
Page 138 of 497
Problems with the steering wheel heating
Problem
Possible causes/consequences and
M
MSolutions The steering wheel
heating has switched
itself off prematurely or
cannot be switched on. The on-board voltage is too low because too many electrical con-
sumers are switched on.
X Switch off electrical consumers that you do not need, such as
the rear window heating or interior lighting.
Once the battery is sufficiently charged, the steering wheel
heating will switch back on automatically. EASY-ENTRY/EXIT feature
Important safety notes G
WARNING
When the EASY-ENTRY/EXIT feature adjusts
the steering wheel, you and other vehicle
occupants –particularly children –could
become trapped. There is arisk of injury.
While the EASY-ENTRY/EXIT feature is mak-
ing adjustments, make sure that no one has
any body parts in the sweep of the steering
wheel.
Move the steering wheel adjustment lever if
there is arisk of entrapment by the steering
wheel. The adjustment process is stopped.
Vehicles with amemory function: if there is a
risk of becoming trapped by the steering
wheel, you can also press one of the memory
function position buttons.T he adjustment
process is stopped. G
WARNING
If children activate the EASY-ENTRY/EXIT fea- ture, they can become trapped, particularly
when unattended. There is arisk of injury.
When leaving the vehicle, always take the key with you and lock the vehicle. Never leave
children unattended in the vehicle. G
WARNING
If you drive off while the EASY-ENTRY/EXIT
feature is making adjustments, you could lose
control of the vehicle. There is arisk of an
accident. Always wait until the adjustment process is
complete before driving off.
The EASY-ENTRY/EXIT feature makes getting in and out of your vehicle easier.
You can activate and deactivate the EASY-
ENTRY/EXI Tfeature in the on-board com-
puter (Y page 294).
Position of the steering wheel when the
EASY-ENTRY/EXIT featureisa ctive The steering wheel tilts upwards if you:
R remove the key from the ignition lock
R with KEYLESS-GO: open the driver's door;
KEYLESS-GO must be in position 1
R with the key: open the driver's door; the
key must be in position 0or 1in the ignition
lock (Y page 179)
i The steering wheel only moves upwards if
it has not already reached the upper stop.
Position of the steering wheel for driv-
ing The steering wheel is moved to the previously
set position if:
R the driver's door is closed and
R with KEYLESS-GO: you press the Start/
Stop button once
or
R with the key: you insert the key into the
ignition lock Steering wheel
135Seats, steering wheela nd mirrors Z
Page 142 of 497
Using the memory button
You can set the front-passenger side exterior
mirror so that you can see the rear wheel on
that side as soon as you engage reverse gear.
This setting can be stored using memor ybut-
ton M?.
X Turn the key to position 2in the ignition
lock (Y page 179).
X With the exterior mirror on the front-
passenger side activated, use adjustment
button =to adjust the exterior mirror .The
rear wheel and the kerb should be visible in
the exterior mirror.
X Press memor ybutton M? and one of the
arrows on adjustment button =within
three seconds.
The parkin gposition is stored if the exterior
mirror does not move.
X If the exterior mirror moves out of position,
repeat the steps.
Calling up astored parking position X
Turn the key to position 2in the ignition
lock (Y page 179).
X Adjust the exterior mirror on the front-
passenger side using button ;.
X Engage reverse gear.
The exterior mirror on the front-passenger
side moves to the stored parkin gposition.
The exterior mirror on the front-passenger
side moves back to its original position:
R as soon as you exceed aspeed of
15 km/h
R if you press button :for the exterior mir-
ror on the driver' sside Memor
yfunction Storing settings
G
WARNING
If you use the memor yfunction on the driver's
side while driving, the adjustment scould cause you to lose contro
lofthe vehicle. There
is ar isk of an accident.
Only use the memor yfunction on the driver's
side while the vehicle is stationary. G
WARNING
If children activate the memor yfunction ,they
could become trapped, especially if they are
unattended. There is arisk of injury.
When leaving the vehicle, always tak ethe key
with you and lock the vehicle. Never leave
children unattended in the vehicle. G
WARNING
When the memor yfunction adjust sthe seat or
steering wheel, you and other vehicle occu-
pant s–p articularly children –could become
trapped. There is arisk of injury.
While the memor yfunction is makin gadjust-
ments, make sure that no one has any body
parts in the sweep of the seat or steering
wheel. If somebody becomes trapped, imme-
diately release the memor yfunction position
button. The adjustment proces sisstopped.
The memor yfunction can be used at any time,
e.g. even when the key isn't in the ignition
lock.
With the memor yfunction ,you can stor eup
to three different settings, e.g. for three dif-
feren tpeople.
The following settings are stored as asingle
memor ypreset:
R position of the seat, backrest and head
restraint
R activ emulticontour seat: seat contour,
dynamic function level
R driver' sside: position of the exterior mir-
rors on the driver' sand front-passenger
sides Memor
yfunction
139Seats, steering wheel and mirrors Z
Page 351 of 497
X
Open the boot lid or the tailgate.
X Press release catch :.
Flap ;folds down.
X Press catch =inwards and pull out
frame ?containing the skibag. Through-loading facility in the rear
compartment The through-loading facility is opened from
the boot.
X Fold down the rear seat armrest.
X Press release catch :.
The flap opens downwards.
Observe the loading guidelines (Y page 342).Through-loading facility in the rear
benchs eat (Saloon)
Important safety notes G
WARNING
If the rear bench seat/rear seat and seat
backrest are not engaged they could fold for- wards, e.g. when braking suddenly or in the
event of an accident.
R The vehicle occupant wouldt hereby be
pushed into the seat belt by the rear bench
seat/rear seat or by the seat backrest. The
seat belt cannot protect as intended and
could result in additional injury.
R Objects or loads in the boot cannot be
restrained by the seat backrest.
This poses an increased risk of injury. Before every trip, make sure that the seat
backrests and the rear bench seat/rear seat
are engaged before every trip.
Observe the loading guidelines (Y page 342).
The left-hand and right-hand rear seat backr- ests can be folded down separately to
increase the boot capacity.
Folding the seat backrest forwards !
Before you fold down the rear seat back-
rest, remove the side head restraints for
the integrated child seat; see the "Side
head restraints for integrated child seat"
section. The side head restraints could oth-
erwise be damaged. i
Vehicles with memory function: when you
fold one or both parts of the rear seat back- rest forwards, the respective front seat
moves forward slightly, when necessary, inorder to avoid contact.
X Vehicles without memory function: if nec-
essary, move the driver's or front-
passenger seat forwards.
X Open the boot.
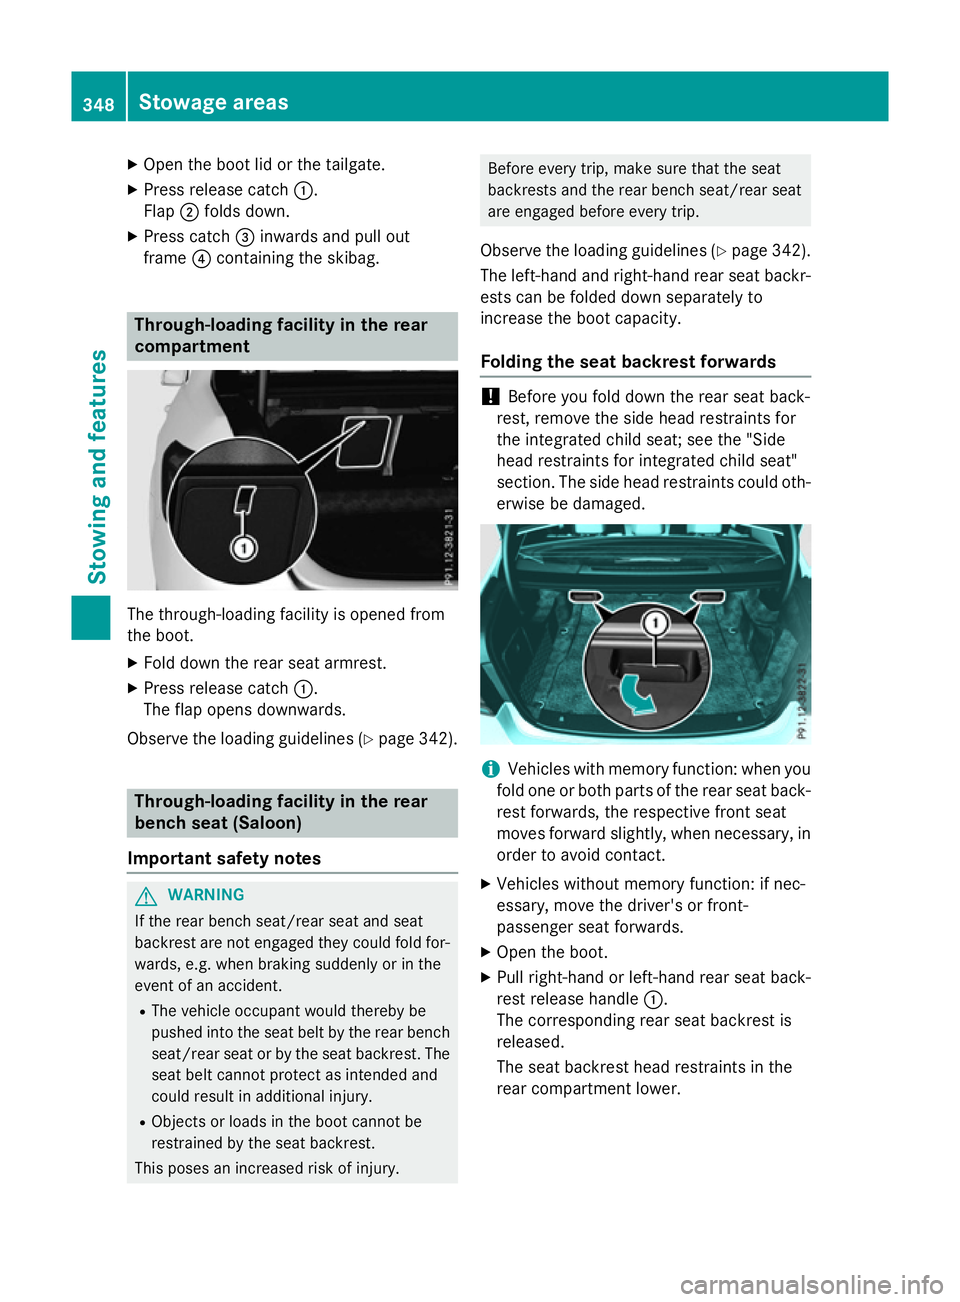
X Pull right-hand or left-hand rear seat back-
rest release handle :.
The corresponding rear seat backrest is
released.
The seat backrest head restraints in the
rear compartment lower. 348
Stowage areasStowinga
nd features