2015 MERCEDES-BENZ E-CLASS ESTATE wipers
[x] Cancel search: wipersPage 182 of 497

sufficient room for the pedals. Do not use
loose floormats and do not place several floor- mats on top of one another. G
WARNING
Unsuitable footwear can hinder correct usage of the pedals, e.g.:
R shoes with thick soles
R shoes with high heels
R slippers
There is arisk of an accident.
Wear suitable footwear to ensure correct
usage of the pedals. G
WARNING
If you switch off the ignition while driving,
safety-relevant functions are only available
with limitations, or not at all. This could affect, for example, the power steering and the brake
boosting effect. You will require considerably
more effort to steer and brake. There is arisk
of an accident.
Do not switch off the ignition while driving. G
WARNING
If the parking brake has not been fully
released when driving, the parking brake can:
R overheat and cause afire
R lose its hold function.
There is arisk of fire and an accident. Release
the parking brake fully before driving off.
! Do not warm up the engine when the vehi-
cle is stationary. Drive off immediately.
Avoid high engine speeds and driving at full throttle until the engine has reached its
operating temperature.
Only shift the automatic transmission to
the desired drive position when the vehicle is stationary.
Where possible,a void spinning the drive
wheels when pulling awayons lippery
roads. You could otherwise damage the
drive train. !
AMG vehicles:
at low engine oil temper-
atures (below +20 †), the maximum
engine speed is restricted in order to pro-
tect the engine. To protect the engine and
maintain smooth engine operation, avoid
driving at full throttle when the engine is
cold.
HYBRID vehicles :make sure that you read
the "HYBRID" Supplement included in the
vehicle literature. Otherwise, you may not
recognise dangers. Key positions
Key g
To remove the key
1 Power supplyf or some consumers, such
as the windscreen wipers
2 Ignition (power supplyf or all consumers)
and drive position
3 To start the vehicle
i If the key does not belong to the vehicle, it
can still be turned in the ignition lock. How-
ever, the ignition will not be switched on.
The engine cannot be started.
KEYLESS-GO General notes
Vehicles with KEYLESS-GO are equipped with
keys featuring an integrated KEYLESS-GO
function and adetachable Start/Stop button. Driving
179Driving and parking Z
Page 183 of 497
The Start/Stop button must be inserted in the
ignition lock and the key must be in the vehi-
cle.
When you insert the Start/Stop button into
the ignition lock, the system needs approx-
imately two seconds recognition time. You
can then use the Start/Stop button.
Pressing the Start/Stop button several times
in succession corresponds to the different
key positions in the ignition lock. This is only
the case if you are not depressing the brake
pedal.
If you depress the brake pedal and press the
Start/Stop button ,the engine start simmedi-
ately.
Ac heck which periodically establishes aradio
connection between the vehicle and the key
determines whether avalid key is in the vehi-
cle. This occurs, for example, when starting
the engine.
To start the vehicle without actively using the
key:
R the Start/Stop button must be inserted in
the ignition lock
R the key must be in the vehicle
R the vehicle must not be locked with the key
or KEYLESS-GO (Y page 95)
Do not keep the KEYLESS-GO key:
R with electronic devices, e.g. amobile
phone or another key
R with metallic objects, e.g. coins or metal
film
R inside metallic objects, e.g. ametal case
This can affect the functionality of KEYLESS-
GO.
If you lock the vehicle with the key's remote
control or with KEYLESS-GO, after ashort
time:
R you will not be able to switch on the ignition
with the Start/Stop button
R you will not be able to start the engine with
the Start/Stop button until the vehicle is
unlocked again If you lock the vehicle centrally using the but-
ton on the frontd oor (Ypage 101), you can
continue to start the engine with the Start/
Stop button.
The engine can be switched off while the vehi-
cle is in motion by pressing and holding the
Start/Stop button for three seconds. This
function operates independently of the ECO
start/stop automatic engine switch-off func-
tion.
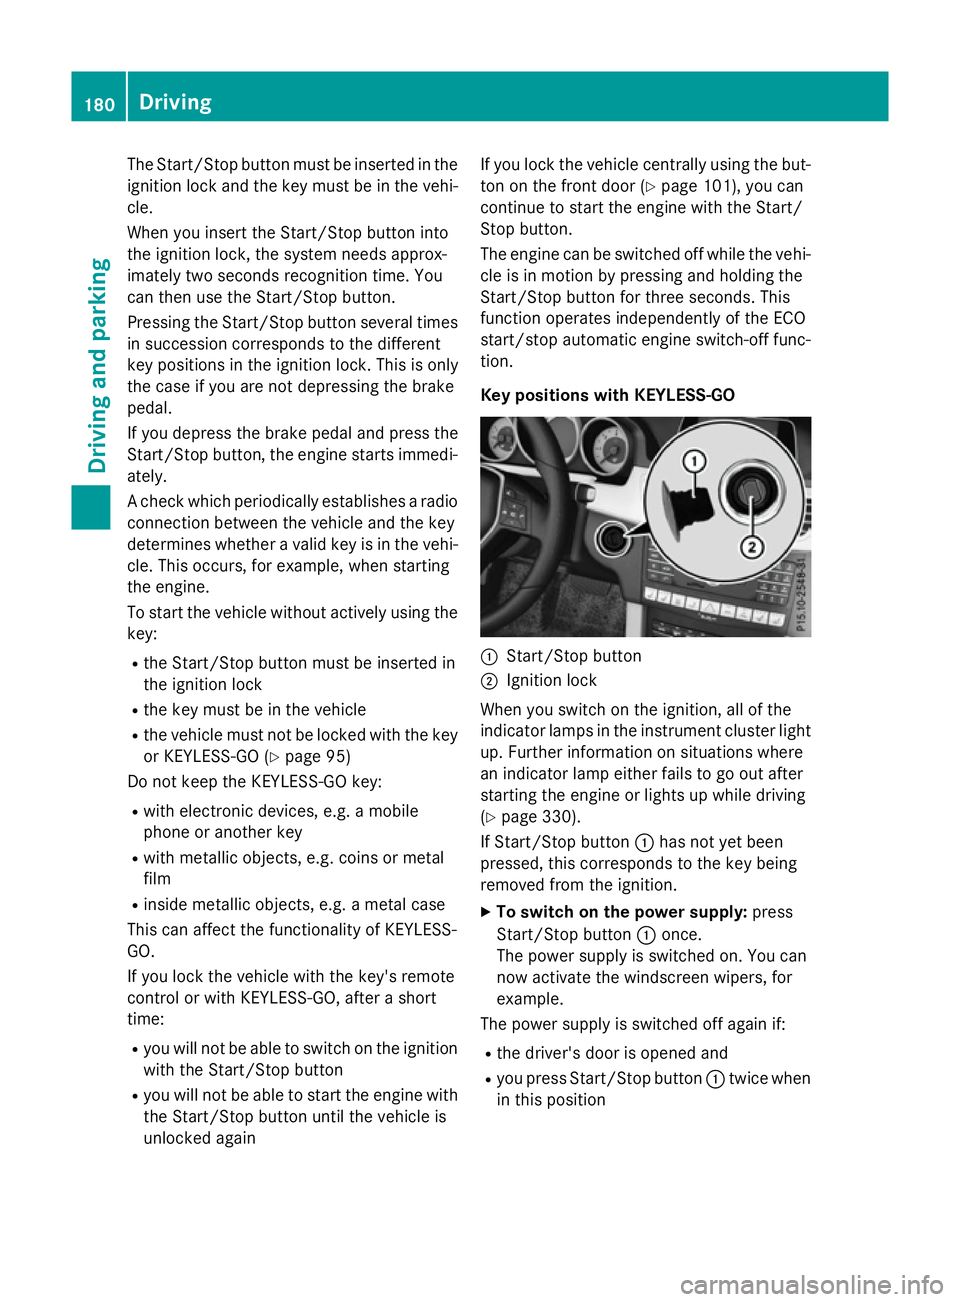
Key positions with KEYLESS-GO :
Start/Stop button
; Ignition lock
When you switch on the ignition ,all of the
indicator lamps in the instrument cluster light up. Further information on situations where
an indicator lamp either fails to go out after
starting the engine or lights up while driving
(Y page 330).
If Start/Stop button :has not yet been
pressed, this corresponds to the key being
removed from the ignition.
X To switch on the power supply: press
Start/Stop button :once.
The power supply is switched on. You can
now activat ethe windscreen wipers, for
example.
The power supply is switched off again if:
R the driver's door is opened and
R you press Start/Stop button :twice when
in this position 180
DrivingDriving and parking
Page 383 of 497

Opening the bonnet
G
WARNING
Certain componentsint he engine compart-
ment could be very hot, e.g. the engine, the
radiator and parts of the exhaust system.
There is arisk of injur ywhen accessin gthe
engin ecompartment.
As far as possible, allow the engine to cool
down and only touch the componentsd escri-
bed in the following. G
WARNING
When the bonnet is open, and the windscreen wipers are set in motion ,you can be injured by
the wiper linkage. There is arisk of injury.
Always switch off the windscreen wipers and
the ignition before opening the bonnet.
! Make sure that the windscreen wipers are
not folded away from the windscreen. Oth-
erwise, you could damage the windscreen
wipers or the bonnet. X
Make sure that the windscreen wipers are
switched off.
X Pull release lever :on the bonnet.
The bonnet is released. X
Reach intot he gap, pull bonnet catc hhan-
dle ;up and lift the bonnet.
If you lift the bonnet by approximately
40 cm, the bonnet is opened and held open automatically by the gas-filled strut.
Closing the bonnet X
Lower the bonnet and let it fall from a
height of approximately 20 cm.
X Check that the bonnet has engaged prop-
erly.
If the bonnet can be raised slightly, it is not
properly engaged. Open it again and close
it with alittle more force. Radiator
Vehicles with adiesel engine: do not cover
the radiator. Do not use thermal mats, insect
protection cover soranythin gsimilar. Doing
so can cause the Onboard Diagnostics Sys-
tem to display inaccurate values. Some of
these values are legally required and must
alway sbec orrect. Engine oil
General notes G
WARNING
Hybrid vehicles: ensure that you read the
"HYBRID "supplement .You could otherwise
fail to recognise dangers. 380
Engine compartmentMaintenance and care
Page 391 of 497

Scratches, corrosiv
edeposits, areas affected
by corrosio nand damag ecaused by inade-
quate care canno talway sbec ompletely
repaired .Insuchc ases, visit aquali fied spe-
cialist workshop.
X Remove impuritie simmediately, where
possible ,whilst avoiding rubbing too hard.
X Soa kinsect remains with insect remover
and rins eoff the treated areas afterwards.
X Soa kbirdd ropping swithw ater and rinse
off the treated areas afterwards.
X Remove coolant, brake fluid ,tree resin,
oils, fuels and greases by rubbing gently
with acloth soaked in petroleu metheror
lighte rfluid.
X Use tar remover to remove tar stains.
X Use silicone remover to remove wax.
Care and treatment of matt paintwork !
Neve
rpolish the vehicl eorthe light alloy
wheels. Polishing make sthe paintwork
shiny.
! The following may cause the paint to
become shiny and thu sreduce the matt
effect:
R Vigorous rubbing with unsuitable mate-
rials.
R Frequent us eofcar washes.
R Washing the vehicl eindirect sunlight.
! Neve
ruse paint cleaner, buffing or pol-
ishing products, or gloss preserver, e.g.
wax. These products are onl ysuitabl efor
high-gloss surfaces. Their us eonvehicles
with matt finish lead stoconsiderable sur-
face damag e(shiny ,spotted areas).
Alway shavep aintwork repairs carrie dout
at aq uali fied specialist workshop.
! Do not us
ewashp rograms with ahot wax
treatment under any circumstances.
Observe thes enotes if your vehicl ehas a
clear matt finish. Thi swillh elpy ou to avoid
damag etothe paintwork du etoincorrect
treatment. These notes also appl
ytolight-alloy wheels
with aclear matt finish.
i The vehicl
eshoul dpreferabl ybewashed
by hand using asoft sponge, car shampoo
and plenty of water.
i Use onl
yinsect remover and car shampoo
from the rang eofrecommended and
approved Mercedes-Benz care products. Cleanin
gvehicle parts
Cleanin gthe wheels G
WARNING
The water jet of circular-jet nozzle s(dirt grind-
ers )can cause damag enot visible from the
outsid etotyresorc hassi scomponents .Com-
ponents damaged in this wa ycan unexpect-
edly fail. There is ariskofana ccident.
Do not us ehigh-pressure cleaners with circu-
lar-jet nozzle stoclean the vehicle. Hav edam-
aged tyre sorchassiscomponents replaced
immediately.
! Do not us
eacidi cwheel cleaning products
to remove brake dust. Thi scould damage
wheel bolts and brake components.
! Do not park up the vehicl
efor an extended
perio dstraight afte rcleaning it, particularly
afte rhaving cleane dthe wheel swithw heel
cleaner. Wheel cleaners could cause
increased corrosio nofthe brake discs and
brake pads/linings. For this reason, you
shoul ddrive for afew minutes afte rclean-
ing .Braking heats the brake discs and the
brake pads/linings, thu sdrying them. The
vehicl ecan then be parked up.
Cleanin gthe windows G
WARNING
If the windscreen wipers are set in motion
when cleaning the windscreen or wiper
blades, yo ucould become trapped. There is a
danger of injury. 388
CareMaintenanc
eand care
Page 415 of 497

X
Safeguard the vehicl eagains trolling away
(Y page 205).
X Switch off the engine.
X Switch off al lelectrical consumers.
X Remove the key from the ignition lock.
or, on vehicles with KEYLESS‑GO,
X Ope nthe driver' sdoor.
The on-board electronics now have status
0.T hisist he same as the key having been
removed.
The driver' sdoorc an be closed again.
All indicator lamps in the instrument cluster
mus tbeo ff.
The fuses are locate dinvarious fus eboxes:
R fus ebox in the engine compartment on the
left-hand sid eofthe vehicle, when viewed
in the direction of travel
R fus ebox in the boot/luggage compartment
on the right-hand sid eofthe vehicle, when
viewe dinthe direction of travel
The fus ealloc ation chart is locate dinthe
vehicl etool kit in the stowag ecompartment
under the boot/luggage compartment floor
(Y page 395). Fus
eboxin the engine compartment
Pa ya ttention to the important safety notes
(Y page 411). G
WARNING
Whe nthe bonne tiso pen, and the windscreen
wipers are set in motion, yo ucan be injured by
the wipe rlinkage. There is ariskofi njury.
Alway sswitch off the windscreen wipers and
the ignition before opening the bonnet.
! Make sure tha
tnomoisture can enter the
fus eb ox when the cove risopen.
! Whe
nclosing the cover, make sure tha tit
is lying correctly on the fus ebox. Moisture
seeping in or dirt could otherwise impair
the operation of the fuses. X
Make sure tha tthe windscreen wipers are
switche doff.
X Ope nthe bonnet.
X Remove any existing moisture from the
fus eb ox using adry cloth.
X To open: take lines ;outoft he guides.
X Mov elines ; to one side. Route the lines
behind connection =to do this.
X Ope nretaining clamps :.
X Remove the fus ebox cove rforwards.
X To close: check whethe rthe sea lislying
correctly in the cover.
X Insert the cove ratthe rea rofthe fus ebox
into the retainer.
X Fol dd ownc ove rand close clamps :.
X Secure lines ;in the guides.
X Close the bonnet. Fus
eboxin the boot
Pa ya ttention to the important safety notes
(Y page 411).
! Make sure tha
tnomoisture can enter the
fus eb ox when the cove risopen.
! Whe
nclosing the cover, make sure tha tit
is lying correctly on the fus ebox. Moisture
seeping in or dirt could otherwise impair
the operation of the fuses. 412
Electrical fusesBreakdown assistance